manuals.online logo
Brands
  1. Home
  2. •
  3. Brands
  4. •
  5. Citizen
  6. •
  7. Watch
  8. •
  9. Citizen F100 User manual

Citizen F100 User manual

りゅうずの位置
F100 User's Guide
Component identication
Receiving the satellite time signal
To see details of charging time, specications, and operations, refer to the instruction manual:
Hour hand
Indication Reception result
OK e reception succeeded.
e time and calender have been corrected.
NO
e reception failed. e time and calendar was not
corrected and the time indication returns to the status
before the reception.
Indication Reception result
OK e reception succeeded.
e time and calender are corrected.
NO
e reception failed. e time and calendar was not
corrected and the time indication returns to the status
before the reception.
Setting Meaning
SMT ON Summer time is indicated.
SMT OFF e standard time is indicated.
Place name/
time zone
Second hand
Date
indication
Minute hand
Crown
ButtonⒶ
ButtonⒷ
RX : Reception-
in-progress
indication
OK/NO : Reception
result
indication
is watch is solar-powered. Expose the dial to light and use it suciently charged.
Outdoor signal reception is recommended for receiving satellite time signal.
1. Push the crown in to position 0.
2. Press and hold the lower right button Ⓐuntil the second
hand points to "RX".
e previous reception result is rst indicated and signal reception starts.
Aer nishing reception, the second hand indicates the reception result
for 2 seconds and returns to normal movement.
• Actual appearance may dier from the illustration above.
Reception to adjust the time and calendar when the leap second has been
updated.
1. Push the crown in to position 0.
2. Press and hold the lower right button Ⓐfor 7 seconds.
Time reception starts aer the second hand points “RX” once and turns
fully around to point “RX” again.
1. Push the crown in to position 0.
2. Press and release the lower right button Ⓐ.
e previous reception result is indicated.
3. Press and release the button Ⓐto nish checking.
Manual reception 1 (time required: 3 to 20 seconds)
Manual reception 2 (21 to 13 seconds)
Checking the previous reception result of the satellite signal
F100 instruction manual
Using the world time
Switching summer time and standard time
1. Pull the crown out to position 1.
2. Press and release the lower right button Ⓐ.
3. Push the crown in to position 0to nish the procedure.
• Each time you press the button, ON and OFF changes alternately.
1. Pull the crown out to position 1.
e second hand indicates the current time zone and
the function hand indicates the summer time setting.
2. Rotate the crown to choose a time zone.
Time indication changes.
• See also "How to read indication of the world time setting" and "Table of
time zones and representative places".
3. Push the crown in to position 0 to nish the procedure.
e function hand returns to day indication.
e watch has 40 time zone markers with
several representative area names. A time zone
is set by pointing the second hand at one of the
markers.
On the illustration, the second hand points to
28 seconds and time zone setting is “+11.5”.
• Time zones are represented by osets from
UTC (Coordinated Universal Time).
Setting the world time
How to read indication of the world time setting
Table of time zones and representative places
Function hand
• Day indication
• Power reserve
level
(in ve levels)
• Summer time
setting
(ON/OFF)
0 1 2
Crown’s position
Time zone marker
Representative
area
Second
hand
Time
zone
Second
hand
Area
name
Representative
area
0 0 sec. LON London
+1 2 sec. PAR Paris
+2 4 sec. ATH Athens
+3 6 sec. RUH Riyadh
+3.5 7 sec. — Tehra n
+4 8 sec. DXB Dubai
+4.5 9 sec. — Kabul
+5 10 sec. KHI Karachi
+5.5 12 sec. DEL Delhi
+5.75 13 sec. — Kathmandu
+6 14 sec. DAC Dhaka
+6.5 15 sec. — Yangon
+7 16 sec. BKK Bangkok
+8 18 sec. BJS(HKG) Beijing/Hong Kong
+8.75 20 sec. — Eucla
+9 21 sec. TYO Tokyo
+9.5 23 sec. ADL Adelaide
+10 25 sec. SYD Sydney
+10.5 26 sec. — Lord Howe Island
+11 27 sec. NOU Noumea
+11.5 28 sec. — Norfolk Island
Time
zone
Second
hand
Area
name
Representative
area
+12 29 sec. AKL Auckland
+12.75 31 sec. — Chatham Islands
+13 32 sec. TBU Nuku’alofa
+14 34 sec. — Kiritimati
-12 36 sec. — Baker Island
-11 38 sec. MDY Midway
-10 40 sec. HNL Honolulu
-9.5 41 sec. — Marquesas Islands
-9 42 sec. ANC Anchorage
-8 44 sec. LAX Los Angeles
-7 46 sec. DEN Denver
-6 48 sec. CHI Chicago
-5 50 sec. NYC New York
-4.5 51 sec. — Caracas
-4 52 sec. SCL Santiago
-3.5 53 sec. — St. John’s
-3 54 sec. RIO Rio de Janeiro
-2 56 sec. FEN Fernando de
Noronha
-1 58 sec. PDL Azores
Continued on the next page
Setting leap second
When the leap second setting is
“-35 seconds”
When the leap second setting is
“-65 seconds”
e hands point to “0 minute 35
s e c o n d s ”.
e hands point to “1 minute 5
s e c o n d s ”.
3. Press and release the upper right button Ⓑto nish
checking.
Correcting the reference position
1. Push the crown in to position 0.
2. Press and hold the upper right button Ⓑfor 7 seconds.
3. Pull the crown out to position 2.
4. Press and release the lower right button Ⓐrepeatedly
to change hand/indication to be corrected.
• Each time you press the button Ⓐ, the target changes as follows.
Date/day → hour hand → minute hand → second hand → (back to the top)
5. Rotate the crown to adjust the hand/indication.
• When you rotate the crown quickly a few times, the hand/indication will
move continuously.
• To stop the rapid movement, rotate the crown in either direction.
6. Push the crown in to position 0.
7. Press and release the button Ⓑto nish checking.
F100 User's Guide
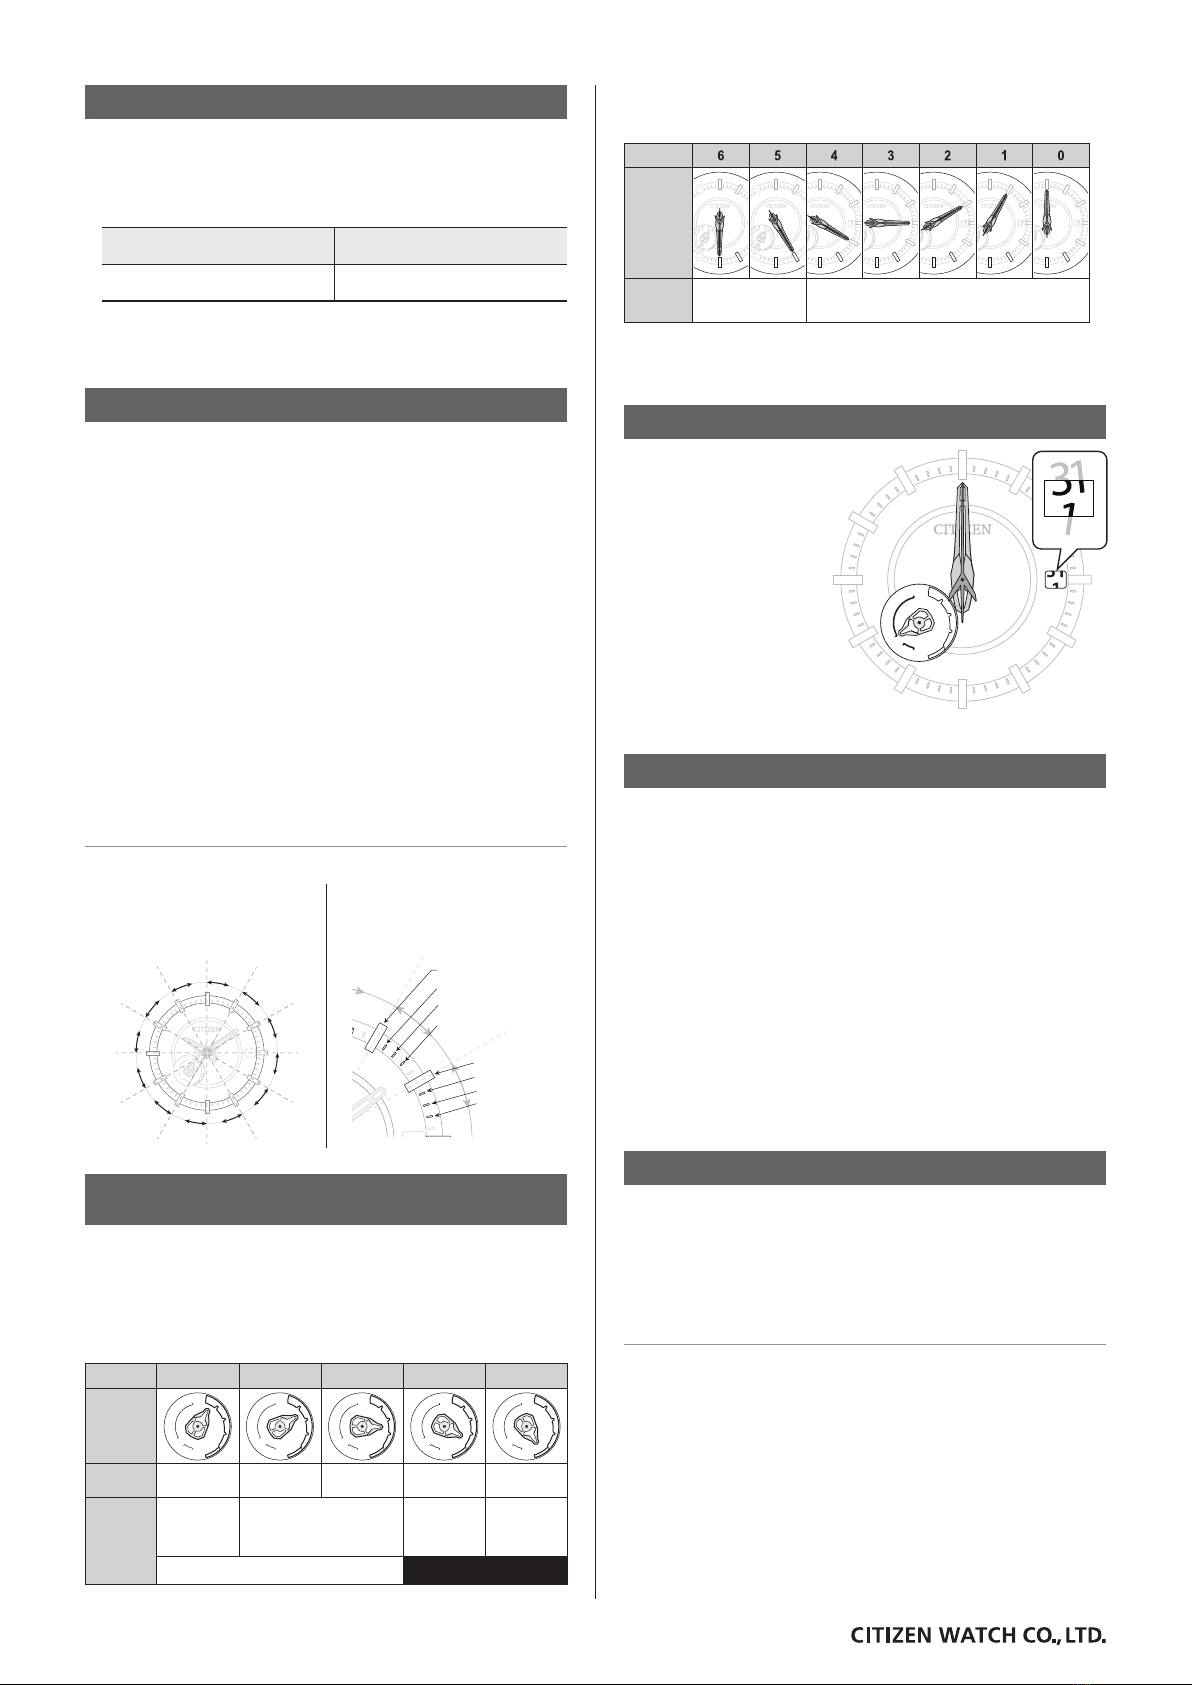
Indication of power generation amount in level
e level of power generation amount means power being generated by the solar cell
represented in 0 to 6 levels.
1. Pull the crown out to position 2.
2. Press and release the upper right button Ⓑ.
Using the “0:00:00” position as the starting point, the minute and second
hands indicate the leap second setting.
Turn the crown to adjust the setting if the leap second is not correct.
3. Push the crown in to position 0 to nish the procedure.
Checking the reference position
1. Push the crown in to
position 0.
2. Press and hold the
upper right button Ⓑ
for 7 seconds.
Correct reference positions:
• All hands : 12 o’clock position
• Date indication:midway
between 31 and 1
• Day : S (Sunday)
3. Press and release the
upper right button Ⓑ
to nish checking.
S
SMT
ON
OFF
F
T
W
T
M
S
Resetting the watch — All Reset
1. Pull the crown out to position 2.
2. Press and hold buttons Ⓐand Ⓑat the same time for
3 seconds or more and release them.
As you release the buttons, the hands move slightly to indicate that reset
completed.
Aer All Reset, adjust the reference position. Execute world time setting and
receive satellite signal manually to adjust the time and calendar aer that.
After All Reset
Adjusting the time and calendar manually
1. Pull the crown out to position 1.
2. Press and hold the upper right button Ⓑuntil the
second hand points to 30 seconds.
3. Pull the crown out to position 2.
e hands point to 0 second.
4. Press and release the lower right button Ⓐrepeatedly
to change the hand/indication to be corrected.
• Each time you press the button Ⓐ, the target changes as follows.
Minute hand → hour hand → date → year/month → day → (back to the top)
5. Rotate the crown to adjust the hand/indication.
• Date indication changes to the next as the function hand rotates 5 times.
• When you rotate the crown quickly a few times, the hand/indication will
move continuously.
• To stop the rapid movement, rotate the crown in either direction.
6. Push the crown in to position 0in accordance with a
reliable time source to nish the procedure.
Set the year and month with the position of the second hand.
“Month” corresponds to one of the
12 zones shown in the gure below.
Each number means month.
“Year” corresponds to the years
since leap year and is indicated with
markers in the zone of each month.
Month and year indications
7
12
1
2
3
4
5
6
7
8
9
10
11
7
Years since leap year:
0(Leap year)
0
Years since leap year: 1
1
Years since leap year: 2
2
Years since leap year: 3
3
Checking the power reserve and power
generation amount
1. Push the crown in to position 0.
2. Press and release the upper right button Ⓑ.
e power reserve and power generation amount at the moment of
pressing the button Ⓑare indicated in levels.
Level
43210
Power
reserve
level
scale
S
SMT
ON
OFF
F
T
W
T
M
S
S
SMT
ON
OFF
F
T
W
T
M
S
S
SMT
ON
OFF
F
T
W
T
M
S
S
SMT
ON
OFF
F
T
W
T
M
S
S
SMT
ON
OFF
F
T
W
T
M
S
S
SMT
ON
OFF
F
T
W
T
M
S
S
SMT
ON
OFF
F
T
W
T
M
S
S
SMT
ON
OFF
F
T
W
T
M
S
S
SMT
ON
OFF
F
T
W
T
M
S
S
SMT
ON
OFF
F
T
W
T
M
S
S
SMT
ON
OFF
F
T
W
T
M
S
S
SMT
ON
OFF
F
T
W
T
M
S
S
SMT
ON
OFF
F
T
W
T
M
S
S
SMT
ON
OFF
F
T
W
T
M
S
S
SMT
ON
OFF
F
T
W
T
M
S
S
SMT
ON
OFF
F
T
W
T
M
S
S
SMT
ON
OFF
F
T
W
T
M
S
S
SMT
ON
OFF
F
T
W
T
M
S
S
SMT
ON
OFF
F
T
W
T
M
S
S
SMT
ON
OFF
F
T
W
T
M
S
S
SMT
ON
OFF
F
T
W
T
M
S
S
SMT
ON
OFF
F
T
W
T
M
S
S
SMT
ON
OFF
F
T
W
T
M
S
S
SMT
ON
OFF
F
T
W
T
M
S
S
SMT
ON
OFF
F
T
W
T
M
S
Duration
(approx.) 24 - 20
months
20 - 14
months 14 - 5 months 5 months -
5 days
5 days or
shorter
Meaning
Power
reserve is
sufficient.
Power reserve is OK.
Power
reserve is
getting low.
Insufficient
charge
warning has
started.
OK for normal use Charge immediately.
Indication of power reserve in level
Level
Meaning
Indication
Sufficient power
generation for
charging.
Charge in a brighter location where the
level of power generation amount reaches
“5” or “6”.

Other manuals for F100

1

Other Citizen Watch manuals

Citizen 6P80 User manual

Citizen

Citizen 6P80 User manual

Citizen 6702 User manual

Citizen

Citizen 6702 User manual

Citizen 6P21 User manual

Citizen

Citizen 6P21 User manual

Citizen E820 User manual

Citizen

Citizen E820 User manual

Citizen H82 User manual

Citizen

Citizen H82 User manual

Citizen W770 User manual

Citizen

Citizen W770 User manual

Citizen B11 User manual

Citizen

Citizen B11 User manual

Citizen MOVEMENT 2350 User manual

Citizen

Citizen MOVEMENT 2350 User manual

Citizen C710 User manual

Citizen

Citizen C710 User manual

Citizen Ana-Digi Temp JG2 User manual

Citizen

Citizen Ana-Digi Temp JG2 User manual

Citizen 677 User manual

Citizen

Citizen 677 User manual

Citizen C050 Manual

Citizen

Citizen C050 Manual

Citizen U10 User manual

Citizen

Citizen U10 User manual

Citizen D320 User manual

Citizen

Citizen D320 User manual

Citizen C900 User manual

Citizen

Citizen C900 User manual

Citizen BL5 SERIES User manual

Citizen

Citizen BL5 SERIES User manual

Citizen A060 User manual

Citizen

Citizen A060 User manual

Citizen Promaster Sky Super Skyhawk JY0080-62E User manual

Citizen

Citizen Promaster Sky Super Skyhawk JY0080-62E User manual

Citizen 6720 Manual

Citizen

Citizen 6720 Manual

Citizen GL30 User manual

Citizen

Citizen GL30 User manual

Citizen C52 series Manual

Citizen

Citizen C52 series Manual

Citizen HYPER AQUALAND MA9XXX User manual

Citizen

Citizen HYPER AQUALAND MA9XXX User manual

Citizen 6P05 User manual

Citizen

Citizen 6P05 User manual

Citizen H145 User manual

Citizen

Citizen H145 User manual

Popular Watch manuals by other brands

Biobeat BB-613WP user guide

Biobeat

Biobeat BB-613WP user guide

Nubia SW1003 manual

Nubia

Nubia SW1003 manual

UnaliWear Kanega quick start guide

UnaliWear

UnaliWear Kanega quick start guide

UNION GLASHÜTTE/SA UNG-27.01 user manual

UNION GLASHÜTTE/SA

UNION GLASHÜTTE/SA UNG-27.01 user manual

Seiko SPL053P1 instructions

Seiko

Seiko SPL053P1 instructions

Timex Performance Watch user guide

Timex

Timex Performance Watch user guide

Omega 232.32.46.21.01.005 manual

Omega

Omega 232.32.46.21.01.005 manual

Patek Philippe ALIBER 324 S QA LU 24H owner's manual

Patek Philippe

Patek Philippe ALIBER 324 S QA LU 24H owner's manual

Level VD53 user guide

Level

Level VD53 user guide

Bell & Ross BR 03-94 Technical notes

Bell & Ross

Bell & Ross BR 03-94 Technical notes

Vivago 8000 Series user guide

Vivago

Vivago 8000 Series user guide

Mühle Glashütte Teutonia Sport II manual

Mühle Glashütte

Mühle Glashütte Teutonia Sport II manual

Casio 5346 Operation guide

Casio

Casio 5346 Operation guide

Suunto OW185 Product safety & regulatory information

Suunto

Suunto OW185 Product safety & regulatory information

MY BUDDY GARD KIDS BUDDY WATCH instruction manual

MY BUDDY GARD

MY BUDDY GARD KIDS BUDDY WATCH instruction manual

Kogan HYBRID+ user guide

Kogan

Kogan HYBRID+ user guide

Omega 3220 Technical guide

Omega

Omega 3220 Technical guide

Chronos Manufactures Richtenburg Apia R11700 Instruction manual / International Guarantee

Chronos Manufactures

Chronos Manufactures Richtenburg Apia R11700 Instruction manual / International Guarantee

manuals.online logo
manuals.online logoBrands
  • About & Mission
  • Contact us
  • Privacy Policy
  • Terms and Conditions

Copyright 2025 Manuals.Online. All Rights Reserved.