manuals.online logo
Brands
  1. Home
  2. •
  3. Brands
  4. •
  5. Citizen
  6. •
  7. Watch
  8. •
  9. Citizen U600 User manual

Citizen U600 User manual

1/4
U600 Abbreviated instruction
• This watch is solar-powered. Expose the dial to light and use it sufficiently charged.
English
UTC hour hand
Hour hand
Second hand
UTC minute hand
Button
B
Button
A
Crown
Minute hand
24-hour hand
Mode hand
Digital display 1
Digital display 2
Function hand
Following items are
indicated:
• Power reserve
• Signal station
• Actual appearance may differ from the illustration.
• The crown has two positions when pulling it out.
Changing the mode
1.
Pull the crown out to position 1.
2.
Rotate the crown to change the mode.
• Turn the crown so that the mode hand will point to a marker of the mode
indication securely.
Mode Content
TME
Mode for indicating the home time and the local time.
CAL
Mode for indicating the date and day of week of the local time.
TMR
Mode for using the countdown timer. For details, see the
instruction manual.
CHR
Mode for using the chronograph. For details, see the instruction
manual.
WT-S
Mode for hiding/indicating areas for the world time and changing
their summer time setting.
AL-1/2
Mode for using the alarm function. For details, see the instruction
manual.
RX-S
Mode for setting the type of time signal/summer time signal
reception. For details, see Setting the reception time and Setting
summer time.
3.
Push the crown in to position 0to finish the procedure.
Using LED lights
Pressing button
B
while the crown is in position
0
turns on the LED lights for 2
seconds.
However, note that the lights do not come on in the following cases.
• During the mode is [TMR] or [CHR]
• During radio wave reception
• During 2-second interval movement (insufficient charge warning status)
Component identification
Crown's position
0 1 2
Time indication of this watch
This watch indicates three types of time below:
Coordinated Universal Time
(UTC) Home time Local time
Changing the time indication of the local time
• You can choose a time zone from the 44 areas and UTC for the local time.
1.
Pull the crown out to position 1.
2.
Rotate the crown to change the mode to [TME] or [CAL].
3.
Press and release the lower right button Aor the upper right
button Brepeatedly to select an area.
• See the table in Setting the area of the home time for selectable areas.
4.
Push the crown in to position 0to finish the procedure.
Switching the home time and local time
You can switch the home time and local time easily.
1.
Pull the crown out to position 1.
2.
Rotate the crown to change the mode to [TME] or [CAL].
3.
Press and release both the lower right button Aand upper
right button Bsimultaneously.
The alarm sounds and the home time and local time switch.
• The calendar switches at the same time.
4.
Push the crown in to position 0to finish the procedure.
2/4
U600 Abbreviated instruction
Checking the power reserve
The function hand indicates the power reserve amount in levels.
Level 3 2 1 0
Indication
Duration
(approx.) 180 - 130 days 130 -20 days 20 - 3 days 3 days ‒
Meaning
Power reserve is
sufficient.
Power reserve is
OK.
Power reserve is
getting low.
Insufficient
charge warning
has started.
Charge immediately
Checking the signal reception result
• This watch receives the time signal at 2:00 AM every day and adjust the time
and calendar automatically. If the 2:00 AM reception was unsuccessful, it tries
signal reception again at 3:00 AM and 4:00 AM.
• The 4:00AM time reception can be changed to other time. Refer to Setting the
reception time.
1.
Pull the crown out to position 1.
2.
Rotate the crown to change the mode to [TME], [CAL] or [RX-S].
3.
Push the crown in to position 0.
4.
Press and release the lower right button A.
The second hand indicates the signal reception result (H/M/L/NO) and the
function hand indicates the signal station (USA/EUR/JPN) from which the
time signal was received.
Reception result
indication (NO)
Reception result
indication
(H/M/L)
Function hand
• Summer time setting of the home time is indicated on the digital display 2.
(“SMT” and “ON” (or “OFF”) are alternately indicated).
H
Received signals in a very good condition
M
Received signals in a good condition
L
Received signals in a not-good condition
NO
The reception failed.
• “H”, “M” and “L” only indicate the condition for reception, not related to
the reception performance of the watch.
• Try signal reception following the steps in Receiving the signal manually
(on-demand reception)if the last reception failed.
5.
Press and release the lower right button Ato finish the
procedure.
The hands returns to normal.
• It returns to normal indication automatically in about 10 seconds without
pressing the button.
Setting the area of the home time
Choose the area where you usually use the watch to set the home time.
• The watch tries to receive the signal from the station assigned for the area of the
home time (indicated on the digital display 2).
1.
Pull the crown out to position 1.
2.
Rotate the crown to change the mode to [TME].
3.
Press and release the lower right button Aor the upper right
button Brepeatedly to select an area.
• An area name and its time is shown on the digital display 1.
• Pressing and holding the button changes area names continuously.
4.
Press and release both the lower right button Aand upper
right button Bat the same time.
5.
Push the crown in to position 0to finish the procedure.
About the time zone
• The time zone in the table is based on UTC (Coordinated Universal Time).
• Countries or regions may change time zones for various reasons.
Time
zone
Area
name Representative area Signal
station
0UTC
Coordinated
Universal Time
–
0LON
*London
EUR
+1
PAR
*Paris
ROM
*Rome
BER
*Berlin
MAD
*Madrid
+2
CAI
Cairo
♦
EUR
JNB
Johannesburg
ATH
*At h en s
+3 MOW
*Moscow
RUH
Riyadh
+3.5 THR
Tehra n
+4 DXB
Dubai
+4.5 KHL
Kabul
+5 KHI
Karachi
♦
JPN
+5.5 DEL
Delhi
+6 DAC
Dhaka
+6.5 RGN
Yangon
+7 BKK
Bangkok
+8 SIN
Singapore
+8 HKG
Hong Kong
BJS
Beijing
JPN
+8 TPE
Taipei
+9 TYO
Tok yo
SEL
Seoul
Time
zone
Area
name Representative area Signal
station
+9.5 ADL
Adelaide
♦
JPN
+10 SYD
Sydney
+11 NOU
Noumea
+12 AKL
Auckland
SUV
Suva
-11 MDY
Midway
♦
USA
-10 HNL
Honolulu
-9 ANC
**Anchorage
-8 LAX
**Los Angeles
USA
YVR
**Vancouver
-7 DEN
**Denver
-6 CHI
**Chicago
MEX
**Mexico City
-5 NYC
**New York
YMQ
**Montreal
-4 CCS
Caracas ♦
USA
-3 RIO
Rio de Janeiro
-2 FEN
Fernando de
Noronha ♦
EUR
-1 PDL
*Az ore s
Any HOM
Depends on the time zone
set.
• USA: the United States of America, EUR: Europe, JPN: Japan
• For an area with * or **, the automatic switching of summer time/standard time
are performed together.
• When using the watch in an area not listed in the table, select an area name in
the same time zone.
• Areas with ♦mark are out of receivable range and signals cannot be received.
(The watch tries to receive signals from the target signal station though.)
• It may be difficult to receive signals in certain environment where it is hard for
signals to reach.
3/4
U600 Abbreviated instruction
Receiving the signal manually (on-demand reception)
• The watch tries to receive the signal from the station assigned for the area of the
home time (indicated on the digital display 2).
• The watch does not try to receive the signal when the home time is UTC.
• The local time and UTC are adjusted synchronously as the reception finished
successfully.
• It takes 2-15 minutes to finish reception.
1.
Pull the crown out to position 1.
2.
Rotate the crown to change the mode to [TME], [CAL] or [RX-S].
3.
Push the crown in to position 0.
4.
Press and hold the lower right button Afor 2 seconds or more.
After an alarm sounds and the second hand points “RX”, release the button.
The second hand moves to point “H”, “M”, or “L” and then the time signal
reception starts. The function hand indicates the signal station from which
the time signal is to be received.
Reception-in-progress
indication (RX)
Reception result
indication (NO)
Reception result
indication
(H/M/L)
Function hand
The second hand returns to normal movement after finishing reception.
Reception was successful Corrected time/calendar is indicated.
Reception failed The time is not corrected and the previously set time
resumes.
Setting the reception time
1.
Pull the crown out to position 1.
2.
Rotate the crown to change the mode to [RX-S].
3.
Pull the crown out to position 2.
4.
Press and release the upper right button B.
The current reception time setting starts blinking and becomes adjustable.
5.
Press and release the lower right button Arepeatedly to
select an reception time setting.
• Each time you press the button, the setting changes as follows:
AUT →MAN →OFF →(back to the top)
MAN
(manual)
The 4:00AM time reception can be changed to other time (home
time) in 1-hour units.
It cannot be set to 2AM and 3AM.
OFF (off)
Automatic reception is not performed.
AUT
(automatic)
Automatic reception is performed according to the initial
settings (at 2AM, 3AM and 4AM).
• When you select “MAN”, rotate the crown to set the time of automatic
reception.
6.
Push the crown in to position 0to finish the procedure.
Setting summer time
Adjusting the automatic switching of summer time/standard time
You can choose whether the watch switches summer time/standard time
automatically or not.
1.
Pull the crown out to position 1.
2.
Rotate the crown to change the mode to [RX-S].
3.
Pull the crown out to position 2.
The current setting for automatic switching starts blinking and becomes
adjustable.
4.
Press and release the lower right button Ato select “AU”or
“mA”.
AU (automatic)
Summer time/standard time are switched automatically
depending on the summer time signal.
mA (manual)
Summer time/standard time are not switched automatically.
• Each time you press the button, the setting changes alternately.
5.
Push the crown in to position 0to finish the procedure.
Activating/deactivating summer time for each area
You can activate/deactivate summer time separately for every area except UTC.
1.
Pull the crown out to position 1.
2.
Rotate the crown to change the mode to [WT-S].
3.
Pull the crown out to position 2.
The digital display 2 turns off and “ON” or “OF” of the summer time setting
of the area displayed on the digital display 1 starts blinking.
4.
Rotate the crown to select an area.
5.
Press and release the lower right button Ato select the
summer time setting.
ON
Summer time is indicated.
OF (OFF)
The standard time is indicated.
• Each time you press the button, the setting changes alternately.
6.
Repeat steps 4 and 5 to set other areas.
7.
Push the crown in to position 0to finish the procedure.
Setting the time and the calendar manually
• The time of the home time and UTC cannot be adjusted separately.
• The time of the home time and UTC is synchronously adjusted as that of the
local time is adjusted.
Setting the time
1.
Pull the crown out to position 1.
2.
Rotate the crown to change the mode to [TME].
3.
Press and release the lower right button Aor the upper right
button Brepeatedly to select an area.
4.
Pull the crown out to position 2.
The second had moves to the 0 second position and the digital display 2
(home area) turns off.
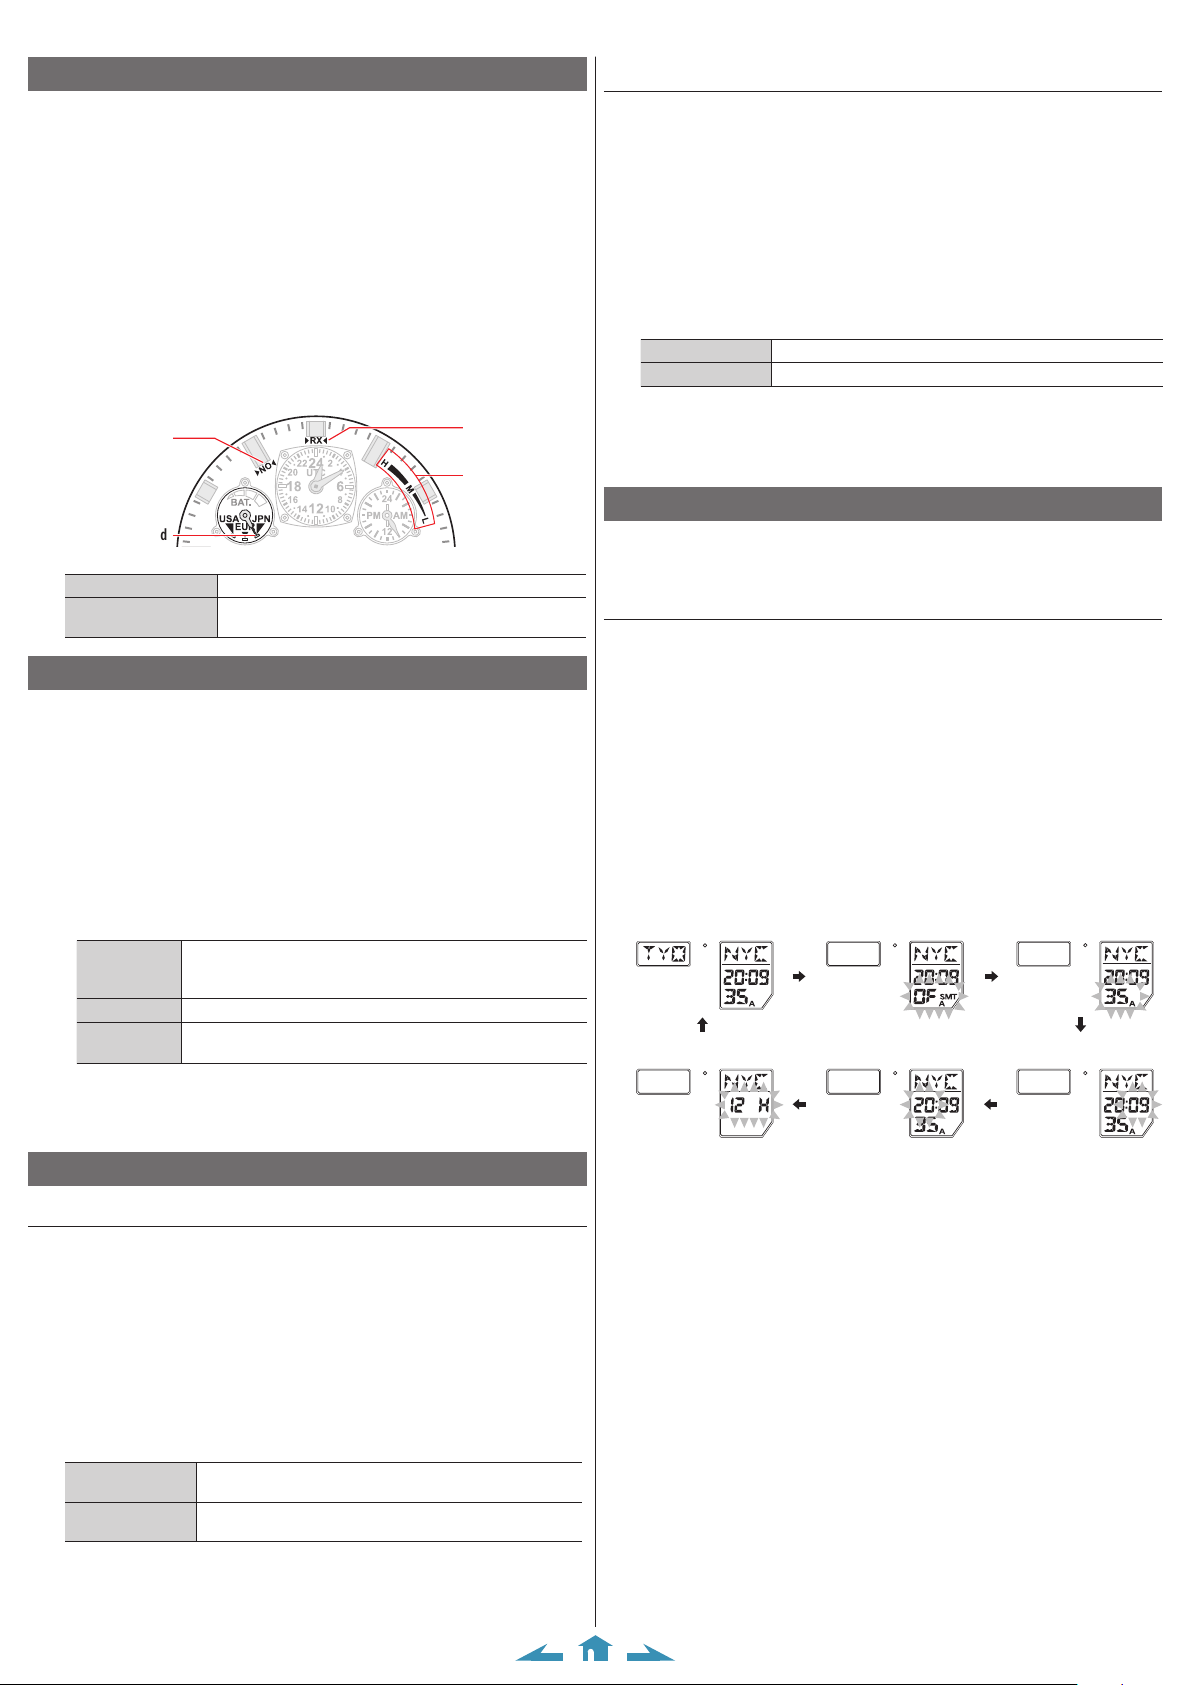
The summer time setting starts blinking and becomes adjustable.
5.
Press and release the upper right button Brepeatedly to
change the target to be set.
• Each time you press the button, the target changes as follows:
<Normal time display>
<12/24-hour basis>
<Summer time setting>
<Hour> <Minute>
<Second>
6.
Adjust the time/indication/setting.
Use the crown to adjust the hour and minute.
Use button
A
to set the summer time, second and 12/24-hour basis.
7.
Repeat steps 5 and 6 to set other targets.
8.
Push the crown in to position 0to finish the procedure.
4/4
U600 Abbreviated instruction
Setting the calendar
1.
Pull the crown out to position 1.
2.
Rotate the crown to change the mode to [CAL].
3.
Press and release the lower right button Aor the upper right
button Brepeatedly to select an area.
4.
Pull the crown out to position 2.
The digital display 2 turns off.
The month starts blinking and becomes adjustable.
5.
Press and release the upper right button Brepeatedly to
change the target to be set.
• Each time you press the button, the target changes as follows:
<Normal time display> <Month> <Date> <Year>
6.
Rotate the crown to adjust the calandar.
7.
Repeat steps 5 and 6 to set other targets.
8.
Push the crown in to position 0to finish the procedure.
Checking the reference position
1.
Pull the crown out to position 1.
2.
Rotate the crown to change the
mode to [CHR].
3.
Pull the crown out to position 2.
The hands start to move to the current
reference positions stored in memory.
4.
Check the reference position.
Correct reference positions:
• Hour, minute and second hands: 0 hour
00 minute 00 second
• 24-hour hand: “24”
• UTC hour and minute hands: 0 hour 00 minute
• Function hand: EUR
When the current reference position is different from the correct one,
proceed to step 4 of Correcting the reference position.
5.
Push the crown in to position 0to finish the procedure.
Correcting the reference position
1.
Pull the crown out to position 1.
2.
Rotate the crown to change the mode to [CHR].
3.
Pull the crown out to position 2.
The hands start to move to the current reference positions stored in
memory.
4.
Press and hold the upper right button Bfor 2 seconds or more.
“CHA” blinks on the digital display 2 and the function hand becomes
adjustable.
5.
Press and release the upper right button Brepeatedly to
change the target to be set.
• Each time you press the button, the target changes as follows:
Function hand →UTC hour and minute hands →Hour hand/24-hour
hand →Minute hand →(back to the top)
6.
Rotate the crown to adjust the target hand.
7.
Repeat steps 5 and 6 to set other targets.
8.
Press and hold the upper right button Bfor 2 seconds or more.
9.
Push the crown in to position 0to finish the procedure.
Resetting the watch - All Reset
1.
Pull the crown out to position 1.
2.
Rotate the crown to change the mode to [CHR].
3.
Pull the crown out to position 2.
4.
Press and release both the lower right button Aand upper
right button Bsimultaneously.
All the digital indication lights up and the watch is reset.
Then a confirmation alarm sounds and all the hands show demonstration
movement.
The setting values after All Reset
Areas of home time and local
time UTC
Time 12:00 AM
Calendar January 1, 2007
Reception time setting
AUT
Summer time setting OF (OFF) at all time zones
Automatic switching of
summer time/standard time
setting
AU
Alarm settings and time
OF (OFF), UTC, 12:00AM
Timer 99:00
Chronograph 00:00:00:00
After All Reset
After All Reset, adjust the reference position and set the time and calendar and
other settings.

Other Citizen Watch manuals

Citizen BN7020-09E User manual

Citizen

Citizen BN7020-09E User manual

Citizen G900 User manual

Citizen

Citizen G900 User manual

Citizen A660H User manual

Citizen

Citizen A660H User manual

Citizen C440 User manual

Citizen

Citizen C440 User manual

Citizen D200 Operating manual

Citizen

Citizen D200 Operating manual

Citizen Eco-Drive B872 User manual

Citizen

Citizen Eco-Drive B872 User manual

Citizen C650 Manual

Citizen

Citizen C650 Manual

Citizen Corso User manual

Citizen

Citizen Corso User manual

Citizen YF10 User manual

Citizen

Citizen YF10 User manual

Citizen C020 Operating manual

Citizen

Citizen C020 Operating manual

Citizen HIGH HAND CHRONOGRAPH Series User manual

Citizen

Citizen HIGH HAND CHRONOGRAPH Series User manual

Citizen 8217 User manual

Citizen

Citizen 8217 User manual

Citizen E260 User manual

Citizen

Citizen E260 User manual

Citizen Promaster 1000M Professional Diver User manual

Citizen

Citizen Promaster 1000M Professional Diver User manual

Citizen YF30 User manual

Citizen

Citizen YF30 User manual

Citizen H990 Eco-Drive Satellite Wave User manual

Citizen

Citizen H990 Eco-Drive Satellite Wave User manual

Citizen AQXXX CTZ-B6807 User manual

Citizen

Citizen AQXXX CTZ-B6807 User manual

Citizen 0S00 User manual

Citizen

Citizen 0S00 User manual

Citizen H990 Eco-Drive Satellite Wave User manual

Citizen

Citizen H990 Eco-Drive Satellite Wave User manual

Citizen Sport AW1524-84E User manual

Citizen

Citizen Sport AW1524-84E User manual

Citizen Quartz 5819 Manual

Citizen

Citizen Quartz 5819 Manual

Citizen 6720 Manual

Citizen

Citizen 6720 Manual

Citizen H162 User manual

Citizen

Citizen H162 User manual

Citizen JNOXXX CTZ-B6770 User manual

Citizen

Citizen JNOXXX CTZ-B6770 User manual

Popular Watch manuals by other brands

Marea Smart B59002 user manual

Marea Smart

Marea Smart B59002 user manual

Jaeger-leCoultre POLARIS MARINER MEMOVOX manual

Jaeger-leCoultre

Jaeger-leCoultre POLARIS MARINER MEMOVOX manual

Swiss THE DIPLOMATIC owner's manual

Swiss

Swiss THE DIPLOMATIC owner's manual

Piaget G0A41035 Instructions for use

Piaget

Piaget G0A41035 Instructions for use

HiTRAx 42.7003 instruction manual

HiTRAx

HiTRAx 42.7003 instruction manual

Zeon IN2602 CALIBRE 821 Operation manual

Zeon

Zeon IN2602 CALIBRE 821 Operation manual

Tissot RACING-TOUCH user manual

Tissot

Tissot RACING-TOUCH user manual

Suunto 9 Peak user guide

Suunto

Suunto 9 Peak user guide

LOUIS XVI ATHOS POUR FEMMES user manual

LOUIS XVI

LOUIS XVI ATHOS POUR FEMMES user manual

Samsung Gear S user guide

Samsung

Samsung Gear S user guide

GOLDEN STATE INTERNATIONAL 40-855 instruction manual

GOLDEN STATE INTERNATIONAL

GOLDEN STATE INTERNATIONAL 40-855 instruction manual

SMART BW1831 manual

SMART

SMART BW1831 manual

Oakley Bullet user guide

Oakley

Oakley Bullet user guide

Seiko V657 instructions

Seiko

Seiko V657 instructions

Pulsar Pulsar ANALOGUE instructions

Pulsar

Pulsar Pulsar ANALOGUE instructions

Huawei JPT-B29 quick start guide

Huawei

Huawei JPT-B29 quick start guide

Ebel Caliber 503 operating instructions

Ebel

Ebel Caliber 503 operating instructions

Telomed OxyKnight user manual

Telomed

Telomed OxyKnight user manual

manuals.online logo
manuals.online logoBrands
  • About & Mission
  • Contact us
  • Privacy Policy
  • Terms and Conditions

Copyright 2025 Manuals.Online. All Rights Reserved.