Clas Ohlson BW6200 User manual

SUOMINORSKSVENSKAENGLISH

2
3
3
Please read the entire instruction manual
before using and save it for future use.
We apologise for any text or photo errors
and any changes of technical data.
If you have any questions concerning
technical problems please contact our
Customer Service Department (see
address on reverse.)
Product description
To remember
Usage
Advanced usage
Care and maintenance
Troubleshooting
Waste disposal
Specications
ENGLISH

2
3
3
This remote control is manufactured pre-
programmed and replaces up to 6 separate
remote controls for controlling, for example,
TVs, VCRs, satellite and digital TV receivers,
and DVD players. You only have to enter the
correct device code and your URC will be
ready for use. A list of device codes is found
at the very end of this instruction manual. The
URC can also be taught (programmed) by
existing remote controls.
- Pre-programmed for most existing
brands.
- Replaces damaged or lost remote
controls.
- Replaces up to 6 remote controls, for
example for TVs, VCRs, satellite and
digital TV receivers, and DVD players.
- Function for Teletext.
- Operated with 4 x R03/AAA batteries (not
included)
- The remote control is compatible with
most brands on the market but it might
not be compatible with your specic
model of the device. Even if the brand
is included in the code list.
- It is not possible to see in the code list if
the remote control ts your specic device
model, you have to try it out.
- The remote control may work with more
codes than one. One has to try it out until
nding the code that works with the most
buttons.
ENGLISH

4
5
5
When a button is pressed, the display is lit for
about 15 seconds, thereafter the display goes
into a sleep mode (energy saving mode).
Press the display again to activate the buttons
and the display.
The display’s buttons only react to button
presses as long as the display is lit. The direct
buttons react even when the display is in
sleep mode.
Button Sound
All buttons give off a low beep when pressed.
The button sound cannot be turned off.
VO L+
VO L-
P- P +
5
4
1
2
7
3
8
10
6
9
ENGLISH

4
5
5
The touch screen’s buttons
1. Infrared sender
2. LED indicator
3. Touch screen
4. Function buttons
5. Battery lid (on the back)
6. Device buttons (device modes,
buttons for selecting device)
7. Function buttons
8. Mute button (TV sound on/off)
9. SHIFT button (for the SHIFT function)
10.PAGE button (turn to next page of
button set)
On the lower part of the remote control,
there are 9 direct buttons with the following
functions:
Circuit breaker ON/OFF
P+ Programme/Channel up
P- Programme/Channel down
VOL+ Volume up
VOL- Volume down
GREEN button Quick button for, among
other things, Teletext
RED button Quick button for, among
other things, Teletext
YELLOW button Quick button for, among
other things, Teletext
BLUE button Quick button for, among
other things, Teletext
Note: Green, red, yellow and blue buttons
are also used by some satellite and cable TV
receivers.
ENGLISH

6
7
7
The remote control is operated with
4 x R03/AAA batteries.
1. Remove the battery lid on the backside.
2. Put in the batteries according to the
marking in the battery compartment.
Remember to turn the batteries right with
plus (+) and minus (-) according to the
marking.
3. Put the battery lid back.
Low batteries
If the battery symbol is shown in the
display the batteries are starting to go low.
You then have to replace the batteries with
new ones.
ENGLISH

6
7
7
Entering device code
Enter the code in the following manner:
1. Open the included code list and look
under the headline for the type of device
that corresponds to your equipment.
TV Brands – Codes for TVs
VCR Brands – Codes for VCRs
SAT Brands – Codes for satellite recei-
vers as well as codes for digital receivers
for cable TV and terrestrial television
broadcasting.
CBL Brands – Codes for analogue cable
TV receivers.
DVD Brands – Codes for DVD players.
Under this headline you then look for the
code that corresponds to the brand of
your device, for example Philips. Every
code contains 4 digits. If there is more
than device code for your brand, you
begin with the rst one.
2. Turn on, for example, the TV manually or
with the original remote control. Choose
channel 1.
3. Press the button for desired device,
for example [ TV ]. The symbol for the
chosen function ashes.
4. Press the buttons [ P+ ] and [ VOL- ]
simultaneously for 3 seconds until the
LED light is lit.
5. Enter your four digit device code with the
buttons [ 0 ] – [ 9 ].
The LED light ashes a few times and
then goes off.
Test the function of the remote control with
the device that you have just programmed.
If the device responds correctly to the but-
tons you press, you have entered the right
device code. Otherwise, you will have to
repeat the procedure above with the other
device codes available for your brand until
your device reacts in the right way when
you press the buttons and until most buttons
work correctly.
ENGLISH

8
9
9
In the same manner, you set the device
codes for other devices as well. Just
remember to press the button for device
type in step 3 above.
Note
If the LED light ashes 6 times while
entering the four digit device code the
programming has been interrupted for one
of the following reasons:
1. No digit has been pressed during an 8
second period.
2. An invalid device code has been ente-
red.
3. The device code has not been entered
correctly. The device code may only
contain the numbers 0-9.
Programming a new device code for a
chosen device type automatically replaces
the old code.
[ TV ] – the button can only save TV
codes.
[ VCR ] – the button can only save VCR
codes.
[ DVD ] and [ SAT ] – the buttons can
save all device codes (including TV and
VCR codes)
Tip!
When you have found the correct device
code we recommend that you write down
the code on the label on the backside of
the remote control.
If no device code works with your device
If you cannot nd the correct device code
for your device you can search through all
the remote control’s codes for the respec-
tive device type.
TV - TVs
VCR - VCRs
SAT - Satellite and digital TV receivers
DVD - DVD players
ENGLISH

8
9
9
If you cannot nd the right device code
in the list, you can search in the following
manner:
1. Turn on, for example, the TV manually
or with the original remote control.
2. Press the button for the desired device,
for example [ TV ]
First press the [ SHIFT ] button and
then button for desired device.
3. Press the buttons [ P+ ] and [ VOL- ]
simultaneously for 3 seconds until the
LED light is lit.
4. Enter the corresponding search code
from the following table.
The LED light ashes 2 times and is
then turned off.
Device type Search code
TV 0001
VCR 0002
SAT 0003
CBL 0004
DVD 0005
(In this example, you press the code for
TV: 0001)
5. Again, press the same button as in step
2 for desired device type.
(In this example the [ TV ] button).
6. Press the buttons [ P+ ] and [ VOL- ]
simultaneously for 3 seconds until the
LED light is lit. Now the remote control is
ready to search.
7. Point the remote control towards desired
device (in this example, the TV) and
press the button ON/OFF several
times slowly and with patience until the
device is turned off. When the device
has turned off, you immediately press
the device button (for this example
[ TV ] ) to store the search code. The
LED light is turned off.
ENGLISH

10
10
11
11
11
11
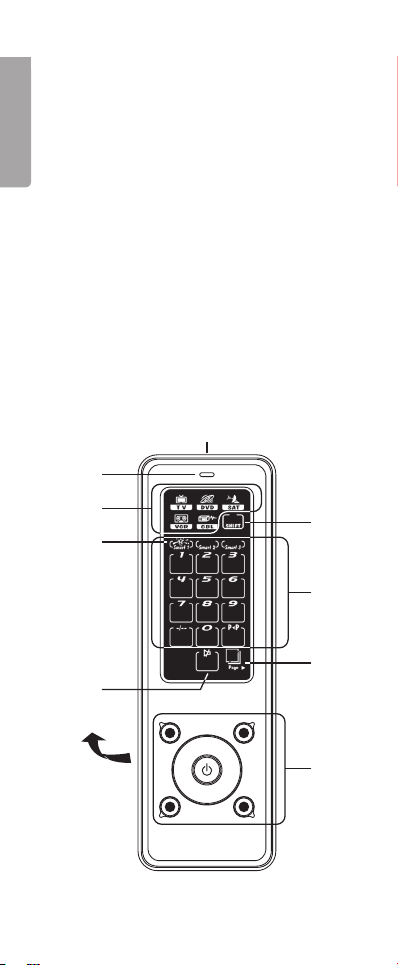
In the same manner as above, search for the
device code for other devices. Remember
to press the correct button for the desired
device in steps 2 and 5 above.
Important!
If the circuit breaker function on your device
is not controlled by infrared lights, you follow
steps 2 through 6 above and start the search.
Then, follow the instructions below.
- Press alternately on the button ON/OFF
and another important function button
until your device reacts with the desired
function. Press the button for the device
you have chosen in the steps above (in
this example the [ TV ] button) to store
the search code.
For example, you press alternately
on ON/OFF and another important
function button or on ON/OFF and
PLAY ►.
- Every time that you press the button
ON/OFF the remote control skips to
the next code and send out a signal for
turning off the device. If you do not ma-
nage to stop pressing ON/OFF in time
before the device is turned off, you turn
on the device as fast as you can. Before
the indicator (the LED light) is turned
off you press [ P- ] to skip backwards.
Repeat step 7 above and store the code.
- If the LED light ashes 6 times after that
you have pressed ON/OFF , you have
reached the library’s last code. Press
on (in this example [ TV ] ) to restore
the remote control and repeat the above
procedure to search again.
Note
DVD, SAT and other device codes may be
stored on all function buttons except TV and
VCR.
ENGLISH

10
10
11
11
11
11
If some functions from the original remote
control are missing on this URC, you can
“teach” the remote control these functions
from the remote control.
In addition to controlling pre-programmed
devices, this URC can also control for
example HiFi equipment. The remote control
can be taught a total of 226 commands.
1. Press the button for the desired device,
for example [ TV ]. The LED light ashes
once.
2. Press the buttons [ P+ ] and [ VOL- ]
simultaneously for 3 seconds until the
LED light is lit.
3. Enter the registration code “0000”. The
LED light continues to shine with a steady
light.
4. Point the original remote control towards
the infrared eye on the universal remote
control at a distance of about 5-8 cm.
Put the remote controls on a at surface
to get good contact between the remote
controls. Also make sure to have fresh
batteries in both remote controls.
5. Press shortly on the button you want to
program on the universal remote control,
for example [ 1 ] for channel 1.
If no button has been chosen within 8
seconds, the LED light ashes quickly 6
times and the programming is cancelled.
6. Press briey on the corresponding button
on the original remote control (in this
example Channel 1). The LED light
ashes and then returns to a steady light.
If the LED light ashes quickly 6 times,
the programming has failed. Adjust the
remote controls’ position in relationship
to each other and try again according to
steps 5 and 6.
ENGLISH

12
1
13
1
13
1
If the receiving remote control does not want
to receive the code, press the button
on the original remote control a little bit
longer.
7. Repeat steps 5-6 to programme additional
functions.
When the programming is done, press the
button for desired device (the same as in
step 1). The LED light ashes twice before
it is turned off and the remote control is
ready to use.
Observe! On some VCRs and DVD players
the buttons up and down, left, right and ok
can be used for play, stop, fwd, rew and rec.
Tip! By using the SHIFT button when recor-
ding, access to another 3 pages with button
functions is given. During recording, press
[ SHIFT ] once to activate the 4th page.
Press [ PAGE ] to switch to the 5th and the
6th page. Press [ SHIFT ] again to leave the
“SHIFT mode.”
If recorded functions only work once in a
while, the original remote control contains
double signals. If this happens, follow the
instructions below.
1. Press the button for desired device, for
example [ TV ]. The LED light ashes once.
2. Press the buttons [ P+ ] and [ VOL- ]
simultaneously for 3 seconds until the LED
light is lit.
3. Enter the registration code “0000”. The
LED light continues to shine with a steady
light.
4. Point the original remote control towards
the infrared eye on the universal remote
control at a distance of about 5-8 cm.
Put the remote controls on a at surface
to get good contact between the remote
controls. Also makes sure that both remote
controls have fresh batteries.
ENGLISH

12
1
13
1
13
1
5. Press briey on the button you want to
program on the universal remote control,
for example [ 1 ] for channel 1.
If no button has been chosen within 8
seconds, the LED light ashes quickly 6
times and the programming is cancelled.
6. Press briey on the corresponding button
on the original remote control (in this
example, Channel 1). The LED light
ashes and then returns to a steady light.
If the receiving remote control does not
want to receive the code, press the button
on the original remote control a little bit
longer.
7. Repeat steps 5-6.
8. Press the button for desired device (the
same as in step 1). The LED light is
turned off and the remote control is ready
to use.
Observe! On some VCRs and DVD players
the buttons up and down, left, right and ok
can be used for play, stop, fwd, rew and rec.
Tip! By using the SHIFT button when recor-
ding, access to another 3 pages with button
functions is given. During recording, press
[ SHIFT ] once to activate the 4th page.
Press [ PAGE ] to switch to the 5th and the
6th page. Press [ SHIFT ] again to leave the
“SHIFT mode.”
Important!
- The function buttons (TV/DVD/SAT/VCR)
and the SHIFT button are not program-
mable.
- Every button can only ll one function.
Recording a new function automatically
annuls the previous function.
- If you pressed the wrong button in step 6
above, you have to wait 16 seconds for
the remote control to return to the normal
mode. Thereafter, you may redo the
programming from the beginning.
ENGLISH

14
1
15
1
15
1
If the LED light ashes quickly 6 times during
recording, the memory is full. Return to normal
mode by pressing a button for desired device.
To clear the memory, follow the instruction
“Entering device code”.
The memory holds a total of 226 commands/
functions.
Point the remote control towards the device
and press desired button for desired function.
The remote control will sound a low beep
and the LED light ashes when sending to
conrm that the button is pressed.
Every device button normally contains 3
pages of buttons. You simply press the
“page” button furthest down to the right on
the screen to move between the pages.
By pressing the SHIFT button on the screen
and then one of the direct buttons you control
the following functions on your TV (if the
function is supported by your TV and you
have the correct device code):
SHIFT and then 1for light strength
SHIFT and then 2for colour
SHIFT and then 3for contrast
Adjust the levels of the above with [ VOL+ ]
and [ VOL- ]
[ VOL+ ] to increase the level.
[ VOL- ] to decrease the level.
With the SHIFT button activated on the
screen you may access other functions as
well depending on device and model. One
has to try it out, however it does not work
on all devices/models.
ENGLISH

14
1
15
1
15
1
Thanks to this function you can control the
light strength and the mute function on
a TV without having to switch between the
different device buttons.
If you have copied any other function on any
of the VOL+, VOL- or MUTE buttons in any
of the DVD, SAT, VCR or CBL device mo-
des, the programme control function will not
work with the corresponding device mode.
Smart Programme (Smart 1, Smart 2,
Smart 3)
The remote control has three kinds of
programmable SMART programmes that
can be programmed with up to 20 steps
(button functions) for each. With the help of
SMART, one can programme several button
functions with time delay to activate several
different functions by only pressing the
SMART button.
To programme a multi-function button
1. Press [ P+ ] & [ VOL– ] on the universal
remote control simultaneously for 3
seconds until the indicator (blue LED
light) is lit.
2. Enter the code for SMART programming
0009.
3. The SMART icon is lit in the lower part
of the display.
4. Chose desired Smart button (for example
Smart 1).
5. Chose a button function from the device
button that you wish to programme, the
indicator (blue LED light) ashes once for
every button function that is chosen.
6. Press and hold the chosen button to set
the sending period for the chosen com-
mand (up to 60 seconds). The sending
period will be as long as the time the
button is pressed.
ENGLISH

16
1
17
1
17
1
7. Repeat step 5 until you are done with the
whole programme and then press the
chosen Smart button again (for example
Smart 1). The SMART programme is now
saved.
8. To programme more SMART program-
mes, repeat steps 1 through 6
1. Point the universal remote control towards
the equipment you want to control.
2. Press and let go off the SMART button
that you have programmed (for example
Smart 1). Corresponding SMART icon
ashes and the indicator (blue LED light)
is lit during the time that the different
programmed key presses are sent. The
SMART icon and the indicator (blue LED
light) stop to ash when all the key press-
ses have been sent. The remote control
returns to normal mode.
1. Do not expose the remote control to dust,
strong sunlight, humidity, high temperatu-
res or shocks.
2. Do not mix new and old batteries.
The old ones may start to leak.
3. Do not use any corroding or polishing
solvents on the remote control.
4. Keep the remote control dust free by dry-
ing it off with a soft and dry piece of cloth.
5. Do not take apart the remote control.
It does not contain any components that
can be adjusted by the user.
ENGLISH

16
1
17
1
17
1
Problem: My remote control is not
working at all!
Action 1: Check your device. If the power
switch is on OFF nothing will work.
Action 2: Check that the batteries are turned
right with the plus and minus the
right way.
Action 3: Check that you have pressed the
right device button.
Action 4: Change the batteries if they are
low.
Action 5: It does not work with your device
model, the remote control does not
work with all models on the market
even if your brand (for example
Philips) is in the code list it is not
sure that it works with your exact
model of the device.
Problem: If there are several device codes
for my device, then what should
I do?
Action 1: Test the device codes one at a time
until you nd the one that works
with the most buttons.
Problem: My equipment only reacts to
some commands.
Action 1: You have set a code that only
works for some commands but not
for others. Try different codes until
most of the buttons work.
Action 2: You can also copy the button
functions that are missing on the
URC from your original remote
control (See the headline
“Recording functions from other
remote controls”).
ENGLISH

18
1
19
1
19
1
Problem: The indicator (green LED light)
indicates error (six quick
ashes) when I try to copy
button functions from an
original remote control.
Action 1: Make sure that you point the
remote controls towards each other
on a at surface at a distance of
5-8 cm.
Action 2: Make sure to not be in direct
sunlight or in a strong light when
you copy button functions.
Action 3: Clean the infrared lens.
Action 4: Check that the batteries are not
low. If the batteries are low, it may
be hard for the remote control to
copy the button presses correctly.
Action 5: Make sure that the remote controls
lie within the same distance during
the whole copying process.
Problem: Some copied functions are not
working.
Action 1: These functions have not been
copied correctly. Try to
re-programme these functions.
Problem: Some copied functions only
work sometimes.
Action 1: Your original remote control may
send double signals.
Go through the procedure under
the headline “Advanced recording
of functions from other remote
controls.”
ENGLISH

18
1
19
1
19
1
Problem: What is SMART?
Action 1: It is an advanced function that
allows you to perform several but-
ton presses with only one button.
When pressing a programmed
SMART-button the program-
med button presses are sent in a
sequence. For more information,
see the headline “Advanced usage
– Smart Programme.”
Disposal of the product should be done
according to local regulations. If you are
unsure of how to proceed, contact your local
authorities.
System Pre-programmed and
recordable infrared
remote control
Memory Recording of up to 226
different buttons
Memory duration Permanent memory,
the memory remains
even after changing
batteries
Supply voltage 4 x batteries LR03/
AAA-batteries
(Alkaline batteries
recommended)
Screen Touch screen (LCD)
with blue backlight
Distance Up to 8 metres with
a clear path and new
batteries
Measurements 163 x 54 x 19.5 mm
Weight 180 grams
(incl. batteries)
ENGLISH

20
0
21
1
Läs igenom hela bruksanvisningen före
användning och spara den sedan för framtida
bruk. Vi reserverar oss för ev. text- och bildfel
samt ändringar av tekniska data. Vid tekniska
problem eller andra frågor, kontakta vår
kundtjänst (se adressuppgifter på baksidan).
Produktbeskrivning 3
Att komma igång 6
Användning 14
Avancerad användning 15
Skötsel och underhåll 16
Felsökningsschema 17
Avfallshantering 19
Specikationer 19
SVENSKA
Table of contents
Languages:
Other Clas Ohlson Remote Control manuals

Clas Ohlson
Clas Ohlson PP-iDual-IR iD RC User manual

Clas Ohlson
Clas Ohlson SR1000 User manual

Clas Ohlson
Clas Ohlson ML-C User manual

Clas Ohlson
Clas Ohlson EMW100TM User manual

Clas Ohlson
Clas Ohlson LD-SCB01 User manual

Clas Ohlson
Clas Ohlson BW0881 User manual

Clas Ohlson
Clas Ohlson BW8380EU User manual

Clas Ohlson
Clas Ohlson 50027 User manual