Clavia nord piano 5 User manual

This Nord Piano 5 service guide shortly explains the most common issues to authorized Nord Service Centers
taking care of the Nord range. The information found in this document is not intended for end users and
dealers. It may not be copied, modified or distributed in any way.
Main features
The Nord Piano 5 comes in two versions, 88 and 73 keys, both models with hammer action using the triple
switch Fatar TP40 keybed. The latest edition of our award-winning Piano series is equipped with dual piano
engines, dual sample synths and twice the memory of the previous generation.
In April 2022 Rev B was launched, with a couple of new features added, using a new panelboard/upper lid.
More details for the NP5 Rev B on page 6.
Main parts, electronics and mechanics:
Mainboard | Part#60340
Panelboard 1 | Part#60356 (REV A)
Panelboard 1 | Part#60368 (REV B)
Panelboard 2 | Part#60354
Powerboard | Part#60300
Lower Lid 88 | Part#40823
Upper Lid 88 | Part#40822 (REV A)
Upper Lid 88 | Part#40853 (REV B)
Lower Lid 73 | Part#40841
Upper Lid 73 | Part#40840 (REV A)
Upper Lid 73 | Part#40852 (REV B)
Keybed NP5/88keys (calibrated) | Part#49619
Keybed NP5/73keys (calibrated) | Part#49843
Wooden side panels (always sold as pair):
NP5 Left/Right 73/88 | Part#40834/40835

Opening the NordPiano 5
The NP5 is opened by loosening four out of five screws on each wooden side panel. Keeping the screw
mounted in each rear down-left/right corner makes it easier to tilt the upper lid when opening up the machine,
please see the picture. After this, loosen the seven screws on the rear side as well as the two screws under the
lower lid.
!Mind the ribbon cable between the panel board in the upper lid and the mainboard in the lower lid, when
opening the upper lid.

The Keybed
All keybeds used in the Nord range are from the Italian manufacturer, Fatar. The keybeds (88/73) used in the
NordPiano 5 are both using triple switch functionality.
A new feature to the NP5 is metal crossbars mounted under the keybed, to further improve the stability and
consistency in the mechanical construction. The actual keybed used in the 88-keys version is the same
(49619) as used in NP3/NP4, but with these crossbars added. See picture below.
Each individual keybed is calibrated on single key level in the Clavia factory and the IC holding this information
is attached under the keybed.
!When replacing a spare keybed it is crucial to work on a stable and flat surface when mounting it into the
lower lid. Always start mounting the screws on the rear side and then, on a flat surface, the screws inside the
NordPiano 5.

Panel board 1 | Panel board 2
Rev A (60356+60354)
NP5 - Rev B
In April 2022 the new NP5 Rev B version was launched in production. The main difference between the A- and
B revisions is a new “Panel board 1”with additional features on the piano section, in terms of push buttons,
LEDs and a new screen print.
Rev A Rev B –with highlighted changes from Rev A
The Rev B version of the Nord Piano 5 adds a number of features related to both the Sample Synth and Piano sections. A dedicated Voice
mode control is added which provides both Mono and Legato settings apart from the default “poly” mode, for the Sample Synth. Related
to this feature, a Glide (portamento) control lets the user choose from four different glide rates (Off, 1, 2, 3) when Mono or Legato is
active.
The Vibrato options for the Sample Synth are also expanded with a new Button/Pedal mode which gives the user real-time control of the
vibrato by using either the on-panel Vibrato button, a connected expression/control pedal or the middle (“sostenuto”) pedal of the Nord
Triple Pedal.
For the Piano section, a new Dyn Comp (dynamic compression) feature is added which can be used for reducing the dynamic range of the
selected piano sound, by raising its minimum sound level. The dynamic range in terms of timbre is not affected, and there are three levels
of compression to choose from. This feature is useful for maintaining a clearly audible performance even if playing very softly or
dynamically.
NP5 Rev B units shipped starts with ser#:
PG14246 (88 keys)
PH12144 (73 keys)

Mainboard
The NP5 mainboard is equipped with twelve 2Gb flashes where the piano samples (8 flashes) and sample
library (4 flashes) are stored.
The flashes U7-10 and U60-63 holds the piano library, controlled by the U4 DSP.
The U11-12 and U64-65 flashes hold the sample library section, controlled by the U3 DSP.
The U2 DSP takes care of the effects section.
Boot up problems
For incoming service cases claiming any kind of “boot up problem”, “error codes at start up”or various
problems on the panel board, it is always worth trying to go into TEST MODE and perform individual tests on
the main and panel board, depending on each individual case. See next page for further details.
! Always try this first !
Even if the NP5 is reported to have boot up problems, try to boot up in test mode and then erase all data
stored on the flashes, followed by a complete install of latest OS version and samples.
Applications and updates can be found on:
https://www.nordkeyboards.com/products/nord-piano-5
After erasing the flashes, always install the OS first, followed by restoring the Nord Piano Factory Backup
file using the latest Nord Sound Manager version. These files can be downloaded from the website above.
If the problem persists, or if the NP5 can’t reach the test mode at all, please contact Clavia for further

Test mode
Like all Nord products, the NP5 holds an internal test program that is used in the production line and as a guide
for troubleshooting at service centres.
Test mode [Shift + Split]
Holding down LIVE MODE at boot up will show the hardware revision and the boot prom version in the display.
Test Confirm, used in test program to confirm operations that modify contents of non-volatile memory and/or
require asking "Please Confirm".
=======================================================================================
Boot Button Combinations for Nord Piano5
=======================================================================================
Mode Button combination Description
--------------------------------------------------------------------------------------------------------------------------------------------
OS <none> Start OS
Update Shift + Store Start updater program (for OS updates)
Test Shift + Split Start test program
Verbose Live Shows HWREV/SW versions during boot

MNB (Various mainboard tests, comments on useful tests)
1. Mainboard Tests Test sequence used in production that automatically runs various DSP/Flash tests etc.
2. Final Tests - Production only
3. E2P Quick EEPROM test, quick version
4. E2P Total
5. DSP Quick
6. DSP Total
7. Flash SPI Quick The SPI flash IC holds the “boot prom”, OS and test program
8. Flash SPI Total
9. Flash Piano Quick Piano partition flash tests
10. Flash Piano Total (Several hours)
11. Flash Sample Quick Sample partition flash tests
12. Flash Sample Total (Several hours)
13. MIDI Connect a “Midi-loop”, Midi-In to Midi-Out and press “Run”
14. Pedal Mux Ctrl - Production only
15. Mnb Pedals - Production only
16. Mnb Pedals (NoSust) - Production only
17. Piano Pedal –Production only
18. Audio Warning –HIGH level audio signals, don’t connect the NP5 directly to headphones/loudspeakers.
PNL
1. Panel Tests (test sequence used in production)
2. OLED All pixels turned on in the OLED display
3. Buttons & LEDs All LEDs turned on, turned off by pressing each corresponding pushbutton, one by one
4. Knobs A/D tests for the potentiometers/knobs
5. Dials Encoder tests
KBD Production only
1. Keyboard Calibration
2. Erase Calibration
SYS
1. E2P Erase
2. Flash Erase OS/TP (Requires an OS-update after running this test (that contains the test program as well))
3. Flash Erase Pno Piano samples partition
4. Flash Erase Pdl Pedal samples partition
5. Flash Erase Pno+Pdl
6. Flash Erase Smp
7. Flash Erase ALL (OS/TP+Pno+Pdl+Smp, requires an OS-update, also containing the test program)
8. Flash Trash OS/TP (Requires an OS-update, also containing the test program)
9. Flash Trash Pno
10. Flash Trash Pdl
11. Flash Trash Pno+Pdl
12. Flash Trash Smp
13. Flash Verify PNO Similar to MNB#10, pointing out which Flash chip that is malfunctioning
14. Flash Verify SMP Similar to MNB#12, pointing out which Flash chip that is malfunctioning
13. Checksum Test Production Only
14. Checksum Update Production Only

Trouble Shooting Guide
OS-mode
The normal boot up process when powering up any Nord unit can be divided into a couple of sections that may
reveal issues on a reported “broken” unit.
When powered on, the first thing that “happens” is the “Nord model”-logo shown in the display
This is followed by the keyboard type under the logo, a “progress bar” and the OS-version installed
When the progress bar is finished the unit goes into normal play mode
If any of these steps are interrupted, halted or that “something else” occurs, such as a short flickering of all
LEDs before the logo is present in the OLED, the progress bar is freezing in the middle of the load process, no
logo is displayed at all, we are probably dealing with a broken unit.
Test mode
The test mode contains four different sections covering mainboard tests (MNB), panelboard tests (PNL),
keyboard calibration (KBD) and system tests (SYS).
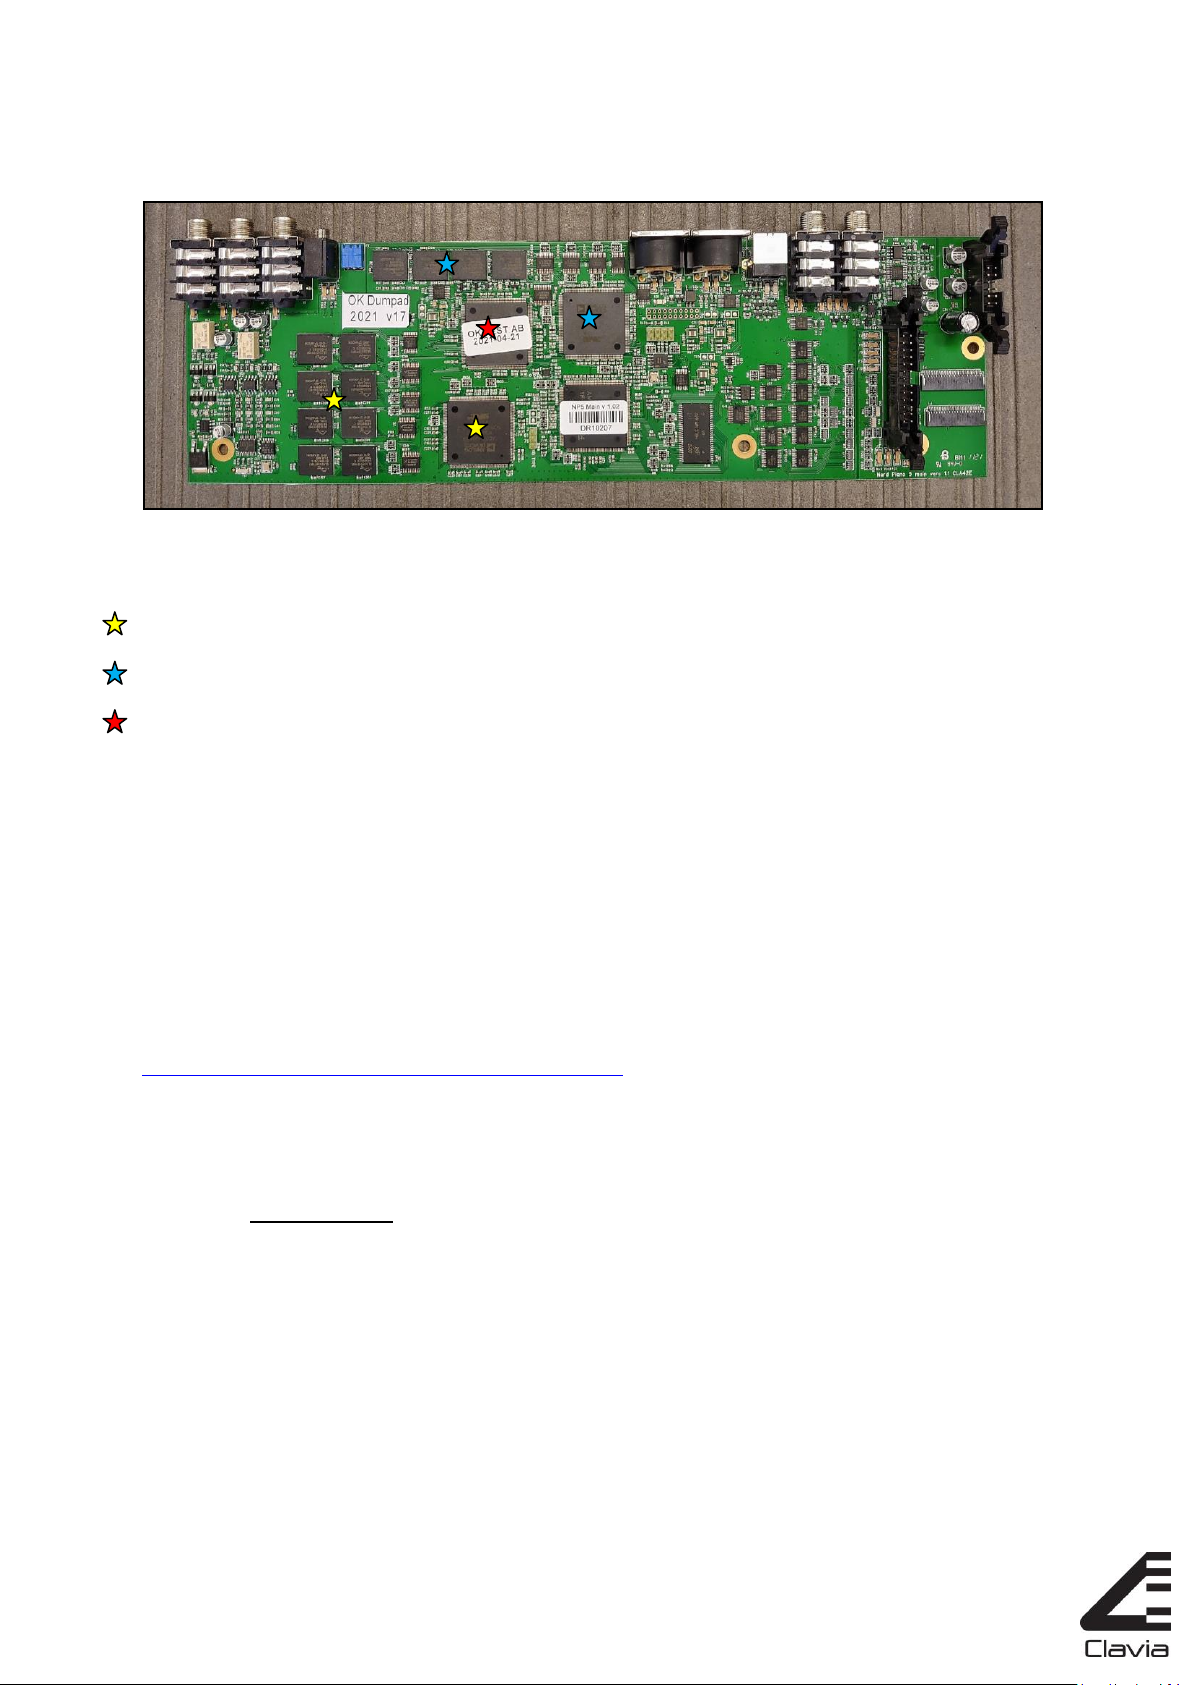
SDRAM test
Before entering the test mode menu, a SDRAM test is performed on the mainboard, displayed by three LEDs or
LED sections lightning up in a short test sequence. If this test fails, one of those three LEDs/sections will start
flashing, in most cases due to a malfunctioning SDRAM chip. Units coming in with boot up problems, such as
“all LEDs are on when powering up”, may be confirmed by these tests.
Mainboard tests
The MNB:1 (see previous page) is a test sequence that runs through various quick tests of the flashes and DSPs.
This test point is a good start to verify the overall status of the mainboard on units with failure claims around
the boot up problems, flashes, “sample failures”, DSP boot issues etc. If this test sequence runs ok on a board
with a reported sample failure it may be worth to run the long/total flash tests as well, and/or go into the SYS-
section for erase/trash/verify-tests to confirm the reported failure claim.
All “Flash Total” tests are destructive as long as the test session is interrupted before being completed.
The whole memory area is verified through various read, erase & write-commands. If this test is interrupted, or
cancelled due to a reported flash error, the unit needs to be reprogrammed via an OS update followed by a
factory restore using the Nord Sound Manager.
Running destructive flash tests (erase, trash, verify) in the SYS section requires a confirm command, displayed
by blinking LEDs next to the corresponding push buttons.
A new test introduced in the NP5 test program is the “Flash Verify” tests in the SYS-menu. This is similar to the
“Trash” tests, with the additional feature pointing out which flash chip that is malfunctioning on each partition
(PNO or SMP) as well. These tests are primarily used for trouble shooting in the production line, but may be
useful on service units from end users.
Audio tests
The audio test on MNB:18 is handy to perform basic trouble shooting on the analogue audio section. Pressing
“Run” (“Line Out, High Level”) will generate a 0dBFS, 1kHz (ish) sine wave from the D/A converter through the
whole analogue audio section to all output jacks.
The “Line Out - High Level” test will cause the headphones output signal to clipping levels. To verify the
headphones signal chain with a clean sine wave, step forward to the “Headphones - High Level” test instead,
that lowers the output signal to correct levels.
This manual suits for next models
1
Table of contents
Other Clavia Musical Instrument manuals

Clavia
Clavia Nord C2 User manual

Clavia
Clavia Nord Electro 5D 61 User manual

Clavia
Clavia NORD PIANO 3 User manual

Clavia
Clavia Nord Piano 2 HP User manual

Clavia
Clavia Nord Electro 4HP User manual

Clavia
Clavia Nord Piano 2 HA88 User manual

Clavia
Clavia Nord C1 User manual

Clavia
Clavia Nord Electro Seventy Three User manual

Clavia
Clavia Nord C1 User manual

Clavia
Clavia Nord Piano 88 User manual