Clavia Nord Piano 2 HP User manual

User Manual
Nord Piano 2 HP
OS Version 1.x
Part No. 50417 Copyright Clavia DMI AB
Print Edition 1.1

CAUTION - ATTENTION
RISK OF ELECTRIC SHOCK
DO NOT OPEN
RISQUE DE SHOCK ELECTRIQUE
NE PAS OUVRIR
CAUTION: TO REDUCE THE RISK OF ELECTRIC SHOCK
DO NOT REMOVE COVER (OR BACK).
NO USER SERVICEABLE PARTS INSIDE.
REFER SERVICING TO QUALIFIED PERSONNEL.
ATTENTION:POUR EVITER LES RISQUES DE CHOC ELECTRIQUE, NE
PAS ENLEVER LE COUVERCLE.
AUCUN ENTRETIEN DE PIECES INTERIEURES PAR L´USAGER.
CONFIER L´ENTRETIEN AU PERSONNEL QUALIFE.
AVIS: POUR EVITER LES RISQUES D´INCIDENTE OU D´ELECTROCUTION,
N´EXPOSEZ PAS CET ARTICLE A LA PLUIE OU L´HUMIDITET.
1) Read these instructions.
2) Keep these instructions.
3) Heed all warnings.
4) Follow all instructions.
5) Do not use this apparatus near water.
6) Clean only with dry cloth.
7) Do not block any ventilation openings. Install in accordance
with the manufacturer’s instructions.
8) Do not install near any heat sources such as radiators, heat
registers, stoves, or other apparatus (including ampliers) that
produce heat.
9) Do not defeat the safety purpose of the polarized or
grounding-type plug. A polarized plug has two blades with one
wider than the other. A grounding type plug has two blades
and a third grounding prong. The wide blade or the third prong
are provided for your safety. If the provided plug does not t
into your outlet, consult an electrician for replacement of the
obsolete outlet.
10) Protect the power cord from being walked on or pinched
particularly at plugs, convenience receptacles, and the point
where they exit from the apparatus.
11) Only use attachments/accessories specied by the manu-
facturer.
12) Use only with the cart, stand,
tripod, bracket, or table specied by the
manufacturer, or sold with the apparatus.
When a cart is used, use caution when
moving the cart/apparatus combination to
avoid injury from tip-over.
13) Unplug this apparatus during lightning
storms or when unused for long periods of time.
14) Refer all servicing to qualied service personnel. Servicing
is required when the apparatus has been damaged in any way,
such as power-supply cord or plug is damaged, liquid has been
spilled or objects have fallen into the apparatus, the apparatus
has been exposed to rain or moisture, does not operate nor-
mally, or has been dropped.
The lightning ash with the arrowhead symbol within
an equilateral triangle is intended to alert the user to the
presence of uninsulated voltage within the products en-
closure that may be of sufcient magnitude to constitute
a risk of electric shock to persons.
Le symbole éclair avec le point de èche à l´intérieur d´un triangle
équilatéral est utilisé pour alerter l´utilisateur de la presence à
l´intérieur du coffret de ”voltage dangereux” non isolé d´ampleur
sufsante pour constituer un risque d`éléctrocution.
The exclamation mark within an equilateral triangle is
intended to alert the user to the presence of important
operating and maintenance (servicing) instructions in the
literature accompanying the product.
Le point d´exclamation à l´intérieur d´un triangle équilatéral est
employé pour alerter l´utilisateur de la présence d´instructions
importantes pour le fonctionnement et l´entretien (service) dans le
livret d´instructions accompagnant l´appareil.
Instructions pertaining to a risk of re, electric shock or injury to persons.
IMPORTANT SAFETY INSTRUCTIONS
SAVE THESE INSTRUCTIONS
Trademarks: The Nord logo is a trademark of Clavia DMI AB. All other trademarks
mentioned in this publication are the properties of their respective holders.
Specications and appearances are subject to change without notice.
Copyright © Clavia DMI AB
No naked ame sources, such as lighted candles, should be placed on
the apparatus;
Do not use the apparatus in tropical climates.
WARNING: To reduce the risk of re or electric shock, do not expose
this apparatus to rain or moisture.
The apparatus shall not be exposed to dripping or splashing and that
no objects lled with liquids, such as vases, shall be placed on the
apparatus.
The maims plug is used as the disconnect device and shall remain
readily operable.
Il convient de ne pas placer sur l´appareil de sources de ammes nues,
telles que des bougies allumées;
L´appareil n’est pas destiné á étre utilisé sous un climat tropical.
L´appareil ne doit pas étre exposé á des égouttements d´eau ou des
éclaboussures et de plus qu´aucun objet rempli de liquide tel que des
vases ne doit étre placé sur l´appareil.
Lorsque la prise du résau d’alimentation est utilisée comme dispositif
de déconnexion, ce dispositif doit demeuré aisément accessible.
Warning - When using electric products, basic precautions should always be followed, including the following:
Additional Safety Information

| 3
1 Introduction
Thank you! ......................... 4
About this manual.................. 4
OS and internal memory ........... 4
Nord Sound Manager............... 4
Factory programs................... 4
Restoring the factory content ............. 4
OS upgrades ....................... 4
Free sounds ........................ 4
Disclaimer .......................... 4
2 About the Nord Piano 2 HP
The Instrument . . . . . . . . . . . . . . . . . . . . . 5
Piano Library . . . . . . . . . . . . . . . . . . . . . . . 5
Small, Medium, Large & Xtra Large......... 5
String Resonance................... 5
Sample Synth ...................... 5
Pedal Noise with Triple Pedal...... 6
3 Panel Overview
Knobs & buttons ................... 7
Knobs ............................... 7
Selector buttons ....................... 7
On/Off and Source buttons............... 7
Shift button ........................... 7
4 Connections
Audio Connections.................. 8
Headphones . . . . . . . . . . . . . . . . . . . . . . . . . . 8
Left Out and Right Out .................. 8
Monitor In ............................ 8
MIDI Connections................... 8
MIDI In ............................... 8
MIDI Out ............................. 8
USB Connection .................... 8
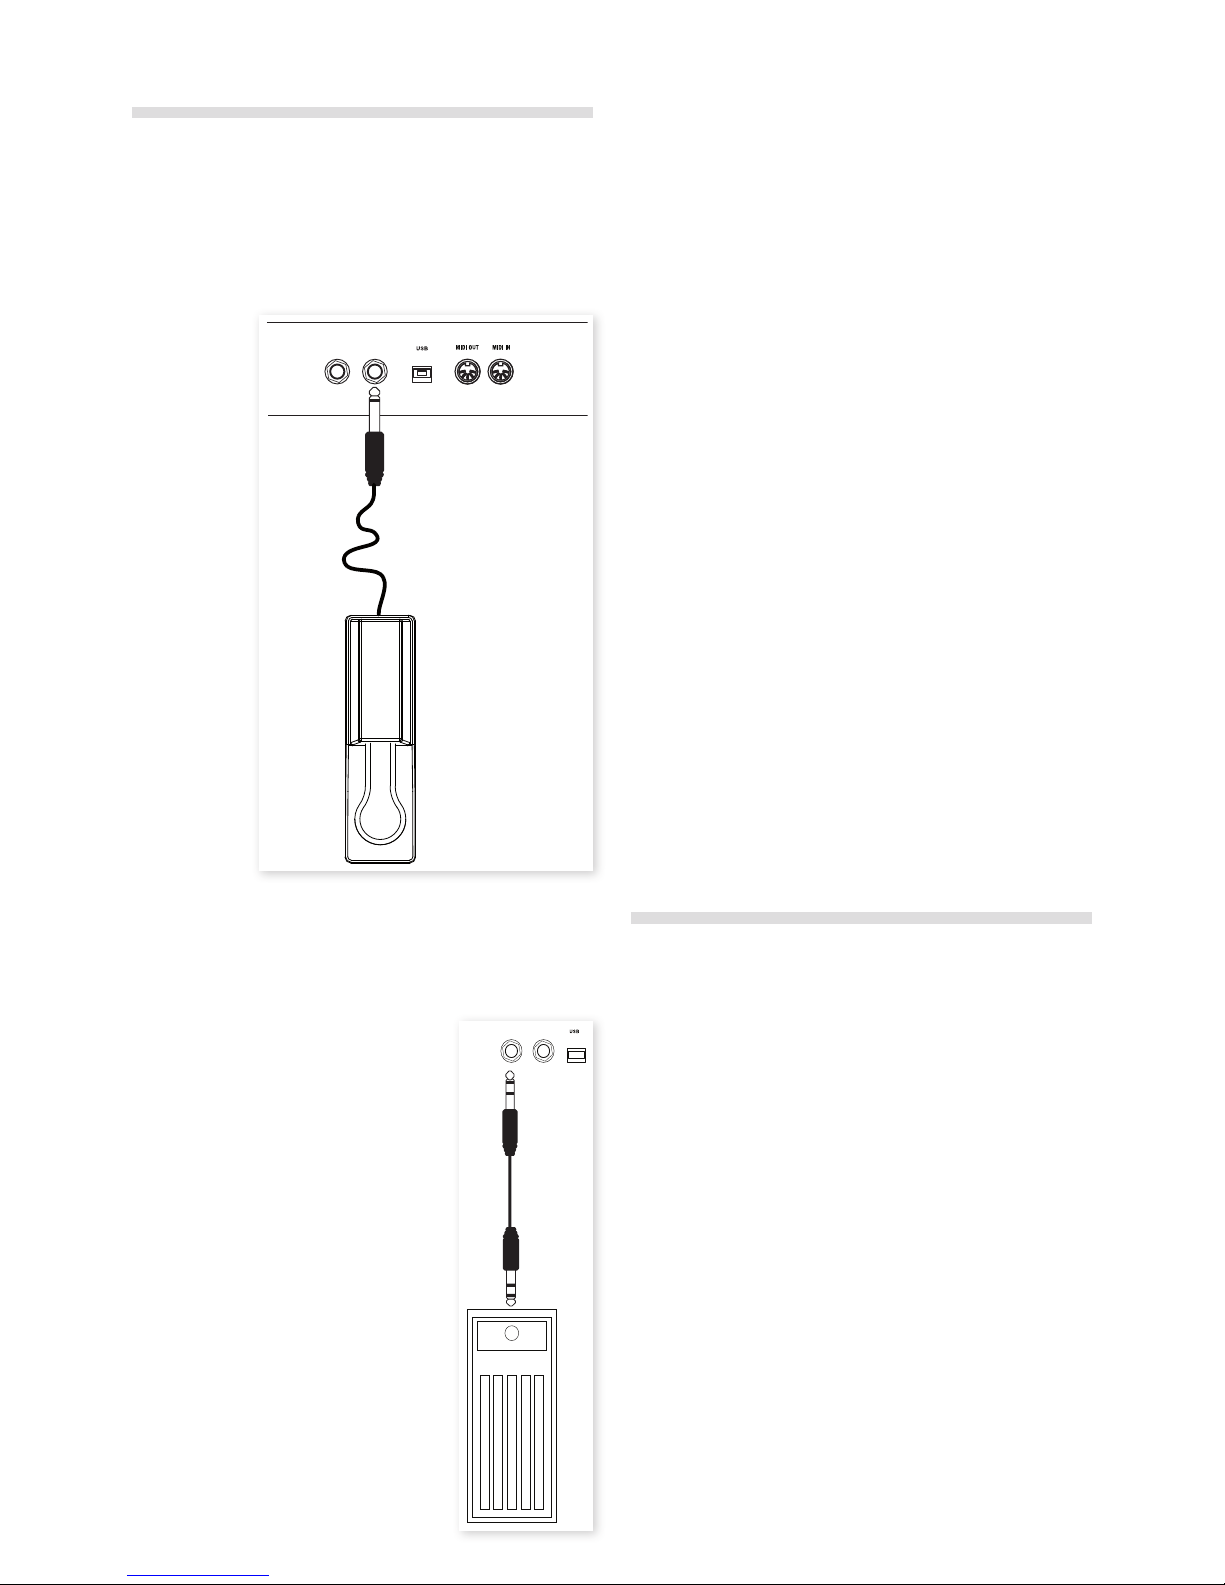
Pedal Connections.................. 9
Sustain Pedal Input ..................... 9
Volume Pedal Input .................... 9
Nord Triple Pedal....................... 9
Music Stand ........................ 9
5 Getting Started
About the programs............... 10
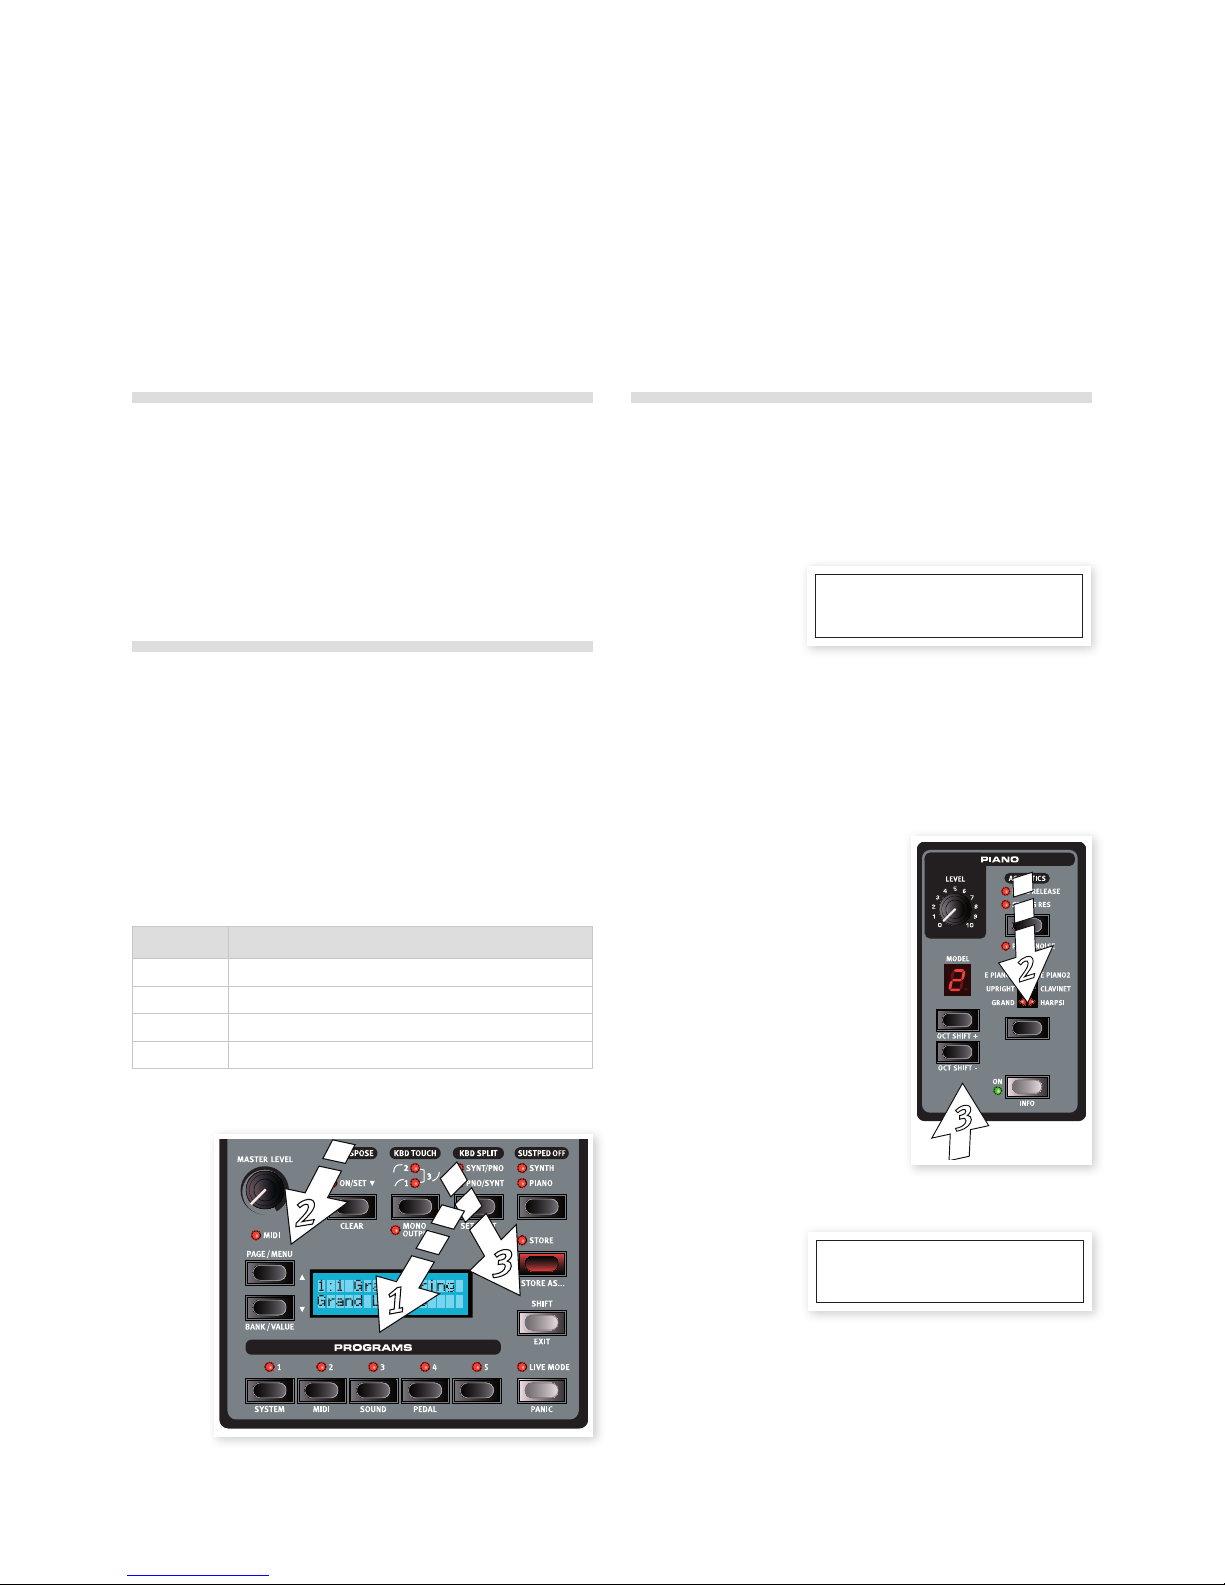
Select a program .................. 10
Edit a program .................... 10
Select a new piano sound............... 10
Memory Protection ................ 11
Storing a program................. 11
Live Mode ......................... 11
Selecting a Sample Synth sound . 11
Split the keyboard ................ 12
Transpose ......................... 12
Adding effects..................... 12
Use the delay......................... 12
Acoustics .......................... 13
Kbd Touch settings................ 13
6 Nord Piano 2 HP Reference
Master level ......................... 14
MIDI Indicator ........................ 14
Program section .................. 14
Up/Down buttons ..................... 14
Bank selection........................ 14
Menus .............................. 14
Display.............................. 14
Store ............................... 14
Store As... ........................... 14
Programs 1 ~ 5 ...................... 15
Shift ............................... 15
Live Mode ........................... 15
Panic ............................... 15
Transpose .......................... 15
Transpose Clear ...................... 15
Kbd Touch .......................... 15
Mono Output......................... 15
Kbd Split ............................ 15
Synt/Pno ............................ 15
Pno/Synt ............................ 15
Sustped Off.......................... 15
Piano .............................. 16
Level ............................... 16
Acoustics ........................... 16
String Resonance . . . . . . . . . . . . . . . . . . . . . 16
Long Release ........................ 16
Pedal Noise.......................... 16
Piano Ty pe........................... 16
Piano Model ......................... 16
Piano Octave Shift .................... 17
On ................................. 17
Info ................................ 17
Sample Synth ..................... 17
Level ............................... 17
Attack .............................. 17
Release ............................. 17
On ................................. 17
Info ................................ 17
Sample ............................. 17
Sample Octave Shift ................... 17
Effects ............................ 17
Effect 1 ............................. 18
Effect 2 ............................. 18
Delay ............................... 18
Equalizer ............................ 18
Amp/Comp . . . . . . . . . . . . . . . . . . . . . . . . . . 18
Reverb.............................. 18
7 The Menus
System Menu ...................... 19
Memory Protect – On, Off ............... 19
Fine Tune............................ 19
Global Transpose ..................... 19
MIDI Menu......................... 19
MIDI Channel......................... 19
Local Control......................... 19
Control Change (CC) Mode.............. 19
Program Change Mode................. 19
Send CC ............................ 19
Dump Program One, All ................20
Sound Menu .......................20
Piano Pedal Noise level................. 20
Piano String Res Level ................. 20
FX Delay Mode .......................20
Pedal Menu........................ 20
Piano Pedal .......................... 20
Volume Pedal Type .................... 20
Volume Pedal Gain .................... 20
Volume Pedal Func ....................20
Sostenuto Pedal Func .................. 20
8 Nord Sound Manager
System requirements .................. 21
Installation ........................ 21
USB Driver........................... 21
Sound Manager ...................... 21
Overview .......................... 21
The Toolbar ......................... 22
The Tabs ............................22
Partition Memory Indicator .............. 22
Right/Ctrl-Clicking.....................22
File Formats..........................22
The Quick Tour .................... 23
Transfer sounds to the Nord Piano 2 HP.... 23
Deleting a sound ...................... 23
Download a new sound ................ 23
Replace.............................23
Relink .............................. 24
Download Queue ..................... 24
Upload sounds from the Nord Piano 2 HP .. 24
Program Bundles ..................... 24
Upload a Program Bundle............... 24
Downloading a Bundle ................. 25
Organize the program partition........... 26
Search Box ..........................26
Auto Select .......................... 26
Backup .............................26
Restore ............................. 26
Sound Manager reference......... 27
Toolbar ............................. 27
Menus ............................. 29
File menu ...........................29
Edit menu ........................... 30
View menu .......................... 30
Help menu...........................30
Tabs ............................... 31
Piano – Samp LIb - Program............. 31
Search Box .......................... 31
Loc - Location ........................ 31
Name............................... 31
Size ................................ 31
Ver – Version Number .................. 31
Info ................................ 31
Footer Area .......................... 31
Partition Memory Indicator .............. 31
Cancel Button ........................ 31
Progress Bar ......................... 31
Message/Text Area .................... 31
Updates and pianos ................... 31
9 MIDI
About the MIDI implementation...32
Note On/Off..........................32
Controllers...........................32
Keyboard velocity .....................32
Program change ...................... 32
MIDI Sysex (System Exclusive) ........... 32
Nord Piano 2 HP with a seq. ...... 32
Connections .........................32
Local On/Off ......................... 32
MIDI Channel.........................32
Program Change...................... 32
Controllers...........................32
About controllers & “chasing” ............ 32
Program & Controller dumps......33
Sending program dumps ...............33
Sending MIDI Controller dumps .......... 33
Receive MIDI SysEx dumps .............33
MIDI Controller list.....................33
MIDI Implementation Chart..............34
10 Index
Index ............................... 35
Nord Piano 2 HP User Manual

Thank you!
We’d first like to thank you for purchasing the Nord Piano 2 HP. Our
goal when we developed the instrument was to create the best profes-
sional, very portable stage piano with an integrated sample synth on
the market. We hope that you will have as much fun owning, playing
and using the instrument, as we had developing it.
About this manual
You are probably very eager to start using your new instrument, and we
sure don’t want to keep you from having fun. We will try to cover all the
essential aspects on how to use the Nord Piano 2 HP in the very first
few pages of this manual. After that follows the reference section where
all the functions are explained in detail.
OS and internal memory
The operating system, programs and pianos in the Nord Piano 2 HP
are stored in a Flash memory. A Flash memory is a great thing, it retains
the data when the power is turned off. Another big advantage is that
you can replace data in the Flash memory at any time. This means that
you will be able to download upgrades, pianos and programs to your
Nord Piano 2 HP from a computer. The Nord Piano 2 HP features a
USB port for quick and easy download of new pianos and samples.
Nord Sound Manager
The Nord Sound Manager is a computer application that allows you
to organize and change the sounds and memory content in the Nord
Piano 2 HP. This easy to use application is included on the DVD that
was delivered in the box with the instrument. Read more on how to use
the Nord Sound Manager in chapter 8 in this manual.
Factory programs
The internal program memory of the Nord Piano 2 HP consists of 240
programs, organized in 2 banks A & B, each with 24 pages with 5
programs in each page. There are also five Live buffer memories, which
will continuously store any changes as they are made.
All of the 240 programs in the Nord Piano 2 HP can be used to store
your own settings. To make sure you don’t accidentally overwrite
programs you want to keep, it’s a good idea to regularly back up your
sounds on a computer using the Nord Sound Manager application.
Restoring the factory content
The factory programs, samples and pianos are available as Nord
Sound Manager backup files for download at the Nord web site at
www.nordkeyboards.com or on the included Nord Piano DVD.
OS upgrades
The latest OS version for Nord Piano 2 HP is available for download at
the NordKeyboards.com website. Please visit us on the web from time
to time, to make sure you have the latest version in your unit.
Free sounds
Since the Nord Piano 2 HP is designed as an “open system”, each and
every piano and every sample in the Nord Piano 2 HP can be replaced
by you. This is done using the Nord Sound Manager application.
The Nord Piano 2 HP is compatible with the continuously expanding
Nord Piano and Nord Sample Libraries. Many of these sounds are
included on the DVDs that accompanies the Piano. When new sounds
are available, you can download these for free from the Nord website.
Yet another good reason to visit the website from time to time.
Disclaimer
Any trademarks and brand names mentioned in this manual are the
property of their respective owners and are not affiliated or associated
with Clavia. These trademarks and brand names are only mentioned to
describe the types of sounds reproduced by Nord Piano 2 HP.
1 Introduction
4 | Nord PiaNo 2 HP User MaNUal os v1.X

The Instrument
To make a great tool we believe that you have to put all the focus on a
few important things and that is exactly what we have tried to achieve
with the Nord Piano 2 HP. A great piano sound and maximum expres-
siveness, true feel, with a natural keyboard response and authentic
sound quality combined with a Sample Synth and some great effects
makes for an inspirational instrument that we hope you will use and
enjoy for a long time.
Let’s look at some of the key features:
Piano Library
The Nord Piano 2 HP is compatible with the piano sounds in the Nord
Piano Library. We have spent a lot of time and effort in creating our
best piano sounds ever, to match the features available in the Nord
Piano 2 HP.
The piano sounds are included on the DVD and are organized in cat-
egories and in some cases available in various sizes (for the acoustic
grand pianos and uprights). New sounds will be available free of charge
on the www.nordkeyboards.com website.
Small, Medium, Large & Xtra Large
All sizes share the same amount of velocity layers, and the Small,
Medium and Large (Sml, Med & Lrg) have same number of zones that
are mapped across the keyboard. This means that you can rely on a
consistent quality in regards to the playability and expressiveness in the
basic sound of every piano, no matter what size you choose to install in
your Nord Piano Library compatible unit.
Small are the pianos that uses the least amount of space in the piano
memory, but still carry a big and powerful punch. This version does
not contain any String Resonance samples at all. If a Small piano is
selected in the Nord Piano 2 HP, the String Resonance feature will be
disabled.
The Medium versions have pedal-down String Resonance samples in
the important middle region of the range, but omit these in the lowest
and the highest areas. This gives you a good ratio between functional-
ity and size.
The Large versions have the pedal-down String Resonance samples all
across the keyboard, providing you with the fullest of sounds, but also
the largest size.
Some of the pianos are also available as Xtra Large (XL) versions.
These versions provide an increased sound quality and expressiveness
as they are fully mapped across an 88-note keyboard. Every key has its
own samples.
String Resonance
String Resonance is the acoustic phenomenon that occurs inside an
acoustic piano or grand when strings, or parts of strings, resonate
at their fundamental or harmonic frequencies when other strings are
played.
When this functionality is turned on while using the Nord Piano 2 HP’s
acoustic pianos, all notes you play will affect each other to reproduce
the wonderful acoustics that occurs inside an acoustic grand or upright
piano.
String Resonance is also very noticeable if you use the sustain pedal
with the String Resonance feature enabled, on any Medium, Large or
Xtra Large acoustic pianos. The notes that you play will have a beautiful
sound quality to them, when all the un-dampened strings resonate as
you play sustained notes.
String Resonance also feature a crescendo effect. If you play the same
key repeatedly with the same force, the sound will change. This is
originally caused by the hammers hitting the vibrating string in various
phases, and creates a nice, gentle fluctuation in volume and timbre in
the Nord Piano 2 HP.
Sample Synth
The Sample Synth in the Nord Piano 2 HP allows you to layer a second
sound on top of the pianos, or to split the keyboard in two halves, with
one sound in each half. The Nord Piano 2 HP is delivered with many
acoustic and electric sounds that supplement the piano sounds.
You will find various types of strings and pads that can be used to
create lush layers. Organs, mallets and synthesizer sounds expand
the keyboard capabilities of the instrument and a selection of basses
makes it easy to create dual-instrument performances with left-hand
bass and right hand backing chords.
All the sounds in the sample memory can be replaced if you want.
This is done by using the Nord Sound Manager, with some very user-
friendly methods that are explained in the Sound Manager chapter
in this manual. There are many samples to choose from. When this
manual was printed the Nord Sample Library contained more than one
thousand samples.
The samples can be found on the Nord Sample Library DVD that was
delivered in the box with the instrument. When new samples become
available, they are published on the www.nordkeyboards.com web site,
where you can download every sample in the Nord Sample Library to
your computer, free of charge.
2 About the Nord Piano 2 HP
CHaPter 2 aboUt tHe Nord PiaNo 2 HP | 5

Pedal Noise with Triple Pedal
The Nord Triple Pedal that can be purchased as an accessory to the
Nord Piano 2 HP offers an unprecedented functionality, with the ad-
dition of a dynamic control of the mechanical noise during operation,
and the ability for you as a player to use half pedaling and “release and
catch again” techniques.
When the sustain pedal is operated on a acoustic grand or upright,
many different sounds are produced by the mechanical components,
several of the sounds can be reproduced by the Nord Piano 2 HP.
The dampers are lifted from the strings when the sustain pedal is
pressed down, and a beautiful sizzle can be heard. When you remove
the foot from the pedal, the dampers are returned on to the strings,
which creates a different, muted type of sound. Since the Nord Triple
Pedal is dynamic, you can experiment with various forces in pressing,
and also in releasing the pedal. If you just slip your foot of the sustain
pedal, allowing the return spring to spring with full force, a noticeable
sound will appear.
The “floor sound” is heard when the pedal reaches the bottom of its
travel. You can experience this in isolation if you press down the pedal
completely, then lift it less than halfway back up and then press down
again.
If you lift the pedal and immediately press it down again, a very rich
sound will be heard. Another big sound is The Stomp, which requires
you to start with your foot above the actual pedal, in order to be able to
reach the high velocity that is required to get this sound.
MThe Pedal Noise features can not be used with the included
switch type pedal.
6 | Nord PiaNo 2 HP User MaNUal os v1.X

Knobs & buttons
Knobs
The knobs control the continuously variable
parameters in the Nord Piano 2 HP.
MA parameter value can be totally different
from the knob’s physical position when
you load a Program. As soon as you start
turning the knob, the value will ‘snap’ to the
knob’s physical position.
Selector buttons
Selector buttons are used to select one setting in an array. Selector
buttons have a set of round or triangular LEDs to indicate the current
setting. Press the button several times to cycle through the possible
options.
Holding Shift and pressing a selector
button (with the exception of the Type
button shown here) will cycle through the
settings in a counter clockwise fashion.
On/Off and Source buttons
On/Off buttons are used for activating a parameter or a group of
parameters such as effects. The Effect’s On/Off buttons acts as source
selectors, hold Shift and press repeatedly to select piano or synth.
You can also double-tap on a source button to
make the source selection.
Shift button
Some buttons have a secondary function, which will be available if you
hold down Shift while pressing the button. The
name of the secondary function is printed below
the button. Shift is also used together with the
Up/Down buttons when you want to change a
setting in the System, MIDI or Sound menus.
If you press and hold Shift while turning a
knob, the parameter value will be presented in the display, without
being changed.
Shift is also used to Exit a Store procedure if you change your mind or
to exit from a select menu when you are finished with those settings.
3 Panel Overview
The front panel of the Nord Piano 2 HP has four main areas, Program, Piano, Sample Synth, and Effects. We’ll familiarize ourselves briefly with the
panel here and describe the functions in detail in the following chapters.
On the left upper part of the panel are the Master Level knob that controls the entire instrument’s output level at the two output jacks and the head-
phone output. This control is not programmable.
The Program Bank section contain the display and the functions that are used to select and store the programs, to set the System, Sound, MIDI and
Pedal functions. We’ll describe this area in greater detail starting at page 14.
Moving towards the middle of the panel, to the left of the display is the instrument section where you select the actual piano and/or synth sounds.
The Effect section contains the functions of the effects. Please refer to page 17 and onwards for more information.
Program Piano Effects
Sample Synth
CHaPter 3 PaNel overview | 7

Audio Connections
Headphones
This is where you connect a ¼" stereo connector from a pair of head-
phones.
Left Out and Right Out
The left and right line level outputs from the Nord Piano 2 HP are
unbalanced. Use ¼" connectors to connect the Nord Piano 2 HP to an
amplifier or recording equipment.
The Nord Piano 2 HP is a stereo instrument, with separate signal paths
for the left and right audio channels. To properly experience the Nord
Piano 2 HP, use both outputs in a stereo operation.
General guide on audio connections:
• Make all the connections before you turn on the power to your amplier.
• Turn on the power to your amplier last.
• Turn off the power to your amplier rst.
EPlaying at a high volume level can result in hearing impairments
such as permanent hearing loss.
Monitor In
Use this to connect and monitor a signal from an mp3 or a CD player
at the Nord Piano 2 HP’s headphone output. This allows you to e.g.
rehearse with the instrument to pre-recorded music.
MSignals connected to this input will not be processed with the
Piano 2 HP’s effects or appear at the Piano’s left and right output
jacks.
MIDI Connections
MIDI In
MIDI connection used to receive MIDI data to the Nord Piano 2 HP
from other equipment such as keyboards or computers.
MIDI Out
MIDI connection used for transmitting keyboard- and panel generated
MIDI data from the Nord Piano 2 HP to other equipment such as sound
modules or computers.
USB Connection
The USB connection is used for the Nord Piano 2 HP to communicate
with a personal computer in order to update the OS or to add or re-
place any of the piano sounds. The computer can run the Nord Sound
Manager application, or be used to transfer the operating system if the
unit needs to be updated.
The Nord Piano 2 HP can also transmit and receive MIDI data via the
USB interface, read more about this in the MIDI chapter.
MComputers running Microsoft Windows operating systems need a
driver for the USB connection to work. The installer for the driver
can be found on the enclosed Nord DVD, or at the
www.nordkeyboards.com website.
4 Connections
PEDAL
SUSTAIN
PEDAL
VOLUME
8 | Nord PiaNo 2 HP User MaNUal os v1.X

Pedal Connections
Sustain Pedal Input
The Nord Piano 2 HP has one input for a sustain pedal. This input
can be used with a standard momentary pedal like the included Nord
pedal, or a Roland DP-6, Yamaha FC-4 etc.
Connect the ¼" connector from the Nord Pedal to the Sustain Pedal
connector on the Nord Piano 2 HP.
There are settings on the panel to exclude piano or samples from
sustaining.
Volume Pedal Input
Connect an Expression pedal to this input in
order to be able to control the volume of the
Piano, the Sample Synth or both.
When connecting an expression-type pedal to
the Volume Pedal input, you should use a cable
with a stereo connector (Tip-Ring-Sleeve), the
pedal must have a stereo output jack.
Pedals from various manufacturers have differ-
ent characteristics. To simplify setup, the most
common pedal models (Roland, Yamaha, Korg
and Fatar) are pre-configured in the Nord Piano
2 HP, you simply select the type of pedal in the
Pedal menu. Read more about this on page
20.
Nord Triple Pedal
The Nord Piano 2 HP can also be used with the Nord Triple Pedal (not
included, optional accessory). This pedal has the functionality of three
pedals in one unit and can be used to take advantage of the pedal
noise features and half damping.
Sustain
The right pedal on the Triple Pedal is the sustain pedal. If you operate
this, all the notes that you play will sustain until the pedal is released
again. The Triple Pedal can also introduce the dynamic pedal noise
functionality, and it can be used with half pedaling techniques by press-
ing it down for parts of its travel on certain pianos.
Soft
The left pedal is the soft pedal, also known as the Una Corda. When
you press this pedal, all the notes you play will be slightly lower in vol-
ume and also have a slightly more subdued tone quality.
Sostenuto
The middle pedal is the Sostenuto. By using this pedal, you can sustain
selected notes, while other notes remain unaffected. Only the notes that
are held down when the pedal is operated will sustain. Other notes that
you play while keeping the pedal down will sound as if no pedal was
operated at all.
Additional features
The middle pedal can be set in the Pedal menu to get additional func-
tionalities. It can be used to sustain only the Sample Synth, or it can be
used to sustain the Synth and at the same time remove the keyboard
from controlling the Synth. This makes it possible to sustain a Synth
chord with the middle pedal, while continue to play a piano sound and
have separate sustain control over that piano, with the "normal" sustain
pedal. The additional functionality is set in the Pedal Menu, read more
on how to do this on page 20.
Music Stand
The rear panel on the Nord Piano 2 HP has two brackets where the
Music Stand (optional accessory) can be mounted.
PEDAL
PEDAL
SUSTAIN
VOLUME
VOLUME
PEDAL
SUSTAIN
PEDAL
CHaPter 4 CoNNeCtioNs | 9

About the programs
Complete settings of every function on the panel are stored in the
Program memory of the Nord Piano 2 HP. This memory area has 240
locations that are organized in 2 Banks (A & B), each Bank with 24
Pages, with 5 programs in each page. Every program can be edited
and replaced as you wish. A complete set of the factory programs are
available on the Nord DVD and on the Nordkeyboards.com web site.
Select a program
1 Programs are selected by pressing the five Program buttons,
located below the display.
2 Press the Up or Down buttons repeatedly, located to the left of the
display, to select the desired Page number. When you’ve changed
the Page, a program will be active immediately.
The Factory programs are organized in the following fashion, which al-
low you to select a program number and then find similar programs by
changing the page with the Up/Down buttons:
Program Description
1 Clean, un-processed pianos.
2Pianos with EQ.
3 Split programs with pianos to the right.
4, 5 Layers and pianos with more effects.
Press and hold the Up or Down buttons to continuously scroll
through the Pages.
3 Hold Shift and press Up or Down to select Bank A or Bank B.
Edit a program
Editing a program is as easy grabbing a knob or pressing a button to
change an existing setting; go ahead and give it a quick try.
1 Use the buttons to get bank A, Page 01, Program 1 for this
exercise. The display looks something like this:
The controls for the Piano instrument are located immediately to the
right of the Program/Display area on the panel. Notice that the Grand
type is the current type in this program.
Select a new piano sound
2 Press repeatedly on the Piano Type selector to browse the 6
types. Each piano type can hold several models.
3 Press repeatedly on the Piano
Model Up or Down buttons, located
beneath the Model LED and play
on the keys to listen to the different
sounds.
This will cycle through the models that
are available in the selected piano type.
Hold Shift and press the Model
buttons to transpose the piano one
octave up or down.
Changing any parameter on the Nord Piano 2 HP panel will immedi-
ately cause an asterisk to appear next to the current program number
in the display.
This is provided to you as an indication that the program has been
edited/changed, but not yet saved into memory. If you select a new
program without performing a Store operation, your edits will be lost
and that program will have its original settings the next time you select
it.
A : 01 : 1
Grand Imperial
A : 01 : 1*
Grand Imperial
5 Getting Started
Let’s take a few minutes to get familiar with the Nord Piano 2 HP. The user interface is designed to be as intuitive as possible, and to perform as well
as you do in a live situation. We hope that you soon will feel confident in using it, and in this short chapter, we will go through most of the functions.
10 | Nord PiaNo 2 HP User MaNUal os v1.X

The two banks (A & B) are duplicated when the Nord Piano 2 HP
leaves the factory. This allows you to start storing sounds at once
in one of these banks without having to worry that you overwrite
something.
Memory Protection
If you are happy with an edit that you have made, you should probably
Store the program. Before you can do this, we need to turn off the
Memory Protect function.
1 Press Shift + Program 1/System to enter the System Menu.
2 Use the Up/Down buttons to select the Memory Protect Mode –
this is the very first option in the System menu.
3 Set the memory protection to Off by pressing and holding Shift
and then press the Down button.
Exit the System menu by pressing the Shift button again.
MThe setting of the memory protection will be remembered even if
the Nord Piano 2 HP is turned off.
Storing a program
Let’s store a program.
1 Press the Store button once.
The Store LED starts flashing and the display will give you a visual
indication of the location.
2 If you want to replace the previous program with your new set-
tings, press the Store button again.
3 If you want to store your new settings in a different location, use
the Page and Program buttons to select a new location where you
want to store the program.
4 If you want to save the Program in the other Bank, press the Up/
Down buttons repeatedly until you reach the next (or previous)
Bank.
The name of the new destination will be shown in the display. You
can also check the sound/settings of that program itself by playing
on the Nord Piano 2 HP. This prevents you from overwriting a
program that you want to keep.
5 Press the Store button a second time to confirm your intention.
The edited program has now replaced the previous one in the location
you specified.
MTo cancel the storing procedure, press any button except for the
Bank, Live Mode or Program buttons.
MWith Memory Protect set to Off, a double tap on the Store button
will store a Program in its original location.
Live Mode
The Live Mode can be described as 5 “live program memories”. If you
press the Live Mode button to turn Live Mode on, all changes to the
panel settings you make will be continuously stored. If you switch the
power off, or select another program, the settings you made are still
stored in the 5 Live Mode programs, so when you power up next time
(or return to that particular Live Mode program) all settings will be
exactly as they were when you left them.
If the Live Mode is selected and you decide you wish to store the
settings permanently as a program instead, you can do so using the
standard methods (see above). You can also store programs into any-
one of the five Live Mode memory locations, in which case the program
settings will replace that current Live Mode memory settings.
Selecting a Sample Synth sound
1 Press the Sample Synth On button. If you are still using the
A:01:01 sound, this will add strings in a layer with the Grand
piano. The name of the sample will be shown in the display.
2 Press repeatedly on the Up
or Down buttons in the Synth
section to listen to the various
samples that are in the Nord
Piano 2 HP’s factory sounds.
3 You can adjust the level of the
Sample Synth with the Level
knob.
CHaPter 5 GettiNG started | 11

Split the keyboard
1 Locate a bass sample with the sample buttons, they are among
the last samples in the sample memory.
2 Press the Kbd Split button to activate a keyboard split.
This allows you to play one instrument to the left of the split and
the other instrument to the right.
3 To switch the Piano from the left to the right hand side, press the
Kbd Split button again. The LED will indicate the split arrange-
ment.
The split can be set by you and stored for every individual Program,
read more on how to do this on page 15.
Transpose
Press and hold the Transpose button and use the Up and Down but-
tons to transpose the Nord Piano 2 HP in semitone steps. The range is
+/- 6 semitones.
MThe pianos have a finite note range, read more about this on page
15.
Adding effects
1 Select the first program again - A:01:1.
2 Turn on Effect 2 (the On LED should light up) by pressing once on
the Source button.
3 Press repeatedly on the Effect 2 selector.
The effect options are indi-
cated with the selector LEDs and
changes in a cyclical, fashion each
time the selector is pressed.
Some of the effects have three
options that indicate the depth of
the effect. Flang1 is the shal-
lowest version, Flang 2 is a more
pronounced effect and when both
Flang 1 and Flang 2 LEDs are
lit, you have selected the most
dramatic flanger effect.
If you double-tap on the Source button, the instrument that is
routed to the effect will change.
4 Turn the Effect Rate knob.
This changes the rate of the active effect.
5 Hold Shift and press repeatedly on the effect selector.
This allows you to reverse through the effect selections.
6 Turn off the effect.
If you continue to press on the effect selector after the effect is
turned off, the effect setting will change even though the effect is
not active.
This method can be used to select a certain effect while playing,
without affecting the sound until you actually turn on the effect.
Use the delay
1 Press the Delay Source button to activate the delay and make
sure it is routed to the instrument that you are playing on the
keyboard.
Hold Shift and press Source again to route the other instrument to
the delay.
2 Adjust the mix of the dry and the wet signal by turning the Delay
knob.
3 Tap repeatedly on the
Tempo/Tap Set button to
set the delay time in sync
with your tapping.
4 Press and hold the Tempo
button, and adjust the
delay time with the Up/
Down buttons to the left
of the display. The display
will show the delay time in
milliseconds.
A : 01 : 1
Grand Imperial
A : 01 : 1
Grand Imperial
12 | Nord PiaNo 2 HP User MaNUal os v1.X

Acoustics
1 Turn off the Sample Synth and select a Grand piano by pressing
the Piano Type selector.
2 Press the Acoustics button to turn on the String Resonance func-
tionality if it is not active already.
3 Play and hold a chord with your left hand, and while the sound
decays, play some staccato notes with your right hand. You can
hear that some of the new notes excites the held notes, making
them “ring” in a sympathetic resonance.
String Resonance is the acoustic phenomenon that occurs when
strings, resonate at their fundamental or harmonic frequencies when
other strings are played.
When this functionality is turned on, all notes you play will affect each
other to reproduce the wonderful acoustics that occurs inside an
acoustic grand or upright piano.
Kbd Touch settings
The Nord Piano 2 HP is equipped with three additional Kbd Touch
settings.
Some of the piano instruments in the Nord Piano 2 HP have very wide
dynamic ranges by nature and we wanted to capture this as accurately
as possible.
However, If you want the piano sounds to respond differently to key-
board velocity, you can set this with the Kbd Touch feature.
When the LEDs are off, the default setting is active. Should you wish to
reach the maximum velocity with a little less effort, press the Kbd Touch
button so that the “1” LED is lit. If you press the button again, the “2”
LED will be lit, making it even easier to reach the maximum velocity.
The third setting is quite the opposite; it will require more effort to
reach the maximum velocity. This may suit those of you with a harder
playing style. This setting can also be useful if you need more expres-
siveness when playing with softer velocities.
This finishes our little tour; we hope that you now have the
initial knowledge on how to operate most of the functions on
the panel. The following chapter contains the reference section,
with the chapter on the Nord Sound Manager application after
that, on page 23.
CHaPter 5 GettiNG started | 13

14 | Nord PiaNo 2 HP User MaNUal os v1.X
Master level
This control sets the overall output level of
the Nord Piano 2 HP, at the L/R and the
headphone outputs.
MThis is not a programmable control.
MIDI Indicator
The MIDI indicator below the Master Level is a LED that flashes when
MIDI data is received. Short flashes indicate any incoming MIDI, longer
flashes indicates accepted MIDI data (on the correct MIDI channel etc.).
Program section
This is the section where you select the banks and programs, where
the Store functions are activated and where you enter the System,
MIDI, Sound and Pedal menus to change these settings.
Up/Down buttons
The Up/Down buttons to the left of the display have several functions in
the Nord Piano 2 HP. Press repeatedly to select one of the 24 Pages in
each Bank; the Bank, Page and Program number and the name of the
program will be presented in the display.
Bank selection
Hold Shift and press Up or Down to select Bank A or Bank B.
Menus
If you have entered any of the System, MIDI, Sound or Pedal menu,
these buttons are first used to select a menu function, and then to-
gether with the Shift button to change the value of a selected function.
Read more about the menus on page 19.
Display
The LCD will show the active program location and the name of the
program. If you edit a program, an asterisk will appear next to the
program number, at the upper row of the display.
If you have entered any of the menus, the setting for each menu item is
shown in the LCD.
The LCD will also display values and settings when you change any of
the functions on the panel. Press and hold Shift while turning a knob to
display the value without changing it.
Store
The red Store button is used when you want
to store the settings that you have made, in
Programs.
1 Press the Store button once and the Store
LED will start to flash.
The display will ask you for a location where to store your new
program - the first option is at the original location.
2 Select the desired location with the Up/Down and the Program
1-5 buttons. Skip this step if you want to overwrite the original.
When you select a new location, the name of the program cur-
rently in the destination will be displayed and the settings will also
become active on the Nord Piano 2 HP. This allows you to verify
that you will not overwrite something important.
3 Press Store again to confirm your intentions and to store the cur-
rent settings to the selected location.
If you change your mind, press any button except the Up/Down or
the Program buttons on the Nord Piano 2 HP panel to abort the
store procedure.
Store As...
Use the Store As feature when you want to store a program with
another name.
1 Press Shift + Store.
The display will show “Set Name” and the current name of the
program on the lower row.
2 Use the Up/Down buttons to select the position, press and hold
Shift and use the Up/Down buttons to select the character.
The display can show 11 characters of a program name.
3 Confirm your intentions by pressing Store once more.
This procedure may be aborted by pressing the Shift button.
MIn order to be able to store settings the Memory Protection must
be turned off. Read more about this on page 11.
6 Nord Piano 2 HP Reference

CHaPter 6 Nord PiaNo 2 HP refereNCe | 15
Programs 1 ~ 5
Use the Program buttons to select the individual programs in a bank or
in the Live Mode.
By pressing Shift and program buttons 1 to 4, you’ll enter the menus.
Read more about the menu settings on page 19.
Shift
A few buttons on the Nord Piano 2 HP panel
have a second function, which is indicated by
a descriptive text printed below the button. You
access these additional functions by holding
Shift while pressing a button.
Live Mode
If you press the Live Mode button, all changes to the panel settings you
make will be continuously saved in the currently active “Live Program”.
If you switch the power off, or select another program, the settings are
still stored in the Live memory, so when you power up next time (or
return to the Live memory) all settings will be exactly as you left them.
The Live Mode has 5 programs, which are selected with the Program
buttons.
If the Live memory is selected and you decide you wish to store
the settings permanently as a program you can do so using the
standard Store methods (see above). You can also store pro-
grams into the Live memory location, in which case the program
settings will replace the current Live memory settings.
Panic
If notes gets stuck and sound indefinitely during a MIDI- or live perfor-
mance, you can press Shift together with the Live Mode button in order
to force every note to stop sounding and to reset any performance
controllers.
Transpose
The Transpose functionality makes it possible to
alter the pitch of the Nord Piano 2 HP in semi-tone
steps. This can be very useful if you want to “play”
in one key, and have the Nord Piano 2 HP “sound”
in another. A setting that you make with this function
will be stored within a program.
1 Press and hold the Transpose button.
2 Set the desired transposition by pressing the Up or Down buttons.
The display will indicate the transposition value. The Active LED
will be lit.
3 Press the Transpose button again to turn it off. The transposition
setting will be retained even when the function is turned off.
MThis transposition will also affect the MIDI output from the Nord
Piano 2 HP.
MIn the System Menu, there is a global transpose that will affect all
programs and all sounds in the Nord Piano 2 HP, but not the MIDI
output. Read more about this on page 19.
EThe piano and sampled sounds have a finite range. It is there-
fore possible to set the Transpose and/or the Global Transpose
to values that will make keys at the top of the Nord Piano 2 HP
keyboard silent.
Transpose Clear
Hold Shift and press the Transpose button to clear a transpose setting.
Kbd Touch
By activating the Kbd Touch feature, you can
select different response curves. These makes the
Nord Piano 2 HP react differently to the velocity
you use on the keyboard .
When all LEDs are off, the default response curve
is active. A Kbd Touch setting of 1 makes it a bit
easier to reach the maximum, a setting of 2 is
even easier. The third setting is the opposite, try
this if your playing style is harder or when you need more control when
playing with softer velocities.
Mono Output
If you press Shift + Kbd Touch, the stereo sound will be played back in
mono instead. Connect the L or the R output on the Nord Piano 2 HP
to an input on the sound system you wish to use.
MThis is a global setting and will affect the entire Nord Piano 2 HP.
The Mono functionality will be reset if the Nord Piano 2 HP is
turned off.
Kbd Split
The keyboard on the Nord Piano 2 HP can be split in two areas; this is
done by pressing the Kbd Split button.
Synt/Pno
This indicates a split keyboard, with the synth to the left of the split and
the piano to the right.
Pno/Synt
This indicates a split keyboard, with the synth to the right of the split
and the piano to the left.
For a layered performance, just activate both instruments with the
respective On/Off buttons.
Set Split
Hold Shift and the Kbd Split button to see the current split and press a
key on the keyboard to set a new split point.
The key you press will be the first key of the upper area.
Use keyboard
Split point: C3
Keyboard Split
Position: C4

16 | Nord PiaNo 2 HP User MaNUal os v1.X
Sustped Off
Use this function to disable the sustain pedal functionality off for the
Synth or Piano section.
Piano
The Pianos in the Nord Piano 2 HP
is organized into six types; each
type can contain several instrument
models. You can freely add new piano
instruments via USB using the Nord
Sound Manager utility (read about the
Manager on page 23).
Right out of the box, Nord Piano 2 HP
features a fine collection of carefully
selected acoustic and electric pianos
and harpsichords. A lot of effort was
made to ensure that the response and
sound of the instruments matches every nuance of the source instru-
ment. Each piano have been multi-sampled in a vast amount of velocity
levels. That’s one reason why they all sound and feel so authentic.
Level
Use the Level knob to set the volume of the selected piano sound. The
setting of this function is stored in the Programs.
Acoustics
The Acoustics features allow you to add
certain acoustic and mechanical components
to the sounds.
String Resonance
String Resonance is the acoustic phenomenon
that occurs when strings, or parts of strings, resonate at their funda-
mental or harmonic frequencies when other strings are played.
When this functionality is turned on, all notes you play will affect each
other to reproduce the wonderful acoustics that occurs inside an
acoustic grand or upright piano.
You will also hear all the strings resonate if you press the sustain pedal
and play some notes.
Press the String Resonance button repeatedly to toggle the String
Resonance on or off. The String Resonance LED will be lit when the
function is active.
MIf a piano is selected that isn’t compatible with the Strings Reso-
nance feature, this function will be disabled. This applies to for ex-
ample the small (Sml) versions of the grand pianos and uprights.
Long Release
Activating Long Release will add a slightly longer release to an acoustic
or electric piano. This is equivalent to what happens when you adjust
the damper tension in an acoustic or an electromechanical instrument.
MIf a piano is selected that isn’t compatible with the Long Release
feature, this function will be disabled. Long Release compatible
pianos are of version 5.3 or later.
Pedal Noise
The third Acoustics feature is the Pedal Noise. By activating this, you
will recreate the mechanical noise that happens when you operate the
sustain pedal on an acoustic or electric piano. This feature can only be
heard if the Nord Triple Pedal is attached (not included, sold separate-
ly). The Nord Triple Pedal is dynamic, you can control the level of the
noise by the force you use when you operate the sustain pedal.
Hold Shift, while pressing on the String Resonance button to turn this
feature on or off.
MIf a piano is selected that isn’t compatible with the Pedal Noise
feature, this function will be disabled.
Piano Type
Use the Piano Type selector to choose which piano sound you want to
use. Each type may consist of several models; press repeatedly on the
model selector to cycle through the models within a selected type.
Type Description
Grand Acoustic & Electric grand pianos
Upright Upright pianos
E Piano 1 Electric Pianos, tine based
E Piano 2 Electric Pianos, reed based
Clavinet Clavinets
Harpsi Harpsichords
MThe type of a piano has been set by the resident Red Panda at the
Nord HQ. You cannot move a piano from one type to another.
Piano Model
Each Piano Type can contain several Piano Models, depending on the
content of the memory in the Nord Piano 2 HP.
1 Press repeatedly on the Model buttons to select the desired
sound within the active Type.
The number of the model will be indicated in the LED display, and
the name of the model will be shown in the display’s second row.
2 Press Shift and the Type button to see the name and version
number of the active piano in the display.
MA Flashing hyphen in the Piano Model section indicates that the
piano sound that the current Program tried to use is not available
in the Flash memory. Select another program, another piano or
download the missing piano to the Nord Piano 2 HP.
EIn the unlikely event that the data of a sound in the Flash memory
is damaged, this will be indicated with a message in the LCD
when the Nord Piano 2 HP is powered up. The Type and Model
LEDs will flash for this particular sound if a program that uses it is
selected. Connect the unit to the Sound Manager to delete and
then reload the piano.
Clavinet Models
On an original Clavinet D6 you can select different pick-up combina-
tions by pressing a number of rocker switches. This functionality is very
faithfully reproduced in the Nord Piano 2 HP, you get all the original
Clavinet D6 pickup selections by pressing the Model button when the
Clavinet is the selected Type.

CHaPter 6 Nord PiaNo 2 HP refereNCe | 17
Clavinet Pick-up Type Description
Clav Model A: Only the “neck” pick-up; a warmer, less bright sound.
Clav Model B: Only the “bridge” pick-up; a bright sound.
Clav Model C: Both pick-ups on and in phase; a very full sound.
Clav Model D: Both pick-ups 180 degrees out of phase; the
fundamental is almost cancelled out and the sound becomes thin.
Piano Octave Shift
The Model buttons can be used together with the Shift button to trans-
pose the piano sound in octave steps.
On
Press the On button to turn the Piano on or off.
Info
Hold Shift and press the On button to see the name of the current
piano in the LCD.
Sample Synth
The Sample Synth allows you to use
samples from the extensive Nord Sam-
ple Library in the Nord Piano 2 HP. The
Piano 2 HP is delivered with a selection
of samples. Additional samples can be
found on the DVD that accompanies
the unit or from the
www.nordkeyboards.com website.
Every sample in the unit can be re-
placed, this is done by using the Nord
Sound Manager.
Level
Use the Level knob to set the volume of the selected synth sample
sound.
Attack
When you strike a key, the sample synth may or may not begin to
sound at once. The actual volume of the sound can be made to be
gradually faded in with the Attack function on the Nord Piano 2 HP.
Turning the Attack knob clockwise allows you to increase the attack
time, which makes the volume of the sound to be gradually increased.
When the Attack knob is turned fully counter-clockwise, the sound will
played back without any additional attack. When turned fully clockwise,
the attack time will be 45 seconds.
MSome samples have a slow attack in the actual waveform, this
cannot be shortened by adjusting this parameter.
Release
When you release a key, the sound of the sample synth may or may
not be silenced at once. The actual sound can be made to be gradually
faded out with the Release function on the Nord Piano 2 HP. Increas-
ing the release time by turning the Release knob clockwise makes the
sound longer, it will gradually decay after you have released the keys.
When the Release knob is turned fully counter-clockwise, the sound
will play back without any additional release. When turned fully clock-
wise, the release time will be 45 seconds.
On
Press the On button to turn the Sample Synth on or off.
Info
Hold Shift and press the On button to see the name of the current
sample in the LCD.
Sample
Press repeatedly on the Sample up/down buttons to select a sample.
The number will be shown in the LED and the name of the selected
sample will be shown in the display.
Sample Octave Shift
The Sample selector buttons can be used together with the Shift but-
ton to transpose the Sample Synth sound in octave steps.
Effects
The Effects section of Nord Piano 2 HP can be used to process the
pianos and the samples. It is programmable and you can configure
your effects separately for each and every program. Some of the ef-
fects are mono in/Mono out and some are stereo in/stereo out. For
each individual effect the channel configuration is stated in the related
text.
The Source buttons turn the effect on or off and is used to select the
instrument that will be affected by that particular effect. A double-tap
on a source button will select the next source. The Piano or Synth LED
will be lit when the Effect is active.
The Effect Selectors is used to cycle through the various effects and/or
effect depths.
Press and hold Shift and press an Effect selector to cycle through
the effects in a counter clockwise fashion.
You can use the Effect Selector to select an effect without it be-
ing turned on, in order to prepare a setting in advance during a
performance.
The Rate knobs changes the rate of the effect.
MA numerical value of the rate will be shown in the display.

18 | Nord PiaNo 2 HP User MaNUal os v1.X
Effect 1
Effect 1 offers three different types of effects:
Tremolo, Auto-Panning, and 2 types of Wah-Wah.
The tremolo and the auto-panning have 3 selectable depths. Pan1 is
less dramatic than Pan2, and Pan 3 (both Pan LEDs lit) is the most
dramatic.
Tremolo is a volume modulation that continuously varies the signal vol-
ume. Tremolo is a commonly used effect, especially for electric pianos.
The Tremolo effect is stereo in/stereo out.
Rate range: 0 - 10.5 Hz.
The Pan effect is an automatic panning modulation that smoothly
moves the signal between the left and right outputs in the stereo pan-
orama. The Pan effect is stereo in/stereo out.
Rate range: 0 - 10.5 Hz.
The A-Wa is a wah-effect where a lowpass filter sweeps across the
frequency range, and is controlled by the volume of the signal. This
means that you can use the velocity on the keyboard to control the
amount of “Quack!” in the sound. The Rate knob sets the frequency
range of the sweep.
A-Wa1 has a nice, mellow sound. A-Wa2 reacts a bit faster and gives
you a brighter, more distinct character.
The Wah effects are stereo in/stereo out.
Effect 2
Effect 2 offers three types of modulation effects:
Phaser, Flanger and Chorus.
Each of these effects has 3 selectable depths in the same fashion as
the tremolo and pan in the Effects 1 section. The Rate knob control the
rate of the effect.
The Flanger produces a characteristic comb filter effect. The Flanger
effect is stereo in/stereo out.
Rate range: 0 - 10.5 Hz.
The Phaser effect produces a characteristic “sweep” effect commonly
used with electric piano sounds. The phaser effect is stereo in/stereo
out.
Rate range: 0 - 10.5 Hz.
The Chorus effect simulates having several slightly de-tuned signals.
The Chorus is stereo in/stereo out.
Rate range: 0 - 2.7 Hz.
Delay
The delay allows you to add echo effects. The delay time can be set
between 20 and 750 milliseconds. The delay effect is stereo in/stereo
out.
Dry/Wet
The Dry/Wel knob sets the balance between the dry, unprocessed
signal and the wet, processed signal.
Feedback
The Feedback is the number of repeats. There are four available set-
tings, indicated by the LEDs. Press the Feedback button repeatedly to
select a setting.
Tempo Tap/Set
Tap the Tempo button to set a delay time. Pressing and holding the
Tap/Set button allows you to set a delay time using the Up/Down but-
tons to the left of the Display.
If the Delay Mode in the Sound Menu is set to “Analog”, the pitch
of the repeats will change if you change the tempo with the Up/
Down buttons. If you set the tempo by tapping, this pitch change
will not occur.
Equalizer
The Nord Piano 2 HP has a 3-band EQ with treble, bass and a sweep-
able midrange (4 kHz, 100 Hz and 200 Hz ~ 8 kHz). The frequencies
can be boosted or attenuated with +/- 15 dB. The EQ is stereo in,
stereo out.
Amp/Comp
This section contains the speaker/amp emulations and a compressor.
Small, JC and Twin emulates three different kinds of amplifier and
speaker cabinets. The Dist is a tube distortion effect without any
speaker emulation. The amount of drive is controlled by the Speaker/
Comp knob.
The Small, JC and Twin effects are mono in/mono out, the Dist effect is
stereo in/stereo out.
Comp is a compressor that will even out the dynamics of what you
play, making low level sounds louder and high level sounds lower in
volume. This produces a tight, punchy sound and makes the overall
level easier to control in a live mix situation. The compressor is stereo
in/stereo out.
When Comp is active, the Drive/Comp knob controls the amount of
compression applied.
Reverb
The Reverb section simulates the natural sound reflections in various
acoustic environments. You can choose between six reverb types with
various lengths and densities, indicated by the LEDs in the selector.
The Stage “1” is a softer version, the Stage “2” is a brighter version,
etc.. The reverb effect is stereo in/stereo out.
The Dry/Wet knob sets the balance between the unprocessed and the
processed signal.

System Menu
Memory Protect – On, Off
This is set to “On” when the Nord Piano 2 HP leaves the factory, mean-
ing that you (or a “cousin”) cannot store any changes to the programs.
Set this to Off when you wish to store your own programs. The System,
MIDI or Sound menu settings and the Live memory are not protected by
this setting.
Range: On (default), Off
Fine Tune
This allows you to fine tune the pitch of the Nord Piano 2 HP.
Range: +/- 50 cent (default = 0).
Global Transpose
This allows you to transpose the entire Nord Piano 2 HP in semitone
steps. Any setting you make here will be added to the panel transpose
that may be saved with the programs.
Range: +/- 6 semitones (default = 0).
MIDI Menu
MIDI Channel
This sets the MIDI Channel that the Nord Piano 2 HP transmits and
responds to. Use the USB channel settings if you want to transmit and
receive keyboard and panel MIDI messages via the USB interface.
Range: 1-16, USB1 - USB16, Off (default = USB 1)
Local Control
This allows you to set if the Nord Piano 2 HP keyboard and front
panel controls should control internal Programs or only send note and
controller messages via MIDI. Local On is the normal “mode”. In Local
Off mode, the front panel and keyboard action are transmitted via MIDI
only and does not control the internal sounds or functions directly.
Range: On (default), Off
MLocal defaults back to Local On every time the Nord Piano 2 HP is
powered on.
Control Change (CC) Mode
This setting specifies how the front panel’s knobs and buttons are han-
dled in the MIDI communication with MIDI Control Change messages.
You can select if the panel controls should either send or receive, or
both or if Control Change messages should be ignored.
Range: Send/Recv (default), Receive, Send, Off
Program Change Mode
Specifies how the Nord Piano 2 HP should handle MIDI Program
Change messages.
Range: Send/Recv (default), Receive, Send, Off
Send CC
You can send a package of all the active Program’s parameters as
MIDI Control Change messages. Press the Store button to perform the
transmission.
7 The Menus
Any settings that you change in the System, MIDI, Sound or Pedal menus will take immediate effect on a global basis, and the settings will be stored
until you change them the next time. Enter the menus by pressing and holding Shift and the System, MIDI, Sound or Pedal button (program but-
tons 1 to 4). Select a function with the Up/Down buttons and change the setting by pressing and holding Shift and the Up or Down button. Exit the
menus by pressing a second time on the program buttons or on the Shift/Exit button.
MThere is one exception, one menu setting that doesn’t get automatically stored when you power off the Piano 2 HP, and this is the MIDI Local
On/Off setting. This always reverts to Local On every time the Nord Piano 2 HP is powered up.
CHaPter 7 tHe MeNUs | 19

Dump Program One, All
This allows you to perform a MIDI Sys Ex dump of the currently
selected Program or of all the programs in the Nord Piano 2 HP. Press
the Store button to perform the transmission.
In the MIDI chapter on page 33 is a description on how the Nord Piano 2
HP receives a Sys Ex dump.
Sound Menu
Piano Pedal Noise level
Sets the level of the Pedal Noise that can be turned on for selected
pianos.
Range: +/- 6 dB (0 dB default)
Piano String Res Level
Sets the level of the String Resonance feature that can be turned on for
selected acoustic pianos.
Range: +/- 6 dB (0 dB default)
FX Delay Mode
This sets if the delay should change the pitch on sounding repeats in
the fashion of an analog delay, if the Tempo is adjusted with the Up/
Down buttons. When set to Normal, the pitch does not change if the
Rate/Tempo is changed with the buttons.
Range: Analog (Default), Normal.
Pedal Menu
Piano Pedal
Select the functionality of the sustain pedal you have attached to the
Nord Piano 2 HP. The default Auto setting tries to determine what type
of pedal you have connected.
If you have a switch pedal type of another brand (Roland DP-2, DP-6,
Yamaha FC-4, M-Audio etc.), select the Sw.Open or Sw.Close option,
depending on the polarity of the pedal.
Type: Auto (default), Triple, Closed, Open
Volume Pedal Type
Select the type of the pedal you have attached to the Volume Pedal
input on the Nord Piano 2 HP. The range of a connected pedal will be
shown in the display if you operate the pedal. This can help you match
the performance of a pedal that isn’t directly available in this menu.
Type: Roland EV5 (default), Roland EV7, Yamaha FC7, Korg, Fatar
SL
Volume Pedal Gain
This setting allows you to add some gain to the output of the pedal.
This can be used if an attached pedal does not reach the maximum
level or setting.
Range: 1 - 10
Volume Pedal Func
Select the destination of the pedal you have attached to the Volume
Pedal input on the Nord Piano 2 HP.
You can use a pedal to control the volume of the entire instrument or
just the Sample Synth, to be able to fade in for example strings or pads
on top of the pianos.
Func: Volume (default), Syn Volume
Sostenuto Pedal Func
If you have the extra accessory, the Nord Triple Pedal, the middle pedal
of the three is the sostenuto pedal. This pedal can be set to three dif-
ferent functionalities, Sostenuto, Syn Sustain and SynSustGate.
Sostenuto will only sustain those keys that were held down when this
pedal was pressed down.
The Syn Sustain mode allows you to have separate control of the
sustain for the Sample Synth and the Pianos.
The SynSustGate mode will allow the middle pedal to sustain the synth
and also remove any keyboard information, making it possible to latch
notes played by the Sample Synth, while still being able to continue to
perform with the Piano (and the normal sustain pedal).
EIf a switch-type pedal is used instead of a Nord Triple Pedal, the
Sample Synth sustain functionality will revert to the sustain pedal.
Func: Sostenuto (default), Syn Sustain, SynSustGate
20 | Nord PiaNo 2 HP User MaNUal os v1.X
Table of contents
Other Clavia Musical Instrument manuals

Clavia
Clavia Nord C1 User manual

Clavia
Clavia NORD PIANO 3 User manual

Clavia
Clavia Nord C2 User manual

Clavia
Clavia Nord Piano 2 HA88 User manual

Clavia
Clavia Nord Electro 4HP User manual

Clavia
Clavia nord piano 5 User manual

Clavia
Clavia Nord Electro 5D 61 User manual

Clavia
Clavia NordStage2 EX 88 User manual

Clavia
Clavia Nord C1 User manual

Clavia
Clavia Nord Piano 88 User manual