Clavia Nord Electro 5D 61 User manual

NORD ELECTRO 5 USER MANUAL OS V1.X | 1
User Manual
English
Nord Electro 5D 61
Nord Electro 5D 73
Nord Electro 5HP 73
OS Version: 1.0x
Edition: C
Part No. 50434 Copyright Clavia DMI AB
Edition: C

2 | NORD ELECTRO 5 USER MANUAL OS V1.X
CAUTION - ATTENTION
RISK OF ELECTRIC SHOCK
DO NOT OPEN
RISQUE DE SHOCK ELECTRIQUE
NE PAS OUVRIR
CAUTION: TO REDUCE THE RISK OF ELECTRIC SHOCK
DO NOT REMOVE COVER (OR BACK).
NO USER SERVICEABLE PARTS INSIDE.
REFER SERVICING TO QUALIFIED PERSONNEL.
ATTENTION:POUR EVITER LES RISQUES DE CHOC ELECTRIQUE, NE
PAS ENLEVER LE COUVERCLE.
AUCUN ENTRETIEN DE PIECES INTERIEURES PAR L´USAGER.
CONFIER L´ENTRETIEN AU PERSONNEL QUALIFE.
AVIS: POUR EVITER LES RISQUES D´INCIDENTE OU D´ELECTROCUTION,
N´EXPOSEZ PAS CET ARTICLE A LA PLUIE OU L´HUMIDITET.
1) Read these instructions.
2) Keep these instructions.
3) Heed all warnings.
4) Follow all instructions.
5) Do not use this apparatus near water.
6) Clean only with dry cloth.
7) Do not block any ventilation openings. Install in accordance
with the manufacturer’s instructions.
8) Do not install near any heat sources such as radiators, heat
registers, stoves, or other apparatus (including ampliers) that
produce heat.
9) Do not defeat the safety purpose of the polarized or
grounding-type plug. A polarized plug has two blades with one
wider than the other. A grounding type plug has two blades
and a third grounding prong. The wide blade or the third prong
are provided for your safety. If the provided plug does not t
into your outlet, consult an electrician for replacement of the
obsolete outlet.
10) Protect the power cord from being walked on or pinched
particularly at plugs, convenience receptacles, and the point
where they exit from the apparatus.
11) Only use attachments/accessories specied by the manu-
facturer.
12) Use only with the cart, stand,
tripod, bracket, or table specied by the
manufacturer, or sold with the apparatus.
When a cart is used, use caution when
moving the cart/apparatus combination to
avoid injury from tip-over.
13) Unplug this apparatus during lightning
storms or when unused for long periods of time.
14) Refer all servicing to qualied service personnel. Servicing
is required when the apparatus has been damaged in any way,
such as power-supply cord or plug is damaged, liquid has been
spilled or objects have fallen into the apparatus, the apparatus
has been exposed to rain or moisture, does not operate nor-
mally, or has been dropped.
The lightning ash with the arrowhead symbol within
an equilateral triangle is intended to alert the user to the
presence of uninsulated voltage within the products en-
closure that may be of sufcient magnitude to constitute
a risk of electric shock to persons.
Le symbole éclair avec le point de èche à l´intérieur d´un triangle
équilatéral est utilisé pour alerter l´utilisateur de la presence à
l´intérieur du coffret de ”voltage dangereux” non isolé d´ampleur
sufsante pour constituer un risque d`éléctrocution.
The exclamation mark within an equilateral triangle is
intended to alert the user to the presence of important
operating and maintenance (servicing) instructions in the
literature accompanying the product.
Le point d´exclamation à l´intérieur d´un triangle équilatéral est
employé pour alerter l´utilisateur de la présence d´instructions
importantes pour le fonctionnement et l´entretien (service) dans le
livret d´instructions accompagnant l´appareil.
Instructions pertaining to a risk of re, electric shock or injury to persons.
IMPORTANT SAFETY INSTRUCTIONS
SAVE THESE INSTRUCTIONS
Trademarks: The Nord logo is a trademark of Clavia DMI AB. All other trademarks
mentioned in this publication are the properties of their respective holders.
Specications and appearances are subject to change without notice.
Copyright © Clavia DMI AB
No naked ame sources, such as lighted candles, should be placed on
the apparatus;
Do not use the apparatus in tropical climates.
WARNING: To reduce the risk of re or electric shock, do not expose
this apparatus to rain or moisture.
The apparatus shall not be exposed to dripping or splashing and that
no objects lled with liquids, such as vases, shall be placed on the
apparatus.
The maims plug is used as the disconnect device and shall remain
readily operable.
Il convient de ne pas placer sur l´appareil de sources de ammes nues,
telles que des bougies allumées;
L´appareil n’est pas destiné á étre utilisé sous un climat tropical.
L´appareil ne doit pas étre exposé á des égouttements d´eau ou des
éclaboussures et de plus qu´aucun objet rempli de liquide tel que des
vases ne doit étre placé sur l´appareil.
Lorsque la prise du résau d’alimentation est utilisée comme dispositif
de déconnexion, ce dispositif doit demeuré aisément accessible.
Warning - When using electric products, basic precautions should always be followed, including the following:
Additional Safety Information

NORD ELECTRO 5 USER MANUAL OS V1.X | 3
1. INTRODUCTION
THANK YOU!
Thank you for purchasing the Nord Electro 5. Our goal when developing the Nord Electro line of instruments has always been to oer the best em-
ulations of traditional electromechanical keyboard instruments in a compact and lightweight package. With the Nord Electro 5 we have taken this
several steps further by not only upgrading the existing sections but also adding a sample synthesizer section and making the Nord Electro 5 bi-tim-
bral – a rst for the Electro series. There are also new ways in which sounds can be layered and organized making the Nord Electro 5 one of the
most versatile and player friendly instruments on the market today.
DISCLAIMER
All trademarks and brand names mentioned in this manual are the property of their respective owners and not in any way aliated or associated with
Clavia AB. The trademarks are only mentioned as a reference to certain sonic qualities or actions reproduced by Nord Electro 5.
TABLE OF CONTENTS
1. INTRODUCTION.................................................................................................... 3
Thank you!..............................................................................................................................................3
Disclaimer...............................................................................................................................................3
2. OVERVIEW....................................................................................................................... 4
3. USING THE NORD ELECTRO 5..................................................... 5
Parts .............................................................................................................................................................5
Program....................................................................................................................................................5
Storing and naming Programs .......................................................................................................6
Live Programs .......................................................................................................................................6
Storing sounds to and from Live Programs.........................................................................6
Organ...........................................................................................................................................................7
Preset 1 and 2 .......................................................................................................................................7
DRWB Live and DRWB Sync.............................................................................................................7
B3...............................................................................................................................................................7
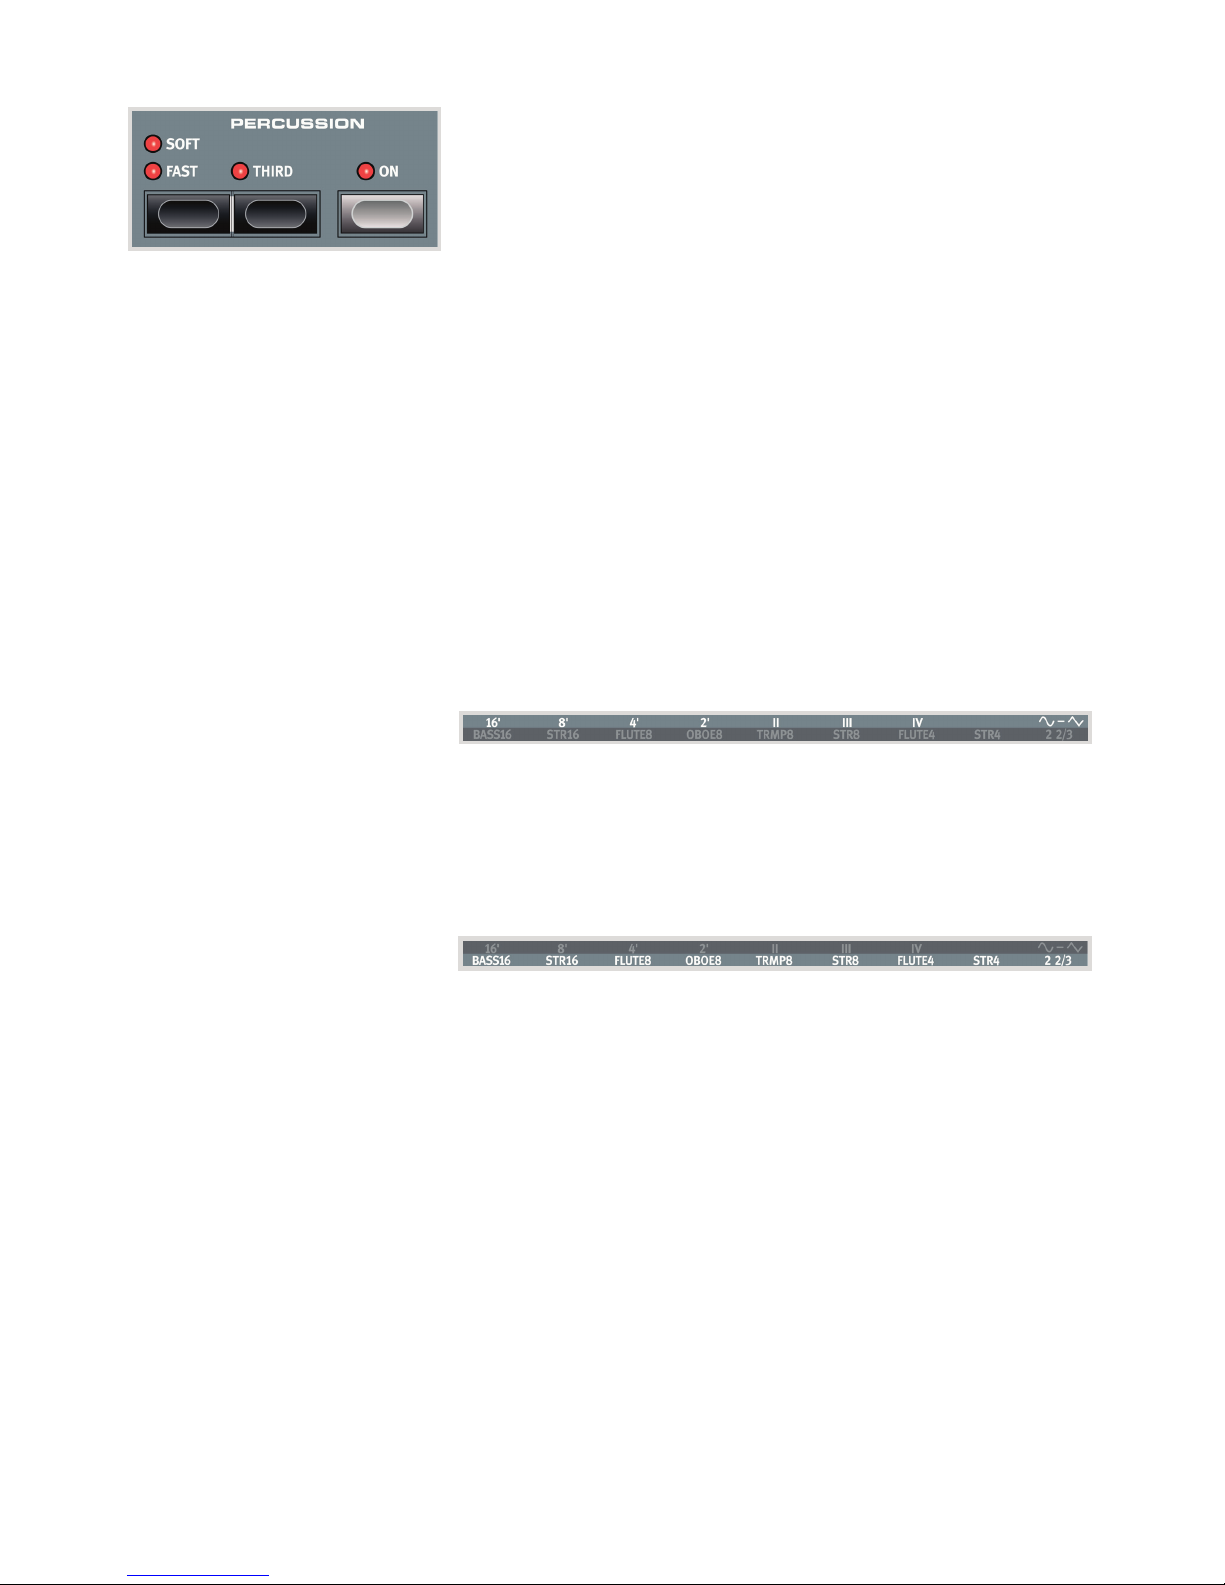
Percussion........................................................................................................................................8
B3+Bass.............................................................................................................................................8
Pipe...........................................................................................................................................................8
VX..............................................................................................................................................................8
Farf ............................................................................................................................................................8
Piano ............................................................................................................................................................8
Long Release.........................................................................................................................................8
String Resonance.................................................................................................................................9
Mono........................................................................................................................................................9
Kbd Touch ..............................................................................................................................................9
Nord Piano Library size comparison chart .................................................................................9
Sample Synth......................................................................................................................................9
Dynamics................................................................................................................................................9
Filter Vel...................................................................................................................................................9
Attack, Sustain and Decay/Release...............................................................................................9
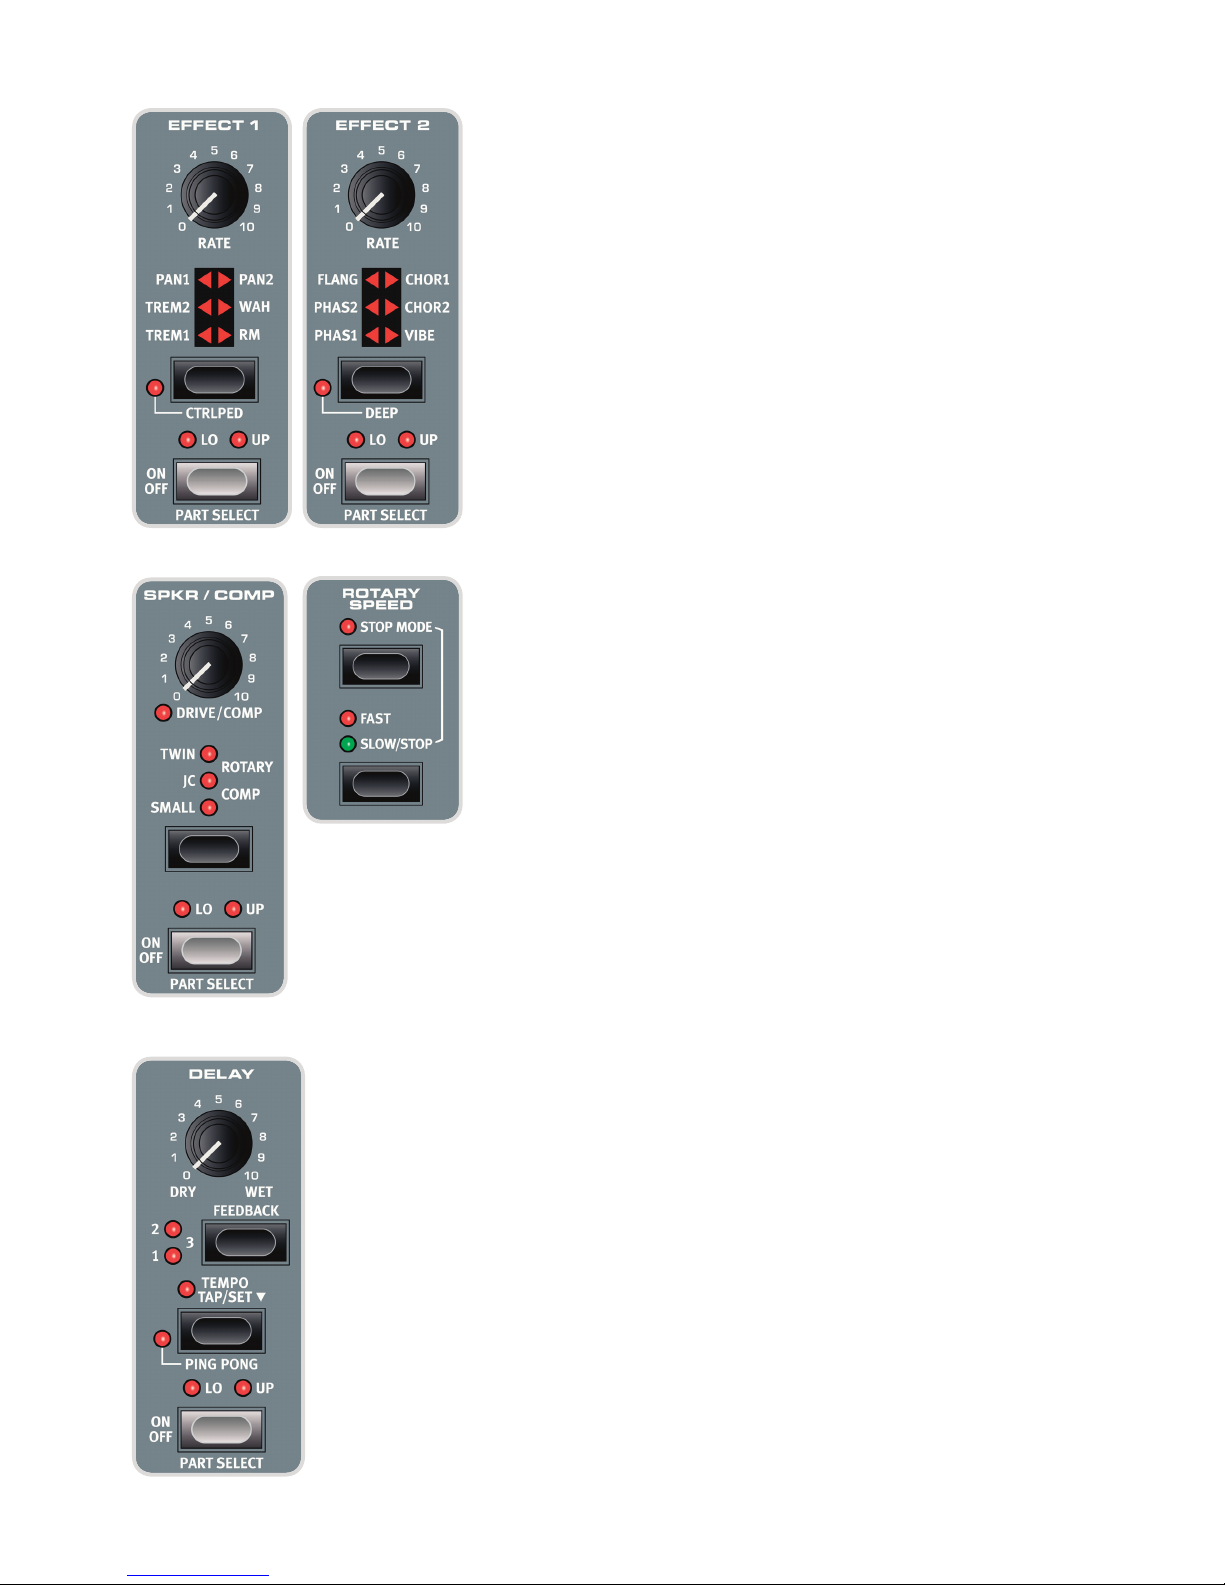
Eects.......................................................................................................................................................10
Eect 1..................................................................................................................................................10
Eect 2..................................................................................................................................................10
Spkr/Comp.......................................................................................................................................... 10
The Rotary eect ........................................................................................................................10
Delay .....................................................................................................................................................10
EQ...........................................................................................................................................................11
Reverb...................................................................................................................................................11
Set List Mode ..................................................................................................................................11
Selecting Programs for a Song....................................................................................................11
Storing Songs and Set Lists ..........................................................................................................12
Storing Program changes from Set List mode.......................................................................12
List View.................................................................................................................................................12
Programs and Set Lists ................................................................................................................... 13
Piano .....................................................................................................................................................13
Sample Synth.....................................................................................................................................13
Organize ..............................................................................................................................................13
4. MIDI.......................................................................................................................................... 14
Scenario 1: Nord Electro 5 as controller..............................................................14
Scenario 2: Nord Electro 5 sending MIDI on Part Upper in
KB Split mode..................................................................................................................................14
Scenario 3: Nord Electro 5 receiving MIDI on Part Upper in
MIDI Upper Receive mode.................................................................................................15
Scenario 4: Nord Electro 5 with a sequencer.................................................15
5. MENUS.................................................................................................................................16
System.....................................................................................................................................................16
MIDI............................................................................................................................................................16
Sound.......................................................................................................................................................16
6. NORD SOUND MANAGER.................................................................17
System Requirements ...........................................................................................................17
Installation..........................................................................................................................................17
Overview .............................................................................................................................................. 17
Downloading Piano sounds .........................................................................................................18
Downloading Sample Synth samples.......................................................................................18
Deleting sounds and samples .....................................................................................................18
Substituting sounds and samples..............................................................................................18
Backing up and restoring your Nord Electro 5............................................19
Sound Up and Sound Down.........................................................................................................19
Bundle Up and Bundle Down ......................................................................................................19
Backup and Restore.........................................................................................................................19
I APPENDIX: CONNECTIONS................................................................ 20
Audio Connections....................................................................................................................20
Headphones ......................................................................................................................................20
Left and Right Out............................................................................................................................20
Monitor In............................................................................................................................................20
MIDI Connections .......................................................................................................................20
MIDI In .................................................................................................................................................20
MIDI Out ..............................................................................................................................................20
USB Connection............................................................................................................................20
Pedal Connections.....................................................................................................................20
Sustain pedal......................................................................................................................................20
Rotor Pedal .........................................................................................................................................20
Control Pedal......................................................................................................................................20
II APPENDIX: MIDI CONTROLLER LIST...............................21
III INDEX....................................................................................................................................22

4 | NORD ELECTRO 5 USER MANUAL OS V1.X
2. OVERVIEW
Above all, the Nord Electro 5 is a player’s instrument, with accessible front panel controls for
virtually all performance functions.
The front panel of the NE5 has ve main areas: Organ, Piano, Program, Sample Synth and Ef-
fects, each of which is discussed in detail in this manual.
Most continuous parameters, such as the master volume level are adjusted using standard
knobs. You will also nd endless knobs. These are used for browsing Programs, scrolling in lists
etc. Some knobs serve double purposes, depending on what mode you are in. In these cases
the alternate functions are written out separated by a ”/”, such as in PROG/MENU.
A parameter value can be dierent from the knob’s physical position when you load a Program.
As soon as you start turning the knob however, the value will snap to the knob’s physical posi-
tion. As adjustments are made, the value of the parameter will also be shown on the large OLED
display.
l Pressing and holding the SHIFT button while turning any knob will cause that parameter’s
current value to be displayed without changing.
Buttons are used for turning functions on and o and switching between dierent settings. Many
buttons serve multiple purposes, in which case a second function will be described under the
button, and is accessed by pressing SHIFT.
The 5D models (61 and 73) contain real Drawbars for adjustment of organ settings. On the 5HP
models buttons and LEDs are used for these functions.
The LED lights on the panel will most commonly be either lit with a xed light, when their asso-
ciated functions are active or non-lit when inactive. In some scenarios blinking LEDs are used.
For example, blinking Menu LEDs indicate that the associated menu is in focus, and the sound
source selectors for the two Parts will blink at a slow rate if the same sound source is selected for
both of them.
Endless knob
Standard knob
Digital drawbar
(5HP model)
Physical drawbar
(5D models)

3.
USING THE NORD ELECTRO 5 | 5
PARTS
The Nord Electro 5 is a bi-timbral instrument,
meaning that it allows you to play two separate
sounds simultaneously. These sound sources
are referred to as PART LOWER and PART UPPER.
For each Part you can choose from one of the
three sound engines:
• The Organ Model
• The Piano Engine
• The Sample Synth
Parts are selected in the Program area and can be blended in any way you choose by turning the
PART MIX knob. In KB SPLIT mode the keyboard is divided in two, with Part Lower to the left and
Part Upper to the right. The split point can be adjusted by pressing the KB SPLIT button while
turning the VALUE dial to select from six available split points: C3, F3, C4, F4, C5 and F5. Green
LEDs are provided across the keyboard to indicate which split point is active.
l It is also possible to use KB SPLIT to allow PART UPPER to be addressed via an external
controller, or to send MIDI only from the upper half of the keyboard. These features require
that an Upper Split channel is dened in the MIDI menu. You can read more about possible
MIDI setups on page 14-page 15.
The OCTAVE SHIFT buttons transpose their respective Parts in octave intervals. The number of
octaves available for each Part to be transposed up or down depends on whether you are in KB
SPLIT mode or not, designed to always give you access to the entire playable range for both Parts.
The TRANSPOSE function, activated by a single press of the button, will allow the keyboard to be
transposed +/- 6 semitones. Pressing and holding the TRANSPOSE button while operating the
VALUE dial adjusts the amount of transposition.
PROGRAM
A Program contains all the settings for all of the available parameters, including sound engines
and sound processing eects, for both Parts regardless of whether both Parts are active within
the Program. Output volume of each Program is controlled using the GAIN knob. This value is
also stored within the Program, allowing adjustment of relative volumes between Programs.
The Nord Electro 5 can store up to 400 user Programs organized in eight banks holding 50 Pro-
grams each. To scroll through your Programs simply turn the PROG dial.
Program names, along with Bank and Program numbers (separated by a colon), are shown
in the display when in Program Mode. The lower half of the display contains small icons
representative of the three available sound engines. Current drawbar positions are shown
for the Organ model, while the names of the loaded sounds are displayed for the Piano and
Sample Synth engines. An asterisk will appear to the right of the program number if/when
changes are made to a Program. Note that these changes will be lost upon changing to
another Program unless a STORE operation is performed rst.
3. USING THE NORD ELECTRO 5

6 | NORD ELECTRO 5 USER MANUAL OS V1.X
STORING AND NAMING PROGRAMS
For saving changes made to an existing Program, press STORE to enter the STORE PROGRAM
TO screen. The display now shows you where the Program will be stored to. Optionally, you can
now use the PROG dial to choose a dierent location.
Press STORE again to go through with the operation. A pop-up text on the display conrms that
the store was successful.
Pending store operations can be aborted by pressing EXIT. The text ”Store aborted!” veries that
no changes were saved.
To name your new Program:
1. Select STORE AS... and you will now see the STORE PROGRAM AS screen. The cursor will
highlight the rst character of the name
2. Press-hold the SHIFT button and an alphanumeric row of letters will show
3. Turn the VALUE knob until the desired character is highlighted
4. Release SHIFT and the cursor will jump to the next letter slot. Optionally use the VALUE dial to
select a dierent position within the name
If needed, use the DEL function to delete the selected character or INS to insert a blank space at
the current cursor position.
Repeat the actions above until the new name is complete. When nished, press STORE again and
the STORE PROGRAM TO screen will show. Again, use the PROG dial to if you want to select a
dierent store location.
LIVE PROGRAMS
The Nord Electro 5 has three easy-to-access Live Programs, diering from regular Programs in
that edits you make are automatically stored. Even when exiting a Live Program, or powering o
the machine your sounds will remain the way you left them, without the need for storing.
STORING SOUNDS TO AND FROM LIVE PROGRAMS
Sounds created in Live mode can be stored to a Program bank. To do this, rst press STORE, or
optionally STORE AS... and then the Program button. From here you can save the Live sound over
an existing Program, or select an unused location using the PROG dial.
Similarily, you can also copy a Program from a Program bank to a Live Program. This is done
from Program mode by pressing STORE and then selecting one of the three LIVE Programs. Con-
rm the action with a second click on the STORE button.
For Live Programs, the display is similar to that of regular Programs, but will read Live 1-3,
depending on which is selected. To select a Live Program, press any
of the Live 1-3 buttons in the Program area.

3.
USING THE NORD ELECTRO 5 | 7
ORGAN
The Organ model faithfully reproduces the tonal characteristics of both tone wheel and transistor
organs, with a vibrant Principal Pipe organ simulation added to complete the sonic palette. Alter-
ing the sound within the Organ section is primarily done through the use of DRAWBARS, whose
settings are stored together with your Program.
PRESET 1 AND 2
For each Program the Organ model can hold two dierent drawbar settings in its memory, graph-
ically visible in the display, selected by pressing PRESET 1 or PRESET 2 respectively. Additionally,
Vibrato/Chorus and Percussion can be turned on or o with each Preset.
DRWB LIVE AND DRWB SYNC
The DRWB LIVE option can be used if you would like a particular Program to always use the actu-
al positions of the drawbars. The DRWB SYNC command is used for instantly applying the current
drawbar postitions to the active organ preset.
l These options are only present on and relevant to the Nord Electro 5D models.
B3
Tone wheel organs use notched steel disks - TONE WHEELS - to produce sine waves, generated
as a wheel rotates at its designated speed close to a corresponding electromagnetical pick-up.
The generated tone, whose pitch depends on the number of notches of that particular disk, is
then transformed and amplied, either through the use of a built-in speaker system or through
an external cabinet depending on the organ model. The details of this construction and all other
aspects of the original design - including its imperfections - are very closely simulated by the B3
model of the Nord Electro 5.
The nine drawbars of the Nord Electro 5 correspond to the available registers on the original B3
model. These are in turn named according to the approximate pipe lengths emulated by its tone
wheels. These ”pipe lengths”, 16’– 1’ are printed at the bottom of the drawbar section. The 8’
drawbar is sometimes referred to as the fundamental, being the root of the overtone series that
form the basis for the drawbar selections and the B3 sound.
The Vibrato and Chorus eects of the B3 model use a simulation of the original rotating scanner
based design. Both eects have three intensities to choose from, V1-V3 and C1-C3 respectively.

8 | NORD ELECTRO 5 USER MANUAL OS V1.X
PERCUSSION
The harmonic percussion feature is available in B3 mode. When switched on, an attack transient
is added to the organ tone giving it a more percussive character. The controls within this section
let you choose between second or third harmonics, slow or fast decay and soft or hard percus-
sion levels.
B3+BASS
One of the features new to the Nord Electro series is the B3+BASS mode, which will give you the
traditional B3 Bass tone wheels - 16’and 8’- in the left hand and a full B3 in the right. To enable
this feature, select Organ for both parts and enable KB Split. In non-split mode the B3+Bass
setting will behave as a normal B3.
l The SOUND menu is home to some additional settings, relevant to the various features of
the B3 model. See “Sound” on page 16 for details.
PIPE
Another new addition is the PIPE organ model which uses physical modelling to produce a versa-
tile and carefully tuned principal pipe section. Its pipe lengths match those of the B3 tone wheel
markings, also ranging from 16’to 1’.
VX
The tonal controls for the VX transistor organ model range from 16’to IV, including the funda-
mental and its octaves, as well as various combinations of harmonics. Additionally, there is a
drawbar for adjusting the sound character between a softer and a brighter (less ltered) mode
represented by the sine and sawtooth waveforms.
The VX organ has three Vibrato modes to choose from - V1-V3 - each increasing its rate and inten-
sity.
FARF
The FARF model is based on another easy-to-recognize transistor organ and has its drawbars
labeled after the original Bass 16 – 2 2/3 tabs. In Farf mode the drawbars are congured as on/
o switches in order to match the original design.
The Vibrato/Chorus options for the Farf model consist of four dierent settings, V1-V2 and C2-
C3. In this case all positions represent variations on the original Vibrato model.
PIANO
The Piano engine has a six-part type selector, each type containing a range of individual pianos
and keyboard instruments, accessible with the selector below the numeric MODEL display. The
Program area display will always show you the name of the currently loaded Piano sound.
From www.nordkeyboards.com you can download any number of piano sounds you like - in ad-
dition to the ones that come pre-installed. Nord Piano Library sounds come in four dierent sizes,
letting you choose which range of features you want for each piano sound (see table below). The
internal memory of the Nord Electro 5 can hold up to 1 GB worth of piano sounds.
l Refer to the Nord Sound Manager section for details on downloading and transferring
sounds.
LONG RELEASE
The rst option of the ACOUSTICS section is LONG RELEASE, which adds a slightly longer release
to acoustic and electric pianos. This can for instance be useful for acheiving a more legato char-
acter in your playing.

3.
USING THE NORD ELECTRO 5 | 9
STRING RESONANCE
For sounds that support this feature STRING RES can be activated. When active, notes that you
play also aect other ”strings” within the loaded piano sound, making them resonate sympatheti-
cally with the played note, just like with a real piano.
MONO
In MONO mode all stereo sampled pianos will be played back in mono. The mono versions of our
piano sounds are specially designed to provide the player with optimal sound and playing experi-
ence, even in mono.
KBD TOUCH
How a piano sample responds to keyboard touch can be adjusted according to what ts your
playing style, or the context which you are performing in. With higher KBD TOUCH settings, less
force is required to trigger high velocity levels and vice versa.
NORD PIANO LIBRARY SIZE COMPARISON CHART
S M L XL
Stereo sampled 3 3 3 3
Detailed velocity mapping 3 3 3 3
String resonance for middle region of the range 3
String resonance for entire range 3 3
Fully mapped keyboard 3
SAMPLE SYNTH
The Sample Synth is a powerful addition to the Nord Electro 5’s Organs and Piano sections. The
internal memory can hold up to 256 MB of samples.The knob below the SAMPLE display is used
to scroll through the available samples. In places 99-159 within the list, samples are displayed
using the numbering A0-F9.
New samples can be downloaded from www.nordkeyboards.com or you could create your own
samples using the Nord Sample Editor, also available from our website.
l See the Nord Sound Manager section for details on downloading and transferring sounds.
DYNAMICS
With the DYNAMICS function it is possible to select four dierent modes of velocity response. If
this funcion is deactivated, samples will always play back at full velocity. When active, the three
dierent settings will give you increasing degrees of dynamic range.
FILTER VEL
With FILTER VEL a low pass lter is applied to the Sample Synth, which reacts to the velocity with
which a note is played. Generally, this gives the sound a more dampened quality with low input
velocities and a brighter character with higher velocity.
ATTACK, SUSTAIN AND DECAY/RELEASE
Another useful feature of the Sample Synth is the envelope section. With the ATTACK knob you
set the time it takes for the sample to reach its full level, whereas DECAY/RELEASE will let you
adjust how quickly the sample fades after having been triggered. At 12 o’clock the sample is in
SUSTAIN mode - meaning that a (looped) sample will sound as long as the key is pressed. Set-
tings past 12 o’clock determine how long the sample sounds after the key has been released.
PERCUSSION
The harmonic percussion feature is available in B3 mode. When switched on, an attack transient
is added to the organ tone giving it a more percussive character. The controls within this section
let you choose between second or third harmonics, slow or fast decay and soft or hard percus-
sion levels.
B3+BASS
One of the features new to the Nord Electro series is the B3+BASS mode, which will give you the
traditional B3 Bass tone wheels - 16’and 8’- in the left hand and a full B3 in the right. To enable
this feature, select Organ for both parts and enable KB Split. In non-split mode the B3+Bass
setting will behave as a normal B3.
l The SOUND menu is home to some additional settings, relevant to the various features of
the B3 model. See “Sound” on page 16 for details.
PIPE
Another new addition is the PIPE organ model which uses physical modelling to produce a versa-
tile and carefully tuned principal pipe section. Its pipe lengths match those of the B3 tone wheel
markings, also ranging from 16’to 1’.
VX
The tonal controls for the VX transistor organ model range from 16’to IV, including the funda-
mental and its octaves, as well as various combinations of harmonics. Additionally, there is a
drawbar for adjusting the sound character between a softer and a brighter (less ltered) mode
represented by the sine and sawtooth waveforms.
The VX organ has three Vibrato modes to choose from - V1-V3 - each increasing its rate and inten-
sity.
FARF
The FARF model is based on another easy-to-recognize transistor organ and has its drawbars
labeled after the original Bass 16 – 2 2/3 tabs. In Farf mode the drawbars are congured as on/
o switches in order to match the original design.
The Vibrato/Chorus options for the Farf model consist of four dierent settings, V1-V2 and C2-
C3. In this case all positions represent variations on the original Vibrato model.
PIANO
The Piano engine has a six-part type selector, each type containing a range of individual pianos
and keyboard instruments, accessible with the selector below the numeric MODEL display. The
Program area display will always show you the name of the currently loaded Piano sound.
From www.nordkeyboards.com you can download any number of piano sounds you like - in ad-
dition to the ones that come pre-installed. Nord Piano Library sounds come in four dierent sizes,
letting you choose which range of features you want for each piano sound (see table below). The
internal memory of the Nord Electro 5 can hold up to 1 GB worth of piano sounds.
l Refer to the Nord Sound Manager section for details on downloading and transferring
sounds.
LONG RELEASE
The rst option of the ACOUSTICS section is LONG RELEASE, which adds a slightly longer release
to acoustic and electric pianos. This can for instance be useful for acheiving a more legato char-
acter in your playing.

10 | NORD ELECTRO 5 USER MANUAL OS V1.X
EFFECTS
The Eects section consists of four dierent insert eect units capable of processing the
sounds of either Part Lower or Upper. This section also includes an Equalizer, which can be
used to process either or both Parts, and a global Reverb eect. Each unit, apart from the
reverb has a PART SELECT control which can be set to LO (Part Lower), UP (Part Upper) or be
inactivated which will bypass the eect.
l In general the eects are applied in the order in which they appear on the panel, but
there are some exceptions. For example, the Pan eect of the Eect 1 section is placed
after the Spkr/Comp eects (excluding the Rotary), in order for it to be as usable as
possible.
EFFECT 1
Eect 1 oers Tremolo, Pan, Wah and Ring Modulator eects. The CTRL PED function lets
you control any of these using a Control Pedal. Try using the pedal together with the Wah,
for some realistic Wah Wah playing or with a Pan eect to gain some real time control of the
stereo imaging.
EFFECT 2
Eect 2 gives you a selection of modulation eects, including two types of Phaser, Flanger,
two Chorus types and a new Vibe eect. This eects section also has an additional DEEP
mode available, which will give all eects a more pronounced character.
SPKR/COMP
The Spkr/Comp section contains four dierent amplier and cabinet models: Small, JC, Twin
and Rotary. There is also a Drive (tube distortion) and a Comp (compressor) eect, the lat-
ter being usable for controlling the dynamic range of a sound. The knob controls the DRIVE
amount, either of the tube distortion or the selected amp model, or the compression amount
when in COMP mode.
THE ROTARY EFFECT
The Rotary speaker eect of the Nord Electro 5 is modeled after a Leslie 122 and can be
controlled in a number of dierent manners. The ROTARY SPEED switch of the Organ sec-
tion toggles between FAST and SLOW rotation speeds, and in STOP MODE between fast or
stopped rotors. Rotary Speed can also be controlled by attaching a pedal switch, sustain
pedal or the optional Nord Half Moon switch to the Rotor Pedal jack.
When both Part Lower and Part Upper are set to Organ, and Rotary is selected, the Spkr/
Comp eect is global.
l Within the Rotary section of the SOUND menu you can make some more advanced
adjustments to the behaviour of the Rotary speaker. See “Sound” on page 16 for
details.
DELAY
The stereo Delay eect features controls for adjusting the DRY/WET signal mix, a selection of
four dierent FEEDBACK intensity levels and a TEMPO button.
TAP the Tempo button repeatedly to enter a tempo, which will show up briey as a BPM
value on the display. Delay tempo can also be SET by pressing down on the Tempo button
while turning the VALUE dial.
When Feedback is deactivated, only the initial delay tap will sound. When active, the lowest
setting gives you a small number of repeats while the highest gives you a very long feedback
tail. Use the Dry/Wet mix control to nd the right balance between the unprocessed and
processed signals.
There is also an optional PING PONG mode in which the delay repeats are alternated between
the left and right channels.

3.
USING THE NORD ELECTRO 5 | 11
EQ
The EQ is a purposeful and ecient 3-band equalizer with xed BASS and TREBLE bands, plus a
mid range section which is sweepable, using the FREQ knob. The bass frequency is set to 100 Hz
and the treble at 4 kHz, while the user adjustable mid frequency range lies between 200 Hz and 8
kHz. Each band can be boosted or attenuated by 15 dB. The EQ can be used in LO, UP or LO +
UP congurations.
REVERB
The Reverb is a global room simulator eect which processes the summed stereo signal of Part
Lower and Part Upper. Besides adjusting the DRY/WET mix control, you can also switch between
Room, Stage and Hall reverb algorithms, of which the latter two also have Soft versions giving the
reverb a less bright character.
SET LIST MODE
To enter Set List mode, press the Set List button. A green LED will indicate that this mode
is active and the display will show the currently selected Set List, the name of the Song as
well as the name of the active Program. By default, the Nord Electro 5 contains ten exam-
ple Songs showing how you could group Programs based on genre. These can of course
be replaced or renamed as you like.
On the Nord Electro 5, Set Lists can be used to group Programs in a manner that ts songs
within a particular set, concert, genre or any other context. Each Set List can contain a number
of entries, in this manual referred to as Songs, which each makes up to four dierent Programs
instantly accessible from the AD buttons within the Program area.
SELECTING PROGRAMS FOR A SONG
When in Set List mode pressing down on either of the A-D buttons will temporarily enter Pro-
gram mode, allowing you to select the Program you wish to use for that particular slot, using the
PROG dial.
Set List
1.1
1.2
1.3
1.4
4.50
Song
A
B
C
D
Program
Part Lower Part Upper
The diagram shows how Set Lists, Songs and Programs relate to each other. Note that all Pro-
grams are stored only as references within the Set Lists. This means that any change made to a
Program will aect how it sounds in all Songs and Set Lists where it is being used.

12 | NORD ELECTRO 5 USER MANUAL OS V1.X
STORING SONGS AND SET LISTS
Set List entries are stored in much the same way in which you would store a Program. When you
have made the selection of Programs you want to use within a particular Song, follow the steps
below:
1. Select STORE AS... and you will now see the STORE AS screen. The cursor will highlight the
rst character of the name
2. Press-hold the SHIFT button and an alphanumeric row of letters will show
3. Turn the PROG/MENU knob until the desired character is highlighted
4. Release SHIFT and the cursor will jump to the next letter slot. Optionally use the VALUE dial to
select a dierent position within the name
Optionally, use the DEL function to delete the selected character or INS to insert a blank space at
the current cursor position.
Repeat the actions above until the name of your Song is complete. When nished, press STORE
again and the STORE TO screen will show. Turn the PROG dial for selecting a dierent store loca-
tion.
To save changes made to an existing Song, simply press STORE to enter the STORE TO screen.
STORING PROGRAM CHANGES FROM SET LIST MODE
You also have the option to store an edited Program from within Set List mode. Simply press
down on the AD button corresponding to the Program you want to store, and from there pro-
cede as usual when storing a Program (see “Storing and naming Programs”on page 6).
LIST VIEW
On the Nord Electro 5, a new List View mode enables easy browsing and navigation of Pro-
grams, Set Lists, Piano sounds and Sample Synth samples.

3.
USING THE NORD ELECTRO 5 | 13
PROGRAMS AND SET LISTS
To scroll through your Programs or Set List entries, turn the LIST dial while pressing down on
the LIST VIEW button.
PIANO
Use the LIST VIEW control within the Piano section, while pressing down on LIST VIEW in the
Program Area to see a list of your piano sounds. Turn the LIST dial to scroll up or down the
list. The sounds can also be stepped through by using the six part type selector and model
controls of the Piano section.
SAMPLE SYNTH
To see a list of all available samples, press down on LIST VIEW in the Program area while
turning the LIST VIEW knob of the Sample Synth section. The top part of the display will
show the numeric list location of the selected sample.
To return from List View, simply press EXIT and you will be back to your previous Program or
Set List screen.
ORGANIZE
With the ORGANIZE function, Programs and Songs can easily be moved to another position
within the same or a dierent Bank.
The Organize command can be used to take you directly to List View’s organize mode from a
Program or Song in a Set List, or be accessed the same way when already in List View. Use
the LIST dial to move the current selection - indicated by two arrows - up or down the list.
l When browsing the sample list, press down
on SHIFT and LIST VIEW to see additional in-
formation about the current sample, including
its size and author.

14 | NORD ELECTRO 5 USER MANUAL OS V1.X
4. MIDI
The Nord Electro 5 is designed to be as exible as possible in regards to how it can be used together with external controllers, sequencers and
sound modules. This section illustrates the most common setups for using the MIDI functionality of the Nord Electro 5 together with other equip-
ment. Each scenario requires that appropriate settings are made in the MIDI Menu and/or the KB Split section. The tables will show you what
parameters needs to be adjusted in each case. Also, the Nord Electro 5 can both send and receive an extensive set of MIDI Controller messages.
For a detailed list of these, see page 21.
MIDI Menu settings
Parameter Setting
Local Control Mode On or O
Channel Global 1-16
Channel Lower Rcv 1-16 or O
Channel Upper Rcv 1-16 or O
Channel Upper Split 1-16 or O
KB Split settings
Parameter Setting
KB Split O
KB Split Point - MIDI Connections: Connect a 5-pin MIDI cable between the MIDI OUT of the Nord Electro 5 and
the MIDI IN of the external module.
SCENARIO 1: NORD ELECTRO 5...
AS CONTROLLER
The Nord Electro 5 can be used as a controller keyboard, in cases where you want to play the
sounds of an external sound module or synthesizer. Local Control Mode can be set to On or O
depending on if you want to use the Nord Electro 5 as part of a layered sound or not.
SCENARIO 2: NORD ELECTRO 5...
SENDING MIDI ON PART UPPER IN KB
SPLIT MODE
With this setup, the upper part of the keyboard can be used to send MIDI to an external sound
module or synthesizer. Useful for cases where you want to play one of the Nord Electro 5 sound
engines in the left hand, but the sound of a dierent unit in your right. The Part Upper sound engine
can either be turned o entirely, or be set to a sound that you want layered with the sound of the
external unit.
MIDI messages for sustain and control pedal are only sent if their respective functions are activated
for Part Upper. Also, Transpose and Octave Shift settings will aect the outgoing MIDI stream, unlike
with MIDI sent on the global channel.
Note that the Nord Electro 5 will not send any MIDI generated above the Split point on the global
channel in this scenario. This is to avoid the external unit receiving double Note On or other MIDI
messages. To enable this setup, Channel Upper Split in the MIDI menu needs to be set to a discrete
MIDI channel.
MIDI Menu settings
Parameter Setting
Local Control Mode On
Channel Global 1-16 or O
Channel Lower Rcv 1-16 or O
Channel Upper Rcv 1-16 or O
Channel Upper Split 1-16
KB Split settings
Parameter Setting
KB Split On
KB Split Point C3-F5
MIDI Connections: Connect a 5-pin MIDI cable between the MIDI OUT of the Nord Electro 5 and the
MIDI IN of the external module.

4.
MIDI | 15
SCENARIO 3: NORD ELECTRO 5...
RECEIVING MIDI ON PART UPPER IN
MIDI UPPER RECEIVE MODE
In this scenario, the Nord Electro 5 is set up to receive MIDI on Part Upper, using an external key-
board to play its corresponding sound engine. Part Lower is played with the keyboard of the Nord
Electro 5, using one of the remaining sound engines. In this setup, Part Lower will utilize the entire
keyboard of the Nord Electro 5 and Part Upper can only be addressed through MIDI sent to the
Upper Split channel.
MIDI Menu settings
Parameter Setting
Local Control Mode On
Channel Global 1-16 or O
Channel Lower Rcv 1-16 or O
Channel Upper Rcv 1-16 or O
Channel Upper Split 1-16
KB Split settings
Parameter Setting
KB Split On
KB Split Point MIDI Upper Rcv
MIDI Connections: Connect a 5-pin MIDI cable between the MIDI IN of the Nord Electro 5 and
the MIDI OUT of the external keyboard.
SCENARIO 4: NORD ELECTRO 5...
WITH A SEQUENCER
There are a few dierent ways in which you could set up the Nord Electro 5 together with a
sequencer. You could either simply use it as a controller keyboard (see Scenario 1) to control
software synths in a DAW setup, or use the sequencer for recording of MIDI data, in turn played
back by the Nord Electro 5.
The most common way of doing this would be to use the global MIDI channel both for sending
MIDI from the Electro 5 and receiving it back from the sequencer. That way the Nord Electro 5
will play back any sound the same, whether controlled by the local keyboard or the sequencer.
To avoid double Note On messages, which may cause sound defects, make sure that Channel
Lower/Upper Rcv are both set to O.
MIDI Menu settings
Parameter Setting
Local Control Mode O
Channel Global 1-16 or O
Channel Lower Rcv O
Channel Upper Rcv O
Channel Upper Split 1-16 or O
KB Split settings
Parameter Setting
KB Split On
KB Split Point MIDI Upper Rcv
MIDI Connections: Connect a USB cable between the Nord Electro 5 and your computer, or
a 5-pin MIDI cable between the MIDI OUT of the Nord Electro 5 and the MIDI IN of your MIDI
interface.

16 | NORD ELECTRO 5 USER MANUAL OS V1.X
5. MENUS
Global system and MIDI settings, as well as global settings
for the Piano, B3 and Rotary sections are accessed respec-
tively through the SYSTEM, MIDI and SOUND menu buttons.
Menu items are scrolled by using the MENU dial, and values
changed by turning the same dial while pressing SHIFT.
Any changes made will automatically be stored until
changed again except for MIDI Local Control On/O which
will return to its default Local On setting everytime the Nord
Electro 5 is powered on.
SYSTEM
MEMORY PROTECT is set to On by default
when the NE5 leaves the factory to prevent
any accidental overwriting of original Programs.
Set to O when you want to store Programs of
your own.
GLOBAL TRANSPOSE is 0 by default but could
be set to anywhere between -6 to +6 semi-
tones.
FINE TUNE is set to 0 cent 440Hz but could be
set to ±50 cent = 1 semitone.
SUSTAIN PEDAL is set to Auto by default but
could also be set to Closed and Open depend-
ing on the polarity of your pedal. The pedal
type will automatically be determined when in
Auto mode.
CONTROL PEDAL TYPE gives you a range of
options corresponding to the most common
makes and models.
ROTARY CONTROL can be set to any of the
three settings, Open, Closed and Half Moon
depending on how you want your switch pedal
to control the Rotary Eect and whether you
are using a Half Moon Switch.
ROTARY PEDAL can be set to either Toggle or
Hold. If a pedal is used to control the Rotor
Speed, Hold mode will give you Fast speed
while the pedal is pressed down. In Toggle
mode stepping on the pedal will switch be-
tween Fast and Slow/Stop Mode.
ORGAN B3 TRIG gives you the option of Fast
and Slow trigger modes. In Fast mode notes
will be triggered earlier when pressing down on
a key. This menu option is not present on the
Nord Electro 5 HP model.
OUTPUT ROUTING MODE lets you choose either
the default Stereo option or the PartL : L, Par-
tU : R setting. In Stereo mode Part Lower and
Part Upper will be routed to both outputs, in
stereo. With PartL : L, PartU : R activated Part
Lower is routed to the Left output and Part
Upper to the Right, both being in mono.
MIDI
LOCAL CONTROL MODE can be set to either On
or O and will be On everytime the Nord Elec-
tro 5 is powered up. This setting determines
whether the keyboard and panel controls are
used to play back sounds and alter parameters
directly, or are sent only via MIDI.
CHANNEL GLOBAL sets the channel the Nord
Electro 5 transmits and responds to. Could be
set to 1–16, or O. Default is 1.
CHANNEL LOWER RECEIVE determines the MIDI
channel which Part Lower responds to. Can be
set to 1-16 or O. Default is O.
CHANNEL UPPER RECEIVE sets the MIDI channel
which Part Upper responds to. Can also be set
to 1-16 or O. Default is O.
CHANNEL UPPER SPLIT sets the MIDI channel
used in MIDI Upper Split mode. Can be set to
1-16 or O. Default is O.
CONTROL CHANGE MODE determines how
the Nord Electro 5 handles MIDI CC (Control
Change) messages. Possible settings are O,
Send, Receive or Send/Receive.
PROGRAM CHANGE MODE aects how the
Nord Electro 5 handles Program Change MIDI
messages. Possible settings are O, Send,
Receive or Send/Receive.
SOUND
PIANO STRING RES determines the sound level
of the Piano String Resonance. Range is from
-6dB to +6dB. Default value is 0dB.
B3 TONEWHEEL MODE sets the amount of
tonewheel crosstalk and cable leakage for the
B3 Model between Clean, Vintage 1, Vintage 2
or Vintage 3. Vintage 1 is default.
B3 KEY CLICK sets the amount of key click for
the B3 Model to Low, Normal, High or Higher.
Normal is default.
B3 KEY BOUNCE turns the key bounce On or
O. When On the key o click is boosted if the
key is released quickly.
B3 PERC DB9 MUTE will in On mode mute the
9th drawbar when percussion is activated just
as with the original instrument but could also
be set to O.
B3 PERC DECAY FAST sets the Fast decay time
of the B3 percussion to Short, Medium or
Long. Medium is default.
B3 PERC DECAY SLOW sets the Slow decay
time of the B3 percussion to Short, Medium or
Long. Medium is default.
B3 PERC VOLUME NORMAL sets the normal
percussion volume to Low, Medium or High.
Medium is default.
B3 PERC VOLUME SOFT sets the soft percus-
sion volume to Low, Medium or High. Medium
is default.
ROTARY SPEAKER TYPE can be set to 122
or 122Close, the latter being a close miked
version of the same speaker emulation. 122 is
default.
ROTARY BALANCE sets the balance between
the bass rotor and treble horn 70/30, 60/40,
50/50, 40/60 and 30/70. Default is 50/50.
ROTARY HORN SPEED could be set to Low,
Normal or High. Default is set to Medium.
ROTARY HORN ACC sets the acceleration and
retardation of the rotary bass horn to Low,
Normal or High. Default is set to Normal.
ROTARY ROTOR SPEED sets the speed of the
rotary bass horn to Low, Normal or High. De-
fault is set to Normal.
ROTARY ROTOR ACC sets the acceleration and
retardation of the rotary treble horn to Low,
Normal or High. Default is set to Normal.

5.
NORD SOUND MANAGER | 17
6. NORD SOUND MANAGER
The Nord Sound Manager is your tool of choice for transferring sounds
to and from the Nord Electro 5, organizing your Programs, Set Lists and
sounds, backing up your instrument and more. The application is avail-
able in both Windows and Mac OSX versions. This chapter will describe
the most common operations within the Nord Sound Manager - for a
complete guide to the application, please refer to the Nord Sound Man-
ager manual, available for download from www.nordkeyboards.com.
SYSTEM REQUIREMENTS
The Nord Sound Manager and Nord Sample Editor is compatible with
computers running Mac OS 10.4 or later, Windows XP, Windows Vista,
Windows 7 and Windows 8.
INSTALLATION
The rst step is to download Nord Sound Manager from www.nordkey-
boards.com. This way you can also be sure that you are using the latest
available version of the application.
Windows: Double click on the ”Nord Sound Manager v6.XX Setup.exe”
le and follow the instructions. After the installation completes you will
nd the application within your Start menu.
Max OSX: Double click on the ”Nord Sound Manager v6.XX.dmg”le
and drag the Nord Sound Manager application from the virtual hard
drive into your Applications folder.
OVERVIEW
The main area of the Nord Sound Manager is the list view, divided into tabs representing the three partitions: Piano, Samp Lib and Program. With-
in each tab the content of the partition is listed. At the top of the list view is a dropdown Bank selector and at the bottom a Partition Memory Indica-
tor, showing how much of the space within each partition is being used.
Towards the top of the application interface is the Toolbar, giving you quick access to the operations most commonly performed. Sometimes a tool
icon will be grayed out, meaning it doesn’t apply to the currently selected partition.
There is also a Top Menu containing all the functionality available from the toolbar and a few more advanced options.
DOWNLOAD AND TRANSFER
SOUNDS AND SAMPLES
Sounds from both the Nord Piano Library and the Nord Sample Library
can freely be downloaded from www.nordkeyboards.com.
The ever growing Nord Piano Library features a large variety of grand
pianos and uprights, as well as electric pianos, clavinets and harpsi-
chords. A broad selection of these comes shipped with your instrument,
but you may eventually want to exchange some of these for new sounds,
or perhaps a dierent size of the same piano sound. To see what sets the
dierent Nord Piano Library sizes apart, see table ”Nord Piano Library size
comparison chart” on page 9.

18 | NORD ELECTRO 5 USER MANUAL OS V1.X
The Nord Sample Library is a broad collection of quality sampled sounds that cover most cate-
gories and instrument families, from vintage to modern and acoustic to electric.
l All our sounds and samples utilize the lossless compression algorithm implemented in the
playback engines of the Nord Electro 5, making it possible to t more sounds into the mem-
ory of the machine without compromising their quality.
DOWNLOADING PIANO SOUNDS
To download a new Piano sound, navigate to the Nord Piano Library section of www.nordkey-
boards.com. Simply click on the download link of the instrument and size you want, and the
sound will be downloaded to your computer. Make sure your Electro 5 is connected and that the
Nord Sound Manager application is open. Select the Piano tab within the application, and then
drag the downloaded .npno le onto the list area. The sound will automatically be transferred to
your instrument.
DOWNLOADING SAMPLE SYNTH SAMPLES
New samples for the Sample Synth are downloaded from the Nord Sample Library section of
www.nordkeyboards.com. Most of the sounds are downloaded as bundles, and come in a .zip
archive containing individual .nsmp les. Once downloaded, decompress the archive and drag
the samples you want onto the list area of the Samp Lib tab.
DELETING SOUNDS AND SAMPLES
If the content of the Piano or Samp Lib partitions are approaching their limits you may have to
delete sounds or samples from the instrument. Within their respective tab, select the Piano sound
or Samp Lib sample you want to delete, and click the Delete icon in the toolbar. A dialog will
appear, asking you to conrm the delete.
SUBSTITUTING SOUNDS AND SAMPLES
You also have the option to substitute a sound or sample for another, which is useful if you want
your Programs to stay intact but for example switch to a dierent sized piano, or dierent version
of a sampled instrument. In this case, select the sound or sample you want to substitute from
the tab list and click the Substitute button. A dialog will open, asking you to locate the sound
or sample you want to use instead. Browse to the .npno or .nsmp le of your choice and click
Substitute in the dialog window.

5.
NORD SOUND MANAGER | 19
BACKING UP AND RESTORING YOUR
NORD ELECTRO 5
Programs created on your Electro 5 can be backed up to your computer, either individually as
.ne5p les or bundled together in the .ne5pb format. A Bundle will also include all the sounds
and samples used for that selection of Programs.
SOUND UP AND SOUND DOWN
To upload as indivudal les, select the Programs, pianos or samples you want from the list of their
respective tabs and click Sound Up in the toolbar and a dialog will open. You now have the
choice to upload the selection you’ve made, or an entire bank. Make your desicion and then
browse to the folder where you want your selection to be stored.
To download pianos, samples or Programs to the Nord Electro 5 select the relevant tab and click
the Sound Down button of the toolbar. The source area within the following dialog gives you the
option to browse for les or a folder containing les of the type you want. In the destination area
you decide whether to add the downloaded les to an existing bank or replace the entire content
of the bank you choose.
BUNDLE UP AND BUNDLE DOWN
To upload a Bundle make the selection of Programs you want to upload and click Bundle Up in
the toolbar. The following dialog gives you the choice of uploading either your selection or any of
the Program banks. Select one of the two options and then browse to the folder where the Bun-
dle should be stored.
In order to transfer a Bundle to the Nord Electro 5, select the Program tab and use the dropdown
menu at the top of the tab view to select which bank you want to add the Bundle content to.
Press the Bundle Down button of the toolbar and a dialog will ask you to locate a Bundle (.
ne5pb) le. Once you have selected a le, the Nord Sound Manager will verify that it contains
valid Programs and sounds. You can then select whether to add the content of the Bundle to the
bank you have selected, or replace the content of a bank of your choice.
BACKUP AND RESTORE
You can also make a full backup of your entire instrument, including its Programs, Set Lists and
all pianos and samples. To do this, click the Backup button of the toolbar. Select a location for
your backup le, and optionally change its name. By default it will be named ”Backup YYYY-MM-
DD.ne5b”. Click Save to begin the backup process, which may take a little while to complete.
To restore your Nord Electro 5 from a backup le, click Restore in the toolbar. Browse to the
backup (.ne5b) le that you want to restore from and click Open. A dialog will appear, asking you
to conrm the restore operation. Within this dialog you can also click on the Show Details button
to see the exact content and settings of the backup. Click Restore to go through with the restore
operation.

20 | NORD ELECTRO 5 USER MANUAL OS V1.X
I APPENDIX: CONNECTIONS
POWER ON/OFF
PEDAL
CONTROL
PEDAL
ROTOR MIDI MONITOR RIGHT LEFT
OUT HEADPHONESPEDAL
SUSTAIN
IN
MIDI
INOUT OUTUSB
v
1.1
Vers.nr
v1.1
Korr. nr
1
Datum, rev.
2015-01-29
542 002 (NCSS White)
-
-
-
1
2
3
4
Datum, urspr.
2014-10-17
Konstruktör
José Esparza
Layout / ändrad av
Tina Jeppsson
Godkänd av
Benämning
UNDERDEL
NORD ELECTRO 5
HP
Clavia part #
40582
Mått plåt (mm)
1034,20 x 81,5
■ Vit
-
-
-
Skala
1:1
Färgnummer (NCS-nr)Lagerordning Färg
LAGER 1: 542 002 Vit (NCSS White)
AUDIO CONNECTIONS
General guide on audio connections: Before you turn on your amplier,
make all audio connections. Always turn on your amplier last, and
when shutting down, always turn o your amplier or active speakers
rst.
HEADPHONES
¼ inch stereo headphone jack.
LEFT AND RIGHT OUT
Unbalanced line level outputs for amplier or recording equipment. The
Nord Electro 5 is a stereo instrument with separate signal paths for left
and right audio channels.
l Using your Nord Electro 5 at a high volume can damage your
hearing.
MONITOR IN
1/8 inch jack for connecting devices such as smartphones, tablets or
computers to the Nord Electro 5, allowing you to play and rehearse to
pre-recorded music. This input is routed to the Headphones output.
MIDI CONNECTIONS
MIDI IN
The MIDI In connection is used for receiveing MIDI data sent from exter-
nal devices such as controller keyboards or computers.
MIDI OUT
The MIDI Out connection will send MIDI data to devices such as exter-
nal sound modules or computers.
USB CONNECTION
The USB port is used for connecting your Nord Electro 5 to a computer.
The connection can be used for transferring MIDI, for OS updates and
for connecting to applications such as the Nord Sound Manager and
Nord Sample Editor. These applications, and the latest OS version can
always be found for download at www.nordkeyboards.com.
l MIDI over USB and the standard MIDI connectors are always both
active at the same time. There is no need to select one of the two
options in a menu or similar.
PEDAL CONNECTIONS
SUSTAIN PEDAL
¼" connector for all common types of sustain pedals. Sustain pedal
polarity can be set in the Systems menu, see“System”on page 16.
ROTOR PEDAL
¼" connector for a switch type pedal, sustain pedal or the optional
half moon switch. Rotary speed will change when either the pedal is
pressed or the half moon switch is operated. Depending on which
pedal or control you are using, the appropriate Rotary Control Type and
Rotary Pedal Mode can be selected in the System menu.
CONTROL PEDAL
¼" connector for an expression pedal of the continuous type, used
for controlling volume and/or eects. Most of the common expression
pedal makes and models are supported, and can be selected in the
System menu.
This manual suits for next models
2
Table of contents
Other Clavia Musical Instrument manuals

Clavia
Clavia Nord C1 User manual

Clavia
Clavia NordStage2 EX 88 User manual

Clavia
Clavia Nord Piano 2 HA88 User manual

Clavia
Clavia nord piano 5 User manual

Clavia
Clavia Nord C2 User manual

Clavia
Clavia Nord Electro 4HP User manual

Clavia
Clavia Nord Piano 88 User manual

Clavia
Clavia NORD PIANO 3 User manual

Clavia
Clavia Nord Electro Seventy Three User manual

Clavia
Clavia Nord C1 User manual