Clean Air Optima CA-704 User manual
Dehumidifier
2in1: Dehumidifying & air purifying
CA-704
Manual
Read these instructions carefully before you start using the dehumidifier and
keep the manual for later usage.
© Copyright : Clean Air Optima
1

Introduction
Clean Air Optima wishes to thank you for purchasing this unique dehumidifier with
high quality technology. We live in times where air pollution, viruses and particulate
matter seem to be an unavoidable threat for our wellbeing Clean Air Optima offers an
dehumidifier that represents an affordable and efficient answer to this threat
Important Notice
To prevent damage and voiding your warranty Please place the unit in its right position for a
minimum of two hours before operating For best result from you portable dehumidifier please
read this instruction manual carefully and save it for future reference
Directory
2) Introduction
3) Important safeguards
4) Technical diagram
5) Usage
6) Usage
7) Usage
8) Other notice
9) Care and cleaning
10) Fault code, Trouble shooting
11) Specifications
12) Service
2

Important safeguards
When using electrical appliances, basic safety precautions should always be followed including the
following:
1 Leave the appliance to stand for at least two hours before power on, especially after
transportation
2 Make sure that the voltage matching with the relevant data indicated on the rating label
3 The socket must be with grounding
4 Keep the appliance dry Make sure that there is no water on the top of the body
5 Do not unpin the plug when the appliance is working
6 If moving needed, please switch it off and unpin the plug
7 Allow a free space of 20 cm around air inlet and air outlet of the appliance
8 Do not insert any object into the air inlet or outlet openings
9 Do not place the dehumidifier near a heating source (esp a radiator) or indirect sunlight
Ensure that the appliance does not become hot
10 Empty the tank regularly (In extreme conditions the water tank may be full after a few
hours operation)
11 Clean the air inlet filter if it becomes contaminated: the appliance is most effective when
the filter is clean
12 Please do not expect the dehumidifier to be effective when too many doors or windows are
opened or when something in the room is producing a lot of humidity
13 If the cord is damaged, it must be replaced by the manufacturer, its service agent or
similarly qualified persons in order to avoid a hazard
a) This appliance can be used by children aged from 8 years and above and persons with reduced
physical, sensory or mental capabilities or lack experience and knowledge if they have been given
supervision or instruction concerning use of the appliance in a safe way and understand the
hazards involved
b) Children should not play with the appliance
c) Cleaning and user maintenance should not be made by children without supervision
d) The refrigerant in this unit with a fluorinated greenhouse gas covered by the Kyoto Protocol,
which dangerous for the environment and fot the global warming if it is enters into atmosphere
e) Chemical name of the refrigerant (R-134a) is a fluorinated greenhouse gas covered by the
Kyoto Protocol, its global warming potential(GWP) is the 1430
3

Technical diagram
3. Air outlet
4. Lamp
5. Wheels
9. UV-lamp
10. Prefilter/activate coal filter
11. Continuous rain port
12. Back cover
13. Power cor
1. Oscillation louver
2. Control panel
6. Han le
7. Air inlet
8. Water tank
4

Usage
Control panel
Down key
Up key
Lamp
Mo e
Timer Oscillation
Ionizer
Power
UV
Power
Starts or stops appliance.
MODE Control
Select the functions of the unit for:
AUTO/HIGH/LOW and FAN. The
appliance will go. AUTO function the first
time it is switched on and remains in this
mode until other type programming is
chosen.
Depending
on
your
relative
humidity
conditions, turn the fan speed switch to
high or low.
FAN (Ventilation Key)
FAN (Ventilation Key): press 'MODE' key to
select 'FAN', and 'FAN' indicator light comes
on.
Lamp
Start the appliance, the lamp will turn on
automatically. The lamp color will change according
to the humidity condition (with 100 seconds as
interval between color changing).
Red color means high humidity RH ≥80%
Green color means comfortable humidity 80 > RH ≥60%
Orange color means dry RH ≤60%
Press 'LAMP' key, the lamp will be off or on
5

OSC (oscillating function)
There are three different directions,
45/90 degree and universal, the
louvers will move or fixed as select
positions
ION (ionization function)
To select 'ION', press the 'ION' key
and the light will come on. An ion
can refresh the air, it's so called air
vitamin.
Carbon filter (deodor function)
Take out the carbon filter from the bag and insert it on
the filter. See picture above.
- Clean the filter 1x every 2 weeks with a vacuum
cleaner
- Replace the filter 1x every 3 months
Order?
https://www.cleanairoptima.com/accessoires/mg/44
(contact the customer service)
UV (Sterilization function)
.To select 'UV' press the 'UV' key and
the light will come on.
Humidity setting
Press UP / DOWN key to select the desired relative
humidity level, default relative humidity is 55%. Relative
humidity 35% is selected, the compressor will not stop
until water tank full.
UV (Sterilization function): To select 'UV' press the 'UV'
key and the light will come on.
FAN (Ventilation key): press 'MODE' key to select 'FAN'
and 'FAN' indicator light comes on.
Defrost
The appliance will defrost automatically as programmed
once the coil sensor detects temperature below some
figure, and the defrosting indicator will light up at the
same time. Once defrosting finishes, the appliance will
recover the previous running mode.
Tank-full
If the water tank is full, the indicator light comes
on and flashes
Timer (timer function)
Press timer to program time and 'TIMER' light comes on while
timer is programmed. Before programming make sure that the
timer function has not been activated (the light must be off)! The
following timer programs are available:
a) Delayed power-on function (the appliance is in stand-
by status) Use key 'UP' and 'DOWN' to set the time
period (0-24 hours). The appliance will start once
time reaches setting value.
b) Delayed power-off function (the appliance is in
working status). The appliance will stop once time
setting value.
6
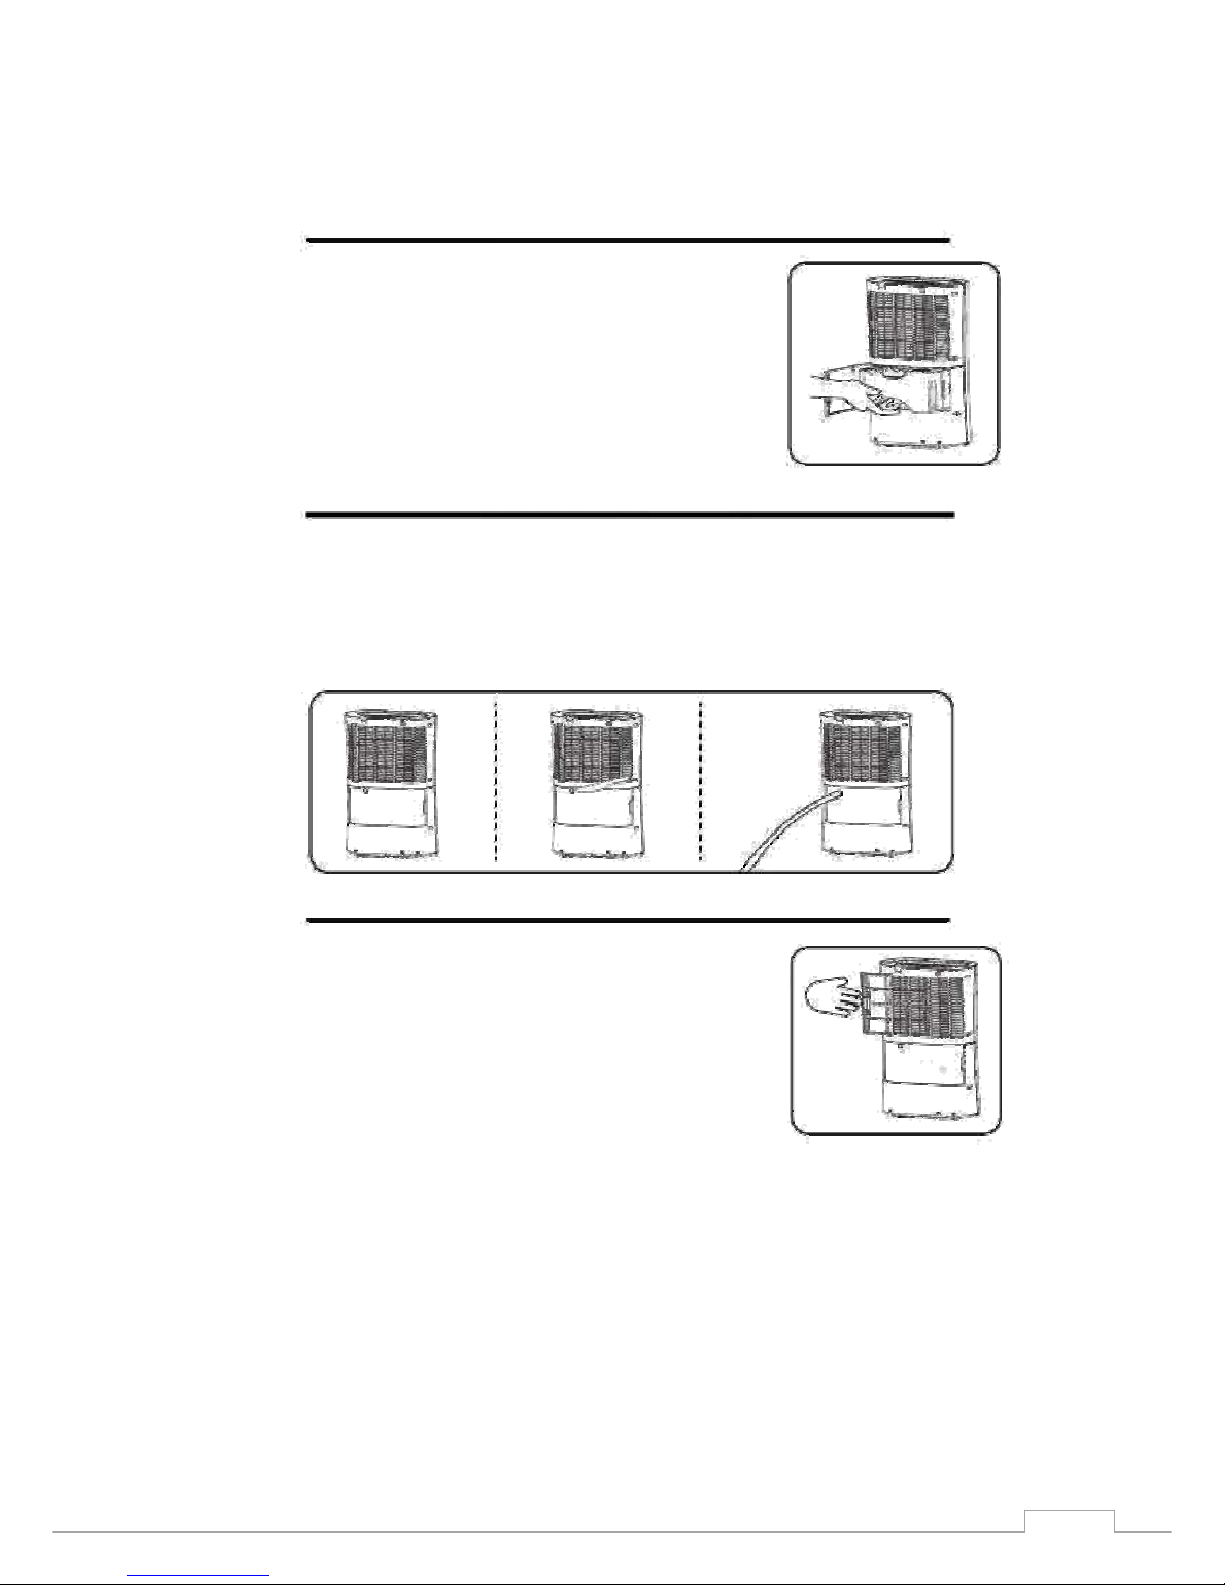
Emptying the water tank
Empty the water tank regularly when full, the air dehumidifier turns off
automatically and the tank full indicator is turned on.
•Open the back cover of your device
•Hold the water tank by its handle
•Pull the water tank out carefully
•Empty the water tank
Return the empty water tank to its position after wiping it off from any water
residue.
Continuous drainage operation
Your device has a drainage port that allows you to have continuous drainage. Connect a 10mm diameter PCV pipe (optional - not
provided in the package) with the drainage port located on back part of the unit, for continuous drainage purpose, as below figure.
Ensuring the hose is directed downwards, allowing water to flow by gravity to an external drain. Ensure that the end of the hose is
lower than the drain opening, otherwise the water will not drain and flooding may occur.
Replacement and maintenance of air filter
When used regularly, the filter may become clogged with dust and particles.
Therefore the filter should be cleaned every one or two weeks. Follow these
steps:
1) Remove the filter by pulling it our carefully.
2) Clean the filter with a vacuum cleaner or with water.
Tap the filter to remove excess water and let it dry completely. Once you
make sure that your filter is completely dry, re-install it on your device. Do not
wash your filter in the dishwasher and never use hair dryers.
7

Other notice
1) The machine uses the temperature range of 5° tot 32°C, please use the machine in this
scope (otherwise it will start the protection action, causing the machine automatically
stop running)
2) At room temperature at 5° and the absolute temperature of the environment is very low
It is not necessary to use the machine
3) When the machine is running, it will produce a small portion of the heat, the room
temperature will be a little higher, this is a normal phenomenon, please feel at ease
4) Automatically stop running, please send the water in the water drained, and put back to
the water tank, the machine will continue to operate
5) In order to ensure the normal operation, do not open the water tank float cover, or place
any foreign body in the water tank
6) When the machine can not start or unknown cause, please check the following steps:
1) Check whether the plug or the power cord is normal
2) Above all is normally, just please re-start the machine after 10 minutes
3) If you are still unable to start, please contact the local dealer or the
company's customer service department
7) Air inlet and outlet and the distance between the adjacent material to keep 15 cm above
8) After the machine is stopped, please restart in five minutes to make sure that the machine
is used for longer service life
9) If the machine is a long time not in use, please unplug the power plug
10) If the machine’s inlet is frosting it will automatically defrost
8
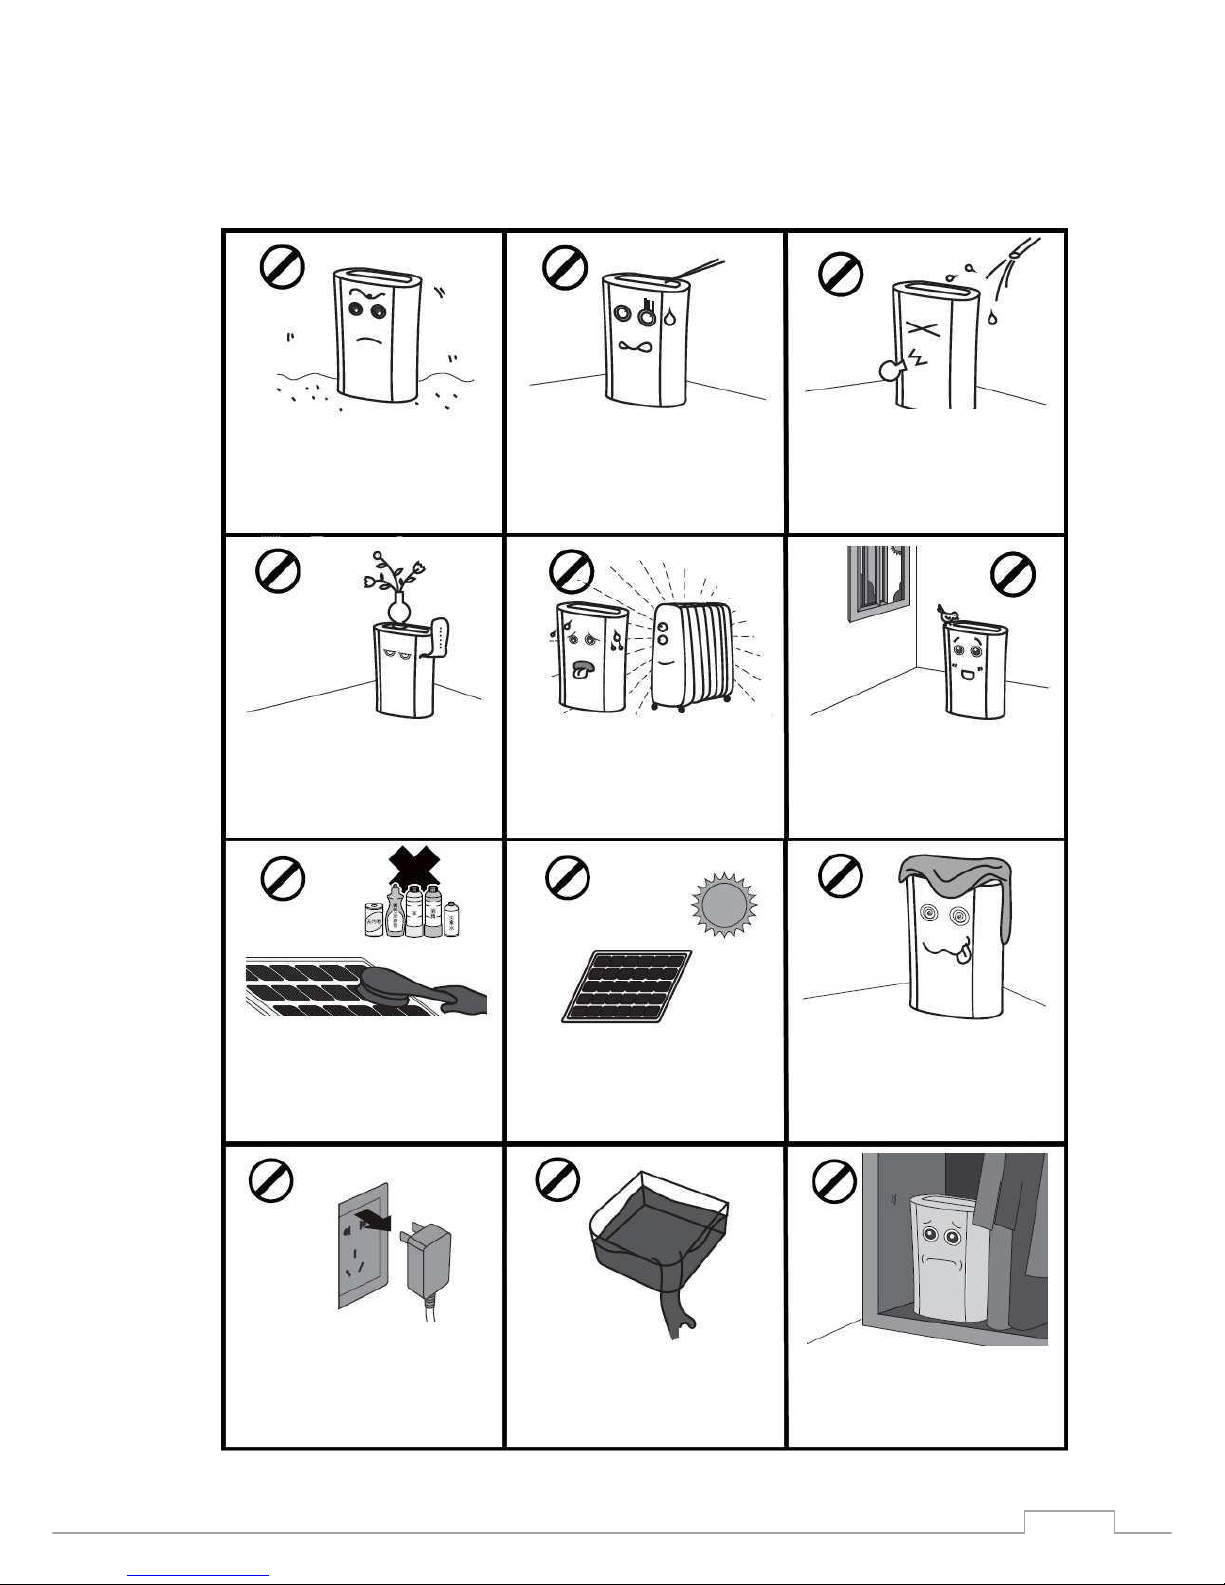
Care and cleaning
Do not put the body on a soft uneven
ground, in order to avoid vibration or sound.
Do not place heavy or water-filled things on
the dehumidifier.
Please clean filter once every two weeks
with water (no water above 40º ,do not use
alcohol,
gasoline,
toluene
and
other
dangerous liquid).
Power failure or long-term no use, please
unplug the power cable plug, so as to avoid
leakage and fire.
Do not use any fine rod, hard objects into the
body, so as to avoid failure or danger.
Do not place the device near a heat sources
to avoid danger and waste electricity.
After cleaning the filter, please do not dry in
the sun, to prevent distortion
Before you moving the machine, pour out the
water within the water tank.
Clean the machine with a soft, slightly damp
cloth. Do not use sprinkling water to avoid
damage to electrical insulation.
Please close the doors and windows when
used to achieve the effect of the desiccant.
Do not put items above or around the body or
the air outlet, to ensure that the effect of the
desiccant air.
When not in use, please unplug the power
plug to avoid danger.
9
Fault code
Code Fai ure
E1
Room temperature (ambient temperature)
sensor for short circuit
E2
R
oom temperature sensor open circuit
E3
Temperature sensor short circuit
E4
Temperature sensor short circuit
E5
Coiler temperature sensor short circuit
E6
Coiler temperature sensor open circuit
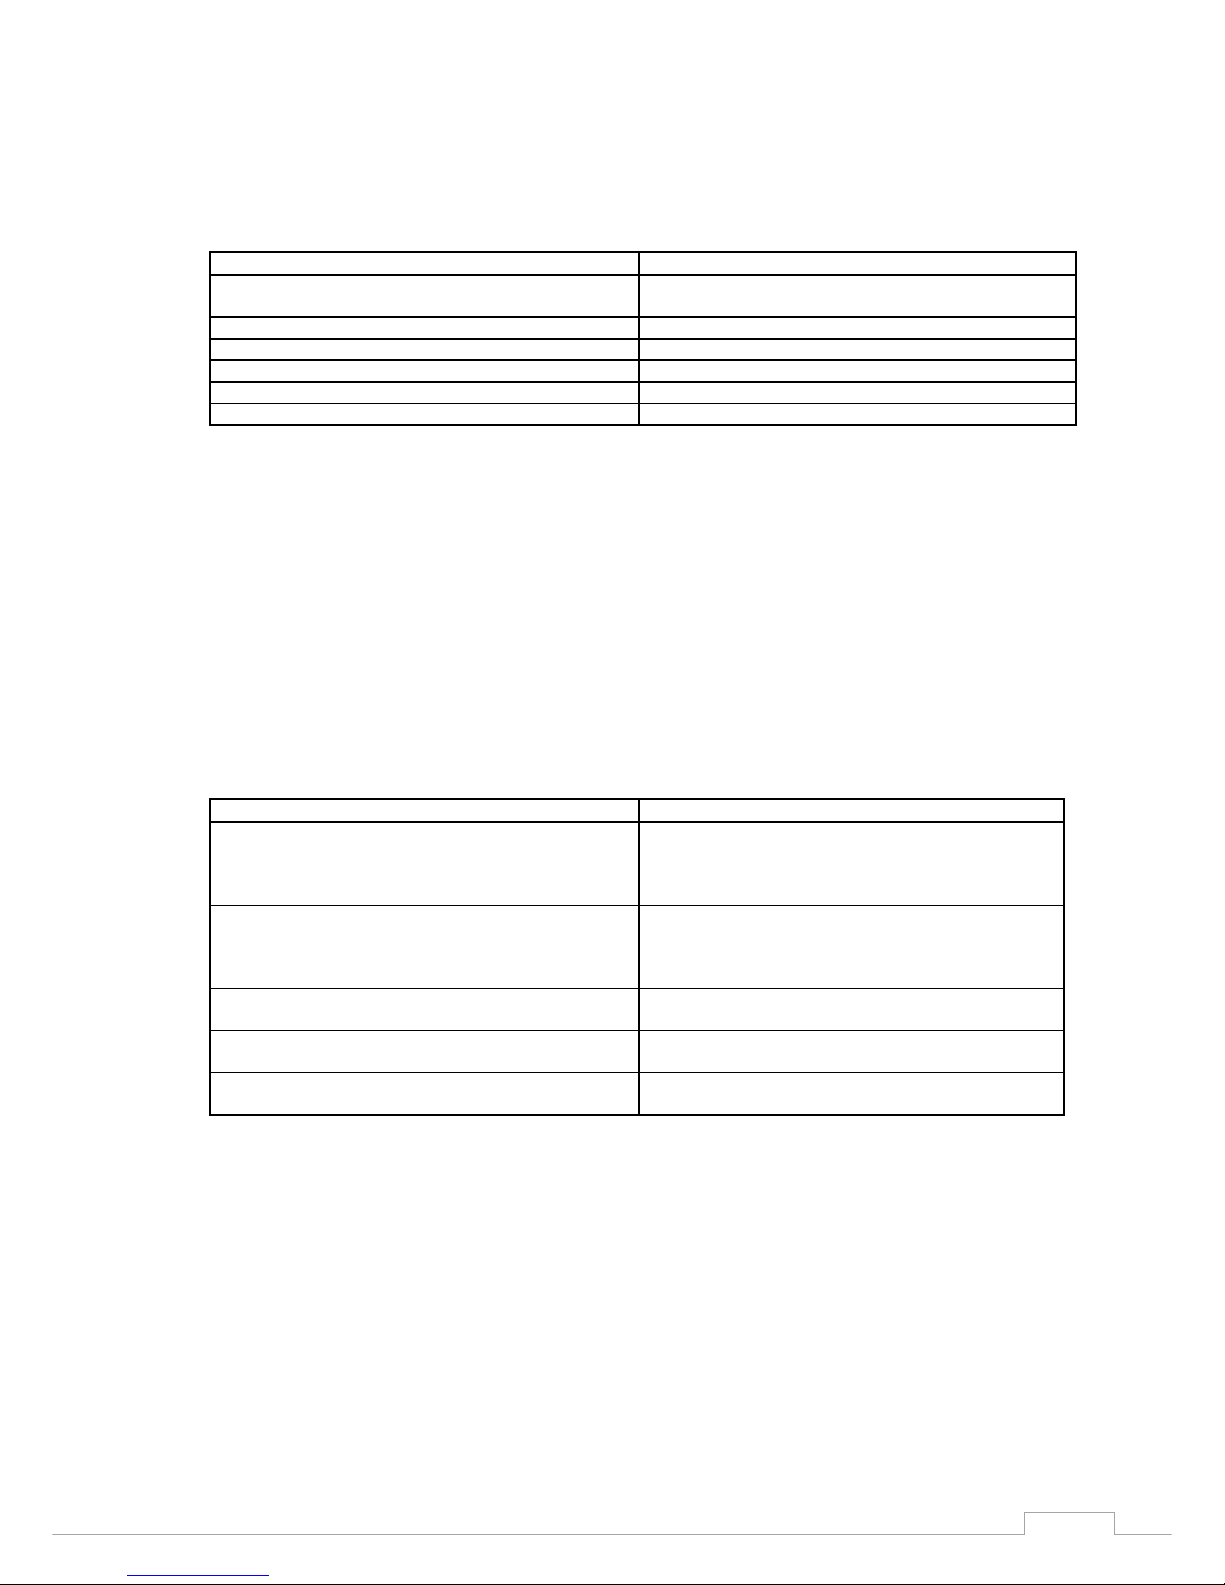
Trouble shooting
When the following problems occur, please contact the local seller or customer service:
1) When the fuse breaks
2) When water or other dirt get's into the machine
3) When the power line or plug is abnormally hot
Please check your machine with the following steps
Issues P ease check as fo owing
The operation switch is "ON" but the machine is
1)
Water tank placed correctly?
not operating
2)
Power plug inserted correctly?
3)
Is the fuse broken?
4)
Is the power on?
Low dehumidification performance
1)
Is the front net dirty?
2)
Is the inte
rior temperature and humidity
too low?
3)
Is the air outlet or air inlet blocked?
Long time operation cannot reach the suitable
1)
Are there opened doors or windows?
humidity condition
2)
Is the interior space too big?
The machine is making noise
1
)
Is the floor flat and hard?
2)
Is the dehumidifier in the right position?
The lamp is continuously on
1)
Is the temperature or humidity sensor
damaged or loosen?
10

Specifications
•Dehumidification capacity: 10 liter / day (30°C/Rv80%)
•Fan air flow: 120m³/h
•Suitable for rooms up to: 40m² / 100m³ / 430ft²
•Dimensions: 580x380x195mm (HxWxD)
•Noise level: <39dB(A)
•Weight: 14,3kg
•Color: White/Black
•Power supply: 220 – 240V, 50Hz
Ask your retailer or your municipality for updated information regarding the disposal of the
packaging and of the device
11

Service
WARRANTY CERTIFICATE FOR THE Clean Air Optima CA-704 Dehumidifier
-
2in1: Dehumidifying & air purifying
Date of purchase: ………………………………………………………………………………………
…
Customers name: …………………………………………………………………………………………
Address: …………………………………………………………………………………………………….
Telephone: ………………………………………………………………………………………………….
Email: ………………………………………………………………………………………………………..
Seller’s name: …………………………………………………………………………………………….
..
Address: …………………………………………………………………………………………………….
1 Please fill in completely this Warranty Certificate Send it with the invoice and the unit,
postage pre-paid and using the original packing box, to your distributor Make sure to include
the appropriate return postage for the package
2 Please enclose a short description of the damage, fault or malfunction, and the
circumstances under which these problems arose
The C ean Air Optima CA-704 is subjected to strict testing procedures before leaving the
factory If within one year from the date of purchase the product does not perform according to
the specifications, because of factory defects, the purchaser is entitled to free repairs or
replacement of parts upon presentation of this warranty (provided that the malfunction or damage
to the device and/or parts occurred under normal operating conditions) What is covered: All parts
defective in material and workmanship For how long: one year from purchase date What we will
do: Repair or replace any defective parts Exclusions: Regular replacement filters and UV-C Lamp
Other Conditions
The provisions of this warranty are in lieu of any other written warranty whether express or
implied, written or oral, including any warranty of merchantability or fitness for a particular
purpose The manufacturer’s maximum liability shall not exceed the actual purchase price paid by
you for the product In no event shall the manufacturer be liable for special, incidental,
consequential, or indirect damages This warranty does not cover a defect that has resulted from
improper or unreasonable use or maintenance, faulty assembly, accident, natural catastrophes,
improper packing, or unauthorized tampering, alteration, or modification as determined solely by
us This warranty is void if the label bearing the serial number has been removed or defaced
Contact
C ean Air Optima Germany GmbH
Enschedestrasse 14
48592 Nordhorn
Germany
info@cleanairoptima com
www cleanairoptima
12

13
Other manuals for CA-704
1
Table of contents
Other Clean Air Optima Dehumidifier manuals

Clean Air Optima
Clean Air Optima CA-707 User manual

Clean Air Optima
Clean Air Optima CA-703 User manual

Clean Air Optima
Clean Air Optima CA-702 Smart User manual

Clean Air Optima
Clean Air Optima CA-705 Smart User manual

Clean Air Optima
Clean Air Optima CA-703B User manual

Clean Air Optima
Clean Air Optima CA-703 User manual


