Clean Air Optima CA-703B User manual

Read these instructions carefully before you start using the Dehumidifier and keep the manual for later usage.
Clean Air Optima Dehumidifier CA-703B/ CA-703W
© Copyright: Clean Air Optima
®
Manual
(EN) User manual
(DE) Gebrauchsanweisung
(NL) Gebruiksaanwijzing
(FR) Mode d’emploi
(ES) Manual del usuario
(PL) Instrukcja obsługi
(CZ) Uživatelská příručka
(RO) Manual de utilizare
(LT) Naudotojo vadovas
(EE) Kasutusjuhend
(LV) Lietošanas pamācība
Find more languages on:
www.cleanairoptima.com/
info/manuals
(RU) Руководство
пользователя
(MK) Прирачник
за користење

2
CA-703B/ CA-703W Parts / Main unit

3

4
English
Thank you for purchasing the Clean Air Optima Dehumidifier CA-703B/ CA-703W.
We wish you many years of healthy indoor air with this ecient and eective product.
Ensure that all safety precautions are followed when using this electrical appliance for the proper
operation of the device. These instructions describe the safety precautions to be observed
during operation. They are meant to prevent injuries and to avoid damaging the device.
Description of the appliance
The appliance consists of the following main components:
1. Handle
2. Air inlet
3. Air outlet
4. Power interface
5. Continuous drainage (water drain, hose connection). Drain hose 1 meter included
6. Water tank
7. Control panel
3. Air outlet
7. Right side plate
8. Air outlet

5
Safety warnings
This device may only be used in accordance with this safety instructions. Take the following
steps to minimize the risk of personal injury caused by for example electric shocks or fire.
1. Only for indoor use. Do not use or store outdoors.
2. The appliance is not intended to be used by children or persons with reduced physical,
sensory or mental capabilities, unless they are supervised by a person responsible
fortheirsafety.
3. Use proper voltage: AC 220V – 240V, 50/ 60Hz.
4. Do not use the device when there is visible damage on the electrical cord or on the device
itself. Do not repair the device yourself in case of damage. Never pull the device by its cord.
If the power cord is damaged, then it must be replaced by an authorized service person
toprevent electric shock or fire.
5. Repairs may only performed by authorized service personal. Do not try to repair the device
yourself to prevent electric shock or fire.
6. Always switch o the device before disconnecting the plug.
7. Always remove the plug from the cord when the device is not being used.
8. Pull the plug when you do not use the device or when you clean internal or external parts of it.
9. For safety use put the device in a steady, horizontal position. Do not move while using.
10. Do not use the device in rooms where inflammable liquids, gases are stored or close
toheat sources or heat-generating devices.
11. Never insert any other object into the body to avoid breakdown.
12. Never cover the air inlet and air outlet grid.
13. Never dissemble or replace the device’s inner parts.
14. Use and store the device not under 5°C or above 50°C.
15. Do not tip the unit to any side when the water tank is full.
16. Do not put heavy objects on the unit.
17. Please avoid places with direct sunlight. There is a risk that the device discolors.
18. Never immerse the unit in water or other liquids.
19. Empty the water tank regularly. In extreme conditions the water tank may be full after a
few hours operation.
20.Use, maintain and clean the device as described in this manual.

6
How to use
Power
Press the “POWER” button, the button lights
up blue, the device starts to dehumidify.
Press the “POWER” button again, the device
turns o. All indicator lights go out. The fan will stop
10seconds later.
The evaporator in the dehumidifier may defrost
automatically if it is operated with a room temperature
less than 18 °C.
- During the defrosting operation, the dehumidification
function and air purification function may intermit.
- Don’t turn of the power or pull out the power plug of
the device during the defrosting operation.
Air Purify Indicator Light
When the device is working, the air purify
function (Ionizer & UV) starts to work when
you push this button. The indicator light will
light up.
Timer
Press the “TIMER” button to set 0-24 hours
timing. Press the button one time, the timer
willincrease with one hour.
When the device is operating, the timer that is set
indicates when the device switches o.
Temperature Light
This light shows the indoor temperature. This light shows the temperature both
when the device is in operation and in standby mode.
Dehumidify Indicator Light
This light shows the indoor humidity. This light
shows the humidity level both when the device
is in operation and in standby mode.
Water Tank Full Indicator Light
When water tank is full, the device will automatically stop. This light turns on and
lights up red.
Drain the water tank, and return the water tank to the body of the device, the water
tank full indicator light will turn o. The device will work automatically again.

7
Water Drainage
Water tank:
The Water tank full indicator light will lights up red when the water tank is full, a warning will
begiven.
Take out the water tank(FIG 1), then empty the water inside. Then put the water tank back into
the dehumidifier correctly.
(Fig 1)
Please do not move the float out of the water tank, or the sensor will not detect the water tank
whether it is full or not (FIG 2).
(Fig 2)

8
Continuous Drainage
Connect the hose
tothe drainage hole.
Installation
When the device is working, make sure that the left distance is 20 cm away from walls
andfurniture, see picture below.

9
Maintenance
NOTE: TURN OFF THE DEVICE AND UNPLUG IT BEFORE ANY MAINTENANCE OR REPAIR
TO AVOID ELECTRIC SHOCKS.
Cleaning
Before cleaning the device, unplug the power cord.
Clean the housing with a soft moisture cloth. Do not use chemical solvent (such as benzene,
alcohol, gasoline). The surface may be damaged or even the whole case may be deformed.
Do not sprinkle water on the device.
Dehumidifier storage
If the dehumidifier will not be used for an extended period of time:
1. Drain the water tank completely and make sure that there is no more water stocked inside.
2 Unplug the device and fold up the power supply cord.
3. Remove and clean the Pre-Filter, allow it to dry completely and reinstall it.
4. Store the dehumidifier in a cool, dry location, away from direct sunlight, extreme
temperature and excessive dust.

10
Troubleshooting
The following is a troubling shooting guide to help you solve any issues that you may have
using the Clean Air Optima Dehumidifier CA-703B/ CA-703W.
Problem Possible Cause Solution
Device does not
switch on
Ineciency
dehumidification
The power cord does not
connect correctly
The water tank is full
orwatertank is not
inthecorrectposition
The environment temperature
isbelow 5°C or above 50°C
The air inlet and outlet have a
blockage
The setting humidity is higher
than environmental humidity
Connect the power plug and
power socket correctly
Drain the water tank and replace
the water tank to the correct
position
The device can not work in such
temperature
Clean the blockage from the air
inlet and outlet
Set the humidity at least 5%
lower than environmental
humidity
Noise The device is installed askew Make sure the machine
isinstalled uprightly

11
WARNING!
If the above recommended solutions do not work, please contact Clean Air Optima technical
support at the telephone number for your region. Do not attempt to disassemble, reassemble,
or repair the device as this may void the warranty.
Specifications
Model CA-703B/ CA-703W
Rated voltage 220V - 240V, 50/60Hz
Rated power 65W
Fan capacity 80 m³/h
Capacity 700ml/Day (30°C RH 80%)
Water tank 2L
Sound level <38 dB(A)
Equipped with Ionizer and UV-Lamp
Dimensions 240 x 140 x 360mm
Weight 2.16kg
Colour White
Complies with
EU regulations CE / WEEE / RoHS
Ask your retailer or your municipality
for updated information regarding
thedisposal of the packaging and
ofthedevice.

12
Service
Warranty Certificate for the Clean Air Optima Dehumidifier CA-703B/ CA-703W.
Date of purchase: ............................................................................................................................................
Customers name: ...........................................................................................................................................
Address: .................................................................................................................................................................
Telephone: ............................................................................................................................................................
Email: .......................................................................................................................................................................
Seller’s name: ....................................................................................................................................................
Address: .................................................................................................................................................................
1. Please fill in completely this Warranty Certificate. Send it with the invoice and the unit,
postage pre-paid and using the original packing box, to your distributor. Make sure to include
the appropriate return postage for the package.
2. Please enclose a short description of the damage, fault or malfunction, and thecircumstances
under which these problems arose.
The Clean Air Optima Dehumidifier CA-703B/ CA-703W is subjected to strict testing
procedures before leaving the factory. If within two years from the date of purchase the
product does not perform according to the specifications, because of factory defects, the
purchaser is entitled tofree repairs or replacement of parts upon presentation of this warranty
(provided that the malfunction or damage to the device and/or parts occurred under normal
operating conditions). What is covered: All parts defective in material and workmanship. For
how long: two years from purchase date. What we will do: Repair or replace any defective parts.
Other Conditions
The provisions of this warranty are in lieu of any other written warranty whether express
orimplied, written or oral, including any warranty of merchantability or fitness for a particular
purpose. The manufacturer’s maximum liability shall not exceed the actual purchase price
paid by you for the product. In no event shall the manufacturer be liable for special, incidental,
consequential, or indirect damages. This warranty does not cover a defect that has resulted
from improper or unreasonable use or maintenance, faulty assembly, accident, natural
catastrophes, improper packing, or unauthorized tampering, alteration, or modification
asdetermined solely by us. This warranty is void if the label bearing the serial number
hasbeen removed or defaced.

13
Thank you
for reading!
Share your feedback about the Clean Air Optima
Dehumidifier CA-703B/ CA-703W on:
www.cleanairoptima.com
For frequently asked questions about the CA-703B/ CA-703W go to:
www.cleanairoptima.com and search for the CA-703B/ CA-703W.
Download PDF instruction manual on:
www.cleanairoptima.com/info/manuals
Watch all Clean Air Optima Product
animation video’s on:
www.youtube.com
Clean Air Optima International B.V. | David Ricardostraat 9-7 / 9-9 | 7559 SH Hengelo (ov)
The Netherlands | Phone: +31 (0) 74 - 2670145
Clean Air Optima Germany GmbH | Enschedestraße 14 | 48529 Nordhorn | Germany
Phone: +49 (0) 5921 879-121
E-mail: inf[email protected] Internet: www.cleanairoptima.com

14
Deutsch
Vielen Dank, dass Sie sich für den Luftentfeuchter Clean Air Optima CA-703B/
CA-703W entschieden haben.
Wir wünschen Ihnen viele Jahre gesunde Raumluft mit diesem ezienten und eektiven
Produkt.
Treen Sie für die ordnungsgemäße Funktion dieses elektrischen Geräts unbedingt alle
Sicherheitsvorkehrungen, wenn das Gerät verwenden. Diese Anleitung beschreibt die
Sicherheitsvorkehrungen, die im Betrieb zu beachten sind. Sie sind dafür vorgesehen,
Verletzungen vorzubeugen und Beschädigungen am Gerät zu vermeiden.
Beschreibung des Geräts
Das Gerät besteht aus folgenden Hauptkomponenten:
1. Gri
2. Lufteinlass
3. Luftauslass
4. Stromanschluss
5. Kontinuierliche Entwässerung (Wasserablauf, Schlauchanschluss) Abflussschlauch 1
Meter im Lieferumfang enthalten
6. Wassertank
7. Bedienfeld
8. Luftauslass

15
Sicherheitshinweise
Dieses Gerät darf nur in Übereinstimmung mit diesen Sicherheitshinweisen verwendet
werden. Führen Sie die folgenden Schritte aus, um das Verletzungsrisiko für Personen
(z.B.durch Stromschläge oder Feuer) zu minimieren.
1. Nur für Innenräume geeignet. Nicht im Freien verwenden oder lagern.
2. Das Gerät ist nicht für die Verwendung durch Kinder oder Personen mit eingeschränkten
körperlichen, sensorischen oder geistigen Fähigkeiten bestimmt, es sei denn, diese
Personen werden von einer für ihre Sicherheit verantwortlichen Person beaufsichtigt.
3. Die richtige Spannung verwenden: AC 220V – 240V, 50/60Hz.
4. Verwenden Sie das Gerät nicht, wenn sichtbare Schäden am Netzkabel oder am Gerät
selbst vorhanden sind. Reparieren Sie das Gerät nicht selbst, wenn es beschädigt ist.
Ziehen Sie das Gerät niemals an seinem Kabel. Wenn das Netzkabel beschädigt ist, muss
es von einem befugten Servicemitarbeiter ausgetauscht werden, um Stromschlag oder
Feuer zu vorzubeugen.
5. Reparaturen dürfen nur von befugtem Servicepersonal durchgeführt werden. Nicht
versuchen, das Gerät selbst zu reparieren, um Stromschlägen oder Feuer vorzubeugen.
6. Immer das Gerät ausschalten, bevor Sie den Netzstecker abziehen.
7. Immer den Stecker am Kabel abziehen, wenn das Gerät nicht benutzt wird.
8. Den Netzstecker aus der Steckdose ziehen, wenn Sie das Gerät nicht benutzen oder wenn
Sie innere oder äußere Teile des Geräts reinigen.
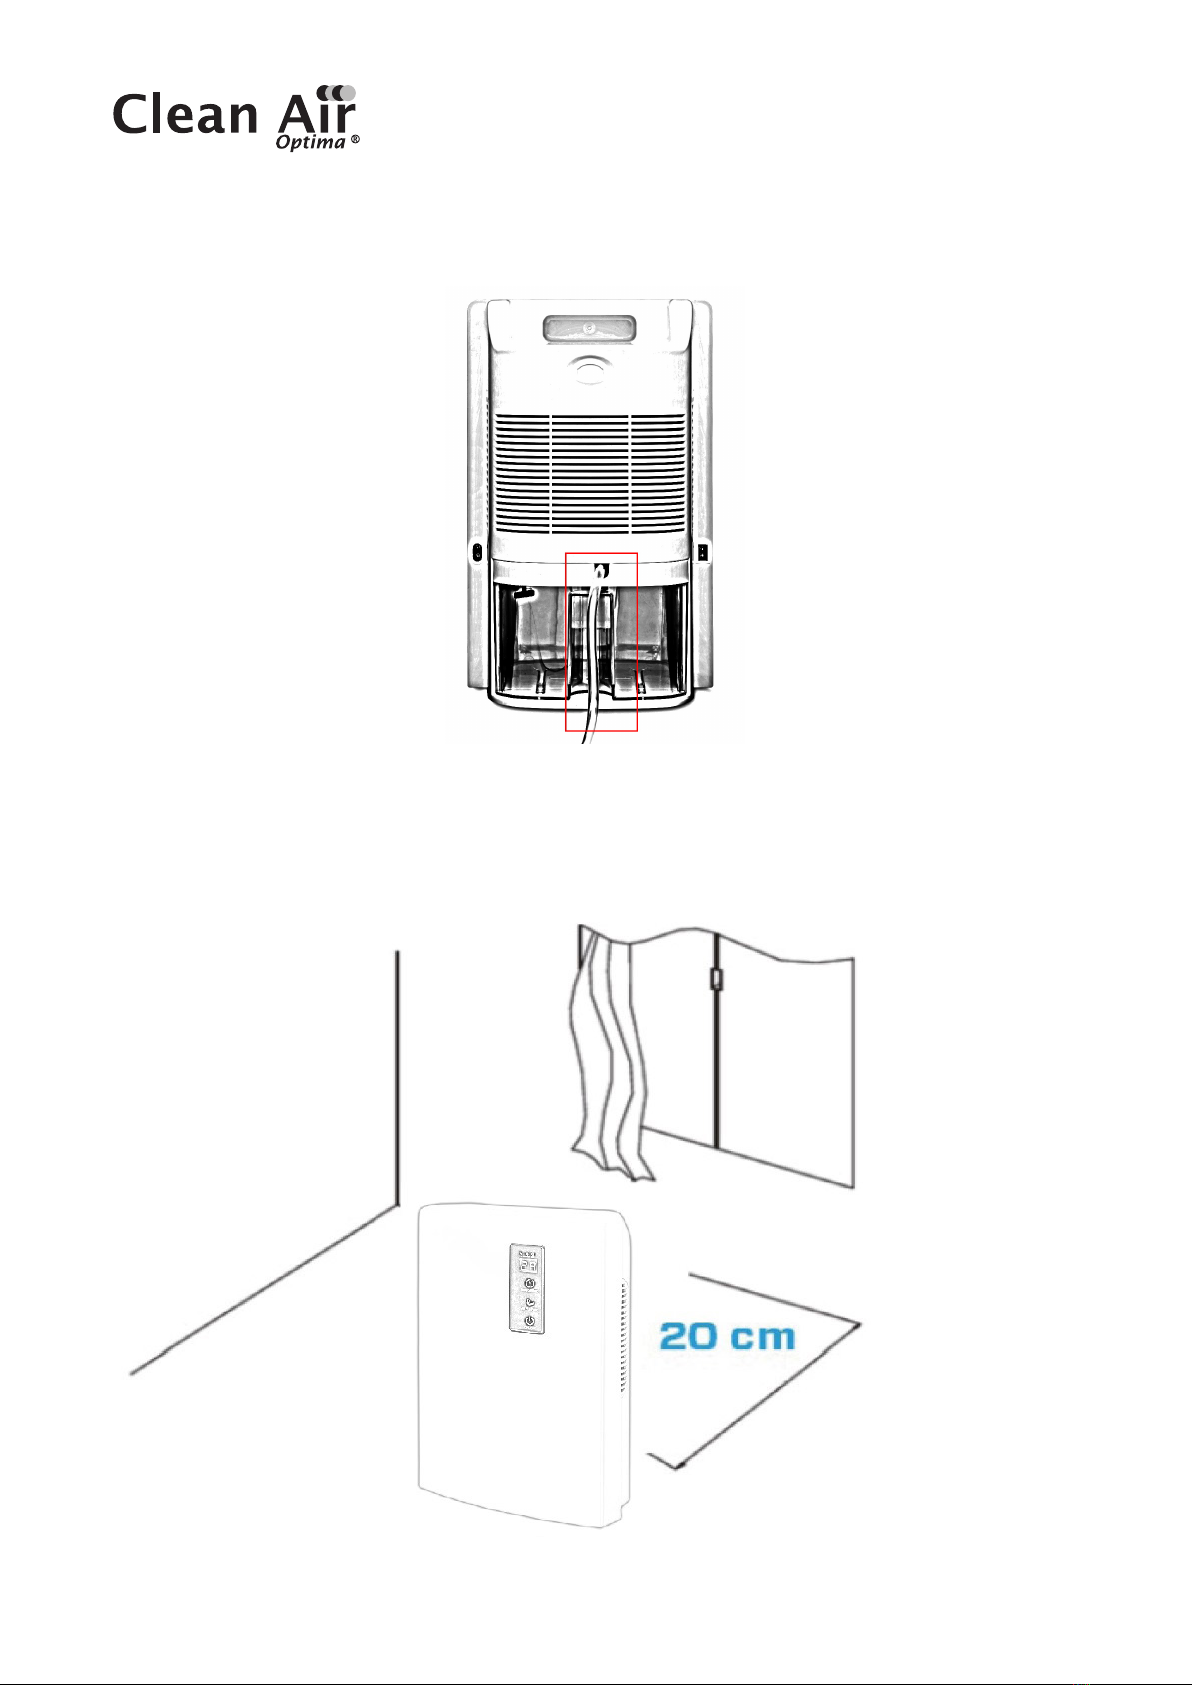
9. Zur Sicherheit das Gerät in eine stabile, horizontale Position stellen. Beim Gebrauch nicht
bewegen.
10. Verwenden Sie das Gerät nicht in Räumen, in denen brennbare Flüssigkeiten oder Gase
aufbewahrt werden, in der Nähe von Wärmequellen oder in besonders feuchten Räumen
(wie dem Badezimmer).
11. Nie andere Gegenstände in das Gehäuse einführen, um Ausfällen vorzubeugen.
12. Nie den Lufteinlass und das Luftauslassgitter abdecken.
13. Nie die inneren Teile des Geräts zerlegen oder ersetzen.
14. Verwenden und lagern Sie das Gerät nicht unter 5°C oder über 50°C.
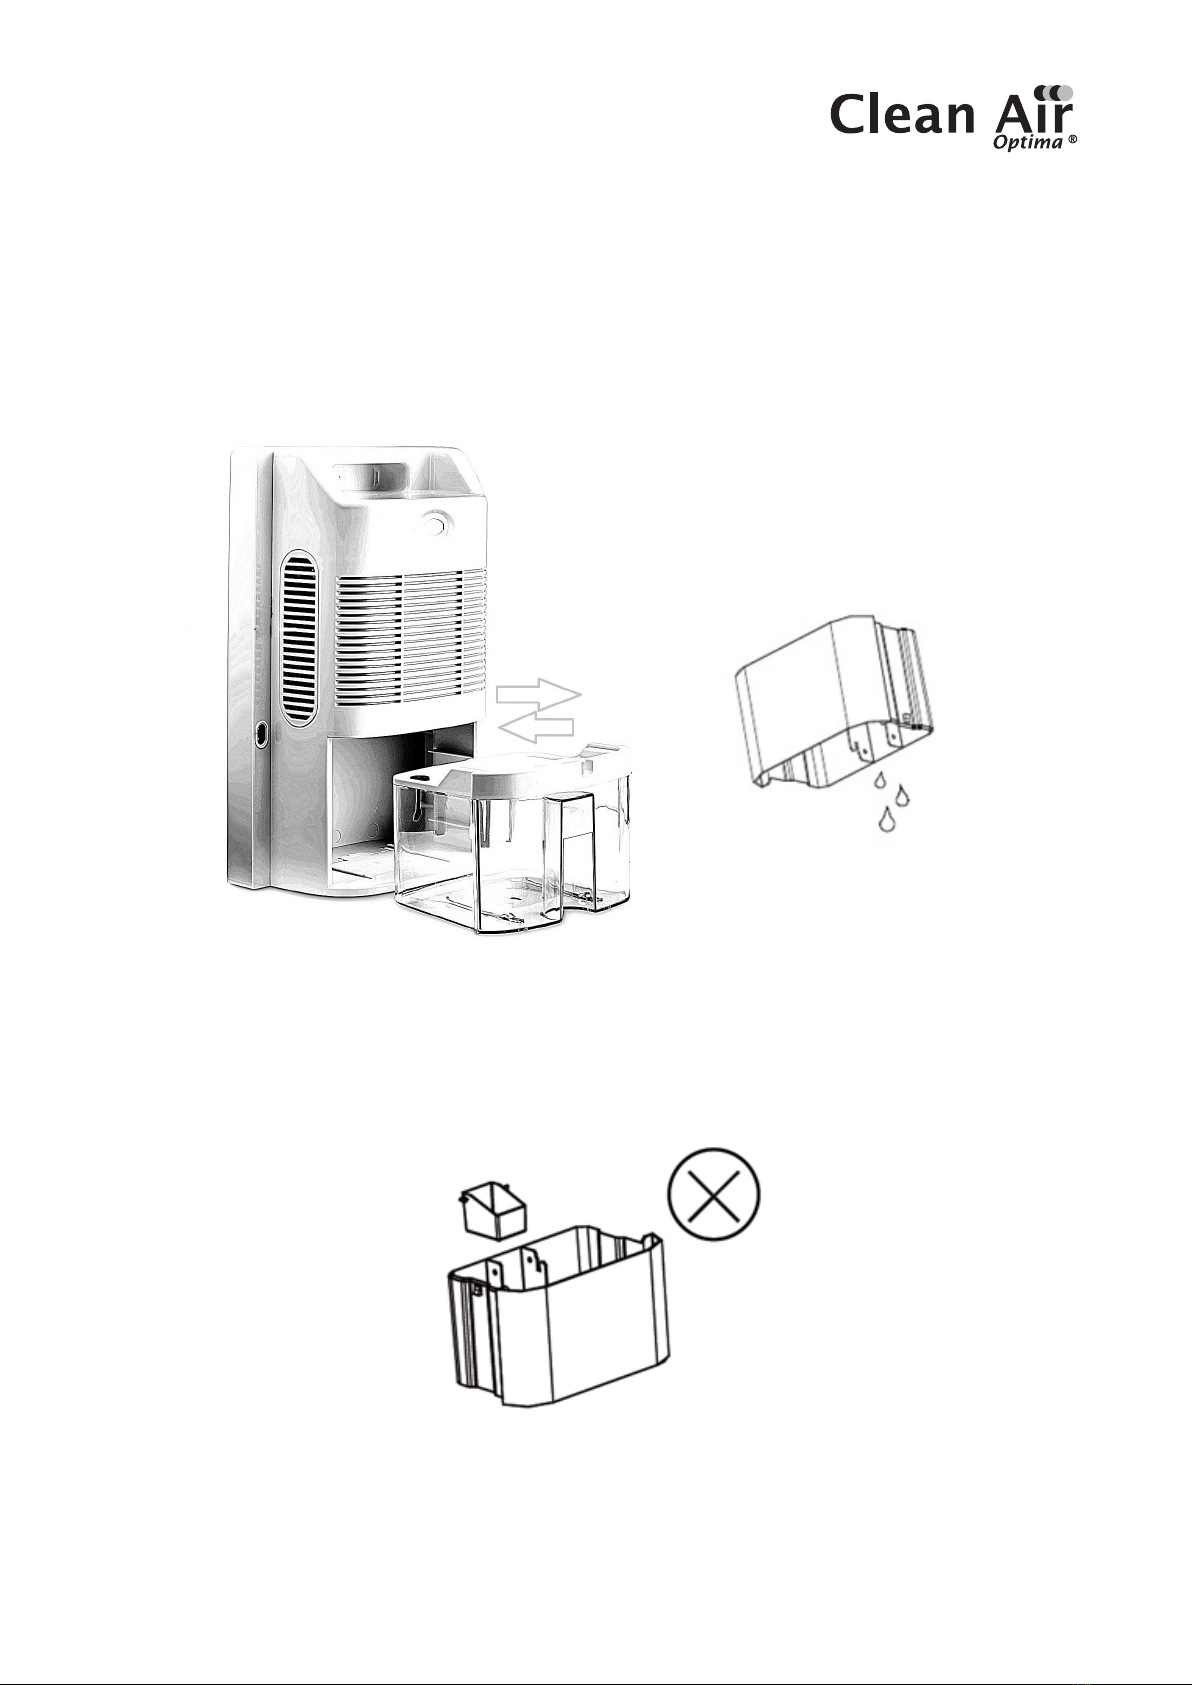
15. Neigen Sie das Gerät nicht zur Seite, wenn der Wassertank voll ist.
16. Keine schweren Gegenstände auf das Gerät stellen.
17. Bitte Orte mit direktem Sonnenlicht vermeiden. Es besteht die Gefahr, dass sich das
Gerätverfärbt.
18. Nie das Gerät in Wasser oder andere Flüssigkeiten eintauchen.
19. Den Wassertank regelmäßig entleeren. Unter extremen Bedingungen kann der Wassertank
bereits nach wenigen Stunden voll sein.
20.Verwenden, warten und reinigen Sie das Gerät wie in dieser Anleitung beschrieben.

16
Verwendung
Leistung
Drücken Sie auf die Taste „POWER“, die Taste
leuchtet blau auf, das Gerät beginnt
Drücken Sie noch einmal auf die Taste „POWER“.
Das Gerät schaltet sich aus. AlleKontrollleuchten erlöschen.
Der Lüfter stoppt 10 Sekunden später.
Der Verdampfer des Luftentfeuchters kann automatisch
abtauen, wenn er bei einer Raumtemperatur von weniger als
18 °C betrieben wird.
- Während des Abtauvorgangs können die Entfeuchtungs-
funktion und die Luftreinigungsfunktion unterbrochen
werden.
- Schalten Sie das Gerät während des Abtauvorgangs
nicht aus und ziehen Sie nicht denNetzstecker.
Kontrollleuchte Lufreinigung
Wenn das Gerät in Betrieb ist, startet die Luft-
reinigungsfunktion (Ionisator & UV), wenn
diese Taste drücken. Die Kontrollleuchte leuchtet auf.
Timer
Drücken Sie die Taste „TIMER”, um eine Zeit von
0-24 Stunden einzustellen. Drücken Sie dieTaste
einmal, der Timer wird um eine Stunde erhöht. Wenn das
Gerät in Betrieb ist, zeigt der eingestellte Timer an, wann das
Gerät ausgeschaltet wird.
Kontrollleuchte Temperatur
Diese Leuchte zeigt die Innentemperatur an.
Diese Leuchte zeigt die Temperatur sowohl im Betrieb als auch im
Standby-Modus an.
Kontrollleuchte für Entfeuchtung
Diese Leuchte zeigt die Raumluftfeuchtigkeit an. Diese Leuchte zeigt die
Raumluftfeuchtigkeit sowohl im Betrieb als auch im Standby-Modus an.
Kontrollleuchte „Wassertank voll“
Wenn der Wassertank voll ist, stoppt das Gerät automatisch. Diese Leuchte schaltet
sich einund leuchtet rot auf.
Entleeren Sie den Wassertank und setzten Sie den Wassertank wieder in das Gehäuse
des Geräts ein. Die Kontrollleuchte für die Wassertankfüllung geht aus. Das Gerät geht
automatisch wieder in Betrieb.

17
Wasserableitung
Wassertank:
Die Kontrollleuchte „Wassertank voll“ leuchtet rot, wenn der Wassertank voll ist. Eine Warnung
wird angezeigt.
Nehmen Sie den Wassertank heraus (Abb. 1), und schütten Sie dann das Wasser aus. Setzen
Sie dann den Wassertank wieder richtig in den Luftentfeuchter ein.
(Abb. 1)
Bitte nehmen Sie den Schwimmer nicht aus dem Wassertank, da der Sensor sonst nicht
erkennt, ob der Wassertank voll ist (ABB. 2).
(Abb. 2)

18
Kontinuierliche Entwässerung
Den Schlauch an die
Entwässerungsönung
anschließen.
Installation
Wenn das Gerät arbeitet, achten Sie darauf, dass der linke Abstand 20 cm von Wänden
undMöbeln entfernt ist (siehe Bild unten).

19
Wartung
HINWEIS: SCHALTEN SIE DAS GERÄT AUS UND ZIEHEN SIE DEN NETZSTECKER, BEVOR
SIE ES WARTEN ODER REPARIEREN, UM STROMSCHLÄGE ZU VERMEIDEN.
Reinigung
Bevor Sie das Gerät reinigen: Ziehen Sie den Netzstecker aus der Steckdose.
Reinigen Sie das Gehäuse mit einem weichen, feuchten Tuch. Verwenden Sie keine
chemischen Lösungsmittel (z.B. Benzol, Alkohol, Benzin). Die Oberfläche kann beschädigt oder
sogar das gesamte Gehäuse verformt werden.
Sprühen Sie kein Wasser auf das Gerät.
Lagerung des Lufentfeuchters
Wenn der Luftentfeuchter längere Zeit nicht benutzt wird:
1. Entleeren Sie den Wassertank vollständig und stellen Sie sicher, dass sich kein Wasser
mehr im Tank befindet.
2. Ziehen Sie den Netzstecker ab und wickeln Sie das Netzkabel auf.
3. Entfernen und reinigen Sie den Vorfilter, lassen Sie ihn vollständig trocknen und bauen
Sieihn wieder ein.
4. Lagern Sie den Luftentfeuchter an einem kühlen, trockenen Ort, nicht im direkten
Sonnenlicht, in extremen Temperaturen und starkem Staub.

20
Störungsbehebung
Im Folgenden finden Sie eine Anleitung zur Störungssuche. Sie hilft Ihnen, Probleme zu lösen,
die bei Verwendung des Luftentfeuchters Clean Air Optima CA-703B/ CA-703W auftreten
können.
Problem Mögliche Ursache Lösung
Gerät schaltet
nichtein
Ineziente
Entfeuchtung
Das Netzkabel ist nicht richtig
angeschlossen
Der Wassertank ist
voll odernicht in der
richtigenPosition
Die Umgebungstemperatur liegt
unter 5°C oder über 50°C
Verstopfung am Lufteinlass
und-auslass
Die eingestellte Luftfeuchtigkeit
ist höher als die
Umgebungsfeuchtigkeit
Den Netzstecker und die
Steckdose korrekt anschließen
Den Wassertank leeren und
inder richtigen Position wieder
einsetzen
Das Gerät funktioniert bei einer
solchen Temperatur nicht
Verstopfung am Luftein-
und-austritt entfernen
Die Luftfeuchtigkeit
mindestens 5% niedriger als die
Luftfeuchtigkeit in der Umgebung
einstellen
Geräusch Das Gerät ist schräg aufgestellt Darauf achten, dass die Maschine
senkrecht aufgestellt ist
This manual suits for next models
1
Table of contents
Languages:
Other Clean Air Optima Dehumidifier manuals

Clean Air Optima
Clean Air Optima CA-703 User manual

Clean Air Optima
Clean Air Optima CA-702 Smart User manual

Clean Air Optima
Clean Air Optima CA-707 User manual

Clean Air Optima
Clean Air Optima CA-703 User manual

Clean Air Optima
Clean Air Optima CA-705 Smart User manual

Clean Air Optima
Clean Air Optima CA-704 User manual