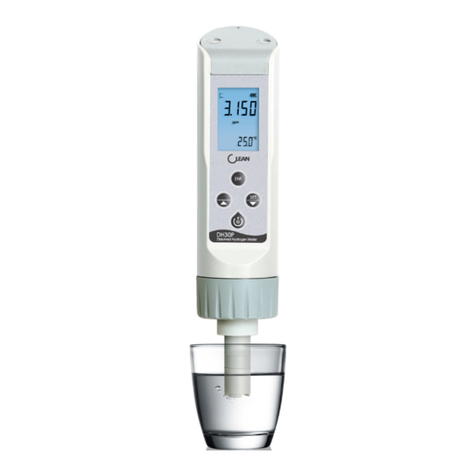
CLEAN Instruments DH30 User manual

4. Key panel
3. CONFIGURATION and LCD INTRODUCTION
2. Precautions
Thank you for selecting Clean products.
Before using the meter, relevant person must read and understand the contents
of this operation manual. Operation Manual should be kept accessible within
the person who use the meters.
Components:
MDH30 Tester
CS6931 sensor
Sensor soaking solution
SL6080(40ml/bottleX1)
Wiping paper CW100 (50*25mm)x3
Battery
Instruction Manual
Set up
Data stabilized
Low battery indicator
Measurement mode
Auto Lock function
Auto Lock after data stabilized
Measuring value
ppm,mV - measuring mode, unit
Dissolved Hydrogen Meter
H2
H2
H2
H2
H2
H2
H2
CLEAN INSTRUMENTS CO. LTD
2F No.140, Zhongxiao St.,
Zhonghe Dist., New Taipei City ,
Taiwan
Instruction Manual
1.Product Overview
-2-
-3- -4-
DH30 tester
Dissolved Hydrogen meter
1.
2.
3
4.
5.
6.
7.
8.
9.
10.
11.
12.
2
3
3
4
4
5
5
6
7
7
8
8
····························································
····································································
·····················
·········································································
···································
·······················································
··········································································
······································································
··········································································
·································
················································································
··················································
ENT
SET
CAL
+
-
AAA
CAL
ENT
SET
CAL
PH30
www.cleaninst.com
Dissolved Hydrogen Meter
H2
H2
H2
H
H2
H2
Immersion
depth:
≤50mm
Operation
Manual
Product Overview
Precautions
CONFIGURATION and LCD INTRODUCTION
Key Panel
Battery and electrode installation
Measurement Mode
Set up
Specification
Package
Electrode using and maintenance
Error
GENERAL INFORMATION
TABLE OF CONTENTS
Long press to enter into mV mode
Increment values or scroll through the next options available
Long press to Power ON/OFF
Short press to ON/OFF backlight
Escape key when in mV mode and setting up
Data setting
Decrement values or scroll through the next options available
Confirm key
Press to unlock in Auto lock mode
5. Battery and Electrode installation
Unscrew the screw cap by following the
arrow direction, slightly unplug the
electrode, install the battery(pay attention
to the anode and cathode of the
electrode).
Then install back the electrode and the
screw cap.
Low battery prompt is at the top of the
screen when battery power is low.( You can
refer to the LCD INTRODUCTION). Please
change the same model battery.
ENT
SET
CAL
PH30
ENT
SET
CAL
PH30
AAA
+
Short press: Short press means release the key once after pressing.
(If there is no mark out below, default it as Short press)
Long press: Long press means press the key for 3 seconds and then release it
Hold: Hold means not release the key and accelerate after a certain time. Not release the key
until the value is set as needed.
Key instruction
Precise and easy operation, Comfortable holding, All functions operated in one hand.
Large LCD with backlight, Multi-line display for easy reading, Auto-Power Off saves
battery after 5 mins non-use
1*1.5V AAA long battery life, User replaceable battery and high-impedance plane
electrode.
Field throw measurement( Auto Lock Function)
Please wipe up the electorde with clean tissue or cloth before using.
Do not throw or beat ,squash or twist the tester deliberately.
Do not expose to the direct sunlight or
put in high humidity or high temperature environment .

6. Measurement Mode
7.
Set up
Before measuring, please polish the electrode metallic diaphragm with the
wiping paper. When measuing, please stir the electrode properly.
【Notice】
1.Please keep the metallic diaphragm always clean.
2. Please rinse off the sensor tip with clean water after each use and cover
the protection bottle back. Please also check the volume of the soaking
solution. If not enough, please be sure to add more.
Note: After each use, if there is some moisture or solution liquid on and near
the metallic diaphragm, random numbers may get displayed. Rinse off the
tip with clean water and place it back in sensor protecting cap. Make sure it
displays”0” before shutting off power.
3. If there is smudginess and mineral elements adhere on the metallic
diaphragm, the responsive time will be deduced and readings might drop.
Please use the wiping paper to polish the electrode metallic diaphragm.
Make sure the sensor tip is very clean.
After cleaning, please must keep the sensor tip in soaking solution. If the
reading is not 0.000ppm when in soaking solution, please change the sensor.
4. Life expectancy of an electrode depends on frequency of use. Generally,
it should be replaced in 1 year.Generally, it should be replaced in 1 year.
Cleaning order of the electrode metallic diaphragm:
1. Spin off the sensor protection bottle (please pay attention not to spill out the
soaking solution).
2. Hold the wiping paper (with the rough surface up) and drop a few drops of
water on the paper.
3. Horizontally contact the bottom of the metallic diaphragm with the wiping
paper which having water on it. Rub rotating as you writing the Arabic
numeral “8” for around 10 times.
4. Rinse off the tip with clean water and place it back in sensor protecting
cap. Make sure it displays”0” before shutting off power.
Electrode
metallic
diaphragm
CW100
wiping paper
Polish the electrode
metallic diaphragm
Components:
MDH30 Tester
CS6931 sensor
Sensor soaking solution
SL6080(40ml/bottleX2)
Wiping paper CW100 (50*25mm)x3
Battery
Instruction Manual
-5- -6-
-7- -8-
In measurement mode, press “ ” to enter SET UP. Corresponding icons will be
displayed. You can press ” ” and “ ” to select the menu and then press ” ”
to confirm. Press ” ” or “ ” to set up and confirm by press ” ”. You can
also press “ ” to back to measurement mode.
The Set up menu as follow:
10.Electrode using and maintenance
9. Package
Concentration
measuring range
Resolution
Accuracy
Temperature
Sensor
LCD
Backlight
Auto power off
Power
Working Environment
Protection
Dimensions
Weight
0.000-1.800ppm
0.001 ppm
+0.002ppm
°C,°F optional
CS6931 replaceable dissolved hydrogen sensor
20*30 mm multi-line crystal display with backlight
ON/OFF optional
5 minutes without key be pressed
1x1.5V AAA7 battery
-5°C - 60°C, Relative Humidity: <90%
IP67
(HXWXD)185 X 40 X48mm
95g
Size: L*W*H 210*100*65mm
Weight: 350g
C
omp
o
M
DH3
0
C
S6
9
3
S
ensor
S
L6
0
80
W
ipin
g
B
atter
y
I
nstru
ct
W
e
i
g
ht
Se
ri
es
Tester
w.cleaninst.com ww
w.cleaninst.com www.
cleaninst.com www.cl
eaninst.com www.clea
ninst.com www.cleani
nst.com www.cleanins
t.com www.cleaninst.
com www.cleaninst.co
m www.cleaninst.com
www.cleaninst.com w
ww
Series
Tester
ww.cleaninst.com www.cleaninst.com www.cleaninst.com www.cleaninst.com www.cleaninst.com www.cleaninst.com www.cleaninst.com www.cleaninst.com www.cleaninst.com www.cleaninst.com www.cleaninst.com www.c
CLEANWater Analysis Solutions
www.cleaninst.com
Series Tester
30
PH30 pHTester
ORP30ORP Tester
CON30Conductivity/TDS/SalinityTester
DO30 DissolvedOxygenTester
FCL30 FreeChlorineTester
DOZ30Dissolved ozone Tester
P01: Unit of the temperature. You can select between °C and °F.
P03: Auto Lock. You can select “ON” or “OFF” to auto lock the data once stabilized.
P04: Factory defaults. You can select to revert to factory defaults.
8.
Specification
Press ” ” to power up. The tester will then enter into measurement mode.
The measurement icon will twinkle if the data is unstabilized. Once stabilized, the top
stabilized icon will be displayed then.
12. GENERAL INFORMATION
When ERR occurs, you can check the electrode and the standard solution.
11. Error
Authorization must be obtained from CLEAN Instruments Customer Service Center to
issue a RIR number before returning items for any reason. When applying for
authorization, please nclude date requiring the reason of return. Instruments must be
carefully packed to prevent damage in shipment and insured against possible
damage or loss. CLEAN Instruments will not be responsible for any damage resulting
from careless or insufficient packing.
Warning: Damage as a result of inadequate packaging is the User / distributor’s
responsibility.
Please follow the guidelines below before transporting.
Use the original packaging material if possible, when transporting back the unit for repair.
Otherwise wrap it with bubble pack and use a corrugated box for better protection.
Include a brief description of any faults suspected for the convenience of Customer
Service Center, if possible . If there are any questions, feel free to contact our Customer
Service Center or distributors.
Warranty
Return Of Malfunction Instruments
Guidelines Or Returning Unit For Repair
CLEAN Instruments warrants this product to be free from significant deviations in
material and workmanship for a period of one year from the date of purchase. If
repair is necessary and has not been the result of abuse or misuse within the warranty
period, please return to CLEAN Instruments and amendment will be made without
any charge. CLEAN Instruments Customer Service Center will determine if product
problem is due to deviations or customer abuse. Out of warranty products will be
repaired on a charge basis.
Other CLEAN Instruments Measuring Instrument manuals
