CleanSpace PRO User manual

2
1. Contents
1. Contents ...........................................................................................................................................................................2
2. Foreword ..........................................................................................................................................................................3
3. Warnings & Limitations.....................................................................................................................................................3
3.1. List of Warnings Within These User Instructions ...................................................................................................................... 3
3.2. Limitations............................................................................................................................................................................... 4
3.3. NIOSH –Approval, Cautions and Limitations ........................................................................................................................... 5
3.4. S –Special or Critical User Instructions .................................................................................................................................... 6
3.5. Respirator Program Management ........................................................................................................................................... 6
4. System Description ...........................................................................................................................................................6
4.1. System Components ................................................................................................................................................................ 7
4.2. Controls and Indicators............................................................................................................................................................ 8
4.3. Alarms ..................................................................................................................................................................................... 9
4.4. Battery .................................................................................................................................................................................. 10
4.5. Filters..................................................................................................................................................................................... 11
5. Before Donning the CleanSpace PAPR ............................................................................................................................12
5.1. Respirator Fit......................................................................................................................................................................... 12
5.2. Pre-Use Inspection................................................................................................................................................................. 15
5.3. Recalibration ......................................................................................................................................................................... 15
5.4. Flow Test ............................................................................................................................................................................... 16
6. Donning the Half Mask CleanSpace PAPR .......................................................................................................................16
Step 1 –Fit a Neck Support to the Power Unit ....................................................................................................................................... 16
Step 2 –Fit a Cleanspace Half Mask to the Power Unit ......................................................................................................................... 17
Step 3 –Fit a Harness to the Power Unit ............................................................................................................................................... 17
Step 4 –Turn the Power Unit to Standby Mode..................................................................................................................................... 18
Step 5 –Don the Respirator................................................................................................................................................................... 18
Step 6 –Adjust the Respirator ............................................................................................................................................................... 18
Step 7 –Complete Seal Check................................................................................................................................................................ 19
7. The Contaminated Area ..................................................................................................................................................20
7.1. Human Factor Considerations................................................................................................................................................ 20
7.2. Entering and Exiting the Contaminated Area ......................................................................................................................... 20
8. Care and Cleaning ...........................................................................................................................................................21
8.1. Cleaning ................................................................................................................................................................................ 21
8.2. Storage.................................................................................................................................................................................. 22
8.3. Recalibration ......................................................................................................................................................................... 23
3
9. Specifications & Warranty ..............................................................................................................................................23
9.1. Specifications......................................................................................................................................................................... 23
9.2. Product Warranty.................................................................................................................................................................. 24
Important: Before use, the wearer must read and understand the entirety of these user instructions. Read these
instructions in conjunction with the appropriate CleanSpace™filter and accessories instructions and any relevant national
standards.
WARNING
This product is part of a system that helps protect against certain airborne contaminants. Misuse may result
in sickness. For proper use, consult an Occupational Health Specialist, these user instructions or contact
CleanSpace Technology Customer Support on sales@cleanspacetechnology.com or the website:
cleanspacetechology.com/welcome/
2. Foreword
Read all instructions and warnings before using this device. If you have questions regarding this system contact CleanSpace
Customer Service on +612 8436 4000 or e-mail support@cleanspacetechnology.com.
3. Warnings & Limitations
3.1. LIST OF WARNINGS WITHIN THESE USER INSTRUCTIONS
This product is part of a system that helps protect against certain airborne contaminants. Misuse may result in sickness. For proper use,
consult an Occupational Health Specialist, these user instructions or contact CleanSpace Technology Customer Support on
sales@cleanspacetechnology.com or the website: cleanspacetechology.com/welcome/
Properly selected, used and maintained respirators help to protect against certain airborne contaminants. It is essential to follow all
instructions and government regulations on the use of this product, including wearing the complete respirator system during all times of
exposure, in order for the product to help protect the wearer. Misuse of respirators may result in overexposure to contaminants and lead
to sickness. For proper use, consult an Occupational Health Specialist, these user instructions or contact CleanSpace Technology Customer
Support on sales@cleanspacetechnology.com or the website: cleanspacetechology.com/welcome/
If the Filter Change Alert is triggered (2 beeps, repeated every second, red Filter Alarm Light flashes), the filter has exceeded service limits
and should be changed. Using a filter that has exceeded service limits can cause the flow to fall below the minimum design flow, which
may result in overexposure to contaminants and lead to sickness.
If the Low Battery Alarm sounds (3 beeps, repeated every second), leave the contaminated area immediately and re-charge the battery.
Operating the respirator after the Low Battery Alarm has sounded can cause the flow to fall below the minimum design flow, which may
result in overexposure to contaminants and lead to sickness.
Always correctly use and maintain the internal lithium-ion battery packs. Failure to do so may result in fire or explosion or could adversely
affect respirator performance and result in injury, sickness or death. Do not charge the on-board battery with unapproved chargers, in
enclosed cabinets without ventilation, near flammable liquids or gases, or near sources of high heat. Do not immerse the device in water.
Do not use, charge or store the device outside the recommended temperature limits.
CleanSpace PRO is not intrinsically safe. Do not use in flammable or explosive atmospheres. Doing so may result in injury or death.
In the extremely rare circumstance that the battery is damaged and electrolyte comes in contact with eyes, flush with water immediately
and seek urgent medical attention.
The battery shall only be charged in non-hazardous areas. Move out of the hazardous area before charging.
CleanSpace Respirators use a unique charger. Do not attempt to charge your CleanSpace Respirator with any other charger.

4
Do not use compressed air or a brush to clean the filter! HEPA filters are very easily damaged by the use of compressed air or by brushing.
Misuse of CleanSpace Respirators by cleaning the filter may result in overexposure to contaminants and lead to sickness.
Use only NIOSH-approved CleanSpace filters. If used with other filters CleanSpace Respirators are not NIOSH approved. Use of other
filters may result in overexposure to contaminants and lead to sickness.
It is essential that the correct filter type is selected for the chosen application.
No Half Mask PAPR can fully protect you if you are not clean shaven. CleanSpace Respirators are not suitable for users with facial hair.
If a satisfactory quantitative fit factor or passing qualitative test cannot be achieved with any of the masks, the CleanSpace Respirator
must not be used. A satisfactory quantitative fit factor for a tight-fitting half mask under Power Off conditions is 100.
You must recalibrate the internal pressure sensor any time that your CleanSpace Respirator is exposed to changes in temperature of more
than 36°F (20°C). It is best practice to also re-calibrate if the unit has been in storage, particularly if the storage temperature is not
known.
If a satisfactory seal check cannot be achieved, do not enter the contaminated area.
Be sure to remove the Seal Check Cap before entering the contaminated area. The cap blocks the exhalation valve, making it more
difficult for your exhaled air to be expelled from the mask. Failure to remove the cap will lead to increased levels of rebreathed Carbon
Dioxide and may result in headache or dizziness. Never leave the cap in place for more than 2 minutes!
Do not remove the respirator until you have vacated the contaminated area. If you have an acute and spontaneous health episode (i.e.
experiencing dizziness) and believe removing the respirator while you leave the contaminated area may help, remove the respirator with
caution.
Never dry the mask or exhalation valve with a cloth that may leave behind lint. Lint contamination of the exhalation valve may cause it to
leak, resulting in overexposure to contaminants and lead to sickness.
The CleanSpace PRO contains a battery, sensitive electronics and a motor. NEVER immerse it in water or use anything wetter than a
damp cloth to clean it.
3.2. LIMITATIONS
Use this respirator strictly in accordance with the information contained in these user instructions. Never modify or alter this
product.
•Do not remove the respirator until you have left the contaminated area, unless you have immediate and sudden
health reasons to do so (for example you are experiencing dizziness and believe removing the respirator while you
leave the contaminated area may help).
•Only suitable for use by clean-shaven personnel. Facial hair under the seal reduces protection and is not permitted.
•This respirator, when used with the half mask does not protect your eyes. In conditions that may damage or irritate
eyes, use protective eyewear.
•Only use your respirator with the parts and accessories listed on the Approval Label.
•Do not use the respirator unless it is powered and running normally.
•Do not use the respirator while it is being charged.
•Do not use in airborne contaminant concentrations above those specified in your national regulations.
•Do not use for respiratory protection against unknown atmospheric contaminants or when concentrations of
contaminants are unknown or immediately dangerous to life or health (IDLH).
•Do not use in oxygen deficient or oxygen enriched atmospheres. Do not use in flammable or explosive
environments.
•Only for use by trained personnel.
•Filters need to be changed regularly. The frequency of change depends on use and the concentration of
contaminants in the atmosphere.
•Do not use for escape purposes. National regulations may impose specific limitations on the use of filters depending
on the filter class and the facemask used.

5
•If the respirator has been used in an area that has caused it to become contaminated with a substance requiring
special decontamination procedures it should be placed in a suitable container and sealed until it can be
decontaminated.
•Do not disassemble the respirator case. There are no user serviceable parts inside.
•Failure to follow all instructions on the use of this product, and/or failure to use the respirator during times of
exposure, may lead to adverse effects on the wearer’s health and may render the warranty void.
Immediate Evacuation
Leave the contaminated area immediately if any of the following occurs.
•The respirator warning lights and/or sounds activate for the Low Battery Alarm or the Filter Change Alert.
•Any part of the respirator is damaged.
•Airflow into the mask decreases or stops.
•Breathing becomes difficult or increased resistance occurs.
•You feel dizzy or your airway is irritated.
•You can taste or smell contaminants.
Operating Conditions
Your respirator is suitable for use in the following atmospheric conditions.
•Temperature: 14°F to 113°F (-10°C to 45°C).
•Relative humidity: 0 to 90% non-condensing.
The respirator will stop functioning if its internal temperature rises above 140°F (60°C) or falls below 14°F (-10°C).
WARNING
This product is part of a system that helps protect against certain airborne contaminants. Misuse may result
in sickness. For proper use, consult an Occupational Health Specialist, these user instructions or contact
CleanSpace Technology Customer Support on sales@cleanspacetechnology.com or the website:
cleanspacetechology.com/welcome/
3.3. NIOSH –APPROVAL, CAUTIONS AND LIMITATIONS
NIOSH Approval
CleanSpace PRO is a NIOSH-approved respirator system. Refer to these User Instructions and to the NIOSH approval label
provided with each CleanSpace PRO for a listing of components that can be used to form a NIOSH-approved respirator.
NIOSH Cautions and Limitations
A - Not for use in atmospheres containing less than 19.5 percent oxygen.
B - Not for use in atmospheres immediately dangerous to life or health.
C - Do not exceed maximum use concentrations established by regulatory standards.
F - Do not use powered air-purifying respirators if airflow is less than four cfm (115 lpm) for tight fitting facepieces or six cfm
(170 lpm) for hoods and/or helmets.
I - Contains electrical parts that may cause an ignition in flammable or explosive atmospheres.
J - Failure to properly use and maintain this product could result in injury or death.
L - Follow the manufacturer's User's Instructions for changing cartridges, canister and/or filters.
M - All approved respirators shall be selected, fitted, used, and maintained in accordance with MSHA, OSHA, and other
applicable regulations.
N - Never substitute, modify, add, or omit parts. Use only exact replacement parts in the configuration as specified by the
manufacturer.
O - Refer to User's Instructions, and/or maintenance manuals for information on use and maintenance of these respirators.
P - NIOSH does not evaluate respirators for use as surgical masks.
S - Special or critical User's Instructions and/or specific use limitations apply. Refer to User's Instructions before donning.
6
3.4. S –SPECIAL OR CRITICAL USER INSTRUCTIONS
This respirator contains a system for synchronizing with your breathing and regulating mask pressure. This system requires re-
calibration whenever it experiences a change in temperature of more than 36°F (20°C). It is best practice to also re-calibrate if
the unit has been in storage, particularly if the storage temperature is not known.
For the most accurate battery charge indication, the respirator must be plugged into its charger. To be sure it is fully charged,
plug into the charger and wait for all three (3) Battery Indicator Lights to light solidly without flashing. If the 3rd Battery
Indicator Light is flashing rapidly, the battery is 95% charged.
3.5. RESPIRATOR PROGRAM MANAGEMENT
Occupational use of respirators must be in compliance with applicable health and safety standards. Before occupational use of
this respirator, a written respiratory protection program must be implemented meeting all the local government requirements.
In the United States, employers must comply with OSHA 29 CFR 1910.134 which includes medical evaluation, training, and fit
testing. Employers must also meet the requirements of Standard Practice for Respiratory Protection ASTM F3387 and any
applicable OSHA substance specific standards. For additional information on this contact OSHA at www.OSHA.gov. In Canada,
CSA standard Z94.4 requirements and/or the requirements of the applicable jurisdiction must be met. Contact an industrial
hygienist or CleanSpace Technical Service with questions concerning the applicability of the respirator to your job requirements.
4. System Description
CleanSpace PRO™(“PRO”) is a complete NIOSH approved respiratory protection system (“respirator”). When used in accordance
with its NIOSH approval, the respirator helps reduce exposure to certain particulates. CleanSpace PRO does not provide
protection against vapors or gases. See NIOSH Cautions and Limitations and the Approval Labels for CleanSpace PRO for
additional information on approvals. CleanSpace PRO is a Powered Air Purifying Respirator (PAPR) which means that it filters
ambient air and delivers it to the wearer using a fan. The fan produces enough flow to ensure that the pressure inside the mask
is positive, which helps to provide a high level of protection to the user. The CleanSpace PRO is breath responsive, which means
that it provides more flow during inhalation and less flow during exhalation whilst maintaining positive pressure in the mask.
The components approved for use in the CleanSpace PRO respiratory system are shown below in Section 4.1.
WARNING
Properly selected, used and maintained respirators help to protect against certain airborne contaminants. It
is essential to follow all instructions and government regulations on the use of this product, including
wearing the complete respirator system during all times of exposure, in order for the product to help protect
the wearer. Misuse of respirators may result in overexposure to contaminants and lead to sickness. For
proper use, consult an Occupational Health Specialist, these user instructions or contact CleanSpace
Technology Customer Support on sales@cleanspacetechnology.com or the website:
cleanspacetechology.com/welcome/
7
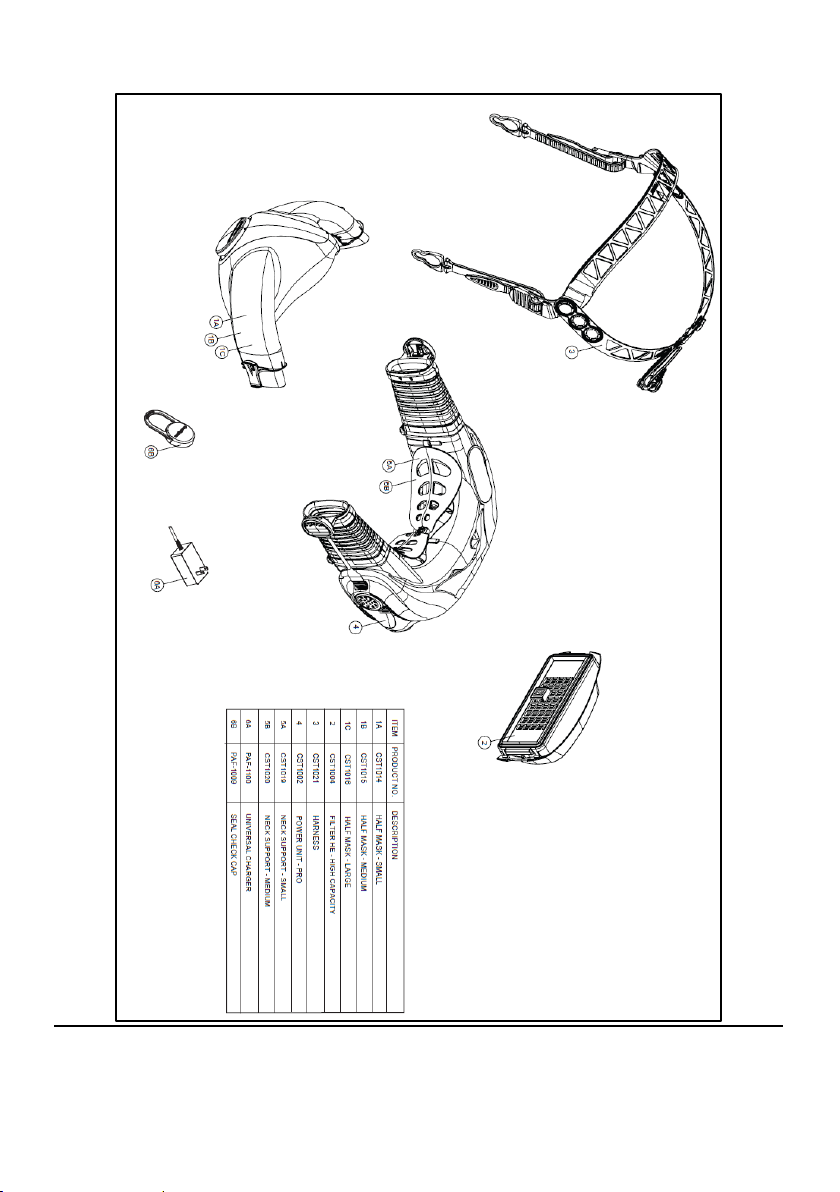
4.1. SYSTEM COMPONENTS

8
Throughout this manual reference is made to various commonly used components and features of the respirator. Familiarize
yourself with these parts before reading the rest of the manual.
A. Mask AirClip
B. Mask Release Button
C. Power Unit AirClip
D. Bellow
E. Adjust Button
F. Filter Latch Button
4.2. CONTROLS AND INDICATORS
A keypad is located on the top side of the Power Unit. It contains all controls and indications, including a Flow Test Button (A),
three (3) Battery Indicator Lights (B), a Power Button (C), a Filter Alarm Light (D) and an On Light (E).
Power Button
The Power Button (C) is used to switch the operating mode. There are three (3) operating modes.
i) Off Mode is when the green Battery Indicator Light(s) (B) are off, the motor is not running, and there is no airflow
to the mask. CleanSpace Respirators automatically switch into Off Mode three (3) minutes after the respirator has
been removed from the user’s face and the sensors detect that there is no breathing.
Note: The Power Button cannot be used to switch a CleanSpace Respirator to Off Mode.
ii) Standby Mode is when the green Battery Indicator Light(s) are on, the motor is not running, and there is no airflow
to the mask. If the CleanSpace Respirator is in Off Mode, it will switch to Standby Mode when the Power Button is
pressed once. The CleanSpace Respirator will automatically switch to Standby Mode within ten (10) seconds of the
user doffing the respirator.
iii) On Mode is when the green Battery Indicator Light(s) and the blue On Light (E) are on, the motor is running, and
there is powered airflow to the mask. If the CleanSpace Respirator is in Standby Mode, it will switch to On Mode
when breathing is detected, or when the Power Button is pressed once.
9
Automatic mode switching
The CleanSpace Respirator switches to On Mode when in Standby Mode and breathing is detected. The CleanSpace Respirator
can only switch to On Mode from Standby Mode.
To conserve battery life when not being worn, CleanSpace Respirators are designed to automatically switch from On Mode to
Standby Mode after ten seconds with no breathing detected, and then to Off Mode after three (3) minutes in Standby Mode.
Battery Indicator Lights
CleanSpace Respirators are equipped with a battery charge indicator comprised of three (3) Battery Indicator Lights. The battery
is fully charged when the charger is connected to the Power Unit and all three (3) lights are solid green. A fully charged Power
Unit has a minimum of four (4) hours operating time. CleanSpace Respirators should be fully charged before use.
A CleanSpace Respirator will operate with one (1), two (2), or three (3) green Battery Indicator Lights illuminated. When a single
Battery Indicator Light is flashing, the Power Unit has less than 20% of battery charge remaining and the user should exit the
contaminated area and recharge the battery.
For approximate operating times, refer to Section 4.4.
Flow Test Button
The Flow Test measures the rate of flow produced by the CleanSpace Respirator to ensure it can deliver a minimum design flow
of 115 liters per minute (l/min). When CleanSpace Respirators are in Standby Mode (not On Mode), pressing the Flow Test
Button (A) initiates the Flow Test. This lasts about 5 seconds.
Refer to Section 5.4 for instructions on running the flow test.
4.3. ALARMS
Filter Change Alert
The Filter Change Alert is triggered when the filter exceeds service limits and needs to be changed. The Filter Change Alert
consists of two (2) beeps, repeated once per second, and the red Filter Alarm Light (D) will flash.
The Filter Change Alert can be muted by pressing the Power Button once. Unless the filter is changed, the alert will resume when
the respirator is next switched to Standby Mode or doffed.
If the Filter Change Alert is triggered, the filter has exceeded service limits and should be changed.
WARNING
If the Filter Change Alert is triggered (2 beeps, repeated every second, red Filter Alarm Light flashes), the
filter has exceeded service limits and should be changed. Using a filter that has exceeded service limits can
cause the flow to fall below the minimum design flow, which may result in overexposure to contaminants
and lead to sickness.
Low Battery Alarm
The Low Battery Alarm is triggered when the battery charge decreases below the level at which it may be able to supply the
minimum design flow of 115 l/min. The Low Battery Alarm consists of three (3) beeps, repeated once per second and a single
green Battery Indicator Light will flash.
If the Low Battery Alarm is triggered, you must leave the contaminated area IMMEDIATELY and recharge the battery.
The Low Battery Alarm cannot be muted.
WARNING
If the Low Battery Alarm sounds (3 beeps, repeated every second), leave the contaminated area
immediately and re-charge the battery. Operating the respirator after the Low Battery Alarm has sounded
can cause the flow to fall below the minimum design flow, which may result in overexposure to
contaminants and lead to sickness.
10
4.4. BATTERY
CleanSpace Respirators have an internal lithium ion (Li-ion) polymer battery. Lithium ion (Li-ion) batteries have the highest
energy density of all battery types and are widely used in portable electronic devices. The commonly available Li-ion polymer
batteries are packaged in a soft polymer film. The soft packaging allows the cells to expand under extreme heat, making the
battery safer in fault conditions. CleanSpace Respirators use quality Li-ion polymer batteries and are designed to be viable over
a minimum of 500 complete charge and discharge cycles while still maintaining at least 70% of their specified full capacity.
Battery Precautions
The following precautions must be followed during use:
•Avoid mechanical shocks or impacts from any sharp or hard objects.
•Do not use the respirator if there are any signs of severe mechanical damage.
•Do not use or place the respirator in extreme heat, such as in direct sunlight, near heat sources, etc. The battery
will be damaged if its temperature rises above 158°F (70°C). The respirator will stop functioning if its internal
temperature rises above 140°F (60°C) or falls below 14°F (-10°C).
•Do not dispose of the respirator in a fire.
•Do not use the respirator in heavy rain or allow it to get wet or immersed in liquid.
•Do not disassemble the Power Unit case. Disassembly will void the Manufacturer’s Warranty. There are no user
serviceable parts inside.
WARNING
Always correctly use and maintain the internal lithium-ion battery packs. Failure to do so may result in fire
or explosion or could adversely affect respirator performance and result in injury, sickness or death. Do not
charge the on-board battery with unapproved chargers, in enclosed cabinets without ventilation, near
flammable liquids or gases, or near sources of high heat. Do not immerse the device in water. Do not use,
charge or store the device outside the recommended temperature limits.
WARNING
CleanSpace PRO is not intrinsically safe. Do not use in flammable or explosive atmospheres. Doing so may
result in injury or death.
WARNING
In the extremely rare circumstance that the battery is damaged and electrolyte comes in contact with eyes,
flush with water immediately and seek urgent medical attention.
Assessing the Level of Charge
The level of battery charge of the respirator can be estimated using the three (3) green Battery Indicator Lights on the keypad.
The battery percentage and the approximate operating time of the respirator when it is NOT on charge are shown in the table
below.
Battery Indicator Lights
Charge
Approximate Operating Time*
80 –100%
6 –8 hours
50 –80%
4 –6 hours
20 –50%
2 –4 hours
Flashing
5 –20%
< 2 hours
Flashing + Low Battery Alarm
< 5%
< 15 minutes (Leave contaminated area immediately)
*Operating time is strongly affected by filter type, filter loading, mask seal, work rate, altitude, and other factors. The
operating times quoted above are average durations at moderate work rates at sea level. Actual operating times may vary
widely from the quoted average durations.
Important: To ensure the battery is 100% charged, plug in the charger and wait until all three (3) green Battery Indicator
Lights turn on solidly without flashing.
11
Charging the Battery
The battery can only be charged at temperatures between
32°F-95°F (0°C and 35°C), should not be charged in
electromagnetic environments (such as near welding
machines) and should not be worn while being charged. To
charge the battery.
•Turn the Power Unit upside down and locate the
charging port.
•Ensure the charger is plugged into a power source and
then insert the charger connector into the charging port.
•The green Battery Indicator Lights on the keypad should
light up and be flashing as the Power Unit charges.
•If none of the indicators are flashing, the unit is not
charging. Check the charger is connected securely at
both ends. If the Power Unit is still not charging, contact
CleanSpace Customer Service.
•Charging is complete when the Power Unit shows three
(3) green solid Battery Indicator Lights. If the third green
indicator light is flashing rapidly, charging is 95%
complete.
•When the Power Unit is fully charged, disconnect the
charger cable from the charging port.
WARNING
The battery shall only be charged in non-hazardous areas. Move out of the hazardous area before charging.
WARNING
CleanSpace Respirators use a unique charger. Do not attempt to charge your CleanSpace Respirator with
any other charger.
4.5. FILTERS
Filter Precautions
The following precautions must be followed during use:
•Always change the filter outside of the contaminated area and with the respirator doffed.
•CleanSpace filter media cannot be cleaned. Cleaning the filter media may cause damage. The filter media is
contained within a filter case. The filter case may be wiped with a dry cloth free of chemicals.
•Used filters should be disposed of responsibly and treated as non-recyclable hazardous* waste (dependent on the
contaminant being filtered).
•Change the filter if it is damaged or there is suspected damage.
•Filters should be changed regularly. The frequency of filter replacement depends on several factors: period of use,
concentration of airborne contaminants, exertion levels and workplace protocols where hazards present a risk for
cross contamination (e.g. biohazards or asbestos).
WARNING
Do not use compressed air or a brush to clean the filter! HEPA filters are very easily damaged by the use of
compressed air or by brushing. Misuse of CleanSpace Respirators by cleaning the filter may result in
overexposure to contaminants and lead to sickness.

12
WARNING
Use only NIOSH-approved CleanSpace filters. If used with other filters CleanSpace Respirators are not NIOSH
approved. Use of other filters may result in overexposure to contaminants and lead to sickness.
WARNING
It is essential that the correct filter type is selected for the chosen application.
Changing the Filter
Change the filter when
•The Filter Change Alert triggers –audible (2 beeps per second) and visual (red Filter Alarm Light flashes).
•The Flow Test indicates that the respirator is not able to produce the minimum design flow of 115 l/min.
•The filter has been exposed to water or other liquids.
•The outside of the filter case is soiled.
•There is any sign of damage or suspected damage to the filter.
•The filter reaches its expiry date. The expiry date is marked on the filter label.
•There are signs of dust or contaminants on the inside surface of the filter.
A CleanSpace Respirator with a clean filter will run for much longer than one with a filter that contains dust contaminants. To
maximize your work time between battery charges, change the filter often in high dust environments.
To remove a used filter, simply press down on one of the Filter Latch Buttons (see Section 4.1) and the filter will be released. To
install a new filter, align the filter so that the ‘CleanSpace’ text faces up (in the same direction as the keypad) and push the filter
towards the Power Unit until you hear a click. The filter should be seated securely in place.
5. Before Donning the CleanSpace PAPR
5.1. RESPIRATOR FIT
Mask Fitting
Before using your respirator, you must determine the right mask for your face and know how to adjust the system to achieve a
good fit. It is vital that your mask is the right size for your face and fits properly. Mask fit must be confirmed with a fit test
performed by a specialist / designated mask fitter (see the ‘Fit Testing’ heading below for more information).
WARNING
No Half Mask PAPR can fully protect you if you are not clean shaven. CleanSpace Respirators are not
suitable for users with facial hair.
13
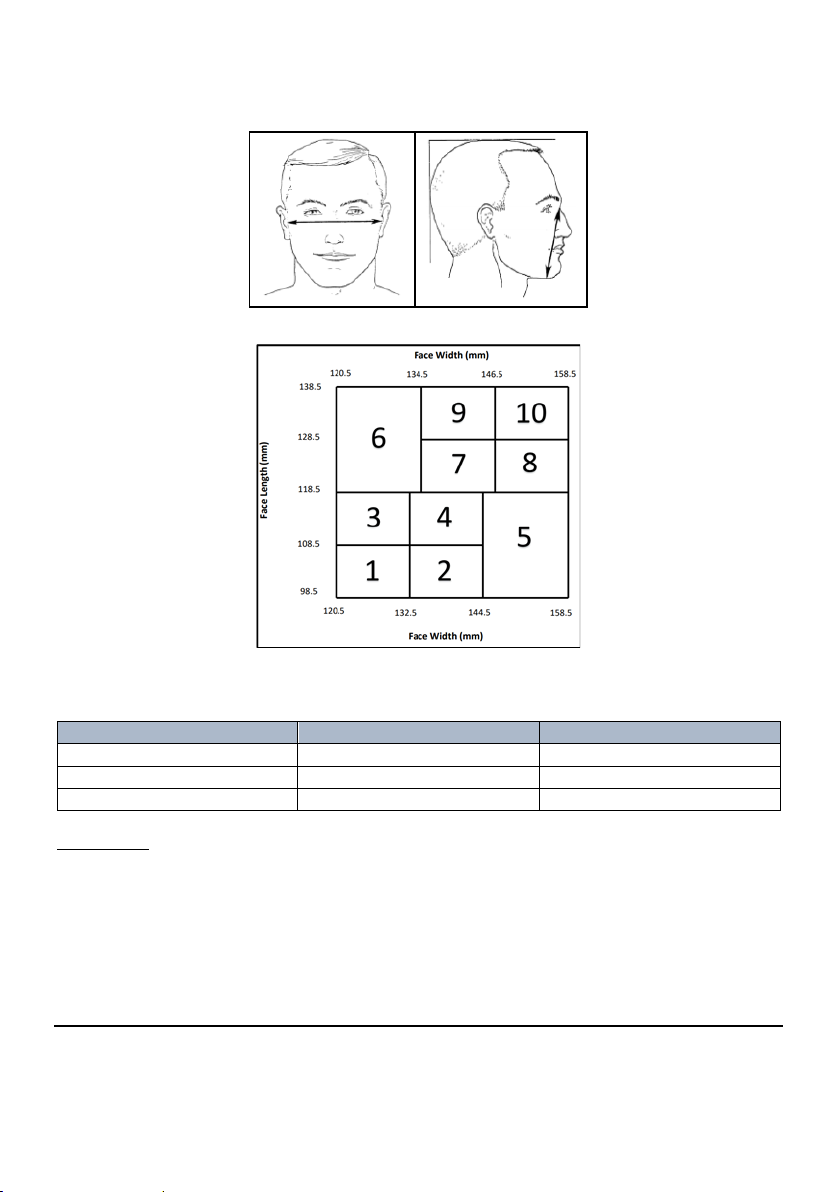
No set of guidelines can ensure that you have the right size mask for your face, however the information below will help your
mask fitting specialist to select the mask most likely to fit you and may therefore save time. The ‘Face Width’ and ‘Face Length’
of a user are defined by the images below.
Using these definitions, the face size of a user can be determined by employing the following table.
To determine which CleanSpace mask is likely to provide the best fit for each face size, use the table below. The ‘fitting
sequence’ is simply the order in which the face masks should be checked for fit.
Half Mask Fitting Sequence
Panel Number
First Try
Then Try
1-2
Small
Medium
3-7
Medium
Small OR Large*
8-10
Large
Medium
* If the medium mask fails initially, the mask fitting specialist will determine whether to try the small or large mask next.
Neck Supports
Your CleanSpace Respirator is supplied with two sizes of neck support, Small (“S”) and Medium (“M”). “S” is for people with
smaller necks and heads while “M” is for those with medium sized heads and necks. Users for whom the “M” neck support does
not provide enough room (both bellows are fully extended but mask is still too tight on face) should use the respirator without
a neck support. This configuration provides extra room and is comfortable due to the curved design of the case. As a general
rule, use the smallest size neck support that is comfortable. Start with a size smaller than you think will be right and work up
(E.g. start with “S” and then move to “M” if required). A smaller neck support positions the Power Unit further from your neck
and will give you the greatest freedom of movement, particularly for looking up.

14
Half Mask
Selecting the right size of neck support is vital to achieving a good half mask fit. You should be able to fully tighten the half mask
on your face and achieve a good seal without using up all the travel in the respirator’s adjustment system. If you have to fully
compress the bellows to achieve a good fit, change to a smaller neck support (for instance use the support marked “S” instead
of “M”). If the mask is too tight around your neck even with the adjustment system at full extension change to a larger neck
support (for instance use the support marked “M” instead of “S”).
Harness
The CleanSpace Respirator is supplied with a harness that is used to support the weight of the respirator and to ensure a good,
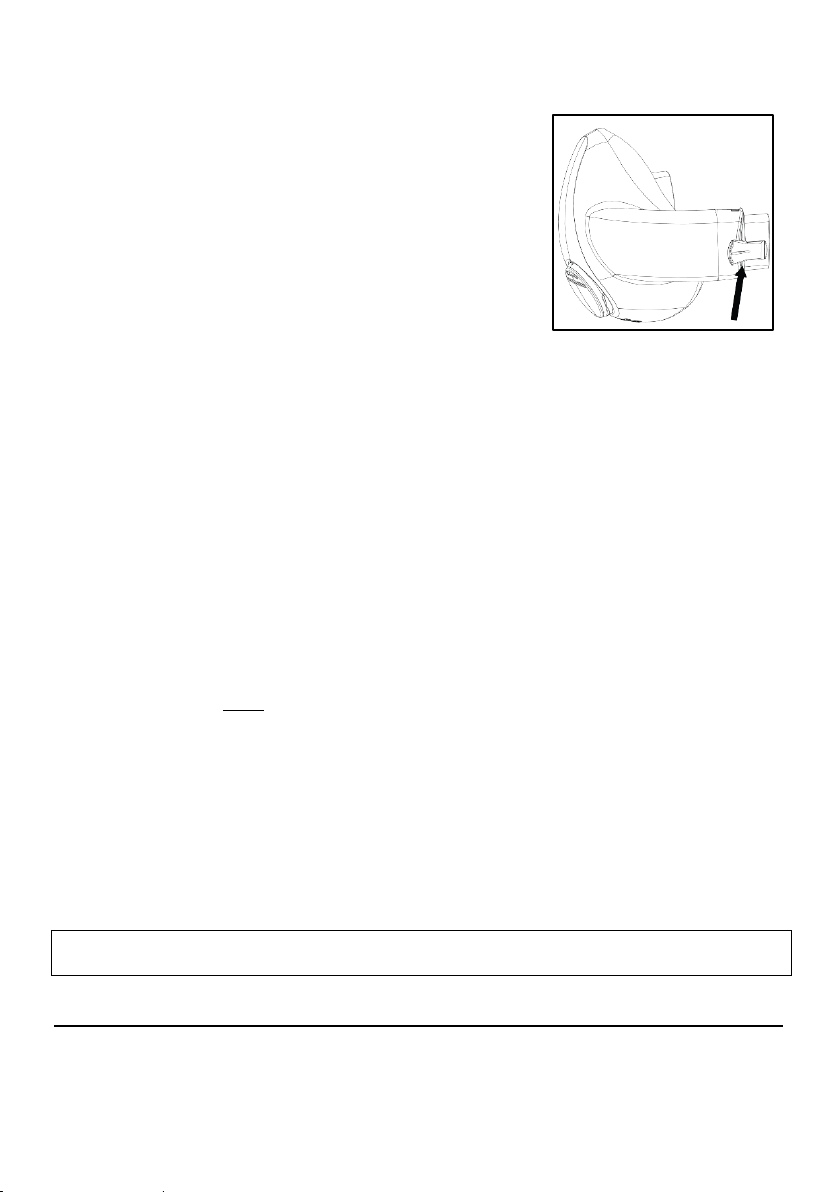
comfortable fit. This harness has a rear strap that can be adjusted by the user to fit a variety of different head sizes. Users with
a larger head should use the hole which ‘elongates’ the rear strap (left-hand arrow in image below) while users with smaller
heads should use the hole which ‘shortens’ the rear strap (right-hand arrow in image below). The harness should sit comfortably
on the crown of the head and support the weight of the respirator. If the size chosen is too small, the straps will not be long
enough to sit flat on the user’s head. If the size chosen is too large, the rear strap will not sit tightly on the back of the user’s
head and may slip.
Fit Testing
Mask fitting must be carried out by a specialist / designated mask fitter. The fit must be confirmed by a fit test performed
according to OSHA regulations 1910.134. A fit test must be performed during initial selection of a respirator, or whenever the
user’s face changes shape (for instance due to weight gain or loss) and at least annually. There are two types of fit test,
qualitative and quantitative.
Qualitative
To perform a qualitative fit test, follow the relevant standard and/or the instructions provided with the test substance. A
qualitative test provides only a PASS/FAIL result, not a fit factor.
Quantitative
To perform a quantitative fit test with a half mask your specialist mask fitter will require PAF-0025 PortaCount Adaptor and the
accompanying S005-7174 Quantitative Fit Test Instructions. The PortaCount Adaptor is an accessory that fits between the mask
and the exhalation valve and allows the air in the mask to be sampled. It comes with detailed instructions on how to carry out a
quantitative fit test.
According to OSHA regulations 1910.134, a tight-fitting half facepiece shall achieve a Power Off fit factor above 100. If your result
is below 100 adjust the mask and try again. If your result continues to be below 100, try changing the size of the mask or neck
support, or adjusting the harness.
WARNING
If a satisfactory quantitative fit factor or passing qualitative test cannot be achieved with any of the masks,
the CleanSpace Respirator must not be used. A satisfactory quantitative fit factor for a tight-fitting half mask
under Power Off conditions is 100.
Once you have achieved an acceptable mask fit and confirmed it with a fit test, record the mask size, neck support size (if any),
harness rear strap position and, if a quantitative test has been performed, the fit factor achieved.
If doing a Power On fit test, a CleanSpace Respirator should generally achieve a fit factor above 1000.
15
5.2. PRE-USE INSPECTION
Before each entry into a contaminated area, the following inspections must be performed.
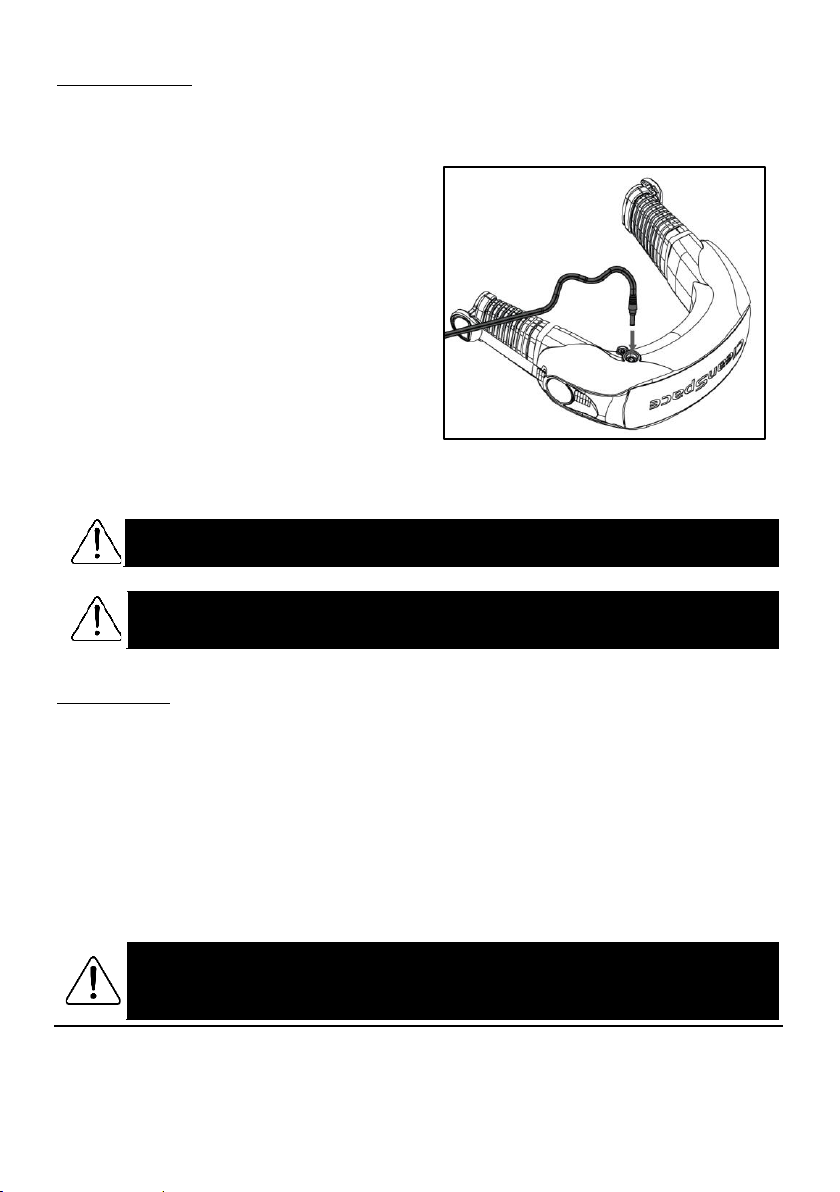
•Visually check all required parts including the Power Unit, mask,
harness, neck supports and filter. If parts are missing or damaged
replace them only with approved parts before proceeding. Take
particular care in ensuring that all parts used in the configuration match
those of the approved (PRO) configuration row on the NIOSH Approval
Label. The half mask will have multiple part numbers on it as they are
used for multiple approved configurations. Make sure the half mask
bears a part number as listed on the approved (PRO) configuration row.
Additional to the Approval Label and Mask Part Numbers, one may
ensure that the correct half mask is chosen by ensuring the Mask
AirClips look like those pictured in the image to the right. If a half mask
designed for use with a different CleanSpace Respirator is chosen you
will not be able to connect it to the PRO Power Unit.
•Check the POWER UNIT for cracks, holes or other damage or missing parts. Do not use the device if there is any
damage or misuse. Check both bellows for splits or holes. Check that the bellows have not become distorted as this
may obstruct the air supply to the mask. Check the neck support (if required). Check that the battery has sufficient
charge to complete the work period by pressing the Power Button. The Battery Indicator Light(s) will illuminate to
indicate the approximate charge. Refer to Section 4.2 and Section 4.4. A full charge is recommended.
•Check the FILTER carefully. The filter seal must be clean and free from damage of any kind. Examine the visible
internal surfaces for any sign that dust has penetrated the media. If dust is found, do not use the filter. The body
of the filter must be free of cracks or signs of damage. If any sign of impact or scratching is found, discard the filter.
Fit the filter to the respirator (see Section 4.5).
•Check the MASK to ensure that there are no cracks, tears or dirt; check the mask is not distorted. Check the mask
exhalation valve for damage or dirt build up. If it is dirty, remove any dirt, hairs or anything that could affect the
seal of the valve against its seat. Check that the valve seat is clean. If the valve is damaged, replace it.
•Check the HARNESS is intact, is not frayed or damaged and has good elasticity.
5.3. RECALIBRATION
This respirator contains a system for synchronizing with your breathing and regulating mask pressure. This system should be re-
calibrated if it experiences a change in temperature of more than 36°F (20°C). It is best practice to also re-calibrate if the unit
has been in storage and the storage temperature is unknown. Steps to re-calibrate:
1.
Remove the filter (and mask if fitted) from the respirator and place the respirator on a stable surface such as a table.
2.
With the respirator in Standby Mode (i.e. one or more Battery Indicator Lights on), press the Power Button and the Flow
Test Button on the keypad at the same time.
3.
When both the blue On Light and the red Filter Alarm Light turn on, release both buttons. Do not touch or move the
respirator.
4.
After 5 –10 seconds, the motor will run and air will blow from the left-hand bellows for 5 –10 seconds.
5.
When the motor/airflow stops, calibration is complete, and the Battery Indicator Lights will return to indicating battery
charge status.
6.
Re-fit the filter.
Important: Failure to remove the filter prior to calibration may result in reduced run times. To restore the performance of
the respirator, calibration must be performed again with the filter removed.
16
WARNING
You must recalibrate the internal pressure sensor any time that your CleanSpace Respirator is exposed to
changes in temperature of more than 36°F (20°C). It is best practice to also re-calibrate if the unit has been
in storage, particularly if the storage temperature is not known.
5.4. FLOW TEST
This test checks that the CleanSpace Respirator can deliver a minimum design flow of 115 l/min. This test should be completed
before entry into a contaminated area.
1. Remove the mask if fitted. Leave the filter in place.
2. Place the respirator flat on a table or other support.
3. Ensure the Power Unit is in Standby Mode (press the Power Button once). Press and release the Flow Test Button.
4. The respirator will automatically run the Flow Test. During the test, the motor will run fast and air will blow from the left-
hand bellows.
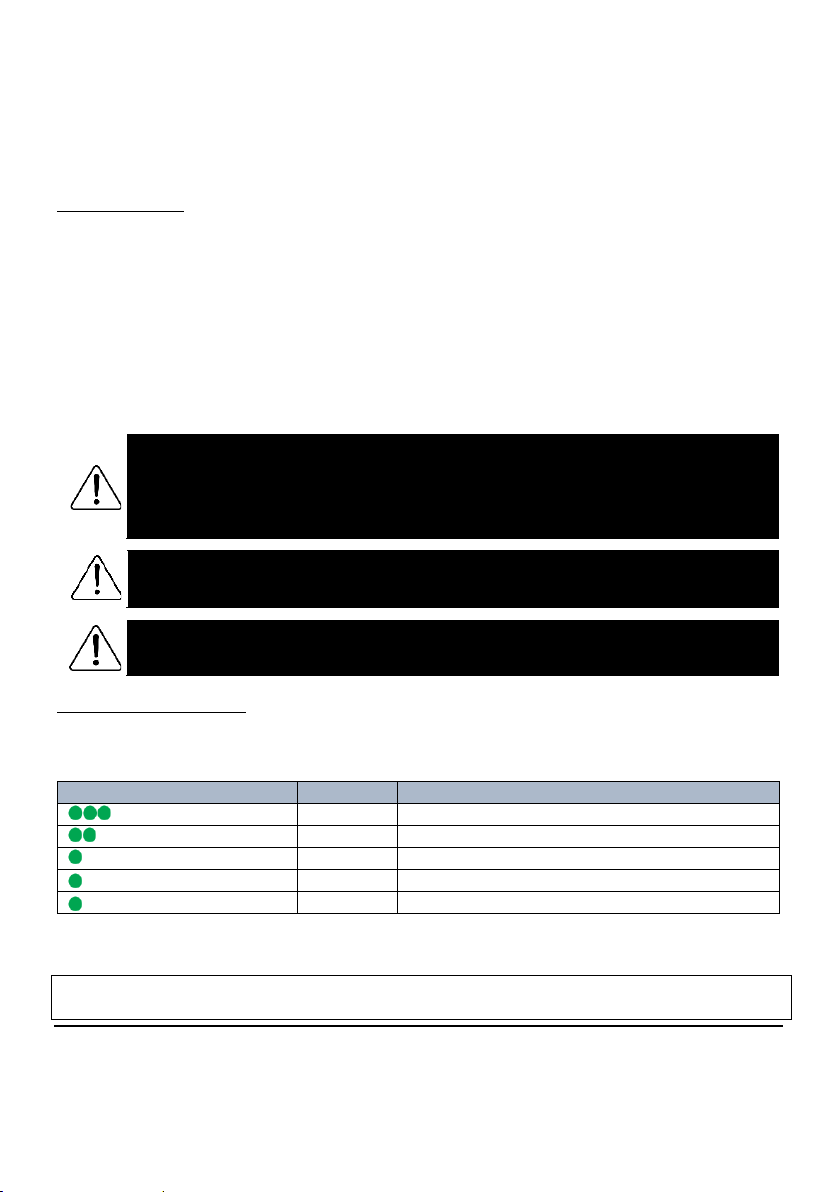
5. After 2 seconds the respirator reports the test result using the Battery Indicator Lights on the keypad. Use the table below
to interpret the indicators.
LIGHTS
Meaning
3 LIGHTS:
PASS (Excellent: flow > 180 l/min)
2 LIGHTS:
PASS (Good)
1 LIGHT:
PASS (Acceptable)
ALL LIGHTS
FLASH
FAIL (Flow <115 l/min)
Do not use the respirator until a new filter has been fitted and/or the battery has been fully
charged and the test has been repeated with a PASS result. Reset the respirator by pressing the
Power Button. Replace the filter and/or fully charge the battery. Repeat the Flow Test. If the
respirator fails the test but the filter is new and the battery is fully charged, contact CleanSpace
Technology and do not use until it has been evaluated.
Important: The Flow Test is not a battery charge test. Three Battery Indicator Lights means that, at the moment it is
tested, the unit can deliver high flow. It does not mean the battery is fully charged. You must check the battery charge
separately. See Section 4.2 and Section 4.4.
6. Donning the Half Mask CleanSpace PAPR
Locate your Power Unit, half mask, neck support and harness. Make sure the half mask and neck support are the same size that
you used for your last successful fit test. Ensure a clean filter is fitted to the Power Unit.
Important: Read through this entire chapter (and the information in previous chapters) before beginning to don the
CleanSpace Respirator.
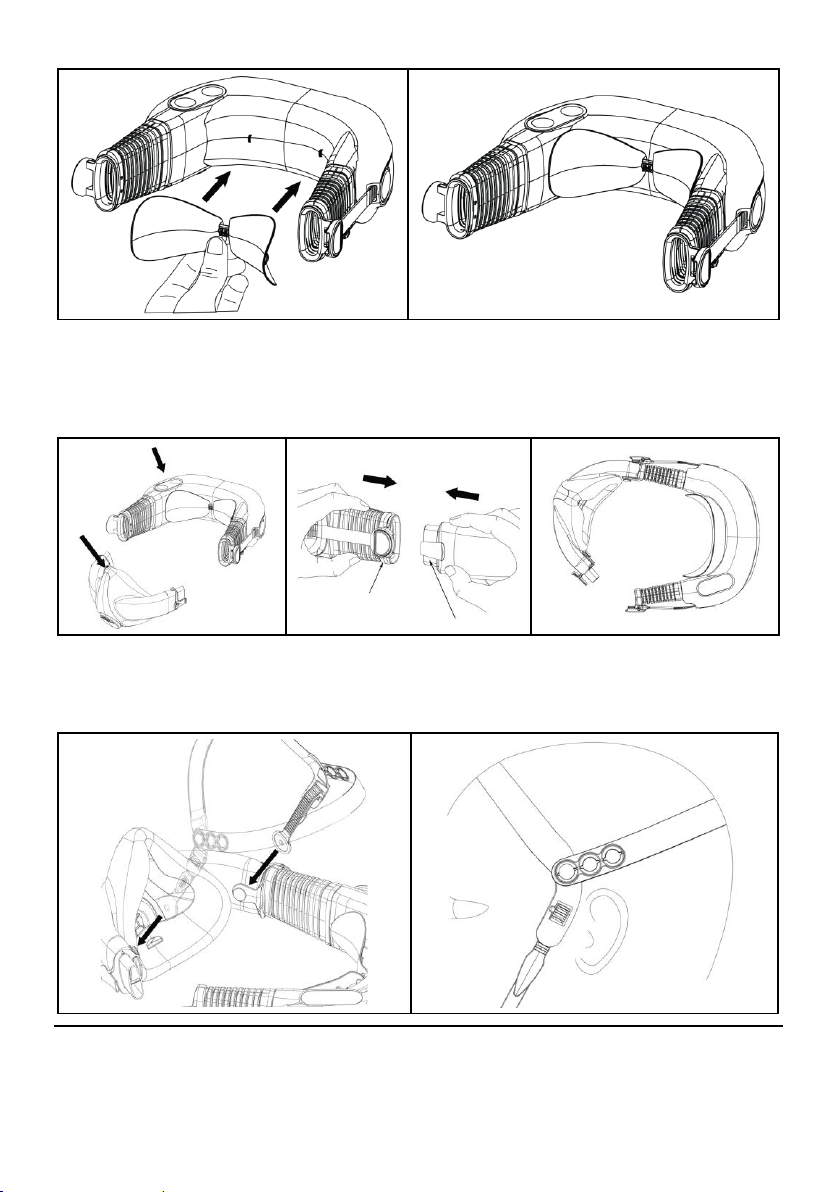
STEP 1 –FIT A NECK SUPPORT TO THE POWER UNIT
The neck support has circular openings at each end which snap over buttons on the Power Unit case. Position the neck support
in place against the buttons and then press firmly until the neck support clips securely into place as shown in the images below.
If your last successful fit test was completed without a neck support, skip this step.
17
STEP 2 –FIT A CLEANSPACE HALF MASK TO THE POWER UNIT
Ensure that the peak of the mask and the keypad on the Power Unit are both facing up. Bring the right-hand Mask and Power
Unit AirClips together until they click into place as shown. Loosen the bellows as far as they will go by pressing the Adjust Buttons
(see Section 4.1) on either side of the Power Unit and gently pulling the mask away from the Power Unit.
STEP 3 –FIT A HARNESS TO THE POWER UNIT
Connect the two side straps of the harness to the circular clips located on the inside of the mask, ensuring that the harness strap
with the front marker is pointing in the direction of the mask. Loosen the side straps as far as they will travel. Ensure the rear
strap setting is the same as used for your last successful fit test.

18
STEP 4 –TURN THE POWER UNIT TO STANDBY MODE
Press the On Button once to turn the Power Unit from Off Mode to Standby Mode. The Battery Indicator Lights should display
the level of charge. The respirator should be fully charged before use.
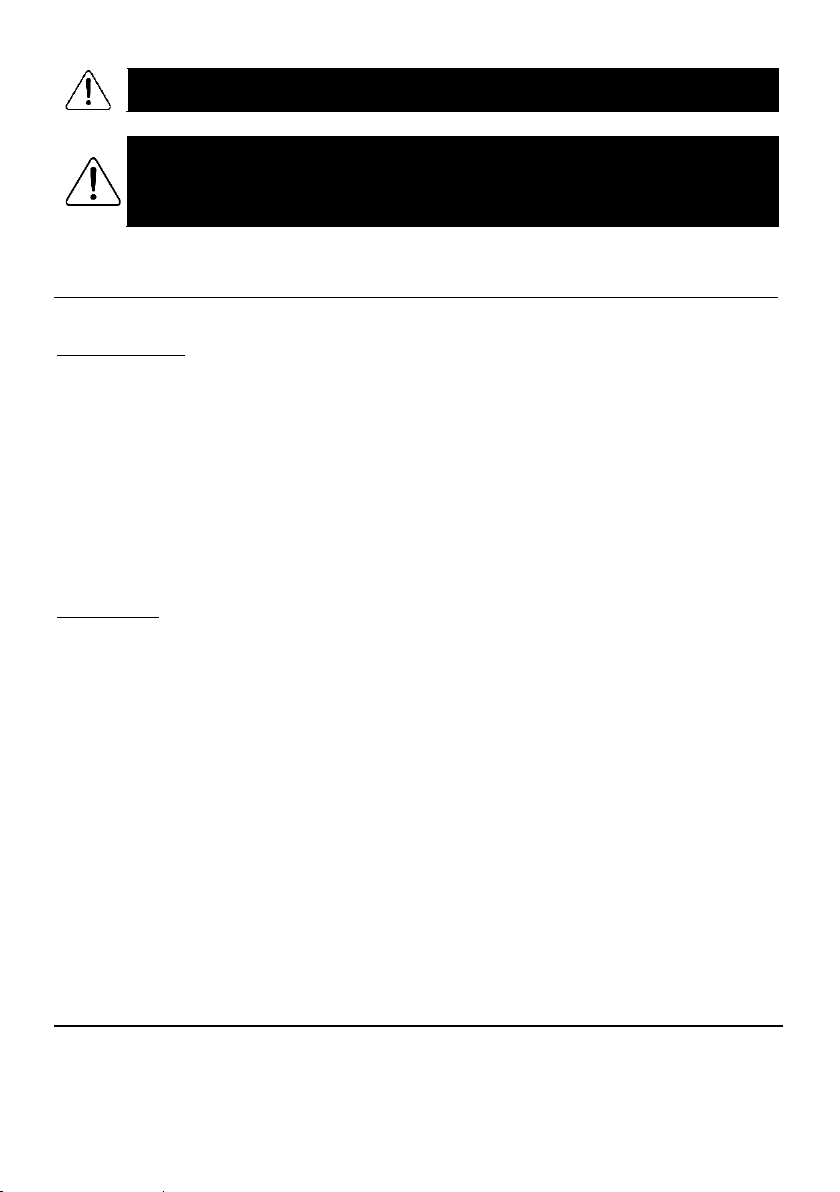
STEP 5 –DON THE RESPIRATOR
Connect the left-hand Mask and Power Unit AirClips as shown below. The breath responsive Power Unit will switch to On Mode
(fan running) automatically when donned and breathing is detected. Pull the harness upwards and over the face until it sits
comfortably on the crown of your head and you can feel it supporting the weight of the respirator. Locate the rear hook of the
harness and clip it securely to the rear hoop located on the top of the Power Unit, ensuring that it supports some of the weight
of the Power Unit.
STEP 6 –ADJUST THE RESPIRATOR
If required, the CleanSpace Respirator can be adjusted after donning by either tightening the bellows or tightening the harness.
1. Tighten the bellows by placing one hand on the back of the Power Unit and one hand over the front of the mask.
Push the Power Unit forwards and the mask backwards, tightening the fit. Ensure bellow adjustments are
symmetrical. If the bellows have been overtightened and the mask is too tight on your face, loosen them by pressing
the Adjust Buttons.
2. Tighten the harness by pulling the side straps downwards as shown. The harness can also be loosened if required
by lifting the ratchet clips upwards and pulling the base of the side straps downwards.
3. Tighten the rear hook by pulling upwards on the back strap. The respirator should sit roughly level.

19
Before checking the fit of the respirator using a seal check (see Step 7), there are some simple signs that may signal that the
respirator has not been fitted properly.
•Gaps: There should be no visible gaps between your face and the mask.
•Creases: If the mask is pulled too tight, or is too large for the face, creases may develop at around the level of the
mouth or on the centerline at the bottom of the cushion. Loosen the mask a little.
•Look down: Look down and check the gap between the bridge of the nose and the mask. Also check that the mask
has not come loose around the chin. Try to fit the chin further into the mask.
•Air in eyes: With the respirator running, check no air leaks into your eyes. If it does, try tightening the mask, or
loosen the harness a little. If those adjustments do not fix the problem, try a different size mask.
•Distortion: Ensure the mask has not become distorted. You should be able to achieve a good fit without the mask
being uncomfortably tight or becoming distorted.
•Over-tightening: Do not over-tighten the mask! If the front of the masks starts to curve in towards the face
(becomes concave) the mask is too tight and may leak. Press the Adjust Buttons to loosen the mask a little.
STEP 7 –COMPLETE SEAL CHECK
A seal check is used to ensure that an adequate seal is achieved each time the respirator is donned and shall be completed
before entering the contaminated area. To complete a Seal Check, place the Seal Check Cap over the exhalation valve of the half
mask, ensuring that no air is flowing from the valve. With the respirator in On Mode and while breathing normally, use your
fingers to feel around the perimeter of the mask for leaks. For extra sensitivity, breathe out firmly to increase the mask pressure
and wet your fingers to make it easier to feel tiny leaks. If there are any leaks, readjust the respirator (harness, adjust button)
and try again. Tilt your head down, up, left, and right and check that there are still no leaks. Once you can feel no leaks from the
mask, the seal check is complete. Remove the Seal Check Cap by gently twisting the handle so that one side of the cap comes
loose from the exhalation valve. Be careful not the dislodge the exhalation valve cover.
20
WARNING
If a satisfactory seal check cannot be achieved, do not enter the contaminated area.
WARNING
Be sure to remove the Seal Check Cap before entering the contaminated area. The cap blocks the exhalation
valve, making it more difficult for your exhaled air to be expelled from the mask. Failure to remove the cap
will lead to increased levels of rebreathed Carbon Dioxide and may result in headache or dizziness. Never
leave the cap in place for more than 2 minutes!
7. The Contaminated Area
7.1. HUMAN FACTOR CONSIDERATIONS
Noisy Environments
In most noisy environments, the respirator alarms are still clearly audible to the user. However, if there is a chance you will not
hear them, you must take the following extra precautions.
•Do not enter the contaminated area unless all three (3) green Battery Indicator Lights are illuminated.
•Do not work in a high noise area for more than four (4) hours. At the end of four (4) hours, leave the contaminated
area and check;
-the Filter Alarm Light is not illuminated; AND
-all three (3) green Battery Indicator Lights are still illuminated.
•If two (2) or fewer green Battery Indicator Lights are illuminated, recharge the CleanSpace Respirator until three (3)
lights are showing again (and the 3rd one has stopped flashing).
•If the Filter Alarm Light is illuminated, change the filter.
•Be particularly aware of difficulty breathing or of the powered airflow stopping. If either of these things occur, exit
the contaminated area immediately.
Communication
The following recommendations are suggested to aid communication whilst wearing a CleanSpace Respirator.
•Speak 30% louder in volume.
•Truncate sentences –shorten communication to ensure it is clear and concise.
•Use closed loop communication –exchange information, acknowledge receipt of that information and confirm the
recipient has interpreted the information correctly.
7.2. ENTERING AND EXITING THE CONTAMINATED AREA
Prior to entering the contaminated area, complete the inspections and checks listed in these user instructions.
1. Ensure a seal check has been done and the motor is responding to your breathing.
2. Familiarize yourself with the Adjust Buttons and the Mask Release Buttons.
3. Check no alarms are sounding or flashing. If your work environment is noisy you may be unable to hear the alarms.
In this case you must follow the special precautions set out in Section 7.1.
4. If additional PPE is required, ensure this is donned also. Enter the contaminated area.
5. Do not remove the respirator until you have left the contaminated area. If you have an acute and spontaneous
health episode (i.e. experiencing dizziness) and believe removing the respirator while you leave the contaminated
area may help, remove the respirator with caution.
6. Leave the contaminated area immediately if any of the following conditions occur:
a. The Low Battery Alarm or the Filter Change Alert triggers.
b. Any part of the system becomes damaged.
c. Airflow into the mask decreases or stops.
Other manuals for PRO
1
Table of contents
Other CleanSpace Respiratory Product manuals

CleanSpace
CleanSpace CleanSpace2 User manual

CleanSpace
CleanSpace HALO User manual

CleanSpace
CleanSpace HALO CS3021 with BIO-HOOD User manual

CleanSpace
CleanSpace PRO User manual

CleanSpace
CleanSpace HALO User manual

CleanSpace
CleanSpace PAF-0060 User manual

CleanSpace
CleanSpace EX User manual

CleanSpace
CleanSpace EX User manual

CleanSpace
CleanSpace ULTRA User manual

CleanSpace
CleanSpace CleanSpace2 User manual


