CleanSpace HALO CS3021 with BIO-HOOD User manual


2
1. Contents
1. Contents............................................................................................................................................................... 2
2. Foreword.............................................................................................................................................................. 3
3. System Description.............................................................................................................................................. 3
4. List of Warnings within these User Instructions .................................................................................. 3
5. NIOSH –Approval, Cautions and Limitations ..................................................................................................... 4
6. S - Special or Critical User Instructions...............................................................................................................5
7. Limitations of Use ................................................................................................................................................ 5
8. Respirator Program Management .......................................................................................................................6
9. System Components............................................................................................................................................ 7
10. HALO BIO System............................................................................................................................................... 8
11. Controls and Indicators........................................................................................................................................9
12. Mask Fitting........................................................................................................................................................ 10
13. Using CleanSpace HALO with HALF MASKS (including HALO BIO Half Masks)............................................12
14. Using CleanSpace HALO BIO with the Head Cover.........................................................................................20
15. Using CleanSpace HALO with Full Face Masks............................................................................................... 22
16. Entering and Exiting the Contaminated Area ....................................................................................................26
17. Working in Noisy Environments.........................................................................................................................27
18. Fitting & Changing the Filter ..............................................................................................................................28
19. Battery Information............................................................................................................................................. 30
20. Cleaning.............................................................................................................................................................32
21. Periodic Maintenance & Checking..................................................................................................................... 35
22. Performing a Quantitative Fit Test (Full Face Mask).........................................................................................36
23. Converting Half Mask HALO into Half Mask HALO BIO ...................................................................................37
24. Specifications.....................................................................................................................................................38
25. Product and Accessory information...................................................................................................................39
26. Product Warranty............................................................................................................................................... 41
Important: Before use, the wearer must read and understand these user instructions. Keep these user
instructions for reference.
Read these instructions in conjunction with the appropriate CleanSpace™filters and accessories instructions.
WARNING
This product is part of a system that helps protect against certain airborne contaminants. Misuse
may result in sickness or death. For proper use, see your Occupational Health Specialist, these
user instructions or contact CleanSpace Technology Customer Service on 1 888 804 0038

3
2. Foreword
Read all instructions and warnings before using this device. Keep these user instructions for reference. If you have
questions regarding this system contact CleanSpace Customer Service on +612 8436 4000 or e-mail
sales@cleanspacetechnology.com
3. System Description
CleanSpace HALO is a complete NIOSH-approved respiratory system. When used in accordance with its NIOSH
approval, the respirator helps to provide respiratory protection against particulates. HALO does not provide
protection against vapours or gasses and is not an intrinsically safe system. See the NIOSH Approval Section of
these user instructions for additional information on approvals.
The components of the CleanSpace HALO system are shown in Section 9. The blower draws ambient air through
the high efficiency filter and supplies filtered air to the wearer via the mask. HALO is a breath responsive respirator
which means that it blows harder during inhalation and more softly during exhalation. The device continuously
adjusts fan speed to maintain positive pressure in the mask. Should the filter become blocked, an audible alarm will
sound and the “Filter” light on the keypad will be illuminated. If the battery voltage falls below the minimum required
to sustain the designed flow rate, an audible alarm will sound.
The HALO BIO System includes a Head Cover which, in combination with the other HALO BIO components, helps
protect the head and neck from splash contamination. The HALO BIO Head Cover is used with the HALO BIO Half
Masks and HALO BIO filter. The HALO BIO System includes an exhalation filter.
WARNING
Properly selected, used and maintained respirators help to protect against certain airborne
contaminants. It is essential to follow all instructions and government regulations on the use of this
product, including wearing the complete respirator system during all times of exposure, in order for
the product to help protect the wearer. Misuse of respirators may result in overexposure to
contaminants and lead to sickness or death. For proper use, see your Occupational Health
Specialist, these user instructions or contact CleanSpace Technology Customer Service on 1 888 804
0038
4. List of Warnings within these User Instructions
WARNING
This product is part of a system that helps protect against certain airborne contaminants. Misuse may result in sickness or death. For
proper use, see your Occupational Health Specialist, these user instructions or contact CleanSpace Technology Customer Service on 1
888 804 0038
WARNING
Properly selected, used and maintained respirators help to protect against certain airborne contaminants. It is essential to follow all
instructions and government regulations on the use of this product, including wearing the complete respirator system during all times of
exposure, in order for the product to help protect the wearer. Misuse of respirators may result in overexposure to contaminants and lead
to sickness or death. For proper use, see your Occupational Health Specialist, these user instructions or contact CleanSpace
Technology Customer Service on 1 888 804 0038
WARNING: never dry the mask or exhalation valve with a cloth that may leave behind lint.
Lint contamination of the exhalation valve may cause it to leak, resulting in overexposure to contaminants and lead to sickness or death.
WARNING: The blower contains a battery, sensitive electronics and a motor. Never immerse it in water or use anything wetter than a
damp cloth to clean it.
No PAPR can fully protect you if you are not clean shaven. CleanSpace HALO is not suitable for users with facial hair.
If a satisfactory fit factor cannot be achieved with any of the masks, CleanSpace halo must not be used
If you cannot adjust the mask to avoid your hairline, the mask is not suitable for you and must not be worn
Do not leave the seal check cap in place for more than 2 minutes
Do not use compressed air or a brush to clean the filter!

4
HEPA filters are very easily damaged by the use of compressed air or by brushing.
Misuse of CleanSpace HALO by cleaning the filter may result in overexposure to contaminants and lead to sickness or death.
Be sure to remove the Seal Check Cap (Half Mask variants) before entering the contaminated area. The Cap blocks the exhalation
valve, making it more difficult for your exhaled air to be expelled from the mask. Failure to remove the cap will lead to build-up of Carbon
Dioxide in the mask, and may result in headache or dizziness. Never leave the Cap in place for more than 2 minutes!
Do not remove the respirator until you have vacated the contaminated area unless you have pressing health reasons to do so (for
instance you are experiencing dizziness and believe removing the respirator while you leave the contaminated area may help)
It is essential that the correct filter type is selected for the chosen application.
If the blocked filter alarm is triggered (2 beeps, repeated every second, red LED flashes), leave the contaminated area immediately and
replace the filter. Operating the respirator after the blocked filter alarm has sounded can cause the flow to fall below the manufacturer’s
minimum designed flow, which may result in overexposure to contaminants and lead to sickness or death.
CleanSpace HALO is not intrinsically safe. Do not use in flammable or explosive atmospheres. Doing so may result in injury or death.
Always correctly use and maintain the internal lithium ion battery packs. Failure to do so may result in fire or explosion or could
adversely affect respirator performance and result in injury, sickness or death.
Do not charge the on-board battery with unapproved chargers, in enclosed cabinets without ventilation, near flammable liquids or
gasses, or near sources of high heat. Do not immerse the device in water. Do not use, charge or store the device outside the
recommended temperature limits
If the battery alarm sounds (3 beeps, repeated every second), leave the contaminated area immediately and re-charge the battery.
Operating the respirator after the low battery alarm has sounded can cause the flow to fall below the manufacturer’s minimum designed
flow, which may result in overexposure to contaminants and lead to sickness or death.
In the extremely rare circumstance that the battery is damaged and electrolyte comes in contact with eyes, flush with water immediately
and seek urgent medical attention
You must recalibrate the internal pressure sensor any time that your CleanSpace HALO is exposed to changes in temperature of more
than 20°C
When fitting a new filter, the blocked filter alarm shall be tested before the respirator is put back into service.
The Exhalation Filter CS3027 is an electrostatic filter and its performance will be degraded by exposure to certain organic solvents
including isopropanol (IPA), xylene and toluene. Always remove the Exhalation Filter before cleaning the mask. If there is any possibility
that the Exhalation Filter has become contaminated with solvent, replace it
5. NIOSH –Approval, Cautions and Limitations
NIOSH APPROVAL
CleanSpace HALO is a NIOSH-approved respirator system. Refer to these User Instructions and to the NIOSH
approval label provided with each CleanSpace HALO for a listing of components that can be used to form a NIOSH-
approved respirator.
NIOSH CAUTIONS AND LIMITATIONS
A - Not for use in atmospheres containing less than 19.5 percent oxygen.
B - Not for use in atmospheres immediately dangerous to life or health.
C - Do not exceed maximum use concentrations established by regulatory standards.
F - Do not use powered air-purifying respirators if airflow is less than four cfm (115 lpm) for tight fitting facepieces or
six cfm (170 lpm) for hoods and/or helmets.
I –Contains electrical parts that may cause an ignition in flammable or explosive atmospheres
J - Failure to properly use and maintain this product could result in injury or death.
L - Follow the manufacturer's User's Instructions for changing cartridges, canister and/or filters.

5
M - All approved respirators shall be selected, fitted, used, and maintained in accordance with MSHA, OSHA, and
other applicable regulations.
N - Never substitute, modify, add, or omit parts. Use only exact replacement parts in the configuration as specified
by the manufacturer
O - Refer to User's Instructions, and/or maintenance manuals for information on use and maintenance of these
respirators.
P - NIOSH does not evaluate respirators for use as surgical masks.
S - Special or critical User's Instructions and/or specific use limitations apply. Refer to User's Instructions before
donning.
6. S - Special or Critical User Instructions
This respirator contains a system for synchronising with your breathing and regulating mask pressure. This system
requires re-calibration whenever it experiences a change in temperature of more than 36°F (20°C). It is best
practice to also re-calibrate if the unit has been in storage, particularly if the storage temperature is not
known.
For the most accurate battery charge indication, the respirator must be plugged into its charger. To be sure it is fully
charged, plug in the charger and wait for all 3 LEDs to light solidly without flashing. If the 3rd LED is flashing
rapidly, the battery is 95% charged.
The CS3024 Head Cover shall only be used in combination with a HALO BIO Half Mask (CS3003H Small, CS3004H
Medium or CS3005H Large); and with a CS3025 Filter HE –HALO BIO. No other combination of mask and filter is
approved for use with the HALO BIO Head Cover. The HALO BIO Masks are approved and may be used without the
Head Cover with either the HALO BIO HE Filter (CS03025) or the HALO Standard HE Filter (CS3022). The HALO
BIO is a tight-fitting half mask PAPR. The head cover does not provide or contribute to the systems respiratory
protection.
7. Limitations of Use
Use this Respirator strictly in accordance with all instructions in these user instructions. Never modify or alter this
product.
•Do not remove the Respirator until you have left the contaminated area,
unless you have pressing health reasons to do so (for instance you are experiencing dizziness and
believe removing the respirator while you leave the contaminated area may help).
•Only suitable for use by clean-shaven personnel. Facial hair under the seal reduces protection and is not
permitted.
•Note: Half Mask variants of CleanSpace do not protect your eyes. In conditions that may damage or
irritate eyes, use protective eyewear or a full-face variant of CleanSpace.
•Only use your respirator with the parts and accessories listed on the Approval Label.
•Do not use the respirator unless it is powered and running normally.
•Do not use the respirator while it is being charged via the AC adaptor.
•Do not use in airborne contaminant concentrations above those specified in your national regulations
•Do not use for respiratory protection against unknown atmospheric contaminants or when concentrations
of contaminants are unknown or immediately dangerous to life or health (IDLH).
•Do not use in oxygen deficient or oxygen enriched atmospheres. Do not use in flammable or explosive
environments.
•Only for use by trained personnel.
•Filters need to be changed regularly. The frequency of change depends on use and the concentration of
contaminants in the atmosphere.
•Do not use for escape purposes. National regulations may impose specific limitations on the use of filters
depending on the filter class and the facemask used.
LEAVE THE CONTAMINATED AREA IMMEDIATELY IF:
•Respirator warning lights and/or sounds activate for low battery or blocked filter

6
•Any part of the respirator is damaged
•Air flow into the mask decreases or stops
•Breathing becomes difficult or increased resistance occurs
•You feel dizzy or your airway is irritated
•You can taste or smell contaminants
Your respirator is suitable for use in the following atmospheric conditions:
•Temperature: 14°F to 113°F (-10°C to 45°C)
•Relative humidity: 0 to 90% non-condensing
The respirator will stop functioning if its internal temperature rises above 140°F (60°C) or falls below 14°F (-10°C
If the respirator has been used in an area that has caused it to become contaminated with a substance requiring
special decontamination procedures it should be placed in a suitable container and sealed until it can be
decontaminated.
Do not disassemble the respirator case. There are no user serviceable parts inside.
Failure to follow all instructions on the use of this product, and/or failure to use the respirator during times of
exposure, may lead to adverse effects on the wearer’s health and may render the warranty void.
WARNING
This product is part of a system that helps protect against certain airborne contaminants. Misuse
may result in sickness or death. For proper use, see your Occupational Health Specialist, these
user instructions or contact CleanSpace Customer Service on 1 888 804 0038
8. Respirator Program Management
Occupational use of respirators must be in compliance with applicable health and safety standards. By United States
regulation employers must establish a written respiratory protection program meeting the requirements of the
Occupational Safety and Health Administration (OSHA) Respiratory Protection standard 29 CFR 1910.134 and any
applicable OSHA substance specific standards. For additional information on this standard contact OSHA at
www.OSHA.gov. In Canada, CSA standard Z94.4 requirements and/or the requirements of the applicable jurisdiction
must be met. Contact an industrial hygienist or CleanSpace Technology Technical Service with questions
concerning the applicability of the respirator to your job requirements.

7
9. System Components
Figure 1 - System Components

8
PARTS OF THE RESPIRATOR
Throughout this manual reference is made to various commonly-used components and features of the respirator.
Familiarise yourself with these parts before reading the rest of the manual. See Figure 2.
Figure 2 - Parts of the Respirator
10. HALO BIO System
A fully configured HALO BIO system incorporates:
•CS3024 Head Cover –HALO BIO
•Half Mask –HALO BIO (CS3003H small, CS3004H medium or CS3005H large)
•CS3025 Filter HE –HALO BIO
•(optionally) CS3027 Exhalation Filter –HALO BIO
Notes:
•The HALO BIO is a tight-fitting half mask PAPR. The head cover does not provide or contribute to the
system’s respiratory protection.
•The CS3024 Head Cover shall only be used in combination with a HALO BIO Half Mask (CS3003H
Small, CS3004H Medium and CS3005H Large) which is configured to adapt to the Head Cover; and with
a CS3025 Filter HE –HALO BIO which is also configured to adapt to the Head Cover. No other
combination of mask and filter is approved for use with the HALO BIO Head Cover.
•The HALO BIO Masks are approved and may be used without the Head Cover with either the HALO BIO
HE Filter (CS03025) or the HALO Standard HE Filter (CS3022).

9
•The optional Exhalation Filter may be used with or without the HALO BIO Head Cover.
•The Snorkel Exhalation Valve Cover on BIO masks is a disposable component. For instructions on
changing it see Section 19 Cleaning.
11. Controls and Indicators
POWER BUTTON
This button is used to switch between the three (3) operating Modes: “On”, “Standby” and “Off”
Mode.
i) Standby Mode is when the green battery indicator lights are on, the motor is not running and
there is no airflow to the mask. The respirator will automatically switch to Standby Mode within ten
(10) seconds of the user taking it off. If the respirator is in Off Mode it will switch to Standby Mode when the Power
button is pressed.
ii) On Mode is when the respirator is being worn, the motor is running and there is air flow to the mask. The motor
will start (called On Mode) when the respirator detects a change in pressure in the mask triggered by your breathing.
In On Mode you should hear the motor running and feel the airflow on your face. You can also switch to On Mode
(start the motor) from Standby Mode by pressing the Power button once.
iii) Off Mode is when the green battery indicator lights are off and the motor is not running and there is no air flow to
the mask. The respirator automatically switches into Off Mode three (3) minutes after it has been removed from the
user’s face and the sensors detect that there is no breathing.
To conserve battery life, the respirator is designed to automatically switch from On Mode to Standby then to Off
Mode when not being worn.
Important: CleanSpace HALO™switches into On Mode when it is in Standby Mode and the wearer starts to
breathe. The respirator can only switch into On Mode from Standby Mode.
10
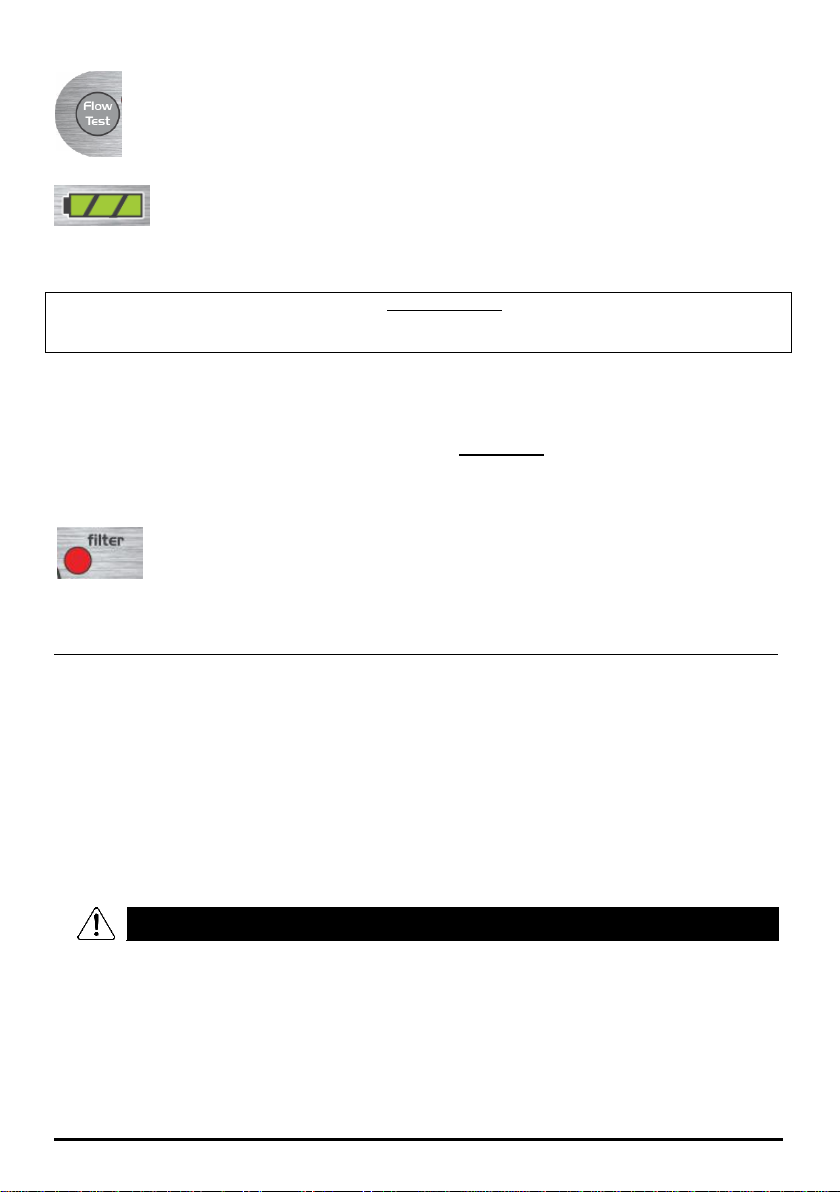
FLOW TEST BUTTON
This button is used to check that the respirator is able to deliver its minimum designed flow. Pressing it
once, when the CleanSpace HALO is in Standby Mode (not ON Mode), starts the flow test which lasts
about 5 seconds. See Section 0 for instructions on running the flow test.
BATTERY INDICATOR LIGHTS
Your respirator is equipped with an indicator of battery charge. There are three (3) battery indicator
lights. With the charger plugged in and three green lights lit, the battery is fully charged and typically has six (6)
hours of operating time. The respirator should be fully charged before use.
If you need to be sure the battery is 100% charged plug in the charger. Even if the battery is fully charged, the 3rd
LED will flash for at least three minutes while the respirator checks its condition. Once all 3 LEDs light solidly
without flashing the battery is at 100%
For how to assess the level of charge, see Section 16.
When the battery approaches a level at which it would not be able to supply the Manufacturer’s Minimum Design
Flow, an alarm sounds (3 beeps, repeated once per second). All green battery lights are extinguished. If the low
battery alarm sounds you must leave the contaminated area immediately and recharge the battery.
Operating time is strongly affected by work rate, altitude, and other factors. The operating times quoted
above are average durations at moderate work rates at sea level. Actual operating times may vary widely
from average durations.
FILTER WARNING ALARM
CleanSpace HALO™has a Filter Warning Alarm, which is triggered when the filter is blocked. If the
Filter Warning Alarm sounds (two beeps, repeated once per second) or the Filter Warning Alarm
light comes on, you must move out of the contaminated area, and change the filter.
12. Mask Fitting
Before using your respirator you must determine the right mask for your face and know how to adjust the machine to
achieve a good fit.
It is vital that your mask is the right size for your face and fits properly. Mask fitting must be carried out by a
specialist / designated mask fitter. The fit must be confirmed by a quantitative fit test performed according to
OSHA regulations 1910.134.
Full Face masks and Half Masks require different equipment and instructions to carry out a quantitative fit test.
Half Masks: To carry out a quantitative fit test your specialist mask fitter will require PAF-0025 PortaCount Adaptor
and the accompanying S005-7174 Quantitative Fit Test Instructions. The PortaCount Adaptor is an accessory that
fits between the mask and the exhalation valve and allows the air in the mask to be sampled. It comes with detailed
instructions on how to carry out a quantitative fit test.
Full Face Masks: See Appendix - Performing a Quantitative Fit Test (Full Face Mask).
No PAPR can fully protect you if you are not clean shaven. CleanSpace HALO is not suitable
for users with facial hair.

11
MASK SELECTION GUIDELINES
No set of guidelines can ensure that you have the right size mask for your face. You must confirm the fit
with a quantitative fit test. But the tables below will help your mask fitting specialist to select the mask most likely
to fit you and may therefore save time.
Half Masks:
Full Face Masks:
12
SELECTING A NECK SUPPORT
Your CleanSpace HALO respirator is supplied with two sizes of neck support, “S”, “M”. “S” (Small) is for people with
smaller necks and heads while “M” (Medium) is for those with medium sized heads and necks. Users for whom the
“Medium” neck support does not provide enough room (both bellows are fully extended but mask is still too tight on
face) should use HALO without a neck support. This configuration provides extra room and is comfortable due to the
curved design of the case.
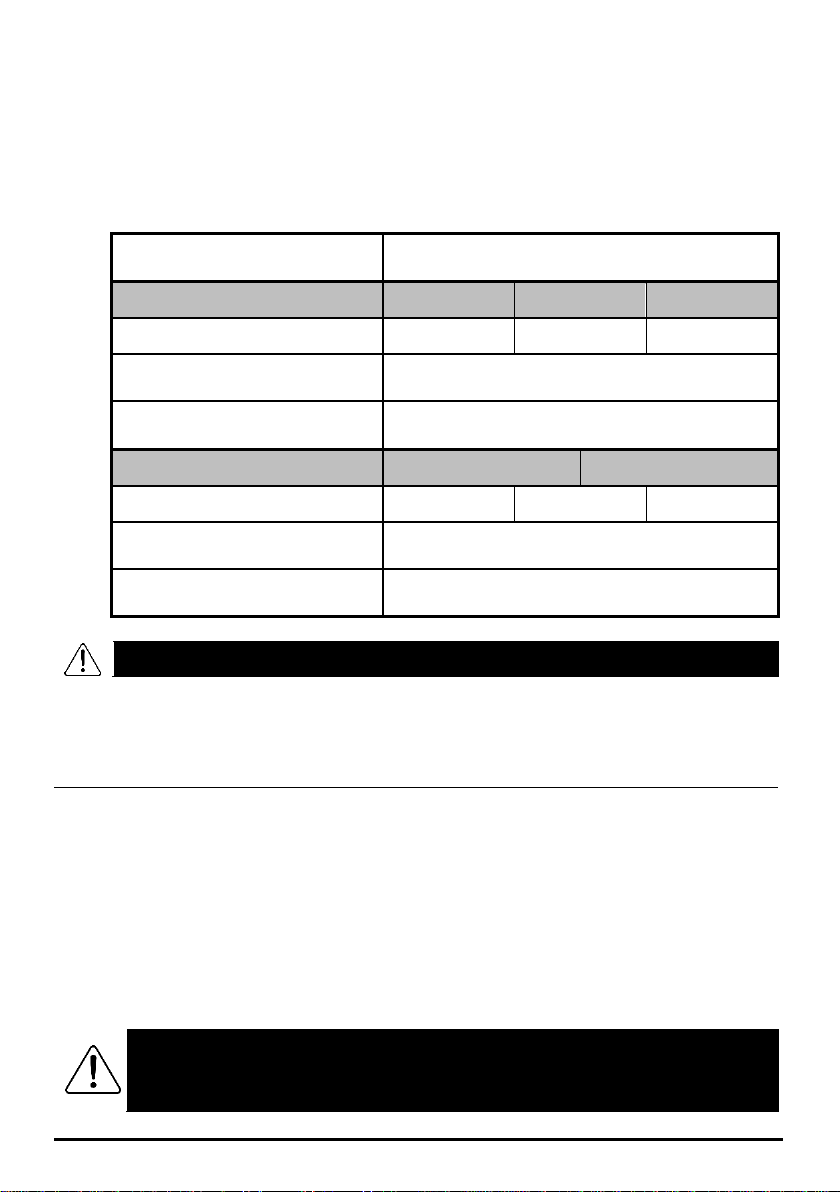
Once you have achieved an acceptable mask fit and confirmed it with a quantitative fit test, record your information
in the table below.
Name
Half Mask:
Small
Medium
Large
Neck Support Size Fitted
Small
Medium
None
Date of Quantitative Fit Test
Fit Factor on Test
Full Face Mask:
Small
Medium/Large
Neck Support Size Fitted
Small
Medium
None
Date of Quantitative Fit Test
Fit Factor on Test
IF A SATISFACTORY FIT FACTOR CANNOT BE ACHIEVED WITH ANY OF THE MASKS,
CLEANSPACE HALO MUST NOT BE USED
13. Using CleanSpace HALO with HALF MASKS (including HALO
BIO Half Masks)
Complete the following five steps each time you use your respirator with a Half Mask.
STEP 1 - INSPECT
Before each entry into a contaminated area, the following inspections must be performed:
•Visually check the entire respirator system including the blower, mask, harness and filter. If parts are
missing or damaged replace them only with approved parts before proceeding. Check the top and
bottom case of the blower for cracks or other damage. Do not use the device if there is any damage.
•Remove the HE filter and check it carefully. The seal must be clean and free from damage of any kind. If
necessary it can be cleaned with a cloth dampened with water. Examine the visible internal surfaces for
any sign that dust has leaked past a damaged seal. If found, replace the filter. The body of the filter must
not be cracked or show any sign of damage. Examine the filter carefully for any sign that it has sustained
an impact or been scratched. If any sign of impact or scratching is found, discard the filter. Refit the HE
filter (see Changing the Filter, page 28)
DO NOT USE COMPRESSED AIR OR A BRUSH TO CLEAN THE FILTER!
HEPA FILTERS ARE VERY EASILY DAMAGED BY THE USE OF COMPRESSED AIR OR BY
BRUSHING.
Misuse of CleanSpace HALO by cleaning the filter may result in overexposure to contaminants
and lead to sickness or death.

13
•Check that the battery is fully charged by pressing the power button. All three battery LEDs must light.
See Section 14.
•Check both bellows for splits or holes. Check that the bellows have not become distorted so as to
partially or fully close the air path to the mask.
•Check the mask to ensure that there are no cracks, tears or dirt; check the mask is not distorted.
•Check the exhalation valve for damage or dirt. If it is dirty, remove the exhalation Valve Cover. Remove
any dirt, hairs or anything that could affect the seal of the valve against its seat. Check that the valve seat
is clean. Reinstall the Valve Cover. If the valve is damaged, replace the mask. A dirty or poorly sealing
valve will reduce protection and shorten battery life.
•Check the harness is intact and the elastic is not frayed or damaged. It must be adjusted to support
some of the weight of the respirator.
STEP 2 –CALIBRATE
This respirator contains a system for synchronising with your breathing and regulating mask pressure. This system
requires re-calibration whenever it experiences a change in temperature of more than 36°F (20°C). It is best
practice to also re-calibrate if the unit has been in storage, particularly if the storage temperature is not
known. To re-calibrate:
1. Remove the mask if fitted.
2. Remove the filter from the respirator.
3. Place the respirator on a stable surface such as a table.
4. With the respirator in standby mode (one or more green LEDs lit), press the Power button and the Flow Test
button at the same time.
If no LEDs are lit. press the Power button once to enter standby mode
5. When both the blue and red LEDs light, release both buttons. Leave the respirator sitting still.
6. After 5 –10 seconds the motor will start and will run for 5 –10 seconds.
7. When the motor stops, calibration is complete.
8. Re-fit the filter.
Important Note: Failure to remove the filter prior to calibration will result in poor battery life. In order to restore the
performance of the respirator, calibration must be performed again with the filter removed.
STEP 3 –TEST FLOW RATE
This test checks that the machine is able to deliver the Manufacturer’s Minimum Design Flow of 120 litres/minute.
1. Remove the mask from the respirator. Leave the filter in place. Place the respirator flat on a table or other
support.
2. Press and release the button marked “Flow Test”
3. The respirator automatically runs the Flow Test. The motor will run fast and air will be discharged from the left
hand bellows.
4. After 2 seconds the respirator reports the result of the test using the LEDs on the keypad. Use the table below
to interpret the LEDs.
LIGHTS
Meaning
3 LEDs:
PASS (Excellent: flow >180 l/min)**
2 LEDs:
PASS (Good)**
1 LED:
PASS (Acceptable)
ALL LEDs
FLASH
FAIL (Flow <120 l/min)
Do not use the respirator until a new filter has been fitted and / or battery charged
and the test has been repeated with a PASS result.
Reset the respirator by pressing the Power button. Fully charge the battery and / or
replace the filter. Repeat the flow test. If filter is new and battery fully charged but the
respirator fails the test, contact CleanSpace Technology and do not use until it has been
evaluated
** This test is not a battery charge test. Three LEDs means that, as of the moment it is tested, the unit can
deliver high flow. It does not mean the battery is full. You must check the battery condition separately. See
Section 16.

14
Figure 7 -
Mask on
Blower (Note
- connection
is on right
hand side)
STEP 4 - DON THE RESPIRATOR
NOTE –please read STEP 4 all the way through before beginning to don the respirator
Locate your blower, mask, neck support and harness. Make sure the mask is the size that you used for your last
successful quantitative fit test. This size should be recorded in this manual (see Section 11 above).
•Fit a mask to CleanSpace HALO
With the peak of the mask upright locate the right-hand mask AirClip. Locate the right-hand blower AirClip. It is on
the same side of the blower as the Keypad.
Figure 5 - Right hand mask AirClip
Figure 6 - Right hand blower AirClip
Join the AirClips, so that the mask is attached
to the blower. See Figure 7.

15
Check that the mask is the right way up! The nose region of the mask must face in the same direction as
the keypad. See Figure 8.
Figure 8 - Nose section of mask and keypad must both face up
Leave the other mask arm and bellow free until you are fitting the Respirator.
Familiarise yourself with the Adjust Buttons and the Mask Release Buttons. See Figure 9
Figure 9 - Mask Release Button and Adjust Button
•Fit the Harness
Holding the harness find the two keyhole clips at the end of each elastic strap, fit these to the
buttons on the inside of each Airclip. Check that the “Front” printing on the main head strap is
pointing to the mask and that there are no twists in the straps.
Figure 10 - Harness Fitting

16
The two straps of the harness fit to the inside of the AirClips on the mask
.
Adjust the harness as follows:
•To move the mask up, tighten the elastic straps by sliding the cleat down the strap
•To adjust for a smaller head size, shorten the rear strap by using a hole further along the
strap, as shown below.
Figure 12 - Adjusting the harness rear strap
•Fit a Neck Support
Align the neck support with the blower, the two arms with the rounded heads should be at the top. Locate
the bottom arms of the neck support in the grooves at the bottom of the unit and slide neck support
upwards until you hear a ‘click’.
NOTE –Users for whom the “Medium” neck support does not provide enough room (both bellows are
fully extended but mask is still too tight on face) may use HALO without a neck support. Note that this
configuration (like all others) must be confirmed by a quantitative fit test performed according to
OSHA regulations 1910.134
Figure 11 –Adjust Harness Length
by Moving Cleat Up or Down Strap
17
Figure 13 - Fitting neck support
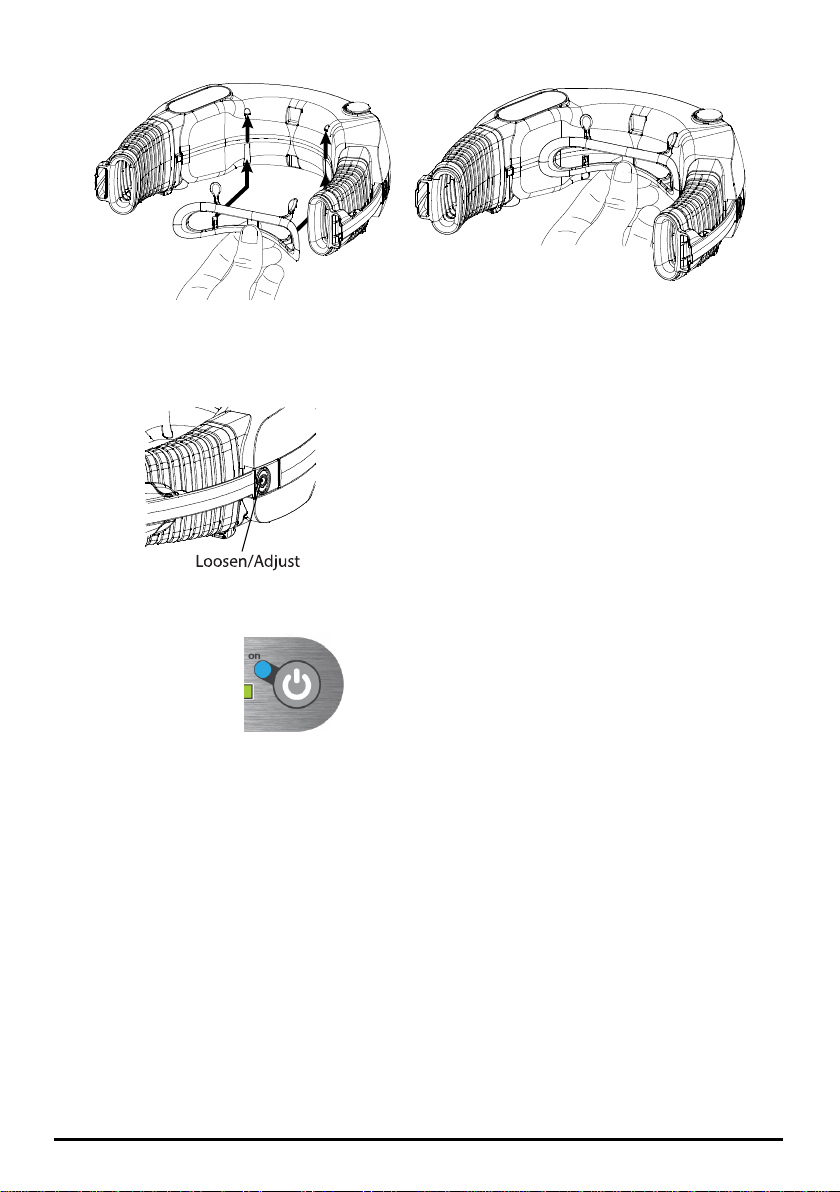
•Loosen both bellows to their widest opening
Press the adjust button on the blower and pull on the bellows to extend them. See Figure 14.
Figure 14 - Adjust Button
•Place the machine in Standby Mode
Press the Power button once
•Don the respirator and start to breathe. (The motor should start)
Place the blower behind your neck with the bellows and mask hanging down one side, harness should be
hanging in front of mask. Fasten the AirClip on your left-hand side. Pull the mask up and around onto
your face. Pull the harness back and onto your head.
Adjust harness and settle it on your head, move cleats up or down to adjust.

18
LEVEL
Breathe normally. The motor should start and you should feel fresh air on your face.
If the motor does not start, it was not in Standby Mode. Take the respirator off, press the
Power button to activate Standby Mode and don it again as described above.
•Check the Harness
The Harness should take a little of the weight of the mask and support the blower so that the respirator
system sits level on your head. If necessary adjust the harness. This is done by shortening or
lengthening the front straps of the harness, by sliding the cleats up or down the straps. Remember to
shorten or lengthen each side by the same amount. If necessary the rear strap can also be adjusted –
see above.
Figure 21 - Correct CleanSpace HALO Position
Figure 18 –Pull mask up and
onto face
Figure 19 –Pull harness back
and onto head
Figure 20 - Settle harness and
adjust
Figure 17 –Device fastened
around neck
Figure 15 - Blower behind
neck
Figure 16 –Fasten AirClip

19
•Tighten the mask on your face
Tighten the mask until you do not feel any leaks
between the mask cushion and your face.
To tighten the mask, place one hand against
the back of the blower and the other over the
front of the mask. Push the blower forwards and
the mask back, tightening the fit. You will hear a
series of clicks as the mask is tightened.
Be careful to tighten each side by the same
amount
STEP 5 –CHECK MASK SEAL (STANDARD MASK)
If using the HALO BIO system CS3024 Head Cover, skip to Section 14
It is essential to do a fit check every time you wear a CleanSpace HALO
Locate PAF-1009, the red Seal Check Cap. Fit Seal Check Cap over the exhalation valve in the mask. The Cap
should snap into place. See Figure 23.
Figure 23 - Fitting Seal Check Cap
Check that no air is flowing from the exhalation valve. Breathe normally.
Using your fingers, feel around the perimeter of the mask for leaks. You will feel any leak as a cool flow of air over
your finger. For greater sensitivity breathe out firmly to raise the mask pressure. Wetting your fingers will make it
easier to feel tiny leaks.
If necessary tighten the mask. To tighten the mask, place one hand against the back of the blower and the other
over the front of the mask. Push the blower forwards and the mask back, tightening the fit. You will hear a series of
clicks as the mask is tightened.
Be careful to tighten each side by the same amount.
After each tightening, feel for leaks again
Tilt your head down (look at the ground) and up (look at the sky). Check that there are still no leaks. Look right and
left, checking for leaks. Adjust if necessary.
Once you can feel no leaks from the mask, the seal check is complete.
IF A SATISFACTORY FIT CANNOT BE ACHIEVED, DO NOT ENTER THE CONTAMINATED ZONE
Remove the Seal Check Cap by gently twisting the handle so that one side of the cap comes loose from the
exhalation valve. Be careful not to dislodge the exhalation Valve Cover. See Figure 24.
PUSH PUSH
Figure 22 - Tightening Mask
20
Figure 24 - Removing Seal Check Cap
Be sure to remove the Seal Check Cap (Half Mask variants) before entering the contaminated
area. The Cap blocks the exhalation valve, making it more difficult for your exhaled air to be
expelled from the mask. Failure to remove the cap will lead to build-up of Carbon Dioxide in
the mask and may result in headache or dizziness.
Never leave the Cap in place for more than 2 minutes!
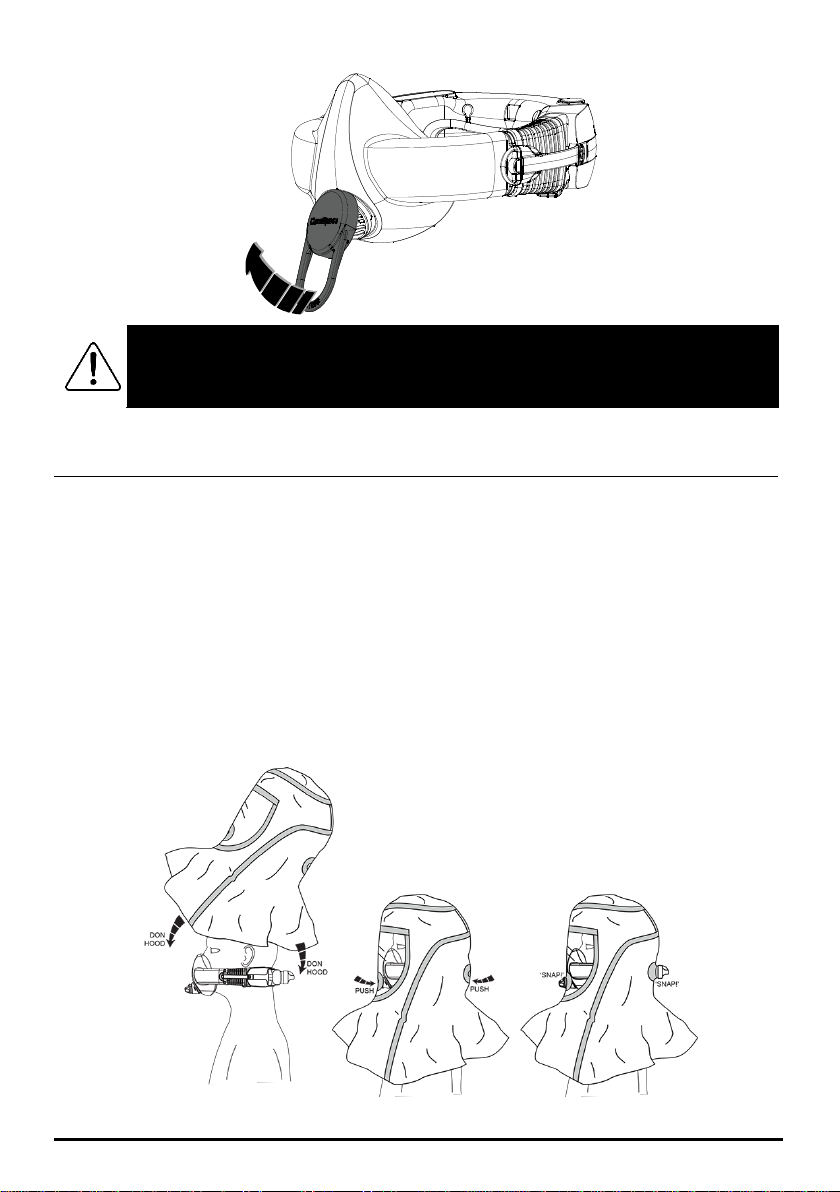
14. Using CleanSpace HALO BIO with the Head Cover
If you are using the HALO BIO Head Cover, carry out the following additional steps
STEP 1 –CHECK MASK SEAL
•Check that you are using a HALO BIO mask (CS3003H, CS3004H or CS3005H) with the blue Snorkel
Exhalation Valve Cover on the front
•Check that you are using CS3025 Filter HE –HALO BIO, with the blue inlet tube
•Don the Head Cover
•Reach behind your head and pull the rear grommet (rubber patch) over the filter inlet tube until you hear
a “snap” and the grommet is sealed around the inlet tube
•Press the front grommet (rubber patch) over the mask Snorkel Exhalation Valve Cover until you hear a
“snap” and the grommet seals around the Snorkel Cover. If necessary, support the Snorkel Cover with
your other hand, reaching up inside the Head Cover.
This manual suits for next models
2
Table of contents
Other CleanSpace Respiratory Product manuals

CleanSpace
CleanSpace EX User manual

CleanSpace
CleanSpace HALO User manual

CleanSpace
CleanSpace CleanSpace2 Installation instructions

CleanSpace
CleanSpace PRO User manual

CleanSpace
CleanSpace PRO User manual

CleanSpace
CleanSpace ULTRA Installation instructions

CleanSpace
CleanSpace CleanSpace2 User manual

CleanSpace
CleanSpace HALO User manual

CleanSpace
CleanSpace ULTRA User manual

CleanSpace
CleanSpace CS302 User manual


