CleanSpace PRO User manual

CleanSpace Technology Pty Ltd
ABN 24 146 453 554
T: +61 2 8436 4000
Unit 5, 39 Herbert Street
St. Leonards NSW 2065 Australia
USER
INSTRUCTIONS
www.cleanspacetechnology.com
sales@cleanspacetechnology.com
CleanSpace ULTRA CST1010
CleanSpace PRO CST1000

2
Contents
1. Warnings & Limitations ..................................................................................................................................................... 3
1.1. List of Warnings Within These User Instructions ...................................................................................................................... 3
1.2. Limitations ............................................................................................................................................................................... 4
1.3. Manufacturers Minimum Design Condition (MMDC) ............................................................................................................... 6
1.4. Special or Critical User Instructions .......................................................................................................................................... 6
2. System Description ........................................................................................................................................................... 6
2.1. System Components ................................................................................................................................................................ 6
2.2. Controls and Indicators ............................................................................................................................................................ 8
2.3. Alarms ................................................................................................................................................................................... 10
2.4. Battery .................................................................................................................................................................................. 11
2.5. Filters..................................................................................................................................................................................... 12
2.6. Accessories ............................................................................................................................................................................ 13
3. Before Donning the CleanSpace Respirator .................................................................................................................... 14
3.1. CleanSpace Respirator Fit ...................................................................................................................................................... 14
3.2. Pre-Use Inspection ................................................................................................................................................................. 15
3.3. Recalibration ......................................................................................................................................................................... 15
3.4. Flow Test ............................................................................................................................................................................... 16
4. Donning the Half Mask CleanSpace Respirator ............................................................................................................... 17
Step 1 – Fit the Neck Support to the Power Unit .................................................................................................................................... 17
Step 2 – Fit the Head Harness to the Half Mask ..................................................................................................................................... 17
Step 3 – Fit the Half Mask to the Power Unit ......................................................................................................................................... 17
Step 4 – Switch the Power Unit to STANDBY Mode ................................................................................................................................ 18
Step 5 – Don the Respirator ................................................................................................................................................................... 18
Step 6 – Adjust the Respirator ............................................................................................................................................................... 19
Step 7 – Complete a Mask Seal Check ................................................................................................................................................... 19
5. Donning the Full-Face Mask CleanSpace Respirator ........................................................................................................ 20
Step 1 – Fit the Neck Support to the Power Unit .................................................................................................................................... 20
Step 2 – Don the Full-Face Mask............................................................................................................................................................ 20
Step 3 – Complete a Mask Seal Check ................................................................................................................................................... 21
Step 4 – Switch the Power Unit to STANDBY Mode ................................................................................................................................ 21
Step 5 – Don the Respirator ................................................................................................................................................................... 21
Step 6 – Adjust the Respirator ............................................................................................................................................................... 22
6. The Contaminated Area .................................................................................................................................................. 22
6.1. Human Factor Considerations ................................................................................................................................................ 22
6.2. Entering the Contaminated Area ........................................................................................................................................... 23

3
6.3. Exiting the Contaminated Area .............................................................................................................................................. 23
6.4. Doffing the Half Mask Respirator........................................................................................................................................... 23
6.5. Doffing the Full-Face Mask Respirator ................................................................................................................................... 24
7. Care and Cleaning ........................................................................................................................................................... 24
7.1. Cleaning ................................................................................................................................................................................ 24
7.2. Storage .................................................................................................................................................................................. 26
7.3. Recalibration ......................................................................................................................................................................... 26
7.4. Servicing ................................................................................................................................................................................ 26
8. List of Components ......................................................................................................................................................... 26
9. Specifications .................................................................................................................................................................. 27
10. Warranty ......................................................................................................................................................................... 28
Please take a moment to register for warranty of your CleanSpace Respirator at cleanspacetechnology.com/warranty-
registration.
Before use, the wearer must read and understand the entirety of these User Instructions including all warnings, all additional
information relating to the appropriate use of CleanSpace filters and accessories and all relevant information documented in
national standards. If you have questions regarding this system, please contact CleanSpace Customer Service on +612 8436 4000
or e-mail support@cleanspacetechnology.com.
1. Warnings & Limitations
1.1. LIST OF WARNINGS WITHIN THESE USER INSTRUCTIONS
1.1.1 GENERAL
This product is part of a system that helps protect against certain airborne contaminants. Misuse may result in sickness.
For proper use, consult an Occupational Health Specialist, these User Instructions or contact CleanSpace Technology
Customer Support on support@cleanspacetechnology.com.
Properly selected, used and maintained respirators help to protect against certain airborne contaminants. It is essential
to follow all instructions and government regulations on the use of this product, including wearing the complete respirator
system during all times of exposure, in order for the product to help protect the wearer. Misuse of respirators may result
in overexposure to contaminants and lead to sickness. For proper use, consult an Occupational Health Specialist, these
User Instructions or contact CleanSpace Technology Customer Support on support@cleanspacetechnology.com or the
website: cleanspacetechnology.com
You must recalibrate the internal pressure sensor any time that your CleanSpace Respirator is exposed to changes in
temperature of more than 20°C, changes in altitude of more than 100m or before using the respirator for the first time. It
is best practice to also recalibrate if the unit has been in storage, particularly if the storage temperature is not known.
1.1.2 BATTERY
Using the respirator after the Low Battery Alarm has triggered can cause the flow to fall below the minimum design flow.
This may result in overexposure to contaminants and lead to sickness.
This product is part of a system that helps protect against certain airborne contaminants. Misuse may
result in sickness. For proper use, consult an Occupational Health Specialist, these User Instructions or
contact CleanSpace Technology Customer Support on support@cleanspacetechnology.com.

4
Always correctly use and maintain the internal lithium-ion battery packs. Failure to do so may result in fire or explosion,
or could adversely affect respirator performance and result in injury, sickness or death.
CleanSpace PRO and CleanSpace ULTRA are not intrinsically safe. Do not use in flammable or explosive atmospheres. Doing
so may result in injury or death.
In the extremely rare circumstance that the battery is damaged and electrolyte comes in contact with eyes, flush with
water immediately and seek urgent medical attention.
The battery shall only be charged in non-hazardous areas. Move out of the hazardous area before charging. The Power
Unit must not be placed on charge in enclosed cabinets without ventilation, near flammable liquids or gases or near heat
sources. Do not use, charge or store the device outside the recommended temperature limits.
CleanSpace Respirators use a unique charger. Do not attempt to charge your CleanSpace Respirator with any other
charger.
CleanSpace Power Units contain a battery, sensitive electronics, and a motor. NEVER immerse the Power Unit in water.
1.1.3 FILTER
Using a filter that has exceeded service limits can cause the flow to fall below the minimum design flow. This may result
in overexposure to contaminants and lead to sickness.
Using the respirator without a filter installed will provide no respiratory protection. This may result in overexposure to
contaminants and lead to sickness.
Do not use compressed air or a brush to clean the filter. HEPA filters are very easily damaged by using compressed air or
by brushing. Misuse of CleanSpace Respirators by cleaning the filter may result in overexposure to contaminants and lead
to sickness.
It is essential that the correct filter type is selected for the chosen application.
Use only CleanSpace filters with the CleanSpace Respirator. Use of other filters may result in overexposure to
contaminants and lead to sickness.
1.1.4 OPERATION
If a satisfactory quantitative fit factor or a passing qualitative test cannot be achieved with any of the masks, the
CleanSpace Respirator must not be used.
If a satisfactory seal check cannot be achieved, do not enter the contaminated area.
If you cannot adjust the Full-Face Mask to avoid your hairline, the mask is not suitable for you and must not be worn.
Do not remove the respirator until you have left the contaminated area. If you have an acute and spontaneous health
episode (i.e. experiencing dizziness) and believe removing the respirator while you leave the contaminated area may help,
remove the respirator with caution.
Never dry the mask or exhalation valve with a cloth that may leave behind lint. Lint contamination of the exhalation valve
may cause it to leak, resulting in overexposure to contaminants and lead to sickness.
1.2. LIMITATIONS
Use this respirator strictly in accordance with the information contained in these User Instructions. Never modify or alter this
product.
1.2.1 CLEANSPACE RESPIRATOR LIMITATIONS
Please refer to your local standards and your workplace guidelines to determine the respiratory protection
equipment that is most suited to your workplace and your needs. This includes managing respiratory protection in
situations where mask fit is compromised – such as talking, walking, bending, facial hair and working under exertion.
Throughout these User Instructions, this symbol will highlight important warnings.

5
This respirator, when used with the Half Mask, does not protect your eyes. In conditions that may damage or irritate
eyes, use protective eyewear.
Only use your respirator with approved parts and accessories.
Do not use the respirator unless it is powered and running normally.
Do not use the respirator while it is being charged.
Do not use in airborne contaminant concentrations above those specified in your national regulations.
Do not use for respiratory protection against unknown atmospheric contaminants or when concentrations of
contaminants are unknown or immediately dangerous to life or health (IDLH).
Do not use in oxygen deficient or oxygen enriched atmospheres. Do not use in flammable or explosive
environments.
Only for use by trained personnel.
Filters need to be changed regularly. The frequency of change depends on use and the concentration of
contaminants in the atmosphere.
Do not use for escape purposes. National regulations may impose specific limitations on the use of filters depending
on the filter class and the facemask used.
If the respirator has been used in an area that has caused it to become contaminated with a substance requiring
special decontamination procedures it should be placed in a suitable container and sealed until it can be
decontaminated.
Do not disassemble the respirator case. There are no user serviceable parts inside.
Failure to follow all instructions on the use of this product, and/or failure to use the respirator during times of
exposure, may lead to adverse effects on the wearer’s health and may render the warranty void.
1.2.2 IMMEDIATE EVACUATION
Leave the contaminated area immediately if any of the following occurs.
The respirator warning lights and/or sounds activate for the Low Battery Alarm, Filter Absent Alarm or the Filter
Change Alert.
Any part of the respirator is damaged.
Airflow into the mask decreases or stops.
Breathing becomes difficult or increased resistance occurs.
You feel dizzy or your airway is irritated.
You can taste or smell contaminants.
1.2.3 OPERATING CONDITIONS
Your respirator is suitable for use in the following atmospheric conditions.
Temperature: -10°C to 45°C.
Relative humidity: 0 to 90% non-condensing.
The respirator will stop functioning if its internal temperature rises above 60°C or falls below -10°C.
If using at the respirator at an altitude greater than 200m above sea level or less than 0m, use the CleanSpace Smart App to set
the operating altitude before use.
This product is part of a system that helps protect against certain airborne contaminants. Misuse may result
in sickness. For proper use, consult an Occupational Health Specialist, these User Instructions or contact
CleanSpace Technology Customer Support on support@cleanspacetechnology.com.

6
1.3. MANUFACTURERS MINIMUM DESIGN CONDITION (MMDC)
In worst-case conditions (very low battery, heavily clogged filter) your respirator will maintain positive pressure in the mask with
an associated flow rate of 120 l/min. This is the manufacturer’s minimum design condition (MMDC). Fully charged, with a clean
particulate filter, it will maintain positive pressure in the mask with an associated flow rate above 200 l/min.
The manufacturers claimed duration when operated at the MMDC is 4 hours. This is the minimum run time a user should expect
from the respirator. In normal use, run times of up to 12-14 hours are more common. Run times are heavily influenced by
altitude, filter condition, filter type, work rate, mask seal and other factors.
To confirm that your respirator can perform above the MMDC prior to use, run the Flow Test as described in Section 3.4.
1.4. SPECIAL OR CRITICAL USER INSTRUCTIONS
This respirator contains a system for synchronizing with your breathing and regulating mask pressure. This system should be
recalibrated if it experiences a change in temperature of more than 20°C, a change in altitude of more than 100m or before using
the respirator for the first time. It is best practice to also recalibrate if the unit has been in storage, particularly if the storage
temperature is not known.
For the most accurate battery charge indication, the respirator must be plugged into its charger and the charger must be plugged
into a power source. Wait for all three (3) Battery Charge Indicators to light solidly without flashing. If the third Battery Charge
Indicator is flashing rapidly, the battery is 95% charged.
2. System Description
CleanSpace™ PRO (CST1000) and CleanSpace™ ULTRA (CST1010) are EN 12942 and AS/NZS 1716 approved respiratory systems
which help to provide protection against particulates, gases and vapours. CleanSpace Respirators are Powered Air Purifying
Respirators (PAPRs) which means that they draw ambient air through the filter using a fan and supply the filtered air to the
wearer via the mask. The fan produces enough flow to ensure that the pressure inside the mask is positive, which helps to
provide a high level of protection to the user. CleanSpace Respirators are breath responsive, which means that they provide
more flow during inhalation and less flow during exhalation whilst maintaining positive pressure in the mask.
2.1. SYSTEM COMPONENTS
Throughout these User Instructions, reference is made to various commonly used components and features of the respirator.
Familiarize yourself with these parts before reading the rest of the User Instructions. For a list of components and their respective
part numbers refer to Section 8.
Properly selected, used and maintained respirators help to protect against certain airborne contaminants.
It is essential to follow all instructions and government regulations on the use of this product, including
wearing the complete respirator system during all times of exposure, in order for the product to help
protect the wearer. Misuse of respirators may result in overexposure to contaminants and lead to
sickness. For proper use, consult an Occupational Health Specialist, these User Instructions or contact
CleanSpace Technology Customer Support on support@cleanspacetechnology.com or the website:
cleanspacetechology.com.

7

8
A. Mask AirClip
B. Mask Release Button
C. Power Unit AirClip
D. Bellow
E. Adjust Button
F. Filter Release Button
G. Power Unit Hoop
A. Fit Test Port
B. Exhalation Valve
C. Rain Cover
D. Sensing Ball Port
2.2. CONTROLS AND INDICATORS
2.2.1 KEYPAD
A keypad is located on the top of the Power Unit. It contains all controls and indicators.

9
2.2.2 POWER BUTTON
The Power Button is used to switch the operating mode of the CleanSpace Respirator. There are three operating modes.
2.2.3 BATTERY CHARGE INDICATOR
A Battery Charge Indicator is located on the keypad of all CleanSpace Respirators. It is comprised of three green lights. The
battery is fully charged when the charger is connected to the Power Unit and all three lights are solid green. The battery charge
and approximate useful time remaining when the CleanSpace Respirator is NOT on charge are shown below.
Battery Charge Indicator Battery Charge (%) Approximate Useful Time Remaining (hrs)*
3 Green Solid Lights 80 – 100 % Up to 14 hours
2 Green Solid Lights 50 – 80 % 6 – 10 hours
1 Green Solid Light 20 – 50 % 2 – 6 hours
1 Green Flashing Light 5 –20 % < 2 hours
1 Green Flashing Light and
Low Battery Alarm < 5 % < 15 minutes
(Leave contaminated area immediately)
Unpowered 0 % 0 minutes
(non-normal operation)
*Operating time is strongly affected by filter type, filter loading, mask seal, work rate, altitude, and other factors. The
operating times quoted above are average durations at moderate work rates at sea level. Actual operating times may vary
widely from the quoted average durations.
OFF Mode
The CleanSpace Respirator is unpowered.
The Battery Charge Indicator is not illuminated.
There is no airflow to the mask.
In OFF Mode, pressing the Power Button once will switch the CleanSpace Respirator to STANDBY Mode.
Note:
The Power Button cannot be used to switch the Power Unit to OFF
Mode
.
STANDBY Mode
The CleanSpace Respirator is actively monitoring and ready to deliver filtered air to the mask with any pressure change.
The Battery Charge Indicator displays battery charge.
There is no airflow to the mask.
In STANDBY Mode, if breathing is detected the CleanSpace Respirator will automatically switch to ON Mode.
In STANDBY Mode, if no breathing is detected for 3 minutes, the CleanSpace Respirator will switch to OFF Mode. This
conserves battery life.
Note:
From STANDBY
M
ode, pressing the Power Button will switch the system to
ON
M
ode. This is not normal procedure.
ON Mode
The CleanSpace Respirator is actively monitoring and delivering filtered air to the mask.
The Battery Charge Indicator displays battery charge.
The blue On Light is illuminated, indicating the Power Unit is in ON Mode.
In ON Mode, if no breathing is detected within 5 seconds, the CleanSpace Respirator will automatically switch to STANDBY
Mode. This conserves battery life when not being worn.
CleanSpace Respirator
s
can only switch to
ON
Mode from S
TANDBY
Mode.

10
2.2.4 FLOW TEST BUTTON
The Flow Test measures the rate of flow produced by the CleanSpace Respirator to ensure it can deliver a minimum design flow
of 120 l/min. When CleanSpace Respirators are in STANDBY Mode, pressing the Flow Test Button initiates the Flow Test.
Refer to Section 3.4 for instructions on running the flow test.
2.3. ALARMS
2.3.1 FILTER CHANGE ALERT
The Filter Change Alert:
Is triggered when the filter exceeds service limits and needs to be changed.
Consists of a repeated aural alert of two beeps per second and a red flashing Filter Alarm Light.
Can be muted by pressing the Power or Flow Test Button once. Unless the filter is changed, the alert will resume when
the CleanSpace Respirator next switches to STANDBY Mode.
If the Filter Change Alert is triggered, the filter has exceeded service limits and should be changed.
2.3.2 LOW BATTERY ALARM
The Low Battery Alarm:
Is triggered when the battery charge decreases below the level at which it may be able to supply the minimum design flow
of 120 l/min.
Consists of a repeated aural alert of three beeps per second and one green flashing Battery Charge Indicator light.
Cannot be muted.
If the Low Battery Alarm is triggered, you must leave the contaminated area IMMEDIATELY and recharge the battery.
2.3.3 FILTER ABSENT ALARM
The Filter Absent Alarm:
Is triggered when the respirator is in ON Mode and it detects that there is no filter present.
Consists of a continuous aural alert and a red flashing Filter Alarm Light.
Can be muted by pressing the Power or Flow Test Button once. Unless a filter is inserted, the alarm will resume in one
minute.
If the Filter Absent Alarm is triggered, you must install a filter before entering the contaminated area.
Using a filter that has exceeded service limits can cause the flow to fall below the minimum design flow.
This may result in overexposure to contaminants and lead to sickness.
Using the respirator after the Low Battery Alarm has triggered can cause the flow to fall below the minimum
design flow. This may result in overexposure to contaminants and lead to sickness.
Using the respirator without a filter installed will provide no respiratory protection. This may result in
overexposure to contaminants and lead to sickness.

11
2.4. BATTERY
CleanSpace Respirators have an internal lithium ion (Li-ion) battery. Lithium ion (Li-ion) batteries have the highest energy density
of all battery types and are widely used in portable electronic devices. CleanSpace Respirators use quality Li-ion batteries and
are designed to be viable over a minimum of 500 complete charge and discharge cycles while still maintaining at least 70% of
their specified full capacity. For detailed battery information refer to the Product Information section of the CleanSpace website
cleanspacetechnology.com.
2.4.1 BATTERY PRECAUTIONS
The following precautions must be followed during use:
Avoid mechanical shocks or impacts from any sharp or hard objects.
Do not use the respirator if there are any signs of severe mechanical damage.
Do not use or place the respirator in extreme heat, such as in direct sunlight, near heat sources, etc. The battery
will be damaged if its temperature rises above 70°C. The respirator will stop functioning if its internal temperature
rises above 60°C or falls below -10°C. Do not use, charge or store the device outside the recommended temperature
limits.
Do not dispose of the respirator in a fire.
Do not use the respirator in heavy rain or allow it to get wet or immersed in liquid.
Do not disassemble the Power Unit case. Disassembly will void the Manufacturer’s Warranty. There are no user
serviceable parts inside.
2.4.2 CHARGING THE BATTERY
The battery can only be charged at temperatures between 0°C and 35°C, should not be charged in electromagnetic environments
(such as near welding machines) and should not be worn while being charged. To charge the battery.
1. Locate the charging port on the underside of the Power Unit.
2. Ensure the Universal Charger is plugged into a power source.
3. Insert the charger cable connector into the charging port.
4. Charging is indicated by at least one green flashing light on the
Battery Charge Indicator.
5. When fully charged, three green solid lights will display on the
Battery Charge Indicator.
6. If the third green Battery Charge Indicator light is flashing
rapidly, charging is 95% complete.
7. When the Power Unit is charged, disconnect the charger cable
from the charging port.
Always correctly use and maintain the internal lithium-ion battery packs. Failure to do so may result in fire
or explosion, or could adversely affect respirator performance and result in injury, sickness or death.
CleanSpace PRO and CleanSpace ULTRA are not intrinsically safe. Do not use in flammable or explosive
atmospheres. Doing so may result in injury or death.
In the extremely rare circumstance that the battery is damaged and electrolyte comes in contact with eyes,
flush with water immediately and seek urgent medical attention.

12
IMPORTANT: To ensure the battery is 100% charged, ensure the charger is connected to the Power Unit and the Battery
Charge Indicator lights all turn on solid green (no flashing).
2.5. FILTERS
2.5.1 FILTER PRECAUTIONS
The following precautions must be followed during use:
Always change the filter outside of the contaminated area and with the respirator doffed.
CleanSpace filter media cannot be cleaned. Cleaning the filter media may cause damage. The filter media is
contained within a filter case. The filter case may be wiped with a dry cloth free of chemicals.
Used filters should be disposed of responsibly and treated as non-recyclable hazardous waste (dependent on the
contaminant being filtered).
Change the filter if it is damaged or there is suspected damage.
Filters should be changed regularly. The frequency of filter replacement depends on several factors: period of use,
concentration of airborne contaminants, exertion levels and workplace protocols where hazards present a risk for
cross contamination (e.g. biohazards or asbestos).
2.5.2 CHANGING THE FILTER
Change the filter when:
The Filter Change Alert triggers – audible (2 beeps per second) and visual (red Filter Alarm Light flashes).
The Filter Absent Alarm triggers but there is a filter in place.
The battery is fully charged but the Flow Test indicates that the respirator is not able to produce the minimum
design flow of 120 l/min.
The filter has been exposed to water or other liquids.
The battery shall only be charged in non-hazardous areas. Move out of the hazardous area before charging.
The Power Unit must not be placed on charge in enclosed cabinets without ventilation, near flammable
liquids or gases or near heat sources. Do not use, charge or store the device outside the recommended
temperature limits.
CleanSpace Respirators use a unique charger. Do not attempt to charge your CleanSpace Respirator with
any other charger.
Do not use compressed air or a brush to clean the filter. HEPA filters are very easily damaged by using
compressed air or by brushing. Misuse of CleanSpace Respirators by cleaning the filter may result in
overexposure to contaminants and lead to sickness.
It is essential that the correct filter type is selected for the chosen application.
Use only CleanSpace filters with the CleanSpace Respirator. Use of other filters may result in overexposure
to contaminants and lead to sickness.
13
The outside of the filter case is heavily soiled.
There is any sign of damage or suspected damage to the filter.
The filter reaches its expiry date. The expiry date is marked on the filter label.
There are signs of dust or contaminants on the inside surface of the filter.
A CleanSpace Respirator with a clean filter will run for much longer than one with a filter that contains dust contaminants. To
maximize your work time between battery charges, change the filter often in high dust environments.
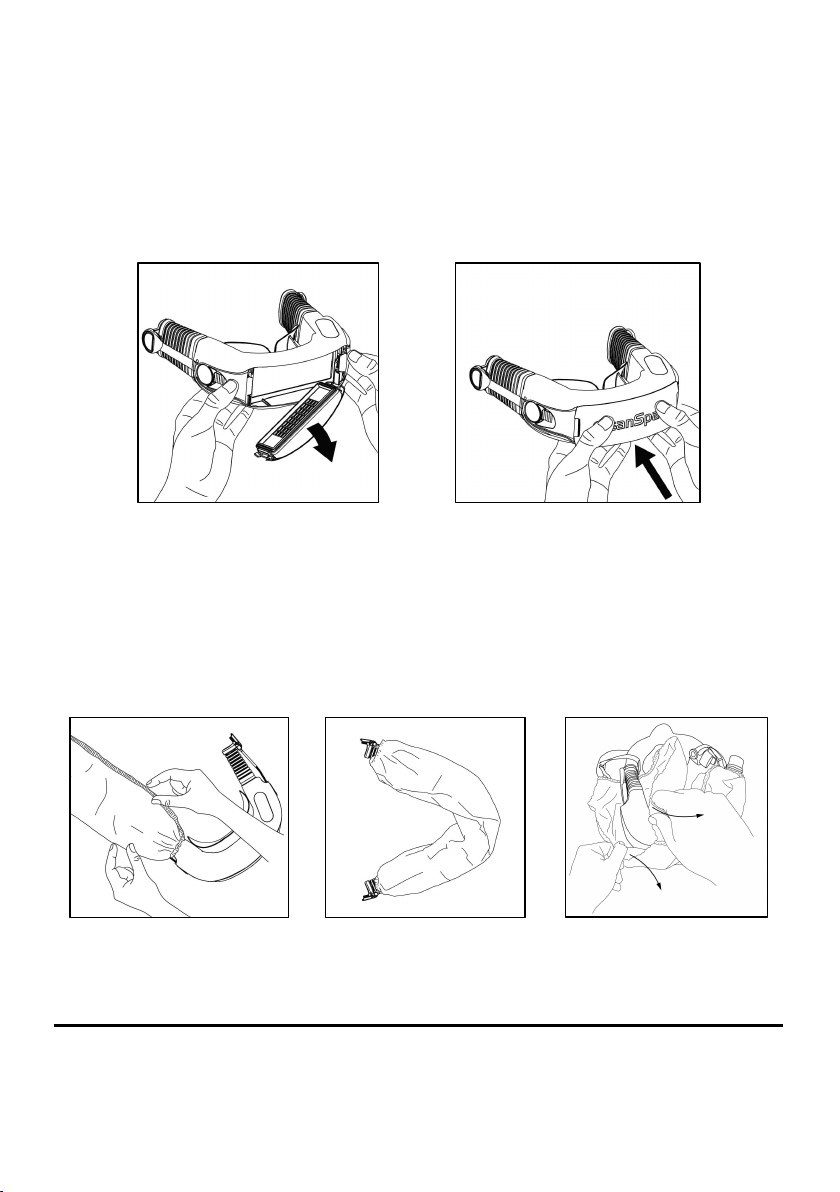
To remove a used filter, simply press down on either Filter Release Button (refer to Section 2.1) and the filter will be released.
To install a new filter, align the filter so that the ‘CleanSpace’ text faces up (in the same direction as the keypad) and push the
filter towards the Power Unit until you hear a click. The filter should be seated securely in place.
2.6. ACCESSORIES
2.6.1 PARTICULATE PRE-FILTER COVERALL
The CleanSpace Particulate Pre-Filter Coverall is an optional accessory used to cover the Power Unit and remove coarse
particulates. The Pre-Filter Coverall should be changed after each use.
It may be useful in high dust environments to enhance the life of the particulate filter, as coarse particles are removed before
entering the particulate filter. The Pre-Filter Coverall should be donned after fitting a Neck Support (if required).
The Pre-Filter Coverall can be removed by tearing it along the seam. This is useful in situations where the coverall has been used
in more hazardous environments (e.g. asbestos, silica), as it allows it to be disposed of responsibly whilst maintaining the
respiratory protection of the user.

14
3. Before Donning the CleanSpace Respirator
3.1. CLEANSPACE RESPIRATOR FIT
3.1.1 MASK SELECTION AND FIT
Before using your CleanSpace Respirator, you must determine the right mask for your face and know how to adjust the system
to achieve a good fit. It is vital that your mask is the right size for your face and fits properly. Mask fit must be confirmed with a
fit test performed by a specialist / designated mask fitter; however the information below will help your mask fitting specialist
to select the mask most likely to fit you and may therefore save time. The ‘Face Width’ and ‘Face Length’ of a user are defined
by the images below.
Face Width
Face Length
Use the tables below to determine which CleanSpace Half or Full-Face Mask is likely to provide the best fit for your face.
*If the medium mask fails initially, the mask fitting specialist will determine whether to try the small or the large mask next.
3.1.2 NECK SUPPORT SELECTION AND FIT
Your CleanSpace Respirator is supplied with two sizes of Neck Support - Small (“S”) and Medium (“M”). “S” is for people with
smaller necks and heads while “M” is for those with medium sized heads and necks. Users for whom the “M” Neck Support does
not provide enough room (both bellows are fully extended but mask is still too tight on face) should use the respirator without
a Neck Support. This configuration provides extra room and is comfortable due to the curved design of the case. As a general
rule, use the smallest size Neck Support that is comfortable.
Half Mask System
Selecting the right size of Neck Support is vital to achieving a good Half Mask fit. With the correct sized Neck Support, the Half
Mask should achieve a good seal without using up all the travel in the respirator’s bellow adjustment system. This gives an
opportunity to adjust the respirator further for increased comfort and freedom of movement.
Full-Face Mask System
When used with a Full-Face Mask, the Neck Support is for comfort only and does not form part of the seal. Nevertheless, if your
work involves vigorous movement, using a Neck Support may stabilise the Power Unit and reduce distracting movement.

15
3.1.3 HEAD HARNESS FIT
The Head Harness is a required component when using the CleanSpace Respirator Half Mask System. It is used to support the
weight of the Power Unit and to ensure a good, comfortable fit. The harness has a rear strap that can be adjusted by the user to
fit a variety of different head sizes. Users with a larger head should use the hole which ‘elongates’ the rear strap (left-hand arrow
in the image below) while users with smaller heads should use the hole which ‘shortens’ the rear strap (right-hand arrow in the
image below). When fitted correctly, the harness should sit comfortable on the crown of the head.
3.1.4 FIT TESTING
Fit Testing must be carried out by a specialist / designated mask fitter. A fit test must be performed during initial selection of a
respirator, or whenever the user’s face changes shape (for instance due to weight gain or loss) and at least annually. Refer to
the relevant national standard, or our product resource section at cleanspacetechnology.com for more information on fit testing
requirements.
3.2. PRE-USE INSPECTION
Before each entry into a contaminated area, carry out a visual inspection of all components of your CleanSpace Respirator
system. If parts are missing or damaged replace them only with approved parts before proceeding.
Check the POWER UNIT for cracks, holes or other damage or missing parts. Do not use the device if there is any
damage or misuse. Check both bellows for splits or holes. Check that the bellows have not become distorted as this
may obstruct the air supply to the mask. Check the Neck Support (if required). Check that the battery has sufficient
charge to complete the work period by pressing the Power Button. The Battery Charge Indicator light(s) will
illuminate to indicate the approximate charge. A full charge is recommended.
Check the FILTER carefully. The filter seal must be clean and free from damage of any kind. Examine the visible
internal surfaces for any sign that dust has penetrated the media. If dust is found, do not use the filter. The body
of the filter must be free of cracks or signs of damage. If any sign of impact or scratching is found, discard the filter.
Fit the filter to the respirator (refer to Section 2.5).
Check the MASK to ensure that there are no cracks, tears or dirt; check the mask is not distorted. Check the mask
exhalation valve for damage or dirt build up. If it is dirty, remove any dirt, hairs or anything that could affect the
seal of the valve against its seat. Check that the valve seat is clean. If the valve is damaged, replace it. If using a Full-
Face Mask, ensure the Rain Cover is lowered before use.
Check the HEAD HARNESS is intact, is not frayed or damaged and has good elasticity.
3.3. RECALIBRATION
This respirator contains a system for synchronizing with your breathing and regulating mask pressure. This system should be
recalibrated if it experiences a change in temperature of more than 20°C, a change in altitude of more than 100m or before using
If a satisfactory quantitative fit factor or passing qualitative test cannot be achieved with any of the masks,
the CleanSpace Respirator must not be used.

16
the respirator for the first time. It is best practice to also recalibrate if the unit has been in storage and the storage temperature
is not known. Steps to recalibrate:
1.
Remove the filter and mask (if fitted) from the Power Unit.
2.
With the respirator in STANDBY Mode (i.e. one or more Battery Charge Indicator lights on), press the Power Button and the
Flow Test Button on the keypad at the same time.
3.
When both the blue On Light and the red Filter Alarm Light illuminate, release both buttons.
4.
Do not touch or move the respirator during the recalibration process.
5.
After 5 seconds, the Power Unit will run and air will blow from the left-hand bellow for about 10 seconds.
6.
When the airflow stops, recalibration is complete, and the Battery Charge Indicators will return to indicating battery charge
status.
7.
Refit the filter to the Power Unit.
3.4. FLOW TEST
The Flow Test checks that the CleanSpace Respirator can deliver a minimum flow of 120 l/min. This test should be completed
before each entry into a contaminated area.
3.4.1 FLOW TEST PROCEDURE
1. Leave the filter in place.
2. Place the respirator flat on a table or other support.
3. Ensure the Power Unit is in STANDBY Mode (press the Power Button once if not). Press and release the Flow Test Button.
4. The respirator will automatically run the Flow Test. During the test, air will flow from the left-hand bellow.
5. After 2 seconds the respirator reports the test result using the Battery Charge Indicator lights on the keypad. Use the table
below to interpret the indicators.
3.4.2 FAILED FLOW TEST
Do not use the respirator until a new filter has been fitted and/or the battery has been fully charged and the test has been
repeated with a PASS result. If the respirator fails the test but the filter is new and the battery is fully charged, contact CleanSpace
Technology and do not use the respirator until it has been evaluated.
Important: The Flow Test is not a battery charge test. Three Battery Charge Indicator lights means that, at the moment it is
tested, the unit can deliver high flow. It does not mean the battery is fully charged. Check the battery charge separately. Refer
to Section 2.2.3.
Flow Test Result Meaning Note
3 Solid Green Lights PASS Excellent
(Flow > 180 l/min)
Flow Test ‘pass’ result will display for a few seconds.
Power Unit will then switch to OFF Mode.
2 Solid Green Lights PASS Good
1 Solid Green Light PASS Acceptable
1 Red Flashing Filter Alarm Light
& 3 Flashing Green Lights FAIL Fail
(Flow < 120 l/min)
Reset by pressing the Power Button once.
Power Unit will then switch to STANDBY Mode.
You must recalibrate the internal pressure sensor any time that your CleanSpace Respirator is exposed to
changes in temperature of more than 20°C, changes in altitude of more than 100m or before using the
respirator for the first time. It is best practice to also recalibrate if the unit has been in storage, particularly
if the storage temperature is not known.

17
4. Donning the Half Mask CleanSpace Respirator
Locate your Power Unit, Half Mask, Neck Support and Head Harness. Make sure the Half Mask, Neck Support (if required) and
Head Harness are the same size or setting that you used for your last successful fit test. Ensure a clean filter is fitted to the Power
Unit.
Important: Read through this entire chapter before beginning to don the CleanSpace Respirator.
STEP 1 – FIT THE NECK SUPPORT TO THE POWER UNIT
The Neck Support has circular openings at each end which snap over buttons on the Power Unit case. Position the Neck Support
in place against the buttons and then press firmly until the Neck Support clips securely into place.
STEP 2 – FIT THE HEAD HARNESS TO THE HALF MASK
Connect the two side straps of the Head Harness to the circular clips located on the inside of the mask, ensuring that the harness
strap with the front marker is facing forwards. Loosen the side straps as far as they will travel.
STEP 3 – FIT THE HALF MASK TO THE POWER UNIT
Ensure that the peak of the mask and the keypad on the Power Unit are both facing up. Bring the right-hand side of the Mask
and Power Unit together until the AirClips click into place. Loosen the bellows as far as they will go by pressing the Adjust Buttons
on each side of the Power Unit whilst gently extending the bellows away from the Power Unit.

18
STEP 4 – SWITCH THE POWER UNIT TO STANDBY MODE
Press the Power Button once to switch the Power Unit to STANDBY Mode from OFF Mode. The Battery Charge Indicator should
display the level of charge. The respirator should be fully charged before use.
STEP 5 – DON THE RESPIRATOR
To don the respirator:
1. Drape the Power Unit around the back of the neck and connect the left-hand side of the Mask and Power Unit until
the AirClips click into place.
2. Lift the mask onto your face and pull the Head Harness upwards and over the face until it sits comfortably on the
crown of your head.
3. Breathe in, the Power Unit will automatically switch to ON Mode. If it doesn’t, check that the respirator is in
STANDBY Mode.
4. Locate the rear harness hook and clip it securely to the Power Unit Hoop.

19
STEP 6 – ADJUST THE RESPIRATOR
If required, the CleanSpace Respirator can be adjusted after donning by either tightening the bellows or tightening the harness.
1. Tighten the bellows by placing one hand on the back of the Power Unit and one hand over the front of the mask.
Push the Power Unit forwards and the mask backwards, tightening the fit. Ensure bellow adjustments are
symmetrical. If the mask is too tight, loosen the bellows by pressing the Adjust Buttons.
2. Tighten the harness by pulling the side straps downwards. The harness can also be loosened if required by lifting
the ratchet clips upwards and pulling the base of the side straps downwards.
3. Tighten the rear hook by pulling upwards on the back strap. The respirator should sit evenly and level.
STEP 7 – COMPLETE A MASK SEAL CHECK
A mask seal check is used to ensure that an adequate seal is achieved each time the respirator is donned. To complete a seal
check:
1. Unclip the left-hand AirClip while holding the Power Unit close to your head with your right hand. The air will
continue to blow for approximately 5 seconds before automatically switching to STANDBY Mode.
2. Block the left-hand mask air inlet with your thumb.
3. Breathe in. You should not be able to draw any air into the mask. The mask should collapse inwards as you inhale,
with no leaks. Listen for any squeaking or whistling noises which may indicate that air is leaking past the seal.
4. Hold your breath for approximately 5 seconds. The mask should stay collapsed against your face. If the mask seal
slowly recovers (mask moves away from your face) there is a leak.
5. If there is a leak, readjust the mask, confirm the left-hand mask air inlet is completely blocked and repeat the seal
check until no leakage is observed.
6. After passing the seal check, reconnect the left-hand side of the Mask and Power Unit, ensuring the AirClips click
into place. The respirator will automatically switch to ON Mode.
If a satisfactory seal check cannot be achieved, do not enter the contaminated area.

20
5. Donning the Full-Face Mask CleanSpace Respirator
Locate your Power Unit, Full-Face Mask and Neck Support. Make sure the Full-Face Mask and Neck Support (if required) are the
same size or setting that you used for your last successful fit test. Ensure a clean filter is fitted to the Power Unit.
Important: Read through this entire chapter before beginning to don the CleanSpace Respirator.
STEP 1 – FIT THE NECK SUPPORT TO THE POWER UNIT
The Neck Support has circular openings at each end which snap over buttons on the Power Unit case. Position the Neck Support
in place against the buttons and then press firmly until the Neck Support clips securely into place.
STEP 2 – DON THE FULL-FACE MASK
To don the Full-Face Mask:
1. Loosen all five (5) straps on the mask harness to their fullest extent. Hold the mask in one hand while you use your
other hand to move the harness straps clear of the mask seal.
2. Place your chin in the cup of the mask face seal and then pull the harness up and over your head. Settle your face
into the mask seal. Adjust the top strap so that the hanger for the back strap sits a couple of centimetres above
your ears.
3. Gently tighten each harness strap in turn by pulling the strap rearward. Start with the bottom straps. As you pull
each strap, use your other hand to steady the mask on your face.
4. Continue to adjust the straps until the mask face seal presses evenly on your face around its entire length.
If you cannot adjust the Full-Face Mask to avoid your hairline, the mask is not suitable for you and must
not be worn.
Other manuals for PRO
1
This manual suits for next models
3
Table of contents
Other CleanSpace Respiratory Product manuals

CleanSpace
CleanSpace HALO User manual

CleanSpace
CleanSpace HALO User manual

CleanSpace
CleanSpace CS302 User manual

CleanSpace
CleanSpace CleanSpace2 User manual

CleanSpace
CleanSpace PRO User manual

CleanSpace
CleanSpace ULTRA User manual

CleanSpace
CleanSpace HALO CS3021 with BIO-HOOD User manual

CleanSpace
CleanSpace CleanSpace2 User manual

CleanSpace
CleanSpace CleanSpace2 Installation instructions

CleanSpace
CleanSpace EX User manual


