Coantec C50 Series User manual

Industrial Videoscope
Users Manual
COANTEC C50 Series
Before using,do read the manual

Copyright declaration
This instruction is applicable to the C50 series. The copyright belongs to the Shenzhen
Coantec Automation Technology Co., Ltd. All the contents are protected by the state
copyright laws and regulations. No one can copy the instructions and any information
contained therein without the consent of the written permission of Shenzhen Coantec
Automation Technology Co., Ltd. In case of copying or translating into other languages
or spreading the instructions in any form, the offender will be held liable.
Attention:
Our company is committed to improving the function and the quality of the service
of the product constantly, so the right to change the contents of any product and
software described in this manual, as well as the content of this manual, is reserved
without prior notice. We have carried out strict collation and repeated checking of this
manual, but we can not guarantee that we can avoid errors and omissions completely.
This manual is only used as a guide to help you correctly use Coantec products, but
does not represent any description of the hardware and software configuration of the
product.
Any questions,please contact our after-sales personality by tel: 0755-89728626

Catalog
1. Users notice..................................................................................................................... 4
1.1 Uses and scope of application...............................................................................4
1.2 Repair and refit..................................................................................................... 4
1.3 Safety precautions.................................................................................................4
2. COANTEC C50 Product instruction............................................................................6
2.1 System Parameters............................................................................................. 6
2.2 Operation Environment.........................................................................................8
3. Operation process...........................................................................................................8
4. Operation guide.............................................................................................................. 9
4.1 Button Introduction............................................................................................9
4.2 C50 A quick start guide for work patterns..........................................................10
4.3 Battery disassembly............................................................................................ 12
4.4 Boot preparation...............................................................................................14
5. Function Introduction..................................................................................................15
5.1 Menu Settings..................................................................................................... 15
5.2 Lock/bending control....................................................................................... 19
5.3 Playback mode:...................................................................................................20
5.4 Photo/Video switching........................................................................................23
5.5 LED brightness adjustment.................................................................................24
5.6 Speed adjustment............................................................................................. 25
5.7 Battery state detection.........................................................................................25
5.8 Reading photos and video files........................................................................... 26
5.9 HDMI external output.........................................................................................26
5.10 Shutdown.......................................................................................................... 28
6. Instrument storage....................................................................................................... 28
7. Solutions to common problems................................................................................... 29

1. Users notice
1.1 Uses and scope of application
This product can only be applied to the real-time detection and analysis in the industrial
field. It can directly observe whether there are defects or anomalies on the inner surface
of the pipe, turbine, cylinder, engine and other devices. This product has direct visual
characteristics, can take photo and video in real time, providing users with appropriate
data collection.
1.2 Repair and refit
This product has no spare parts for the user to maintain, do not try to disassemble, refit
and repair.So if the damage and loss to the users caused by that,Shenzhen Coantec
Automation Technology Co., Ltd. will not bear any responsibility. The maintenance
service of this product is only provided by Shenzhen Coantec Automation Technology
Co., Ltd. and authorized dealers.
1.3 Safety precautions
It is not appropriate to control the operating handle for a long time
in the maximum bending angle during operation, which will make
the equipment in high load state and affect the service life of the
equipment.So please control the maximum bending angle within 40
seconds.
When using this product, please comply with the following
contents:
1) Prohibit use this instrument to observe human body or animal body;
2) Prohibit work under charged condition in order to avoid electric shock;
3) Do not contact the end of the lens directly in the process of use, especially pay
attention to the use of endoscope in the high temperature environment, at this
time the contact end may cause burns;

4) Do not look closely at the strong light source emitted from the endoscope lens
at the end, avoiding the influence of strong light on eyesight;
5) Do not force excessive bending, stretching, twisting and rolling the pipeline,
otherwise it may cause damage to pipelines or equipment;
6) Long term use of this product will cause the lens to stain, resulting in blurred
picture and affecting data collection. Please wipe the lens with alcohol before
use;
7) If there is any abnormality in the angle adjustment operation, stop the current
operation and turn off the machine, then contact the supplier;
8) Keep the insertion tube away from any liquid other than water, brine, oil and
light oil;
9) When the instrument is used up, please clean the front end of the insertion
tube in time to prevent corrosion.
2. COANTEC C50 Product instruction
COANTEC C50 (hereinafter referred to as C50) series industrial videoscope is a portable
and easy to use,360 degree arbitrarily oriented industrial videoscope, researched and
developed by the Shenzhen Coantec Automation Technology Co., Ltd. This product
adopts a hand-held design,highlight 5 inches LCD daylight display, high definition image
sensing technology.The image is more HD and can be photographed and taped.The probe
is corrosion resistant, wearable, waterproof and dust-proof, meeting the requirements of
IP67. It can be widely used in many industrial fields such as special inspection, electric
power, automobile, machinery, aviation, pipeline and container.
2.1 System Parameters
Probe Diameter
φ4.8/φ6 /φ8mm
Probe Material
Hard titanium alloy

Camera Resolution
1,000,000 pixels
Depth of View
10-100mm/5-180mm/25mm-100mm
Angel of Field
120°/110°
Viewing Direction
Standard:straight view /Optional:side view
Light Type
Rear-mounted LED (≥3w hours) ,optic fiber
light guiding
Illumination
100,000lx at a maximum
Brightness
8 levels, manual adjustment
White Balance
Auto white balance
Bending Control
360°all way motor-driven control
Bending Angle
≥160°±10°
Insert Tube Length
1.5m/1.5-6m/1.5-10m
Insertion Tube
Double tungsten alloy braided insert tube of 4
layers
Insertion Tube Protection
130mm length wear resistant pipe anti twist
protection tube
Structure material
Anti - fall shell
Language Menu
Chinese, English, Japanese, Korean, German,
French, Portuguese, Spanish, and Russian.(9
language optional)
Display
Highlight 5 inches LCD daylight display
Image / Video Recording File
Format
JPEG、BMP/MP4
Host
Integrated hand-held design

Memory
Standard SD card:8G, Maximum: 32G
Data Interface
HDMI high definition output interface, external
display.
Bending Lock
One-key lock
Step Regulation
Step regulation between high-speed and low-speed
bend
Lighting function
Emergency lighting device
Dustproof &Waterproof
Host IP55,Probe IP67
Working Time
≥4 hours,Can be extended to 8 hours
Weight of the system
about 1.35kg, and the total weight is determined
by the length and diameter of the tube
Battery
2 groups of power supply (each group of 3
rechargeable lithium batteries)
Capacity
3200mAh*3(supporting online charging)
Product Warranty
One year warranty,life-long maintenance
2.2 Operation Environment
Host System Working
Temperature
-10°C~40°C (when 0°C below, the display needs
preheating)
Camera Working Temperature
-20°C~75°C ,when 0°C below, please reduce
oriented operation.
Store Temperature
-20°C~60°C
Relative Humidity Maximum
80%, non-condensing

3. Operation process
1) Take out the instrument:Press the lock to open the instrument case,take out of the
instrument main unit while drawing out the tube and holding the probe,to avoid
impact the probe and scratch the lens.
2) Ready to start: install battery and SD card.
3) Insert the pipeline: insert the insertion tube into the equipment.
4) Adjust the brightness: adjust the brightness of the light source to get the appropriate
illumination to make the picture achieve the best effect.
5) Detection operation: during observation, the direction of the probe is controlled
through the operation of the joystick, and the images and videos are taken at the
same time.
6) Insertion tube recovery: confirm that the probe of the industrial endoscope inserted
tube is in the unlocked state, so that it can automatically restore to the straight
position and then slowly extract it.
7) Storage instrument: After use, turn off the power switch, remove the battery, put the
instrument into the carrying case, and insert the insertion tube to ensure that no part
will be squeezed by the cover and close the upper cover.
4. Operation guide
4.1 Button Introduction
C50 button and function interface schematic diagram is shown below (Figure1)。

Figure1
①Power switch: switchgear for control equipment.
②Storage card slot: you need to install a storage card for storing JPEG/BMP
pictures and MP4 video files. If you do not install the storage card, press the photo
key / look back key will prompt "no SD card was detected, please insert SD card".
③HDMI high definition output interface: used for external display.
④Preview key: back to the JPEG/BMP picture file and MP4 video file, this mode
can take full screen view / play, file delete, file name editing, add notes and so on.
⑤Menu Setting key: for function settings.
⑥Lock bit step key: set the movement mode of the front end probe, switch the lock
step / unlock follow mode.
⑦Control rocker: control the motion direction and angle of the front end probe,
this key has the function of direction navigation, and also has auxiliary function

under different operation mode, and press the middle OK button to express it.
⑧Photo / video switch key: switch camera mode / video mode.
⑨Brightness adjustment key: adjust the brightness of the LED lamp on the front
end probe.
⑩Speed adjustment key: adjust the movement speed of the front end probe.
⑪Photo / video key: take pictures in the photo mode, video or capture in video
mode.
⑫Charging port: the power adapter can be used to supply the equipment directly or
to charge the battery in the device.
4.2 C50 Work Mode Quick Start Guide
C50 industrial endoscope system mainly has 3 working modes, which are real-time
detection mode, playback mode, and system setup mode. After the system is switched on
the system, the real-time detection mode is entered by default. Please refer to figure 1
button function list for details of button functions under different modes and sub modes.
Figure 1 Button function list
Button
shape
Button
name
Real-time
detection
Playback
Video
play
system
setting
time
setting
Setup
Menu
Entry system
and setting
return
return
exit
setting
exit
setting
Locking step
Lock step
/Unlocking
and
following
probe motion
mode
---
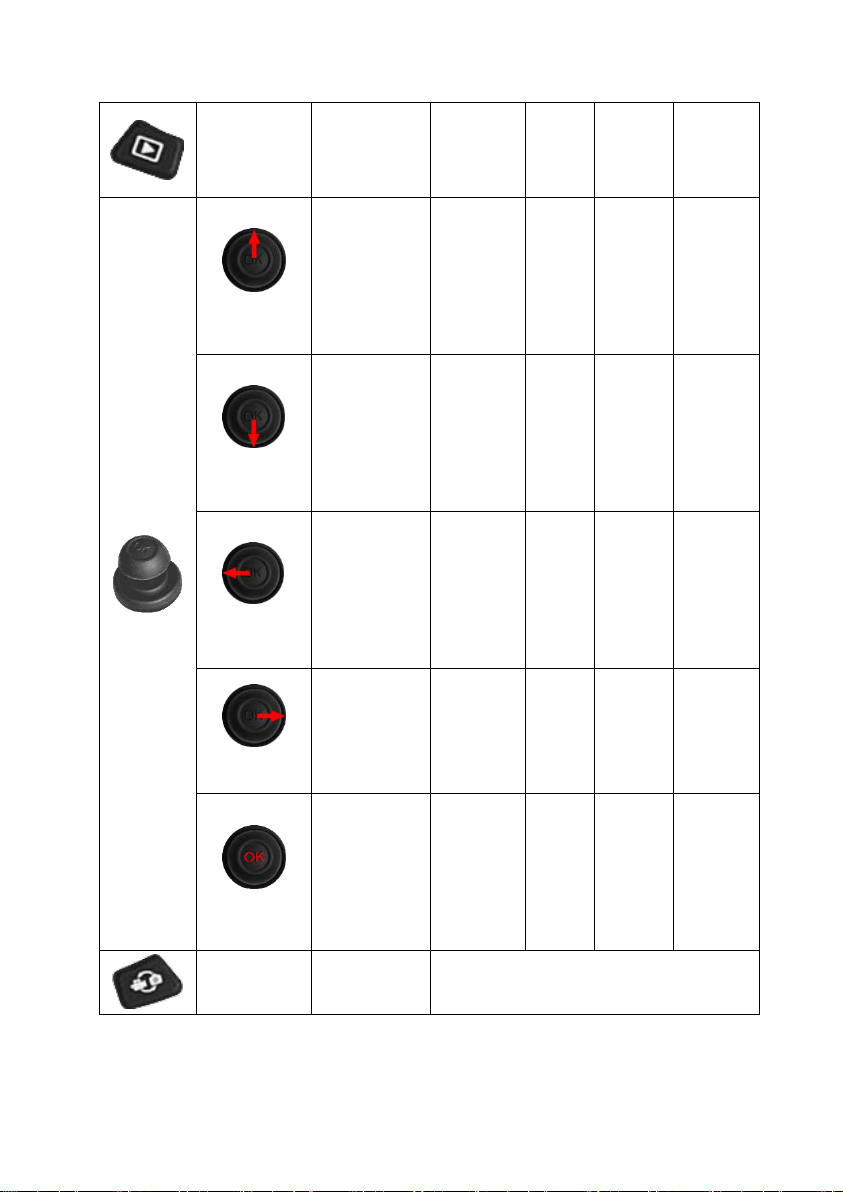
Playback
Enter into
Playback
Enter into
real-time
detection
---
---
---
UP
Control the
probe to
move up
the
previous
option
---
select
the
previou
s setup
item
increase
the
number
Down
Control the
probe to
move down
the next
option
----
select
the
next
setup
item
reduce
the
number
Left
Control the
probe to
move left
the
previous
file
Fast
forwa
rd
---
---
confirm
and
move
the
previous
Right
Control the
probe to
move right
the next
file
fast
back--
-
---
confirm
and
move
the next
OK
---
Confirm
selection
video
play
start /
pause
select
settings
confirm
and
move
the
previous
photo/video
swift
photo/video
swift
---
(On the
back of
the
endoscop
e)
photo/
video
Photo or
video
When the photo / video switching key is
taken in the photo mode, it can be
photographed as a photo key; when the
photo / video switching key is in the video
mode, it acts as the video key. Press the
video immediately and press the video
once again. In the process of video
recording, press this key and can be
caught.
Brightness
adjustment
adjust the
luminance of
the probe
LED lamp
---
Speed
regulation
adjustment
Adjust the
motion speed
of the front
end probe
---
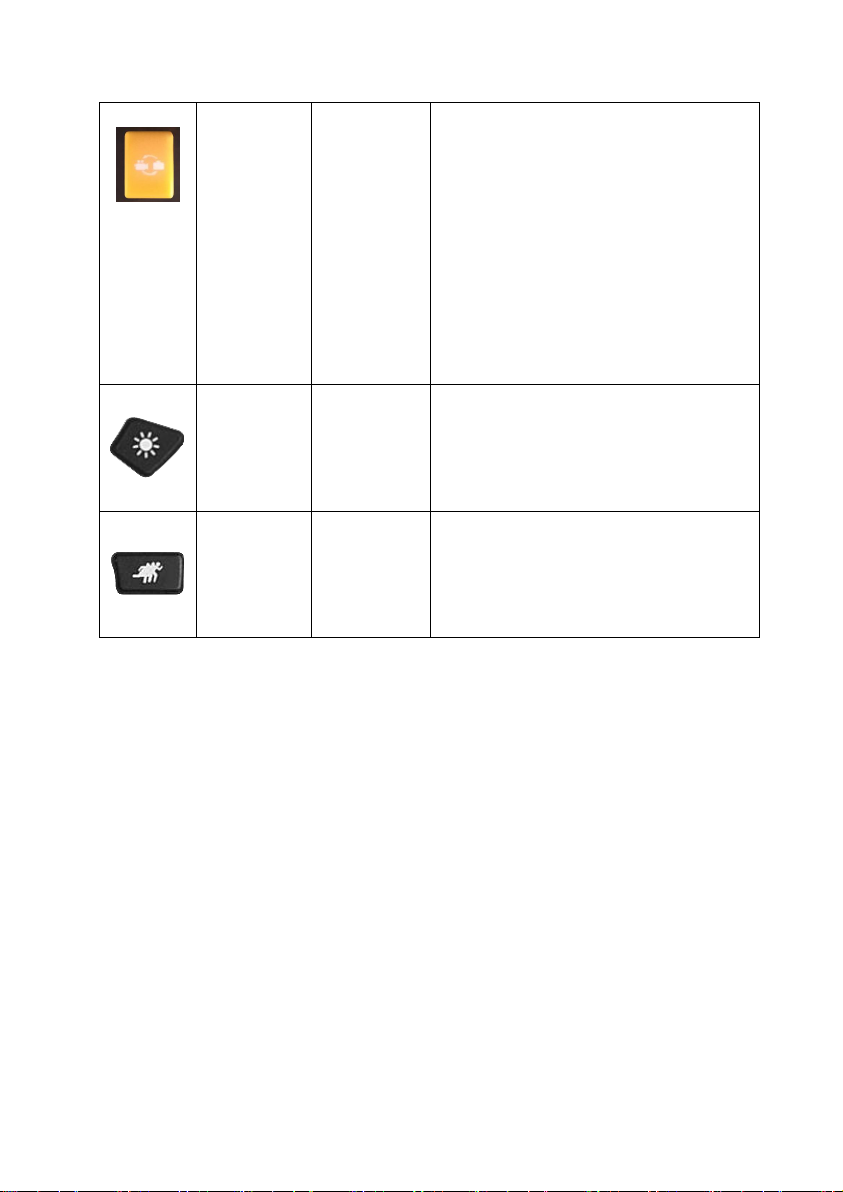
4.3 Battery disassembly
C50 uses 3 pcs 18650 rechargeable lithium batteries to supply power. Please follow the
following steps to remove and install the battery.
1) Press the battery button on both sides of the main engine at the same time, open the
battery back cover, and remove the battery along the arrow direction (Figure. 2).
2) Install the battery according to the positive and negative pole instructions
(Figure 3).

Figure 2
Figure 3
3) Align the buckle of the battery cover with the slot of the body and firmly cover the
back cover (Figure 4)
Figure 4
4.4 Boot preparation

1) Make sure that the insertion tube and lens are in the straightened state before
starting the work; the steering operation is strictly prohibited when the insertion
tube is in the collapsed state.
2) Press and hold the power button for 3 seconds to turn on the host, display the boot
interface (Figure 5). After the boot screen is displayed for a few seconds, the
password window will pop up (Figure 6). This password function can be selected in
the menu settings.
3) If the SD memory card is not detected by C50, the icon without memory card will
appear in the upper right corner of the screen (Figure 7). Please insert the memory
card and make sure the contact is good.
Figure 5
Figure 6

Figure 7
5. Function Introduction
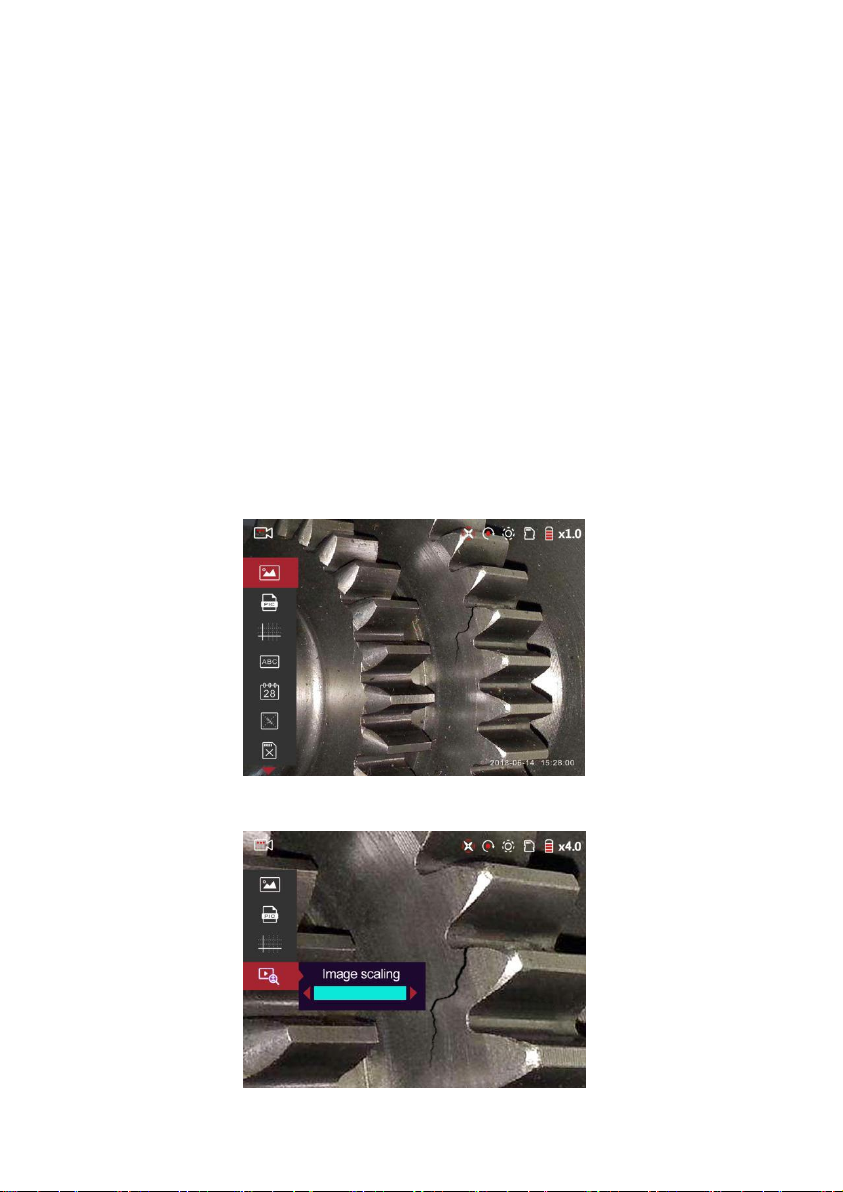
5.1 Menu Settings
In the real-time detection mode, press the setup menu button to enter the system
setup mode (Figure 8), in which the image and system parameters can be set. Image zoom,
image display, reference line, watermark information, browsing mode, picture format,
browsing navigation, image flip, image size,time and date, power-on password, system
upgrade, etc. can be set as needed.
1) Picture zoom function, which can adjust the real-time detection screen by 4.0 times
(Fig. 9)
2) The image display is divided into three different effects: color, black and white, and
negative.
3) The coordinate reference line can be selected to be on/off. When turned on, the
screen will display the coordinate reference line (Figure 10).
4) The watermark information function can be selected to be turned on/off. When
turned on, the watermark information will be displayed in the lower right corner of
the screen (Fig. 11), and the captured photo will automatically display the
watermark.
5) Browse mode is divided into list mode (Figure 12) / nine-square grid mode (Figure
13).
6) Image format selectable JPEG/BMP.
7) Browsing navigation function can be selected to be on/off. After opening, the
picture is viewed in full screen in the look back mode, and the middle picture in the
upper right corner guides the enlarged position.
8) Image size is 960*720 due to the screen ratio is 4:3.
9) Real-time detection screen up and down flip function (Figure 14).
10) Time and date setting.
11) Language selection.
12) Format memory card.
13) Restoring the default settings will restore all device settings to their factory state.
14) Power-on password function can choose to set power-on password / cancel
power-on password.
15) Upgrade the system, mainly for manufacturers and customers to upgrade the
system.
Figure 8

Figure 9
Figure 10
Figure 11
Figure 12

Figure 13
Figure 14
5.2 Lock/bending control
The control rocker in the middle of the instrument can realize 360 degree arbitrary angle
steering control of the front end probe. When operating, be sure to slowly move the
rocker for bending control to extend its life. The movement of the probe is divided into
two movement modes: follow and lock step. The lock step button is used to
switch. The small icon in the upper right corner of the screen will display the current
status:
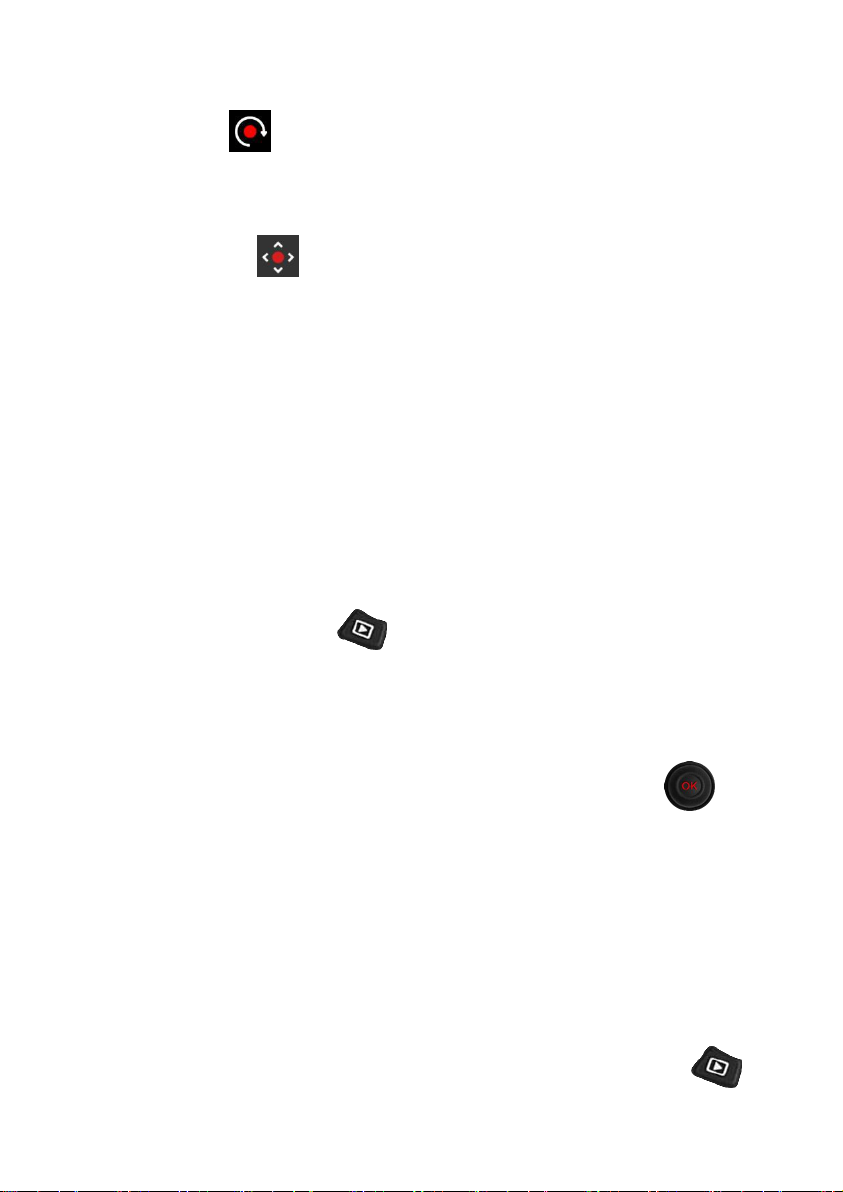
1) Follow mode : the probe follows the direction of movement of the rocker, and
the rocker is released, and the probe is automatically reset. This mode helps the user
to quickly find the target to be tested;
2) Lock step mode : the rocker is moved, and the probe performs micro-step
movement to realize precise control of the movement direction of the front end
probe, and is convenient for fine observation of the measured object.
Note: If the bending control mechanism stops rotating, or if there is any abnormality in
the operation of the endoscope, stop the observation immediately, unlock it, release the
rocker, and confirm that the probe is in the follow mode, the probe should be in the reset
state, and then carefully take out the endoscope insertion tube from the device under test;
if you hear the harsh current inside the instrument when you move the joystick, do not
force it to bend further.
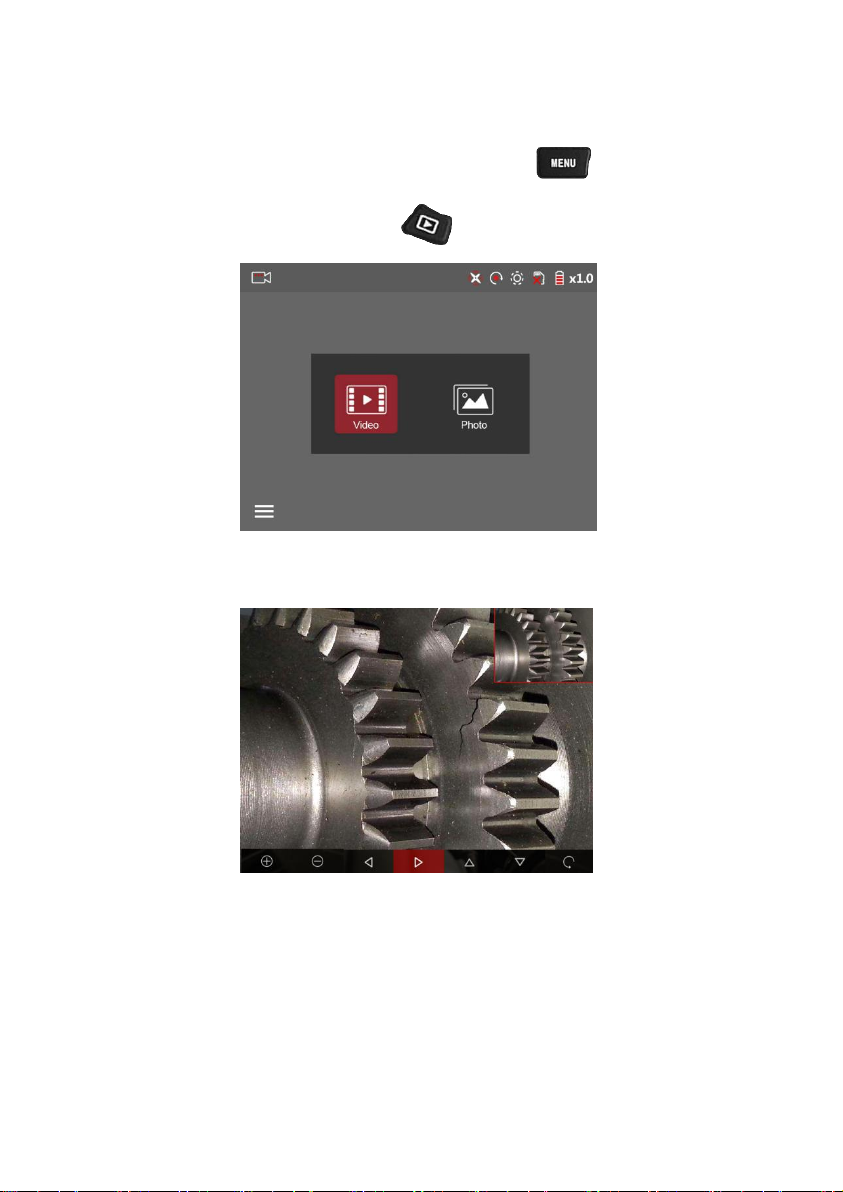
5.3 Playback mode:
Press the playback preview button to enter the playback mode. If there is no file in
the memory card, it will be prompted on the screen; when there are files in the memory
card, you can view JPEG, BMP image files and MP4 video files. Image/video files are
automatically sorted and stored (Figure 15) and can be previewed as needed. Move the
joystick up or down to switch the picture/video preview. Press the OK button in
the middle of the joystick to select the following operations:
1) View the picture in full screen. In this mode, the picture can be zoomed 8 times.
When zooming, the picture-in-picture guides the enlarged area (Figure 16). The PIP
function can be selected to be on/off within the settings.
2) Play video files (Figure 17).
3) Delete files (Figure 18).
4) Edit the file name (Fig. 19), add a comment (Fig. 20), and so on.
If there are more files in SD card and press the playback preview button
immediately after booting, it will take about 10 seconds to load the image (Figure 21).
After the loading is completed, press the setup menu button to exit the loading
window, press the playback preview button again to enter Playback mode.
Figure 15
Figure 16
Table of contents
Other Coantec Diagnostic Equipment manuals


