STITCH LINE
T Attach Rainfly continued
T St re
1. All metal poles and stakes must to be placed in the storage
bag to prevent damage to the abric items placed in the
carry case.
2. Make sure tent is clean and dry be ore placing in carry case.
3. Remove rain ly, spread out on loor o tent, then unzip
door & vents be ore taking tent down or storage.
4. Neatly old tent to width o pole storage bag, place on tent,
roll tightly, and place in carry case.
5. Store in a clean, dry area.
12/07
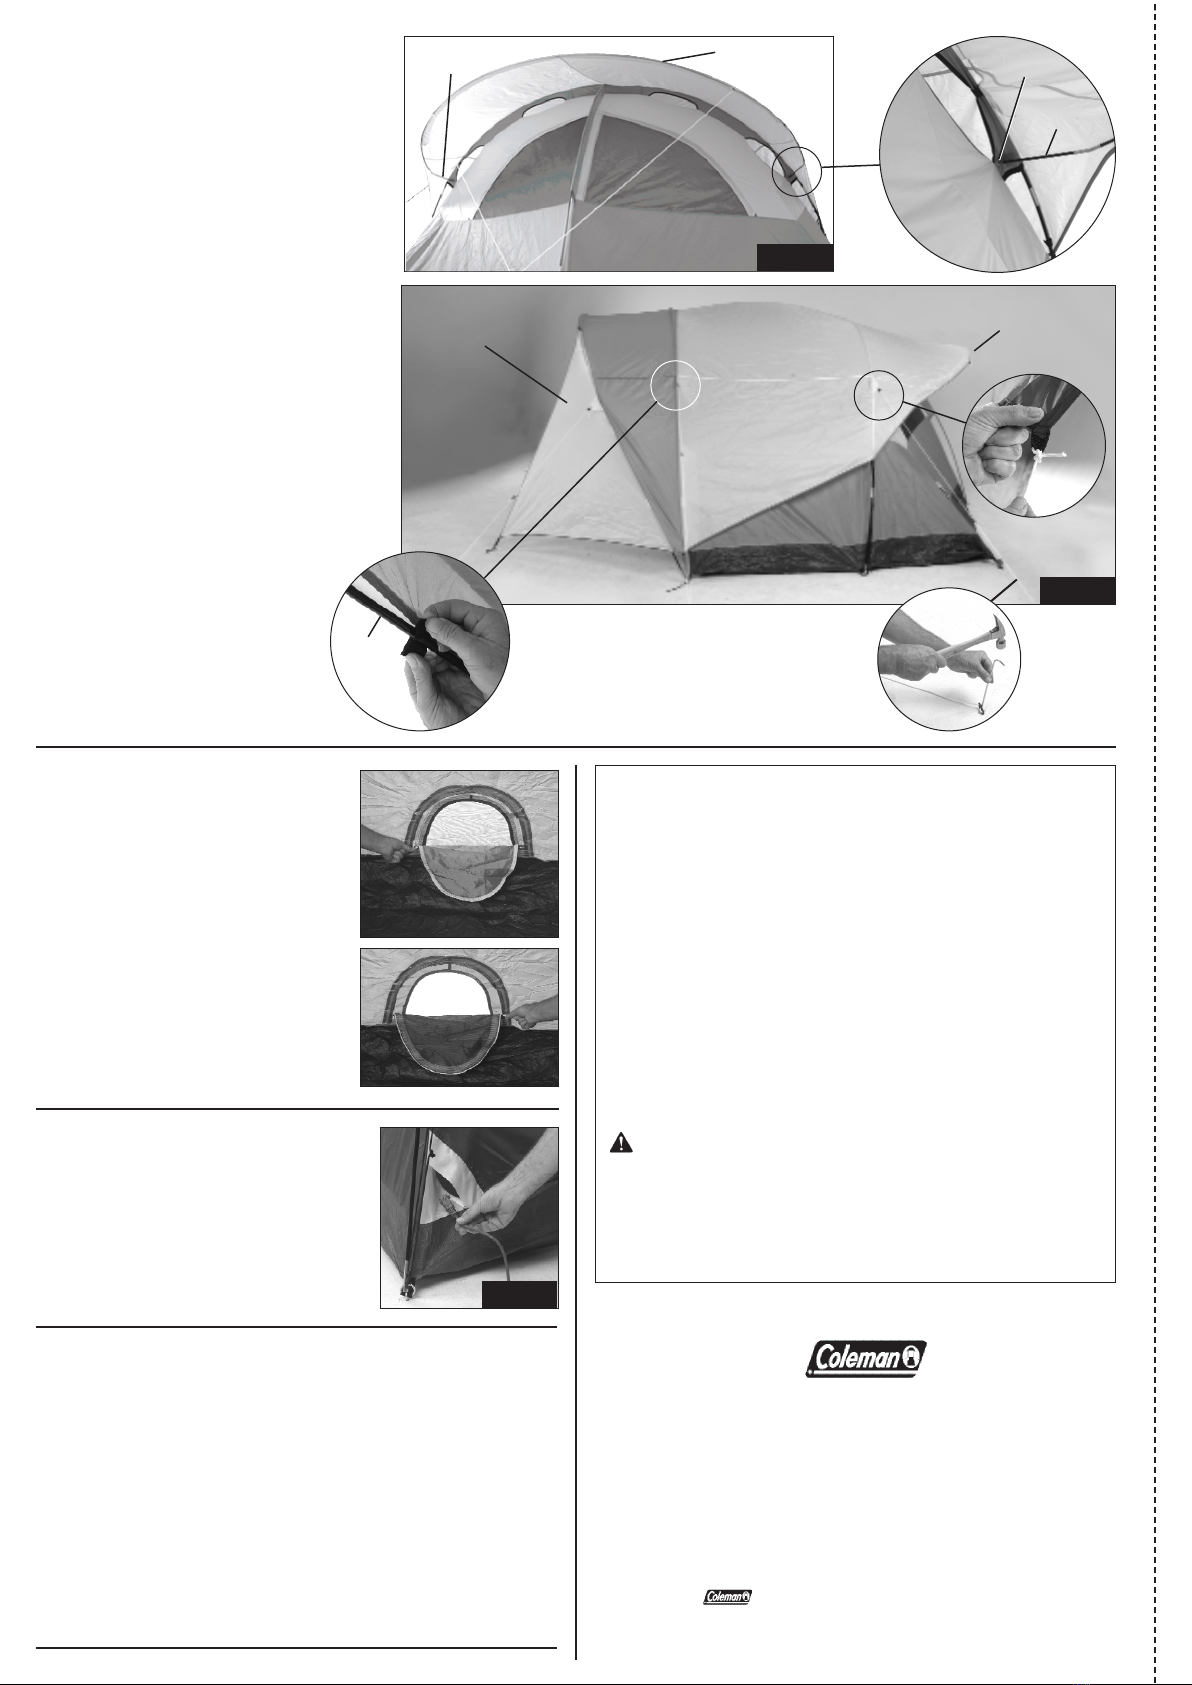
7. Assemble the interlocking, shock-cord-
ed back awning pole, with metal
tips on the angled end pieces.
8. Insert back awning pole through
sleeve in rain ly awning at back o tent
as shown. (Fig. 6)
9.Insert metal tip, on back awning pole,
into metal grommet in upper corner.
(Fig. 6 & 6A)
10. Go to opposite end o back awning
pole and gradually apply pressure to the
pole to orm an arch. Insert the metal
tip on the awning pole into the metal
grommet. (Fig. 6)
11. Locate all hook & loop asteners on
seams on underside o rain lay and
wrap around black main poles to
secure. (Fig. 7A)
12. Tie guylines through loops on web
straps on the rain ly. (Fig. 7 & 7B)
13. Stretch guylines until taut, then
secure with stakes. (Fig. 7C)
Things You Should Know:
•Under certain conditions (cold weather, high humidity, etc.) condensa-
tion will orm on the inside o your tent. Condensation is caused by
water vapor rom your breath, perspiration, or any wet clothing inside
the tent. It is NOT LEAKAGE through the tent abric. It can be minimized
by removing wet clothing rom your tent and by providing good ventila-
tion through the tent.
•Never store tent, even or a short period o time, without drying it
thoroughly and brushing o caked dirt. Do not pack stakes or poles
inside your tent. Use a separate storage bag.
•STAKES SHOULD BE REMOVED BY PULLING ON THE STAKE ITSELF.
NEVER PULL ON THE TENT TO REMOVE STAKE.
•TENT POLES SHOULD NOT BE LEFT TELESCOPED TOGETHER
DURING STORAGE.
•Do not leave your tent set-up or weeks at a time. Be aware that exposure
to ultraviolet rays rom the sun can seriously damage material and/or
cause it to become discolored.
WARNING: Keep all flame and eat sources away
from t is tent fabric.
This tent meets the flammability requirements of CPAI-84. The
fabric may burn if left in continuous contact with any flame source.
The application of any foreign substance to the tent fabric may
render the flame-resistant properties ineffective.
Electrical C rd Access
1. Unzip access panel in the lower
le t corner o tent and bring in
electrical cord. Use only UL approved
cords that are rated or outdoor
usage. (Fig. 10)
Fig. 10
Fig. 7
C ler Access
The smaller zippered opening at the
rear o the tent is designed or added
ventilation and easy access to your
beverage cooler.
1. To use as a vent, unzip lap to
expose screen. (Fig.8)
2. To use as a cooler access, unzip
other lap to make an avenue to
bring beverages into the tent.
(Fig.9)
Fig. 8
Fig. 9
7A
Black
Main
Pole
7B
Back Window
Back Window
Vent o Tent
Vent o Tent
6A
Front Door &
Vestibule o Tent
Back Awning &
Window Vent
o Tent
Side View o Tent
Grommet
Back
Awning Pole
Sleeve in Rain ly
Awning
Back Awning
Pole
7B
Fig. 6
Underside
o Rain ly 7C
The Coleman Company, Inc. • 3600 N. Hydraulic • Wichita, Kansas 67219
1-800-835-3278 • www.coleman.com
Sunbeam Corporation (Canada) Limited
DBA Jarden Consumer Solutions
20B Hereford Street • Brampton, ON L6Y 0M1
1 800 387-6161 • www.colemancanada.ca
FABRI UÉE EN CHINE • IMPRIMÉ EN CHINE
© 2007 The Coleman Company, Inc.
Coleman®et sont des marques déposées de The Coleman Company, Inc.


