manuals.online logo
Brands
  1. Home
  2. •
  3. Brands
  4. •
  5. Color imagination
  6. •
  7. Lighting Equipment
  8. •
  9. Color imagination LED-PAR36X3W-UV SI-027 User manual

Color imagination LED-PAR36X3W-UV SI-027 User manual

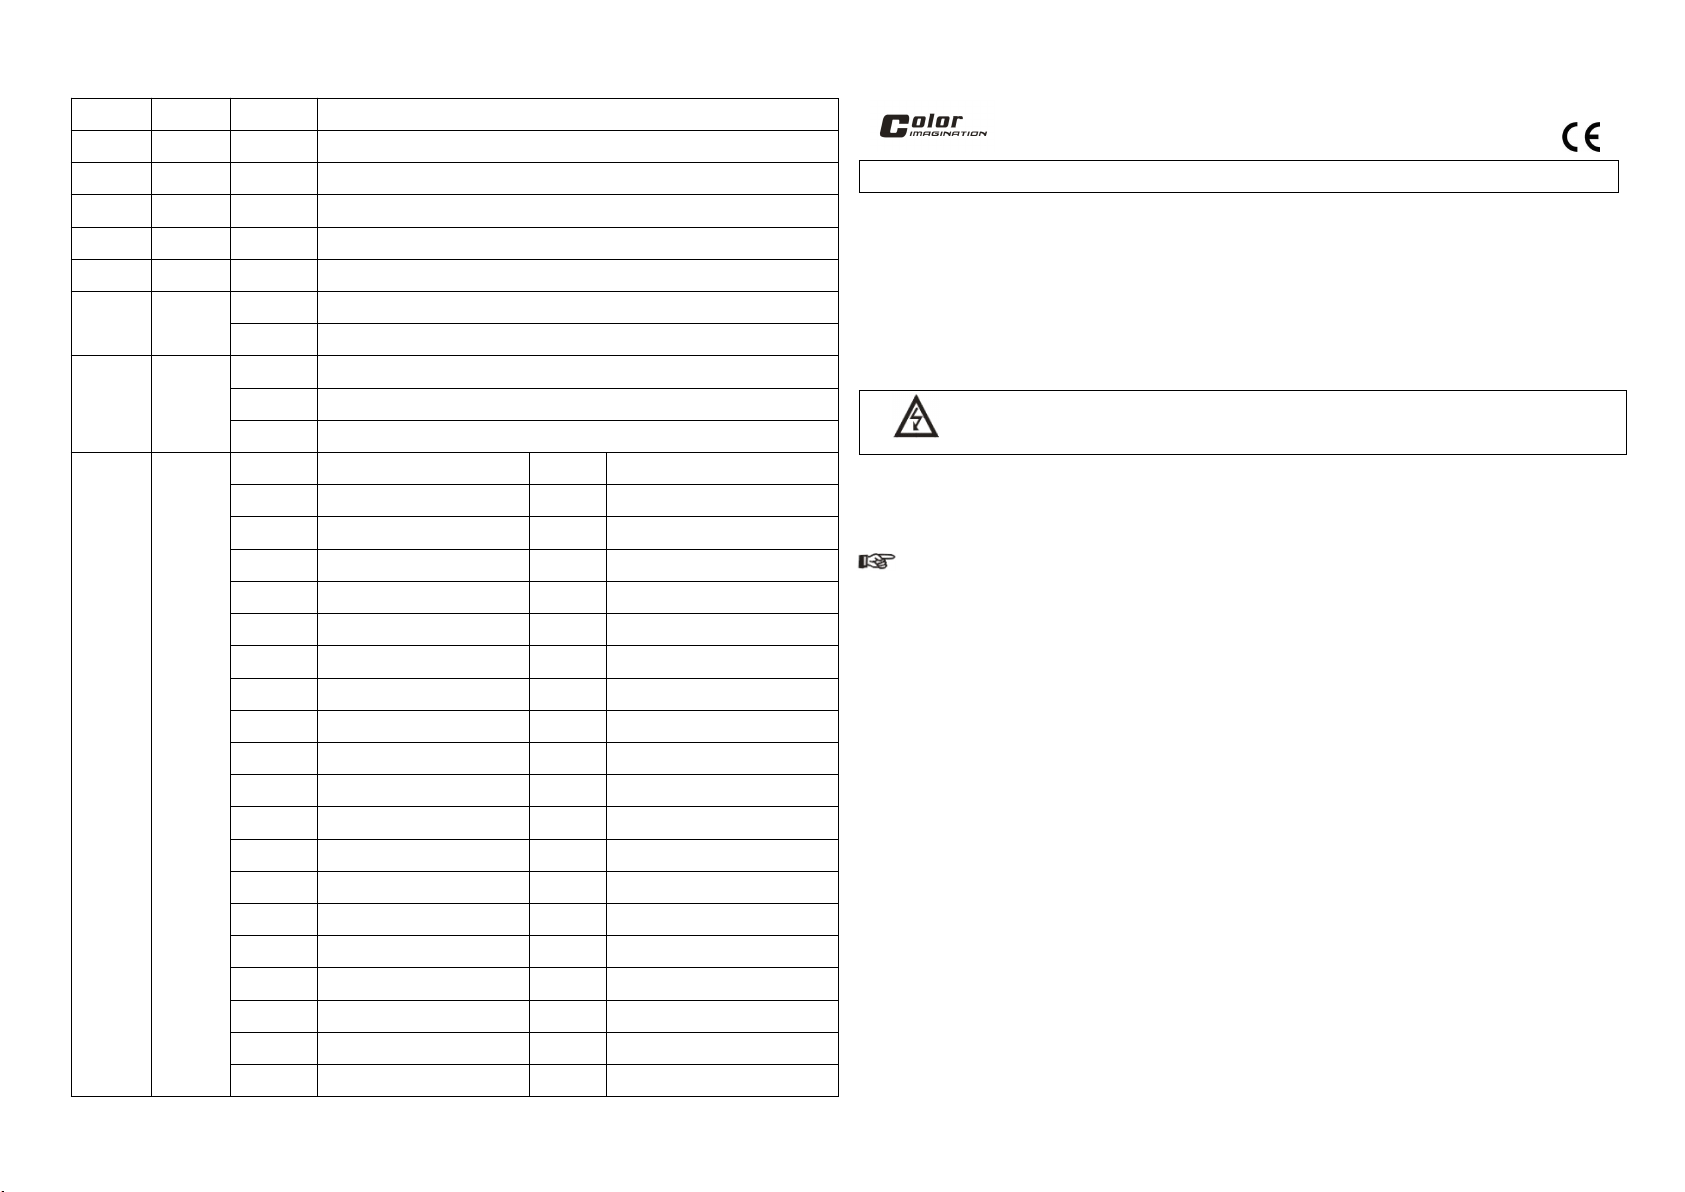
Channel Function Value Description
1 Dimmer 0-255 0-100% Linear Dimmer
2 UV 0-255 0-100% UV Dimmer
3 UV 0-255 0-100% UV Dimmer
4 UV 0-255 0-100% UV Dimmer
5 Strobe 0-255 Strobe effect from slow to fast, speed adjustable
6
Preset
Program
0-127 Blackout
128-255 Fade in fade out: CH6 to adjust the speed
7
Preset
Program
0-127 Blackout
128-191 Color Chasing: CH6 to adjust the speed
192-255 Color Chasing :Random speed unadjustable
8
Color
Macro
0-007 OFF 168-175 UV 100% UV 100% UV 100%
008-015 UV 100% G 20% UV 176-183 UV 100% UV 100% UV 25%
016-023 UV 100% UV 40% UV 184-191 UV 100% UV 100% UV 50%
024-031 UV 100% UV 60% UV 192-199 UV 100% UV 100% UV 75%
032-039 UV 100% UV 80% UV 200-207 UV 100% UV 100% UV 100%
040-047 UV 100% UV 100% UV 208-215 UV 20% UV 100% UV 100%
048-055 UV UV 100% UV 216-223 UV 40% UV 100% UV 100%
056-063 UV UV 100% UV 20% 224-231 UV 60% UV 100% UV 100%
064-071 UV UV 100% UV 40% 232-239 UV 80% UV 100% UV 100%
072-079 UV UV 100% UV 60% 240-247 UV 20% UV 100% UV 100%
080-087 UV UV 100% UV 80% 248-255 UV 50% UV 50% UV 50%
088-103 UV UV UV 100%
104-111 UV 20% UV UV 100%
112-119 UV 40% UV UV 100%
120-127 UV 60% UV UV 100%
128-135 UV 80% UV UV 100%
136-143 UV 100% UV UV 100%
144-151 UV 100% UV 25% UV 100%
152-159 UV 100% UV 50% UV 100%
160-167 UV 100% UV 75% UV 100%
LED-PAR36X3W-
LED-PAR36X3W-
LED-PAR36X3W-
LED-PAR36X3W- UV
UV
UV
UV SI-0
SI-0
SI-0
SI-0 27
27
27
27
For
For
For
For your
your
your
your own
own
own
own safety,
safety,
safety,
safety, please
please
please
please read
read
read
read this
this
this
this user
user
user
user manual
manual
manual
manual carefully
carefully
carefully
carefully before
before
before
before your
your
your
your initially
initially
initially
initially start-up!
start-up!
start-up!
start-up!
Every person involved with the installation, operation and maintenance of this device has to
- be qualified
- follow the instructions in this manual
- consider this manual to be part of the total product
- keep this manual for the entire service life of the product
- pass this manual on to every further owner or user of the product
- include every supplementary update with the original manual
B efore your initial start-up, please make sure that there is no damage caused during shipment. Should there be
any, do not use the device and consult your supplier.
SAFETY
SAFETY
SAFETY
SAFETY INSTRUCTIONS
INSTRUCTIONS
INSTRUCTIONS
INSTRUCTIONS
Cautions!
Cautions!
Cautions!
Cautions! Be careful with your operations. With a dangerous voltage you can suffer a dangerous
electric shock when touching the wires!
This device has left our premises in absolutely perfect condition. In order to maintain this condition and to ensure
a safe operation, it is absolutely necessary for the user to follow the safety instructions and warning notes written
in this user manual.
Important
Important
Important
Important :Damages caused by the disregard of th is user manual are not subject to warranty. The dealer
will not accept liability for any resulting defects or problems.
If the device has been exposed to drastic temperature fluctuations (e.g. after delivery), do not switch it on
immediately. The arising condensation water might damage your device. Leave the device switched off until it has
reached room temperature.
This device is allowed to be operated with an AC of 220-150V, and is designed for indoor use only. Make sure the
available voltage is not higher!. This device fails under protection class!. The power plug must only be plugged
into a protection-class I outlet. The Green or Yellowish-Green conductor must be earthed!
Check the device and the power cord from time to time. Make sure the power cord is not crimped or damaged by
sharp edges. Never let the power cord come into contact with other cables! Handle the power cord and all
connections with the mains with particular cautions! Always connect the device to the mains least. Always
disconnect from the mains, when the device is not is user or before cleaning it. Never leave the device running
unattended!
Operate the device only after having familiarized with its functions. Keep away children and amateurs from the
device!
Do not shake the device. Avoid brute force when installing or operating. Do not permit operation by person not
qualified for operating the device. Most damages are the result of unprofessional operation!
There are no serviceable parts inside the device. Maintenance and service operations can be only carried by a
qualified person.
Please consider that unauthorized modifications on the device are forbidden due to safety reasons! Please note
that damages caused by manual modifications on the device or unauthorized operation by unqualified persons
are not subject to warranty. If this device will be operated in any way different to the one described in this manual,
it may suffer damages and the guarantee becomes void. Furthermore, any other operation may lead to dangers
like short-circuit, electric shock, etc.
BACK
BACK
BACK
BACK PANEL
PANEL
PANEL
PANEL
OPERATIONS
OPERATIONS
OPERATIONS
OPERATIONS
DMX512
DMX512
DMX512
DMX512 Connection
Connection
Connection
Connection
Only use a stereo shielded cable and 3-pin plugs and connectors in order to
connect the controller with the fixture r one fixture with another 。
Occupation
Occupation
Occupation
Occupation of
of
of
of the
the
the
the XLR
XLR
XLR
XLR Connection:
Connection:
Connection:
Connection:
The wire must not come into contact with each other, otherwise the fixtures will not work at all, or will
not work properly
If you are using controllers with this occupation, you can connect the DMX output of the controller directly with the
DMX input of the first device in the DMX chain. If you wish to connect DMX controllers with other XLR outputs,
you need to use adapter cables.
Building
Building
Building
Building A
A
A
A Serial
Serial
Serial
Serial DMX
DMX
DMX
DMX Chain
Chain
Chain
Chain :
:
:
:Connect the DMX output of the 1
st
device in the DMX chain with the DMX input
of the next device. Always connect one output with the input of the next until all devices are connected.
Caution
Caution
Caution
Caution :
:
:
:At the last device, the DMX cable has to be terminated with a terminator. Solder a 120 ohm resistor
between Data ( -) and Data ( +) into a 3-pin XLR plug and plug it in the DMX output of the last device.
DMX
DMX
DMX
DMX Start
Start
Start
Start Address
Address
Address
Address Setting
Setting
Setting
Setting
This device has 8 DMX channels. If you set, for example, the start address to channel 1, the device will use the
channels # 1
st
to 8
th
for control. T h e first available channel for the next fixture will be the 9
th
.
Please be sure that you do not have any overlapping channels in order to control each device correctly and
independently from any other fixture on the DMX chain. If two, three or more devices
are addressed similarly , they will work similarly.
Press the menu button until it shows AXXX in the display. XXX is the address you se
last time. Press UP or DOWN button to select your desired address, etc, A001.
Press ENTER button to save or press MENU button to exit.
Auto
Auto
Auto
Auto Operation
Operation
Operation
Operation
Press the MENU button until it shows one of the following :
- FLAS: strobe effect
- FADER: fade in and fade out effect
- ASC-: automatic color change effect
Press UP or DOWN button to select one of them,
the device will be operated automatically with built-in programs
Press ENTER button, the last two digits in the display will show
00-12. This is the speed or different built-in programs.
Press UP or DOWN button to select.
Press ENTER button to save or press MENU button to exit
Sound
Sound
Sound
Sound Operation
Operation
Operation
Operation
Press the MENU button until it shows one of the following :
- SOUF: Sound-active effect (mode 1 )
- SOUD: Sound-active effect (mode 2 )
Press UP or DOWN button to select.
Press Enter button to save or press MENU button to exit.
Manual
Manual
Manual
Manual Operation
Operation
Operation
Operation
Press the MENU button until it shows C1-C4 in the display. C1-C4
means Red, Green, Blue respectively.
Press UP or DOWN button to select C1, C2, C3 or C4. Press the
ENTER button, the last two digits in the display will show 00-12.
This is the level of the manual dimmer.
Press ENTER button to save or press MENU button to exit.
TECHNIAL
TECHNIAL
TECHNIAL
TECHNIAL SPECIFICATIONS
SPECIFICATIONS
SPECIFICATIONS
SPECIFICATIONS
Input Voltage AC90-260V 50/60Hz
Power Consumption 120W
LED Quantity
36*3W LEDs (UV )
Life Span 50000H
DMX Channel 8CH
DMX
DMX
DMX
DMX Channel
Channel
Channel
Channel

Other Color imagination Lighting Equipment manuals

Color imagination MINISPOT 250Z User manual

Color imagination

Color imagination MINISPOT 250Z User manual

Color imagination MINISPOT 250 User manual

Color imagination

Color imagination MINISPOT 250 User manual

Color imagination ProFollow 330 User manual

Color imagination

Color imagination ProFollow 330 User manual

Color imagination SI-056 User manual

Color imagination

Color imagination SI-056 User manual

Color imagination SI-055 User manual

Color imagination

Color imagination SI-055 User manual

Color imagination SI-071 User manual

Color imagination

Color imagination SI-071 User manual

Color imagination SI-017 User manual

Color imagination

Color imagination SI-017 User manual

Color imagination LEDZOOM 1915F User manual

Color imagination

Color imagination LEDZOOM 1915F User manual

Popular Lighting Equipment manuals by other brands

Exterrain RAVEN810 user manual

Exterrain

Exterrain RAVEN810 user manual

Lampo SYUGR20W instructions

Lampo

Lampo SYUGR20W instructions

LOXONE Touch Nightlight Air Commissioning and installation instructions

LOXONE

LOXONE Touch Nightlight Air Commissioning and installation instructions

Cameo PAR 56 CAN user manual

Cameo

Cameo PAR 56 CAN user manual

Philips 56493-31-16 user manual

Philips

Philips 56493-31-16 user manual

Monte Carlo Fan Company MC49-L series owner's manual

Monte Carlo Fan Company

Monte Carlo Fan Company MC49-L series owner's manual

PR Lighting AQUA 350 BEAM manual

PR Lighting

PR Lighting AQUA 350 BEAM manual

MJ LED LIGHTNING MJ-3432A user manual

MJ LED LIGHTNING

MJ LED LIGHTNING MJ-3432A user manual

Bowens DUO-LITE HEAD Operating	 installations

Bowens

Bowens DUO-LITE HEAD Operating installations

ETC Sensor IQ DALI Control Option Card installation guide

ETC

ETC Sensor IQ DALI Control Option Card installation guide

Chauvet MiN Laser RGX 2.0 user manual

Chauvet

Chauvet MiN Laser RGX 2.0 user manual

Endon 68835 instruction manual

Endon

Endon 68835 instruction manual

Elation ELAR PAR 72 UV manual

Elation

Elation ELAR PAR 72 UV manual

American DJ Neutron Star User instructions

American DJ

American DJ Neutron Star User instructions

NORDRIDE 2010 VIPER LED operating instructions

NORDRIDE

NORDRIDE 2010 VIPER LED operating instructions

Equinox Systems Cirrus user manual

Equinox Systems

Equinox Systems Cirrus user manual

Satco NUVO LIGHTING 65-079 Installation and service instructions

Satco

Satco NUVO LIGHTING 65-079 Installation and service instructions

Lampo IP40 Led Colour user manual

Lampo

Lampo IP40 Led Colour user manual

manuals.online logo
manuals.online logoBrands
  • About & Mission
  • Contact us
  • Privacy Policy
  • Terms and Conditions

Copyright 2025 Manuals.Online. All Rights Reserved.