ColorMatic VitoMat III User manual

1
User Manual
For the pneumatic
Filling machine
VitoMat III

2
Instructions for the usage of VitoMat III
Chapter Page
1. Application and general advises 3
2. Assembling and implementing 4
3. Filling of cans 4
4. Cleaning 6
5. Safety instructions 7
6. Service and maintenance 7
7. Elimination of possibly occuring failures 8
8. Accessories and spare parts 8
9. Liability 9
10. General notes
11. Address 9
12. Declaration of conformity 10

3
Instructions for use
The compressed air unit of the VitoMat assortment for filling of aerosol cans is used for the
quick and easy filling of pre-filled ColorMatic cans with lacquer. The cans are already filled
with propellant and solvent.
Advantages of a VitoMat:
•Every customer gets the desired colour he wants within a short time even for just one
can. But the machine is also perfect for the filling of a larger quanity.
•Cleaning circuit-system, without manual cleaning, the thinner runs through the
machine and thereby cleans it
•No electrical connection needed
•Requires little space, relatively low weight
•Also suitable for waterbased lacquers
•Easy to apply and easy to clean
•Adjustable pedestals
•The bottom part can be screwed to the place of employment
•Transparent inspection window made from solvent-resistant plastic for permanent
possibility to control.
•High working security by solid construction and easy handling
•The filling time takes only a few seconds, depending on pressure (7-8 bar)
Directions for use for VitoMat III
1. Instructions für use
With VitoMat III filling machines ColorMatic pre-filled cans with solvent and propellant will be
additional filled with lacquers of different manufacturers and different paint qualities. These
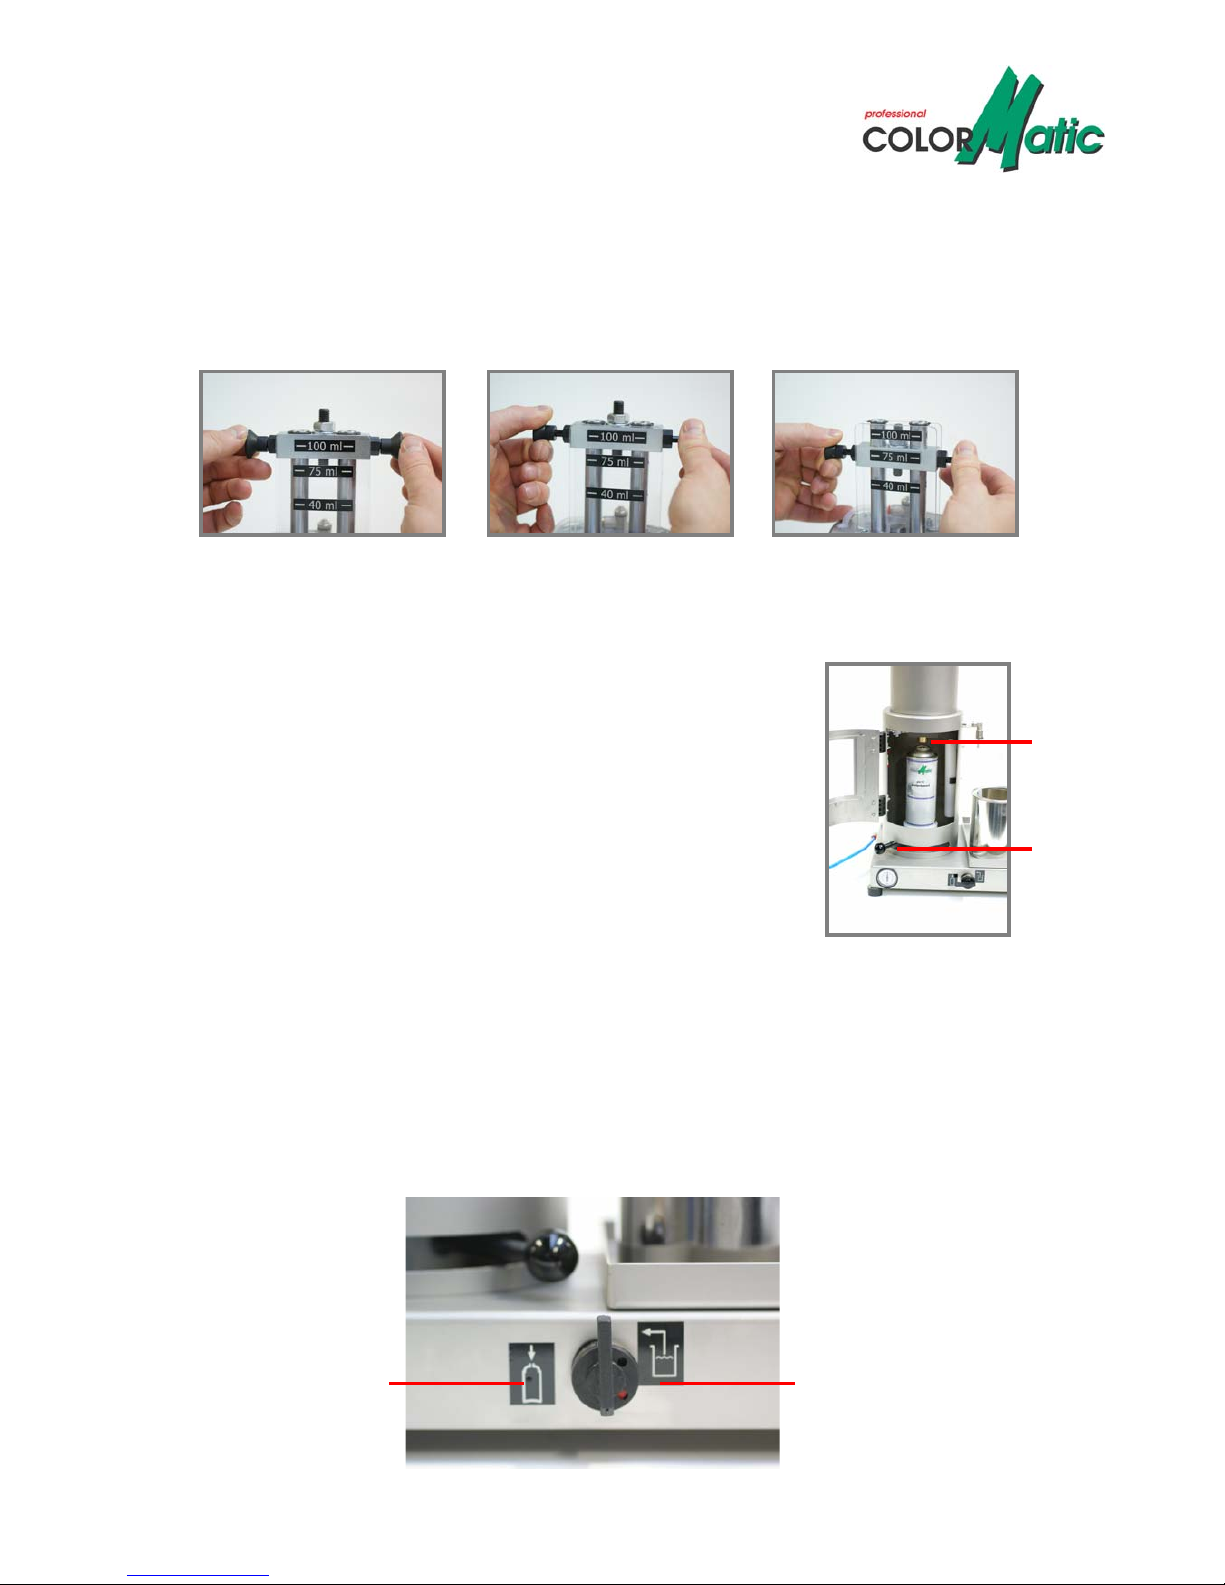
cans are constructed for a fill quantity of 400ml and 150ml (for the filling of 150ml cans a
special adapter is necessary) and a test gauge pressure of 15bar. 400ml cans are pre-filled
with approx. 300ml (depending on the product) of a solvent-propellant-mixture and therefore
they have a free filling space of 100ml more or less. By means of a press-in construction this
lacquer will be additional filled into the cans.

4
2. Mounting and starting up
The filling machine is pre-installed by the manufacturer except the air pressure adapter.
2.1. Assembly
Put the filling machine on a safe and solid work place.
2.2. Installation
Install the connecting tube to the air pressure adapter of the
machine and connect the compressor clutch on the other
side of the tube with the compressor. Switch on the
compressor and read at the pressure regulator the pressure
value. The machine is pre-installed by the producer on 7 bar.
You can reach an optimal operation with a pressure of 7 to 8
bar. During operation you can make correction, but always it
should exist a constant pressure of 6.5 bar. Now the
machine is ready for use.
Please put the tube in the destned adapater on the side of the
machine.
The air pressure display should always indicate a constant pressure
of minimum 6.5 bar.
3. Filling of cans
3.1. Take the nozzle off from an empty Colormatic can.
3.2. Put a canister with the paint to be filled into the demountable bowl
aside the filling machine. Dip the aspiration hole into the lacquer.
The canister with the paint to be filled is standing in the bowl beside, the filling tube is
dipping into the colour (canister for the paint isn’t included in delivery).

5
At the top of the machine you can adjust the filling quantity. For a 400ml can set the marking
to 100ml, for a „Converter can“ to 75ml and for 150ml cans to 40ml. Vernier adjustment is
possible with a setscrew.
1. Pull at the grips on the side… 2. the adjustment is unlocked… 3. now you can easily move the
bar to the right filling quantity
3.3. Open the door of the machine and clip the can between the
therefore destined guide hole and pressing-on plate. If you want to
fill a 150ml can, then you need a size adapter, which has to be put
under the can.
For the right positioning of the can you have to pull the locking lever
to the right and the can has to be locked well-fitted under the filling
adapter.
3.4. Now close the safety door.
3.5. The filling process
Put the lever on the board to the marking „absorption“. Cause you have adjusted the right
filling quantity before, only the needed quantity of lacquer will be absorbed. Then put the
switch to „filling“ and after a few seconds the can is ready filled. How long this lasts depends
on the viscosity of the lacquer and the air pressure in the machine (there must exist a
constant air pressure of 6.5 bar).
Filling Absorption
Locking
lever
Filling
ada
p
ter

6
ATTENTION: the filling process is only possible if the door is closed.
3.6. The filling process is finished when the paint is completely absorbed and in the can. Now
open the safety door, but before you take out the can, move the locking lever back to the left
side to basic position.
3.7. Put the nozzle on the can and shake well for approx. 3 minutes. Then you can label the
can directly according the filled colour.
4. Cleaning
For cleaning put a canister with thinner in the bowl and dip both tubes into the
thinner. Because of the closed cleaning loop the thinner will be used to full
capacity. - During the filling process the piston is on the interior side of
the machine.
- For the cleaning process the white piston has to seal the
filling adapter very well.
- Therefore put the piston on the pressing-on plate under the
filling adapter and move the locking lever like during the filling
process to the right side.
a. If you want either to change the colour or to finish your work, then you have to clean
the machine thoroughly. Because it is a circuit, the cleaning is very easy. With the
intake hose the thinner is pumped into the system, in the other tube the thinner is
leaving again. So you can use the same thinner twice (only recommended for dark
colours).
Also the demountable bowl makes the cleaning easier.
b. All parts, if they had contact with the lacquers, are immediately to clean with a soft
and absorbent paper or a with a thinner moistened cloth, so that the machine is clean
and ready-to-use for the next filling.

7
5. Safety instructions
In case of appropriate using there is no risk of injury coming from the filling machine. This will
be achieved by the following engineered safeguards.
•The filling process takes place within a closed housing.
•The filling process can only happen at closed safety door. You cannot start the filling
process if the door is opened.
•It is only allowed to use original ColorMatic replacement parts and components.
•We recommend to wear safety goggles and gloves if you handle with lacquers.
•Avoid eating, drinking and smoking during the whole filling process.
•Avoid open fire and spark formation.
6. Maintenance
•The machine doesn’t need a special maintenance.
•Minimum bi-yearly, depending from the intensity of using, it is necessary to take out
the connecting hose from the compressor, so that the pressure within the air regulator
is falling in all and you can remove the cumulated water.
•The machine doesn’t need lubrication.
•A thoroughly cleaning is of particular importance, otherwise dried fragments of paint
can cause damages.
The „leak tube“ on the side over the filling and intake hose gives a clue in case
there is a leak in the system. If there comes out fluid, the piston has to be
replaced.
At the air regulator the working pressure can
be adjusted in case if the pressure pre-installed
by the producer isn’t correct (7bar).

8
7. Elimination of possibly occuring failures
•Leakage of the piston, fluid is dripping out the “leak tube”.
Check:
If the cock/cylinder/adapter possibly is damaged (this could happen at faulty or not
tidily cleaning).
Solution:
Replace appropriate parts.
•If you move the switch and nothing happens, respectively the machine doesn’t start to
work.
Check:
- If the compressor is switched on – please switch on
- If the tube is connected with the compressor – please connect
- At the manometer if the air pressure is between 7-8 bar. If not, inasmuch as the
compressor is switched on, turn the screw of the air regulator and adjust the pressure
to the working value.
•The filling process cannot activate
Check:
If the door lock is arrested?
Solution:
Lock the door.
•For all further irregularities while working please inform our service team of MOTIP
DUPLI GmbH (phone +49 (0) 6266 75 0)
8. Accessories and spare parts
Gate valve 257070
Piston: 256677
Injector: 257087
Pressure regulator 257124
Inspection window 257117
Distance adapter for 150ml cans: 257094
You can find Information about the machine (type, order
no. and so on.), on the bottom of machine on the type
plate.

9
9. Liability
The term of liability for the operability of the machine is one year. The guarantee is not
applicable at incorrect using and mechanical damage. Also if the customer doesn’t use
original spare parts or accessories.
10. General notes
•ATEX-classification: II 3 G c T4
•Acceptable application in potentially explosive gaseous atmosphere zone 2 (category
3G)
•The filling machine VitoMat III is only for the filling of pre-filled ColorMatic cans.
Please note the operating conditions and the information given in this manual.
•Maximum working pressure 10 bar
•Air pressure quality minimum class 5 according to ISO 8573-1
•Caution! Make sure that a can or the white piston for the cleaning process is under
the filling adapter and is locked if you absorbed lacquer or thinner.
•Caution! Use only original ColorMatic cans.
•Caution! Pre-filled ColorMatic cans can be used only once.
11. Address
MOTIP DUPLI GmbH
Kurt-Vogelsang-Str. 6
74855 Haßmersheim
Phone: ++49 (0) 6266 75-0
Fax: ++49 (0) 6266 75-340
P.O. Box 1140
74851 Haßmersheim
The type plate of VitoMat III with information about the manufacturer, year of
production and serial number is on the bottom of the machine.
Table of contents
Other ColorMatic Dispenser manuals
Popular Dispenser manuals by other brands

Nordson
Nordson Spectrum II Series Installation, operation and maintenance manual

Loctite
Loctite SD10 Operation manual

InSinkErator
InSinkErator Steamin' Hot H-770 Installation, care and use

Coastwide Professional
Coastwide Professional J Series Instruction guide

rosseto
rosseto EZ Multi-Cone 1W Assembly instructions

Server
Server Touchless Express SE-SS-TDP1.3 manual