manuals.online logo
Brands
  1. Home
  2. •
  3. Brands
  4. •
  5. Combi
  6. •
  7. Baby Accessories
  8. •
  9. Combi BC-W31 User manual

Combi BC-W31 User manual

Routine Safety Inspection
Safety Warnings
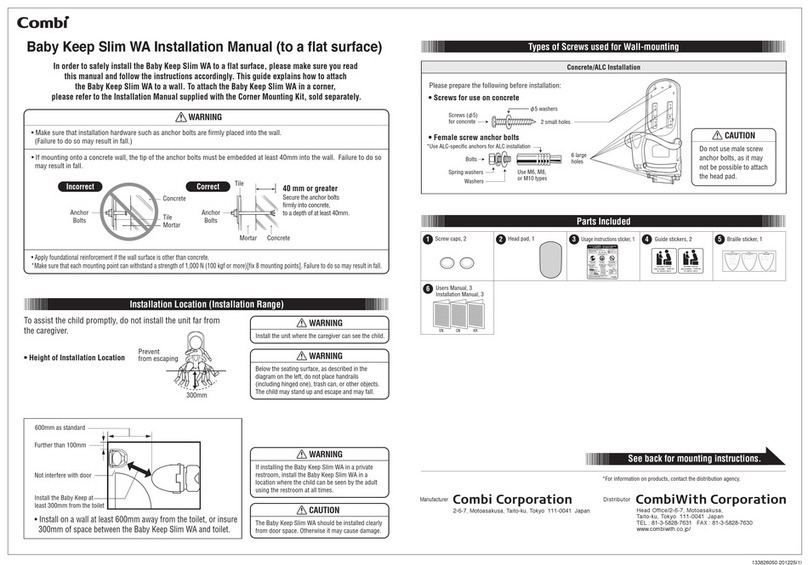
In order to safely install the Baby Keep WA, please make sure to read this manual and follow the instructions accordingly.
This guide explains how to attach the Baby Keep Slim WA to a corner. To attach the Baby Keep FL type to a wall, please
refer to the Installation Manual sapplied with the Baby Keep FL type.
Baby Keep WA Corner Mounting Kit Installation Manual
For Corner Installation Use
Types of Screws used for Wall-mounting
CAUTION
Do not use male screw
anchor bolts.
Tile
Mortar
Concrete
Anchor
Bolts
Tile
Mortar Concrete
Anchor
Bolts
Concrete/ALC Installation
Please prepare the following before installation:
Backboard
Corner sticker
The daily or weekly inspection is a check using both eyes and hands. No tools are necessary.
• Main maintenance parts include pads and decals.
• Product durable period is 7 years. Repair Parts available with in 5 years after end of production.
For more information regarding the maintenance inspection (additional cost) and repair parts (sold separately).
Technical Specifications
BC-W31
Product Name Corner Mounting Kit
Dimensions W205×D65×H623.5mm
Weight 1.9kg
Materials • BBase/Steel (Rust-proof)
• Corner Cover/ABS Resin
*Be advised that technical specifications for this product may change without notice for reasons such as improvement in design.
To Be Used With : Baby Keep Slim WA (Model BK-W62)
Safety precautions noted here are divided into “warnings” and “cautions” according to the urgency and seriousness of the harm and
damage that may occur. Please read this instruction manual carefully before use, and observe the safety precautions.
If this label is ignored or mishandled, there is risk of injury or property damage.
If this label is ignored or mishandled, there is risk of serious injury or death.
WARNINGS
CAUTIONS
WARNING
• Make sure that installation hardware such as anchor bolts can be firmly placed into the wall. (Failure to do so may result in fall.)
• Apply foundational reinforcement if the wall surface is other than concrete.
*Make sure that each mounting point can withstand a strength of 1,000 N (100 kgf or more)[fix 4 mounting points]. Failure to do so may result in fall.
• If mounting onto a concrete
wall, the tip of the anchor bolts
must be embedded at least
40mm into the wall. Failure to
do so may result in fall.
Incorrect Correct 40 mm or greater 
Secure the anchor bolts
firmly into concrete,
to a depth of at least 40mm.
4 large
holes
Spring washers
Washers
Bolts
Use M6, M8,
or M10 types
*Use ALC-specific anchors for ALC installation
• Female screw anchor bolts
See back for mounting instructions.
*For information on products, contact the distribution agency.
Manufacturer
Distributor
2-6-7, Motoasakusa, Taito-ku, Tokyo 111-0041 Japan Head Office/2-6-7, Motoasakusa,
Taito-ku, Tokyo 111-0041 Japan
TEL : 81-3-5828-7631 FAX : 81-3-5828-7630
www.combiwith.co.jp/
Conduct the daily and annual safety inspections described below in
order to safely use this product. Injury or serious accident could
occur if safety inspections are not performed and/or problems with
the product are not observed.
WARNING
If a problem is found during the inspection, immediately
stop using it, and contact your dealer or the service
center below for assistance.
1. Physical Inspection
1. Check for loose parts
2. Make sure the base does not wobble or shake,
and that the guard is firmly in place
3. Check for scratches or broken parts
3. Sticker Check
Stickers should be firmly adhered and
legible. Check for scratches, rips, missing stickers,
or fadedness.
2. Checking the Guard's Function
1. Insure that the guard is firmly in place, does not wobble
or shake, and moves from left to right.
2. After testing the opening and closing function of the guard several times,
insure that neither the base nor the guard wobbles or shakes.
4. Head and Seat Pad Check
Check for scratches and broken parts. Make sure
the head and seat pads do not wobble or shake.
Bottom cover
Usage instructions stickers
(supplied with Baby Keep)
*Guide stickers, 2
(supplied with Baby Keep)
Head pad
Base sticker
Base logo sticker
Guard
Routine inspection sticker
Product Number
137916080 201225(1)
WARNING CAUTION
If installing the Baby Keep FL in a
private restroom, install the Baby
Keep FL in a location where the child
can be seen by the adult using the
restroom at all times.
The Baby Keep FL should be
installed clearly from door space.
Otherwise it may cause damage.
• Install on a wall at least 600mm away from the toilet, or insure 300mm of space
between the Baby Keep FL and toilet.
600mm as standard
Not interfere with door
Install the Baby Keep at
least 300mm from
the toilet
• Height of Installation
Location
To assist the child promptly,
do not install the unit far
from the caregiver.
Installation Location (Installation Range)
WARNING
Install the unit where the caregiver
can see the child.
WARNING
Below the seating surface, as described in
the diagram on the left, do not place
handrails (including hinged one), trash
can, or other objects. The child may stand
up and escape and may fall.
Prevent
from escaping
300mm
137916080 201225(1)
1M6 Screws, 8
6
2φ6 Flat washers,
2 big (diameter φ20),
2 small (diameter φ12)
4Corner cover, 2
3φ4 Self-tapping screws, 4
1Place a mark on the wall 545mm
above the floor.
2
Align the bottom points of the corner
fixtures to the areas marked on the wall. Once
four points have been marked on the wall, install
the anchor bolts.
5Attach the other corner cover to the
top part of the base.
6Attach the base to the corner fixture
connected to the wall.
7
Attach the head pad and bottom cover.
8The stickers other than Corner sticker are
come with the product.
5
Corner
sticker
Baille
sticker
Routine
inspection
sticker
3Fix the corner fixtures to the wall at
four mounting points.
4Remove the bottom cover of the Baby
Keep WA (henceforth the base), and
mount the corner cover.
Baby Keep WA Corner Mounting Tools
Installation Manual, 3
EN CN KR
510mm
545
mm 560mm
510mm
560mm
115115
Holes in backboard
as seen from
the front
545mm Bottom cover
Corner cover
623.5mm
204mm
5Braille sticker, 1
Please prepare the following before installation:
Confirm that the guard works properly
by opening and closing several times.
Do not use small holes
Necessary Strength of Installation Fixtures
Wall:1,000N (100kgf) or more per place
Install the Baby Keep in an area where reinforcement measures
strong enough to support the following conditions have been
taken. Failure to do so may result in collapse.
(
(
*At least 40mm in length
Use an M6, M8, or M10
female type anchor bolt.
(
(
Use an M6, M8, or M10
female type anchor bolt.
Female type anchor bolts, 4
Make an installation point
Spring washers
Washers
Bolts
6 holes
2 holes
Head pad
(supplied with
Baby Keep)
Back side
*The up arrow on the back
indicates which side is up.
Square holes
Match the 6 tabs with the
corresponding square holes
on the backside to attach the
head pad.
Screws, 2
Bottom cover
CAUTION
The head pad tabs
will make a clicking
sound when correctly
attached. Note that
the tabs may break if
incorrectly inserted.
Screw caps, 2
(supplied with
Baby Keep)
WARNING
• Stickers must be placed in highly visible areas. Dangerous
actions such as indicated on the usage instructions sticker
may lead to injury or serious accidents.
• Thoroughly check the Baby Keep WA once it has been
installed. Refer to the Users Manual “Maintenance Inspec-
tion” section. Using the Baby Keep WA without completely
assembling it can lead to injury or serious accidents.
Usage instructions stickers
(supplied with Baby Keep)
Guide stickers, 2
(supplied with
Baby Keep)
Restroom entrance Restroom stall
Corner Mounting Kit Hardware
and Accessories
Corner Installation Instructions * Hole positions are all center pitch (center-to center) dimensions.
Spring
washers
Washers
Bolts
M6, M8, or M10 types
can be used
*Use ALC-specific anchors for ALC installation
• M8 Female type anchor bolts (for use with large holes), 4
Parts are
included 3
Part is
included 3
Parts are
included 2
Parts are
included 2
Parts are
included 1
Parts are
included 1

Other Combi Baby Accessories manuals

Combi Magical Compact Signature Series User manual

Combi

Combi Magical Compact Signature Series User manual

Combi Rishena User manual

Combi

Combi Rishena User manual

Combi Adventure Walker User manual

Combi

Combi Adventure Walker User manual

Combi NEMULILA BEDi LONG Series User manual

Combi

Combi NEMULILA BEDi LONG Series User manual

Combi Baby Keep Slim WA User manual

Combi

Combi Baby Keep Slim WA User manual

Combi Baby Keep Slim F62 User manual

Combi

Combi Baby Keep Slim F62 User manual

Combi Lakumug Series User manual

Combi

Combi Lakumug Series User manual

Combi Rock N Roll Walker User manual

Combi

Combi Rock N Roll Walker User manual

Combi LakuMug User manual

Combi

Combi LakuMug User manual

Combi All-in-One Activity Walker User manual

Combi

Combi All-in-One Activity Walker User manual

Combi Joytrip Advance ISOFIX Series User manual

Combi

Combi Joytrip Advance ISOFIX Series User manual

Combi All-in-One Activity Walker User manual

Combi

Combi All-in-One Activity Walker User manual

Popular Baby Accessories manuals by other brands

Baninni NINA CHICA user guide

Baninni

Baninni NINA CHICA user guide

Philips SCF880 Specifications

Philips

Philips SCF880 Specifications

Upseat Splat Mat manual

Upseat

Upseat Splat Mat manual

OXFORD BABY 12496 Assembly instructions

OXFORD BABY

OXFORD BABY 12496 Assembly instructions

playzoom WALKIE TALKIES user manual

playzoom

playzoom WALKIE TALKIES user manual

Philips SCF280/39 Specification sheet

Philips

Philips SCF280/39 Specification sheet

Childcare Ervo Trios 073041-389 instruction manual

Childcare

Childcare Ervo Trios 073041-389 instruction manual

Disney baby NEMO Palma Change Centre 057630-259 manual

Disney baby

Disney baby NEMO Palma Change Centre 057630-259 manual

Little Tikes Cozy Coupe 992261 owner's manual

Little Tikes

Little Tikes Cozy Coupe 992261 owner's manual

Safety 1st BH087 user guide

Safety 1st

Safety 1st BH087 user guide

Titaniumbaby Nitro 360 Instructions for use

Titaniumbaby

Titaniumbaby Nitro 360 Instructions for use

Stokke HARNESS user guide

Stokke

Stokke HARNESS user guide

Infanti ISOFIX manual

Infanti

Infanti ISOFIX manual

Fisher-Price Y4476 quick start guide

Fisher-Price

Fisher-Price Y4476 quick start guide

Philips AVENT SCF334 user manual

Philips AVENT

Philips AVENT SCF334 user manual

Summer My Fun Tub instruction manual

Summer

Summer My Fun Tub instruction manual

Costway baby joy ABST-H12 user manual

Costway

Costway baby joy ABST-H12 user manual

Beurer janosch Instructions for use

Beurer

Beurer janosch Instructions for use

manuals.online logo
manuals.online logoBrands
  • About & Mission
  • Contact us
  • Privacy Policy
  • Terms and Conditions

Copyright 2025 Manuals.Online. All Rights Reserved.