manuals.online logo
Brands
  1. Home
  2. •
  3. Brands
  4. •
  5. COMPX
  6. •
  7. Lock
  8. •
  9. COMPX elock Operating instructions

COMPX elock Operating instructions

CompX eLock®is a highly engineered lock with a motor-driven latch. Its uncompromising lock
control electronics include a non-volatile memory that stores 250 user / supervisor codes and
audit trail. With optional LockView®audit trail software, CompX eLock®remembers 1500 access
attempts. Programming is simple with numeric keypad or WindowsTM based LockView®software.
Quick Programming Guide
1. GETTING STARTED:
a. The unit is shipped with no user / supervisor codes
b. Press and hold until the beeping stops
c. Input the new PIN (4 digit min) and press or present new card
d. This PIN / Card is now a supervisor in slot #001
2. ADD A USER:
a. Input a valid supervisor PIN and press or present valid supervisor card
b. Press and hold until beeping stops
c. Input the new user PIN (4 digit min) and press or present new card
3. ADD A SUPERVISOR:
a. Input a valid supervisor PIN and press or present valid supervisor card
b. Press and hold until beeping stops
c. Press and hold again until beeping stops
d. Input new supervisor PIN (4 digit min) and press or present NEW supervisor card
4. DELETE A USER OR SUPERVISOR:
a. Input a valid supervisor PIN and press or present valid supervisor card
b. Press and hold until beeping stops
c. Input the PIN to be deleted and press or present existing card to be deleted
5. ADD A USER WITH A SPECIFIC SLOT ASSIGNMENT:
a. Input a valid supervisor PIN and press or present valid supervisor card
b. Press and hold until beeping stops
c. Enter slot number that will be assigned to user and press
(example: to program slot 6 type 006 )
d. Input the new user PIN (4 digit min) and press or present NEW card
6. DELETE A USER WITH A SPECIFIC SLOT ASSIGNMENT:
a. Input a valid supervisor PIN and press or present valid supervisor card
b. Press and hold until beeping stops
c. Enter slot number to be cleared and press (example: to clear slot 6 type 006 )
d. Enter slot number to be cleared again and press (example: to clear slot 6 type 006 )
See programming
guide included
with optional
LOCKVIEW®
software for
advanced
programming
instructions.
NUMERIC
KEYPAD
MAGSTRIPE
CARD
PROX
READER
PROX READER / KEYPAD
DUAL SYSTEM
MAGSTRIPE / KEYPAD
DUAL SYSTEM
Thank you for choosing the
CompX eLock®refrigerator kit.
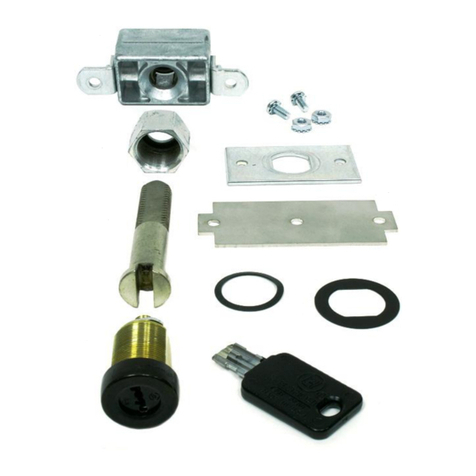
What's in the box?
8 - #8 tamper resistant .5” screws
2 - #8 tamper resistant 3/8” screws
1 - strike plate
1 - strike plate cover
1 - CompX eLock®instruction sheet
3 - double-sided tape 7.5” X 1”
1 - complete eLock refrigerator kit
(batteries not included)
1 - series of serial code stickers
(keep in a safe place)
1 - factory reset card (magstripe
or prox units only)
What's needed?
kT15 pin-in-head torx tool
k6 - AA batteries
ktape measure (or ruler)
kdrill (if doing drilling installation)
1
Installing the Refrigerator Kit
Mount the strike
at least 3.5" from
NON-HINGED EDGE
of the refrigerator.
There are two main parts of this installation: installing the strike and installing the
eLock assembly. The strike and the eLock assembly can be mounted either with foam
tape or by drilling holes and using screws. It is important to note that mounting the
strike and the eLock assembly are independent of each other. One can be foam
tape mounted, and one can be drill mounted if desired. The two do not need
to be mounted using the same method.
a. Screw one tamper resistant sheet
metal screw into the center of the strike's
slotted area. Note: The end of the metal
strike needs to curve up.
b. Place the plastic strike cover over the
metal strike. If strike was mounted using
foam tape, please proceed to Step 3.
c. Attach with one tamper resistant
machine screw.
Install the strike
Step
1:
Secure the strike and attach the strike cover (if strike was mounted using foam tape, ONLY do b.)
Step
2:
Foam Tape Installation
Please note that if foam tape installation
of the strike is used, the strike will not
be adjustable once it's put in place.
a. Clean top of both the refrigerator
and the strike with rubbing alcohol.
Wait for the alcohol to dry.
b. With a pencil, mark refrigerator 7-1 ⁄16"
from the front of the door and at least
3.5" from the non-hinged edge.
Measure from this line to the front
of the cabinet (dim. “A”); cut a piece
of tape this length.
c. Remove tape backer and affix to end
of strike. The upward curve should be
on top. Apply tape to the opposite
side. Remove backer. Line up strike
with line on refrigerator; apply
pressure to seal it on.
Drilling Installation
a. Before drilling, verify that there are
no refrigerant lines inside the top
of the refrigerator.
b. Drill a 9/64" hole, 6-1 ⁄16" from
the edge of the front of the refrigerator
and at least 3.5" from the non-hinged
edge of the refrigerator.
Note: The end of the metal
strike needs to curve up.
2
Installing the Refrigerator Kit continued
The CompX eLock®assembly (body) can be mounted to the front of the refrigerator
either by using foam tape or by drilling holes.
Foam Tape Installation
Please note that if foam tape installation of the strike is used,
the main CompX eLock®will not be adjustable once it's put in place.
a. Install one piece of double-sided tape on each side
of the CompX refrigerator eLock assembly.
b. Remove liner from double-sided tape.
c. Carefully press CompX eLock®onto the center of the strike.
Drilling Installation
a. Click CompX eLock®onto strike.
b. Push assembly up and center it on the strike.
c. Drill six 9/64" holes through the housing into the refrigerator door
for the mounting screws. Secure with screws. Note: Top two screws may
be omitted if they interfere with door handle access.
Note: If foam tape was used to mount the strike, the CompX eLock®refrigerator kit
installation is COMPLETE. The CompX eLock®may now be used.
Mount the main CompX eLock®body to the refrigerator door
Step
3:
a. Remove the plastic cover from the strike plate. Drill 9/64" hole
in second opening of strike.
b. If adjustment of strike is needed, loosen up the first strike
screw and adjust the strike. Tighten up the screw.
c. Drill hole for second screw and install second screw.
d. Reattach the plastic strike cover and attach with two
tamper resistant machine screws.
Finish installation of the strike (ONLY if drilled installation of strike was used)
Step
4:
3

Other manuals for elock

2

Other COMPX Lock manuals

COMPX MFW-1118 Guide

COMPX

COMPX MFW-1118 Guide

COMPX Stock Locks C1770 Guide

COMPX

COMPX Stock Locks C1770 Guide

COMPX C8062 Guide

COMPX

COMPX C8062 Guide

COMPX MFWSG29000 Guide

COMPX

COMPX MFWSG29000 Guide

COMPX Stock Locks C3205 Guide

COMPX

COMPX Stock Locks C3205 Guide

COMPX Stock Locks C4153 Guide

COMPX

COMPX Stock Locks C4153 Guide

COMPX StealthLock SL-100 User manual

COMPX

COMPX StealthLock SL-100 User manual

COMPX RC-4842 Guide

COMPX

COMPX RC-4842 Guide

COMPX C8384 Guide

COMPX

COMPX C8384 Guide

COMPX Regulator AT User manual

COMPX

COMPX Regulator AT User manual

COMPX Stock Locks BL12L Series Guide

COMPX

COMPX Stock Locks BL12L Series Guide

COMPX Stock Locks C1974 Guide

COMPX

COMPX Stock Locks C1974 Guide

COMPX Timberline CB-235 User manual

COMPX

COMPX Timberline CB-235 User manual

COMPX YPT-1010 Guide

COMPX

COMPX YPT-1010 Guide

COMPX Stock Locks C1775 Guide

COMPX

COMPX Stock Locks C1775 Guide

COMPX Timberline CB-234 User manual

COMPX

COMPX Timberline CB-234 User manual

COMPX Timberline CB-245 User manual

COMPX

COMPX Timberline CB-245 User manual

COMPX Chicago Tubar IC-12L User manual

COMPX

COMPX Chicago Tubar IC-12L User manual

COMPX National D8950 User manual

COMPX

COMPX National D8950 User manual

COMPX Stock Locks C1802 Guide

COMPX

COMPX Stock Locks C1802 Guide

COMPX TYPE300 Guide

COMPX

COMPX TYPE300 Guide

COMPX Timberline CB-235 User manual

COMPX

COMPX Timberline CB-235 User manual

COMPX 230SERIES User manual

COMPX

COMPX 230SERIES User manual

COMPX National D2905 User manual

COMPX

COMPX National D2905 User manual

Popular Lock manuals by other brands

Securiturk SGL-1S1500 user manual

Securiturk

Securiturk SGL-1S1500 user manual

Weiser kevo Touch-to-Open quick start guide

Weiser

Weiser kevo Touch-to-Open quick start guide

HMF 2030-11 instruction manual

HMF

HMF 2030-11 instruction manual

TIP TEMPerature Products CompX eLock 200 Series instructions

TIP TEMPerature Products

TIP TEMPerature Products CompX eLock 200 Series instructions

Kwikset OBSIDIAN Programming and troubleshooting guide

Kwikset

Kwikset OBSIDIAN Programming and troubleshooting guide

Digilock Shared Use RFID Camlock quick guide

Digilock

Digilock Shared Use RFID Camlock quick guide

Assa Abloy Yale Real Living Assure Lever YRL256 Installation and programming instructions

Assa Abloy

Assa Abloy Yale Real Living Assure Lever YRL256 Installation and programming instructions

BeLine 1000 Series installation guide

BeLine

BeLine 1000 Series installation guide

Alarm Lock Trilogy PDL1300 Programming instructions

Alarm Lock

Alarm Lock Trilogy PDL1300 Programming instructions

SIMON RWA ZVE-LOCK operating manual

SIMON RWA

SIMON RWA ZVE-LOCK operating manual

Noble ETZ08T manual

Noble

Noble ETZ08T manual

Schlage KC9232 installation manual

Schlage

Schlage KC9232 installation manual

Assa Abloy HES 5000 Series Installation & operating instructions

Assa Abloy

Assa Abloy HES 5000 Series Installation & operating instructions

Schlage M490DE Installation instructions and use

Schlage

Schlage M490DE Installation instructions and use

Locksmart LockSmart Original Instruction guide

Locksmart

Locksmart LockSmart Original Instruction guide

Assa Abloy Interlock IEGL instructions

Assa Abloy

Assa Abloy Interlock IEGL instructions

GTO FM142 brochure

GTO

GTO FM142 brochure

LockState RemoteLock LS-5i user manual

LockState

LockState RemoteLock LS-5i user manual

manuals.online logo
manuals.online logoBrands
  • About & Mission
  • Contact us
  • Privacy Policy
  • Terms and Conditions

Copyright 2025 Manuals.Online. All Rights Reserved.