manuals.online logo
Brands
  1. Home
  2. •
  3. Brands
  4. •
  5. Conrad
  6. •
  7. Adapter
  8. •
  9. Conrad 97 37 64 User manual

Conrad 97 37 64 User manual

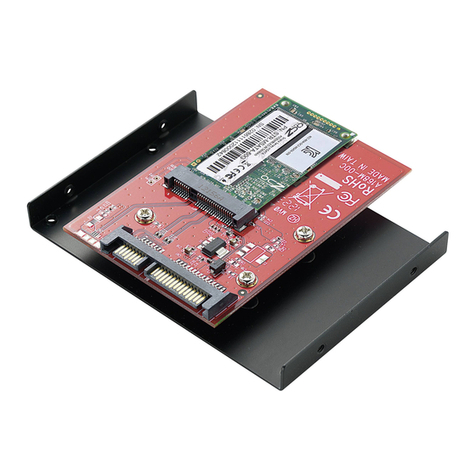
PCI-Express-Adapter x1 auf x16 Version 03/10
Best.-Nr. 97 37 64
Bestimmungsgemäße Verwendung
Das Produkt ist zum Einbau in einen PCI-Express-x1-Steckplatz eines Computers vorgesehen
und bietet dort die Möglichkeit, eine PCI-Express-Karte (bis zu x16) in einem PCI-Express-x1-Slot
zu betreiben.
Dieses Produkt erfüllt die gesetzlichen, nationalen und europäischen Anforderungen. Alle ent-
haltenen Firmennamen und Produktbezeichnungen sind Warenzeichen der jeweiligen Inhaber.
Alle Rechte vorbehalten.
Lieferumfang
• Adapter
• Bedienungsanleitung
Merkmale
• Ein Sockel für PCI-Express-Steckkarte (x1, x2, x4, x8 oder x16)
• Speziell geeignet für den Betrieb einer Slimline-PCI-Express-Steckkarte in einem PCI-
Express-x1-Steckplatz
Einbau
ᏘFalls Sie keine Fachkenntnisse für den Einbau besitzen, so lassen Sie den
Einbau von einer FACHKRAFT oder einer entsprechenden Fachwerkstatt
durchführen!
Durch unsachgemäßen Einbau wird sowohl das Produkt als auch Ihr
Computer und alle angeschlossenen Geräte beschädigt.
Vorsicht, Lebensgefahr!
Schalten Sie den Computer, in den der Adapter eingebaut werden soll und alle
angeschlossenen Geräte aus und trennen Sie alle Geräte von der Netzspannung,
ziehen Sie den Netzstecker! Das Ausschalten über den Ein-/Ausschalter genügt
nicht!
• Öffnen Sie das Gehäuse Ihres Computers und nehmen Sie den Gehäusedeckel vorsichtig ab.
• Suchen Sie einen freien PCI-Express-x1-Steckplatz und entfernen Sie das zugehörige
Slotblech.
• Stecken Sie den Adapter in den PCI-Express-x1-Steckplatz ein.
• In den x16-Slot des Adapters kann nun eine PCI-Express-Steckkarte (x1, x2, x4, x8, x16) ein-
gesteckt werden, z.B. eine Grafikkarte.
Bitte beachten Sie:
Ein Festschrauben der Steckkarte im PC-Gehäuse ist nur dann möglich, wenn es
sich um eine sog. Slimline-Karte handelt, also um eine Steckkarte mit geringer
Bauhöhe mit einem entsprechenden kurzen Slotblech.
Wird die Steckkarte nicht im Gehäuse festgeschraubt, besteht die Gefahr, dass sie
sich beim Anstecken von Kabeln oder auch später bei Betrieb aus dem Adapter löst.
Dies kann zu einem Kurzschluss und damit zu einer Zerstörung von Adapter,
Steckkarte und Mainboard führen!
• Verschließen Sie das Gehäuse Ihres Computers.
• Verbinden Sie Ihren Computer und Monitor mit der Netzspannung und schalten Sie alle
Geräte ein.
• Startet Ihr Computer nicht korrekt, so schalten Sie ihn sofort aus und kontrollieren Sie den rich-
tigen Sitz des Adapters und der von Ihnen eingesteckten PCI-Expresskarte.
Vor dem erneuten Öffnen des Computers ist dieser wieder von der Netzspannung
zu trennen, siehe oben!
Entsorgung
Elektrische und elektronische Produkte dürfen nicht in den Hausmüll!
Entsorgen Sie das Produkt am Ende seiner Lebensdauer gemäß den geltenden
gesetzlichen Bestimmungen.
쮕BEDIENUNGSANLEITUNG www.conrad.com
PCI-Express-Adapter x1 to x16 Version 03/10
Order No. 97 37 64
Intended Use
The product is intended for installation in a PCI Express x1 slot of a computer, and it provides the
option to operate a PCI Express card (up to x16) in a PCI Express x1 slot.
This product complies with the applicable National and European requirements. All names of
companies and products are the trademarks of the respective owner. All rights reserved.
Package Contents
• Adapter
• Operating Instructions
Features
• A socket for PCI Express plug-in card (x1, x2, x4, x8 or x16)
• Particularly suitable for operating a Slimline PCI Express plug-in card in a PCI Express x1 slo
Installation
ᏘIf in doubt about how to install the device correctly, please contact an EXPERT
or a specialist workshop and let them do the installation!
In the case of improper installation, the product as well as your computer and
any connected devices can be damaged.
Caution, lethal hazard!
Switch off the computer in which the adapter is to be installed and all connected
devices. Disconnect all devices from the mains voltage and pull out the mains
plug. Switching the device off with the ON/OFF button is not sufficient!
• Open your computer’s housing and carefully remove the cover.
• Look for a free PCI Express x1 slot and remove the corresponding slot bracket.
• Insert the adapter into the PCI Express x1 slot.
• Only one PCI Express plug-in card (x1, x2, x4, x8, x16) can be inserted into the X16 slot on
the adapter, e.g. a graphics card.
Please note:
The plug-in card can only be permanently screwed into the PC housing if it is a so-
called Slimline card, i.e. a plug-in card with low height and a corresponding short slot
bracket.
If the plug-in card is not screwed permanently in the housing, it can fall out of the
adapter when inserting the cables or even later during operation. This can cause a
short-circuit and hence, the destruction of the adapter, plug-in card and motherbo-
ard!
• Replace the computer housing.
• Connect your computer and monitor to the mains voltage and switch on all devices.
• If the computer does not start correctly, switch it off immediately and check that the adapter
and the plugged-in PC Express card are correctly installed.
Before you open the computer again, it must be disconnected from the mains
voltage, see above!
Disposal
Electrical and electronic products do not belong in the household waste!!
Please dispose of the device when it is no longer of use, according to the current sta-
tutory requirements.
OPERATING INSTRUCTIONS www.conrad.com
Diese Bedienungsanleitung ist eine Publikation der Conrad Electronic SE, Klaus-Conrad-Str. 1,
D-92240 Hirschau (www.conrad.com).
Alle Rechte einschließlich Übersetzung vorbehalten. Reproduktionen jeder Art, z. B. Fotokopie,
Mikroverfilmung, oder die Erfassung in elektronischen Datenverarbeitungsanlagen, bedürfen der
schriftlichen Genehmigung des Herausgebers. Nachdruck, auch auszugsweise, verboten.
Diese Bedienungsanleitung entspricht dem technischen Stand bei Drucklegung. Änderung in Technik
und Ausstattung vorbehalten.
© Copyright 2010 by Conrad Electronic SE.
These operating instructions are a publication by Conrad Electronic SE, Klaus-Conrad-Str. 1, D-92240
Hirschau (www.conrad.com).
All rights including translation reserved. Reproduction by any method, e.g. photocopy, microfilming, or
the capture in electronic data processing systems require the prior written approval by the editor.
Reprinting, also in part, is prohibited.
These operating instructions represent the technical status at the time of printing. Changes in
technology and equipment reserved.
© Copyright 2010by Conrad Electronic SE.
Adaptateur PCI-Express x1 sur x16 Version 03/10
N° de commande 97 37 64
Utilisation conforme
Le produit est prévu pour l’insertion dans l’emplacement PCI-Express-x1 d’un ordinateur et offre
la possibilité d’utiliser une carte PCI-Express (jusqu’à x16) dans un emplacement PCI-Express-
x1.
Cet appareil satisfait aux exigences légales nationales et européennes. Tous les noms d’entre-
prises et les appellations d’appareils figurant dans ce mode d’emploi sont des marques dépo-
sées des propriétaires correspondants. Tous droits réservés.
Étendue de la livraison
• Adaptateur
• Instructions d’utilisation
Caractéristiques
• Un socle pour carte enfichable PCI-Express (x1, x2, x4, x8 ou x16)
• Convient en particulier pour l’utilisation d’une carte enfichable Slimline-PCI-Express dans un
emplacement PCI-Express-x1
Montage
ᏘSi vous n’avez pas les connaissances spécifiques nécessaires pour le monta-
ge, veuillez confier cette opération à un TECHNICIEN SPÉCIALISÉ ou à un ate-
lier spécialisé !
Un montage erroné risque d’endommager non seulement ce produit mais aus-
si votre ordinateur ainsi que tous les appareils qui y sont connectés.
Attention, danger de mort !
Éteignez l’ordinateur devant accueillir l’adaptateur ainsi que tous les appareils
raccordés puis déconnectez tous les appareils de la tension secteur en retirant la
fiche de contact ! La mise hors circuit de l’appareil par l’interrupteur
marche/arrêt ne suffit pas
• Ouvrir le boîtier de l’ordinateur et retirer le couvercle du boîtier avec précaution.
• Cherchez un emplacement PCI-Express-x1 libre et déposez le cache métallique du slot.
• Insérer l’adaptateur dans l’emplacement PCI-Express-x1.
• L’emplacement x16 de l’adaptateur permet l’insertion d’une carte enfichable PCI-Express (x1,
x2, x4, x8, x16), par ex. une carte graphique.
Attention :
Le serrage de la carte enfichable dans le boîtier du PC n’est possible que s’il s’agit
d’un carte dite Slimline, donc d’une carte enfichable de faible hauteur avec une tôle
courte correspondante.
Si la carte enfichable n’est pas vissée dans le boîtier, elle risque de se détacher de
l’adaptateur lors du raccordement de câbles ou encore plus tard lors du fonctionne-
ment. Cela peut causer un court-circuit et par conséquent la destruction de l’adap-
tateur, de la carte enfichable et de la carte mère !
• Refermer ensuite le boîtier de l’ordinateur.
• Branchez votre ordinateur et votre moniteur à la prise réseau, puis allumez tous les appareils.
• Si l’ordinateur ne démarre pas correctement, l’arrêter immédiatement et contrôler la position
correcte de l’adaptateur et de la carte Express PCI insérée.
Avant d’ouvrir de nouveau l’ordinateur, il doit de nouveau être coupé de la
tension d’alimentation, voir précédemment !
Élimination
Les appareils électriques et électroniques ne doivent pas être jetés dans les ordures
ménagères.
Il convient de procéder à l’élimination de l’appareil au terme de sa durée de vie con-
formément aux prescriptions légales en vigueur.?
MODE D’EMPLOI www.conrad.com
PCI-express-adapter x1 op x16 Versie 03/10
Bestelnr. 97 37 64
Beoogd gebruik
Het product kan worden ingebouwd in een PCI-express-x1-insteekpositie van een computer en
biedt daar de mogelijkheid een PCI-express-kaart (tot x16) in een PCI-express-x1-slot te gebrui-
ken.
Dit product voldoet aan de wettelijke, nationale en Europese eisen. Alle voorkomende bedrijfs-
namen en productaanduidingen zijn handelsmerken van de betreffende eigenaren. Alle rechten
voorbehouden.
Omvang van de levering
• Adapter
• Gebruiksaanwijzing
Kenmerken
• Een sokkel voor PCI-express-insteekkaart (x1, x2, x4, x8 of x16)
• Speciaal geschikt voor het gebruik van een Slimline-PCI-express-insteekkaart in een PCI-
express-x1-insteekpositie
Installatie
Ꮨ
Indien u niet voldoende vakkennis heeft voor de inbouw, dient u de inbouw
door een VAKMAN of een erkend elektrotechnisch bedrijf uit te laten voeren!
Door ondeskundige inbouw raken zowel het product zelf als ook uw computer
en alle aangesloten apparaten beschadigd.
Voorzichtig, levensgevaar!
Schakel de computer, waarin u de adapter gaat inbouwen en alle andere aanges-
loten apparatuur uit en koppel alle apparaten los van de netspanning; neem alle
stekkers uit het stopcontact! Uitschakelen via de aan/uit-schakelaar is niet voldo-
ende!
• Open de behuizing van uw computer en haal het deksel van de behuizing voorzichtig weg.
• Zoek een vrije PCI-express-x1-insteekpositie en verwijder de bijhorende slotplaat.
• Steek de adapter in de PCI-express-x1-insteekpositie.
• In het x16-slot van de adapter kan nu een PCI-express-insteekkaart (x1, x2, x4, x8, x16) wor-
den ingestoken, bijv. een grafische kaart.
Let a.u.b. op:
Het vastschroeven van de insteekkaart in de PC-behuizing is alleen dan mogelijk
wanneer het om een zgn. slimline-kaart gaat, dus om een kaart met geringe
opbouwhoogte en overeenkomstig korte slotplaat.
Wordt de insteekkaart niet in de behuizing vastgeschroefd, dan bestaat het gevaar
dat deze zich bij het aansluiten van kabels of later bij het in gebruik zijn uit de adap-
ter losmaakt. Dit kan tot kortsluiting leiden en daarmee tot het defect raken van de
adapter, insteekkaart en moederbord!
• Sluit de computerbehuizing.
• Verbind nu uw computer en de monitor met de netvoeding en zet alle apparaten aan.
• Start uw computer niet correct, schakel deze dan direct uit en controleer de passing van de
adapter en de door u ingestoken PCI-expresskaart.
ndien u de computer opnieuw wilt openen, dient u deze opnieuw van de-
netvoeding los te koppelen, zie boven!
Verwijderen
Elektrische en elektronische producten horen niet bij huishoudelijk afval!
Verwijder het product aan het einde van zijn levensduur in overeenstemming met de
geldende wettelijke bepalingen.
GEBRUIKSAANWIJZING www.conrad.com
Ce mode d'emploi est une publication de la société Conrad Electronic SE, Klaus-Conrad-Str. 1,
D-92240 Hirschau (www.conrad.com).
Tous droits réservés, y compris de traduction. Toute reproduction, quelle qu'elle soit (p. ex. photoco-
pie, microfilm, saisie dans des installations de traitement de données) nécessite une autorisation écri-
te de l'éditeur. Il est interdit de le réimprimer, même par extraits.
Ce mode d'emploi correspond au niveau technique du moment de la mise sous presse. Sous réserve
de modifications techniques et de l'équipement.
© Copyright 2010 by Conrad Electronic SE.
Deze gebruiksaanwijzing is een publicatie van de firma Conrad Electronic SE, Klaus-Conrad-Str. 1,
D-92240 Hirschau (www.conrad.com).
Alle rechten, vertaling inbegrepen, voorbehouden. Reproducties van welke aard dan ook, bijvoorbeeld
fotokopie, microverfilming of de registratie in elektronische gegevensverwerkingsapparatuur, vereisen
de schriftelijke toestemming van de uitgever. Nadruk, ook van uittreksels, verboden.
Deze gebruiksaanwijzing voldoet aan de technische stand bij het in druk bezorgen. Wijziging van
techniek en uitrusting voorbehouden.
© Copyright 2010 by Conrad Electronic SE. 01_0310_01/AB
Other Conrad Adapter manuals

Conrad 97 37 79 User manual

Conrad

Conrad 97 37 79 User manual

Conrad 87 23 00 User manual

Conrad

Conrad 87 23 00 User manual

Conrad AC1300 Installation instructions

Conrad

Conrad AC1300 Installation instructions

Conrad 97 37 86 User manual

Conrad

Conrad 97 37 86 User manual

Conrad 40 55 86 User manual

Conrad

Conrad 40 55 86 User manual

Conrad 97 17 91 User manual

Conrad

Conrad 97 17 91 User manual

Conrad EMP600PIR User manual

Conrad

Conrad EMP600PIR User manual

Conrad 98 93 37 User manual

Conrad

Conrad 98 93 37 User manual

Conrad 98 62 38 User manual

Conrad

Conrad 98 62 38 User manual

Conrad 989267 User manual

Conrad

Conrad 989267 User manual

Conrad 91 79 11 User manual

Conrad

Conrad 91 79 11 User manual

Conrad 98 24 17 User manual

Conrad

Conrad 98 24 17 User manual

Conrad 97 24 97 User manual

Conrad

Conrad 97 24 97 User manual

Conrad J5 Create User manual

Conrad

Conrad J5 Create User manual

Conrad 41 75 35 User manual

Conrad

Conrad 41 75 35 User manual

Conrad 40 88 70 User manual

Conrad

Conrad 40 88 70 User manual

Conrad 1405910 User manual

Conrad

Conrad 1405910 User manual

Conrad Renkforce RF-2000362 User manual

Conrad

Conrad Renkforce RF-2000362 User manual

Conrad 975221 User manual

Conrad

Conrad 975221 User manual

Conrad 98 61 70 User manual

Conrad

Conrad 98 61 70 User manual

Conrad Powerline Adapter PL85D User manual

Conrad

Conrad Powerline Adapter PL85D User manual

Conrad 99 40 46 User manual

Conrad

Conrad 99 40 46 User manual

Conrad 98 62 41 User manual

Conrad

Conrad 98 62 41 User manual

Conrad PL200D User manual

Conrad

Conrad PL200D User manual

Popular Adapter manuals by other brands

Zenisu Keisoku ZS-6228-8N Series user manual

Zenisu Keisoku

Zenisu Keisoku ZS-6228-8N Series user manual

Jabra A120s Specifications

Jabra

Jabra A120s Specifications

Toshiba GN-2010 Operator's manual

Toshiba

Toshiba GN-2010 Operator's manual

Belkin F8T003 user manual

Belkin

Belkin F8T003 user manual

Sonoff Micro user manual

Sonoff

Sonoff Micro user manual

D-Link DHP-303 - PowerLine HD EN Starter user manual

D-Link

D-Link DHP-303 - PowerLine HD EN Starter user manual

StarTech.com TB2USB3ES instruction manual

StarTech.com

StarTech.com TB2USB3ES instruction manual

SIIG SATA-to-IDE Adapter Quick installation guide

SIIG

SIIG SATA-to-IDE Adapter Quick installation guide

ZNYX NetBlaster ZX470 Series user guide

ZNYX

ZNYX NetBlaster ZX470 Series user guide

TRENDnet TPL-401E Specifications

TRENDnet

TRENDnet TPL-401E Specifications

Lindy 42888 manual

Lindy

Lindy 42888 manual

NEC SB-02AM quick start guide

NEC

NEC SB-02AM quick start guide

CAMERA LINK PHRONTIER PHIRE PHR-68-M025 user manual

CAMERA LINK

CAMERA LINK PHRONTIER PHIRE PHR-68-M025 user manual

Proware PW-MN561 user guide

Proware

Proware PW-MN561 user guide

Gigabyte GN-BTD01 user guide

Gigabyte

Gigabyte GN-BTD01 user guide

Hasselblad HTS 1.5 datasheet

Hasselblad

Hasselblad HTS 1.5 datasheet

Emtec WI200 user guide

Emtec

Emtec WI200 user guide

Airlink101 ASOHORL Quick installation guide

Airlink101

Airlink101 ASOHORL Quick installation guide

manuals.online logo
manuals.online logoBrands
  • About & Mission
  • Contact us
  • Privacy Policy
  • Terms and Conditions

Copyright 2025 Manuals.Online. All Rights Reserved.