Conrad 97 54 64 User manual

2-Port USB-KVM-Kabel „Nano“ Version 03/11
Best.-Nr. 97 54 64 °
Bestimmungsgemäße Verwendung
Das Produkt dient dazu, zwei nebeneinander stehende Computer über eine USB-Tastatur, eine
USB-Maus und einen VGA-Monitor bedienen zu können.
Das Produkt entspricht den gesetzlichen, nationalen und europäischen Anforderungen. Alle ent-
haltenen Firmennamen und Produktbezeichnungen sind Warenzeichen der jeweiligen Inhaber.
Alle Rechte vorbehalten.
Lieferumfang
• KVM-Kabel
• CD mit Software
• Bedienungsanleitung
Merkmale
• Monitor mit analogem VGA-Anschluss ansteckbar
• Anschluss von je einer USB-Tastatur und USB-Maus
• Umschaltung zwischen den beiden Computern per Kabelfernbedienung, PC-Tastatur oder
Software
Sicherheitshinweise
Bei Schäden, die durch Nichtbeachten dieser Bedienungsanleitung verur-
sacht werden, erlischt die Gewährleistung/Garantie! Für Folgeschäden über-
nehmen wir keine Haftung!
Bei Sach- oder Personenschäden, die durch unsachgemäße Handhabung
oder Nichtbeachten der Sicherheitshinweise verursacht werden, übernehmen
wir keine Haftung. In solchen Fällen erlischt die Gewährleistung/Garantie.
• Aus Sicherheits- und Zulassungsgründen (CE) ist das eigenmächtige Umbauen
und/oder Verändern des Produkts nicht gestattet.
• Das Produkt ist nur für geschlossene, trockene Innenräume vorgesehen, es darf
nicht feucht oder nass werden! Setzen Sie es keinen extremen Temperaturen oder
direkter Sonneneinstrahlung aus.
• Das Produkt ist kein Spielzeug, es gehört nicht in Kinderhände.
• Lassen Sie das Verpackungsmaterial nicht achtlos liegen, dieses könnte für
Kinder zu einem gefährlichen Spielzeug werden.
• Gehen Sie vorsichtig mit dem Produkt um, durch scharfe Kanten werden die Kabel
beschädigt. Knicken Sie die Kabel nicht.
Beschreibung der Anschlüsse/Bedienelemente
1 USB-Stecker, mit einem USB-Port von PC 2 verbinden
2 VGA-Stecker, mit VGA-Ausgang der Grafikkarte von PC 2 verbinden
3 USB-Buchse, zum Anschluss der USB-Tastatur (oder USB-Maus)
4 USB-Buchse, zum Anschluss der USB-Maus (oder USB-Tastatur)
5 USB-Stecker, mit einem USB-Port von PC 1 verbinden
6 VGA-Stecker, mit VGA-Ausgang der Grafikkarte von PC 1 verbinden
7 VGA-Buchse, zum Anschluss des VGA-Monitors
8 Kabelfernbedienung mit Taste zum Umschalten zwischen PC 1 und PC 2
PC 1
PC 2
1
2
3
4
5
6
7
8
쮕BEDIENUNGSANLEITUNG www.conrad.com Anschluss
• Schalten Sie beide Computer und den Monitor aus.
• Verbinden Sie den VGA-Stecker (6) und den USB-Stecker (5) mit dem ersten Computer (PC 1).
• Verbinden Sie den VGA-Stecker (2) und den USB-Stecker (1) mit dem zweiten Computer (PC 2).
• Schließen Sie eine USB-Tastatur und eine USB-Maus an den USB-Buchsen (3) und (4) an.
An welcher der beiden USB-Buchsen die Tastatur bzw. Maus angeschlossen wird, ist dabei
belanglos.
• Verbinden Sie einen VGA-Monitor mit dem VGA-Monitoranschluss (7) des KVM-Kabels.
• Platzieren Sie die Kabelfernbedienung (8) in der Nähe Ihrer Tastatur.
Inbetriebnahme
• Schalten Sie die beiden Computer ein.
• Beim Drücken auf die Taste der Kabelfernbedienung (8) kann nun zwischen den beiden
Computern hin und her geschaltet werden. Sie sehen jeweils das Monitorbild des ausgewähl-
ten Computers, die Tastatur und Maus sind jeweils am gerade ausgewählten Computer aktiv.
Die LED im Gehäuse der Kabelfernbedienung wechselt die Farbe, um den Umschaltvorgang
anzuzeigen (PC 1 = orange, PC 2 = grün).
• Ein Umschaltvorgang kann auch mit der Tastatur ausgelöst werden. Drücken Sie dazu zwei-
mal kurz die Taste „Scroll Lock“ auf der Tastatur (sofern auf Ihrer Tastatur vorhanden).
• Falls gewünscht, so lassen sich die PCs auch per Software umschalten, siehe nächster
Abschnitt.
Software-Installation und Bedienung
☞Die Software ist nur für Windows (ab Windows XP) geeignet.
Wenn Sie andere Betriebssysteme einsetzen, so schalten Sie zwischen den
Computern entweder per Taste auf der Kabelfernbedienung oder per zweimaligem
kurzen Druck auf die Taste „Scroll Lock“ der PC-Tastatur um.
• Legen Sie die mitgelieferte CD in das entsprechende Laufwerk Ihres Computers ein. Wenn die
Installation nicht automatisch startet, so starten Sie das Programm „Setup.exe“ im Haupt-
verzeichnis der CD.
Folgen Sie allen Anweisungen der Software.
☞Installieren Sie die Software auf beiden Computern. Beachten Sie, dass u.U.
Administratorrechte erforderlich sind, damit sich die Software installieren lässt.
• In der Menüleiste bzw. am Desktop erscheint ein neues Symbol, über das der Umschalt-
vorgang vorgenommen werden kann.
Tipps & Hinweise
• Das KVM-Kabel kann nur analoge VGA-Monitorsignale umschalten. Zum Betrieb ist deshalb
nur ein Monitor mit analogem VGA-Anschluss geeignet. Der Betrieb von Monitoren mit aus-
schließlich digitalen Schnittstellen (z.B. DVI) ist nicht möglich.
• Zum Anschluss an Grafikkarten mit DVI-Buchse ist ein entsprechender VGA-DVI-Adapter
erforderlich (nicht im Lieferumfang). Der Betrieb an einer DVI-Buchse in Verbindung mit einem
VGA-DVI-Adapter setzt voraus, dass an der DVI-Buchse der Grafikkarte auch ein analoges
Monitorsignal vorhanden ist.
• Zum Umschalten zwischen den beiden Computern gibt es 3 verschiedene Möglichkeiten:
1. Umschalten per Druck auf die Taste der Kabelfernbedienung
2. Umschalten durch zweimaligen Druck auf die Taste „Scroll Lock“ der PC-Tastatur
3. Umschalten per Software (Windows XP oder höher erforderlich)
• Wenn einer der Computer ausgeschaltet ist, kann nicht zu diesem Computer umgeschaltet
werden.
• Verwenden Sie keine Verlängerungskabel zwischen den Buchsen/Steckern des KVM-Kabels
und den Computern bzw. der USB-Tastatur/-Maus, da dies zu Funktionsstörungen führen
kann. Außerdem verschlechtert sich beim Einsatz von VGA-Kabeln die Bildqualität auf dem
angeschlossenen VGA-Monitor.
• Verwenden Sie zum Anschluss der USB-Stecker (1) und (5) einen USB-Port des Mainboards.
Wenn ein USB-Hub oder der USB-Port einer Steckkarte verwendet wird, so ist ein Umschalt-
vorgang manchmal nicht möglich.
Entsorgung
Entsorgen Sie das Produkt am Ende seiner Lebensdauer gemäß den geltenden
gesetzlichen Bestimmungen.
Diese Bedienungsanleitung ist eine Publikation der Conrad Electronic SE, Klaus-Conrad-Str. 1,
D-92240 Hirschau (www.conrad.com).
Alle Rechte einschließlich Übersetzung vorbehalten. Reproduktionen jeder Art, z. B. Fotokopie,
Mikroverfilmung, oder die Erfassung in elektronischen Datenverarbeitungsanlagen, bedürfen der
schriftlichen Genehmigung des Herausgebers. Nachdruck, auch auszugsweise, verboten.
Diese Bedienungsanleitung entspricht dem technischen Stand bei Drucklegung. Änderung in Technik
und Ausstattung vorbehalten.
© Copyright 2011 by Conrad Electronic SE.

2-Port USB KVM Cable “Nano” Version 03/11
Item-No. 97 54 64 °
Use in accordance with manufacturer’s instructions
The product is used to operate two computers, standing next to each other, via a USB keyboard,
a USB mouse and a VGA monitor.
This product complies with the applicable National and European regulations. All names of com-
panies and products are the trademarks of the respective owner. All rights reserved.
Package Contents
• KVM cable
• CD with software
• Operating Instructions
Features
• Monitor connectable with analogue VGA port
• Connection of a USB keyboard and USB mouse
• Switching between the two computers through wired remote control, PC keyboard or software
Safety Instructions
The warranty will be void in the event of damage caused by failure to observe
these safety instructions! We do not assume any liability for any consequen-
tial damage!
We do not assume any liability for material and personal damage caused by
improper use or non-compliance with the safety instructions. In such cases
the warranty will be null and void.
• The unauthorised conversion and/or modification of the product is inadmissible
because of safety and approval reasons (CE).
• The product should only be used in dry indoor areas, it must not be exposed to
damp or wet! Do not expose it to extreme temperatures or direct sunlight.
• The product is not a toy and should be kept out of the reach of children.
• Do not leave packing materials unattended. They may become dangerous play-
things for children.
• Handle the product with care. The cables can be damaged by sharp edges. Do not
bend the cables.
Description of the connections/controls
1 USB plug, connect with a USB port of PC 2
2 VGA plug, connect to the VGA output of the graphics card of PC 2
3 USB socket, for connection of the USB keyboard (or USB mouse)
4 USB socket, for connection of the USB mouse (or USB keyboard)
5 USB plug, connect with a USB port of PC 1
6 VGA plug, connect to the VGA output of the graphics card of PC 1
7 VGA socket, for connection of the VGA monitor
8 Wired remote control with key to switch between PC 1 and PC 2
PC 1
PC 2
1
2
3
4
5
6
7
8
OPERATING INSTRUCTIONS www.conrad.com Connection
• Turn off the two computers and the monitor.
• Connect the VGA plug (6) and the USB plug (5) to the first computer (PC 1).
• Connect the VGA plug (2) and the USB plug (1) to the second computer (PC 2).
• Connect a USB keyboard and a USB mouse to the USB ports (3) and (4). It is not important to
which of the two USB sockets the keyboard or mouse is connected.
• Connect a VGA monitor to the VGA monitor connector (7) of the KVM cable.
• Place the wired remote control (8) near your keyboard.
Getting Started
• Switch both computers on.
• Now you can switch between the two computers by pressing the key of the wired remote con-
trol (8). You will see the image of the monitor of the selected computer respectively. The key-
board and mouse are activated on the currently selected computer. The LED in the housing
of the wired remote control changes colour to indicate the switching process (PC 1 = orange,
PC 2 = green).
• You can also switch by using the keyboard. To do this, briefly press the “Scroll Lock” key twice
on the keyboard (if available on your keyboard).
• If needed, you can also swap the PCs via a software program; see next section.
Software installation and handling
☞The software is only suitable for Windows (from Windows XP).
If you are using other operating systems, you can switch between the computers either
by using the key on the wired remote control or by briefly pressing the key “Scroll Lock”
twice on the PC keyboard.
• Insert the CD provided in the appropriate drive on your computer. If the installation program
does not start automatically, start the program “Setup.exe“ in the main directory on the CD.
Follow the program’s instructions.
☞Install the software on both computers. Please note that administrator rights might
be required to be able to install the software.
• A symbol will appear in the menu bar or on the desktop which is used to perform the switching
between the computers.
Tips & Notes
• The KVM cable can only convert analogue VGA monitor signals. Thus, only a monitor with
analogue VGA interface is suitable. The operation of monitors with only digital interfaces (e.g.
DVI) is not possible.
• For a connection to graphics cards with DVI sockets, you will need a corresponding VGA-DVI
adaptor (not included). The operation on a DVI socket in combination with a VGA-DVI adap-
tor requires that an analogue monitor signal is also available on the DVI socket of the graphic
card.
• To switch between the two computers, you have 3 different options:
1. Switch by pressing the key of the wired remote control
2. Switch by pressing the key “Scroll Lock” twice on the PC keyboard
3. Switching via software (requires Windows XP or higher)
• If one of the computers is turned off, you cannot switch to this computer.
• Do not use extension cables between the sockets/plugs of the KVM cable and the computers
or the USB keyboard/mouse since this may lead to malfunctions. Furthermore, the image qua-
lity deteriorates on the VGA monitor when using VGA cables.
• Use a USB port of the main board to connect the USB plugs (1) and (5). If you are using a
USB hub or the USB port of a plug-in card, a switching is sometimes not possible.
Disposal
Please dispose of the product, when it is no longer of use, according to the current
statutory requirements.
These operating instructions are a publication by Conrad Electronic SE, Klaus-Conrad-Str. 1, D-92240
Hirschau (www.conrad.com).
All rights including translation reserved. Reproduction by any method, e.g. photocopy, microfilming, or
the capture in electronic data processing systems require the prior written approval by the editor.
Reprinting, also in part, is prohibited.
These operating instructions represent the technical status at the time of printing. Changes in
technology and equipment reserved.
© Copyright 2011 by Conrad Electronic SE.

Câble KVM USB à 2 ports «Nano» Version 03/11
N° de commande 97 54 64 °
Utilisation conforme
Le produit sert à exploiter deux ordinateurs installés côte à côte, via un clavier, une souris USB
et un écran VGA.
Cet appareil satisfait aux exigences légales nationales et européennes. Tous les noms d’entre-
prises et les appellations d’appareils figurant dans ce mode d’emploi sont des marques dépo-
sées des propriétaires correspondants. Tous droits réservés.
Étendue de la livraison
• Câble KVM
• CD avec logiciel
• Manuel d’utilisation
Caractéristiques
• Écran avec port VGA analogique enfichable
• Ports pour clavier USB et souris USB
• Commutation entre les deux ordinateurs via une télécommande filaire, un clavier d’ordinateur
ou un logiciel
Consignes de sécurité
Tout dommage résultant du non-respect de ce manuel d’utilisation entraîne
l’annulation de la garantie ! Nous déclinons toute responsabilité pour les dom-
mages consécutifs !
De même, nous déclinons toute responsabilité en cas de dommages matériels
ou corporels résultant d’une utilisation de l’appareil non conforme aux spéci-
fications ou d’un non-respect des présentes instructions. Dans de tels cas la
garantie est annulée.
• Pour des raisons de sécurité et d’homologation (CE), il est interdit de modifier la
construction ou de transformer l’appareil de son propre gré.
• L’appareil ne convient que pour une utilisation dans des locaux fermés et secs, il
ne doit ni prendre l’humidité, ni être mouillé ! Ne pas exposer l’appareil à des tem-
pératures extrêmes ou à des rayons directs du soleil.
• Ce produit n’est pas un jouet, le tenir hors de portée des enfants.
• Ne pas laisser le matériel d’emballage sans surveillance, il pourrait constituer un
jouet dangereux pour les enfants.
• Maniez l’appareil avec précaution, des arêtes vives peuvent endommager les
câbles. Ne jamais plier les câbles.
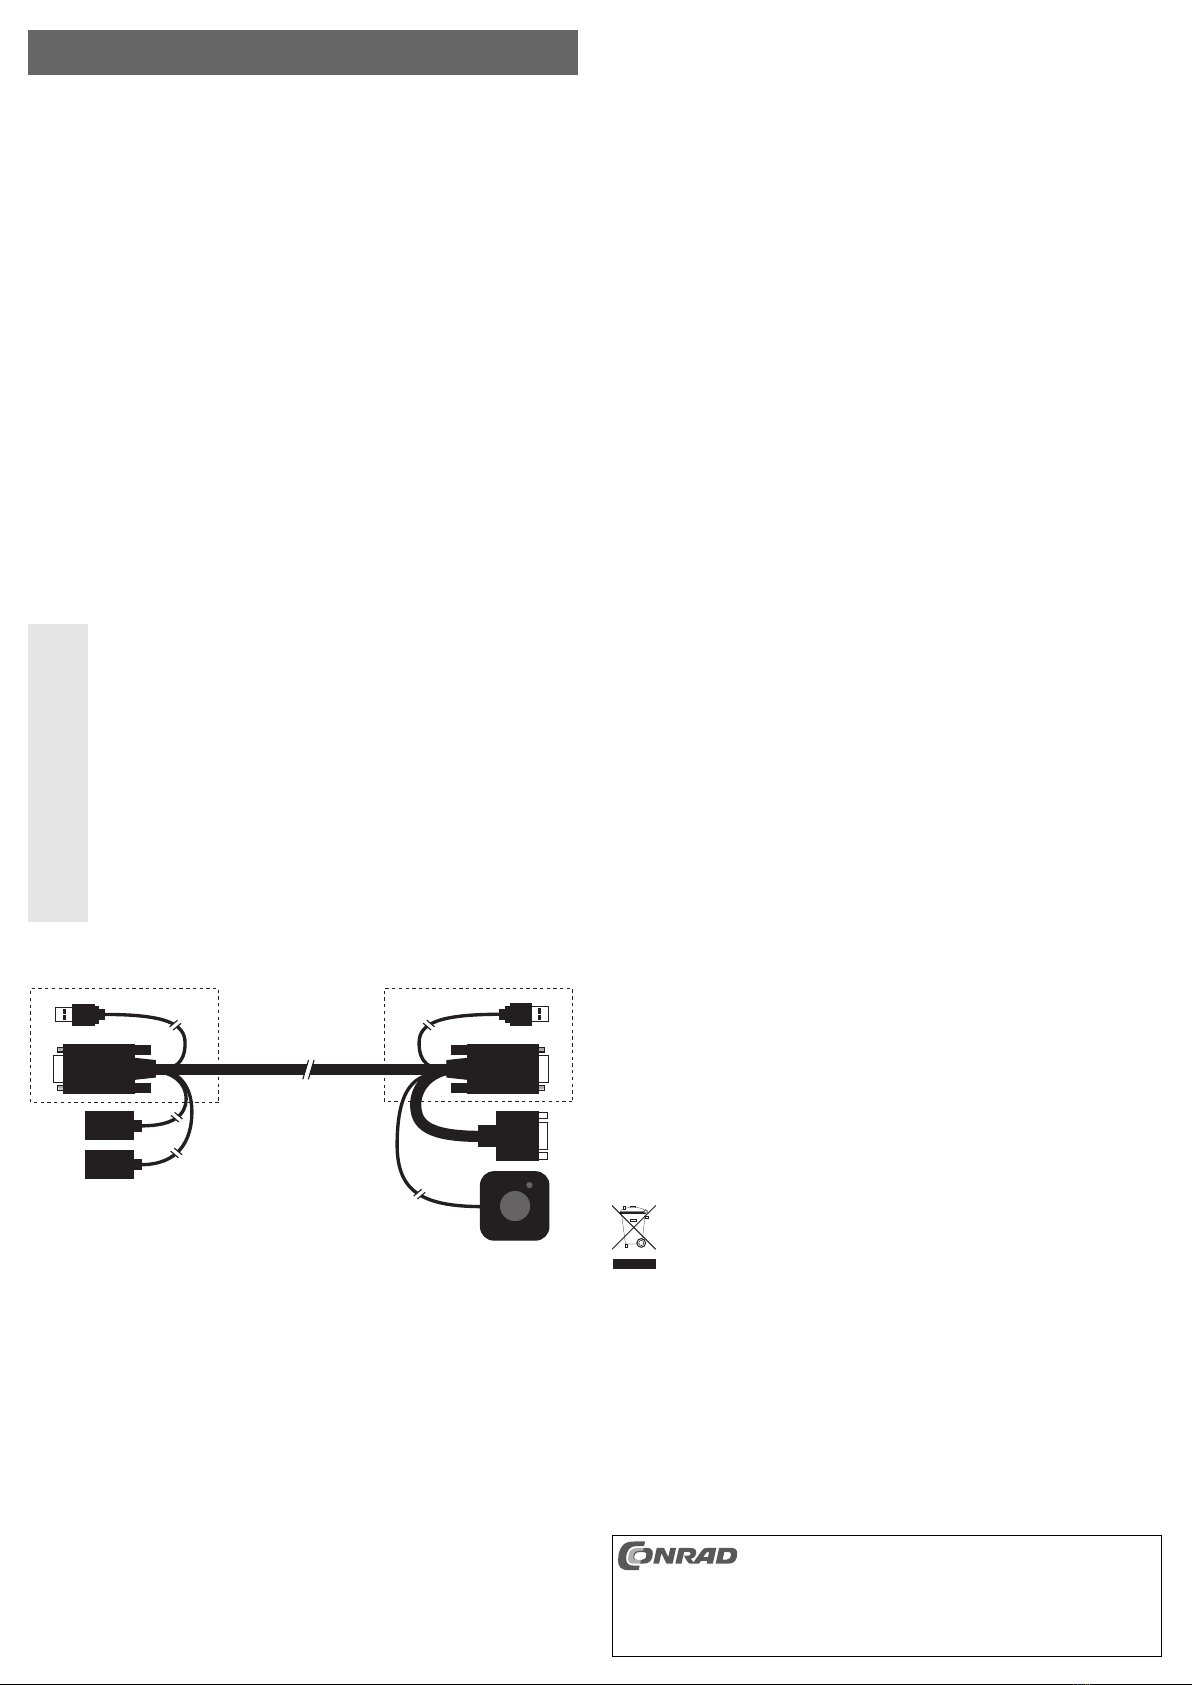
Description des connecteurs/éléments de commande
1 Connecteur USB, à raccorder à un port USB du PC 2
2 Connecteur VGA, à raccorder à la sortie VGA de la carte graphique du PC 2
3 Port USB pour le raccordement du clavier USB (ou de la souris USB)
4 Port USB pour le raccordement de la souris USB (ou du clavier USB)
5 Connecteur USB, à raccorder à un port USB du PC 1
6 Connecteur VGA, à raccorder à la sortie VGA de la carte graphique du PC 1
7 Port VGA pour le raccordement de l’écran VGA
8 Télécommande filaire avec touche pour commutation entre le PC 1 et le PC 2
PC 1
PC 2
1
2
3
4
5
6
7
8
MODE D’EMPLOI www.conrad.com Raccordement
• Éteindre les deux ordinateurs ainsi que l’écran.
• Raccordez le connecteur VGA (6) et le connecteur USB (5) au premier ordinateur (PC 1).
• Raccordez le connecteur VGA (2) et le connecteur USB (1) au deuxième ordinateur (PC 2).
• Raccorder un clavier USB ou une souris USB aux ports USB (3) et (4). Lequel des deux ports
USB reçoit le clavier USB ou la souris USB n’a pas d’importance.
• Connectez un écran VGA au port d’écran VGA (7) du câble KVM.
• Placez la télécommande filaire (8) à proximité de votre clavier.
Mise en service
• Allumez les deux ordinateurs.
• Lorsque vous appuyez sur la touche de la télécommande filaire (8), vous avez ensuite la pos-
sibilité de commuter entre les deux ordinateurs. Vous voyez respectivement l’image de l’écran
de l’ordinateur sélectionné, le clavier et la souris sont respectivement actifs sur l’ordinateur
sélectionné. Le témoin LED dans le boîtier de la télécommande filaire change de couleur pour
indiquer la commutation (PC 1 = orange, PC 2 = vert).
• La commutation peut également être déclenchée avec le clavier. Pour cela, appuyez deux fois
brièvement sur la touche « Scroll Lock » du clavier (si disponible sur votre clavier).
• Si vous le souhaitez, vous pouvez également commuter entre les PC à l’aide du logiciel, cf.
chapitre suivant.
Installation du logiciel et utilisation
☞Le logiciel est uniquement adapté pour Windows (à partir de Windows XP).
Si vous utilisez d’autres systèmes d’exploitation, vous pouvez commuter entre les
ordinateurs, soit en appuyant sur la touche de la télécommande filaire, soit en
appuyant deux fois brièvement sur la touche « Scroll Lock » du clavier du PC.
• Insérer le CD fourni dans le lecteur correspondant de votre ordinateur. Si l’installation ne démar-
re pas automatiquement, lancez le programme « Setup.exe » dans le répertoire principal du CD.
Suivre toutes les instructions du logiciel.
☞Installer le logiciel sur les deux ordinateurs. Veuillez noter que des droits d’adminis-
trateur peuvent être requis pour l’installation du logiciel.
• Dans la barre de menu ou sur le bureau, apparaît un nouvel icône, permettant d’effectuer la
commutation.
Conseils et indications
• Le câble KVM ne peut que commuter des signaux VGA analogiques. Par conséquent, seul un
écran avec port VGA analogique est adapté pour l’exploitation. L’utilisation d’écrans avec
interfaces exclusivement numériques (p.ex. DVI), n’est pas possible.
• Pour le raccordement aux cartes graphiques avec connecteur DVI, un adaptateur VGA-DVI
correspondant est requis (non fourni). L’exploitation effectuée à travers un port DVI, en com-
binaison avec un adaptateur VGA-DVI, exige qu’un signal d’écran analogique soit également
disponible sur le port DVI de la carte graphique.
• 3 options différentes sont proposées pour la commutation entre les deux ordinateurs :
1. commutation via la touche de la télécommande filaire
2. commutation en appuyant deux fois brièvement sur la touche « Scroll Lock » du clavier du PC
3. commutation via le logiciel (Windows XP ou version ultérieure requis)
• Si l’un des ordinateurs est éteint, la commutation vers ce dernier est impossible.
• Ne pas utiliser de rallonge entre les prises/connecteurs du câble KVM et les ordinateurs ou
clavier/ souris USB, car cela pourrait causer des dysfonctionnements. En outre, la qualité
d’image de l’écran VGA connecté se détériore lorsque des câbles VGA sont utilisés.
• Utiliser un port USB sur la carte mère pour raccorder les connecteurs USB (1) et (5). Si vous
utilisez un concentrateur USB ou le port USB d’une carte enfichable, il peut arriver que la
commutation soit impossible.
Élimination
Il convient de procéder à l’élimination du produit au terme de sa durée de vie, con-
formément aux prescriptions légales en vigueur.
Ce mode d'emploi est une publication de la société Conrad Electronic SE, Klaus-Conrad-Str. 1,
D-92240 Hirschau (www.conrad.com).
Tous droits réservés, y compris de traduction. Toute reproduction, quelle qu'elle soit (p. ex. photoco-
pie, microfilm, saisie dans des installations de traitement de données) nécessite une autorisation écri-
te de l'éditeur. Il est interdit de le réimprimer, même par extraits.
Ce mode d'emploi correspond au niveau technique du moment de la mise sous presse. Sous réserve
de modifications techniques et de l'équipement.
© Copyright 2011 by Conrad Electronic SE.

2-poorts USB-KVM-kabel ‘Nano’ Versie 03/11
Bestnr. 97 54 64 °
Beoogd gebruik
Het product dient ervoor, twee naast elkaar staande computers via een USB-toetsenbord, een
USB-muis en een VGA-monitor te kunnen bedienen.
Het product voldoet aan de nationale en Europese wettelijke regels. Alle voorkomende bedrijfs-
namen en productaanduidingen zijn handelsmerken van de betreffende eigenaren. Alle rechten
voorbehouden.
Omvang van de levering
• KVM-kabel
• CD met software
• Gebruiksaanwijzing
Kenmerken
• Monitor met analoge VGA-aansluiting insteekbaar
• Aansluiting van een willekeurig USB-toetsenbord en USB-muis
• Omschakelen tussen de beide computers via kabelafstandsbediening, pc-toetsenbord of soft-
ware
Veiligheidsaanwijzingen
Bij schade, veroorzaakt door het niet in acht nemen van deze gebruiksaan-
wijzing, vervalt het recht op vrijwaring/garantie! Wij aanvaarden geen aanspra-
kelijkheid voor gevolgschade!
Voor materiële schade of persoonlijk letsel, veroorzaakt door ondeskundig
gebruik of het niet in acht nemen van de veiligheidsaanwijzingen, zijn wij niet
aansprakelijk. In dergelijke gevallen vervalt de garantie.
• Om redenen van veiligheid en toelating (CE) is het eigenmachtig ombouwen en/of
wijzigen van het product niet toegestaan.
• Het product is uitsluitend bestemd voor gebruik in gesloten, droge ruimtes bin-
nenshuis; het mag niet vochtig of nat worden! Niet blootstellen aan extreme tem-
peraturen of direct zonlicht.
• Het product is geen speelgoed, buiten bereik van kinderen houden.
• Laat verpakkingsmateriaal niet achteloos rondslingeren. Dit kan voor kinderen
gevaarlijk speelgoed zijn.
• Behandel het product voorzichtig, door scherpe kanten worden de kabels bescha-
digd. Knik de kabels niet dubbel.
Beschrijving van de aansluitingen/bedieningselementen
1 USB-steker, op een USB-poort van pc 2 aansluiten
2 VGA-steker, op VGA-uitgang van de grafische kaart van pc 2 aansluiten
3 USB-aansluiting, voor de aansluiting van het USB-toetsenbord (of USB-muis)
4 USB-aansluiting, voor de aansluiting van de USB-muis (of USB-toetsenbord)
5 USB-steker, op een USB-poort van pc 1 aansluiten
6 VGA-steker, op VGA-uitgang van de grafische kaart van pc 1 aansluiten
7 VGA-aansluiting, voor de aansluiting van de VGA-monitor
8 Kabelafstandsbediening met toets voor het omschakelen tussen pc1 en pc2
PC 1
PC 2
1
2
3
4
5
6
7
8
GEBRUIKSAANWIJZING www.conrad.com Aansluiten
• Schakel de beide computers en de monitor uit.
• Sluit de VGA-steker (6) en de USB-steker (5) aan op de eerste computer (pc 1).
• Sluit de VGA-steker (2) en de USB-steker (1) aan op de tweede computer (pc 2).
• Sluit een USB-toetsenbord en een USB-muis aan op de USB-aansluitingen (3) en (4). Het is
niet belangrijk op welke van de beide USB-aansluitingen het toetsenbord resp. de muis wordt
aangesloten.
• Sluit een VGA-monitor aan op de VGA-monitoraansluiting (7) van de KVM-kabel.
• Zet de kabelafstandsbediening (8) in de nabijheid van het toetsenbord.
Ingebruikname
• Zet de beide computers aan.
• Bij het indrukken van de toets van de kabelafstandsbediening (8) kan nu tussen de beide com-
puters heen en weer worden geschakeld. U ziet telkens het monitorbeeld van de gekozen
computer, het toetsenbord en muis zijn telkens op de juist gekozen computer actief. De LED
in de behuizing van de kabelafstandsbediening wisselt van kleur, om het omschakelproces
weer te geven (pc 1 = oranje, pc 2 = groen).
• Het omschakelproces kan ook via het toetsenbord worden geactiveerd. Druk daarvoor twee
keer kort op de “Scroll Lock”-toets op het toetsenbord (in zoverre aanwezig op uw toetsenbord).
• Indien gewenst, kunnen de pc’ s ook via de software worden omgeschakeld, zie de volgende
alinea.
Software-installatie en bediening
☞De software is alleen geschikt voor Windows (vanaf Windows XP).
Als u andere besturingssystemen gebruikt, schakel dan of met de toets op de kabel-
afstanstandsbediening of via het twee keer kort indrukken van de “Scroll Lock”-toets
van het pc-toetsenbord tussen de computers.
• Plaats de meegeleverde CD in het betreffende station van uw computer. Wanneer het installa-
tieprogramma niet automatisch opstart, dient u het programma „Setup.exe“ in de hoofddirectory
van de CD te starten.
Volg alle aanwijzingen van de software.
☞Installeer de software op de beide computers. Let er op, dat er eventueel administrator-
rechten vereist zijn, om de software te kunnen installeren.
• In de menubalk resp. op de desktop verschijnt een nieuw pictogram, via welke het omschakel-
proces kan worden uitgevoerd.
Tips & aanwijzingen
• De KVM-kabel kan nu analoge VGA-monitorsignalen omschakelen. Voor het gebruik is daa-
rom alleen een monitor geschikt met een analoge VGA-aansluiting. Het gebruik van monito-
ren met uitsluitend digitale interfaces (bijv. DVI) is niet mogelijk.
• Voor het aansluiten op grafische kaarten met DVI-aansluiting is een overeenkomstige VGA-
DVI-adapter noodzakelijk (niet in de levering inbegrepen). Het gebruik op een DVI-aansluiting
in combinatie met een VGA-DVI-adapter vereist, dat er ook een analoog motorsignaal aanwe-
zig is op de DVI-aansluiting van de grafische kaart.
• Er bestaan 3 verschillende mogelijkheden voor het omschakelen tussen de beide computers:
1. Omschakelen door de toets op de kabelafstandsbediening in te drukken
2. Omschakelen door twee keer op de “Scroll Lock”-toets van het pc-toetsenbord te drukken.
3. Omschakelen via de software (Windows XP of hoger vereist)
• Mocht een van de computers zijn uitgeschakeld, kan er niet naar deze computer worden
omgeschakeld.
• Gebruik geen verlengkabel tussen de aansluitingen/stekers van de KVM-kabel en de compu-
ters of het/de USB-toetsenbord/-muis, omdat dit tot functiestoringen kan leiden. Bovendien
gaat de beeldkwaliteit op de VGA-monitor achteruit bij het gebruik van VGA-kabels.
• Gebruik voor het aansluiten van de USB-stekers (1) en (5) een USB-poort van het moeder-
bord. Indien een USB-hub of een USB-poort van een insteekkaart wordt gebruikt, dan kan
vaak niet worden omgeschakeld.
Afvoer
Voer het product aan het einde van zijn levensduur af conform de geldende wette-
lijke bepalingen.
Deze gebruiksaanwijzing is een publicatie van de firma Conrad Electronic SE, Klaus-Conrad-Str. 1,
D-92240 Hirschau (www.conrad.com).
Alle rechten, vertaling inbegrepen, voorbehouden. Reproducties van welke aard dan ook, bijvoorbeeld
fotokopie, microverfilming of de registratie in elektronische gegevensverwerkingsapparatuur, vereisen
de schriftelijke toestemming van de uitgever. Nadruk, ook van uittreksels, verboden.
Deze gebruiksaanwijzing voldoet aan de technische stand bij het in druk bezorgen. Wijziging van
techniek en uitrusting voorbehouden.
© Copyright 2011 by Conrad Electronic SE. V2_0311_01/AB
Table of contents
Languages:
Other Conrad Cables And Connectors manuals

Conrad
Conrad j5create User manual

Conrad
Conrad 97 55 31 User manual

Conrad
Conrad 98 61 68 15 User manual

Conrad
Conrad 97 65 34 User manual

Conrad
Conrad 52 70 19 User manual

Conrad
Conrad Donut User manual

Conrad
Conrad 55 29 21 User manual

Conrad
Conrad 91 79 12 User manual

Conrad
Conrad 1278722 User manual

Conrad
Conrad 97 25 14 User manual

Conrad
Conrad 97 51 66 User manual

Conrad
Conrad 98 92 02 User manual

Conrad
Conrad 976177 User manual

Conrad
Conrad RF-2928570 User manual

Conrad
Conrad 98 99 49 User manual

Conrad
Conrad 97 56 04 User manual

Conrad
Conrad 97 54 63 User manual

Conrad
Conrad 97 49 66 User manual

Conrad
Conrad 90 30 04 User manual

Conrad
Conrad 97 49 70 User manual