Conrad 86 04 27 User manual

Version 02/12
Höhenmesser mit Wettervorhersage Seite 4-16
Altimeter with Weather Forecast Page 17-28
Altimètre et prévision météo Page 29-41
Hoogtemeter met weersvoorspelling Pagina 42-54
Best.-Nr. / Item-No.: 86 04 27
BEDIENUNGSANLEITUNG OPERATING INSTRUCTIONS
MODE D’EMPLOI GEBRUIKSAANWIJZING
Diese Bedienungsanleitung gehört zu diesem Produkt. Sie enthält wichtige
Hinweise zur Inbetriebnahme und Handhabung. Achten Sie hierauf, auch wenn
Sie dieses Produkt an Dritte weitergeben.
Heben Sie deshalb diese Bedienungsanleitung zum Nachlesen auf!
Eine Auistung der Inhalte nden Sie in dem Inhaltsverzeichnis mit Angabe der
entsprechenden Seitenzahlen auf Seite 4.
These operating instructions belong with this product. They contain important
information for putting it into service and operating it. This should be noted also
when this product is passed on to a third party.
Therefore look after these operating instructions for future reference!
A list of contents with the corresponding page numbers can be found in the index
on page 17.
Ces instructions d’utilisation font partie de ce produit. On y trouvera des
informations importantes pour la mise en service et l’utilisation. Il faut respecter
ces instructions, même si ce produit est transmis à tierce personne.
Conservez ces instructions d’utilisation en guise de référence.
Vous trouverez une liste du contenu dans la table des matières avec indication
des pages correspondantes à la page 29.
Deze gebruiksaanwijzing hoort bij dit product. Er staan belangrijke aanwijzingen
in betreffende de ingebruikname en gebruik, ook als u dit product doorgeeft aan
derden.
Bewaar deze handleiding zorgvuldig, zodat u deze later nog eens kunt nalezen!
U vindt een opsomming van de inhoud in de inhoudsopgave met aanduiding van
de paginanummers op pagina 42.

3
(15)
(16)
(19)
(17)
(18)
(20)

4
5
Einführung1.
Sehr geehrte Kundin, sehr geehrter Kunde,
wir bedanken uns für den Kauf dieses Produkts. Dieses Produkt erfüllt die gesetzlichen nationalen
und europäischen Anforderungen. Um diesen Zustand zu erhalten und einen gefahrlosen
Betrieb sicherzustellen, müssen Sie als Anwender diese Bedienungsanleitung beachten! Diese
Bedienungsanleitung gehört zu diesem Produkt. Sie enthält wichtige Hinweise zur Inbetriebnahme
und Handhabung. Achten Sie hierauf, auch wenn Sie dieses Produkt an Dritte weitergeben. Heben
Sie deshalb diese Bedienungsanleitung zum Nachlesen auf!
Alle enthaltenen Firmennamen und Produktbezeichnungen sind Warenzeichen der jeweiligen Inhaber.
Alle Rechte vorbehalten.
Tel. 0 180/5 31 21 11 Fax 0 180/5 31 21 10
e-mail: Bitte verwenden Sie für Ihre Anfrage unser Formular im Internet. www.conrad.de unter
der Rubrik Kontakt
www.conrad.at bzw. www.business.conrad.at
Tel. 0848/80 12 88 Fax 0848/80 12 89
Mo. – Fr. 8.00 bis 12.00 Uhr, 13.00 bis 17.00 Uhr
Inhaltsverzeichnis
Seite
1.Einführung ................................................................................................................................. 5
2.Bestimmungsgemäße Verwendung........................................................................................... 6
3.Lieferumfang.............................................................................................................................. 6
4.Sicherheitshinweise................................................................................................................... 6
5.Batterien einsetzen / wechseln.................................................................................................. 8
6.Inbetriebnahme.......................................................................................................................... 8
7.Hauptfunktionen ........................................................................................................................ 9
8.Uhr-Modus............................................................................................................................... 10
9.Barometer-Modus.................................................................................................................... 12
10.Höhenmesser-Modus ............................................................................................................ 13
11.Andere Funktionen ................................................................................................................ 14
12.Entsorgung ............................................................................................................................ 15
13.Technische Daten.................................................................................................................. 16

6
7
Setzen Sie das Produkt keiner mechanischen Beanspruchung aus.•
Wenn kein sicherer Betrieb mehr möglich ist, nehmen Sie das Produkt außer Betrieb und•
schützen Sie es vor unbeabsichtigter Verwendung. Der sichere Betrieb ist nicht mehr
gewährleistet, wenn das Produkt:
sichtbare Schäden aufweist,-
nicht mehr ordnungsgemäß funktioniert,-
über einen längeren Zeitraum unter ungünstigen Umgebungsbedingungen gelagert wurde-
oder
erheblichen Transportbelastungen ausgesetzt wurde.-
Gehen Sie vorsichtig mit dem Produkt um. Durch Stöße, Schläge oder dem Fall aus bereits •
geringer Höhe wird es beschädigt.
Beachten Sie auch die Sicherheitshinweise und Bedienungsanleitungen der übrigen Geräte,•
an die das Produkt angeschlossen wird.
Batterien / Akkus
Achten Sie beim Einlegen der Batterien / Akkus auf die richtige Polung.•
Entfernen Sie die Batterien / Akkus, wenn Sie das Gerät längere Zeit nicht verwenden, um •
Beschädigungen durch Auslaufen zu vermeiden. Auslaufende oder beschädigte Batterien
/ Akkus können bei Hautkontakt Säureverätzungen hervorrufen. Beim Umgang mit
beschädigten Batterien / Akkus sollten Sie daher Schutzhandschuhe tragen.
Bewahren Sie Batterien / Akkus außerhalb der Reichweite von Kindern auf. Lassen Sie •
Batterien / Akkus nicht frei herumliegen, da diese von Kindern oder Haustieren verschluckt
werden könnten.
Alle Batterien / Akkus sollten zum gleichen Zeitpunkt ersetzt werden. Das Mischen von alten •
und neuen Batterien / Akkus im Gerät kann zum Auslaufen der Batterien / Akkus und zur
Beschädigung des Geräts führen.
Nehmen Sie keine Batterien / Akkus auseinander, schließen Sie sie nicht kurz und werfen Sie•
sie nicht ins Feuer. Versuchen Sie niemals, nicht auadbare Batterien aufzuladen. Es besteht
Explosionsgefahr!
Sonstiges
Wenden Sie sich an eine Fachkraft, wenn Sie Zweifel über die Arbeitsweise, die Sicherheit•
oder den Anschluss des Produktes haben.
Lassen Sie Wartungs-, Anpassungs- und Reparaturarbeiten ausschließlich von einem •
Fachmann bzw. einer Fachwerkstatt durchführen.
Sollten Sie noch Fragen haben, die in dieser Bedienungsanleitung nicht beantwortet werden,•
wenden Sie sich an unseren technischen Kundendienst oder an andere Fachleute.
Bestimmungsgemäße Verwendung2.
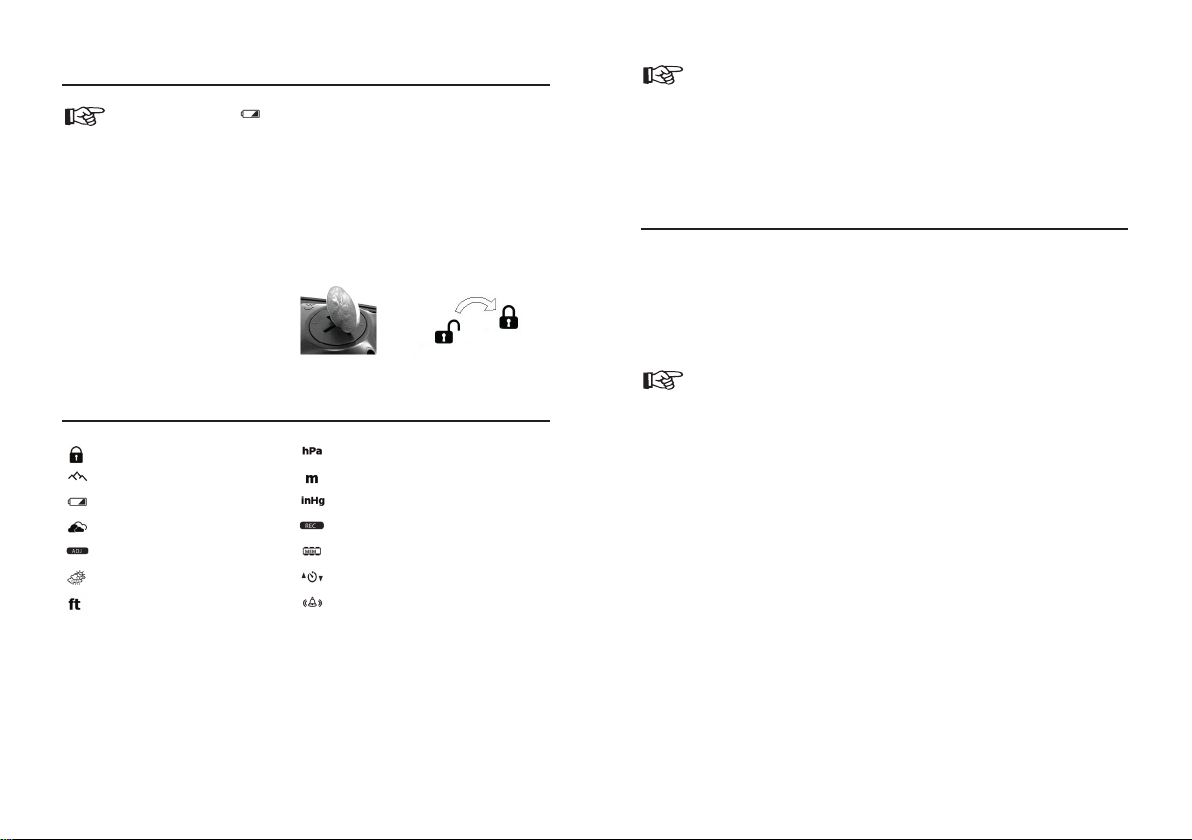
Das Produkt ist dazu bestimmt Höhe, Luftdruck und die Wettervorhersage anzugeben
und eignet sich dadurch für Outdooraktivitäten. Außerdem verfügt das Produkt über eine
Taschenlampenfunktion, eine Uhr mit Datum, Stoppuhr sowie Wecker und kann über den
Karabiner immer sicher verstaut werden. Die Aufnahmefunktion des Produktes zeichnet
in wählbaren Zeitintervallen die Höhenwerte auf und erlaubt die Speicherung und spätere
Wiedergabe der Daten.
Aus Sicherheits- und Zulassungsgründen (CE) ist das eigenmächtige Umbauen und/oder
Verändern des Produktes nicht gestattet. Eine andere Verwendung als oben beschrieben ist nicht
erlaubt und kann zur Beschädigung des Produkts führen. Darüber hinaus ist dies mit Gefahren,
wie z. B. Kurzschluss, Brand, Stromschlag usw. verbunden. Lesen Sie die Bedienungsanleitung
genau durch und bewahren Sie diese für späteres Nachschlagen auf.
Lieferumfang3.
Höhenmesser•
2 x Knopfzelle Typ CR2032•
Bedienungsanleitung•
Sicherheitshinweise4.
Bei Schäden, die durch Nichtbeachten dieser Bedienungsanleitung
verursacht werden, erlischt die Gewährleistung/Garantie! Für Folgeschäden
übernehmen wir keine Haftung!
Bei Sach- oder Personenschäden, die durch unsachgemäße Handhabung
oder Nichtbeachten der Sicherheitshinweise verursacht werden, übernehmen
wir keine Haftung. In solchen Fällen erlischt die Gewährleistung/Garantie.
Wichtige Hinweise, die unbedingt zu beachten sind, werden in dieser
Bedienungsanleitung durch das Ausrufezeichen gekennzeichnet.
Personen / Produkt
Der Karabiner des Produktes ist nicht zum Klettern geeignet.•
Setzen Sie das Produkt keinen extremen und plötzlichen Temperaturschwankungen aus, da•
dies zu einem schnellen Wechsel der Anzeigeangaben und damit zur Beeinträchtigung der
Genauigkeit der Messwerte führt.
Der Hersteller oder Lieferant übernimmt keine Verantwortung für inkorrekte Anzeigen oder die•
Folgen, die eine inkorrekte Anzeige nach sich ziehen könnte.
Das Produkt ist kein Spielzeug. Halten Sie es von Kindern und Haustieren fern.•
Lassen Sie das Verpackungsmaterial nicht achtlos liegen. Dieses könnte für Kinder zu einem•
gefährlichen Spielzeug werden.
Schützen Sie das Produkt vor extremen Temperaturen, direktem Sonnenlicht, starken •
Erschütterungen, hoher Feuchtigkeit, Nässe, brennbaren Gasen, Dämpfen und
Lösungsmitteln.

8
9
Die Tasten sind mehrfach belegt und haben, je nachdem welche Einstellung sie
gerade vornehmen, andere Funktionen.
Drücken Sie die Tasten einmal kurz, um sie zu betätigen. Bei bestimmten
Einstellungen ist es auch notwenig, die Taste nach dem Drücken zu halten. Es
dauert dann etwa 2 Sekunden, bis die gewünschte Aktion eintritt.
Durch Drücken und Halten der Hoch-/ Runter-Tasten (15, 16) während einer
Zahleneinstellung können Sie das Umstellen der Zahlen beschleunigen.
Hauptfunktionen7.
Uhr-Modus
Die Funktionen Uhr, Datum, Stoppuhr und Wecker sind sowohl im Höhenmesser-, als auch
im Barometer-Modus verfügbar. Umstellen lassen sich Uhr und Datum allerdings nur im
Barometermodus.
Durch Drücken der Mode-Taste (17) können Sie zwischen den Funktionen Uhr, Datum, Stoppuhr
und Wecker wechseln.
Wenn Sie zwischen Höhenmesser- und Barometer-Modus mit den Hoch-/Runter-
Tasten wechseln, oder eine Funktion aus den beiden Modi nutzen wollen, stellen
vorher sicher, dass im Uhrmodus die Uhr angezeigt wird.
Mit der Mode-Taste (17) können Sie zur Uhr umschalten.
Höhenmesser- und Barometer-Modus
Der Barometer-Modus zeigt den Luftdruck, die Temperatur und die Wettervorhersage an.
Der Höhenmesser-Modus zeigt die Höhenlage an und die Temperatur. In diesem Modus sind
auch die Funktionen der Höhenmessung mit Referenz und die Aufnahme und Wiedergabe von
Höhenmesswerten verfügbar.
Durch Drücken der Hoch-/ Runter-Tasten (15, 16) können Sie zwischen Barometer- und
Höhenmesser-Modus wechseln. Der Höhenmesser-Modus wird durch die Hoch-Taste (15)
aktiviert, der Barometer-Modus durch die Runter-Taste (16) Stellen Sie vor dem Umschalten
sicher, dass im Uhrmodus die Uhr angezeigt wird.
Batterien einsetzen / wechseln5.
Sobald das Symbol erscheint, wechseln Sie so schnell wie möglich die
Batterien.
Entsperren Sie mit Hilfe einer Münze das Batteriefach auf der Rückseite des Produktes.1.
Drehen Sie den Batteriefachdeckel gegen den Uhrzeigersinn auf und entfernen sie ihn.
Legen Sie die Batterien mit dem Pluspol nach außen ein und schließen Sie das Batteriefach2.
wieder.
Sperren Sie das Batteriefach mit Hilfe einer Münze. Drehen Sie den Batteriefachdeckel mit3.
dem Uhrzeigersinn zu.
Beachten Sie die Symbole auf dem
Gehäuse.
Inbetriebnahme6.
Display-Übersicht
(1) Tastensperre an (8) Einheit Druck: Hecto-Pascal
(2) Höhenmesser-Modus (9) Einheit Höhe: Meter
(3) Akku schwach (10) Einheit Druck: Zoll Quecksilber
(4) Barometer-Modus (11) Höhenmesser Aufnahme
(5) Höhenmessung mit Referenz (12) Höhenmesser Wiedergabe
(6) Wettervorhersage (13) Stoppuhr
(7) Einheit Höhe: Fuß (14) Wecker
Tasten-Übersicht
(15) Hoch-Taste (18) Set-Taste
(16) Runter-Taste (19) Taschenlampe
(17) Mode-Taste (20) Hintergrundbeleuchtung

10
11
Um die Aufwärtszählung zu starten, drücken Sie die Hoch-Taste (15). Das blinkende Symbol2.
zeigt an, dass die Stoppuhr läuft. Pausieren und starten Sie die Aufwärtszählung erneut
mit der Hoch-Taste (15).
Um die Stoppuhr wieder auf Null zu setzen, drücken und halten Sie die Runter-Taste (16).3.
Abwärtszähler:
Drücken Sie die Mode-Taste (17) bis Sie die Stoppuhr erreicht haben.1.
Um die Zeit einzustellen, drücken und halten Sie die Set-Taste (18). Die Sekundenstelle2.
der Stoppuhr beginnt zu blinken. Stellen Sie die gewünschte Sekundenzahl mit den Hoch-/
Runter-Tasten (15, 16) ein.
Drücken Sie die Set-Taste (18). Sie gelangen zur Minuteneinstellung und danach zur3.
Stundeneinstellung.
Wenn Sie die Zeit eingestellt haben speichern Sie die Einstellung mit der Mode-Taste (17).4.
Um die Abwärtszählung zu starten, drücken Sie die Hoch-Taste (15). Das blinkende Symbol5.
zeigt an, dass die Stoppuhr läuft. Pausieren und starten Sie die Abwärtszählung erneut
mit der Hoch-Taste (15).
Wenn die Zählung beendet ist, erklingt ein Signalton. Die Stoppuhr ist danach automatisch6.
wieder auf Ihre vorgegebene Zeit eingestellt.
Sie können die Zählung vorzeitig beenden, indem Sie sie mit der Hoch-Taste (15) pausieren. 7.
Drücken und halten Sie die Runter-Taste (16), um die Stoppuhr auf Null zurückzusetzen.
Wecker
Der Wecker kann sowohl im Höhenmesser-Modus, als auch im Barometer-Modus
eingestellt werden.
Drücken Sie die Mode-Taste (17) bis Sie den Wecker erreicht haben.1.
Um den Wecker ein- oder auszuschalten, drücken Sie eine der Hoch-/ Runter-Tasten (15,2.
16).
Um die Weckzeit umzustellen, drücken und halten Sie die Set-Taste (18). Die Minutenstelle3.
der Weckzeit blinkt. Stellen Sie die Minuten mit den Hoch-/ Runtertasten (15, 16) ein.
Drücken Sie die Set-Taste (18). Sie gelangen zur Stundeneinstellung. Speichern Sie die4.
Einstellungen, indem Sie die Mode-Taste (17) drücken.
Der Wecker ist nach der Zeiteinstellung automatisch eingeschaltet. Das Symbol5. zeigt
an, dass der Wecker eingeschaltet ist. Um den Wecker auszuschalten, drücken Sie eine der
Hoch-/ Runter-Tasten (15, 16).
Uhr-Modus8.
Datum / Uhrzeit einstellen
Uhr und Datum können nur im Barometer-Modus eingestellt werden. Sie können
die Einstellung mit dem Drücken der Mode-Taste (17) beenden.
Während der Einstellung der Uhrzeit stellen Sie auch die Einheiten für Temperatur,
Druck und Höhe ein.
Wählen Sie die Uhr im Uhr-Modus mit der Mode-Taste (17) und den Barometer-Modus mit1.
der Runter-Taste (16).
Drücken und halten Sie die Set-Taste (18), bis die Datumeinstellung erscheint und eine2.
Stelle aufblinkt. Stellen Sie mit den Hoch-/ Runter-Tasten (15, 16) die Jahreszahl ein. Durch
einen erneuten Druck auf die Set-Taste (18) wechseln Sie zur Monatseinstellung, danach zur
Einstellung der Tage.
Drücken Sie die Set-Taste (18) und die Symbole für Monat und Tag blinken. Mit den Hoch-/3.
Runtertasten (15, 16) können Sie die Reihenfolge von Tag und Monat wählen.
Drücken Sie die Set-Taste (18), um zur Uhreinstellung zu gelangen. Die Uhr wird angezeigt4.
und die Sekundenstelle blinkt. Durch Drücken der Hoch- /Runter-Tasten (15, 16) setzen Sie
die Anzeige auf Null zurück.
Drücken Sie die Set-Taste (18). Sie gelangen zur Minuteneinstellung und danach zur5.
Stundeneinstellung.
Drücken Sie die Set-Taste (18) und wählen Sie mit den Hoch-/ Runter-Tasten (15, 16), ob Sie6.
die Anzeige im 24 Stunden oder 12 Stunden-System anzeigen wollen.
Drücken Sie die Set-Taste (18). Die Anzeige für die Temperatureinheit auf dem Display blinkt.7.
Sie können nun mit den Hoch- /Runter-Tasten ° C oder ° F einstellen.
Drücken Sie die Set-Taste (18). Die Anzeige für die Druckeinheit auf dem Display blinkt. Sie8.
können nun mit den Hoch- /Runter-Tasten hPa oder inHg einstellen.
Wenn Sie Korrekturen vornehmen wollen, drücken Sie so oft die Set-Taste (18), bis Sie die 9.
gewünschte Stelle erreicht haben und nehmen Sie die Einstellungen mit den Hoch-/ Runter-
Tasten (15, 16) vor.
Wenn Sie Datum, Zeit und Einheiten richtig eingestellt haben, beenden und speichern Sie10.
die Einstellungen mit der Mode-Taste (17).
Stoppuhr
Die Stoppuhr kann sowohl im Höhenmesser-Modus, als auch im Barometer-Modus
eingestellt werden.
Die Stoppuhr kann hoch- oder runterzählen.
Aufwärtszähler:
Drücken Sie die Mode-Taste (17) bis Sie die Stoppuhr erreicht haben.1.

12
13
Höhenmesser-Modus10.
Wenn Sie zwischen Höhenmesser- und Barometer-Modus mit den Hoch-/ Runter-
Tasten wechseln, oder eine Funktion aus den beiden Modi nutzen wollen, stellen
vorher sicher, dass im Uhr-Modus die Uhr angezeigt wird.
Mit der Mode-Taste (17) können Sie zur Uhr umschalten.
Der Höhenmesser bestimmt die Höhe in Metern oder Fuß.
Bitte beachten Sie:
Die Berechnung der Höhenlage erfolgt anhand der Messung des Luftdrucks. Da sich•
der Luftdruck je nach Wetterlage ändert, verändert sich damit auch die Anzeige des
Höhenwertes.
Geben Sie deshalb vor jedem Einsatz des Höhenmesser-Modus (z.B. für eine Wanderung) •
eine Referenz in Form einer bekannten Höhenlage an.
Die Messung der Höhenlage in einem Flugzeug mit Druckkabine ist nicht möglich.•
Höhenmesser einstellen
Drücken und halten Sie die Set-Taste (18).1.
Sie können nun wählen, ob sie mit oder ohne Referenz die Höhe bestimmen wollen. Drücken2.
Sie die Hoch-/ Runter-Tasten, um die Funktion ein (on) oder aus (off) zu schalten.
Wenn Sie die Referenz einschalten, geben sie mit Hilfe der Hoch-/ Runter-Tasten (15, 16)3.
den Wert ein. Das Symbol erscheint im Display und zeigt an, dass mit Referenzhöhe
gemessen wird. Sollte die gewünschte Einheit noch nicht eingestellt sein, drücken Sie die
Set-Taste (18) und kehren Sie später zu diesem Menüpunkt zurück. Wenn Sie die Referenz
ausschalten, drücken Sie ebenfalls danach die Set-Taste (18).
Stellen Sie als nächstes das Aktualisierungsintervall für die Aufnahme ein. Mit den Hoch-/ 4.
Runter-Tasten (15, 16) können Sie zwischen 1, 10, 30 und 60 Minuten wählen.
Drücken Sie die Set-Taste (18). Die Anzeige der Einheit für die Höhe blinkt. Stellen Sie die5.
gewünschte Einheit mit den Hoch-/ Runter-Tasten (15, 16) ein.
Drücken Sie die Mode-Taste (17), um die Einstellungen zu speichern, oder drücken Sie6.
erneut zweimal die Set-Taste (18), um zu der Referenzeinstellung zurückzukehren, bevor
Sie speichern.
Aufnahmen und Wiedergabe von Höhenwerten
Das Zeitintervall für die Aufnahme stellen Sie in den Höhenmessereinstellungen
ein. Siehe Kapitel 10.1.
Die gestoppte Aufnahme kann nicht fortgeführt werden. Um eine neue Aufnahme zu
starten muss erst der Speicher geleert werden.
Sie können die gespeicherten Daten auch während der Aufnahme wiedergeben.
Barometer-Modus9.
Die Einheiten für Druck und Höhe stellen Sie über die Datum-/ Uhrzeiteinstellung
ein. Siehe Kapitel 8.1.
Wenn Sie zwischen Höhenmesser- und Barometer-Modus mit den Hoch-/Runter-
Tasten wechseln, oder eine Funktion aus den beiden Modi nutzen wollen, stellen
vorher sicher, dass im Uhr-Modus die Uhr angezeigt wird.
Mit der Mode-Taste (17) können Sie zur Uhr umschalten.
Das Barometer misst den Luftdruck und aktualisiert sich alle 20 Minuten. Es zeigt den Luftdruck
in Hecto-Pascal, bzw. Zoll Quecksilber an.
Wettervorhersage
Je nach gemessenen Luftdruck werden folgende Symbole für die Wettervorhersage angezeigt:
sonnig leicht bewölkt bewölkt Niederschlag
Bitte beachten Sie:
Die Anzeige stellt nicht die momentane Wetterlage dar, sondern es handelt sich um eine•
Vorhersage für die nächsten 12 bis 24 Stunden.
Wird in der Nacht „Sonnig“ angezeigt, bedeutet dies eine sternenklare Nacht.•
Die Berechnung der Wettervorhersage nur auf Grundlage der Beobachtung des •
Luftdruckverlaufs ergibt nur eine maximale Genauigkeit von etwa 70%.
Das tatsächliche Wetter am nächsten Tag kann deshalb komplett anders sein.•
Da der gemessene Luftdruck nur für ein Gebiet mit einem Durchmesser von etwa 50 km•
gilt, kann sich das Wetter auch schnell ändern. Dies gilt vor allem in Gebirgs- oder
Hochgebirgslagen.
Verlassen Sie sich deshalb nicht auf die Wettervorhersage des Höhenmessers, sondern •
informieren Sie sich vor Ort, wenn Sie z.B. eine Bergwanderung machen wollen.
Die Aktualisierung der Symbole der Wettervorhersage erfolgt im 20-Minuten-Rhythmus. •
Wechseln die Anzeigesymbole nicht, dann hat sich entweder der Luftdruck nicht verändert
oder die Veränderung ist so langsam eingetreten, dass sie von dem Höhenmesser nicht
registriert werden konnte.

14
15
Tastensperre
Die Tastensperre lässt sich nur im Barometer-Modus aktivieren, während im Uhr-
Modus die Uhr angezeigt wird.
Um die Tastensperre zu aktivieren, drücken und halten Sie gleichzeitig die Hoch-Taste (15) 1.
und die Runter-Taste (16).
Das Symbol2. erscheint im Display.
Um die Tastensperre zu deaktivieren, drücken und halten Sie gleichzeitig die Hoch-Taste (15) 3.
und die Runter-Taste (16).
Entsorgung12.
Produkt
Elektronische Geräte sind Wertstoffe und gehören nicht in den Hausmüll.
Entsorgen Sie das Produkt am Ende seiner Lebensdauer gemäß den geltenden
gesetzlichen Bestimmungen.
Entnehmen Sie evtl. eingelegte Batterien/Akkus und entsorgen Sie diese getrennt
vom Produkt.
Batterien / Akkus
Sie als Endverbraucher sind gesetzlich (Batterieverordnung) zur Rückgabe aller gebrauchten
Batterien/Akkus verpichtet; eine Entsorgung über den Hausmüll ist untersagt.
Schadstoffhaltige Batterien/Akkus sind mit dem nebenstehenden Symbol
gekennzeichnet, das auf das Verbot der Entsorgung über den Hausmüll hinweist.
Die Bezeichnungen für das ausschlaggebende Schwermetall sind: Cd=Cadmium,
Hg=Quecksilber, Pb=Blei (die Bezeichnung steht auf den Batterien/Akkus z.B. unter
dem links abgebildeten Mülltonnen-Symbol).
Ihre verbrauchten Batterien/Akkus können Sie unentgeltlich bei den Sammelstellen
Ihrer Gemeinde, unseren Filialen oder überall dort abgeben, wo Batterien/Akkus
verkauft werden.
Sie erfüllen damit die gesetzlichen Verpichtungen und leisten Ihren Beitrag zum Umweltschutz.
Um die Aufnahme zu starten, drücken und halten Sie die Hoch-Taste (15).1.
Das Symbol2. blinkt und zeigt an, dass aufgenommen wird.
Sie können die Aufnahme jederzeit stoppen, indem Sie in den Höhenmesser-Modus3.
zurückkehren und die Hoch-Taste (15) drücken und halten. Das Symbol zeigt an, dass
Daten gespeichert wurden. Bevor Sie eine neue Messung beginnen, müssen die Daten
gelöscht werden.
Die Aufnahme stoppt automatisch, wenn der Speicher voll ist. Das passiert nachdem 30 4.
Zeitintervalle vergangen sind und 30 Datensätze gespeichert wurden. Auf dem Display wird
die Botschaft FULL (voll) eingeblendet.
Um die gespeicherten Daten wiederzugeben, drücken Sie die Set-Taste (18). Das Symbol5.
erscheint. Anstelle der Temperatur wird nun die Nummer des Datensatzes angezeigt,
darüber der gespeicherte Höhenwert und darunter im automatische Wechsel das Datum und
die Uhrzeit der Aufnahme. Mit den Hoch-/ Runter-Tasten (15, 16) können Sie zwischen den
Datensätzen wechseln.
Um den Speicher zu leeren, drücken und halten Sie im während der Wiedergabe die Set-6.
Taste, bis die Nachricht CLR (leer) erscheint. Jetzt können Sie eine neue Aufnahme starten.
Beenden Sie die Wiedergabe, indem Sie die Set-Taste (18) drücken.7.
Andere Funktionen11.
Taschenlampe
Um die Taschenlampe einzuschalten, drücken Sie die Taschenlampe-Taste (19).1.
Um die Taschenlampe blinken zu lassen, drücken Sie die Taschenlampe-Taste (19) erneut.2.
Um die Taschenlampe auszuschalten, drücken Sie die Taschenlampe-Taste (19).3.
Hintergrundbeleuchtung
Um die Hintergrundbeleuchtung zu aktivieren, drücken Sie die Hintergrundbeleuchtung-Taste 1.
(20).
Das Display wird für 4 Sekunden beleuchtet, bevor sich die Hintergrundbeleuchtung 2.
automatisch abschaltet.
Thermometer
Die Einheit für die Temperatur stellen Sie über die Datum-/ Uhrzeiteinstellung ein.
Siehe Kapitel 8.1.
Das Thermometer misst die aktuelle Temperatur.

16
17
Table of Contents
Page
1.Introduction.............................................................................................................................. 18
2.Intended use............................................................................................................................ 19
3. Delivery content ...................................................................................................................... 19
4.Safety instructions ................................................................................................................... 19
5.Inserting / changing batteries .................................................................................................. 21
6.Operation................................................................................................................................. 21
7.Main functions ......................................................................................................................... 22
8.Clock mode.............................................................................................................................. 23
9.Barometer mode...................................................................................................................... 24
10.Altimeter mode ...................................................................................................................... 25
11.Other functions ...................................................................................................................... 26
12.Disposal................................................................................................................................. 27
13.Technical data........................................................................................................................ 28
Technische Daten13.
Spannungsversorgung: 2 x 3 V (Knopfzelle Typ CR2032)
Schutzart: IPX5
Messbereiche: -700 bis 8950 m (Höhenmesser) / 300 bis 1100 mbar/hPa
(Barometer) / -10 bis +60 ºC (Thermometer)
Genauigkeit: <5000 m: ±20 m ±66 ft / >5000 m: ±0,5 %(Höhenmesser) /
±1,5 mbar/hPa (Barometer) / ±1 ºC ±1,8 ºF (Thermometer)
Auösung: 1 m/ft (Höhenmesser) / 1 hPa 0,05 inHg (Barometer) /0,1 ºC/ºF
(Thermometer)
Abmessungen (L x B x H) : 65 x 22 x 115 mm
Gewicht: 75 g

18
19
Intended use2.
This product is designed to indicate the altitude and air pressure and provide a weather forecast,
thus making it an ideal companion for outdoor activities. The product also features a torch
function, a clock with date, stopwatch and alarm functions and can at all times be securely
attached using the carabiner. The recording function records altitudes in selectable intervals,
also allowing storage and later replay of the data.
For safety and approval purposes (CE), you must not rebuild and/or modify this product. If you
use the product for purposes other than those described above, the product may be damaged. In
addition, improper use can cause hazards such as short circuiting, re, electric shock etc. Read
the instructions carefully and keep them. Make this product available to third parties only together
with its operating instructions.
Delivery content3.
Altimeter•
2 x button cell battery type CR2032•
Operating instructions•
Safety instructions4.
Read the operating instructions carefully and especially observe the safety
information. If you do not follow the safety instructions and information
on proper handling in this manual, we assume no liability for any resulting
personal injury or damage to property. Such cases will invalidate the
warranty/guarantee.
Persons / Product
The product’s carabiner is not suitable for rock climbing.•
Do not subject the product to extreme and sudden temperature uctuations as this causes a •
rapid change of display information and therefore interferes with the precision of the data.
The manufacturer or supplier assumes no responsibility for the display of incorrect data or•
potential consequences resulting from an incorrect display.
The device is not a toy. Keep it out of the reach of children and pets.•
Do not leave packaging material lying around carelessly. These may become dangerous •
playing material for children.
Protect the product from extreme temperatures, direct sunlight, strong jolts, high humidity,•
moisture, ammable gases, vapours and solvents.
Do not place the product under any mechanical stress.•
If it is no longer possible to operate the product safely, take it out of operation and protect it•
from any accidental use. Safe operation can no longer be guaranteed if the product:
is visibly damaged, -
is no longer working properly,-
has been stored for extended periods in poor ambient conditions or-
Introduction1.
Dear Customer,
Thank you for purchasing this product. This product complies with the applicable National and
European specications. We kindly request the user to follow the operating instructions, to
preserve this condition and to ensure safe operation! These operating instructions relate to this
product. They contain important notices on commissioning and handling. Please take this into
consideration when you pass the product on to third parties. Please keep these instructions for
further reference!
All company names and product designations contained herein are trademarks of the respective
owners. All rights reserved.
For a fast response of your technical enquiries please use the e-mail address listed below.
Phone +49 9604 / 40 88 80
Fax +49 9604/40 88 48
Mon to Thurs 8.00am to 4.30pm, Fri 8.00am to 2.00pm

20
21
Inserting / changing batteries5.
Once the icon appears, replace the batteries as soon as possible.
Unlock the battery compartment on the rear side of the product using a coin. Open the battery1.
compartment cover by turning it counterclockwise and removing it.
Insert the batteries with the positive side facing outwards and close the battery compartment 2.
again.
Lock the battery compartment using a coin. Close the battery compartment cover by turning 3.
it clockwise.
Observe the icons on the housing.
Operation6.
Display – Overview
(1) Key lock on (8) Pressure unit: Hectopascal
(2) Altimeter mode (9) Altitude unit: Metres
(3) Battery low (10) Pressure unit: Inches of mercury
(4) Barometer mode (11) Altimeter recording
(5) Altimetry with reference (12) Altimeter playback
(6) Weather forecast (13) Stopwatch
(7) Altitude unit: Feet (14) Alarm clock
Keys – Overview
(15) Up key (18) Set key
(16) Down key (19) Torch
(17) Mode key (20) Background lighting
has been subjected to any serious transport-related stresses.-
Please handle the product carefully. Jolts, impacts or a fall even from a low height can damage •
the product.
Also observe the safety and operating instructions of any other devices which are connected •
to the product.
(Rechargeable) batteries
Correct polarity must be observed while inserting the (rechargeable) batteries.•
(Rechargeable) batteries should be removed from the device if it is not used for a long period •
of time to avoid damage through leaking. Leaking or damaged (rechargeable) batteries might
cause acid burns when in contact with skin, therefore use suitable protective gloves to handle
corrupted (rechargeable) batteries.
(Rechargeable) batteries must be kept out of reach of children. Do not leave (rechargeable) •
batteries lying around, as there is risk, that children or pets swallow them.
All (rechargeable) batteries should be replaced at the same time. Mixing old and new•
(rechargeable) batteries in the device can lead to (rechargeable) battery leakage and device
damage.
(Rechargeable) batteries must not be dismantled, short-circuited or thrown into re. Never •
recharge non-rechargeable batteries. There is a risk of explosion!
Miscellaneous
Consult an expert when in doubt about operation, safety or connection of the device.•
Maintenance, modications and repairs are to be performed exclusively by an expert or at a •
qualied shop.
If you have questions which remain unanswered by these operating instructions, contact our •
technical support service or other technical personnel.

22
23
Clock mode8.
Setting date and time
Time and date can only be set in Barometer mode. You can exit the setting by
pressing the Mode key (17).
When setting the time, you will also be able to set the units for temperature,
pressure and altitude.
In Clock mode, select the time using the Mode key (17) and the Barometer mode using the1.
Down key (16).
Press and hold the Set key (18) until the date setting appears and a digit starts ashing. Using 2.
the Up/Down keys (15, 16), set the year. By pressing the Set key (18) once more you can
switch to the month setting, followed by the day setting.
Press the Set key (18) and the icons for month and day will start ashing. Using the Up/Down 3.
keys (15, 16), you can select the sequence of how days and months are displayed.
Press the Set key (18) to enter the time setting. The time will be shown, with the seconds digits4.
ashing. By pressing the Up/Down keys (15, 16) you can reset the display to zero.
Press the Set key (18). Now you enter the minutes setting, followed by the hour setting.5.
Press the Set key (18) and, using the Up/Down keys (15, 16), set the time system either to6.
24-h or 12-h display.
Press the Set key (18). The indicator for the temperature unit will start ashing on the display. 7.
Using the Up/Down keys, you can now set the unit to ° C or ° F.
Press the Set key (18). The indicator for the pressure unit will start ashing on the display. 8.
Using the Up/Down keys, you can now set the unit to hPa or inHg.
If you want to modify settings, press the Set key (18) several times until you reach the required 9.
digit; you can then modify the settings by using the Up/Down keys (15, 16).
After correctly setting the date, time and units, exit the settings and save them using the 10.
Mode key (17).
Stopwatch
The stopwatch can be set both in Altimeter mode and in Barometer mode.
The stopwatch can count up or down.
Up-counter:
Press the Mode key (17) until you have reached the stopwatch function.1.
To start up-counting, press the Up key (15). The ashing icon 2. indicates that the stopwatch
is running. Pause and then restart the up-counting by pressing the Up key (15).
To reset the stopwatch to zero, press and hold the Down key (16).3.
Multiple functions are allocated to the keys; depending on the setting you are
modifying, their functions vary.
To press a key, press it briey once. With certain settings it will be necessary to hold
the key after pressing it down. It will then take approx. 2 seconds until the required
function is actioned.
You can accelerate the counting through numbers by pressing and holding the Up
and Down keys (15, 16) when setting values.
Main functions7.
Clock mode
The clock, date, stopwatch and alarm functions are available both in Altimeter and Barometer
mode. Clock and date can only be modied in Barometer mode, however.
By pressing the Mode key (17) you can toggle between clock, date, stopwatch and alarm
functions.
If you want to switch between Altimeter and Barometer mode using the Up/Down keys, or want to
use a function from one of these two modes, rst ensure that in Clock mode the time is shown.
You can switch to time or date using the Mode key (17).
If you want to switch between Altimeter and Barometer mode using the Up/Down
keys, or want to use a function from one of these two modes, rst ensure that in
Clock mode the time is shown.
You can switch to time using the Mode key (17).
Altimeter and Barometer Mode
The Barometer mode shows the air pressure, temperature and weather forecast.
The Altimeter mode shows the altitude and temperature. In this mode, the functions of altimetry
with a reference and recording and playback of altitude readings are available.
By pressing the Up/Down keys (15, 16) you can switch between Barometer and Altimeter mode.
The Altimeter mode can be activated by pressing the Up key (15), the Barometer mode by
pressing the Down key (16). Before switching, ensure that in Clock mode the time is shown.

24
25
Weather forecast
Depending on the air pressure reading, the following icons for weather forecast are shown:
sunny slightly cloudy overcast precipitation
Please note:
The display does not represent the current weather conditions but gives a forecast of the •
next 12 to 24 hours.
If “sunny” is displayed at night, this means a starlit night.•
The calculation of the weather forecast based solely on the barometric pressure results only•
in a maximum accuracy of about 70%.
This means that the actual weather can be totally different the following day.•
Since the measured barometric pressure is only valid for an area with a radius of about 50 •
km, the weather can also change quickly. This is especially the case in mountainous areas
and high mountain regions.
This is why you should not rely on the weather forecast of the altimeter but also get some•
information locally, for example when you want to hike in the mountains.
The icons indicating the weather forecast are refreshed every 20 minutes. If the display •
icons do not change, then either the air pressure did not change or the change occurred so
gradually that it cannot be registered by the altimeter.
Altimeter mode10.
If you want to switch between Altimeter and Barometer mode using the Up/Down
keys or want to use a function from one of these two modes, rst ensure that in
Clock mode the time is shown.
You can switch to the time using the Mode key (17).
The altimeter indicates the altitude in metres or feet.
Please note:
The altitude is calculated by measuring the air pressure. As the air pressure changes•
depending on the weather situation, this will also change the altitude reading.
Therefore, prior to any use of the Altimeter mode (e.g. for a hiking trip) enter the reference•
of a known altitude.
Measuring altitude inside the pressurised cabin of a plane is not possible.•
Setting the altimeter
Press and hold the Set key (18).1.
You can now select whether you want to measure altitude with or without using a reference.2.
Press the Up/Down keys to turn the function on or off.
Down-counter:
Press the Mode key (17) until you have reached the stopwatch function.1.
To set the time, press and hold the Set key (18). The seconds digits of the stopwatch start2.
ashing. Using the Up/Down keys (15, 16), set the required seconds value.
Press the Set key (18). Now you enter the minutes setting, followed by the hour setting.3.
After setting the time, you can save the settings using the Mode key (17).4.
To start down-counting, press the Up key (15). The ashing icon 5. indicates that the
stopwatch is running. Pause and then restart the down-counting by pressing the Up key (15).
A beep sounds when the counting has nished. The stopwatch then automatically switches 6.
back to the time previously set by you.
You can prematurely stop the counting by pausing with the Up key (15). Press and hold the7.
Down key (16) to reset the stopwatch to zero.
Alarm clock
The alarm can be set both in Altimeter mode and in Barometer mode.
Press the Mode key (17) until you have reached the alarm function.1.
To turn the alarm on or off press one of the Up/Down keys (15, 16).2.
To set the alarm time, press and hold the Set key (18). The minutes digits of the alarm time3.
start ashing. Using the Up/Down keys (15, 16), set the minutes.
Press the Set key (18). You now enter the hour setting. Save the settings by pressing the 4.
Mode key (17).
After the time is set, the alarm is automatically turned on. The icon5. indicates that the
alarm is active. To turn the alarm off press one of the Up/Down keys (15, 16).
Barometer mode9.
You can set the units for pressure and altitude via the date/time setting. See chapter
8.1.
If you want to switch between Altimeter and Barometer mode using the Up/Down
keys, or want to use a function from one of these two modes, rst ensure that in
Clock mode the time is shown.
You can switch to the time using the Mode key (17).
The barometer measures the air pressure and refreshes its reading every 20 minutes. It indicates
the air pressure in hectopascal or inches of mercury, respectively.

26
27
Background lighting
To activate the background lighting, press the Background lighting key (20). 1.
The display will be illuminated for 4 seconds before the background lighting is turned off again2.
automatically.
Thermometer
You can set the unit for temperature via the date/time settings. See chapter 8.1.
The thermometer measures the current temperature.
Key lock
The key lock can only be activated in Barometer mode, while the time is displayed
in Clock mode.
To activate the key lock, press and hold the Up key (15) and the Down key (16) 1.
simultaneously.
The icon2. will be displayed.
To deactivate the key lock, press and hold the Up key (15) and the Down key (16) 3.
simultaneously.
Disposal12.
Product
Electronic devices are recyclable waste and must not be disposed of in the household
waste.
At the end of its service life, dispose of the product according to the relevant statutory
regulations.
Remove any inserted (rechargeable) batteries and dispose of them separately from
the product.
When activating the reference, enter the required value using the Up/Down keys (15, 16). 3.
The icon appears in the display indicating that readings are measured with a reference
altitude. If the required unit has not been set yet, press the Set key (18) and return to this menu
item later. When turning the reference off, also press the Set key (18) afterwards.
Next, set the refresh interval for the recording. Using the Up/Down keys (15, 16), you can 4.
select between 1, 10, 30 and 60 minutes.
Press the Set key (18). The altitude unit indicator starts ashing. Using the Up/Down keys (15, 5.
16), set the required unit.
Press the Mode key to save the settings or press the Set key (18) again twice to return to the 6.
reference setting before saving the settings.
Recording and playback of altitude readings
You can set the time interval for the recording in the altimeter settings. See chapter
10.1.
The stopped recording cannot be continued. To start a new recording, rst empty
the memory.
You can also playback the stored data during the recording.
To start recording, press the Up key (15).1.
The icon2. starts ashing, indicating that recording has commenced.
You can stop the recording at any time by returning to the Altimeter mode and by pressing and3.
holding the Up key (15). The icon indicates that data has been saved. Before starting a
new measurement the data has to be deleted.
The recording will automatically stop when the memory is full. This will happen after 30 time4.
intervals have passed and 30 data records have been saved. The display will show the
message FULL.
To playback the stored data press the Set key (18). The icon5. will be displayed. Instead
of the temperature, the number of the data record will be shown, above it the stored altitude
record, and below it the date and time of the recording (alternating automatically). You can
toggle between the data records using the Up/Down keys (15, 16).
To empty the memory, press and hold the Set key during the playback until the message CLR6.
(clear) appears. Now you can start a new recording.
End the playback by pressing the Set key (18).7.
Other functions11.
Torch
To turn the torch on, press the Torch key (19).1.
To have the torch ash, press the Torch key (19) again.2.
To turn the torch off, press the Torch key (19).3.

28
29
(Rechargeable) batteries
You as the end user are required by law (Battery Ordinance) to return all used batteries/
rechargeable batteries. Disposing of them in the household waste is prohibited.
Contaminated (rechargeable) batteries are labelled with this symbol to indicate that
disposal in the domestic waste is forbidden. The designations for the heavy metals
involved are: Cd = Cadmium, Hg = Mercury, Pb = Lead (name on (rechargeable)
batteries, e.g. below the trash icon on the left).
Used (rechargeable) batteries can be returned to collection points in your municipality,
our stores or wherever (rechargeable) batteries are sold.
You thus full your statutory obligations and contribute to the protection of the environment.
Technical data13.
Power supply: 2 x 3 V (button cell battery type CR2032)
Protection class: IPX5
Measuring ranges: -700 to 8950 m (altimeter) / 300 to 1100 mbar/hPa (barometer)
/ -10 to +60 ºC (thermometer)
Accuracy: <5000 m: ±20 m ±66 ft / >5000 m: ±0.5 %(altimeter) /
±1.5 mbar/hPa (barometer) / ±1 ºC ±1.8 ºF (thermometer)
Resolution: 1 m/ft (altimeter) / 1 hPa 0.05 inHg (barometer) /0.1 ºC/ºF
(thermometer)
Dimensions (W x H x D): 65 x 22 x 115 mm
Weight: 75 g
Table des Matières
Page
1.Introduction.............................................................................................................................. 30
2. Utilisation prévue..................................................................................................................... 31
3.Contenu d’emballage............................................................................................................... 31
4. Consignes de sécurité............................................................................................................. 31
5.Insertion / remplacement des piles.......................................................................................... 33
6. Mise en service........................................................................................................................ 33
7.Fonctions principales............................................................................................................... 34
8.Mode Horloge.......................................................................................................................... 35
9. Mode Baromètre...................................................................................................................... 37
10. Mode Altimètre....................................................................................................................... 38
11.Autres fonctions ..................................................................................................................... 39
12. Elimination des déchets......................................................................................................... 40
13. Données techniques ............................................................................................................. 41

30
31
Introduction1.
Chère cliente, cher client,
Nous vous remercions de l’achat du présent produit. Ce produit répond aux exigences légales
nationales et européennes. An de maintenir le produit dans son état actuel et d’assurer un
fonctionnement sans risques, les utilisateurs sont tenus de suivre les instructions contenues
dans le présent mode d’emploi ! Le présent mode d’emploi fait partie intégrante du produit.
Il contient des consignes importantes pour la mise en service et la manipulation du produit.
Prêtez-y attention, notamment lorsque le produit sera transmis à une tierce personne. Conservez
le présent mode d’emploi an de pouvoir le consulter à tout moment.
Tous les noms de société et toutes les désignations de produit sont des marques déposées de
leurs propriétaires respectifs. Tous droits réservés.
Tél. 0 892 897 777
Fax 0 892 896 002
e-mail: [email protected]
du lundi au vendredi 8h00 à 18h00 le samedi de 8h00 à 12h00
Tél. 0848/80 12 88
Fax 0848/80 12 89
e-mail: [email protected]
du lundi au vendredi 8h00 à 12h00, 13h00 à 17h00
Utilisation prévue2.
Le produit est conçu pour indiquer l’altitude, la pression atmosphérique et les prévisions
météorologiques et est utilisable pour les activités de plein air. Par ailleurs, le produit est doté
d‘une fonction lampe de poche, d’une montre avec la date, d’un chronomètre et d’un révéil et peut
être rangé en sécurité avec un mousqueton. La fonction de mémorisation du produit enregistre
à intervalles réguliers les valeurs d’altitude et permet la mémorisation et la lecture ultérieure des
données.
Pour des raisons de sécurité et d’homologation (CE), toute transformation et/ou modication du
produit est interdite. Si vous utilisez le produit à d’autres ns que celles décrites précédemment,
cela risque d’endommager le produit. Par ailleurs, une utilisation incorrecte peut être source de
dangers tels que court-circuit, incendie, électrocution. Lisez attentivement le mode d’emploi et
conservez le. Ne transmettez le produit à des tiers qu’accompagné de son mode d’emploi.
Contenu d’emballage3.
Altimètre•
2 piles bouton de type CR2032•
Mode d’emploi•
Consignes de sécurité4.
Lisez le mode d’emploi avec attention en étant particulièrement attentif aux
consignes de sécurité. En cas de non-respect des consignes de sécurité
et des informations données dans le présent mode d’emploi pour une
utilisation correcte de l’appareil, nous déclinons toute responsabilité en cas
de dommage personnel ou matériel consécutif. En outre, la responsabilité/
garantie sera alors annulée.
Personnes / Produit
Le mousqueton du produit n’est pas approprié pour l’escalade.•
N’exposez pas le produit à des variations de température extrêmes et soudaines car cela •
entraîne un changement rapide de l’afchage et réduit la précision des valeurs de mesure.
Le fabricant décline toute responsabilité vis-à-vis d’une indication erronée des valeurs de •
mesure et des conséquences qui en découlent.
Ce produit n’est pas un jouet. Gardez-le hors de portée des enfants et des animaux •
domestiques.
Ne laissez pas traîner le matériel d’emballage. Cela pourrait devenir un jouet pour enfants •
très dangereux.
Gardez le produit à l’abri de températures extrêmes, de la lumière du soleil directe, de •
secousses intenses, d’humidité élevée, d’eau, de gaz inammables, de vapeurs et de
solvants.
N’exposez pas le produit à des contraintes mécaniques.•

32
33
Insertion / remplacement des piles5.
Dès que l’icône s’afche, remplacez les piles le plus tôt possible.
À l’aide d’une pièce de monnaie, déverrouillez le logement des piles qui se trouve sur la face 1.
arrière du produit. Ouvrez le couvercle du logement des piles en le tournant dans le sens
contraire des aiguilles d’une montre, puis enlevez-le.
Insérez les piles en tournant le pôle positif vers l’extérieur, puis refermez le logement des 2.
piles.
Verrouillez le logement des piles à l’aide d’une pièce de monnaie. Fermez le couvercle du 3.
logement des piles en le tournant dans le sens des aiguilles d’une montre.
Tenez compte des symboles gurant sur le
boîtier.
Mise en service6.
Aperçu de l’écran
(1) Verrouillage de touches activé (8) Unité de pression : hectopascal
(2) Mode altimètre (9) Unité de hauteur : mètre
(3) accumulateur faible (10) Unité de pression : pouce de mercure
(4) Mode baromètre (11) Enregistrement altimétrique
(5) Mesure de hauteur avec référence (12) Restitution altimétrique
(6) Prévisions météorologiques (13) Chronomètre
(7) Unité de hauteur : Pied (14) Réveil
Aperçu des touches
(15) Touche Haut (18) Touche Set
(16) Touche Bas (19) Lampe de poche
(17) Touche Mode (20) Éclairage de l‘arrière-plan
Si une utilisation en toute sécurité n’est plus possible, cessez d’utiliser le produit et protégez-•
le d’une utilisation accidentelle. Une utilisation en toute sécurité n’est plus garantie si le
produit :
présente des traces de dommages visibles, -
le produit ne fonctionne plus comme il devrait, -
a été stocké pour une période prolongée dans des conditions défavorables ou bien-
a été transporté dans des conditions très rudes.-
Maniez le produit avec précaution. À la suite de chocs, de coups ou de chutes, même de faible •
hauteur, l’appareil peut être endommagé.
Respecter également les informations concernant la sécurité et le mode d’emploi pour les •
autres appareils connectés à cet appareil.
Piles / accumulateurs
Respecter la polarité lors de l’insertion des piles / accumulateurs.•
Retirer les piles / accumulateurs de l’appareil s’il n’est pas utilisé pendant longtemps an •
d’éviter les dégâts causés par des fuites. Des piles / accumulateurs qui fuient ou qui sont
endommagées peuvent provoquer des brûlures acides lors du contact avec la peau ;
l’utilisation de gants protecteurs appropriés est par conséquent recommandée pour manipuler
les piles / accumulateurs corrompues.
Garder les piles / accumulateurs hors de portée des enfants. Ne pas laisser traîner de piles / •
accumulateurs car des enfants ou des animaux pourraient les avaler.
Il convient de remplacer toutes les piles / accumulateurs en même temps. Le mélange de •
piles / accumulateurs anciennes et de nouvelles piles / accumulateurs dans l’appareil peut
entraîner la fuite de piles / accumulateurs et endommager l’appareil.
Les piles / accumulateurs ne doivent pas être démontées, court-circuitées ou jetées au feu. •
Ne jamais recharger des piles non rechargeables. Il existe un risque d’explosion !
Divers
Adressez-vous à un technicien spécialisé si vous avez des doutes concernant le mode de •
fonctionnement, la sécurité ou le raccordement de l‘appareil.
Tout entretien, ajustement ou réparation ne doit être effectué que par un spécialiste ou un •
atelier spécialisé.
Si vous avez encore des questions auxquelles ce mode d‘emploi n‘a pas su répondre, nous •
vous prions de vous adresser à notre service technique ou à un expert.

34
35
Mode Horloge8.
Réglage de la date / de l’heure
Ce n’est qu’en mode Baromètre que l’on peut régler l’heure et la date. Vous pouvez
terminer le réglage en appuyant sur la touche Mode (17).
Pendant le réglage de l’heure, procédez également au réglage des unités de
température, de pression et de hauteur.
Choisissez l’heure en mode Horloge à l’aide de la touche Mode (17) et le mode Baromètre 1.
avec la touche Bas (16).
Appuyez et maintenez une pression sur la touche Set (18) jusqu’à ce que le réglage de la 2.
date s’afche et qu’un point clignote. Réglez le chiffre de l’année à l’aide des touches Haut/
Bas. En appuyant de nouveau sur la touche Set (18), vous passez au réglage du mois, puis
au réglage des jours.
En appuyant sur la touche Set (18), les icônes du mois et du jour se mettent à clignoter. Vous 3.
pouvez choisir l’ordre du jour et du mois avec les touches Haut/Bas (15,16).
Appuyez sur la touche Set (18) pour accéder au réglage de l’heure. L’heure s’afche et 4.
l’endroit réservé aux secondes clignote. En appuyant sur les touches Haut/Bas (15,16), vous
remettez l’afchage à zéro.
Appuyez sur la touche Set (18). Vous accédez au réglage des minutes, puis au réglage des 5.
heures
Appuyez sur la touche Set (18), puis indiquez à l’aide des touches Haut/Bas si vous souhaitez 6.
l’afchage dans le système horaire de 24 heures ou de 12 heures.
Appuyez sur la touche Set (18). L’afchage de l’unité de température clignote à l’écran. Vous 7.
pouvez maintenant régler les °C ou les °F à l’aide des touches Haut/Bas.
Appuyez sur la touche Set (18). L’afchage de l’unité de pression clignote à l’écran. Vous 8.
pouvez maintenant régler hPa ou inHg à l’aide des touches Haut/Bas.
Lorsque vous souhaitez effectuer des corrections, appuyez à plusieurs reprises sur la touche 9.
Set (18) jusqu’à ce que vous ayez atteint l’emplacement désiré, puis procédez aux réglages
à l’aide des touches Haut/Bas (15,16).
Lorsque vous avez procédé correctement au réglage des unités, de la date et de l’heure, 10.
terminez les réglages et sauvegardez-les à l’aide de la touche Mode (17).
Chronomètre
Le chronomètre peut être utilisé non seulement en mode Altimètre mais aussi en
mode Baromètre.
Le chronomètre peut effectuer un comptage progressif ou à rebours.
Compteur progressif :
Appuyez sur la touche Mode (17) jusqu’à ce que vous ayez accédé au chronomètre.1.
Plusieurs affectations sont attribuées aux touches. Celles-ci ont, par ailleurs,
d’autres fonctions selon le réglage que vous effectuez.
Appuyez brièvement sur les touches pour les actionner. Il est également nécessaire
de maintenir une pression sur la touche lors de certains réglages. Il faut ensuite
attendre environ deux secondes pour que l’action désirée se produise.
En appuyant et en maintenant une pression sur les touches Haut /Bas (15,16) lors
d’un ajustement des chiffres, vous pouvez accélérer le changement des chiffres.
Fonctions principales7.
Mode Horloge
Les fonctions Heure, date, chronomètre et réveil sont disponibles aussi bien en mode Altimètre
qu’en mode Baromètre. Toutefois, ce n’est qu’en mode Baromètre que l’on peut régler l’heure
et la date.
En appuyant sur la touche Mode (17), vous pouvez basculer entre les fonctions heure, date,
chronomètre et réveil.
Lorsque vous basculez entre les modes Altimètre et Baromètre avec les touches
Haut/Bas ou que vous souhaitez utiliser une fonction relevant des deux modes,
assurez-vous au préalable que le mode Horloge afche l’heure.
Avec la touche Mode (17), vous pouvez passer à l’heure.
Modes Baromètre et Altimètre
Le mode Baromètre indique la pression, la température et les prévisions météo.
Le mode Altimètre indique l’altitude et la température. Sont également disponibles dans ce mode
les fonctions de mesure de hauteur avec référence ainsi que l’enregistrement et la restitution
des valeurs d’altitude.
En appuyant sur les touches Haut/Bas (15,16), vous pouvez basculer entre les modes Altitude et
Baromètre. On active le mode Altitude en appuyant sur la touche Haut (15), et le mode Baromètre
avec la touche Bas (16). Avant de basculer, assurez-vous que le mode Horloge afche l’heure.

36
37
Mode Baromètre9.
Vous pouvez régler les unités de pression et d’altitude au-dessus du réglage de
l’heure et de la date. Voir Chapitre 8.1.
Lorsque vous basculez entre les modes Altimètre et Baromètre avec les touches
Haut/Bas ou que vous souhaitez utiliser une fonction relevant des deux modes,
assurez-vous au préalable que le mode Horloge afche l’heure.
Avec la touche Mode (17), vous pouvez passer à l’heure.
Le baromètre mesure la pression atmosphérique qui est mise à jour toutes les 20 minutes. La
pression atmosphérique s’afche en hectopascals ou en pouces de mercure.
Prévisions météo
Selon la pression atmosphérique mesurée, les icônes suivantes s’afchent pour les prévisions
météorologiques :
ensoleillé légèrement
nuageux
nuageux précipitations
Important :
Cet afchage ne représente pas la météo actuelle, mais la météo des 12 à 24 heures à •
venir.
Si « Ensoleillé » est afché de nuit, ceci indique un ciel nocturne dégagé.•
Le calcul des prévisions météo basé uniquement sur l’observation de la tendance de la •
pression atmosphérique résulte en une précision maximale d’environ 70 %..
La météo du lendemain peut, pour cette raison, être complètement différente.•
Comme la pression atmosphérique mesurée ne s’applique qu’à une zone d’un diamètre de 50 •
km environ, la météo peut également varier rapidement. Ceci vaut avant tout pour les régions
montagneuses ou en haute altitude.
C’est pourquoi vous ne devez pas vous er aux prévisions de l’afcheur d’altitude mais vous •
informer sur place si vous avez par ex. l’intention de faire une randonnée en montagne.
La mise à jour des symboles des prévisions météorologiques s’effectue à la cadence de 20 •
minutes. L’absence de changement des symboles peut s’expliquer par le fait que la pression
atmosphérique est restée inchangée ou que la modication est intervenue si lentement qu’elle
n’a pu être enregistrée par l’indicateur d’altitude.
Pour démarrer le comptage progressif, appuyez sur la touche Haut (15). L’icône 2. clignotant
indique que le chronomètre est en marche. Mettez le comptage progressif sur pause, puis
redémarrez-le à l’aide de la touche Haut (15).
Pour remettre de nouveau le chronomètre à zéro, appuyez et maintenez une pression sur la 3.
touche BAS (16).
Compteur à rebours :
Appuyez sur la touche Mode (17) jusqu’à ce que vous ayez accédé au chronomètre.1.
Pour régler le temps, appuyez et maintenez une pression sur la touche Set (18). 2.
L’emplacement réservé aux secondes sur le chronomètre commence à clignoter. Réglez le
chiffre des secondes désiré à l’aide des touches Haut/Bas (15,16).
Appuyez sur la touche Set (18). Vous accédez au réglage des minutes, puis au réglage des 3.
heures
Lorsque vous avez procédé au réglage du temps, sauvegardez-le à l’aide de la touche Mode 4.
(17).
Pour démarrer le compte à rebours, appuyez sur la touche Haut (15). L’icône 5. clignotant
indique que le chronomètre est en marche. Mettez le compte à rebours sur pause, puis
redémarrez-le à l’aide de la touche Haut (15).
Lorsque le comptage est terminé, un bip sonore retentit. Le chronomètre est alors 6.
automatiquement réglé sur son temps prescrit.
Vous pouvez mettre n au comptage de manière précoce en le mettant sur pause à l’aide 7.
de la touche Haut (15). Appuyez et maintenez une pression sur la touche Bas (16) pour
réinitialiser le chronomètre.
Réveil
Le réveil peut être utilisé non seulement en mode Altimètre mais aussi en mode
Baromètre.
Appuyez sur la touche Mode (17) jusqu’à ce que vous ayez accédé au réveil.1.
Pour activer ou désactiver le réveil, appuyez sur les touches Hau/Bas (15,16).2.
Pour régler l’heure du réveil, appuyez et maintenez une pression sur la touche Set (18). Les 3.
minutes clignotent. Réglez les secondes à l’aide des touches Haut/Bas (15,16).
Appuyez sur la touche Set (18). Vous accédez au réglage des heures. Sauvegardez les 4.
réglages en appuyant sur la touche Mode (17).
Le réveil s’active automatiquement après le réglage du temps. L’icône 5. indique que
l’alarme est activée. Pour désactiver le réveil, appuyez sur les touches Haut/Bas (15,16).

38
39
Pour démarrer l’enregistrement, appuyez et maintenez une pression sur la touche Haut (15).1.
L’icône 2. clignote et indique que l’enregistrement est en cours.
Vous pouvez interrompre l’enregistrement à tout moment en revenant au mode Altimètre et 3.
en appuyant et en maintenant une pression sur la touche Haut (15). L’icône indique que
des données ont été enregistrées. Avant de commencer une nouvelle mesure, il faut effacer
les données.
L’enregistrement s’arrête automatiquement lorsque la mémoire est pleine. Ce phénomène 4.
intervient après que 30 intervalles de temps se sont écoulés et que 30 ensembles de données
ont été sauvegardés. Le message FULL (plein) apparaît à l’écran.
Pour restituer les données sauvegardées, appuyez sur la touche Set (18). L’icône 5.
apparaît. Au lieu de la température, c’est maintenant le numéro de l’ensemble des données
qui s’afche, au-dessus la valeur d’altitude enregistrée et en dessous (en alternance
automatique) la date et l’heure de l’enregistrement. À l’aide des touches Haut/Bas (15,16),
vous pouvez basculer entre les ensembles de données.
Pour vider la mémoire, appuyez et maintenez une pression sur la touche Set pendant la 6.
restitution jusqu’à ce que le message CLR (vide) s’afche. Maintenant, vous pouvez démarrer
un nouvel enregistrement.
Terminez la restitution en appuyant sur la touche Set (18).7.
Autres fonctions11.
Lampe de poche
Pour allumer la lampe de poche, appuyez sur la touche Lampe de poche (19).1.
Pour faire clignoter la lampe de poche, appuyez une nouvelle fois sur la touche Lampe de 2.
poche (19).
Pour éteindre la lampe de poche, appuyez sur la touche Lampe de poche (19).3.
Éclairage de l’arrière-plan
Pour activer l’éclairage de l’arrière-plan, appuyez sur la touche Éclairage de l’arrière-plan 1.
(20).
L’écran s’éclaire pendant quatre secondes avant que l’éclairage de l’arrière-plan ne 2.
s’éteigne.
Thermomètre
Vous pouvez régler l’unité de température au-dessus du réglage de l’heure et de
la date. Voir Chapitre 8.1.
Le thermomètre mesure la température effective.
Mode Altimètre10.
Lorsque vous basculez entre les modes Altimètre et Baromètre avec les touches
Haut/Bas ou que vous souhaitez utiliser une fonction relevant des deux modes,
assurez-vous au préalable que le mode Horloge afche l’heure.
Avec la touche Mode (17), vous pouvez passer à l’heure.
L’afcheur d’altitude indique l’altitude en mètres ou en pieds.
Important :
Le calcul de l’altitude s’effectue à l’aide de la mesure de la pression atmosphérique. Puisque •
la pression atmosphérique change selon le temps, l’afchage de la valeur d’altitude change
également.
C’est pourquoi vous devez indiquer la référence avant chaque utilisation du mode Altimètre •
(par ex. pour une randonnée).
La mesure de l’altitude dans un avion disposant d’une cabine pressurisée est impossible.•
Réglage de l’altimètre
Appuyez et maintenez une pression sur la touche Set (18)1.
Vous pouvez alors choisir si vous souhaitez dénir la hauteur avec ou sans référence. Utiliser 2.
les touches Haut/Bas pour commuter la fonction MARCHE (ON) ou ARRET (OFF).
Lorsque vous activez la référence, indiquez la valeur à l’aide des touches Haut/Bas (15,16) 3.
L’icône s’afche à l’écran et indique que l’on mesure avec une hauteur de référence. Si
vous n’avez pas encore procédé au réglage de unité désirée, appuyez sur la touche Set (18)
et retournez plus tard à cette option de menu. Lorsque vous désactivez la référence, appuyez
également par la suite sur la touche Set (18)
Réglez ensuite l’intervalle de mise à jour de l’enregistrement. Vous pouvez choisir entre 1, 10, 4.
30 et 60 minutes avec les touches Haut/Bas (15,16).
Appuyez sur la touche SET (18). L’afchage de l´unité de hauteur clignote. Réglez l’unité 5.
désirée à l’aide des touches Haut/Bas (15,16).
Appuyez sur la touche Mode (17) pour sauvegarder les réglages ou appuyez de nouveau sur la 6.
touche Set (18) pour retourner au réglage de référence avant de procéder à la sauvegarde.
Enregistrement et restitution des valeurs d’altitude
Vous pouvez régler l’intervalle de temps d’enregistrement dans les réglages de
l’altimètre. Voir Chapitre 10,1.
Il est impossible de poursuivre un enregistrement interrompu. Pour démarrer un
nouvel enregistrement, il faut d’abord vider la mémoire.
Pendant l’enregistrement, vous pouvez également restituer les données
enregistrées.
Table of contents
Languages:
Other Conrad Measuring Instrument manuals

Conrad
Conrad 77 63 01 User manual

Conrad
Conrad 64 64 45 User manual

Conrad
Conrad EKM 265 User manual

Conrad
Conrad VOLTCRAFT CO-50 User manual

Conrad
Conrad 84 17 78 User manual

Conrad
Conrad VC-602 User manual

Conrad
Conrad 100609 User manual

Conrad
Conrad RF Explorer User manual

Conrad
Conrad 57 02 06 User manual

Conrad
Conrad SB-090 Firmware update

Conrad
Conrad TP-90 User manual

Conrad
Conrad KW-9015 Operating manual

Conrad
Conrad 57 08 99 User manual

Conrad
Conrad VC-605 User manual

Conrad
Conrad VC940 User manual

Conrad
Conrad 13 02 30 User manual

Conrad
Conrad 85 73 36 User manual

Conrad
Conrad 82 15 70 User manual

Conrad
Conrad 81 67 47 User manual

Conrad
Conrad P3 User manual