CoolLED pE-800 User manual

1
Quick Start Guide for Sequence Runner in
Nikon NIS Elements
IQS015- Rev 01
Issue Date: 30/10/2023
Contents
1 What is Sequence Runner? ............................................................................................1
2 Equipment Required .....................................................................................................1
3 Hardware setup ............................................................................................................2
4 Configuring Sequencer Mode in NIS Elements................................................................4
5 How Fast is Sequence Runner? ......................................................................................9
6 Useful Documents.........................................................................................................9
1What is Sequence Runner?
Sequence Runner provides a cost-effective approach for high-speed multi-colour fluorescence
imaging. Using the Global TTL input of the CoolLED Illumination System, Sequence Runner allows a
camera’s TTL output to drive a user-defined LED sequence. LED channel selection and intensity is
configured in NIS Elements, and each LED in the sequence is triggered on receiving a TTL signal. This
simple approach provides high-speed imaging with illumination precisely synchronised to the
camera, which also minimises phototoxicity and photobleaching.
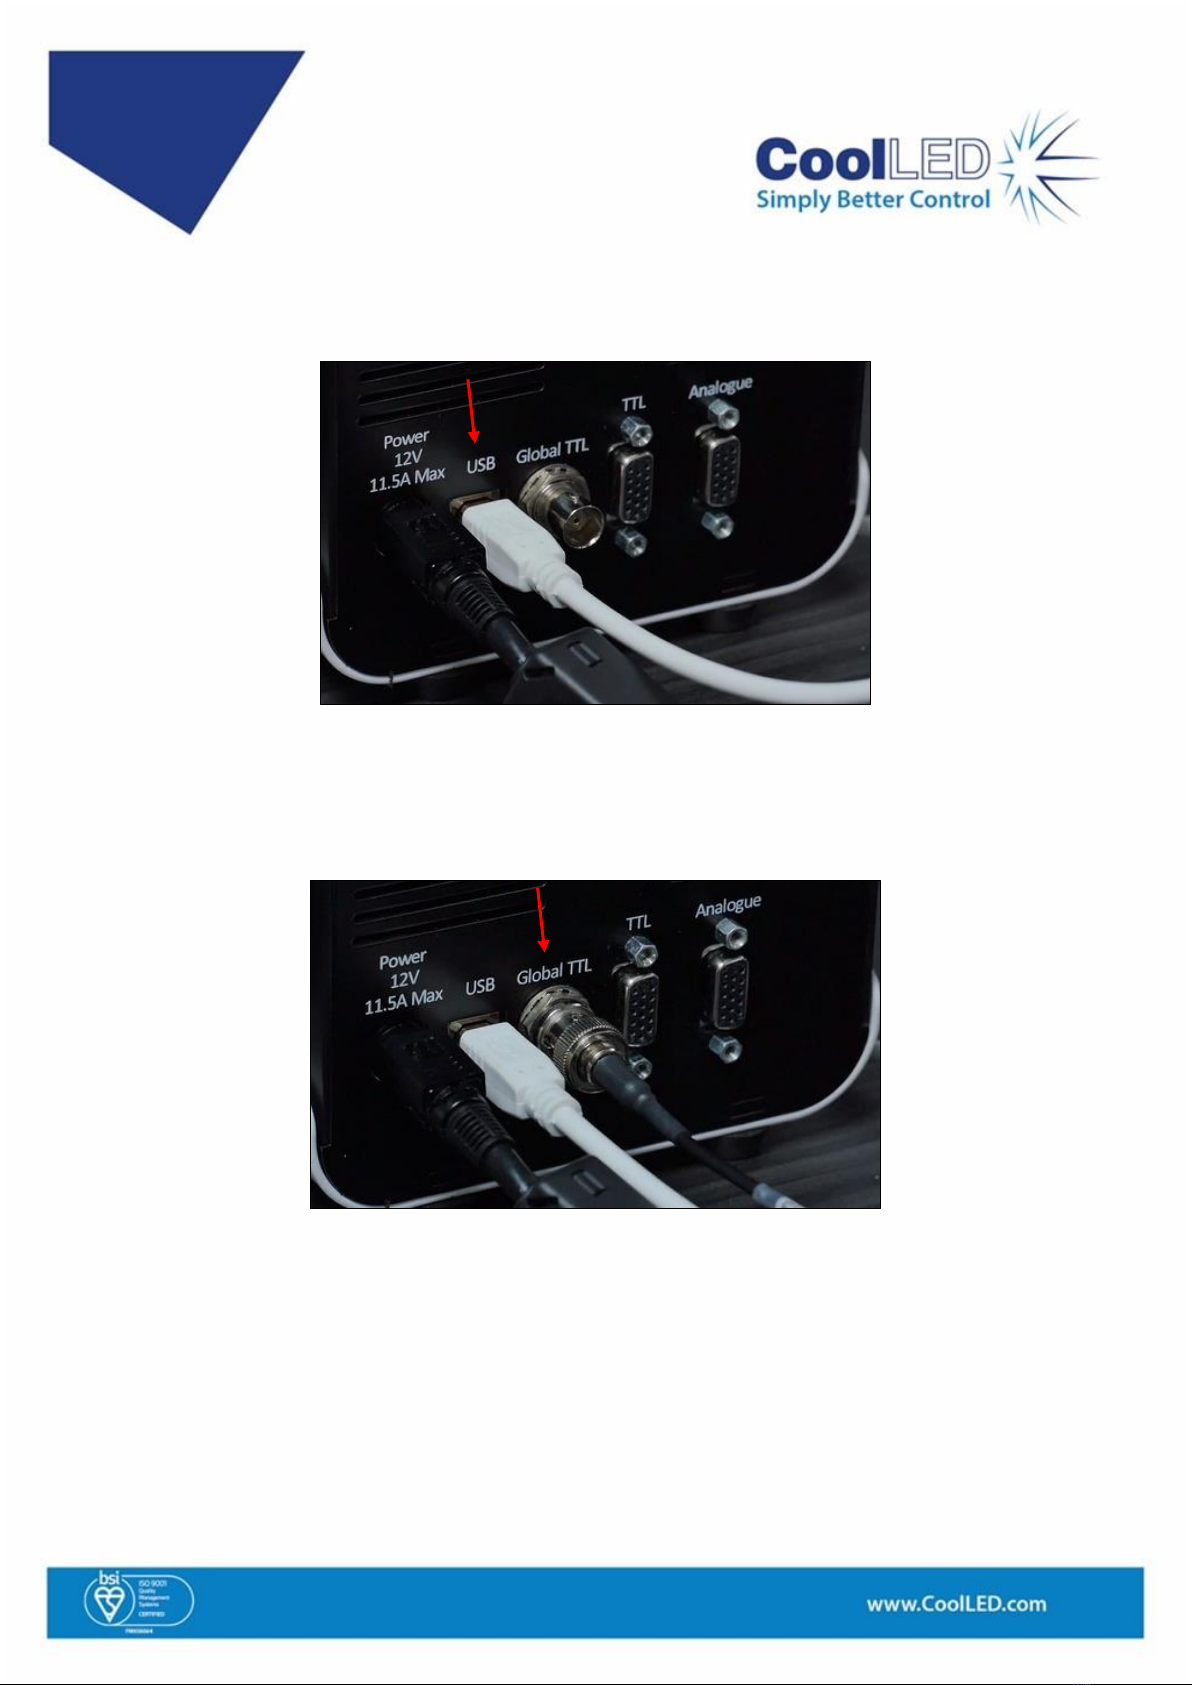
2Equipment Required
In addition to a fluorescence microscope setup, the following components are required:
•NIS Elements AR
•Illumination Sequence NIS module
•Triggered Device Control NIS module
•A CoolLED Illumination System which is supported in NIS Elements and features the
Sequence Runner Function. These are currently:
opE-800
opE-800fura
opE-300ultra
opE-340fura
•Camera with TTL output
•Compatible cable to connect camera TTL output to Global TTL (BNC) of CoolLED Light Source

2
3Hardware setup
Full installation instructions for CoolLED Illumination Systems are available in the relevant product
manual (see Useful Documents).
1. If using a Pinkel filter configuration for high-speed, high-contrast imaging, install inline single-
band excitation filters into the CoolLED Light Source. Full details can be found in the relevant
product manual, but briefly:
•For the pE-800 Series, remove the filter holder using the thumbscrews and insert filters with the
arrow on the filter facing down. It is important to secure all filters using the grub screw and hex
key (provided with purchase of Illumination System).
Figure 1: Installing excitation filters directly into the pE-800 Series and securing with grub screws
•For the pE-300ultra and pE-340fura, slide the filter holders out and orient the filters in the holder so
the arrow on the filter will point up or forward once the filter holder is re-installed (Figure 2).
Ensure filters are secured using grub screw and hex key (provided with purchase of Illumination
System).
Figure 2: For the correct orientation of excitation filters installed in the pE-300ultra or pE-340fura, the arrow on the filter must point forward
or upwards when the filter holder is installed in the Light Source

3
2. To allow the LED sequence to be configured in NIS Elements, connect the CoolLED Illumination
System to the PC via USB (Figure 3). The USB cable is supplied with purchase of CoolLED
Illumination System.
Figure 3: Connect the Illumination System to the PC via USB cable
3. Connect the camera directly to the CoolLED Illumination System, inserting the trigger cable
supplied with your camera into the ‘Global TTL’ input (Figure 4). This is how the camera will send
TTL pulses to drive the LED illumination sequence.
Figure 4: Directly connect camera and Light Source, inserting trigger cable into ‘Global TTL’ port
Note: Sequence Runner only works via the Global TTL input; all other TTL inputs are used for
individual channel TTL triggering.

4
4Configuring Sequencer Mode in NIS Elements
If using the CoolLED Illumination System with NIS Elements for the first time, before following the
steps below please see installation and configuration instructions in our Quick Start Guide and
Tutorial Video.
1. Add the ‘Illumination Sequence’ module during installation. If NIS Elements is already installed,
the installation must be modified to add this. In Windows settings, navigate to ‘Apps & features’,
and select ‘Modify’ instead of uninstalling NIS Elements. Whether modifying or installing NIS
Elements for the first time, follow the instructions and when ‘Modules’ window appears, check
‘Illumination Sequence’ box.
Note: The Triggered Acquisition module for NIS Elements is an optional extra; please ask Nikon for
purchase and installation instructions.
Figure 5: Lef: Modify NIS Elements installation in Windows 'Apps & Features' settings. Right: Whether modifying installation or completing
installation for first time, add 'Illumination Sequence' from the ‘Modules’ window
2. Once the installation (or modification) is complete, launch NIS Elements.
3. To enter Sequencer (Sequence Runner) mode, scroll down the pE-800 Pad and click ‘Configure…’
(Figure 6).
Note: In this example, NIS Elements is already configured for our hardware setup. If the CoolLED Pad
shown is not showing, please see Quick Start Guide or Tutorial Video to learn how to set up and
control the CoolLED Illumination System.

5
Figure 6: Click 'Configure...' (red box) to open the pE-800 Configuration window
4. When the pE-800 Configuration window opens, from the ‘Connection’ menu, select ‘USB +
Global BNC (Sequencer.)’ (Figure 7) and close the Configuration window.
Figure 7: Enter Sequencer (Sequence Runner) mode by selecting USB + Global BNC (Sequencer)
5. The LED sequence is configured using the Triggered Acquisition Pad. To open this, navigate to
‘Acquire’on the main menu, and scroll down to select ‘Triggered Acquisition…’ (Figure 8).
Figure 8: To open the Triggered Acquisition Pad, navigate to ‘Acquire’and select 'Triggered Acquisition...'
Note: Drag the ‘Triggered Acquisition’ window towards the ‘Acquisition’ tab to form an adjacent tab.

6
6. Figure 9 shows the configuration options available. Firstly, add the LEDs you wish to appear in
the sequence by clicking the blue ‘+’ icon. The number under the ‘#’ column indicates this LED’s
position in the sequence. To change the selected LED, use the dropdown menu under ‘Line’.
7. Set the power (intensity) percentage. Since the up/down arrows are small, it may be easier to
modulate the LED intensity using the slider in the pE-Pad. LED intensity control is also possible in
real-time control when Sequence Runner is active (Figure 10).
8. Set the exposure from the dropdown menu. This sets the same exposure for all LEDs.
9. Select ‘Enable Triggering’.
Figure 9: The 'Triggered Acquisition' Pad, where LED selection, intensity and exposure are configured
10. Once settings are complete, return to the ‘Acquisition’ tab.
LED selection:
Add LED to sequence
Delete selected LED
from sequence
Move selected LED up
or down in sequence
Clear sequence
Select ‘Enable Triggering’
Set exposure
Change LED selection
Set LED power (intensity)
LED sequence position
(box checked if selected
to run in sequence)

7
Figure 10: LED intensity can also be adjusted on the pE-Pad using the sliders or entering percentage values. Left: while configuring
Sequence Runner (it is not necessary to select LEDs); Right: when Sequence Runner is active, intensity can be adjusted in real time
11. Configure camera settings (for example, see Figure 11).
Figure 11: Example camera settings used for this setup
12. Select ‘Live’ to begin live image acquisition using Sequence Runner (Figure 12). Alternatively,
please see our Quick Start Guide for guidance on how to use ND Acquire.
Figure 12: To start Sequence Runner for live image acquisition, select 'Live' (red box)
13. If everything is working correctly, you will observe illumination according to the protocol within
NIS Elements.
14. To exit Sequence Runner mode, select USB from the configuration window (Figure 6, Figure 7).

8
4.1 How to further increase speed
1. Reducing the ROI enables even faster imaging speeds, while also minimising the area that
can potentially become photobleached. On the camera control window, select the ‘ROI’
checkbox and click ‘ROI Size’. This opens the dropdown menu, where an ROI size can be
selected or defined.
Figure 13: Reducing Region of Interest (ROI) to increase imaging speed
2. Data can be saved to PC memory only. Navigate to ‘Acquire’, ‘Fast Timelapse’ and for
‘Sample Storing’, select ‘Memory Only’. Enter the total frame number of your experiment
into ‘Number of Frames’ and select ‘Run now’ (Figure 14).
Figure 14: Fast Timelapse mode maximises imaging speed

9
5How Fast is Sequence Runner?
Imaging speed depends on parameters individual to each experiment. It can therefore be useful to
demonstrate the speed of Sequence Runner (for example, compared to the speed of standard USB
control). This is easily demonstrated by observing the time it takes to complete a time-lapse.
1. Select ‘ND acquire’ (Figure 12) and follow the instructions on the ‘ND Acquisition Wizard’ to
run a timelapse experiment.
Note: uncheck ‘Multichannel’ when using Sequence Runner
2. Once the experiment is complete, navigate to ‘File’ and select ‘Image Properties’.
3. In the ‘Image Properties’ window (Figure 15), select the ‘Recorded Data’ tab.
4. The left column (‘Time [s]’) shows the total time for the acquisition.
Figure 15: Image Properties window
Figure 16: Comparing total acquisition times for timelapse of 400 frames. Left: using standard USB, acquisition took 28.8 seconds. Right:
Sequence Runner completed acquisition in 4.8 seconds
6Useful Documents
NIS Elements Quick Start Guide
NIS Elements tutorial video
pE-800 Series user manual
pE-300 Series user manual
pE-340fura user manual
For further information or questions regarding CoolLED Illumination Systems, please contact
Other manuals for pE-800
4
This manual suits for next models
4
Table of contents
Other CoolLED Lighting Equipment manuals
Popular Lighting Equipment manuals by other brands

Saxby Lighting
Saxby Lighting Sight ECO instruction manual

Vision & Control
Vision & Control LDLF30x240-G525/UDC Instructions for use

Ecco
Ecco 3800 Series Assembly, installation and operation instructions

Lutron Electronics
Lutron Electronics EcoSystem 5-Series installation guide

DOTLUX
DOTLUX EXITmulti 3177-060120 user manual

GENLED
GENLED acolyte RIBBONLYTE Guide