Cornelius G User manual

1/23
INSGR_V17_2023-09-01
ASSEMBLY INSTRUCTIONS
OVAL POOLS NBS
MODEL G
OVAL POOL
• Never dive, jump or slide into an above ground swimming pool.
Diving, jumping or sliding may result in permanent injury or death.
• The homeowner is responsible to install all safety labels.The
safety labels shall be placed above the water line, never covered
and always visible from any potential entry points of the pool. Also,
make sure to install safety labels at all access points of your yard.
• Adult supervision is always necessary. Never take your eyes off
children or swimmers in the water or near the pool.
• Designate an adult pool watcher. Make sure that you or your pool
watcher are able to intervene in less then 10 seconds to save a life
or avoid injury.
• Do not swim during thunder, electrical or wind storms.
• Keep rescue equipment such as life rings and reaching poles etc,
in a prominent area by the pool at all times. Please consult your
municipality to get a rescue equipment list.
• An emergency phone number such as: nearest available police,
fire, ambulance and/or rescue unit, must be visible from pool area.
A functioning fixed or cellular phone must be reachable immedi-
ately.
• It is important that all users be able to see the bottom of the pool.
Foggy water must be cleared up before entering the pool. At night,
sufficient lighting must be available. It’s the homeowner's sole
responsibility to provide adequate lighting for pool bottom, safety
labels and walkways, which exceeds minimum standards of the IES
of North America.
• Never swim alone, under the influence of drugs or alcohol, tired
or ill.
• All accessories and liners : the homeowner must follow the manu-
facturer’s instructions and safety warnings.
• Do not affix any other products to your pool other then required
by your local code.
• Do not sit, climb or stand on the top ledges of the pool.
WARNING : this product contains chemicals which are known to the state of California to cause
cancer and/or reproductive harm. p65warnings.ca.gov
DO NOT DIVE OR JUMP, SHALLOW WATER!
WARNING : THIS POOL IS NOT DESIGNED FOR DIVING AND/OR JUMPING.
WARNING : The pool owner is responsible to ensure everyone who accesses the yard, fol-
lows all safety instructions.
WARNING : Be sure you have read and understand the 'Safety Information' sheets before
you begin your pool installation.

2/23
FILTRATION SYSTEM ASSEMBLY
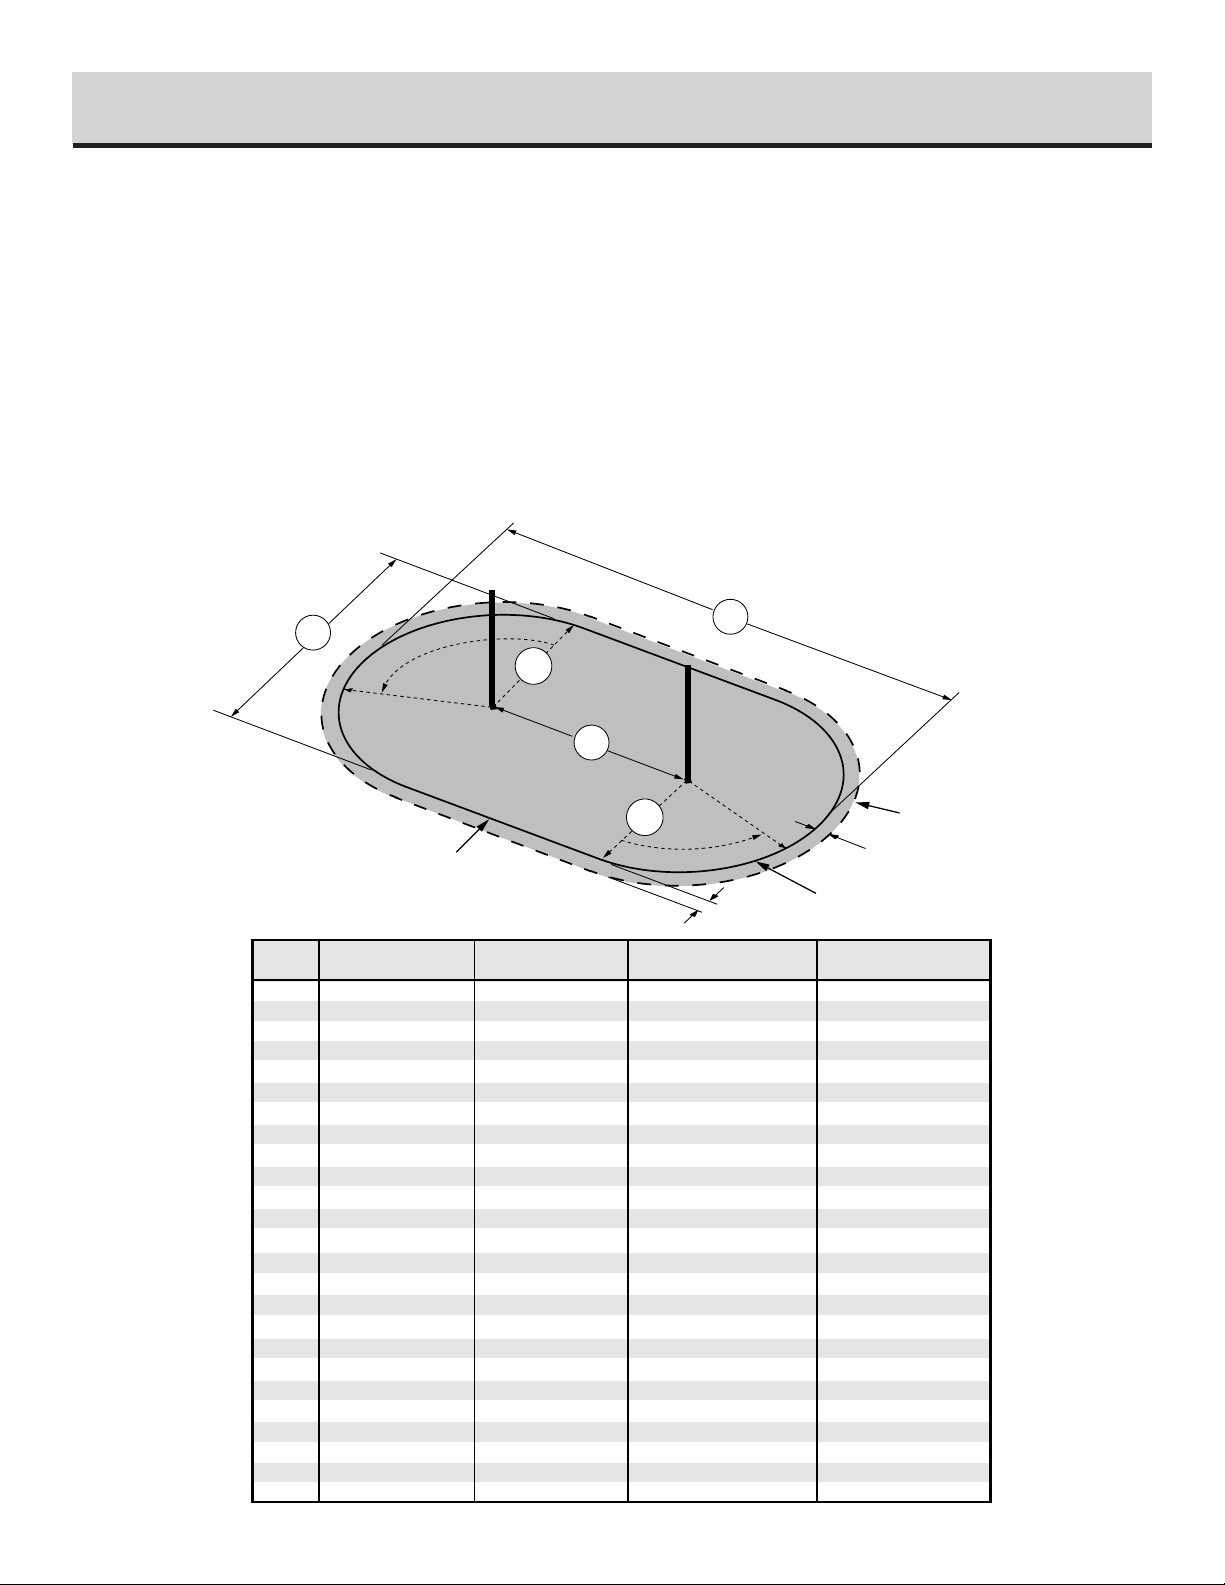
Assemble skimmer, inlet, drain (optional), filter, pump, hoses according to manufacturer’s instructions.
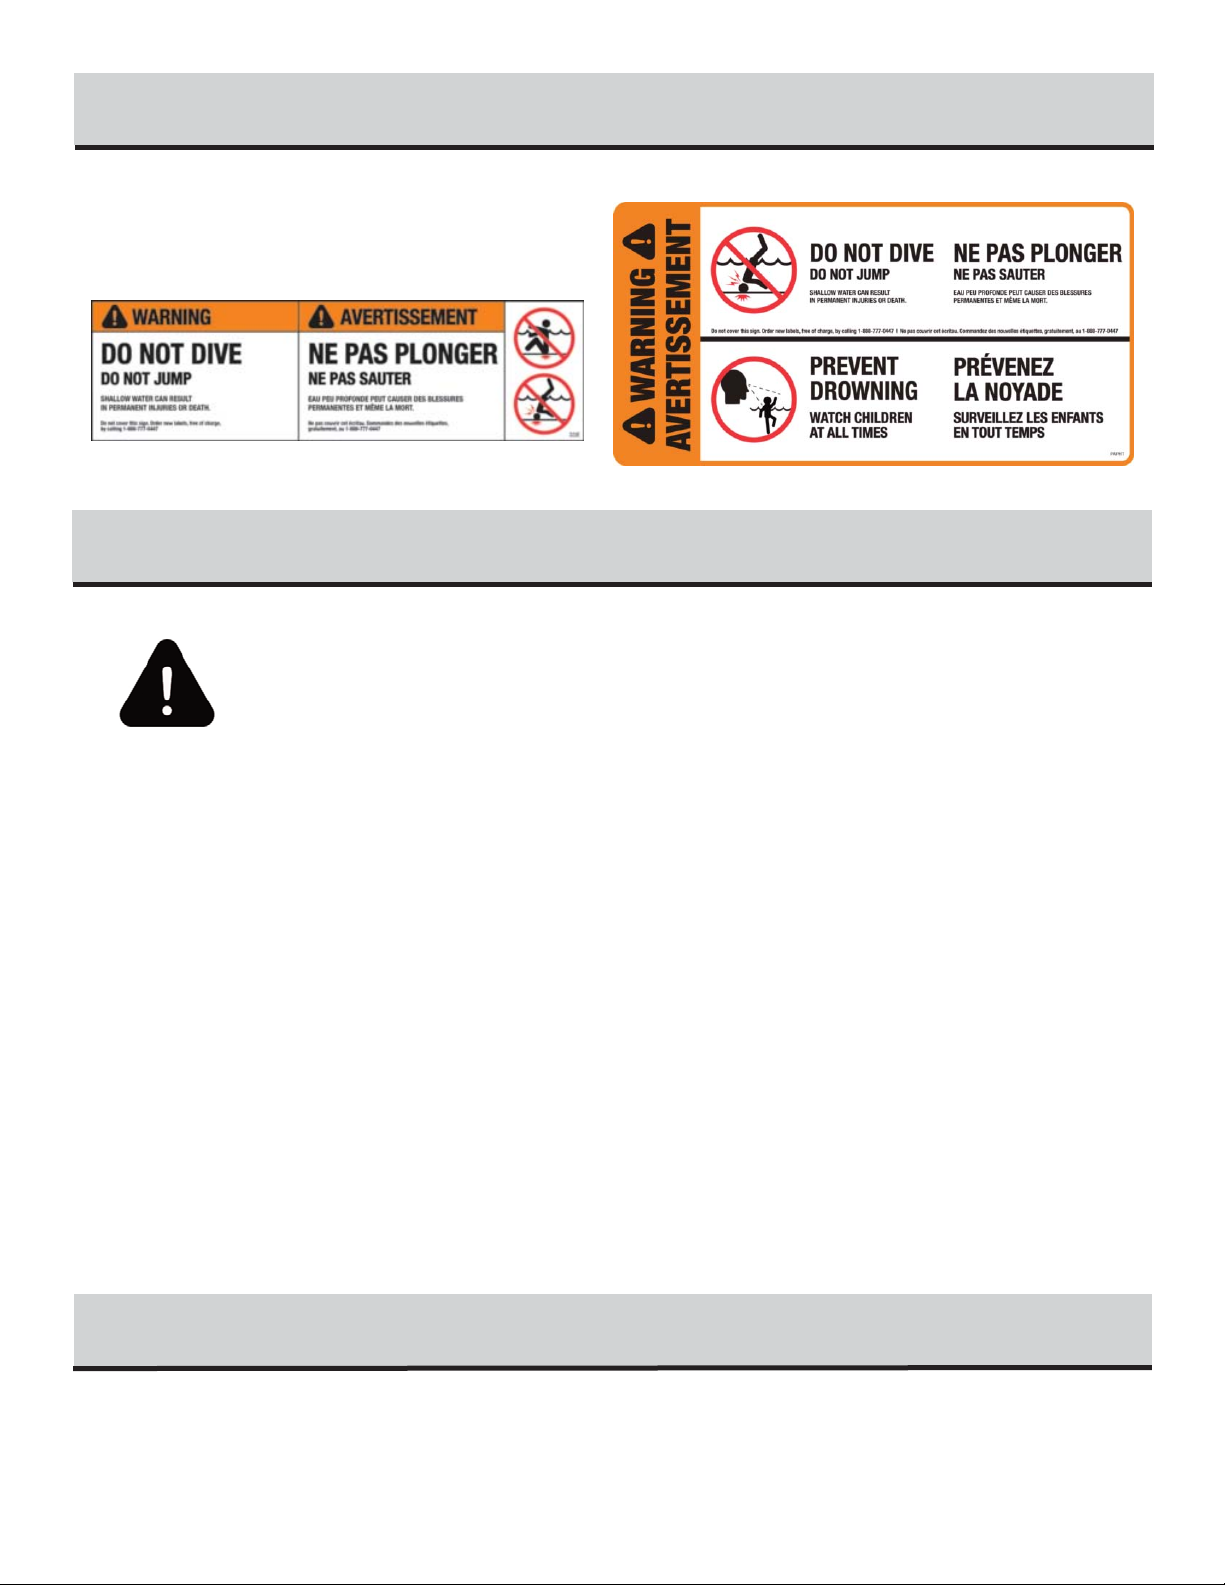
If you require additional labels, you can order more free of charge
by calling 1-888-777-0447
Congratulations! You have purchased a pool of superior quality and
durability. To achieve the best possible results, follow the instruc-
tions carefully. Failure to follow the installation procedures may
result in damage to your pool or property and void your warranty.
We recommend that you make a preliminary study of the instruction
booklet to familiarize yourself with the different parts of your pool.
Make sure that you understand each step thoroughly before you
begin assembling. We recommend having your pool installed by a
professional. We wish you a most pleasant and refreshing summer.
The homeowner must supervise the installation of the pool in order
to make sure that proper installation methods are followed.
The pool is subject to wear and deterioration if not maintained pro-
perly and could lead to failure of the pool’s structure. Failure of the
pool structure might release large quantities of water that will cause
property damage, bodily harm or even death.
Before installing your pool, you should check local regulations such
as building codes, zoning requirements and electrical codes.
Refrain from finishing up your pool with stones, rocks, gravel,
etc., to avoid chipping of the paint and damaging the pool wall.
Most decorative rocks are very acidic and they can damage
and/or corrode your pool wall beyond repair.
We are not responsible for the installation of the pool. We are not
affiliated with any pool installer and assume no responsibility or
liability linked to a faulty installation of the pool.
Warning : Do not modify any components of the pool without the
written authorization of the manufacturer. Doing so will void the
warranty.
If you need any parts, you can order these by calling
1-888-777-0447 or at www.corneliuspools.com
SAFETY INFORMATION
WARNING : All pool components, such as the filtration system, pump and heater should not be
positioned in such a way that someone could use them to gain access to the pool. Be sure that
filter, pump, all toys, chairs, tables, buildings or similar objects are at least at a minimum of 4’
(1,22 m) away from the pool. Positioning such objects too close to the pool may allow access
to the water while unattended and may cause serious injury or death.
SAFETY LABELS

3/23
PARTS LIST
ITEM DESCRIPTION
POOL WALL
BOLT & NUT FOR WALL & TENSION STRAPS
COPING (OPTIONAL)
LEDGE - ROUND SECTION
LEDGE - STRAIGHT SECTION
BOTTOM CONNECTOR
UPRIGHT
TOP CONNECTOR
TOP CAP
TOP TRACK - ROUND SECTION
TOP TRACK - STRAIGHT SECTION
BUTTRESS ASSEMBLY
BUTTRESS POST
CAP EXTENSION - STRAIGHT SECTION
FOOT BEAM
SPLICE BRACKET
PRESSURE PLATE
SPACER
BOLT 1/2" X 3" (12,7 mm X 76,2 mm)
NUT 1/2" (12,7 mm)
WASHER 1/2" (12,7 mm)
BOLT CAP COVER
STYROFOAM BLOCK
TENSION STRAP
1/4" X 5/8" (6,35 mm X 15,88 mm)
STANDARD SCREW SILVER 1''
AA
BB
DD
A
B
C
D
E
F
G
J
K
L
O
P
S
T
N
UB
U
UU
V
BA
BC
Y
Z
BOTTOM TRACK - ROUND SECTION
BOTTOM TRACK -
STRAIGHT SECTION
ZL LONG SCREW 1-1/2''
BB
Z
(silver)
UB
UUU V
* SEE DRAWING PARTS NEXT PAGE
ZL

4/23
PARTS LIST (continued)
DD
B
F
U
BA
UB
BC
O
J
S
V
L
N
UB
T
Y
X
BB
E
Z
Z
Z
Z
V
UU
V
BA
P
ZL
Z
Z
A
DD
AA
BB
C
G
E
D
F
K
ZL
Z
Z
Z
Straight section Round section

SIZE
DISTANCE (A-B)
POOL RADIUS (R)POOL WIDTH (D)POOL LENGTH (E)
18'x38' (6.25 m)20'-6"(2.72 m)8'-11"17' 10"(5.44 m) (11.68 m)38' 4"
10'x16' (1.68 m)5'-6"(1.52 m)5'10' (3.05 m) (4.72 m)15' 6"
10'x18' (2.51 m)8'-3"(1.52 m)5'10'(3.05 m) (5.56 m)18' 3"
10'x21' (3.35 m)11'-0"(1.52 m)5'10'(3.05 m) (6.40m)21'
12'x18' (1.98m)6'-61/2"(1.82 m)5' 11-3/4" 11' 11-1/2"(3.65 m) (5.64 m)18' 6"
12'x24' (3.65 m)12'-0"(1.82 m)5' 11-3/4" 11' 11-1/2"(3.65 m) (7.30 m)23' 11-1/2"
12'x27' (4.47m)14'-8"(1.82 m)5' 11-3/4" 11' 11-1/2"(3.65 m) (8.14 m)26' 8-1/4"
13'x17' (1.21m)3'-11 3/4" (2.13 m)6' 6"13'(3.96m) (5.18 m)16' 11-3/4"
13'x23' (2.87 m)9'-5"(2.13 m)6' 6"13'(3.96m) (6.83 m)22' 5"
14'x20' (1.68 m)5'-6"(2.31 m)7' 1/2"14' 1"(4.29 m) (5.97m)19' 7"
14'x25' (3.35 m)11'-0"(2.31 m)7' 1/2"14' 1"(4.29 m) (7.65 m)25' 1"
15'x20' (1.42m)4'-8"(2.44 m)7' 6"15'(4.57 m) (5.99 m)19' 8"
15'x26' (3.07 m)10'-1"(2.44 m)7' 6"15'(4.57 m) (7.65 m)25' 1"
15'x31' (4.75 m)15'-7"(2.44 m)7' 6"15'(4.57 m) (9.33 m)30' 7-1/4"
16'x26' (3.23 m)10'-71/2"(2.59 m)7' 11-1/2"15' 11"(4.85 m) (8.08 m)26' 6"
16'x32' (4.90m)16'-1"(2.59 m)7' 11-1/2"15' 11"(4.85 m) (9.75 m)32'
18'x33' (4.57 m)15'-0"(2.72 m)
8'-11"17' 10"(5.44 m) (10.00 m)32' 10"
18'x44' (7.92m)26'-0"(2.72 m)8'-11"17' 10"(5.44 m) (13.36 m)43' 10"
8'x19' (3.35 m)11'-0"(1.40m)4' 1/2"8' 1"(2.46m) (5.82 m)19' 1"
8'x16' (2.51 m)8'-3"(1.40m)4' 1/2"8' 1"(2.46m) (4.98m)16' 4"
8'x14' (1.68 m)5'-6"(1.40m)4' 1/2"8' 1"(2.46m) (4.14 m)13' 7"
7'x15' (2.51 m)8'-3"(1.07 m)3' 6"7'(2.13 m) (4.65 m)15' 3"
7'x13' (1.68 m)5'-6"(1.07 m)3' 6"7'(2.13 m) (3.81 m)12' 6"
12'x21' (2.82 m)9’-3"(1.82 m)5' 11-3/4" 11' 11-1/2"(3.65 m) (6.46m)21' 2-1/2"
15'x23' (2.51 m)8'-3"(2.44 m)7' 6"15'(4.57 m) (7.09 m)23 3"
When selecting a site for your pool, take into account your local
regulations regarding fences and utility laws pertaining to elec-
trical cables, as well as the landscaping which you are planning
once the pool is installed.
Mark the approximate location of the 4 corners of the pool to con-
firm pool orientation and available space in your yard. (Refer to
Chart 1.1)
Drive a stake into the ground for points A and B using the distance
of the straight section according to your pool size referenced in
Chart 1.1. It is important that your A and B measurements are exact
to ensure proper installation and avoid problems further on.
Draw two half circles from the A and B stakes using the radius (R)
according to Chart 1.1
Join the two half circles with two straight lines parallel to line (AB)
at the exact distance (R) from line (AB), refer to chart 1.1
Measure and verify that your total length (E) matches Chart 1.1.
Remove all sod from the area plus an addtionnal 6" (15 cm) around
the pool outline. (See illustration 1.1)
5/23
Chart 1.1
SITE PREPARATION
1
E
A-B
POOL
SOD
REMOVAL
D
6” (15 cm)
6” (15 cm)
R
R
LINE PARALLEL
TO(A-B)
A
B
Illustration 1.1

6/23
DO NOT ALLOW WATER TO ACCUMULATE AROUND POOL. Make
sure to provide good drainage away from the pool.
SITE LEVELLING
The entire area must be perfectly levelled, using a proper levelling
tool. Eliminate any protrusions. Ensure that the surface is free of
debris such as rocks, wood, nutgrass, weeds and other debris.
Start by finding the center points (C) of both side sections using
points A&B. The center point of each side section should be at equal
distance from points A&B. Once both center points(C) are located,
start locating trenches from these points. (Refer to illustration 2.1)
TRENCHES FOR BUTTRESS ASSEMBLIES
Before diging you must refer to the proper chart and illustration
(See next pages)
Dig trenches to a depth equal to the thickness of the patio blocks
(a minimum thickness of a 1 3/4" is recommended) and the but-
tress assembly beam 3 1/4" (8 cm).
(Refer to illustrations 2.2)
Make sure trenches are smooth and levelled without compacting
them.
Refer to illustration 2.3 for trench layout detail, all grey shaded
areas.
Place and level patio blocks into trenches. Make sure that the top
of patio block is 3 1/4" (8 cm) deep in order to accomodate for the
buttress assembly thickness. (Refer to illustration 2.4) Top of but-
tress assembly must be level with the soil.
LEVELLING AND TRENCH PREPARATION
2
16” (48,8 cm)
48” (121,92 cm)
Thickness of
thepatioblock
31/4” (8,25 cm)
GROUND
LEVEL
PATIOBLOCK
31/4” (8cm)
TRENCHES
DEEPERSECTIONS
FOR PATIOBLOCKS
SOIL
48”
(121,92 cm)
Illustration 2.2
Illustration 2.3
A
B
C
C
=
=
=
=
TRENCH
OUTLINES
Illustration 2.1
TRENCHES
PATIOBLOCKS
8” x 16”
SOIL
48”
(121,92 cm)
31/4” (8cm)
BUTTRESS ASSEMBLY LOCATIONS
Illustration 2.4

7/23
SIZE
DISTANCE (A-B)
POOL RADIUS (R)POOL WIDTH (D)POOL LENGTH (E) PATIO
BLOCK
COMPACTION
SAND
STONE
DUST
10'x16'(1.68 m)5'-6"(1.52 m)5'10' (3.05 m) (4.72 m)15' 6"16 1 ton1/3ton
12'x18'(1.98 m)6'-61/2"(1.82 m)5' 11-3/4" 11' 11-1/2"(3.65 m) (5.64 m)18' 6"1411/2ton3/4 ton
13'x17' (1.21 m)3'-11 3/4" (2.13 m)6' 6"13'(3.96 m) (5.18 m)16' 11-3/4" 1411/2ton3/4 ton
14'x20'(1.68 m)5'-6"(2.31 m)7' 1/2"14' 1"(4.29 m) (5.97 m)19' 7" 16 1 1/2ton3/4 ton
15'x20'(1.42m)4'-8"(2.44 m)7' 6"15'(4.57 m) (5.99 m)19' 8" 16 1 1/2ton3/4 ton
8'x14' (1.68 m)5'-6"(1.40m)4' 1/2"8' 1"(2.46m) (4.14 m)13' 7"141ton1/3ton
7'x13'(1.68 m)5'-6"(1.07 m)3' 6"7'(2.13 m) (3.81 m)12' 6"141ton1/3ton
DISTANCE A - B
AB
R
TRENCHES
3-1/4" - 8cm
6 "
(15 cm)
48"
(122 cm) 32"
(79 cm)
16"
(40.6cm)
R
6"
(15 cm)
6'3-1/2"(1,92 m)
22-3/4”
(58 cm)
10” (25 cm)
Trenches for patioblocks
Soil
C
LEVELLING AND TRENCH PREPARATION
2

8/23
SIZE
DISTANCE (A-B)
POOL RADIUS (R)POOL WIDTH (D)POOL LENGTH (E) PATIO
BLOCK
COMPACTION
SAND
STONE
DUST
10'x18'(2.51 m)8'-3"(1.52 m)5'10'(3.05 m) (5.56 m)18' 3"18 1 ton1/3ton
8'x16'(2.51 m)8'-3"(1.40m)4' 1/2"8' 1"(2.46m) (4.98 m)16' 4" 16 1 ton1/3ton
7'x15'(2.51 m)8'-3"(1.07m)3' 6"7'(2.13 m) (4.65 m)15' 3"16 1 ton1/3ton
12'x21' (2.82 m)9'-3"(1.82 m)5' 11-3/4" 11' 11-1/2"(3.65 m) (6.46m)21' 2-1/2"16 1 1/2ton3/4 ton
15'x23'(2.51 m)8'-3"(2.44 m)7' 6"15'(4.57 m) (7.09 m)23 3" 16 11/2ton3/4 ton
LEVELLING AND TRENCH PREPARATION
2
DISTANCE A - B
R
TRENCHES
3-1/4" - 8cm
6"
(15 cm)
48"
(122 cm) 32"
(79 cm)
16"
(40.6cm)
R
6"
(15 cm)
9'1/4"(2,75 m)
10” (25 cm)
22-3/4”
(58 cm)
Trenches for patioblocks
Soil
AB
C

9/23
SIZE
DISTANCE (A-B)
POOL RADIUS (R)POOL WIDTH (D)POOL LENGTH (E) PATIO
BLOCK
COMPACTION
SAND
STONE
DUST
10'x21' (3.35 m)11'-0"(1.52 m)5'10'(3.05 m) (6.40m)21' 20 1 ton1/3ton
12'x24' (3.65 m)12'-0"(1.82 m)5' 11-3/4" 11' 11-1/2"x 23'(3.65 m) (7.30 m)23' 11-1/2"18 1 1/2ton3/4 ton
13'x23'(2.87 m)9'-5"(2.13 m)6' 6"13'(3.96 m) (6.83 m)22' 5"18 1 1/2ton3/4 ton
14'x25'(3.35 m) (2.31 m)7' 1/2"14' 1"(4.29 m) (7.65 m)25' 1"20 1 1/2ton3/4 ton
15'x26'(3.07 m)10'-1"(2.44 m)7' 6"15'(4.57 m) (7.65 m)25' 1"20 2 tons 11/2ton
16'x26'(3.23 m)10'-71/2"(2.59 m)7' 11-1/2"15' 11"(4.85 m) (8.08 m)26' 6"20 2 tons 11/2ton
8'x19'(3.35 m)11'-0"(1.40m)4' 1/2"8' 1"(2.46m) (5.82 m)19' 1" 18 1 ton1/3ton
11'-0"
LEVELLING AND TRENCH PREPARATION
2
DISTANCE A - B
R
TRENCHES
3-1/4" - 8cm
6"
(15 cm)
48"
(122 cm) 32"
(79 cm)
16"
(40.6cm)
R
6"
(15 cm)
11'9"(3,58 m)
10” (25 cm)
22-3/4”
(58 cm)
22-3/4”
(58 cm)
Trenches for patioblocks
Soil
AB
C

10/23
SIZE
DISTANCE (A-B)
POOL RADIUS (R)POOL WIDTH (D)POOL LENGTH (E) PATIO
BLOCK
COMPACTION
SAND
STONE
DUST
12'x27' (4.47m)14'-8"(1.82 m)5' 11-3/4" 11' 11-1/2"(3.65 m) (8.14 m)26' 8-1/4" 20 1 1/2ton3/4 ton
LEVELLING AND TRENCH PREPARATION
2
DISTANCE A - B
R
TRENCHES
3-1/4" - 8cm
6"
(15 cm)
48"
(122 cm) 32"
(79 cm)
16"
(40.6cm)
R
6"
(15 cm)
14'5-3/4"(4,39 m)
10” (25 cm)
10” (25 cm)
22-3/4”
(58 cm)
Trenches for patioblocks
Soil
AB
C

11/23
SIZE
DISTANCE (A-B)
POOL RADIUS (R)POOL WIDTH (D)POOL LENGTH (E) PATIO
BLOCK
COMPACTION
SAND
STONE
DUST
15'x31' (4.75 m)15'-7"(2.44 m)7' 6"15'(4.57 m) (9.33 m)30' 7-1/4" 242tons 11/2ton
16'x32'(4.90 m)16'-1"(2.59 m)7' 11-1/2"15' 11"(4.85 m) (9.75 m)32'242tons 11/2ton
18'x33'(4.57 m)15'-0"(2.72 m)8'-11"17' 10"(5.44 m) (10.00 m)32' 10"26 2 tons 11/2ton
LEVELLING AND TRENCH PREPARATION
2
DISTANCE A - B
R
TRENCHES
3-1/4" - 8cm
6"
(15 cm)
48"
(122 cm) 32"
(79 cm)
16"
(40.6cm)
R
6"
(15 cm)
17'2-1/2"(5,24 m)
10” (25 cm)
22-3/4”
(58 cm)
22-3/4”
(58 cm)
Trenches for patioblocks
Soil
AB
C

SIZE
DISTANCE (A-B)
POOL RADIUS (R)POOL WIDTH (D)POOL LENGTH (E) PATIO
BLOCK
COMPACTION
SAND
STONE
DUST
18'x38'(6.25 m)20'-6"(2.72 m)8'-11"17' 10"(5.44 m) (11.68 m)38' 4" 30 3tons 21/2ton
LEVELLING AND TRENCH PREPARATION
2
DISTANCE A - B
R
6"
(15 cm)
48"
(122 cm) 32"
(79 cm)
16"
(40.6cm)
R
6"
(15 cm)
22'8"(6,91 m)
10” (25 cm)
22-3/4”
(58 cm)
22-3/4”
(58 cm)
Trenches for patioblocks
Soil
TRENCHES
3-1/4" - 8cm
AB
C
12/23

13/23
SIZE
DISTANCE (A-B)
POOL RADIUS (R)POOL WIDTH (D)POOL LENGTH (E) PATIO
BLOCK
COMPACTION
SAND
STONE
DUST
18'x44' (7.92 m)26'-0"(2.72 m)8'-11"17' 10"(5.44 m) (13.36 m)43' 10"343tons 21/2ton
LEVELLING AND TRENCH PREPARATION
2
DISTANCE A - B
R
TRENCHES
3-1/4" - 8cm
6"
(15 cm)
48"
(122 cm) 32"
(79 cm)
16"
(40.6cm)
R
6"
(15 cm)
28'2-1/2"(8,60 m)
10” (25 cm)
22-3/4”
(58 cm)
22-3/4”
(58 cm)
Trenches for patioblocks
Soil
AB
C

14/23
BUTTRESS POST (O)
SPACER(UB)
BOLT 1/2” X 3” (U)
NUT 1/2” (UU)
WASHER1/2” (V)
SPACER(UB)
Refer to Illustration 3.1. Join splice brackets (T) to the foot beam
(S) using bolts 1/2" X 3" (12.7 mm x 76.2 mm) (U), spacers (UB),
nuts (UU) and washers (V). Remember to insert both spacers (UB)
in the foot beam aligned with the holes, so the bolts go through the
spacers when they are inserted.
STRAIGHT SECTION FOOT BEAM ASSEMBLY
3
SPLICE BRACKET (T)
WASHER1/2” (V)
NUT 1/2” (UU)
FOOT BEAM (S)
SPACER(UB)
BOLT 1/2” X 3” (U)
SPACER(UB)
Illustration 3.1
Refer to illustration 4.1. Assemble the buttress post using bolts 1/2"
X 3" (12,7 mm X 76,2 mm) (U), nuts (UU), washers (V) and spacers
Remember to insert both spacers (UB) between the splice braket
in the buttress aligned with the holes so the bolts go through the
spacers when they are inserted.
Refer to Illustration 4.2. Cover the bolt heads with bolt cap covers
(BA) and insert the styrofoam blocks (BC) at both ends of foot
beam.
1/2” BOLT CAPCOVER(BA)
STYROFOAM BLOCK (BC)
FOOT BEAM (S)
STYROFOAM BLOCK (BC)
Illustration 4.2Illustration 4.1
STRAIGHT SECTION BUTTRESS POST ASSEMBLY
4

15/23
BOTTOM TRACK (straight section) AND PRESSURE PLATE
5
Refer to illustration 6.1 and chart 1.3 carefully. You are now ready
to assemble the tension strap rows according to your respective
pool size.
Refer to Illustration 6.1 : If there is more than one steel tension strap
per row, assemble each joint of the straps together using 4 bolts
and nuts (BB) 1/4" X 5/8" (6,35 mm X 15,88 mm), making sure
the bolt heads are on top.
Attach the assembled tension straps to the foot beams on both
sides of the pool using 4 standard screws ''Z'' (silver).
TENSION STRAP INSTALLATION
6
BUTTRESS
ASSEMBLY
BOLT (BB)
NUT (BB)
STANDARD SCREWS(Z)SILVER
TENSION STRAPS
Illustration 6.1
8x14
3
3
1
8x16
4
4
1
8x19
5
5
1
10x16
3
3
1
10x18
4
4
1
10x21
5
5
1
12x18
6
3
2
12x24
10
5
2
12x27
12
6
2
13x17
6
3
2
13x23
10
5
2
14x20
6
3
2
14x25
10
5
2
15x20
6
3
2
15x26
10
5
2
15x31
14
7
2
16x26
15
5
3
16x32
21
7
3
18x33
21
7
3
18x38
27
9
3
18x44
33
11
3
POOL SIZES
TENSION STRAPS
QUANTITY (TOTAL)
ROWSTOASSEMBLE
STRAPS PERROW
7x13
3
3
1
TENSION STRAPS
LENGHT (Each - W x L)
2" X 24-7/8"2" X 47-7/8"2" X 43-1/2"2" X 50-1/8"2" X 42-1/32"
7x15
4
4
1
12x21
8
4
2
15x23
2" X 55-9/16"
2" X 37-15/16"
2" X 11-1/2"2" X 49-15/16"
4
12
3
Position the buttress post assemblies in the center of the patio block
in the previously dug trenches.
Refer to Illustration 5.1 : Once the buttress post assemblies are
placed in the trenches, install the straight section bottom tracks.
Refer to Illustration 5.2 : Attach pressure plates in between the foot
beams with 4 standard screw ''Z'' (silver).
BOTTOM TRACK
STRAIGHT SECTION STANDARD
SCREW “Z”
PRESSURE PLATE
PATIO BLOCK
Illustration 5.2
Illustration 5.1
WARNING:
Never use an impact gunfor wall and
tension straps screws.
Minimumtorqueforce of 60 inch pounds
to maximumof 85 inch pounds.
Chart 1.3

Refer to illustration 7.1. Starting with round section : Place the end
of the first round section bottom track on the foot beam so it is in-
serted into the outside notch of the last buttress post of each
straight section. Place the first bottom connector of the round sec-
tion, at the other end of the bottom track.
Repeat this procedure until the both half circles are completed.
Important : Before going to the next step, make sure that the centre
of the pool is properly squared and the tension straps are straight
with no buckles. Refer to illustration 7.2.
The two measurements, D1 and D2, should
be exactly the same.
If they are not, adjust one entire straight side
as necessary.
This is a very important step,
do not continue until measure-
ments are identical.
16/23
ROUND SECTION BOTTOM TRACK INSTALLATION
7
1STBOTTOM TRACK
ROUND SECTION
1 BOTTOM CONNECTOR
ROUND SECTION
ST
BOTTOM TRACK
STRAIGHT SECTION
D1
D1
D2
D2
Illustration 7.2
Illustration 7.1

WARNING: Never use an impact gunfor wall and
tension straps screws. Minimumtorqueforce of
60 inch poundsto maximumof 85 inch pounds.
BOLT End
Start
NUT
Insideof pool
Outsideof pool
!
IMPORTANT! A non-compliant installation according to manufacturers' instruction will void the warranty.
A faulty installation will cause the wall joint to split open which could result in serious and/or fatal injuries!
Outsideof pool
Insideof pool
Fold
Fold
TOP VIEW
17/23
WALL INSTALLATION
8
When installing the steel wall, it is important to do so in a loca-
tion protected from the wind or on a day without any wind.
Before uncoiling the wall, add sand for the pool bottom and cove.
Choose the filter location beside a round section (never in a straight
section). The starting point should be at that location of the skimmer
and water return holes and be sure it is at least a minimum of 4’
(1.2 m) away from the pool. Make sure the pre-punched holes for
the skimmer and water return are at the top and facing the planned
location of your filter.
Begin inserting the wall into the bottom tracks in the middle of a
bottom connector. At first, the wall is kept in place with one or two
stakes and strings (or extra people). One person uncoils the wall
on two beams or planks, while a second person inserts it in the
bottom tracks. Do not uncoil more than 10' (3 m) of wall before
you install a support bar or stake and string to hold the wall in place.
Also in the straight section, temporarily secure the wall with trans-
parent tape to the buttress posts.
Once the wall is completely uncoiled, you may find that it is too
long or that both ends do not meet perfectly. If such is the case,
adjust the tracks and bottom connectors until wall holes line up.
If this does not work, roll up the wall again, check measurements
as per chart 1.4 (next page), adjust tracks and bottom connectors
and if applicable, uncoil the wall again. If the spread is too wide,
measure the wall and check it against the chart of actual wall
lengths below. Join both ends of the wall by orienting folds outward
to hide the exclamation icon per illustration below.
Note : If the wall joint is positioned properly, you should no
longer see the exclamation icon. If you can see the icon, you
must reverse the overlap.
Insert bolts and nuts (BB) in every hole and tighten with wrench
(screw head on water side of wall). Tape over screw heads with 3
layers of duck tape. You must use the wall bolts and nuts supplied
in the wall box.
DET
TA
AIL 8.
.
1
WARNING:
Never use an impact gunfor wall and
tension straps screws.
Minimumtorqueforce of 60 inch pounds
to maximumof 85 inch pounds.
CO
M
P
PA
AC
SAND
ST
C
TION
PLANKS
TA
AKE
AND
STRING
BOTTOM
CONNECTOR
BOTTOM TRACK
WATER
RETURN
HOLE
WALL
SKIMMERHOLE
PATIOBLOCK
End

UPRIGHT INSTALLATION (ROUND SECTION)
10
Assemble the upright to the bottom connector using the 1 screw
"Z" on each side.
BOTTOM
CONNECTOR
BOTTOM TRACK
SCREW
‘’Z’’
UPRIGHT
PATIO
BLOCK
18/23
SAND BASE & SAND COVE
9
WALL INSTALLATION (CONTINUED)
8
8x14
36' 5"
(11.10 m)
8x168x1910x1610x1810x2112x1812x2412x27 13x17
Chart of actual wall lenghts
41' 11"
(12.78 m)
47' 5"
(14.45m)
42' 5"
(12.92 m)
53' 5"
(16.25 m)
47' 11"
(14.60 m)
50' 7"
(15.42m)
61' 7"
(18.77 m)
67' 1"
(20.45m)
48' 11"
(14.91 m)
7x13
33' 0"
(10.06 m)
13x23 14x2014x2515x2015x2615x3116x2616x32 18x33 18x3818x44
59' 10"
(18.24 m)
55' 3"
(16.84 m)
66' 3"
(20.19 m)
56' 6" 67' 5" 78' 4"
(17.22 m) (20.55 m) (23.88 m)
71' 2"
(21.69 m)
82' 2"
(25.06 m)
86' 97'
54' (x 2)
(26.21 m) (29.56 m) (16.46mx 2)
15x23
63' 7"
(19.38 m)
12x21
56' 1"
(17.09 m)
7x15
38' 6"
(11.73 m)
Chart 1.4
You can now spread 2" (5 cm) of compaction sand, which is al-
ready inside the pool perimeter. Also, build a 4" cove, not needded
if prefab cove used 4" (10 cm) thick around the inside base of the
wall. Compact the center with a tampering tool or vibrating plate
and the cove by hand. The cove will protect the liner from the sharp
edges of the bottom wall tracks.
Level compaction sand one last time. Make sure that any sharp
stones, debris or roots have been removed from the surface. For
better protection, spray sand with water and pack it once more until
the base is smooth, even and levelled.
12" (30cm)
LINER
4'' (10cm)
WALL
SAND COVE
(or PREFAB COVE)
COMPACTION
SAND
2'' (5 cm)
6'' (15 cm)
total

19/23
This is to complement liner manufacturer’s instructions. If you
have any questions, please refer to the liner manufacturer’s in-
structions, first.
1- Overlap liner : Install the coping strip* around the perimeter of
the pool, then the top track on the wall, followed by the top plate on
each upright. As the pool is filling, adjust the length of the liner on
the wall by removing one top track at a time. Never remove more
than one top track at a time.
2- U-Bead (J-Hook) (installed directly on the wall) : Hang the liner
bead on the top of the wall and install the top track to secure it fol-
lowed by the top plate on each upright.
3- Using liner retainer : Install the liner retainer on the top of the wall
around the perimeter of the pool and then hang the liner bead in the
lower part of the liner retainer around the whole pool. Install the top
track to secure followed by the top plate on each upright.
*Required but not included with all kits.
OVERLAP
LINER
TOP TRACK
WALL
COPING
STRIP*
TOP TRACK INSTALLATION (3 OPTIONS)
12
U-BEAD
LINER
(J-HOOK)
TOP TRACK
WALL
UNIVERSAL
BEAD or BEADED
TOP TRACK
WALL
LINER RETAINER *
(bead receiver)
1
2
3
VINYL LINER INSTALLATION
11
See the liner manufacturer's instruction

20/23
TOP CONNECTOR INSTALLATION
13
Install the top connector into the upright and secure with 1 screw
''Z'' on each side.
SCREW ‘’Z’’
UPRIGHT
TOP CONNECTOR
Install the top connector into the uprights and secure with 1 screw
''Z'' on each side. Install the cap extension into the buttress post
with 1 screw ''Z'' on each side.
TOP CONNECTOR
SCREW ‘’Z’’
BUTTRESS POST
CAP EXTENSION
STRAIGHT SECTION
ROUND SECTIONS
STRAIGHT SECTIONS
Table of contents
Other Cornelius Swimming Pool manuals
Popular Swimming Pool manuals by other brands

Trigano Jardin
Trigano Jardin OSMOSE Oval Assembly instructions

Waterman
Waterman Standard Series Assembly and operating instructions

Bestway
Bestway POWER STEEL 2622026 owner's manual

Wilbar
Wilbar Optimum Pool Freeform 95-0778 General instructions

Bestway
Bestway Hydrium 56668 owner's manual

Intex
Intex Prism Frame 126716GN owner's manual