Corvette A2DIY-C5CD Instruction Manual

Courtesy of: DiscountCarStereo.com
Serving the internet community since 1995
Created January 16, 2013
Revised May 10, 2023

PRODUCT SAFETY & DISCLAIMER
READ ALL INSTRUCTIONS CAREFULLY BEFORE INSTALLING, FAILURE TO DO SO MAY CAUSE
PERSONAL INJURY OR DAMAGE TO PRODUCT AND/OR PROPERTY
•This installation guide is provided as a GENERAL installation guide, some vehicles vary and
may require additional steps. We do not accept responsibility for third party labor charges
or modifications. Exercise due-diligence when installing this product.
•We do not accept any responsibility for vehicle damage or personal injury resulting from
the installation of this product.
•Careless installation and operation can result in equipment damage.
Click here if installing older push button version
Requirement
Functioning 12-disc changer in trunk or hatch
Introduction: Updated version
If looking to add Bluetooth features to your American classic with trunk/hatch
mounted 12-disc changer you should consider the A2DIY-C5CD Kit. This revised
easy to install kit is essential to adding Bluetooth features to the C5 radio.
This module sounds great for mobile conversations, streaming Pandora, Sirius
radio, Apple music, audiobook, podcast and more. The included media button
(remote) can be mounted on dashboard or steering wheel to adjust volume,
track selection and more. In addition, an optional USB type-C charging kit is
available to keep devices charged while on the road. Thanks to the A2DIY-C5CD
module users keep the radio and CD changer while enjoying Bluetooth
features only available on newer cars.
Warning: A functioning 12-disc changer required for this module to work.
Disc will continuously spin while in Bluetooth mode.
If changer is missing or malfunctions; this module will not work.
See Frequently Asked question at the end of this guide for more details.
Installation (connects at radio)
Remove radio from dash to gain access to connectors.
Click link below
https://www.youtube.com/watch?v=WTbWYNJTSDs
1. Locate and disconnect factory 20-pin plug from radio as seen in Fig. 1
Fig. 1
radio connector
2. Connect factory 20-pin plug to 20-pin socket on installation harness
(white) See Fig. 2
Fig. 2
Fig. 3
installation harness

3. Connect installation harness 20-pin plug (black/gray) (See Fig. 3) to
radio 20-pin socket (See Fig. 1)
Required 12-disc CD changer
Playback options: (make selection at checkout)
Warning: Regardless of playback option, a functioning 12-disc changer is
required. Changer remains connected and magazine must have at
least one “Disc”which will spin continuously while in Bluetooth
mode.
These options are available and selected at checkout:
1. Retain changer playback (default)
2. Auxiliary input (instead of changer playback)
1. Retain CD changer playback:
This is the default playback option that allows retention (use) of the 12-
disc changer in trunk or hatch and if selected proceed to installation
step 4.
2. AUX input (instead of changer playback):
This option allows users to connect and play a portable audio device (e.g.,
sat radio, Alexa, iPod, Mp3 etc.) forfeiting 12-disc changer playback,
Warning: With this option, the required 12-disc CD changer remains
connected but will no longer play. Magazine must have at least one
“DISC”
1. Connect included 3.5mm audio cable (See Fig. 4) to “AUX” jack (See Fig.
5)
2. Route audio cable plug to audio device location (within 3 ft.)
3. Proceed to installation step 4.
Fig. 4
3.5male to male audio cable
Fig. 5
4. Install microphone to headliner, sun visor etc.; (See Fig. 6)
5. Route cable down pillar, under dashboard and into radio cavity.
6. Connect microphone plug to module “MIC” input.
Wind noise (Convertibles) will negatively affect phone audio. Users are
advised to install microphone away from wind/ventilation ducts etc.

Visor microphone
Fig. 6
Optional USB type-C charging kit (charge only)
Optional USB type-C charger can be added to the A2DIY-C5CD Kit. Should you
decide to add it, we suggest one of 3 installation options:
A. Flush to dash/panel requires drilling a ¾” hole
B. Flush with support bracket (Mount terminal wherever your installation
demands without drilling)
C. Freestanding- (default)
A. Flush to dash/panel (drilling required)
1. Drill a ¾” hole in the dash/panel using a step drill bit or equivalent
(See Fig. 10)
Fig. 10
Step drill bit
2. Insert cable through hole created in step 1
3. On module installation harness locate charger Fig. 11)
4. Connect cable from step 2 to charger USB type C- port
Fig. 11
5. Snap USB head to opening until flush with surface (See Fig. 12)
Fig. 12
Tuck and secure any extra wire from moving parts and test operation

B. Bracket Mount (No drilling)
1. Locate a flat surface at location of choice within 3.2 ft. of module and
mount support bracket (See Fig. 14) to surface screws (included).
Fig. 14
mounting bracket
2. Insert cable through hole in bracket (See Fig. 15) and connect to
charger (See Fig. 11)
Fig. 15
3. Snap USB head to bracket opening until flush (See Fig. 16)
Fig. 16
4. Tuck and secure any extra wire away from moving parts and test
operation (
See Bluetooth Pairing and Connection
)
Media remote
Pairing: Ensure Bluetooth is enabled on your device (e.g., Smartphone/Tablet
etc.) scan/search for available devices and select BT009 from list. Media
remote can be paired with multiple devices but can only operate one at a time.
Fig. 18
Installation:
Attach remote to steering wheel (includes holder) or dashboard to safely and
conveniently control multi-media functions even when smartphone is out of
reach.
Charging:
Media button has a built-in rechargeable 200mAH battery which may last up to
10 days. Use supplied USB cable to connect media button to charging source.
Reaches full charge after 2 hours.

Remote control operation:
Once paired with smartphone/Tablet, users may perform the following functions
on iOS devices with Bluetooth 3.0 and later and Android 4.0 or later.
These remote functions do not apply to the Corvette radio.
Bluetooth pairing and connection
This process must be carried out upon initial install after which the A2DIY-C5CD
will automatically reconnect with paired phone upon entering vehicle.
1. Go to smartphone settings and enable Bluetooth
2. Smartphone will automatically begin searching for devices.
3. Select Bluetooth name below, tap “Connect”
Note: Supports multiple phone pairings but connects to one phone at a time.
If for some reason phone fails to pair, ensure no other has paired to module in
such case you must unpair that device in other to pair another.
Warning: Caller ID, song text is not shown on radio screen. Operate
Bluetooth device via media button, VR (voice recognition) or device built-in
controls. Use radio buttons to adjust playback level and tone controls
(e.g., Bass/treble etc.)

Bluetooth operation
1. Turn ignition and radio “ON”
2. Press CD/AUX or Tape/AUX button on radio
Reminder: CD changer magazine must have at least one disc for AUX button
to function.
3. Launch smartphone music streaming application
4. Set smartphone media volume to 80% and raise radio volume knob to set
playback level. If distorted, lower audio device volume.
5. Use media remote to change tracks, volume adjustment, pause, play on
smart device (e.g., smartphone) these do not apply to the C5 radio
6. Place test call
7. Press media button Pause/Play to answer/end call
8. Press media button Pause/Play to switch between CD changer or AUX
playback and streaming
9. If correct operation is confirmed go ahead and reinstall radio.
Notes:
1. On incoming calls, ring tone plays through car speakers
2. AUX and or CD changer has playback priority.
3. *Media button does not control AUX device nor C5 radio functions. Use
AUX device built-in buttons for music selection and controls.
Feature comparison
The following chart illustrates the requirements and features offered by our
exclusive C5 Bluetooth modules.
FYI: Our Bluetooth kits are defined as music streaming and/or hands-free.
Bluetooth music streaming modules do not support hands-free calls, but our
hands-free kits include music streaming.
Features/Requirements
A2D-C5
A2DIY-C5
A2D-C5FM
A2DIY-C5CD
C5CD-HF
Retains changer playback
YES
NO
YES
YES*
YES*
Requires CD changer
YES
NO
NO
YES
YES
Audio input jack (Aux in)
NO
YES
Op
*
*
USB charging port
Op
Op
NO
Op
YES
Hands-free calls
NO
YES
NO
YES
YES
Connect to radio
YES
YES
YES
YES
YES
Connects to changer
YES
NO
NO
NO
NO
Supports voice activation
**
**
**
**
YES
Wireless remote control
Op
YES
Op
YES
Op
Push-to-talk button
NO
NO
NO
NO
YES
Controls from radio
NO
NO
NO
NO
NO
*Optional: Aux input or CD changer playback retention
** Voice Activation possible from smart device buttons
Op=optional

Frequently asked questions & troubleshooting
1. What is the difference between the C5CD-HF and A2DIY-C5CD?
The A2DIY-C5CD includes media button (remote). C5CD-HF, media button is
optional and instead a push-to-talk button with built-in microphone is
included. See feature comparison table for more.
2. What is the difference between the A2D-C5 and A2DIY-C5CD?
The A2DiY-C5 supports music streaming and Hand-free calls. The A2D-C5
supports music streaming only (no hands-free calls).
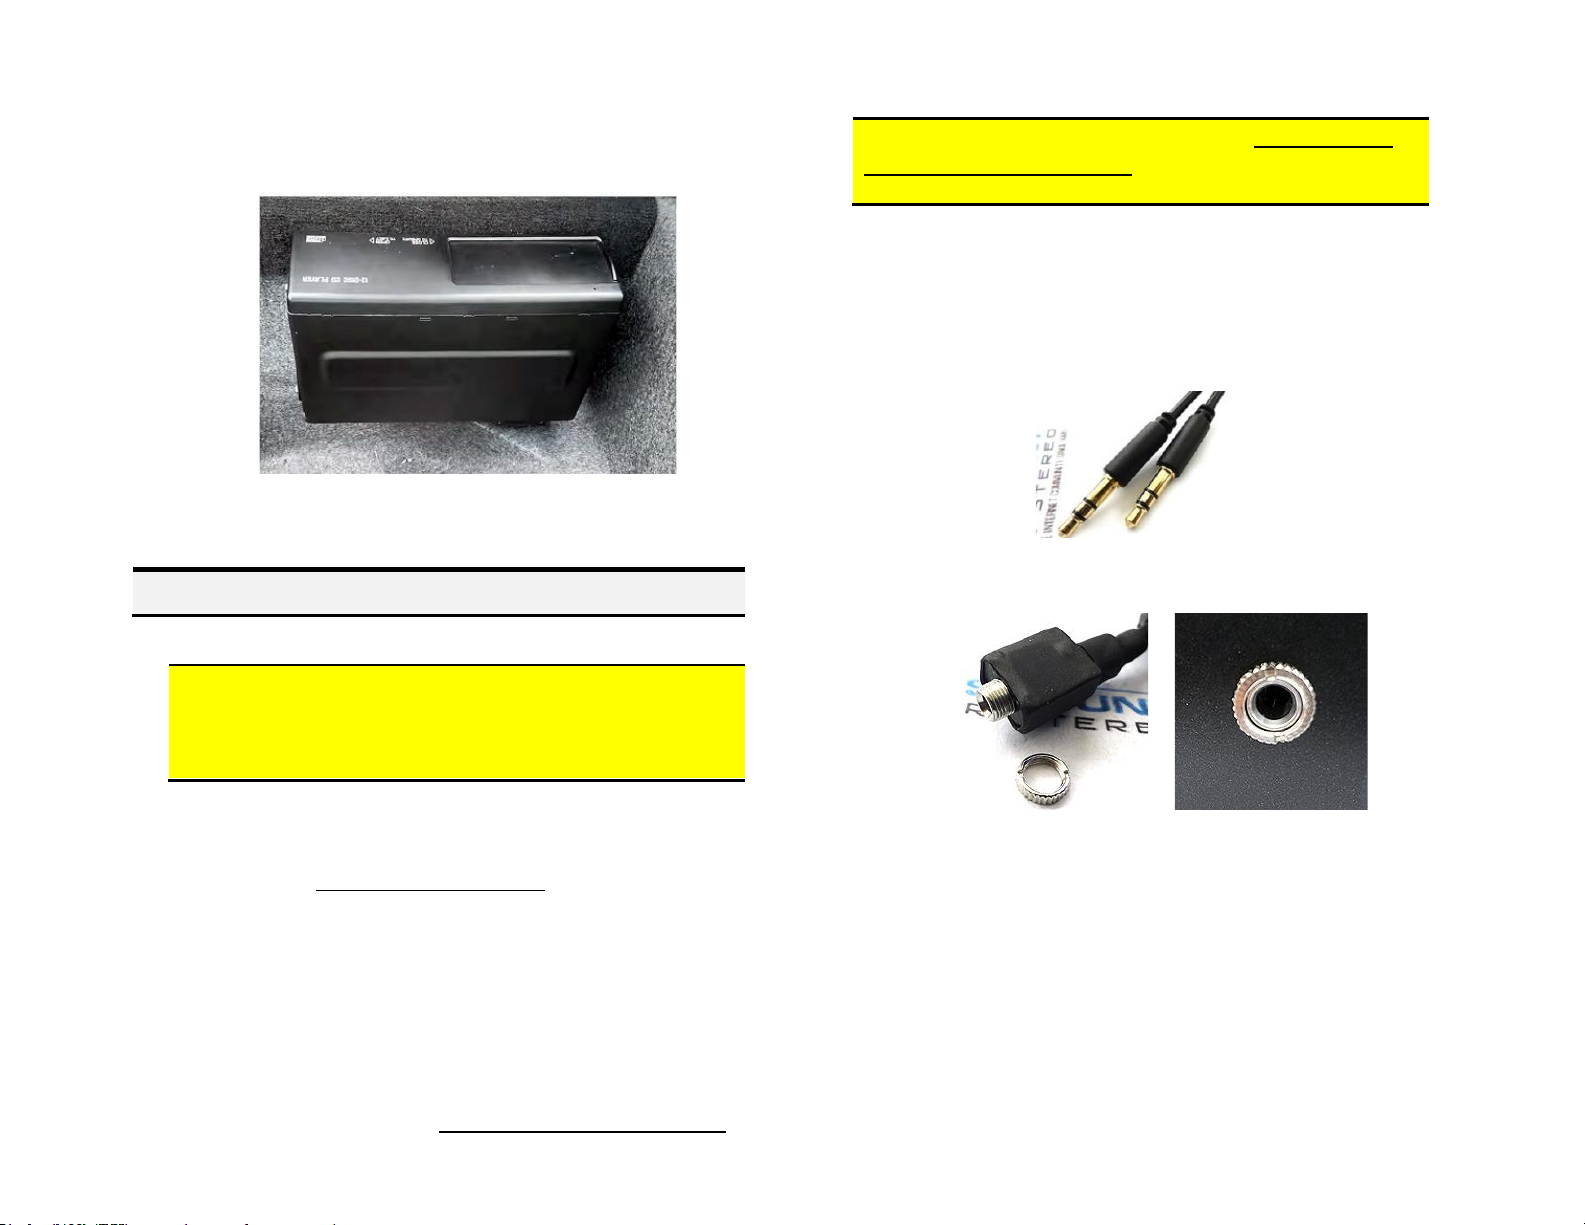
3. Does the A2DIY-C5CD work on all C5 radios?
Works in 1997-04 C5 with Theftlock AM/FM/CD or AM/FM/Cassette with
functional 12-disc changer in trunk/hatch. (Will not work if changer
malfunctions in any way).
4. Will radio display call number or song name?
NO. These features are not possible on C5 radios.
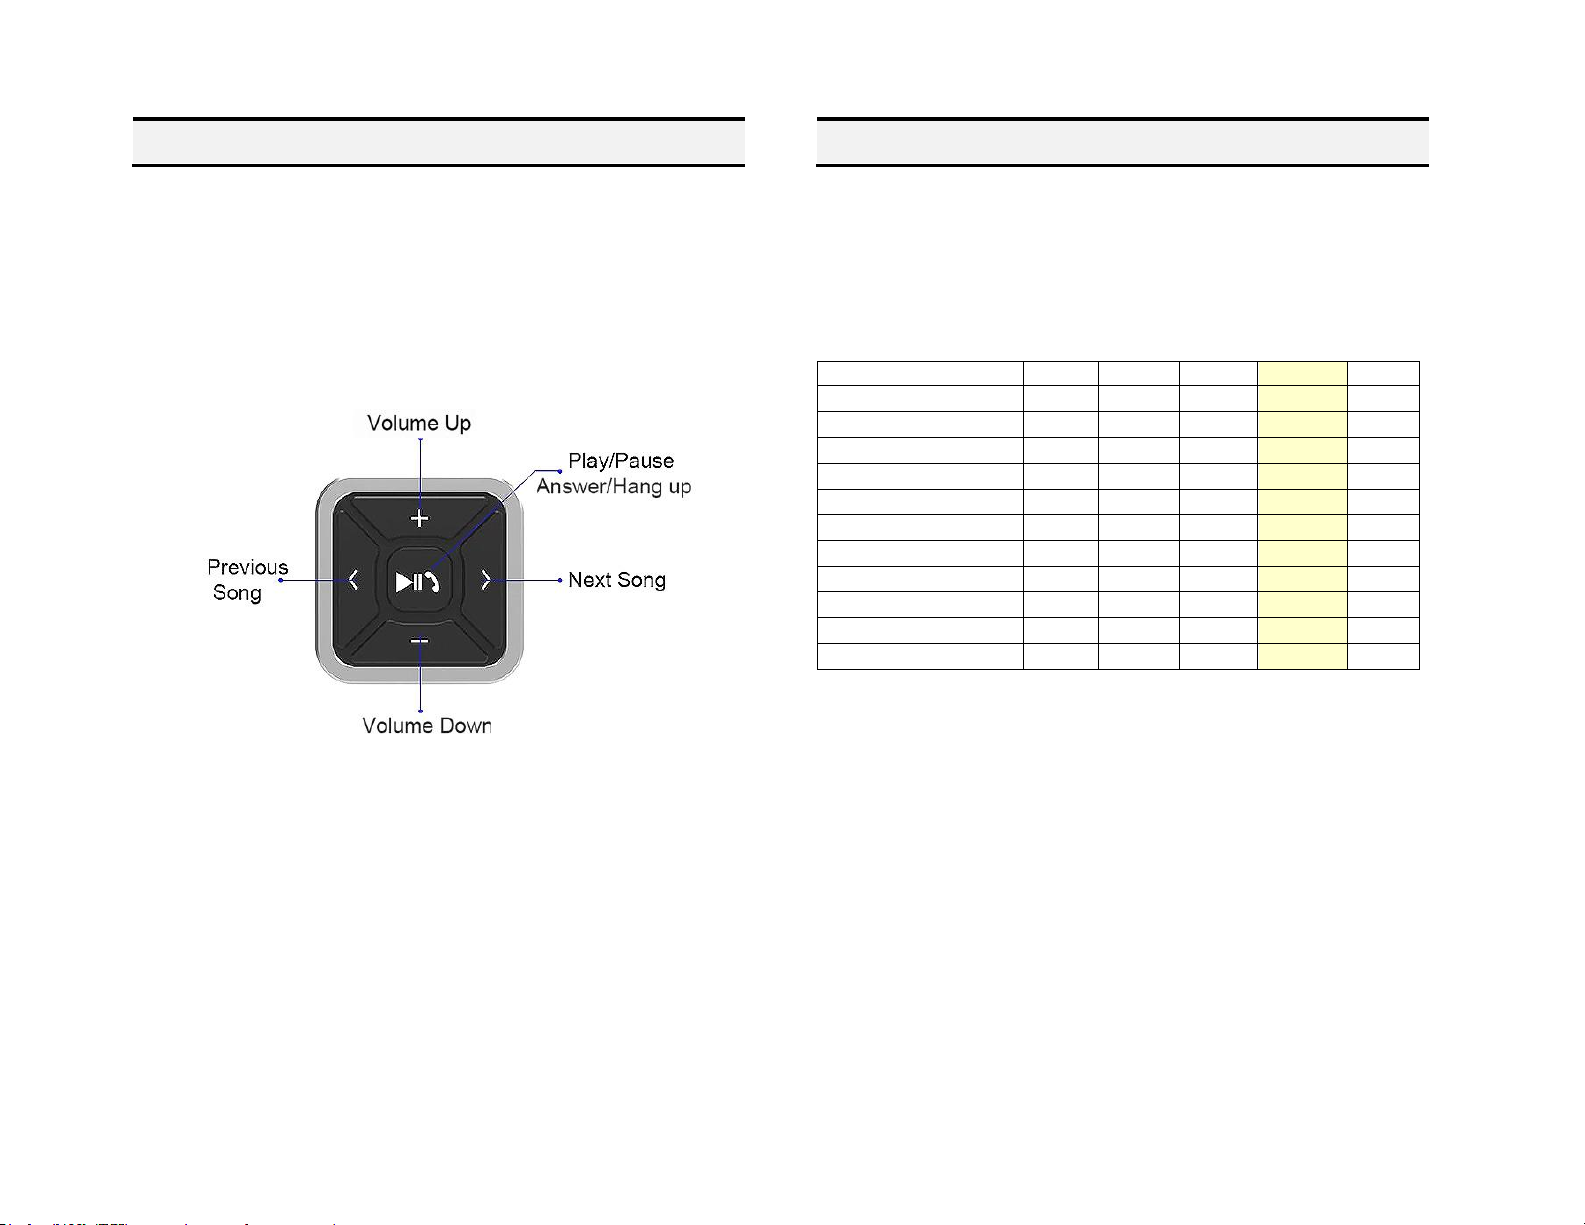
5. Is it possible to control smartphone music from radio buttons?
NO; Use smartphone or audio device built-in controls, media button or
voice commands. Use radio volume button to set playback level.
6. I selected the option to retain CD changer playback but how do I listen
to CD’s?
Press CD/AUX or Tape/AUX button on radio to enter Bluetooth mode (if
not already), then press Pause/Play button on media remote.
7. I selected option to retain changer playback plus AUX input; but how
do I listen to AUX device?
Press CD/AUX or Tape/AUX button on radio to enter Bluetooth Mode (if
not already), Connect aux device to 3.5mm jack, press Play/Pause on
media button. To stream music, repeat aforementioned steps.
8. Will radio mute when call is made and/or received?
Muting is only possible when radio is in “AUX/Bluetooth mode. If in AM/FM
mode; radio will not mute. Radio must be switched to “AUX” to hear callers
voice on car speakers.
9. My second phone does not pair or find Bluetooth module. Why not?
Ensure no other phone is paired. Allow module to enter “discovery” mode
at which point it is ready for pairing.
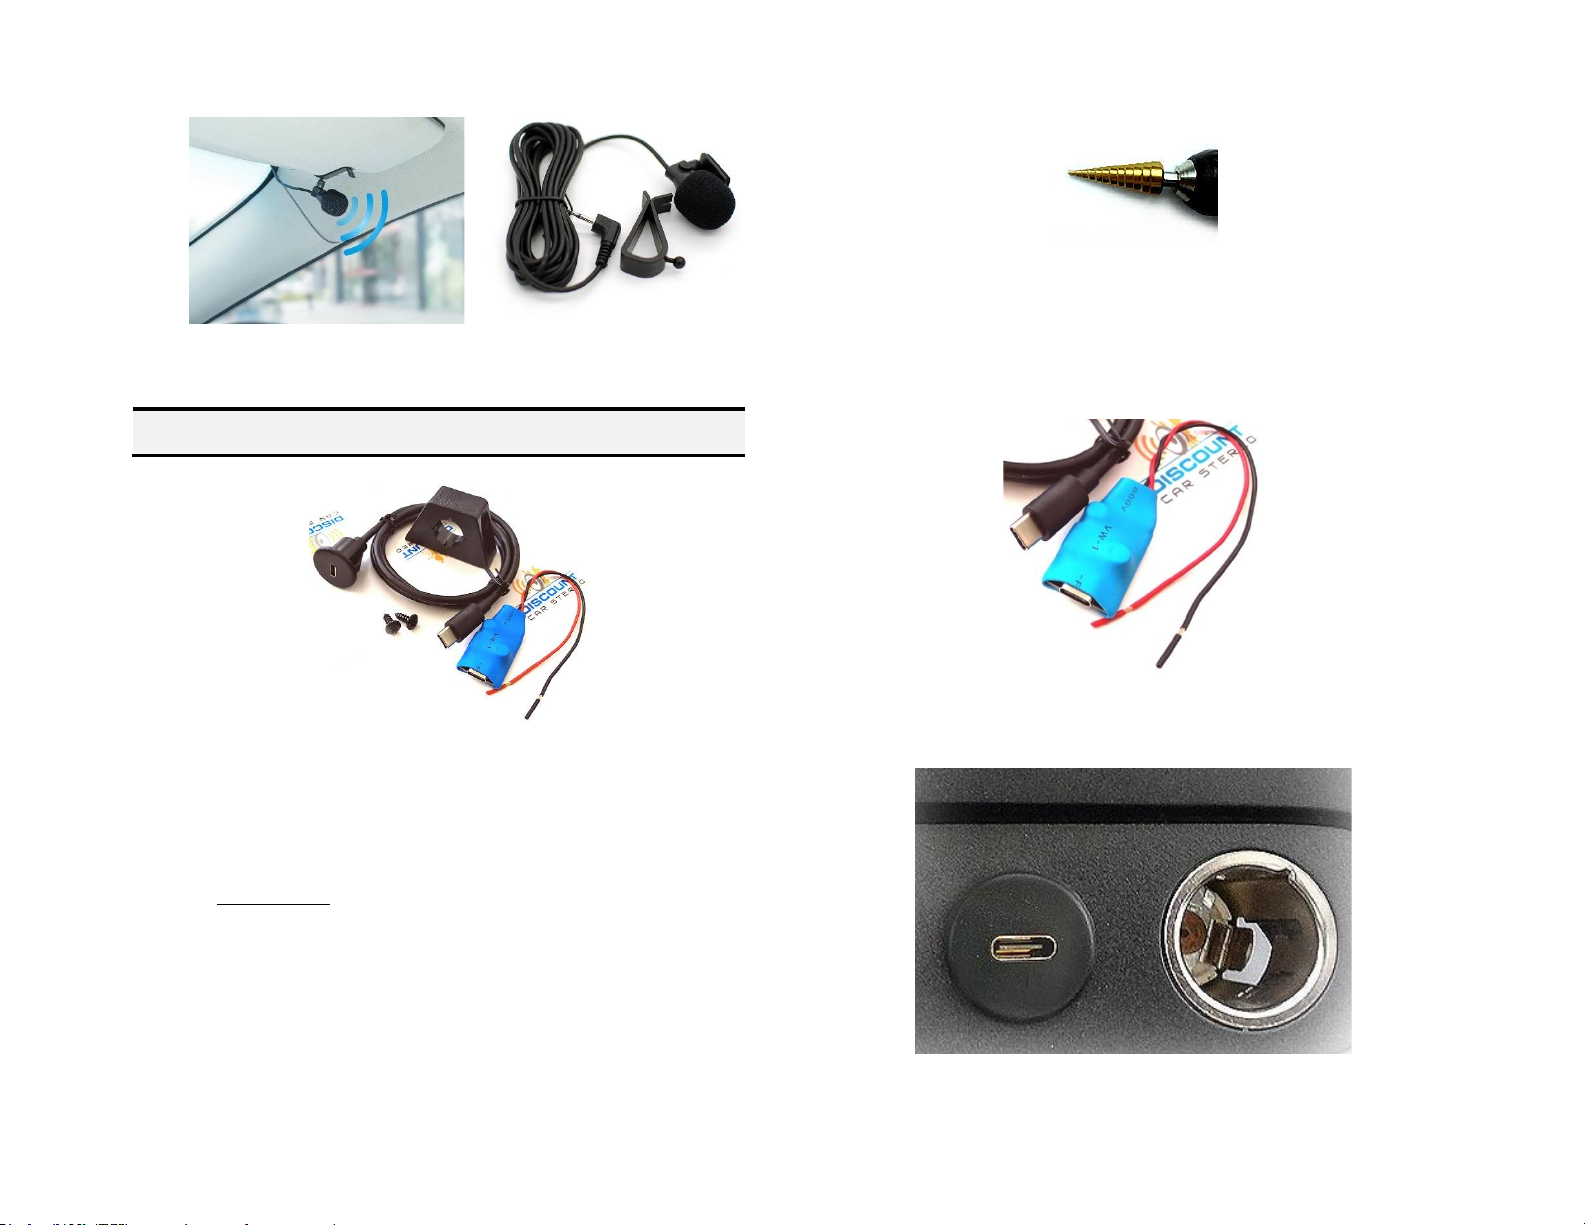
10. Will I be able to connect a flash drive to optional USB charging port?
NO; Optional USB type-C port does not support thumb/flash drives. Charge
only.
11. Will radio CD player or Tape player work after installing this module?
YES! The CD player or Tape player built-into AM/FM radio or remote 12-disc
changer operation are not affected by this module.
12. Callers not able to hear my voice with top down (convertible).
Can you offer some guidance?
In convertibles, microphone mounted to visor is exposed to wind noise.
Notable, callers will have no issue while vehicle is standing still. Our
microphone includes noise cancellation features, which is different than
wind noise and our recommendation is to install microphone in an area less
susceptible to wind noise (e.g., pillar, mirror etc.).
13. How do I remove radio from dashboard to install module?
The ADIY-C5CD connects to the radio. Click link for video instructions:
https://www.youtube.com/watch?v=WTbWYNJTSDs
15. Will disc in CD changer continuously spin when in Bluetooth mode?
YES. There is no way to pause or stop disc from spinning. Once “CD/AUX”
or “TAPE/AUX”button is pressed, the disc will continuously spin.
Disclaimer
• This product has no affiliation with GM or Apple
• When possible, professional installation is recommended
Email support@discountcarstereo.com
© 1995-May-23 Discount Car Stereo, Inc. All rights reserved. Information in this document is
subject to change without notice. Other products and companies referred to herein are
trademarks or registered trademarks of their respective companies or mark holders.
Table of contents
Other Corvette Automobile Accessories manuals