Costway SP35307 User manual

USER'S MANUAL / HANDBUCH / MANUEL DE L'UTILISATEUR /
MANUAL DEL USUARIO / MANUALE UTENTE /
INSTRUKCJA OBSŁUGI
Home Use Exercise bike / Heimtrainer / Vélo d’Appartement /
Bicicleta estática / Cyclette per Allenamento Aerobico /
Rower treningowy
SP35307
UNITED STATES
CANADA UNITED KINGDOM
GERMANY
FRANCE
ITALY
SPAIN
JAPAN
RUSSIA
AUSTRALIA
TIPS:
Your suggestions and comments for COSTWAY are really important to us!
We sincerely solicit you to go back to our shop and leave a good rating in just a
simple click. It would be quite encouraging if you could kindly do so like below:
February 24, 2018
Great products so far. Fast delivery, easy setup, and working without any issues.
Great products so far
With your inspiring rating, COSTWAY will be more consistent to offer you
EASY SHOPPING EXPERIENCE, GOOD PRODUCTS and EFFICIENT SERVICE!
Ihre Vorschläge und Kommentare für COSTWAY sind wirklich wichtig für uns!
Wir bitten Sie aufrichtig, in unseren Shop zurückzukehren und durch nur einen Klick eine
gute Bewertung zu hinterlassen. Es wäre sehr ermutigend, wenn Sie das so tun könnten:
Tolle Produkte bis jetzt
24. Februar 2018
Gute Produkte. Schnelle Lieferung, einfaches Aufbauen, funktionieren ohne Problem.
Mit Ihrer inspirierenden Bewertung wird COSTWAY konsistenter sein, um Ihnen
EIN SCHÖNES EINKAUFSERLEBNIS, GUTE PRODUKTE und EFFIZIENTEN
SERVICE zu bieten!
Vos suggestions et vos commentaires pour COSTWAY sont vraiment importants pour nous !
Nous vous invitons sincèrement à revenir à notre boutique pour laisser une bonne évaluation
seulement en un clic. Ce serait très encourageant si vous pouviez le faire comme ci-dessous:
Bons produits jusqu'à présent
24 février 2018
Excellents produits jusqu'à présent. Livraison rapide et installation facile. Il fonctionne sans problème.
Avec votre évaluation inspirante, COSTWAY sera plus professionnel dans le but de
vous offrir une BONNE EXPERIENCE D'ACHATS, de BONS PRODUITS et un SERVICE
EFFICACE!
US office:Fontana
UK office:Ipswich
DE office:FDS GmbH,Neuer Höltigbaum 36,22143 Hamburg,Deutschland
FR office : 26 RUE DU VERTUQUET, 59960 NEUVILLE EN FERRAIN, FRANCE
EN DE FR ES IT PL

Please check if you have all parts as listed below.
Note: Small components/parts might be pre-fitted to the larger components so as to make
it easier for end users to assemble the spin bike. Please check carefully on all the
parts before contacting us regarding any missing components.
7. Handle Frame x 1 8. Handle Post Assembly x 1 9. Pedal (L/R) Set x 1
10. Monitor x 1 11. Monitor Holder x 1 12. Lock Knob M1 x 2
1. Main Body x 1
2. Rear Stabilizer x 1
3. Front Stabilizer x 1
4. Saddle x 1
5. Saddle Adjustment Frame x 1
6. Saddle Post Assembly x 1
www.costway.com www.costway.com
Parts List
NO. ITEM QTY NO. ITEM QTY
1Main Body 1 11 Monitor Holder 1
2Rear Stabilizer 1 12 Lock Knob M1 2
3Front Stabilizer 1 13 Lock Nut N1 1
4Saddle 1 14 Bolt S1 4
5Saddle Adjustment Frame 1 15 Allen Bolt T1 4
6Saddle Post Assembly 1 16 Nut 4
7Handle Frame 1 17 Washer 8
8Handle Post Assembly 1 18 Allen Wrench 1
9Pedal (L/R) Set 1 19 Open End Wrench 2
10 Monitor 1
13. Lock Nut N1 x 1 14. Bolt S1 x 4 15. Allen Bolt T1 x 4 16. Nut x 4
17.Washer x 8 18. Allen Wrench x1 19. Open End Wrench x 2
02 03

www.costway.com www.costway.com
3. SADDLE ASSEMBLY
Loosen the lock knob and pull
out, insert the saddle post
assembly into the rear opening
tube, and then tighten the lock
knob.
Loosen the lock nut to select
the correct position and fix the
nut.
Place the saddle onto the
saddle adjustment frame and
tighten the saddle locking nuts
4. HANDLE & MONITOR
ASSEMBLY
Loosen the lock knob and
insert the handle frame
assembly into the opening
tube, and tighten the lock knob
when the handle frame at
desired position.
Attach the monitor holder to the
handle frame and fix the
monitor, connect the sensor
wire into the monitor.
- Assembling Finish -
Assembly Instruction
2. PEDAL(L/R) ASSEMBLY
Fasten the left pedal by turning in
an anti-clockwise direction, and
then tighten anti-separation nut in
an anti-clockwise direction.
Fasten the right pedal by turning in
a clockwise direction, and then
tighten anti-separation nut in a
clockwise direction.
1. STABILIZER ASSEMBLY
Divide the front stabilizer and rear
stabilizer, to fix them onto the main
body with bolts T1 x 4, washer x 4
and nuts x 4.
04 05

www.costway.com
Safety Information
* This product is intended for home use, before using the equipment to
exercise, always do stretching exercises to properly warm up.
* Always wear appropriate workout clothing when exercising.
* Keep hands away from all moving parts.
* Do not place any sharp objects around the equipment.
* Before using the equipment, check the nuts and bolts are securely
tightened, as well as some parts like pedals etc..
* If the user experiences dizziness, nausea, chest pain or other
abnormal symptoms stop the workout and seek immediate medical
attention.
Care and Maintenance
1. Examine the equipment periodically in order to detect any damage or
wear which may have been produced.
2. Lubricate moving parts with light oil periodically or prevent premature
wear.
3. Inspect and tighten all parts before using the equipment, replace any
defective parts immediately, and do not use the equipment again until it
is in perfect working order.
4. The equipment can be cleaned using a damp cloth and mild
non-abrasive detergent. Do not use solvents.
5. Do not attempt to repair this equipment yourself.
www.costway.de
7. Griffrahmen x 1 8. Griffpfosten x 1 9. Pedal (L/R) x 1
10. Monitor x 1 11. Monitorhalter x 1 12. Verriegelungsknopf M1 x 2
1. Hauptkörper x 1 2. Heckstabilisator x 1 3. Frontstabilisator x 1
4. Sael x 1 5. Saeleinstellrahmen x 1 6. Saelstütze x 1
Bitte überprüfen Sie, ob Sie alle unten aufgeführten Teile haben.
Hinweis: Kleine Komponenten/Teile können an den größeren Komponenten vormontiert
sein, um dem Endbenutzer die Montage des Spinbikes zu erleichtern. Bitte überprüfen
Sie alle Teile sorgfältig, bevor Sie uns bezüglich fehlender Komponenten kontaktieren.
06 07

www.costway.de www.costway.de
Teileliste
NR. ARTIKEL MENGE NR. ARTIKEL MENGE
1Hauptkörper 1 11 Monitorhalter 1
2Heckstabilisator 1 12 Verriegelungsknopf M1 2
3Frontstabilisator 1 13 Kontermutter N1 1
4Sattel 1 14 Bolzen S1 4
5Satteleinstellrahmen 1 15 Inbusschraube T1 4
6Sattelstütze 1 16 Mutter 4
7Griffrahmen 1 17 Unterlegscheibe 8
8Griffpfosten 1 18 Inbusschlüssel 1
9Pedal (L/R) 1 19 Schlüssel 2
10 Monitor 1
13. Kontermutter N1 x 1 14. Bolzen S1 x 4 15. Inbusschraube T1 x 4 16. Mutter x 4
17. Unterlegscheibe x 8 18. Inbusschlüssel x1 19. Schlüssel x 2
Montageanleitung
2. PEDAL (L / R) MONTAGE
Befestigen Sie das linke Pedal,
indem Sie es gegen den
Uhrzeigersinn drehen, und ziehen
Sie dann die Antiteilationsmutter
gegen den Uhrzeigersinn fest.
Befestigen Sie das rechte Pedal,
indem Sie es im Uhrzeigersinn
drehen, und ziehen Sie dann die
Trennschutzmutter im
Uhrzeigersinn fest.
1. STABILISATOR-MONTAGE
Teilen Sie den vorderen Stabilisator
und den hinteren Stabilisator, um
sie mit den Schrauben T1 x 4, der
Unterlegscheibe x 4 und den
Muttern x 4 am Hauptkörper zu
befestigen.
08 09

www.costway.de www.costway.de
Sicherheitsinformation
Dieses Produkt ist für den Heimgebrauch vorgesehen. Machen Sie vor
dem Training immer Dehnübungen, um sich richtig aufzuwärmen.
* Tragen Sie beim Training immer geeignete Trainingskleidung.
* Halten Sie die Hände von allen beweglichen Teilen fern.
* Stellen Sie keine scharfen Gegenstände um das Gerät.
* Überprüfen Sie vor dem Gebrauch des Geräts, ob die Schrauben und
Muttern fest angezogen sind, sowie einige Teile wie Pedale usw.
* Wenn dem Benutzer Schwindel, Übelkeit, Brustschmerzen oder
andere abnormale Symptome auftreten, beenden Sie das Training und
suchen Sie sofort einen Arzt auf.
Pflege und Wartung
1. Untersuchen Sie das Gerät regelmäßig, um eventuelle Schäden oder
Verschleiß festzustellen.
2. Schmieren Sie bewegliche Teile regelmäßig mit leichtem Öl oder
vermeiden Sie vorzeitigen Verschleiß.
3. Überprüfen Sie alle Teile und ziehen Sie sie fest, bevor Sie das Gerät
verwenden. Tauschen Sie defekte Teile sofort aus und verwenden Sie
das Gerät erst wieder, wenn es einwandfrei funktioniert.
4. Das Gerät kann mit einem feuchten Tuch und einem milden, nicht
scheuernden Reinigungsmittel gereinigt werden. Verwenden Sie keine
Lösungsmittel.
5. Versuchen Sie nicht, dieses Gerät selbst zu reparieren.
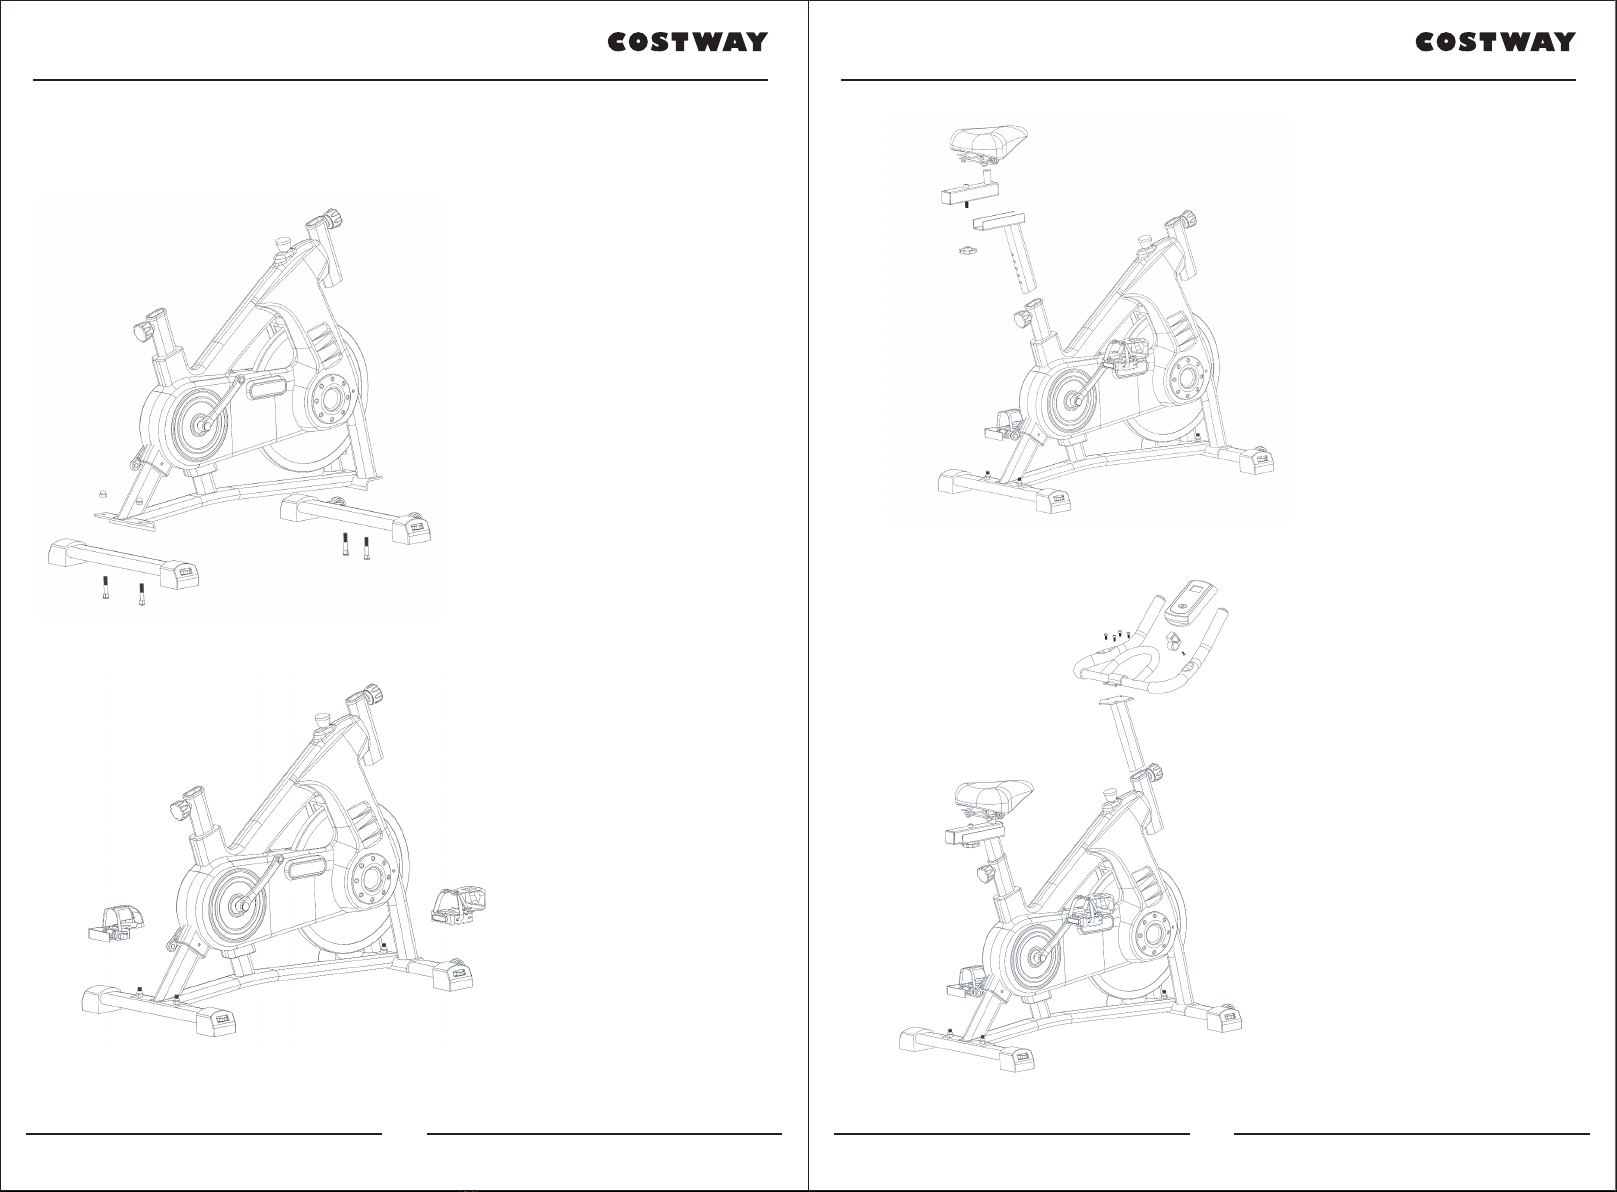
3. SATTELMONTAGE
Lösen Sie den
Verriegelungsknopf und ziehen
Sie ihn heraus, setzen Sie die
Sattelstützenbaugruppe in das
hintere Öffnungsrohr ein und
ziehen Sie den
Verriegelungsknopf fest.
Lösen Sie die Kontermutter, um
die richtige Position
auszuwählen und die Mutter zu
befestigen. Setzen Sie den
Sattel auf den
Sattelverstellrahmen und
ziehen Sie die
Sattel-Sicherungsmuttern fest.
4. GRIFF- UND
ÜBERWACHUNGSMONTAGE
Lösen Sie den
Verriegelungsknopf, setzen Sie
die Griffrahmenbaugruppe in
das Öffnungsrohr ein und
ziehen Sie den
Verriegelungsknopf fest, wenn
sich der Griffrahmen in der
gewünschten Position befindet.
Befestigen Sie den
Monitorhalter am Griffrahmen
und befestigen Sie den Monitor.
Schließen Sie das Sensorkabel
an den Monitor an.
- Zusammenbau ist fertig –
10 11

www.costway.fr www.costway.fr
Liste des Pièces
N° Pièce Qté N° Pièce Qté
1Corps principal 1 11 Support de moniteur 1
2Stabilisateur arrière 1 12 Bouton de verrouillage M1 2
3Stabilisateur avant 1 13 Écrou de blocage N1 1
4Selle 1 14 Boulon S1 4
5Cadre de réglage de la selle 1 15 Boulon Allen T1 4
6Ensemble de la tige de selle 1 16 Écrou 4
7Cadre de la poignée 1 17 Rondelle 8
8
Ensemble du poteau de poignée
1 18 Clé Allen 1
9
Ensemble de Pédale (gauche et droite)
1 19 Clé plate 2
10 Moniteur 1
13. Écrou de blocage N1 x 1 14. Boulon S1 x 4 15. Boulon Allen T1 x 4 16. Écrou x 4
17. Rondelle x 8 18. Clé Allen x 1 19. Clé plate x 1
7. Cadre de la poignée x 1 8. Ensemble du poteau de poignée x 1 9. Pédale
10. Moniteur x 1 11. Support de moniteur x 1 12. Bouton de verrouillage M1x2
1. Corps principal x 1 2. Stabilisateur arrière x 1 3. Stabilisateur avant x 1
4. Selle x 1 5. Cadre de réglage de la selle x 1 6. Ensemble de la ge de selle x 1
Veuillez vérifier si toutes les pièces sont répertoriées dans la liste ci-dessous.
Remarque : les petites pièces peuvent être prémontées sur les grandes pièces afin de
faciliter l’assemblage du vélo d’appartement par l’utilisateur final. Veuillez vérifier
soigneusement toutes les pièces avant de nous contacter pour tout élément manquant.
12 13

www.costway.fr www.costway.fr
Instruction de Montage
2. ASSEMBLAGE DE PÉDALE
Fixez la pédale gauche en la
tournant dans le sens inverse des
aiguilles d’une montre, puis serrez
l’écrou dans le sens inverse des
aiguilles d’une montre.
Fixez la pédale droite en la
tournant dans le sens des aiguilles
d’une montre, puis serrez l’écrou
dans le sens des aiguilles d’une
montre.
1. ASSEMBLAGE DE
STABILISATEUR
Divisez le stabilisateur avant et le
stabilisateur arrière, fixez-les sur le
corps principal avec des boulons T1
x 4, des rondelles x 4 et des écrous
x 4.
3. ASSEMBLAGE DE LA
SELLE
Desserrez le bouton de
verrouillage et tirez-le, insérez
l’ensemble de la tige de selle
dans le tube d’ouverture
arrière, puis resserrez le
bouton de verrouillage.
Desserrez l’écrou de blocage
pour choisir la bonne position
et fixez l’écrou. Placez la selle
sur le cadre de réglage de la
selle et serrez les écrous de
blocage de la selle.
4. ASSEMBLAGE DE LA
POIGNÉE ET DU MONITEUR
Desserrez le bouton de
verrouillage et insérez
l’ensemble du cadre de la
poignée dans le tube
d’ouverture, puis resserrez le
bouton de verrouillage lorsque
le cadre de la poignée se
trouve dans la position
souhaitée.
Fixez le support du moniteur au
cadre de la poignée et fixez le
moniteur, connectez le fil du
capteur dans le moniteur.
-Assemblage terminé-
14 15

www.costway.fr www.costway.es
Informations sur la Sécurité
* Ce produit est destiné à un usage domestique, avant d’utiliser
l’équipement pour faire de l’exercice, faites toujours des exercices
d’étirement pour vous échauffer correctement.
* Portez toujours des vêtements d’entraînement appropriés lorsque vous
faites de l’exercice.
* Gardez les mains loin de toutes les parties en mouvement.
* Ne placez pas d’objets tranchants autour de l’équipement.
* Avant d’utiliser l’équipement, vérifiez que les écrous et les boulons
sont bien serrés, ainsi que certaines parties comme les pédales, etc.
* Si l’utilisateur ressent des étourdissements, des nausées, des douleurs
thoraciques ou d’autres symptômes anormaux, arrêtez l’entraînement et
consultez immédiatement un médecin.
Soins et Entretien
1. Examinez périodiquement l’équipement afin de détecter tout
dommage ou usure qui aurait pu se produire.
2. Lubrifiez périodiquement les pièces mobiles avec de l’huile légère ou
évitez les l’usure.
3. Inspectez et serrez toutes les pièces avant d’utiliser l’équipement,
remplacez toute les pièces défectueuses immédiatement, et veuillez ne
pas utiliser à nouveau l’équipement avant qu’il est en parfait état de
fonctionnement.
4. L’équipement peut être nettoyé à l’aide d’un chiffon humide et de
détergent non abrasif. Ne pas utiliser de solvants.
5. N’essayez pas de réparer cet équipement par vous-même. 7. Marco de la manija x 1 8. Conjunto de poste de manija x 1 9. Juego de pedales (Dcha/Izda) x 1
10. Monitor x 1 11. Soporte para monitor x 1 12. Lock Knob M1 x 2
1. Cuerpo principal x 1 2. Estabilizador trasero x 1 3. Estabilizador delantero x 1
4. Sillín x 1 5. Marco de ajuste del sillín x 1 6. Conjunto de poste de sillín x 1
Verifique si tiene todas las piezas como se detalla a continuación.
Nota: Los componentes / piezas pequeños se pueden premontar en piezas más grandes
para facilitar a los usuarios finales el montaje de la bicicleta estática. Verifique
cuidadosamente todas las partes antes de contactarnos con respecto a los componentes
faltantes.
16 17

www.costway.es www.costway.es
Lista de partes
Núm. ARTICULO Cant. Núm. ARTICULO Cant.
1Cuerpo principal 1 11 Soporte para monitor 1
2Estabilizador trasero 1 12 Lock Knob M1 2
3Estabilizador delantero 1 13 Tuerca de seguridad N1 1
4Sillín 1 14 Perno S1 4
5Marco de ajuste del sillín 1 15 Tornillo de hexágono 4
6Conjunto de poste de sillín 1 16 Tuerca 4
7Marco de la manija 1 17 Arandela 8
8Conjunto de poste de manija 1 18 Llave hexagonal 1
9Juego de pedales (Dcha/Izda) 1 19 Llave de extremo abierto 2
10 Monitor 1
13. Tuerca de
seguridad N1 x 1
14. Perno S1 x 4 15. Tornillo de
hexágono T1 x 4
16. Tuerca x 4
17. Arandela x 8 18. Llave hexagonal x1 19. Llave de extremo abierto x 1
Instrucciones de Montaje
2. MONTAJE DE PEDAL
(Dcha/Izda)
Apriete el pedal izquierdo
girándolo en sentido antihorario y
luego apriete la tuerca
anti-separación en sentido
antihorario.
Apriete el pedal derecho girándolo
en el sentido de las agujas del
reloj y luego apriete la tuerca
anti-separación en el sentido de
las agujas del reloj.
1. MONTAJE DEL
ESTABILIZADOR
Divida el estabilizador delantero y el
estabilizador trasero para fijarlos al
cuerpo principal con pernos T1 x 4,
arandela x 4 y tuercas x 4.
18 19

www.costway.es www.costway.es
Información de seguridad
* Este producto está diseñado para uso doméstico, antes de usar el
equipo para hacer ejercicio, siempre haga ejercicios de estiramiento.
* Siempre use ropa de entrenamiento adecuada cuando haga ejercicio.
* Mantenga las manos alejadas de todas las partes móviles.
* No coloque objetos afilados alrededor del equipo.
* Antes de usar el equipo, verifique que las tuercas y los pernos estén
bien apretados, así como algunas partes como pedales, etc.
* Si el usuario experimenta mareos, náuseas, dolor en el pecho u otros
síntomas anormales, detenga el entrenamiento y busque atención
médica inmediatamente.
Cuidados y mantenimiento
1. Examine el equipo periódicamente para detectar cualquier daño o
desgaste que pueda haberse producido.
2. Lubrique las piezas móviles con aceite ligero periódicamente o evite
el desgaste prematuro.
3. Inspeccione y apriete todas las piezas antes de usar el equipo,
reemplace las piezas defectuosas de inmediato y no vuelva a usar el
equipo hasta que esté en perfecto estado de funcionamiento.
4. El equipo se puede limpiar con un paño húmedo y detergente suave
no abrasivo. No utilizar solventes.
5. No intente reparar este equipo usted mismo.
3. MONTAJE DEL SILLÍN
Afloje la perilla de bloqueo,
inserte el conjunto del poste del
sillín en el tubo de apertura
posterior y luego apriete la
perilla de bloqueo.
Afloje la tuerca de seguridad
para seleccionar la posición
correcta y fijar la tuerca.
Coloque el sillín en el marco de
ajuste del sillín y apriete las
tuercas de bloqueo del sillín.
4. MONTAJE DE MANIJA Y
MONITOR
Afloje la perilla de bloqueo e
inserte el conjunto del marco
del mango en el tubo de
apertura, y apriete la perilla de
bloqueo cuando el marco del
mango esté en la posición
deseada.
Conecte el soporte del monitor
al marco de la manija y fije el
monitor, conecte el cable del
sensor al monitor.
- Acabado de montaje -
20 21

www.costway.it www.costway.it
Elenco delle Parti
N. ARTICOLO
QUANTITÀ
N. ARTICOLO
QUANTITÀ
1Corpo principale 1 11 Supporto di monitore 1
2Stabilizzatore posteriore 1 12 Manopola di blocco M1 2
3Stabilizzatore anteriore 1 13 Controdado N1 1
4Sella 1 14 Bullone S1 4
5Telaio di regolazione della sella 1 15 Bullone a brugola T1 4
6Assemblaggio della sella 1 16 Dado 4
7Telaio della maniglia 1 17 Rondella 8
8
Gestire il montaggio post
1 18 Chiave a Brugola 1
9
Pedale (L / R) Set
1 19 Chiave aperta 2
10 Monitore 1
13. Controdado N1 x 1 14. Bullone S1 x 4 15. Bullone a Brugola T1 x 4 16. Dado x 4
17. Rondella x 8 18. Chiave a Brugola x1 19. Chiave Aperta x 1
7. Telaio della maniglia x 1 8. Gesre il Montaggio Post x 1 9. Pedale (L / R) Set x 1
10. Monitore 11. Supporto di monitore x 1 12. Manopola di blocco M1 x 2
1. Corpo Principale x 1 2. Stabilizzatore Posteriore x 1 3. Stabilizzatore Anteriore x 1
4. Sella x 1
5. Telaio di Regolazione
della Sella x 1 6. Assemblaggio della sella x 1
Si prega di verificare se si dispone di tutte le parti elencate di seguito.
Nota: Piccoli componenti / parti potrebbero essere pre-montati sui componenti più grandi
in modo da facilitare agli utenti finali il montaggio della bicicletta. Si prega di controllare
attentamente tutte le parti prima di contattarci per eventuali componenti mancanti.
22 23

www.costway.it www.costway.it
Istruzioni di Assemblaggio
2. MONTAGGIO DI PEDALE (L /
R)
Fissare il pedale sinistro ruotando
in una direzione anti-separazione,
e serrare il dado anti-separazione
in senso antiorario.
Fissare il pedale destro ruotando
in senso orario, quindi serrare il
dado anti-separazione in senso
orario.
1. MONTAGGIO DELLO
STABILIZZATORE
Dividere lo stabilizzatore anteriore e
lo stabilizzatore posteriore, per
fissarli sul corpo principale con
bulloni T1 x 4, rondella x 4 e dadi x
4.
3. MONTAGGIO DI SELLA
Allentare la manopola di
bloccaggio ed estrarre, inserire
il gruppo montante della sella
nel tubo di apertura posteriore,
quindi serrare la manopola di
bloccaggio.
Allentare il controdado per
selezionare la posizione
corretta e fissare il dado.
Posizionare la sella sul telaio di
regolazione della sella e
serrare i dadi di bloccaggio
della sella.
4. MANIGLIA E MONTAGGIO
DEL MONITORE
Allentare la manopola di blocco
e inserire il gruppo telaio
maniglia nel tubo di apertura,
quindi serrare la manopola di
blocco quando il telaio maniglia
nella posizione desiderata.
Collegare il supporto del
monitor al telaio della maniglia
e fissare il monitor, quindi
collegare il cavo del sensore al
monitor.
- Finitura di assemblaggio -
24 25

www.costway.pl
Informazioni sulla Sicurezza
* Questo prodotto è destinato all'uso domestico, prima di utilizzare
l'attrezzatura per l'esercizio fisico, eseguire sempre esercizi di stretching
per riscaldarsi correttamente.
* Indossare sempre abbigliamento adeguato durante l'allenamento.
* Tenere le mani lontano da tutte le parti in movimento.
* Non posizionare oggetti appuntiti attorno all'apparecchiatura.
* Prima di utilizzare l'apparecchiatura, verificare che i dadi e i bulloni
siano serrati saldamente, nonché alcune parti come i pedali, ecc.
* Se l'utente avverte vertigini, nausea, dolore toracico o altri sintomi
anomali, interrompere l'allenamento e consultare immediatamente un
medico.
Cura e Manutenzione
1. Esaminare periodicamente l'apparecchiatura per rilevare eventuali
danni o usura che potrebbero essere stati prodotti.
2. Lubrificare periodicamente le parti mobili con olio leggero o prevenire
l'usura prematura.
3. Ispezionare e serrare tutte le parti prima di utilizzare
l'apparecchiatura, sostituire immediatamente eventuali parti difettose e
non utilizzare nuovamente l'apparecchiatura fino a quando non è
perfettamente funzionante.
4. L'apparecchiatura può essere pulita con un panno umido e un
detergente delicato non abrasivo. Non usare solventi.
5. Non tentare di riparare da soli questa apparecchiatura.
www.costway.it
7. Rama uchwytu x 1 8. Montaż słupka uchwytu x 1 9. Zestaw pedałów (L / R) x 1
10. Monitor 11. Uchwyt x 1 12. Pokrętło blokujące M1x 2
1. Główny korpus x 1 2. Tylny stabilizator x 1 3. Przedni stabilizator x 1
4. Siedzenie x 1 5. Rama regulacji siedzenia x 1 6. Montaż siedzenia x 1
Sprawdź, czy masz wszystkie wymienione poniżej części.
Uwaga: Małe elementy / części mogą być wstępnie zamontowane na większych
elementach, aby ułatwić końcowy montaż roweru. Przed skontaktowaniem się z nami
należy dokładnie sprawdzić wszystkie części pod kątem brakujących elementów.
26 27

www.costway.pl www.costway.pl
Lista części
Nr. Jednostka Ilość Nr. Jednostka Ilość
1Korpus główny 1 11 uchwyt 1
2Stabilizator tylny 1 12 pokrętło blokujące M1 2
3Przedni stabilizator 1 13 Nakrętka N1 1
4Siodełko 1 14 Śruba S1 4
5Rama do regulacji siodełka 1 15 Śruba imbusowa T1 4
6Zespół siodełka 1 16 Nakrętka 4
7Rama uchwytu 1 17 Podkładka 8
8Zespół wspornika 1 18 Klucz imbusowy 1
9Pedał (L / R) Zestaw 1 19 Klucz płaski 2
10 Monitor 1
13. Przeciwnakrętka N1 x 1 14. Śruba S1 x 4 15. Śruba imbusowa T1 x 4 16. Nakrętka x 4
17. Podkładka x 8 18. Klucz imbusowy x1 19. Klucz płaski x 1
Instrukcja montażu
2. Montaż pedałów (L / P)
Przykręć lewy pedał w kierunku
przeciwnym do ruchu wskazówek
zegara i dokręć przeciwnakrętkę
przeciwnie do ruchu wskazówek
zegara.
Zamocuj prawy pedał, obracając
go zgodnie z ruchem wskazówek
zegara, a następnie dokręć
przeciwnakrętkę zgodnie z ruchem
wskazówek zegara.
1. MONTAŻ STABILIZATORA
Pprzymocuj przedni stabilizator i
tylny stabilizator do korpusu za
pomocą śrub T1 x 4, podkładki x 4 i
nakrętek x 4 .
28 29

www.costway.pl www.costway.pl
Informacje dotyczące bezpieczeństwa
* Ten produkt jest przeznaczony do użytku domowego, przed użyciem
sprzętu do ćwiczeń, zawsze wykonuj ćwiczenia rozciągające, aby
odpowiednio się rozgrzać.
* Zawsze noś odpowiednią odzież podczas treningu.
* Trzymaj ręce z dala od wszystkich ruchomych części.
* Nie umieszczaj ostrych przedmiotów w pobliżu urządzenia.
* Przed użyciem urządzenia sprawdź, czy nakrętki i śruby są dobrze
dokręcone (a także niektóre części, takie jak pedały itp.).
* Jeśli użytkownik odczuwa zawroty głowy, nudności, ból w klatce
piersiowej lub inne nietypowe objawy, należy przerwać trening i
natychmiast skonsultować się z lekarzem.
Czyszczenie i konserwacja
1. Okresowo sprawdzaj sprzęt pod kątem ewentualnych uszkodzeń lub
zużycia.
2. Okresowo smaruj ruchome części lekkim olejem i zapobiegaj ich
przedwczesnemu zużyciu.
3. Przed użyciem urządzenia sprawdź i dokręć wszystkie części,
natychmiast wymień uszkodzone części i nie używaj ponownie
urządzenia, dopóki nie będzie w pełni funkcjonalne.
4. Sprzęt można czyścić wilgotną szmatką i łagodnym nieściernym
detergentem. Nie używaj rozpuszczalników.
5. Nie próbuj naprawiać tego urządzenia samodzielnie.
3. SIODEŁKO
Poluzuj pokrętło blokujące i
wyjmij, włóż zespół wspornika
siodełka do tylnej rury
otwierającej, a następnie
dokręć pokrętło blokujące.
Poluzuj nakrętkę
zabezpieczającą, aby wybrać
prawidłową pozycję i
zabezpiecz nakrętkę. Umieść
siodełko na ramie regulacji
siodełka i dokręć nakrętki
blokujące siodełko.
4. UCHWYT MONITORA
Poluzuj pokrętło blokady i włóż
zespół ramy uchwytu do rurki
otwierającej, a następnie
dokręć pokrętło blokady, gdy
rama uchwytu znajdzie się w
żądanym położeniu.
Przymocuj podstawę monitora
do ramy uchwytu i zabezpiecz
monitor, a następnie podłącz
kabel czujnika do monitora.
- Zakończenie montażu -
30 31
This manual suits for next models
1
Table of contents
Languages:
Other Costway Exercise Bike manuals