Costway EP24192 User manual

Please give us a chance to make it right and do better !
Contact our friendly customer service department for help first.
Replacements for missing or damaged parts will be shipped ASAP !
Contact Us!
Do NOT return this item.
Propane Tank Top Heater
EP24192
USER’S MANUAL
THIS INSTRUCTION BOOKLET CONTAINS IMPORTANT SAFETY INFORMATION. PLEASE READ AND KEEP FOR FUTURE REFERENCE.
US office: Fontana UK office: Ipswich AU office: Truganina
DE office: Hamburg
FR office: Saint Vigor d'Ymonville
PL office: Gdańsk
US:cs.us@costway.com
UK:cs.uk@costway.com

Before You Start
Please read all instructions carefully.
Retain instructions for future reference.
Separate and count all parts and hardware.
Read through each step carefully and follow the proper order.
We recommend that, where possible, all items are assembled
near to the area in which they will be placed in use, to avoid
moving the product unnecessarily once assembled.
Always place the product on a flat, steady and stable surface.
Keep all small parts and packaging materials for this product
away from babies and children as they potentially pose a serious
choking hazard.
02 03
USER'S MANUAL AND
OPERATING INSTRUCTIONS
RADIANT
PROPANE
TANK TOP
HEATER
GENERAL HAZARD WARNING
Failure to comply with the precautions and instructions provided with this
heater, can result in death, serious bodily injury and property loss, or damage
from the hazards of fire, explosion, burn, asphyxiation, carbon monoxide
poisoning, and/or electrical shock.
Only persons who can understand and follow the instructions should use or
service this heater.
If you need assistance or heater information such as an instruction manual,
labels, etcetera, ask qualified technician for help.
CONSUMER: Retain this manual for future reference.
WARNING! FIRE, BURN, INHALATION, AND EXPLOSION HAZARD, KEEP
SOLID COMBUSTIBLES, SUCH AS BUILDING MATERIALS, PAPER OR
CARDBOARD, A SAFE DISTANCE AWAY FROM THE HEATER AS
RECOMMENDED BY THE INSTRUCTIONS. NEVER USE THE HEATER IN SPACES
WHICH DO, OR MAY, CONTAIN VOL ATILE OR AIRBORNE COMBUSTIBLES, OR
PRODUCTS SUCH AS GASOLINE, SOLVENTS, PAINT THINNERS, DUST PARTICL
ES OR UNKNOWN CHEMICALS.
CALIFORNIA PROPOSITION 65 WARNING: This fuel, and byproducts or
combustion of this fuel, contains chemicals known to the State of California to
cause cancer, birth defects or other reproductive harm. This product contains
chemicals, including lead and lead compounds, a chemical known to the state
of California to cause birth defects or other reproductive harm. Wash hands
after handling.

04 05
WARNING!
NOT FOR PERSONAL, HOUSEHOLD OR
RECREATIONAL VEHICLE USE.
RADIANT TANK TOP PROPANE HEATER
This heater is designed and approved for use as a temporary construction heater.
It is in compliance with standards ANSI Z83.7 and CSA2.14 -2011.
It is impossible to anticipate every use which may be made of this heater. CHECK
WITH YOUR LOCAL FIRE SAFETY AUTHORITY IF YOU HAVE QUESTIONS ABOUT
APPLICATIONS OR LOCAL CODES.
Other standards govern the use of fuel gases and heat producing products in
specific applications. Check with your local authority regarding such standards.
IMPORTANT: Read this user's manual carefully and completely before trying to
operate or service this heater. Improper use of this heater can cause serious
injury or death from fire, explosion and/or carbon monoxide poisoning.
This is a direct-fired tank top heater for indoor use in properly ventilated areas
or for use outdoors. All the products of combustion generated by the heater are
forced through the heater and released into the area being heated. This heater
produces a small amount of carbon monoxide when operating. Carbon monoxide
can build up in a heated space and failure to provide adequate ventilation could
result in poisoning or death. Proper ventilation must be provided.
GENERAL SAFETY INSTRUCTIONS
Accidents are always tragic especially because so many of them could have
been prevented with lttle care and judgment. There are some basic good
practices, you should follow for safe use of your heater.
IMPORTANT SAFETY INFORMATION
● Children should be carefully supervised if/when they are in the area.
● Always maintain proper clearance from combustible materials. Minimum
clearance from combustibles; side & rear: 36” (91 cm); top: 36”(91 cm); front:
60” (152 cm); floor 0”when installed on 20lb. propane (LP) tank.
● Do not use on finished floors of any type.
● Heater must be placed on level and stable surface.
● Do not operate the heater without safety burner guards in place.
● Never place anything including clothes or other flammable items on the
heater.
● The appliance area must be kept clear and free from combustible materials,
gasoline and other flammable liquids.
● Do not modify or operate a heater which has been modified.
● Adequate clearance for accessbility and for combustion & ventilation air
supply must be maintained at all times when the heater is operating.
● Service and repair should be done by a qualified service person. The heater
should be inspected before each use and at least annually by a qualified
person. More frequent cleaning may be required as necessary. Do not service
while hot or operating.
● Never connect heater to an unregulated gas supply.
● This heater is for use with propane (LP) gas only, do not convert heater to
any other gas. Installation must conform to local codes or, in the absence of
local codes, with the standard for the Storage and Handling of Liquefied
Petroleum Gases ANSI/NFPA NFPA 58 and the Natural Gas and Propane
Installation Code CSA B149.1.
● The minimum and maximum inlet pressures to the regulator from the gas
tank are 17.5 psi (120.7 kPa) and bottle pressure, respectively. Use only the
regulator & hose assembly provided with the heater. Inspect the regulator/hose
assembly prior to each use of the heater. If there is excessive abrasion or wear
or hose is cut, replace with identical regulator/hose assembly prior to using this
heater.
● Gas supply connections should be checked using a 50/50 solution of liquid
dish soap and water. The formation of bubbles indicate a gas leak. Correct all
leaks before using the heater. Never use a flame to check for gas leaks.
● The flow of combustion and ventilation air must not be obstructed.
SPECIFICATIONS
RADIANT PROPANE TANK TOP HEATER
MODEL BTU
OUTPUT
IGNITION
TYPE
OPERATING TIME
(20 Ib. tank)
EP24192 15,000 Match up to 28 Hrs. (high)
WEIGHT
PRODUCT
2.678
lbs/1.215 kg
PACKAGED
3.520 lbs/
1.597 kg

06 07
● This heater should not be directed toward any propane (LP) or gas container
within 20ft. (6.1 m) of the exit nozzle. The heater should also be located at
least 6 ft. (1 .83 m) away from any propane (LP) gas container (For use in
Canada: heater should be located at least 10 ft. (3.05 m) from any propane
(LP) gas container).
● The propane (LP) tank supply system must be arranged to provide for vapor
withdrawal from the operating tank.
PROPANE SAFETY
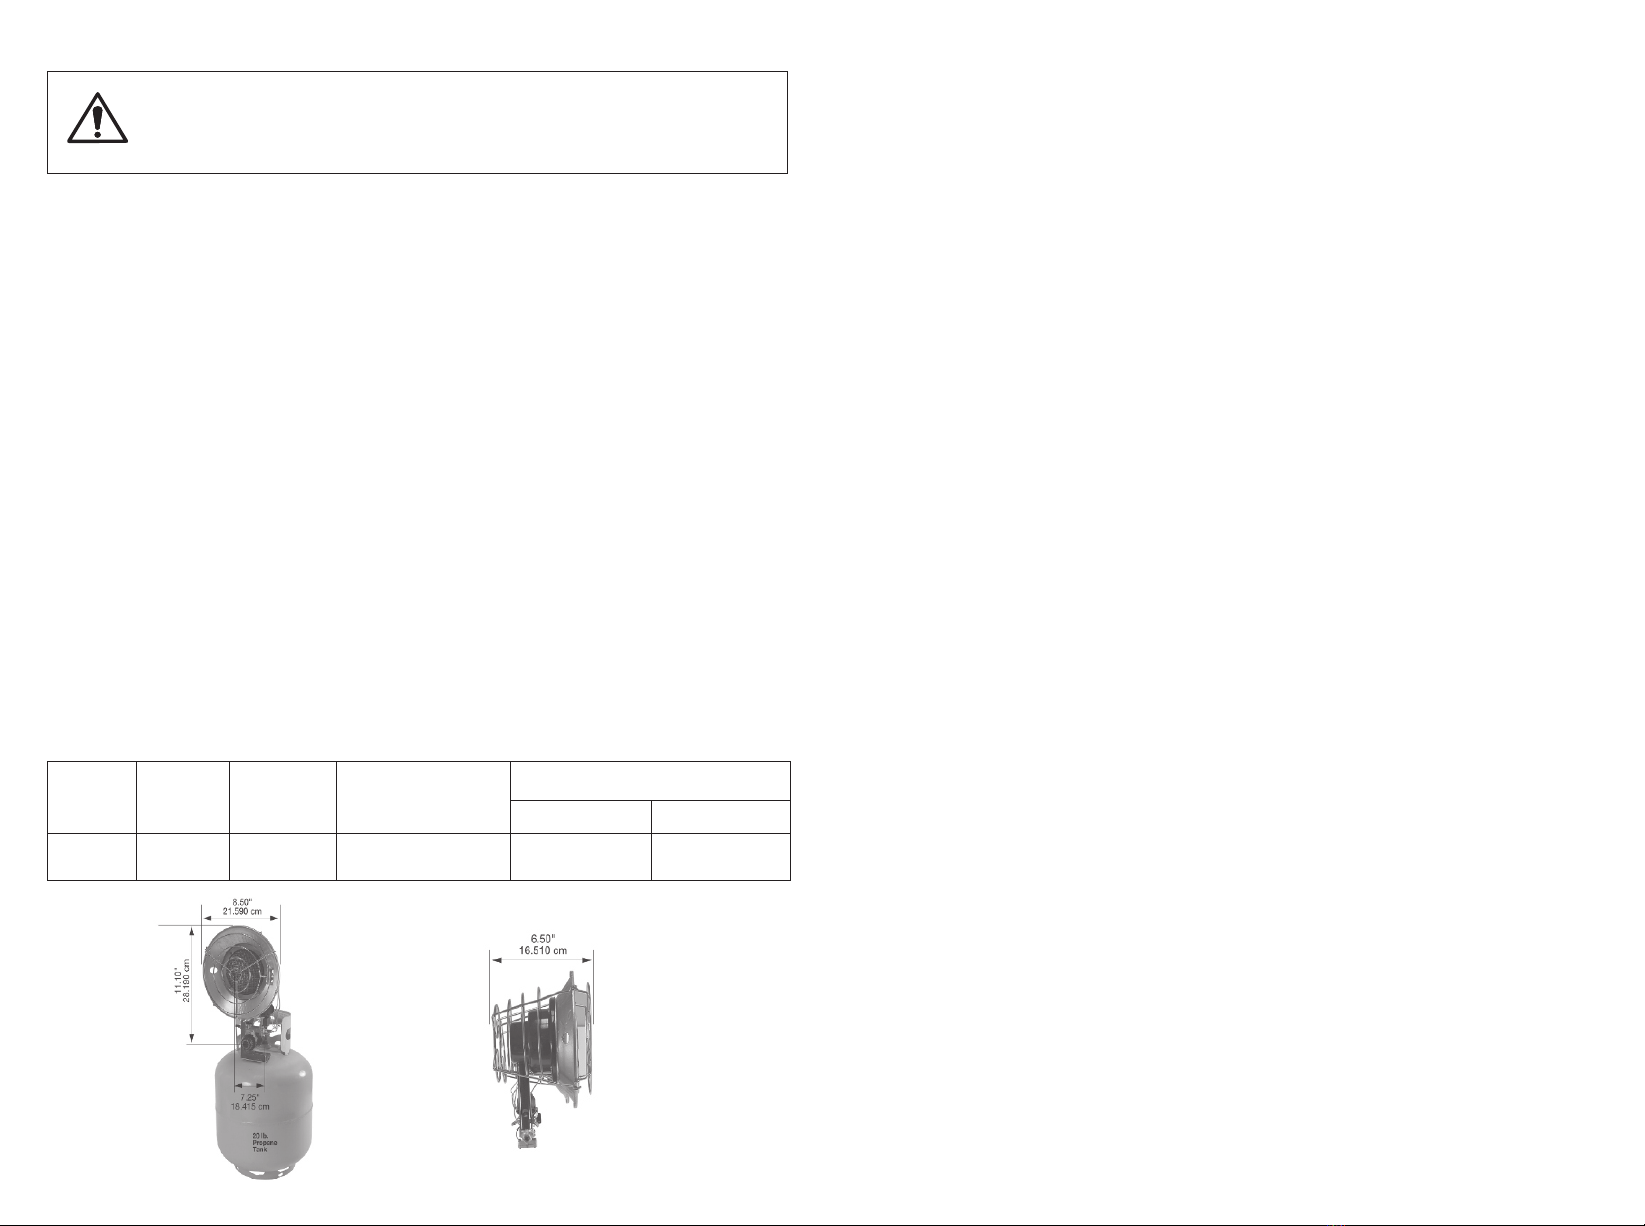
This heater requires a 20 lb. propane (LP) tank for operation (not included).
Use of this heater with any other propane (LP) tank is not recommended and
can be dangerous.
The propane (LP) gas tank must also be equipped with the following:
● A collar to protect the propane (LP) gas valve.
● A shutoff valve terminating a propane (LP) gas tank valve outlet as specified
in the American National Standard for Compressed Gas Cylinder Valve Outlet
and Inlet Connections.
● A safety relief valve having direct communications with the vapor space of the
tank.
● An arrangement of vapor withdrawal.
The hose assembly must be visually inspected prior to each use of the heater. If
it is evident that there is excessive abrasion, wear or the hose is cut, it must be
replaced prior to the heater being put into operation.
Propane (LP) Fuel Gas Odor.
Propane (LP) gas and natural gas have man-made odorants added speifcally for
detection of fuel gas leaks. It can be described as a rotten egg" smell. If a gas
leak occurs you should be able to smell the fuel gas. Since propane (LP) is
heavier than air you should smell for the gas odor low to the floor
Any Gas Odor Or Smell Is Your Signal Start Immediate Action!
● Do not take any action that could ignite the fuel gas. Do not operate any
electrical switches. Do not pull any power supply or extension cords. Do not
light matches or any other source of flame. Do not use your telephone.
● Get everyone out of the building and away from the area immediately.
● Close all propane (LP) gas tanks.
● Propane (LP) gas is heavier than air and may settle in low areas. When you
have reason to suspect a propane leak, keep out of all low areas.
● While outside the building call your fuel gas supplier and your fire
department. Do not re-enter the building or area in question.
● Stay out of the building and away from the area until declared safe by the
firefighters and your fuel gas supplier.
● Be sure to have the fuel gas service person and the firefighters check for
escaped gas. Have them air out the building and area before you return.
Properly trained service people must repair any leaks, check for further
leakages, and then have them relight the appliance for you.
PROPANE SAFETY (CONTINUED)
Propane (LP) Odor Fading - No Odor Detected
● Some people have dfficulty with smells and cannot smell the odor of the
man-made chemical added to propane (LP) or natural gas. You must determine
if you can smell the odorant in these fuel gases.
● Learn to recognize the odor of propane (LP) gas and natural gas. It can be
described as a“rotten egg”smell. The odorant can fade over time so leaking gas
is not always detectable by smell alone. Local propane (LP) gas dealers will be
more than happy to give you a scratch and sniff pamphlet. Use it to become
familiar with the fuel gas odor.
● Smoking can decrease your ability to smell. Being around an odor for a period
of time can aftect your sensitivity to that particular odor. Odors present in
animal confinement buildings can mask fuel gas odor.
● If there is an underground leak, the movement of gas through the soil can
fiter the odorant but the danger may still exist.
● Propane (LP) gas odor may differ in intensity at difterent levels. Since
propane (LP) gas is heavier than air, there may be more odor at lower levels.
● Always be sensitive to the slightest gas odor. If you continue to detect any
gas odor, no matter how small, treat it as a serious leak. Take immediate action
as discussed previously.
WARNING: Asphyxiation Hazard
● Do not use this heater for heating human living quarters.
● Do not use in unventilated areas.
● The flow of combustion and ventilation air must not be
obstructed.
● Proper ventilation air must be provided to support the combustion
air requirements of the heater being used as listed in this manual.
● Refer to the specification section of the heater's manual or heater
dataplate to determine combustion air ventilation requirements of
the heater.
● Lack of proper ventilation air will lead to improper combustion.
● Improper combustion can lead to carbon monoxide poisoning
leading to serious injury or death. Symptoms of carbon monoxide
poisoning can include headache, dizziness, burning eyes and nose,
nausea, dry mouth or sore throat and dificulty in breathing.

08 09
Critical Points To Remember!
● Propane (LP) gas has a distinctive odor. Learn to recognize these odors.
Reference Propane (LP) Fuel Gas Odor and Propane (LP) Odor Fading sections
above. Make all persons aware of the heaters use and to always be consciously
aware of the odors of propane (LP) gas.
● If you have not read this manual or have not been properly trained in the use
and service of propane (LP) gas then do not attempt to light the heater,
perform service or repairs, or make any adjustments to the heater on the
propane (LP) gas fuel system.
● A periodic sniff test around the heater or at the heater's connections; i.e.
hose to heater and hose/regulator to tank etc., is a good safety practice under
all conditions. If you smell even a small amount of gas, ask qualified technician
for help.
REFILLING THE PROPANE TANK
ALL NEW PROPANE TANKS MUST BE PURGED BEFORE THE FIRST
FILLING.
● Turn heater gas valve knob and gas tank valve to OFF position.
● Thread POL fitting into interior threads of propane (LP) tank valve. This fitting
has LEFT-HANDED THREADS (reversed). Turn POL fitting COUNTER CLOCKWISE
to tighten and CLOCKWISE to loosen. Protect POL fitting from damage when
disconnected from tank.
● Have tank filled by qualified supplier.
● Some propane (LP) tanks have a bleed-off valve. This valve should be
inspected for leaks after each fling of the tank. Turn clockwise to close the
valve.
● Fasten full propane (LP) tank and connect POL fitting to tank valve by turning
COUNTER CLOCKWISE.
● With heater gas valve knob still in the OFF position, turn ON tank valve and
check all gas connections with a 50/50 liquid dish soap and water solution to be
sure they are tight and leak proof. The formation of bubbles indicate a gas leak.
Correct all leaks before using the heater. Never use a flame to check for gas
leaks.
REFILLING THE PROPANE TANK (CONTINUED)
Propane (LP) is safe to use when properly handled. Careless handling of the
propane (LP) gas tank could result in fire and/or an explosion. Therefore:
● Always keep tank securely fastened in an upright position.
● Avoid tipping tank on its side when connected to a regulator since this may
cause damage to diaphragm in the regulator.
● Handle valves with care.
● Never connect an unregulated propane (LP) tank to heater.
● Do not subject propane (L .P) tank to excessive heat.
● Tightly close the gas shutoff valve on the propane (LP) tank after each use.
● The POL fitting must be protected when disconnected from the propane (LP)
tank.
● Never store a propane (LP) gas tank inside a building or in the vicinity of any
gas burning appliance.
CONNECTING HEATER TO PROPANE TANK
Read and understand all safety information before connecting heater to
propane tank.
1. Make sure heat regulator knob is in the OFF position.
2. (Applies to dual burner model only). Place heater onto tank with tank collar
bracket over tank collar (Fig. 1) Mounting bolt knob should be positioned to the
outside of tank collar. (Fig. 1)
3. (Applies to dual burner model only). Firmly secure to tank by
hand-tightening mounting bolt knob. Do not overtighten mounting bolt knob.
4. For single and double burner models, insert heat regulator valve connector
into propane (LP) tank's valve outlet fting and turn Fuel Connecting Nut left
(reverse thread, turn counterclock-wise) until fully tightened. No wrench is
required.
5. (Applies to single burner model only). Loosen wing bolt and slide support
bracket (Fig. 3) down until the base of the bracket seats firmly on the tank to
support the burner.
6. Open propane (LP) tank valve slowly.
7. Check all fitings for leaks. Apply a 50/50 mixture of liquid dish soap and
water to all joints. Bubbles forming show a leak. Correct all leaks at once.
WARNING: NEVER USE AN OPEN FL AME TO CHECK FOR LEAKS.
8. Always remove propane tank from heater after each use following the
guidelines in this manual. Do not store heater while attached to propane (LP)
tank.
WARNING!
THE TANK MUST NEVER BE STORED IN A BUILDING,
GARAGE OR ANY OTHER ENCLOSED AREA.

LIGHTING INSTRUC TIONS (CONTINUED)
1. Open propane tank valve by turning it
counterclockwise .
2. Turn heater regulator knob clockwise to the
"High” position .
WARNING: Stand to the side of
unit while lighting. Do not stand
or have any part of your body
over or in front of heater while
lighting.
3. Do not attempt to light one burner off of
the other. Use one match per burner. Locate
ignition hole in side of burner. Insert a lit match through ignition hole.
Do not light from front of burner.
OPERATION - LIGHTING INSTRUCTIONS
Read and understand all safety information before operating heater.
WARNING: Burner and Burner Guard should always face away from
propane (LP) tank shut-off and regulator.
WARNING: Improper installation, alteration, service or maintenance
can cause property damage, injury or death. Read the installation,
operating and maintenance instructions thoroughly before installing or
servicing this equipment.
WARNING: Do not cover air inlet holes in mixing tube.
WARNING: Make sure there is no open flame in the area. Fully open
the propane tank valve.
10 11
WARNING: Always maintain proper clearance from
combustible materials. Minimum clearance from
combustibles: side & rear: 36" (91 cm); Top: 36" (91
cm); Front: 60" (152 cm); Floor: 0”when installed on
20lb. tank.
CAUTION: Do not insert match into air inlet holes in mixing tube.
WARNING: Do not push in safety shut-off valve plunger before
inserting lit match.
CONNECTING HEATER TO PROPANE TANK
CHECKING FOR LEAKS
Check all gas connections with a 50/50 mix of liquid dish soap and water
solution to be sure they are tight and leak proof. The formation of bubbles
indicates a gas leak. Correct all leaks before using the heater.
● The installation of your heater must meet all local codes and/or gas utility
requirements or, in the absence of local codes, the Storage and Handling of
Liquefied Petroleum Gases, ANS I/NFPA 58 and the Natural and Propane
Installation Code, CSA B149.1.
● Always maintain proper clearance from combustible materials. Minimum
clearance from combustibles; side & rear: 36" (91 cm); top: 36" (91 cm);
front: 60”(152 cm); floor: 0”when installd on 20lb tank.
● The hose assembly should be visually inspected prior to each use of the
heater. If it is evident that there is excessive abrasion or wear, or the hose is
cut, it must be replaced prior to the heater being put into operation. The
replacement hose assembly must be the exact replacement.
WARNING: NEVER USE AN OPEN FLAME TO CHECK FOR LEAKS.
4. Press safety shut-off valve fully inwards to allow gas to flow.
5. Burner should light. Mesh screen on burner glows red when lit. After burner
is lit, continue holding in safety shut-off valve plunger (30 seconds) until heater
stays lit.

12 13
WARNING: NEVER LEAVE THE HEATER UNATTENDED WHEN LIT.
VENTILATION
Always be sure to supply proper ventilation while operating this heater.
Provide a minimum of 1/2 square foot (0.047 square meter) opening for
fresh air supply for 15,000 BTU' of heat.
6. If the burner does not light within 30 seconds, tur regulator knob to the OFF
position. Wait at least five (5) minutes for the gas to dissipate before
re-lighting.
7. If heater will not light after repeated tries, do not attempt to repair heater.
Ask qualified technician for help.
8. After burner lights, turn the heater regulator knob to the desired heat
setting: LOW, MED, or HI.
9. For dual burner models only : light both burners when maximum heat is
needed. Use one burner to conserve fuel. Repeat steps to light second burner.
LIGHTING UNDER WINDY CONDITIONS
When using this heater outdoors on a windy day, it will be necessary to use a
match or long stem butane lighter to ignite the burner. It may be dfficult to
keep the match lit long enough under windy conditions. Follow the“Lighting
instructions" procedure atter doing the following:
1. Position the heater and tank such that the burner faces away from the wind.
2. Position your body behind the heater such that your body blocks the wind
while you are following the instructions for lighting.
TURNING OFF THE HEATER
1. Tightly close propane tank valve by turning clockwise .
2. Turn the heater regulator knob to the OFF position. Wait at least 30 minutes
for the heater to cool before handling heater.
3. Always remove the heater from the propane tank after each use. Do not
store heater while attached to propane tank. Do not store propane (LP) tank in
a building, garage or any other enclosed area.
MAINTENANCE INSTRUCTIONS
1. Turn unit off, alow heater to fully cool and disconnect propane hose before
performing any maintenance functions.
2. Keep unit clean and keep the inside of the unit debris free.
3. Have unit checked by a qualified technician at least once a year, preferably
prior to the heating season.
STORAGE
Never store a propane (LP) gas tank inside a building or in the vicinity of any
gas or oil burning appliance. When the propane (LP) tank is not disconnected
from the heater, the gas tank and heater must be stored outdoors in a well
ventilated area, out of the reach of children. If for any reason the heater is to
be stored indoors, the tank must be disconnected and stored outdoors in a well
ventilated area out of reach of children, in accordance with the standard for the
Storage and Handling of Liquefied Petroleum Gases, ANSINFPA 58 and CSA
B149.1, Natural Gas and Propane Installation Code. The plastic tank valve plug
supplied with your tank must be tightly installed when the tank is disconnected
from the heater.
TROUBLESHOOTING
PROBLEM
1. Unit will not light.
2. Burner will not
stay It when gas
valve plunger
released.
3. Excessive flames
coming out of
Burner, not
glowing red.
4. Flames
flashback/burn
inside the mixing
tube.
1. Valve on propane ( LP) tank
not open.
2. Propane (LP) lank empty.
3. Regulator not in "High'
position.
4. Excess flow device triggered.
5. Defective Regulator.
1. Wiring of thermocouple.
2. Defective thermocouple.
3. Defective gas valve.
1. Debris or spider webs in
mixing tube or burner.
2. Clogged orifice.
1. Debris or spider webs in
Mixing tube.
2. Clogged orifice.
POSSIBLE CAUSE CORRECTIVE ACTION
1. Open tank valve by.
turning counter-clockwise.
2. Have tank refilled.
3. Tum regulator to "High'
position.
4. Close tank valve, wait 5
minutes and reopen slowly.
5. Replace Regulator
assembly.
1. Check wiring connections
are properly engaged.
2. Replace thermocouple.
3. Replace gas valve
assembly.
1. Clean burner tube with
bottle brush, rinse in water
and drain thoroughly before
reinstalling.
2. Remove and clean using
compressed air.
1. Clean burner tube with
bottle brush, rinse in water
and drain thoroughly before
reinstalling.
2. Remove and clean using
compressed air.
Table of contents
Other Costway Heater manuals

Costway
Costway ES10285US User manual

Costway
Costway ES10202US User manual

Costway
Costway EP23749 User manual

Costway
Costway HW58872 User manual

Costway
Costway EP23750 User manual

Costway
Costway ES10201DE User manual

Costway
Costway EP24688US User manual

Costway
Costway ES10252 User manual

Costway
Costway OP3178 User manual

Costway
Costway EP25436 User manual

Costway
Costway EP25439 User manual

Costway
Costway ES10253US User manual

Costway
Costway EP24150 User manual

Costway
Costway EP22618 User manual

Costway
Costway ES10159US User manual

Costway
Costway EP22916 User manual

Costway
Costway EP24918US Series User manual

Costway
Costway EP23746 User manual

Costway
Costway EP25438 User manual

Costway
Costway FP10220 User manual