manuals.online logo
Brands
  1. Home
  2. •
  3. Brands
  4. •
  5. Costway
  6. •
  7. Kitchen Appliance
  8. •
  9. Costway KC42155 User manual

Costway KC42155 User manual

USER'S MANUAL / HANDBUCH / MANUEL DE L'UTILISATEUR /
MANUAL DEL USUARIO / MANUALE UTENTE /
INSTRUKCJA OBSŁUGI
Sausage Maker / Wurstfüller / Machine à Saucisses /
Máquina de Salchichas / Macchina per Salsicce /
Nadziewarka do kiełbas
KC42155
UNITED STATES
CANADA UNITED KINGDOM
GERMANY
FRANCE
ITALY
SPAIN
JAPAN
RUSSIA
AUSTRALIA
TIPS:
Your suggestions and comments for COSTWAY are really important to us!
We sincerely solicit you to go back to our shop and leave a good rating in just a
simple click. It would be quite encouraging if you could kindly do so like below:
February 24, 2018
Great products so far. Fast delivery, easy setup, and working without any issues.
Great products so far
With your inspiring rating, COSTWAY will be more consistent to offer you
EASY SHOPPING EXPERIENCE, GOOD PRODUCTS and EFFICIENT SERVICE!
Ihre Vorschläge und Kommentare für COSTWAY sind wirklich wichtig für uns!
Wir bitten Sie aufrichtig, in unseren Shop zurückzukehren und durch nur einen Klick eine
gute Bewertung zu hinterlassen. Es wäre sehr ermutigend, wenn Sie das so tun könnten:
Tolle Produkte bis jetzt
24. Februar 2018
Gute Produkte. Schnelle Lieferung, einfaches Aufbauen, funktionieren ohne Problem.
Mit Ihrer inspirierenden Bewertung wird COSTWAY konsistenter sein, um Ihnen
EIN SCHÖNES EINKAUFSERLEBNIS, GUTE PRODUKTE und EFFIZIENTEN
SERVICE zu bieten!
Vos suggestions et vos commentaires pour COSTWAY sont vraiment importants pour nous !
Nous vous invitons sincèrement à revenir à notre boutique pour laisser une bonne évaluation
seulement en un clic. Ce serait très encourageant si vous pouviez le faire comme ci-dessous:
Bons produits jusqu'à présent
24 février 2018
Excellents produits jusqu'à présent. Livraison rapide et installation facile. Il fonctionne sans problème.
Avec votre évaluation inspirante, COSTWAY sera plus professionnel dans le but de
vous offrir une BONNE EXPERIENCE D'ACHATS, de BONS PRODUITS et un SERVICE
EFFICACE!
US office:Fontana
UK office:Ipswich
DE office:FDS GmbH,Neuer Höltigbaum 36,22143 Hamburg,Deutschland
FR office : 26 RUE DU VERTUQUET, 59960 NEUVILLE EN FERRAIN, FRANCE
EN DE FR ES IT PL
www.costway.com www.costway.de
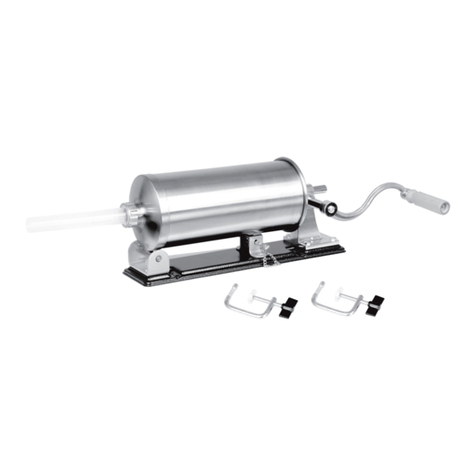
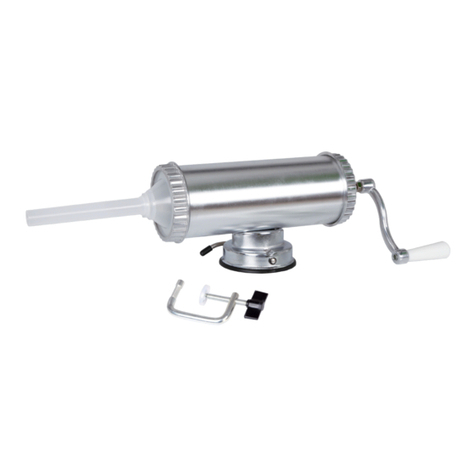
This sausage maker features beautiful appearance, novel construction and high
efficiency.The product has applied gear wheel for the purpose of convenience.
According to the construction diagram,this manual will guide you for use of this
product.
1.Installation
Find a suitable bench or table and put the machine on by clamping the edge.
Twist the screw(1)till the machine is fixed on the table. Then curve the handle (2)
and install onto the gear wheel axis (3), insert the washer (4), then fix it by screw
(5). Choose stuffing funnel (8) and install it into the outlet at the bottom by
turning right.
2.Making Sausage
Put a casing on the funnel first. Turn the curve handle counter-clockwise to
rewind the force disk (6) out of cylinder (7) and then move it towards right side
for 90 degrees. Input the marinated mince into the cylinder, move the force disk
back to the position of the cylinder. The machine is now ready for use.Simply by
turning the curve handle clockwise, your lovely sausage is ready in just a few
minutes.
3.Cleaning and Maintenance
According to the diagram,rewind the force disk out of cylinder and remove all the
turning parts and funnel.Wash the machine with warm water and detergent and
then dry it for next use.
Dieser Wurstmacher ist mit schönem Aussehen, neuartiger Konstruktion und
hoher Effizienz. Das Produkt hat aus praktischen Gründen ein Zahnrad
angebracht. Gemäß dem Konstruktionsdiagramm wird dieses Handbuch Sie zur
Verwendung dieses Produkts führen.
1.Installation
Suchen Sie eine geeignete Bank oder einen Tisch und bringen Sie die Maschine
an, indem Sie die Kante festklemmen. Drehen Sie die Schraube (1), bis die
Maschine auf dem Tisch befestigt ist. Dann den Handkurbel (2) krümmen und
auf das Zahnrad (3) montieren, die Unterlegscheibe (4) einsetzen, dann mit der
Schraube (5) befestigen, den Einfülltrichter (8) auswählen und ihn durch Drehen
in den Auslass unten einsetzen Recht.
2.Wurst machen
Legen Sie zuerst ein Gehäuse auf den Trichter. Drehen Sie die Handkurbel
gegen den Uhrzeigersinn, um die Kraftscheibe (6) aus dem Füllzylinder (7)
zurückzuspulen und dann für 90 Grad nach rechts zu bewegen. Geben Sie das
marinierte Hackfleisch in das Fass, bewegen Sie die Kraftscheibe zurück in die
Position des Fasses. Die Maschine ist jetzt betriebsbereit. Einfach durch Drehen
der Handkurbel im Uhrzeigersinn ist Ihre schöne Wurst in wenigen Minuten
fertig.
3.Reinigung und Wartung
Nach dem Diagramm die Kraftscheibe aus dem Fass zurückspulen und alle
drehenden Teile und den Trichter entfernen. Die Maschine mit warmem Wasser
und Reinigungsmittel waschen und dann für die nächste Verwendung trocknen.
02 03
1. screw
8. stuffing funnel
6. Force disk pusher
7. cylinder
2. curve handle
4. washer
5. screw
3. Gear wheel axis
3.Zahnradachse
5.Schraube
4.Unterlegscheibe
2.Handkurbel
7.Füllzylinder
6.Kraftscheibe
8.Einfülltrichter
1.Schraube
www.costway.fr www.costway.es
Esta máquina de salchichas con una apariencia hermosa, construcción
novedosa y alta eficiencia. El producto ha aplicado la rueda dentada para su
conveniencia.
De acuerdo con el diagrama de construcción, este manual lo guiará para el uso
de este producto.
1.Instalación
Encuentre un banco o mesa adecuados y encienda la máquina sujetando el
borde. Gire el tornillo (1) hasta que la máquina quede fija en la mesa. Luego,
doble la manija (2) e instálela en el eje de rueda dentada (3), inserte la arandela
(4), luego fíjela con un tornillo (5). Elija el embudo de relleno (8) e instálelo en la
salida en la parte inferior girando a la derecha.
2.Hacer salchichas
Primero ponga una carcasa en el embudo. Gire la manija curvada en sentido
antihorario para extraer el pistón (6) del cilindro(7) y luego muévalo hacia el lado
derecho durante 90 grados. Ingrese la carne picada marinada en el cilindro,
mueva el pistón nuevamente a la posición del cilindro. La máquina ya está lista
para usar. Simplemente girando el mango de la curva en el sentido de las
agujas del reloj, su encantadora salchicha estará lista en solo unos minutos.
3.Limpieza y mantenimiento
Según el diagrama, rebobine el pistón del cilindro y retire todas las piezas
giratorias y el embudo. Lave la máquina con agua tibia y detergente y luego
séquela para el próximo uso.
3. eje de la rueda dentada
5. tornillo
4. arandela
2. manija curvo
7. cilindro
6. pistón de silicio
8. embudo de relleno
1. tornillo
Cette machine à saucisses a une belle apparence, une construction novatrice et
une grande efficacité. Le produit est équipé d’une roue dentée pour des raisons
de commodité.
Selon le schéma de construction, ce manuel vous guidera pour l’utilisation de ce
produit.
1. Installation
Trouvez un banc ou une table appropriés et mettez la machine en place en
serrant le bord. Tournez la vis (1) jusqu’à ce que la machine soit fixée sur la
table. Ensuite, courbez la poignée (2) et installez-la sur l’axe de roue dentée (3),
insérez la rondelle (4), puis fixez-la à l’aide de la vis (5). Choisissez l’entonnoir
de remplissage (8) et installez-le dans la sortie du bas en tournant à droite.
2. Fabrication de la saucisse
Mettez d’abord un boyau sur l’entonnoir. Tournez la poignée courbe dans le
sens inverse des aiguilles d’une montre pour rembobiner le disque de force (6)
hors du cylindre (7), puis déplacez-le vers le côté droit sur 90 degrés.
Introduisez le hachis mariné dans le cylindre, ramenez le disque de force à la
position du cylindre. La machine est maintenant prête à l’emploi. En tournant
simplement la poignée courbe dans le sens des aiguilles d’une montre, votre
saucisse est prête en quelques minutes seulement.
3. Nettoyage et Entretien
Selon le schéma, rembobinez le disque de force hors du cylindre et retirez
toutes les pièces tournantes et l’entonnoir. Lavez la machine à l’eau chaude et
au détergent, puis séchez-la pour la prochaine utilisation.
3.Axe de roue dentée
5.Vis
4.Rondelle
2.Poignée courbe
7.Cylindre
6. Disque de force
8. Entonnoir de remplissage
1.Vis
04 05
www.costway.it www.costway.pl
W naszej nadziewarce o eleganckim wyglądzie, nowatorskiej konstrukcji i
wysokiej wydajności zastosowano koło zębate dla wygody użytkowania.
Niniejsza instrukcja pozwoli ci na poznanie schematu konstrukcyjnego
urządzenia i sposobu korzystania z niego.
1. Instalacja
Znajdź odpowiednią ławkę lub stół i załóż maszynę, zaciskając jej krawędź.
Przekręć śrubę (1), aż maszyna zostanie przymocowana do stołu. Następnie
zakręć uchwyt (2) i zamontuj na kole zębatym (3), włóż podkładkę (4), a
następnie przymocuj śrubą (5). Wybierz lejek do napełniania (8) i zainstaluj go w
gnieździe u dołu, obracając w prawo.
2. Wyrób kiełbasy
Załóż osłonę na lejek. Obróć uchwyt w lewo, aby wysunąć dysk naciskowy (6)
ze zbiornika (7), a następnie przesuń w prawo o 90 stopni. Wprowadź
marynowane mielone mięso do zbiornika, przesuń dysk naciskowy z powrotem
do pierwotnego położenia. Urządzenie jest teraz gotowe do użycia. Wystarczy
przekręcić uchwyt w prawo, aby twoja kiełbasa była gotowa w ciągu kilku minut.
3. Czyszczenie i konserwacja
Zgodnie ze schematem wysuń dysk naciskowy ze zbiornika, wyjmij wszystkie
obracające się części i lejek. Umyj urządzenie ciepłą wodą z detergentem, a
następnie wysusz i przechowuj w bezpiecznym miejscu do następnego użycia.
3. oś koła zębatego
5. śruba
4. podkładka
2. uchwyt
7. zbiornik
6. tłok
8. lejek do napełniania
1. śruba
Questo produttore di salsicce presenta un bell'aspetto, una costruzione
innovativa e un'alta efficienza. una nuova costruzione e un'alta efficienza. Il
prodotto ha applicato la ruota dentata per motivi di praticità. Secondo lo schema
di costruzione, questo manuale ti guiderà all'uso di questo prodotto.
1. Installazione
Trova una panca o un tavolo adatto e metti la macchina bloccando il bordo.
Ruotare la vite (1) fino a quando la macchina non si fissa sul tavolo, quindi
curvare la maniglia (2) e installarla sulla ruota dentata (3), inserire la rondella
(4), quindi fissarla con la vite (5). Scegli imbuto di riempimento (8) e installalo
nella presa in basso ruotando a destra.
2. Preparare la salsiccia
Metti prima un involucro sull'imbuto. Ruotare la maniglia della curva in senso
antiorario per riavvolgere il disco di forza (6) fuori dal cilindro (7) e quindi
spostarlo verso il lato destro per 90 gradi. Inserisci il trito marinato nel cilindro,
sposta il disco di forza nella posizione del cilindro. La macchina è ora pronta per
l'uso. Semplicemente ruotando la maniglia della curva in senso orario, la tua
deliziosa salsiccia è pronta in pochi minuti.
3. Pulizia e manutenzione
Secondo lo schema, riavvolgere il disco di forza dal cilindro e rimuovere tutte le
parti rotanti e l'imbuto. Lavare la macchina con acqua calda e detergente, quindi
asciugarla per il prossimo utilizzo.
3.Asse della ruota dentata
5.Vite
4.Rondella
2.Maniglia curva
7.Cilindro
6. Forzare lo spingi disco
8. Imbuto per imbottitura
1.Vite
06 07

Other Costway Kitchen Appliance manuals

Costway NP11210 User manual

Costway

Costway NP11210 User manual

Costway HW56444 User manual

Costway

Costway HW56444 User manual

Costway KC55271US User manual

Costway

Costway KC55271US User manual

Costway FP10229US User manual

Costway

Costway FP10229US User manual

Costway FP10125US-SL User manual

Costway

Costway FP10125US-SL User manual

Costway HW56444DE User manual

Costway

Costway HW56444DE User manual

Costway OP71192 User manual

Costway

Costway OP71192 User manual

Costway FP10176US-BK User manual

Costway

Costway FP10176US-BK User manual

Costway NP10813 User manual

Costway

Costway NP10813 User manual

Costway KC42159 User manual

Costway

Costway KC42159 User manual

Costway NP10814BK User manual

Costway

Costway NP10814BK User manual

Costway KC42158 User manual

Costway

Costway KC42158 User manual

Costway FP10128US User manual

Costway

Costway FP10128US User manual

Costway EP71065US-BL User manual

Costway

Costway EP71065US-BL User manual

Costway OP70086 User manual

Costway

Costway OP70086 User manual

Costway KC38774 User manual

Costway

Costway KC38774 User manual

Costway KC53791 User manual

Costway

Costway KC53791 User manual

Costway NP10731 User manual

Costway

Costway NP10731 User manual

Costway NP10437 User manual

Costway

Costway NP10437 User manual

Costway EP24810US User manual

Costway

Costway EP24810US User manual

Costway FP10060US User manual

Costway

Costway FP10060US User manual

Popular Kitchen Appliance manuals by other brands

Skymsen CLM-300 instruction manual

Skymsen

Skymsen CLM-300 instruction manual

ROTOR Sanamat RSI instruction manual

ROTOR

ROTOR Sanamat RSI instruction manual

Back to Basics Smoothie Maker instructions

Back to Basics

Back to Basics Smoothie Maker instructions

Stanley BRANDON DRY OIL Operation instructions

Stanley

Stanley BRANDON DRY OIL Operation instructions

Forme FMC-5070 instruction manual

Forme

Forme FMC-5070 instruction manual

Boann UM1717 manual

Boann

Boann UM1717 manual

La Cornue Broche Flamberge Installation, operation and maintenance manual

La Cornue

La Cornue Broche Flamberge Installation, operation and maintenance manual

Livoo MEP138 user manual

Livoo

Livoo MEP138 user manual

Miroco MI-MF001 user guide

Miroco

Miroco MI-MF001 user guide

ci Oil Presso Manual & user guide

ci

ci Oil Presso Manual & user guide

M.J. MALLIS GROUP SIAT SM1-P Instruction manual and spare parts list

M.J. MALLIS GROUP

M.J. MALLIS GROUP SIAT SM1-P Instruction manual and spare parts list

Russell Hobbs 18553-56 instructions

Russell Hobbs

Russell Hobbs 18553-56 instructions

Gorenje SM701GCW instruction manual

Gorenje

Gorenje SM701GCW instruction manual

Milantoast 15050 Instructions for use

Milantoast

Milantoast 15050 Instructions for use

Electronic.Star 10008248 instructions

Electronic.Star

Electronic.Star 10008248 instructions

U-Line 1224WCINT-00B User guide & service manual

U-Line

U-Line 1224WCINT-00B User guide & service manual

ARDESTO FDB-5385 instruction manual

ARDESTO

ARDESTO FDB-5385 instruction manual

Champion CHKA500 user manual

Champion

Champion CHKA500 user manual

manuals.online logo
manuals.online logoBrands
  • About & Mission
  • Contact us
  • Privacy Policy
  • Terms and Conditions

Copyright 2025 Manuals.Online. All Rights Reserved.