manuals.online logo
Brands
  1. Home
  2. •
  3. Brands
  4. •
  5. Costway
  6. •
  7. Kitchen Appliance
  8. •
  9. Costway KC42158 User manual

Costway KC42158 User manual

USER'S MANUAL / HANDBUCH / MANUEL DE L'UTILISATEUR /
MANUAL DEL USUARIO / MANUALE UTENTE /
INSTRUKCJA OBSŁUGI
Sausage Maker / Wurstfüller / Machine à Saucisses /
Máquina de Salchichas / Macchina per Salsicce /
Nadziewarka do kiełbas
KC42158
UNITED STATES
CANADA UNITED KINGDOM
GERMANY
FRANCE
ITALY
SPAIN
JAPAN
RUSSIA
AUSTRALIA
TIPS:
Your suggestions and comments for COSTWAY are really important to us!
We sincerely solicit you to go back to our shop and leave a good rating in just a
simple click. It would be quite encouraging if you could kindly do so like below:
February 24, 2018
Great products so far. Fast delivery, easy setup, and working without any issues.
Great products so far
With your inspiring rating, COSTWAY will be more consistent to offer you
EASY SHOPPING EXPERIENCE, GOOD PRODUCTS and EFFICIENT SERVICE!
Ihre Vorschläge und Kommentare für COSTWAY sind wirklich wichtig für uns!
Wir bitten Sie aufrichtig, in unseren Shop zurückzukehren und durch nur einen Klick eine
gute Bewertung zu hinterlassen. Es wäre sehr ermutigend, wenn Sie das so tun könnten:
Tolle Produkte bis jetzt
24. Februar 2018
Gute Produkte. Schnelle Lieferung, einfaches Aufbauen, funktionieren ohne Problem.
Mit Ihrer inspirierenden Bewertung wird COSTWAY konsistenter sein, um Ihnen
EIN SCHÖNES EINKAUFSERLEBNIS, GUTE PRODUKTE und EFFIZIENTEN
SERVICE zu bieten!
Vos suggestions et vos commentaires pour COSTWAY sont vraiment importants pour nous !
Nous vous invitons sincèrement à revenir à notre boutique pour laisser une bonne évaluation
seulement en un clic. Ce serait très encourageant si vous pouviez le faire comme ci-dessous:
Bons produits jusqu'à présent
24 février 2018
Excellents produits jusqu'à présent. Livraison rapide et installation facile. Il fonctionne sans problème.
Avec votre évaluation inspirante, COSTWAY sera plus professionnel dans le but de
vous offrir une BONNE EXPERIENCE D'ACHATS, de BONS PRODUITS et un SERVICE
EFFICACE!
US office:Fontana
UK office:Ipswich
DE office:FDS GmbH,Neuer Höltigbaum 36,22143 Hamburg,Deutschland
FR office : 26 RUE DU VERTUQUET, 59960 NEUVILLE EN FERRAIN, FRANCE
EN DE FR ES IT PL
www.costway.com www.costway.de
02 03
Thanks for choosing our product. When you open the box, you will find a brand
new, beautiful, originally fabricated and easy operating sausage maker.
Installation & Stuffing
1. Take out the machine from the box and put it on a smooth table.
2. Take out the crank handle (1) and install it properly onto the rear end of the
spiral spindle (4).
3. Fasten the crank handle with the screw nut provided onto the setscrew (2) at
the end of the Spiral spindle.
4. Unscrew the front Screw ring (6).
5. Rotate the crank handle counter-clockwise in order to move the force disk (5)
on the spiral spindle backwards.
6. Stuff the meat mince into the machine tube.
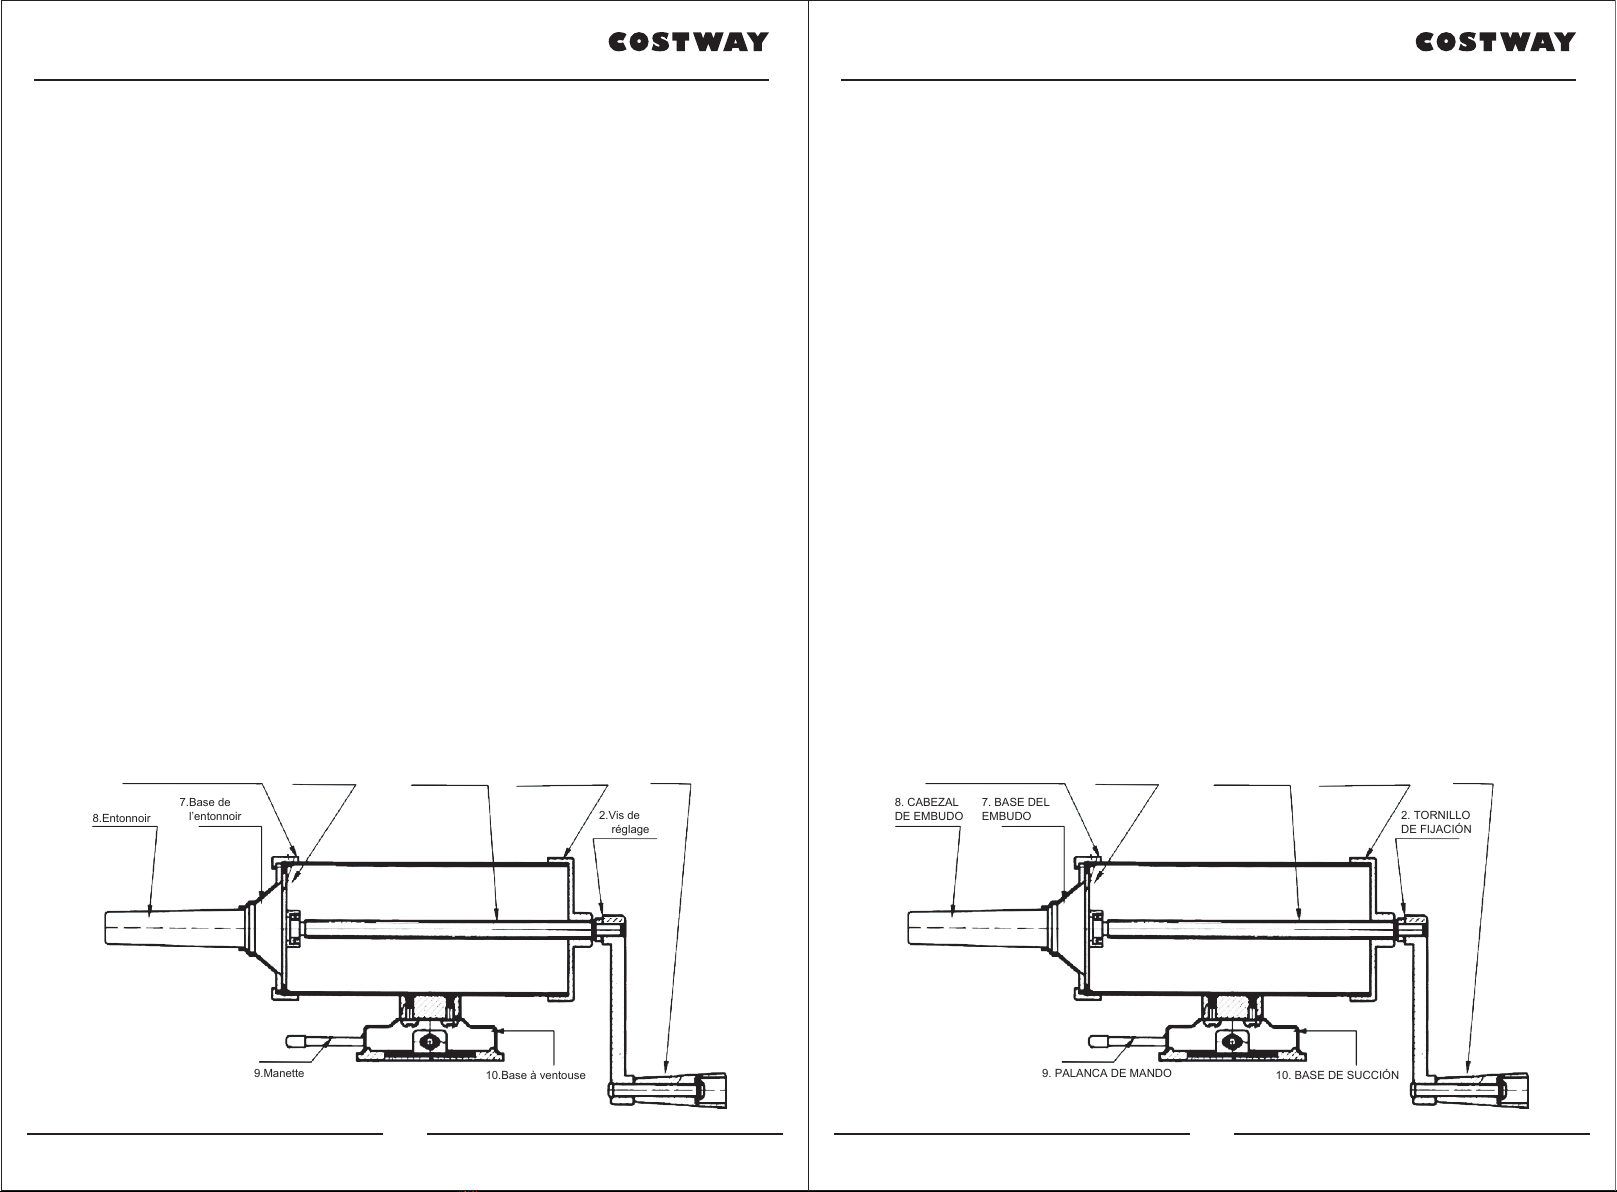
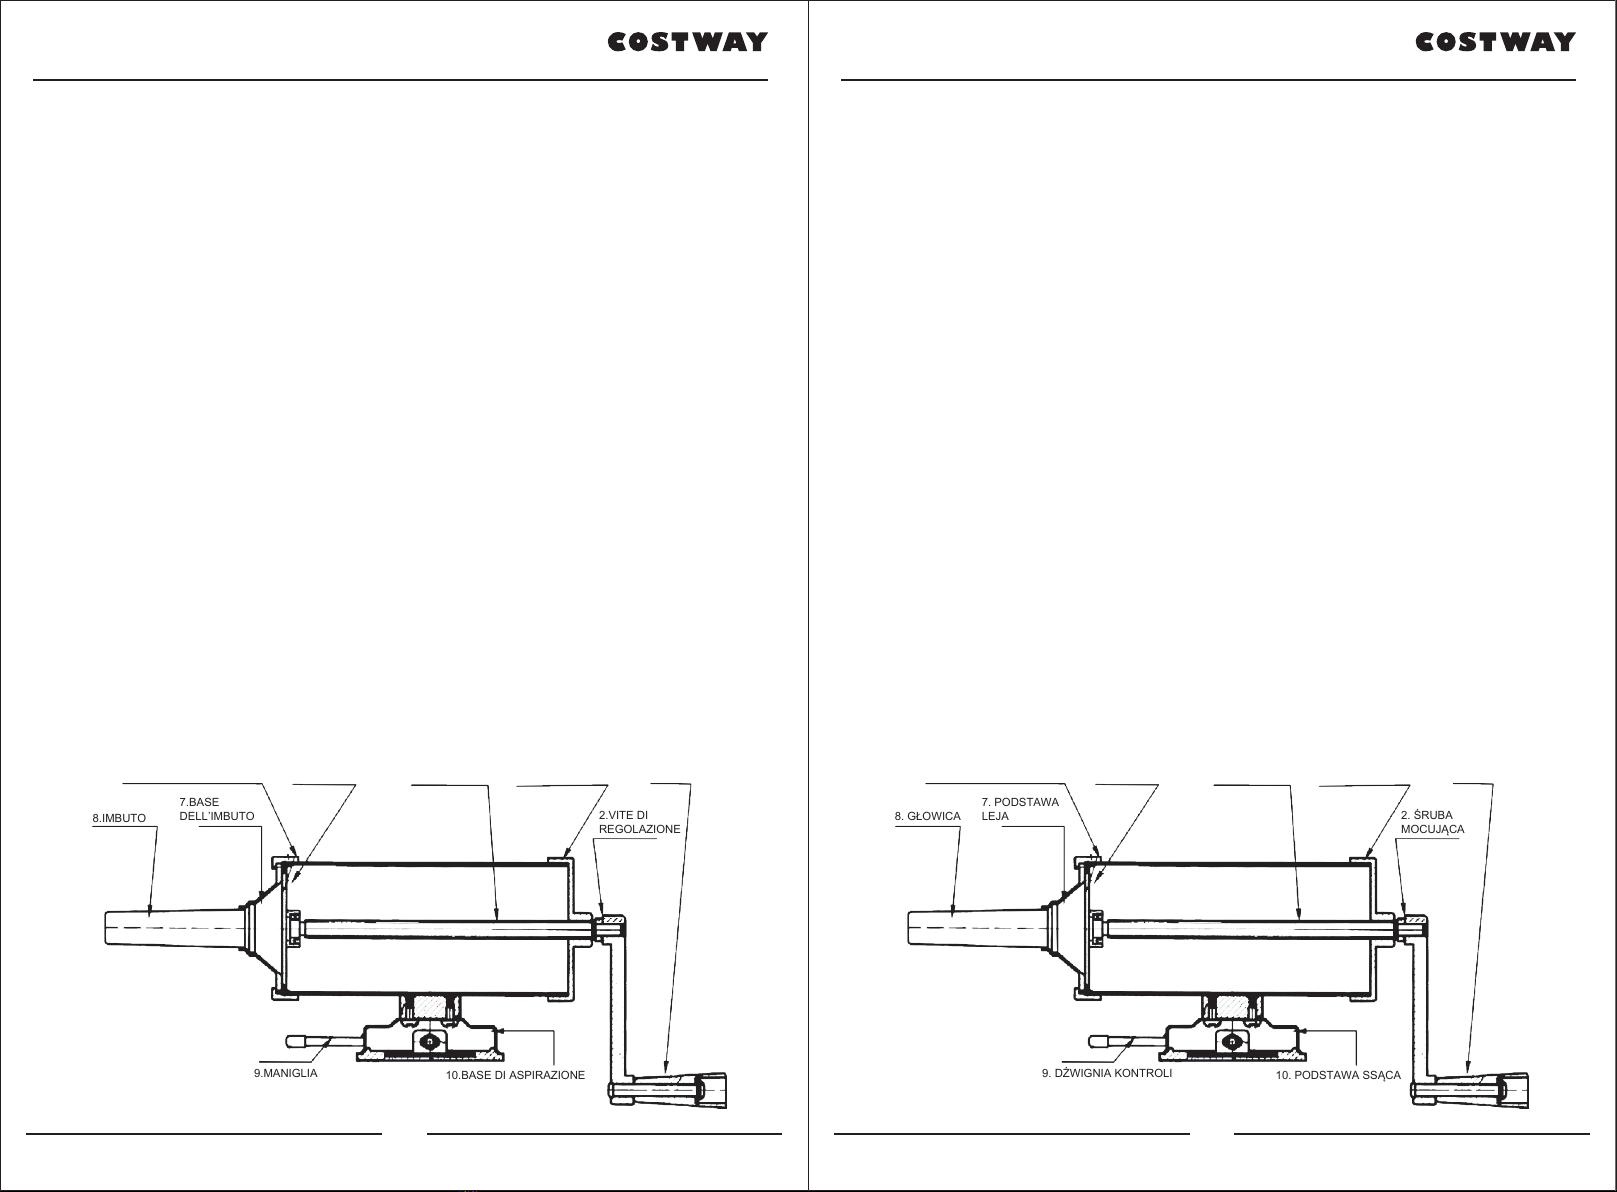
7. Take out the funnel base (7), choose your preferred funnel head (8) - there
are three types for your option -- and install it onto the funnel base. Join the
funnel base with the front screw ring by inserting the funnel base through the
front screw ring and screw it onto the machine tube.
8. Adjust the machine onto a proper position by pressing down the joystick (9) of
the suction base (10), which could be fixed by the table. You can now start to
make sausages.
Cleaning and Maintenance
1. Disassemble the machine by unscrewing front screw ring first and then
remove the rear cover (3) according to the diagram.
2. Caution: If you do not take off the both front screw ring and the rear cover in
order, the spiral spindle will move forward and that may cause the force disk
hooked by the front screw ring. Therefore, the force disk must always be rotated
backwards for a certain space, before you take down the rear cover.
3. Clean the machine and dry it. Keep it in a good condition for next usage.
6.FRONT SCREW RING
8.FUNNEL
HEAD
7.FUNNEL
BASE
5.FORCE DISK 4.SPIRAL SPINDLE 3.REAR COVER
2.SETSCREW
9.JOYSTICK 10.SUCTION BASE
1.HANDLE
Vielen Dank, dass Sie sich für unser Produkt entschieden haben. Wenn Sie die
Verpackung öffnen, finden Sie einen brandneuen, schönen, original gefertigten und
einfach bedienbaren Wurstmacher.
Installation und Füllung
1.Nehmen Sie die Maschine aus der Verpackung und legen Sie sie auf eine ebene
Oberfläche.
2.Nehmen Sie die Handkurbel (1) heraus und montieren Sie sie am hinteren Ende der
Spiralspindel (4).
3.Befestigen Sie die Handkurbel mit der mitgelieferten Schraubenmutter an der
Einstellschraube (2) am Ende der Spiralspindel.
4.Schrauben Sie den vorderen Schraubenring (6) ab.
5.Drehen Sie die Handkurbel gegen den Uhrzeigersinn, um die Kraftscheibe (5) auf der
Spiralspindel nach hinten zu bewegen.
6.Füllen Sie das Hackfleisch in den Maschinenschlauch.
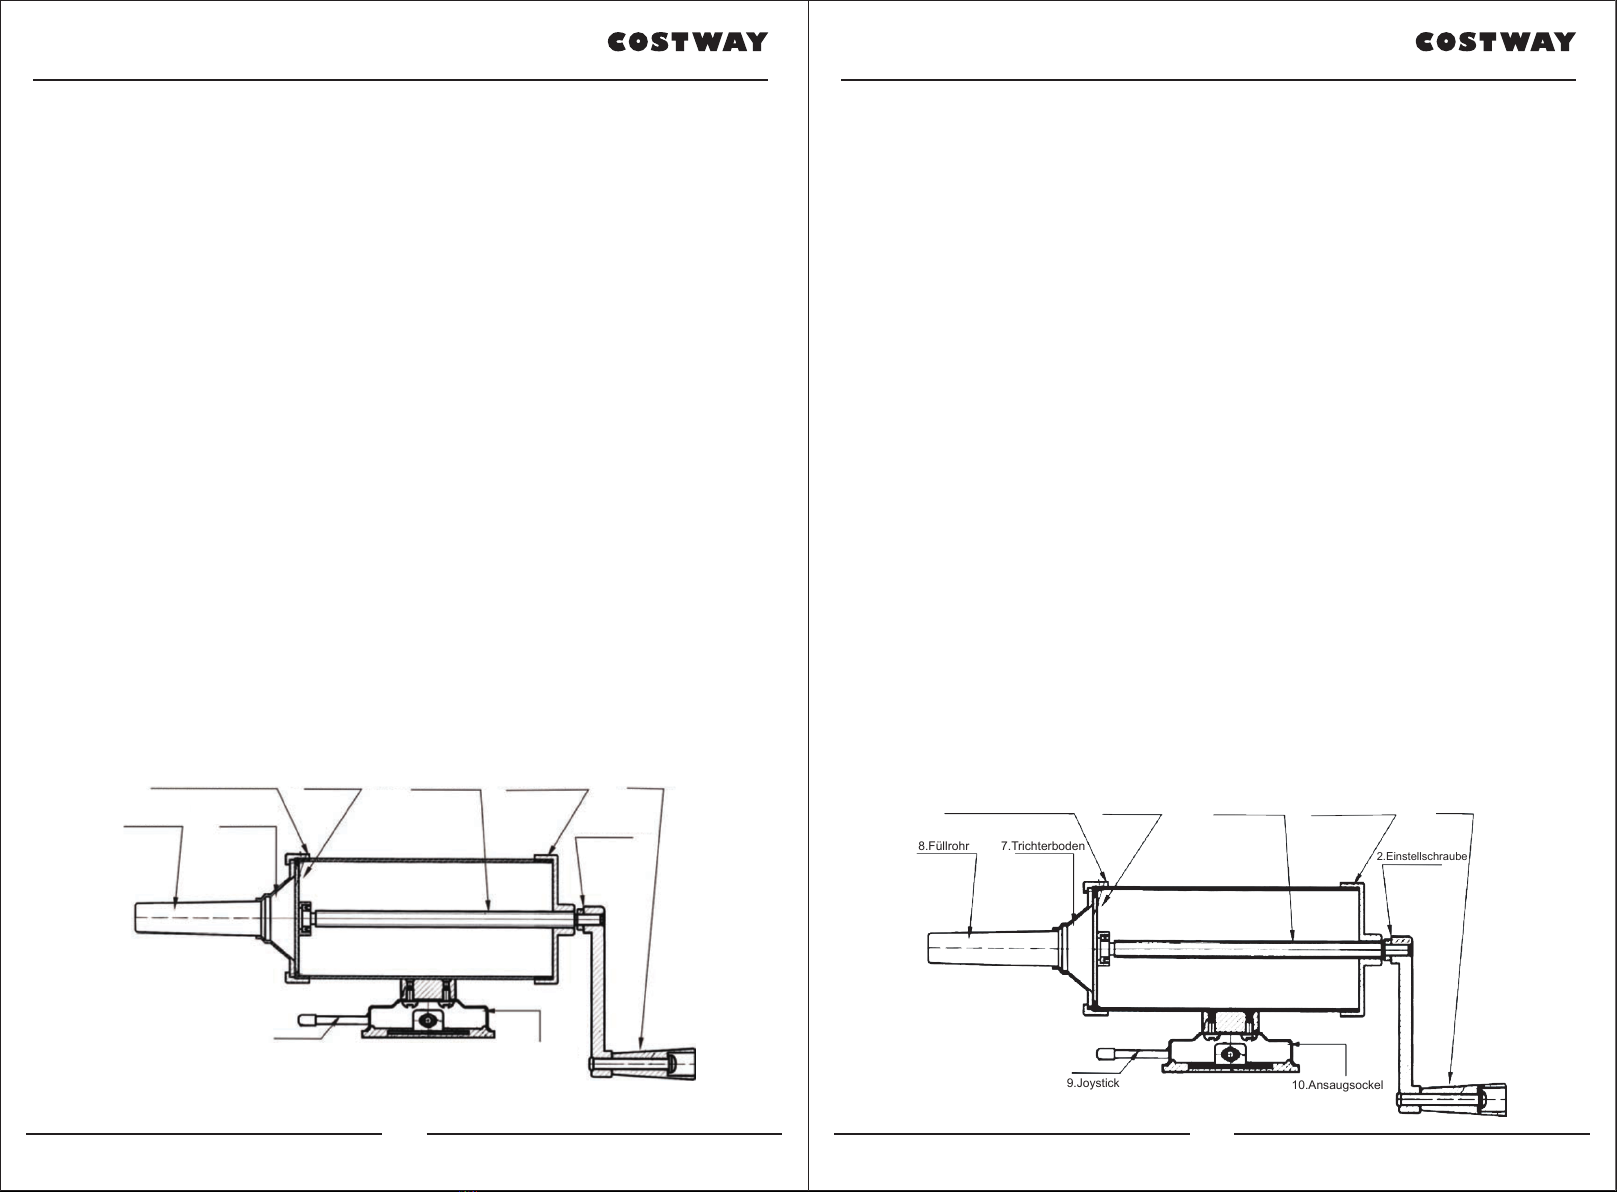
7.Nehmen Sie den Trichterboden (7) heraus, wählen Sie Ihr bevorzugtes Füllrohr (8) -
es gibt drei Arten für Ihre Wahl - und installieren Sie ihn auf der Trichterbasis. Verbinden
Sie den Trichterboden mit dem vorderen Schraubenring, indem Sie den Trichterboden
durch den vorderen Schraubenring einführen und auf das Maschinenrohr schrauben.
8.Stellen Sie die Maschine auf eine geeignete Position ein, indem Sie den Joystick (9)
den Ansaugsockel (10) drücken, der vom Tisch fixiert werden kann. Sie können jetzt
beginnen, Würstchen zu machen.
Reinigung und Wartung
1.Demontieren Sie die Maschine, indem Sie zuerst den vorderen Schraubenring lösen
und dann die hintere Abdeckung (3) gemäß dem Diagramm entfernen.
2.Vorsicht: Wenn Sie den vorderen Schraubenring und den hinteren Deckel der Reihe
nach nicht entfernen, bewegt sich die Spiralspindel nach vorne, was dazu führen kann,
dass sich die Kraftscheibe am vorderen Schraubenring verhakt. Daher muss die
Kraftscheibe immer um einen gewissen Abstand nach hinten gedreht werden, bevor Sie
die hintere Abdeckung abnehmen.
3.Maschine reinigen und trocknen. Bewahren Sie es für die nächste Verwendung in
einem guten Zustand auf.
1. Handkurbel
2.Einstellschraube
3.Abdeckung4. Spiralspindel5.Kraftscheibe
6.Schraubenring
7.Trichterboden
8.Füllrohr
10.Ansaugsockel
9.Joystick
www.costway.fr www.costway.es
Merci d’avoir choisi notre produit. En ouvrant la boîte, vous trouverez une machine à
saucisses tout neuf, magnifique, et facile à utiliser.
Installation et rembourrage
1. Sortez la machine de la boîte et posez-la sur une table lisse.
2. Sortez la manivelle (1) et installez-la correctement sur l’extrémité arrière de l’axe en
spirale (4).
3. Fixez la manivelle avec l’écrou fourni sur la vis de réglage (2) à l’extrémité de la tige
en spirale.
4. Dévissez la bague filetée avant (6).
5. Tournez la manivelle dans le sens inverse des aiguilles d’une montre afin de déplacer
le disque de force (5) sur la tige en spirale vers l’arrière.
6. Farcissez le hachis de viande dans le tube de la machine.
7. Sortez la base de l’entonnoir (7), choisissez votre entonnoir préféré (8) - il y en a trois
types pour votre option - et installez-la sur la base de l’entonnoir. Reliez la base de
l’entonnoir à la bague filetée avant en insérant la base de l’entonnoir dans la bague
filetée avant et vissez-la sur le tube de la machine.
8. Réglez la machine sur une position correcte en appuyant sur la manette (9) de la
base à ventouse (10), qui peut être fixée par la table. Vous pouvez maintenant
commencer à faire des saucisses.
Nettoyage et Entretien
1. Démontez la machine en dévissant d’abord la bague filetée avant, puis retirez le
couvercle arrière (3) selon le schéma.
2. Attention : Si vous n’enlevez pas dans l’ordre la bague filetée avant et le couvercle
arrière, l’axe en spirale se déplacera vers l’avant et cela peut provoquer l’accrochage du
disque de force par la bague filetée avant. Par conséquent, le disque de force doit
toujours être tourné vers l’arrière pour un certain espace, avant que vous n’enleviez le
couvercle arrière.
3. Nettoyez la machine et séchez-la. Gardez-la en bon état pour la prochaine utilisation.
04 05
1. Manivelle
2.Vis de
réglage
3.Couvercle arrière
4. Axe en spirale
5.Disque de force
6.Bague filetée avant
7.Base de
l’entonnoir
8.Entonnoir
10.Base à ventouse
9.Manette
Gracias por elegir nuestro producto. Cuando abra la caja, encontrará una máquina de
salchichas nuevo, hermoso, originalmente fabricado y fácil de operar.
Instalación y Relleno
1. Saque la máquina de la caja y colóquela sobre una mesa lisa.
2. Retire la manivela (1) e instálela correctamente en el extremo posterior del eje espiral
(4).
3. Sujete la manivela con la tuerca del tornillo provista en el tornillo de fijación (2) al final
del eje espiral.
4. Desatornille el anillo de tornillo delantero (6).
5. Gire la manivela en sentido antihorario para mover el pistón (5) en el eje espiral
hacia atrás.
6. Rellene la carne picada en el tubo de la máquina.
7. Saque la base del embudo (7), elija su cabezal de embudo (8) preferido, hay tres
tipos para su opción, e instálelo en la base del embudo. Una la base del embudo con el
tornillo frontal insertando la base del embudo a través del anillo del tornillo frontal y
atorníllelo en el tubo de la máquina.
8. Ajuste la máquina en una posición adecuada presionando hacia abajo la palanca de
mando (9) de la base de succión (10), que podría ser fijado por la mesa. Ahora puedes
comenzar a hacer salchichas.
Limpieza y mantenimiento
1. Desmonte la máquina desenroscando primero el anillo del tornillo delantero y luego
retire la cubierta posterior (3) según el diagrama.
2. Precaución: si no quita el anillo del tornillo delantero y la cubierta posterior en orden,
el eje espiral se moverá hacia adelante y eso puede causar que el pistón se enganche
con el anillo del tornillo delantero. Por lo tanto, el pistón siempre debe girarse hacia
atrás durante cierto espacio, antes de desmontar la cubierta posterior.
3. Limpie la máquina y séquela. Manténgalo en buenas condiciones para el próximo
uso.
1. MANIVELA
2. TORNILLO
DE FIJACIÓN
3. CUBIERTA
POSTERIOR
4. EJE ESPIRAL
5. PISTÓN DE
SILICIO
6. ANILLO DE TORNILLO
DELANTERO
7. BASE DEL
EMBUDO
8. CABEZAL
DE EMBUDO
10. BASE DE SUCCIÓN
9. PALANCA DE MANDO
www.costway.it www.costway.pl
06 07
Grazie per aver scelto il nostro prodotto. Troverai una bella macchina per salsicce
nuova di zecca, originariamente realizzata e facile da usare quando apri la confezione.
Installazione e riempimento
1. Estrarre la macchina dalla confezione e posizionarla su un tavolo liscio.
2. Estrarre la manovella (1) e installarla correttamente all'estremità posteriore del
mandrino a spirale (4).
3. Collegare la manovella alla vite di regolazione (2) che si trova all'estremità del
mandrino a spirale usando il dado in dotazione.
4. Svitare l'anello della vite anteriore (6).
5. Ruotare la manovella in senso antiorario per spostare all'indietro il disco di forza (5)
sul perno a spirale.
6. Farcire la carne macinata nel tubo della macchina.
7. Estrai la base dell'imbuto (7), scegli il tuo imbuto preferito (8) - ci sono tre tipi tra cui
scegliere - e installalo sulla base dell'imbuto. Inserire la base dell'imbuto attraverso
l'anello della vite anteriore per unirli e avvitarlo sul tubo della macchina.
8. Regolare la macchina nella posizione desiderata premendo la maniglia (9) della base
della ventosa (10) che può essere fissata dal tavolo. Ora puoi iniziare a fare salsicce.
Pulizia e manutenzione
1. Smontare la macchina svitando prima l'anello della vite anteriore, quindi rimuovere il
coperchio posteriore (3) secondo lo schema.
2. Attenzione:Se non si rimuovono in ordine l'anello della vite anteriore e il coperchio
posteriore, il mandrino a spirale si sposterà in avanti e il disco della forza potrebbe
essere bloccato dall'anello della vite anteriore. Per questo motivo, il disco di
alimentazione deve essere sempre all'indietro per un po 'di spazio prima di rimuovere il
coperchio posteriore.
3. Si prega di pulire la macchina e asciugarla. Tenerlo in buone condizioni per il
prossimo utilizzo.
1. MANOVELLA
2.VITE DI
REGOLAZIONE
3.COPERCHIO
POSTERIORE
4. MANDEINO
A SPIRALE
5.DISCO DI FORZA
6.ANELLO A VITE ANTERIORE
7.BASE
DELL’IMBUTO
8.IMBUTO
10.BASE DI ASPIRAZIONE
9.MANIGLIA
Dziękujemy za wybranie naszego produktu. Po otwarciu pudełka znajdziesz zupełnie
nową, piękną maszynę do kiełbas, oryginalnie wyprodukowaną i łatwą w obsłudze.
Instalacja i napełnianie
1. Wyjmij maszynę z pudełka i umieść na płaskim stole.
2. Wyjmij korbę (1) i zainstaluj ją prawidłowo na tylnym końcu spiralnego wału (4).
3. Zabezpiecz korbę za pomocą nakrętki znajdującej się na śrubie ustalającej (2) na
końcu wału spiralnego.
4. Odkręć przedni pierścień śrubowy (6).
5. Obróć korbą w lewo, aby przesunąć tłok (5) na spiralnym wałku do tyłu.
6. Napełnij urządzenie farszem.
7. Wyjmij podstawę lejka (7), wybierz preferowaną głowicę lejka (8), (istnieją trzy typy
opcji) i zainstaluj ją w podstawie lejka. Przymocuj podstawę lejka do przedniej śruby,
wkładając podstawę lejka przez przedni pierścień śruby i wkręć ją w rurkę maszyny.
8. Ustaw maszynę w odpowiedniej pozycji, naciskając dźwignię sterującą (9)
podstawy ssącej (10). Teraz możesz zacząć robić kiełbaski.
Czyszczenie i konserwacja
1. Zdemontuj maszynę, najpierw odkręcając przedni pierścień śrubowy, a następnie
zdejmij tylną pokrywę (3) zgodnie ze schematem.
2. Uwaga: Jeśli nie zdejmiesz przedniego pierścienia śrubowego i tylnej pokrywy,
wałek spiralny przesunie się do przodu, co może spowodować zaczepienie tłoka o
przedni pierścień śrubowy. Dlatego tłok powinien zawsze być obrócony do tyłu o
określoną przestrzeń przed zdjęciem tylnej pokrywy.
3. Wyczyść i wysusz urządzenie. Zachowaj go w dobrym stanie do następnego
użycia.
1. KORBA
2. ŚRUBA
MOCUJĄCA
3. TYLNA
POKRYWA
4. OŚ SPIRALNA
5. TŁOK
SILIKONOWY
6. PIERŚCIEŃ ŚRUBY
PRZEDNIEJ
7. PODSTAWA
LEJA
8. GŁOWICA
10. PODSTAWA SSĄCA
9. DŹWIGNIA KONTROLI

Other Costway Kitchen Appliance manuals

Costway KC42159 User manual

Costway

Costway KC42159 User manual

Costway NP10813 User manual

Costway

Costway NP10813 User manual

Costway FP10128US User manual

Costway

Costway FP10128US User manual

Costway NP10814BK User manual

Costway

Costway NP10814BK User manual

Costway EP71065US-BL User manual

Costway

Costway EP71065US-BL User manual

Costway OP70086 User manual

Costway

Costway OP70086 User manual

Costway OP71192 User manual

Costway

Costway OP71192 User manual

Costway KC38774 User manual

Costway

Costway KC38774 User manual

Costway FP10229US User manual

Costway

Costway FP10229US User manual

Costway FP10176US-BK User manual

Costway

Costway FP10176US-BK User manual

Costway NP10437 User manual

Costway

Costway NP10437 User manual

Costway KC53791 User manual

Costway

Costway KC53791 User manual

Costway FP10125US-SL User manual

Costway

Costway FP10125US-SL User manual

Costway HW56444DE User manual

Costway

Costway HW56444DE User manual

Costway FP10060US User manual

Costway

Costway FP10060US User manual

Costway NP10731 User manual

Costway

Costway NP10731 User manual

Costway NP11210 User manual

Costway

Costway NP11210 User manual

Costway EP24810US User manual

Costway

Costway EP24810US User manual

Costway KC42155 User manual

Costway

Costway KC42155 User manual

Costway KC55271US User manual

Costway

Costway KC55271US User manual

Costway HW56444 User manual

Costway

Costway HW56444 User manual

Popular Kitchen Appliance manuals by other brands

Commercial Pro CP250 instruction manual

Commercial Pro

Commercial Pro CP250 instruction manual

Victorio Poppy VKP1163 instruction manual

Victorio

Victorio Poppy VKP1163 instruction manual

Presto PopLite Plus instructions

Presto

Presto PopLite Plus instructions

Teesa TSA3031 owner's manual

Teesa

Teesa TSA3031 owner's manual

TEFAL ZP600 manual

TEFAL

TEFAL ZP600 manual

Hamilton Beach Premium Big Mouth 67850 manual

Hamilton Beach

Hamilton Beach Premium Big Mouth 67850 manual

HAYGAIN HG-2002 user manual

HAYGAIN

HAYGAIN HG-2002 user manual

Braun MQ 500 manual

Braun

Braun MQ 500 manual

Princess Aerofryer XL instruction manual

Princess

Princess Aerofryer XL instruction manual

Allavino AWR110-1 instruction manual

Allavino

Allavino AWR110-1 instruction manual

AIGOSTAR 02074SM01 700W-S Instruction booklet

AIGOSTAR

AIGOSTAR 02074SM01 700W-S Instruction booklet

Oster 2605 user guide

Oster

Oster 2605 user guide

Aroma Breakfast-To-Go instruction manual

Aroma

Aroma Breakfast-To-Go instruction manual

Alfresco Chef NAPLES Manual & user guide

Alfresco Chef

Alfresco Chef NAPLES Manual & user guide

SousVide SVQ-6L instruction manual

SousVide

SousVide SVQ-6L instruction manual

Ernesto HG00320A quick start guide

Ernesto

Ernesto HG00320A quick start guide

Melissa 16240046 manual

Melissa

Melissa 16240046 manual

Granite Ware F0730 Instruction manual and users guide

Granite Ware

Granite Ware F0730 Instruction manual and users guide

manuals.online logo
manuals.online logoBrands
  • About & Mission
  • Contact us
  • Privacy Policy
  • Terms and Conditions

Copyright 2025 Manuals.Online. All Rights Reserved.