Step 2: Familiarise Yourself with the Gocycle Dashboard
Before operating your Gocycle, you will need to: 1) charge your Gocycle, 2) familiarise
yourself with the dashboard display, 3) understand the electronic shifting, and 4) set the
mode of operation that is best suited to your personal riding preference and appropriate
for the country in which you are operating the Gocycle*. Also ensure you complete the
Pre-Ride Checks (see over). Please consult the Gocycle Owner’s Manual for more detailed
information regarding these steps.
Operating Your Gocycle®
Register
your
Goc
ycle at www.gocycle.com/safety to stay informed of important safety notices and to activate your warranty www.gocycle.com[email protected]You can operate your Gocycle in different modes to suit your personal riding style. The motor assistance will start and stop at different speeds—you can control this with either the red power
button A or the rider pedal input, or a combination of both. See below for more information. To view current mode of operation: Press and hold buttons Aand B. The current mode of
operation will show on the dashboard display (C). To select operation mode: Press and hold buttons Aand Buntil all LEDs flash and the operation mode shows on the dashboard display
(C). Click button Brepeatedly until you reach your desired mode (C). To save the mode, press and hold button Auntil LEDs flash and then release the button.
Step 4: Set the Mode of Operation
Step 3: Understand Electronic Shifting
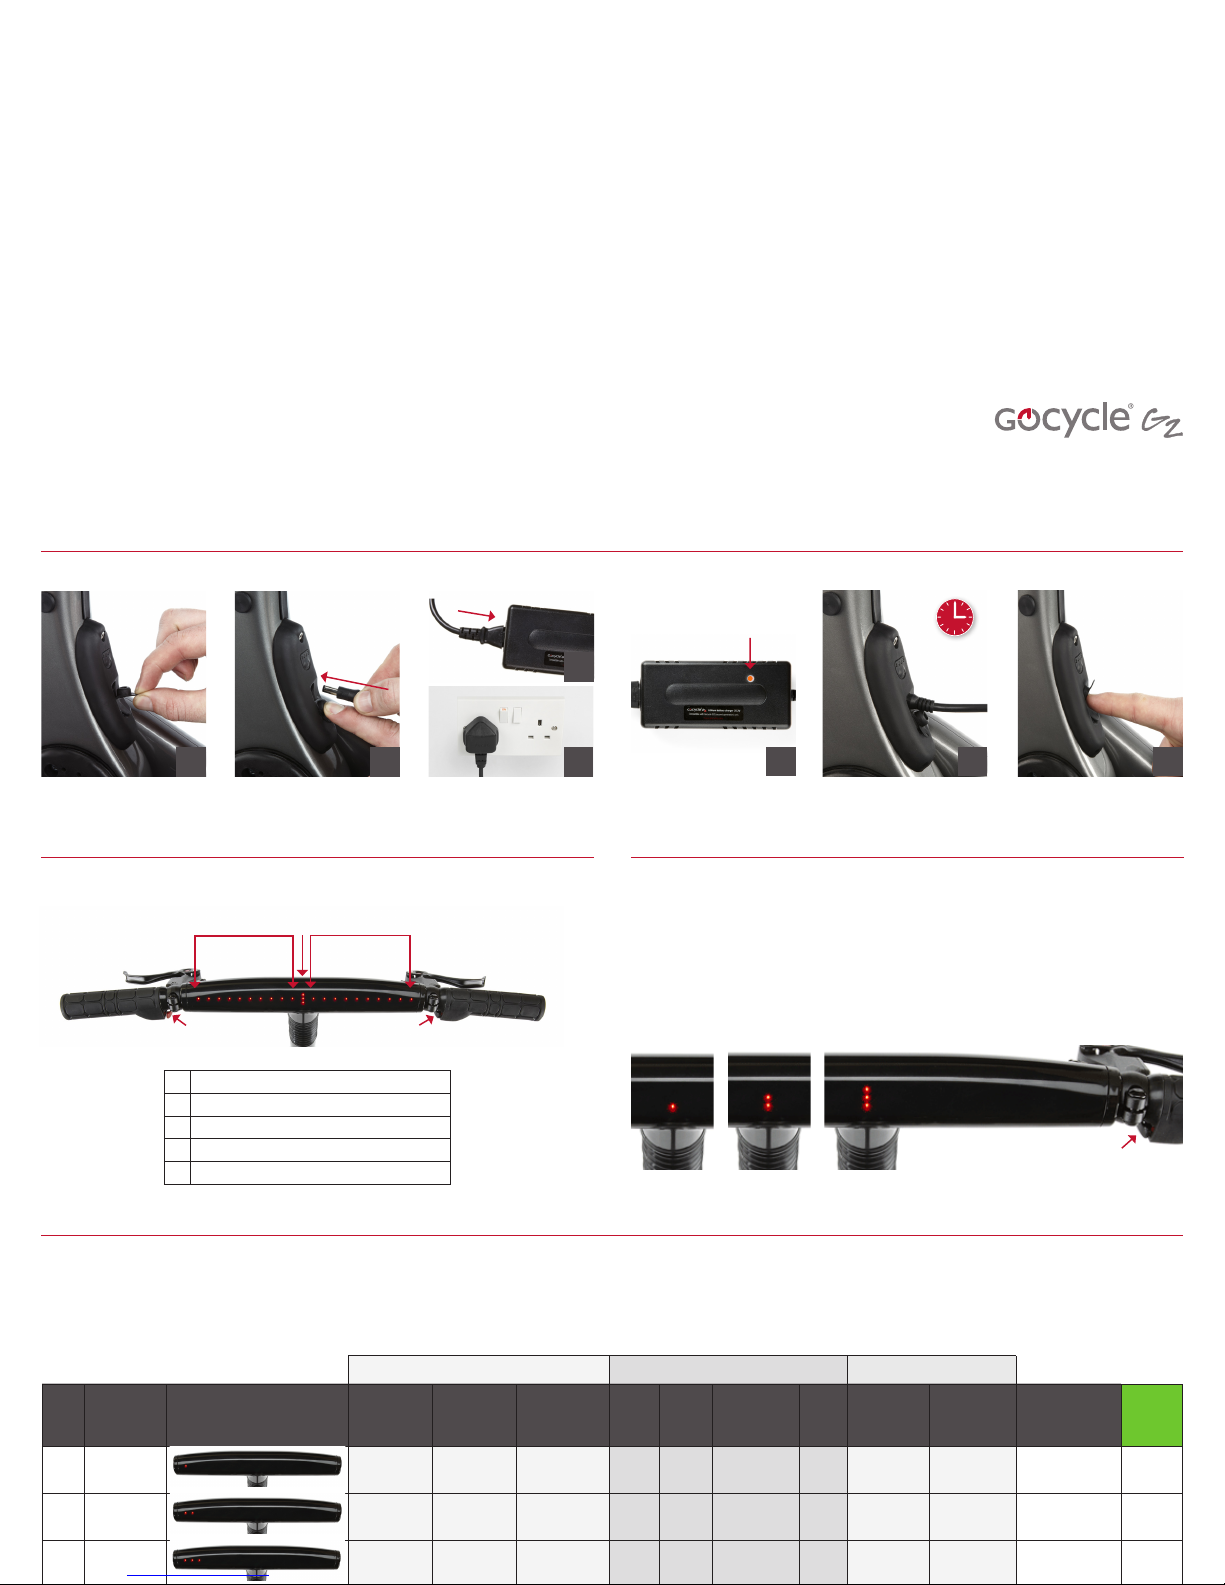
Step 1: Charge Your Gocycle
ARed power button
BElectronic gear shift
CBattery charge indicator/mode reference
DGear selection display
ESpeed display
A B
EDC
Open the rubber charging
port cover
When battery is fully charged, remove
the charging lead and replace the
rubber charging port cover
Charge complete when charger
light turns green and all ten LEDs
on the dash flash (see Step 2: C)
Whilst holding open the rubber
charging port cover, insert the
charging lead
6
1 2 5
approx.
5.5 hours
The charger light will turn orange
to indicate charging
4
A) Plug the mains lead into the
charger; B) Plug the lead into the
mains and turn on the mains electricity
3B
ON
Starting and Stopping the Motor Motor Operating Speed (No. of LEDs) (E) Controlling Motor Speed
Mode
No. Mode Name Dashboard LED Display
How to Start
Motor
How to Stop
Motor
Continuously
Press Red Button
to Operate the
Motor
No
Motor
Motor
Start
Power Reduces
above this
Speed (Power
Taper Speed)
No
Motor
Pedal Input
Controls
Motor Power
Red Button
for Full Motor
Assist
Low Battery
Warning
(1 LED Flashing)
Meets
EN
15194
1City Light pedal effort
Stop pedalling
or reduce pedal
effort
X0–1 2 5 8+ √ √
Motor will not
operate unless red
button is pressed
√
2Eco Medium pedal
effort
Stop pedalling
or reduce pedal
effort
X0–1 2 5 8+ √ √
Motor will not
operate unless red
button is pressed
√
3On Demand Pedal + press
button
Stop pedalling
or reduce pedal
effort
√0–1 2 5 8+ X√
Motor will not
operate unless red
button is pressed
√
4Eco+
(Custom)
Medium/high
pedal effort
Stop pedalling
or reduce pedal
effort
X0–1 2 5 8+ √ √
Motor will not
operate unless red
button is pressed
√
Customisable via App (see www.gocycle.com/app for more information)
City mode: utilises your Gocycle’s torque sensor, with the motor assistance level controlled by rider pedal input.
(Hard pedalling = high motor assistance, soft pedalling = less motor assistance).
In this mode, within the motor operating speed and whilst the rider is providing pedal input, the motor will start
automatically and will continue to operate until the maximum speed is reached. For maximum motor assistance,
press and hold the red power button. Above the maximum motor speed, the motor will stop. There is no need to
press the red power button. When the pedals cease to rotate or with reduced pedal input, the motor will stop.
Eco mode: operates in the same manner as City mode, but the rider must pedal harder to gain assistance. Use this
mode if you wish to conserve your battery and increase your range. In this mode, within the motor operating speed
and whilst the rider is providing pedal input, the motor will start automatically and will continue to operate until the
maximum speed is reached.
For maximum motor assistance, press and hold the red power button. Above the maximum motor speed, the motor
will stop. There is no need to press the red power button. When the pedals cease to rotate or with reduced pedal
input, the motor will stop.
On Demand mode: the rider can simply choose whether or not to have motor assistance. Select this mode if you
wish to ride the Gocycle without motor assistance—or assistance only when required.
In On Demand mode, within the motor operating speed and whilst pedalling, simply press and hold the red power
button to start and maintain motor assistance. The motor will continue to operate until the maximum speed is
reached, or until the pedals cease to turn, or until the power button is released. When the pedals cease to rotate or
the power button is released, the motor will stop.
Custom mode: The factory default setting is Eco+, which operates in the same manner as Eco mode, but the rider must
pedal harder to gain assistance. Use this mode if you wish to further conserve your battery and increase your range.
In this mode, within the motor operating speed and whilst the rider is providing pedal input, the motor will start
automatically and will continue to operate until the maximum speed is reached. For maximum motor assistance,
press and hold the red power button. Above the maximum motor speed, the motor will stop. There is no need to
press the red power button. When the pedals cease to rotate or with reduced pedal input, the motor will stop.
Custom mode is fully customizable via the Gocycle App. For more information, please visit www.gocycle.com/app or
contact your local reseller.
Note: In any riding mode, relying heavily on the motor assistance will dramatically reduce the range of your battery
and increase the wear on your motor drive components. See Owner’s Manual 6.4 Maximising Your Gocycle’s Motor
Performance and Reliability for more information as to how to get the best out of your Gocycle.
B
3A
Your Gocycle is equipped with electronic shifting. Whilst riding, single click button Bto shift
up a gear. Your Gocycle includes a predictive downshift feature. When slowing down, your
Gocycle will automatically downshift from 3rd gear to 2nd gear (at 7 LEDs) and from 2nd
gear to 1st gear (at 3 LEDs). It is possible to override the automatic downshift by double-
clicking button Bto shift down.
CAUTION! Electronic shifting can appear to be sensitive compared to traditional
mechanical shifting. Practise to familiarise yourself with upshifting and downshifting before
riding on busy roads or in traffic.
*Power and speed regulations for electric
vehicles vary from country to country. If
you are unsure, before selecting the mode
of operation, please consult your local
transportation authority.
3rd gear2nd gear1st gear
Step 5: Returning the Battery to Sleep Mode
The Gocycle will use power when stationary and in Operation mode, or while the charger light is green. This will drain the battery. Best practice is to enter Sleep mode to conserve the
battery—when not in use and/or the battery is fully charged. With the Gocycle disconnected from the battery charger, press and hold the button on the battery until the two right LEDs flash
and the dashboard display turns off. Refer to section 5.3 of the Gocycle Owner’s Manual for more information.