manuals.online logo
Brands
  1. Home
  2. •
  3. Brands
  4. •
  5. Sakura
  6. •
  7. Laboratory Equipment
  8. •
  9. Sakura Tissue-Tek Prisma Plus User manual

Sakura Tissue-Tek Prisma Plus User manual

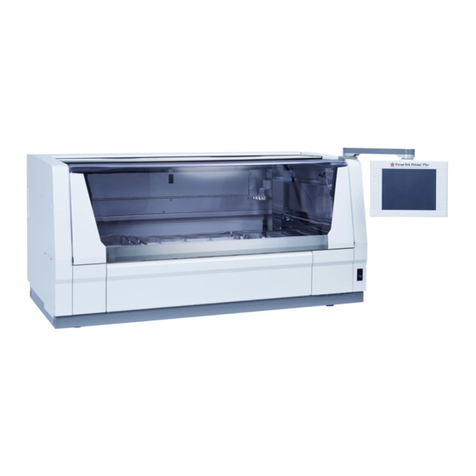
Tissue-Tek Prisma®Plus
Automated Slide Stainer
Ensure
Quick Reference Guide
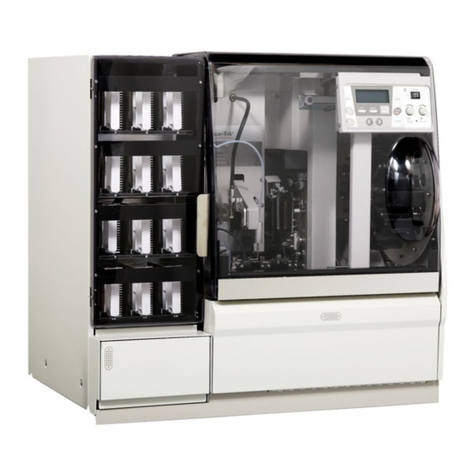
The Tissue-Tek Prisma®Plus automated slide stainer is
an instrument that simultaneously carries out multiple
staining protocols on slides containing sections that are
acquired from fresh or fixated material. The instrument,
as part of the histopathology process, is intended to
facilitate the in vitro examination of human and animal
tissue for morphology changes by a pathologist.
This Quick Reference Guide contains information about
day-to-day use, maintenance and cleaning. For more
detailed information we refer to the most recent
Operating Manual of this instrument.
All users should be trained for the use of the Sakura
instruments. The Sakura User Training is a training to
ensure that new and existing users of a Sakura
instrument have the knowledge and skills to operate and
maintain the instrument in a proper way.
Daily operations
To operate the instrument start with entering the
password on the touch screen display.
Note: Ensure that the reagents within the instrument
match the current or desired configuration before
starting a program.
The door at the bottom of the hood gives access to the
start stations. While loading these pay attention to the
orientation of the basket, the “upside” should face right.
The instrument can be loaded with two types of baskets
containing either 10 or 20 slides.
The starting procedure explained below is an example.
If the instrument has been set to start upon closing of
the door, you do not need to touch the start key. By
pressing the Start key in the main screen a menu
appearsfrom where the staining protocol, the location of
the basket, number of slides and coverslipper program
are selected. The last two options will only appear when
certain user defined settings are met.
Version : 2019-1
Multiple runs with an identical program are started at the
same time by selecting more than one start station.
Pressing Start again will start the selected staining
protocol.
During process the permitted operations are limited. In
continuous mode the option to add more baskets and
start them with priority becomes available. The status of
the end stations and the individual runs can be checked
by respectivelypressing End station status or Detailed
monitor.
In order to pause a staining process, press Pause on
the left of the stain process screen. All runs will be
paused at this point. Press Resume to continue or
Abort and choose to cancel specific or all runs. When
eligible runs have been selected press Abort again to
stop their process. Open the hood at this point and
remove the aborted baskets. After closing the hood
again the Exit option becomes available. Selecting this
option will complete the abort operation and the system
will continue from the moment it was paused.
When a stain process is completed, the basket is stored
in an end station, program end (PE) station or placed in
the link station when a coverslipper is connected. When
the link station is occupied, the system will temporarily
place the basket in an end station.
Upon finishing a run, a notification window will appear
briefly informing the user to remove the finished baskets.
Access is gained by opening the door. Once all
completed baskets are removed and the door is closed
again, a confirmation window appears. Press Yes to
confirm the removal of the baskets. If the baskets are
not removed select No.
After all daily operations are completed close the lids on
all reservoirs to reduce evaporation of the solutions.
When reagents have been refreshed, the usage limit for
solution stations with a managed usage like runs, days
or slides can be reset from the stain process menu by
selecting the Reset Solution Usage Information button.
Any errors that might occur are logged and found in the
same menu as the Reset Solution Usage Information.
Touch the Log Off key at the bottom left of the screen
to log off from the instrument. This action can be done
even after a stain protocol has started. The only options
availablenow relate to checking the status of these runs.
Maintenance
Daily:
Cleaning interior and exterior surfaces
Wiping the instrument with a clean cloth is
sufficient. The entire system should be
thoroughly cleaned once a month with water
and a mild detergent. Refrain from using bleach
and acids as these might cause corrosion. In
the event where one of these solutions are
spilled, dilute with water and wipe off with a
cloth.
Cleaning the washing stations and drain
Check for debris in the stations and rinse with
water when required. The nozzle can be
cleaned using water and a mild detergent. To
confirm that the cleaning station has been
assembled correctly, perform a water supply
test (found in the utility menu). The drain and
attached hose are cleaned with water or with
regular household bleach ( 2,5 - 10%) in case
they are clogged. Be careful using bleach as
this may cause corrosion.
Weekly:
Cleaning solution reservoirs
Water and a neutral detergent are normally
enough. If a stain does not come off easily,
place the item in a commercial chemical dye
cleaner or bleach and afterwards rinse with
water.
Cleaning arm holder groove and baskets
Due to repeated staining operations both items
become dirty over time. Use a cloth moistened
with alcohol to clean the arm holder groove.
Rinse the baskets including the holders with
water to avoid corrosion caused by acids and
increase the lifetime.
Cleaning touch screen
Use a cloth moistened with 70-80% alcohol to
clean the screen. Do not directly spray on the
screen as this may cause damage.
Bi-Weekly:
Replacing activated carbon filters
Replace both activated carbon filters located at
the back wall of the solution reservoir area.
Ensure upon closing the filter storage door, a
click is heard that indicates it is properly closed.
If not closed well it can collide with the robotic
arm.
The recommendation of carbon filter exchange
frequency is based on operational testing in
order to comply with EN61326 and EN61010.
The frequency might differ per lab due to size of
the workspace, condition of ventilation,
reagents used and their replacement cycles,
quantityof tissue samples processed and more.
Monthly:
Cleaning the drying and heating stations
The two rightmost stations located at the back
of the instrument are drying stations. First,
remove the two special attachments from the
drying stations. Next, clean the stations using
neutral detergent, and then wipe down with a
dry cloth. Restore the stations by following the
removal steps in reverse order.
The two rightmost stations located at the front
of the instrument are heating stations. Remove
them by holding the two tongues located at the
edges. Be aware when handling the stations
since they remain very hot after operation.
Clean them with neutral detergent and wipe
down with a dry cloth. The interior of the heating
stations is coated with Teflon so ensure the
coating is not rubbed with sharp objects, as the
coating will be scraped off.
Yearly:
Preventative maintenance
Preventative maintenance is performed by a
Sakura representative or a qualified service
engineer.
Maintenance task
Frequency
Exterior surface
Daily
Interior surface
Daily
Washing stations
Daily
Drain
Daily
Solution reservoirs
Weekly
Touch screen
Weekly
Slide baskets and holder
Weekly
Replace carbon filters
Bi-weekly
Drying and heating stations
Monthly
Preventative maintenance
Yearly
The use of bleach or acid might cause corrosion.

Other manuals for Tissue-Tek Prisma Plus

1

Other Sakura Laboratory Equipment manuals
Sakura Tissue-Tek AutoTEC a120 User manual

Sakura

Sakura Tissue-Tek AutoTEC a120 User manual

Sakura Tissue-Tek DRS 2000 User manual

Sakura

Sakura Tissue-Tek DRS 2000 User manual

Sakura Tissue-Tek Glas g2 User manual

Sakura

Sakura Tissue-Tek Glas g2 User manual

Sakura Tissue-Tek Glas g2 User manual

Sakura

Sakura Tissue-Tek Glas g2 User manual

Sakura 6134 User manual

Sakura

Sakura 6134 User manual

Sakura Tissue-Tek Film User manual

Sakura

Sakura Tissue-Tek Film User manual

Sakura Cyto-Tek 2500 User manual

Sakura

Sakura Cyto-Tek 2500 User manual

Sakura Tissue-Tek TEC 6 Instruction Manual

Sakura

Sakura Tissue-Tek TEC 6 Instruction Manual

Sakura Tissue-Tek Prisma Plus Prisma-P-AD User manual

Sakura

Sakura Tissue-Tek Prisma Plus Prisma-P-AD User manual

Sakura Histo-Tek VP1 User manual

Sakura

Sakura Histo-Tek VP1 User manual

Sakura Tissue-Tek Xpress x120 User manual
Sakura

Sakura Tissue-Tek Xpress x120 User manual

Sakura Tissue-Tek Prisma Plus User manual

Sakura

Sakura Tissue-Tek Prisma Plus User manual

Sakura Tissue-Tek TEC 6 EM Option User manual

Sakura

Sakura Tissue-Tek TEC 6 EM Option User manual

Sakura Cyto-Tek 2500 User manual

Sakura

Sakura Cyto-Tek 2500 User manual
Sakura Tissue-Tek AutoTEC a120 User manual

Sakura

Sakura Tissue-Tek AutoTEC a120 User manual

Sakura Tissue-Tek Glas User manual

Sakura

Sakura Tissue-Tek Glas User manual
Popular Laboratory Equipment manuals by other brands

Steinberg Systems SBS-MR-2000 user manual

Steinberg Systems

Steinberg Systems SBS-MR-2000 user manual

NoiseKen FNS-AX4-A20 instruction manual

NoiseKen

NoiseKen FNS-AX4-A20 instruction manual

VERDER Carbolite Gero HT 5/220 Installation, operation and maintenance instructions

VERDER

VERDER Carbolite Gero HT 5/220 Installation, operation and maintenance instructions

Labnet MultiGene OptiMax TC9610 Operation manual

Labnet

Labnet MultiGene OptiMax TC9610 Operation manual

VERDER Carbolite Gero HTMA 4/220 Installation, operation and maintenance instructions

VERDER

VERDER Carbolite Gero HTMA 4/220 Installation, operation and maintenance instructions

Philips SCF287 manual

Philips

Philips SCF287 manual

Biosan MMS-3000 User instructions

Biosan

Biosan MMS-3000 User instructions

Thermo Scientific HESI-II Probe user guide

Thermo Scientific

Thermo Scientific HESI-II Probe user guide

Oxford Optronix HypoxyLab user manual

Oxford Optronix

Oxford Optronix HypoxyLab user manual

Sartorius Sartobind IEX MA 15 operating instructions

Sartorius

Sartorius Sartobind IEX MA 15 operating instructions

GenScript eStain L1 manual

GenScript

GenScript eStain L1 manual

biodex ATOMLAB 500 Operation and service manual

biodex

biodex ATOMLAB 500 Operation and service manual

iseg THQ Desktop Technical documentation

iseg

iseg THQ Desktop Technical documentation

Keysight U5855A user guide

Keysight

Keysight U5855A user guide

Brooks CryoPod quick start guide

Brooks

Brooks CryoPod quick start guide

Buchi V-300 Operation manual

Buchi

Buchi V-300 Operation manual

Macherey-Nagel NucleoMag 96 PCR user manual

Macherey-Nagel

Macherey-Nagel NucleoMag 96 PCR user manual

HTI HT-C600 Operation instructions

HTI

HTI HT-C600 Operation instructions

manuals.online logo
manuals.online logoBrands
  • About & Mission
  • Contact us
  • Privacy Policy
  • Terms and Conditions

Copyright 2025 Manuals.Online. All Rights Reserved.