Crane NOZ-CHEK Cryogenic Manual

www.cranecpe.com
OPERATION AND MAINTENANCE INSTRUCTIONS
NOZ-CHEK®Cryogenic Valves
brands you trust.
Crane ChemPharma & Energy

www.cranecpe.com
2
NOZ-CHEK®Cryogenic Installation, Operation & Maintenance
1.0 INTRODUCTION AND BACKGROUND
1.1 HIGH PERFORMANCE NON-SLAM CHECK VALVE
Crane Stockham Valve has been an innovative leader
in non-return valve design since 1960. The design of
modern compression and pumping installation and
certain other process applications have a requirement for
low pressure drop, rapid response, non-slam check valves.
The Noz-Chek® product is the result of a two year project
undertaken by Crane Stockham Valve Engineers in
conjunction with Queen’s University, Belfast. During this
development many hydrodynamic flow and surge tests
were performed at their flow laboratory.
Final testing was successfully conducted in the hydraulic
machinery laboratory of the Industrial Technology
Division of Delft Hydraulics, at Delft Netherlands.
The product of this development is a precision non-return
valve which can be placed in critical locations to ensure
predictable, non-slam closing times in applications where
extremely quick flow reversal is anticipated.
The Noz-Chek® valve range has been designed to meet
ASME B16.34 and API 6D specifications. The Crane
Stockham Valve manufacturing facility in the UK is
approved to ISO 9001, and the Pressure Equipment
Directive 2014/68/EU.
The Noz-Chek® is a high performance non-return check
valve offering four major benefits for critical service
applications:-
• Minimises water hammer in liquid service.
• Removal of chatter associated with conventional
valves in reciprocating compressor service.
• Protects rotating equipment from damage due to
flow reversal.
• Minimises the pressure loss in the piping.
It optimises the performance between low pressure loss
and quick dynamic response, keeping the reverse velocity
to a minimum.
Further development and testing of the valve, including
updating to state of the art machining techniques and
refined material selection, means the Noz-Chek® now fully
complies with BS 6364 cryogenic leak rates.
1.2 CRYO NOZ-CHEK ® FEATURES
Cryogenic Service
The Cryo Noz-Chek® valve is capable of achieving reduced
leak rates of less than 300cc/min/inch at -196°C which
fully complies with BS6364 and ISO 28921-1.
Low Pressure Loss
Axial movement of the valve disc allows an ideal
streamlined flow path. The valve geometry creates a
controlled reduction in flow area, resulting in an increased
flow velocity through the valve. The venturi effect allows
maximum valve capacity and minimises pressure loss.
Long Valve Life
The Crane Stockham Valve Noz-Chek® is a simple,
compact, reliable, well engineered valve. The only moving
part is the disc, which has a stem, positively guided
through a low friction bearing. Noz-Chek II ® components
are designed to have a long quiet and dependable life.
Non-Slam Characteristics
Flow velocity into the valve inlet causes the disc to move
axially and compresses the valve spring. The valve is fully
opened when the inlet velocity has reached the critical
velocity. The valve is designed to be in the fully open
position with the smallest possible axial movement.
When inlet velocity is reduced below critical velocity the
compressed spring initiates valve disc closure.
The short stroke, spring assisted disc design minimises
valve slam and water hammer.
Spring Options
The Crane Stockham Valve Noz-Chek® is available with
different strength springs. The choice of different
springs effects critical velocity and valve response. Crane
Stockham Valve engineers review each application
and make the correct spring selection for each specific
application.

3
www.cranecpe.com
NOZ-CHEK®Cryogenic Installation, Operation & Maintenance NOZ-CHEK®Cryogenic Installation, Operation & Maintenance
2.0 INITIAL COMMISSIONING
A Crane Stockham Valve Noz-Chek® check valve is a
precision built product, specifically designed for the
operating parameters of your system.
Please observe the following recommendations:
2.1 INITIAL / COMMISSIONING PROCEDURE
(a) Valves will be packed in accordance with our ESB 2155
APP20, Packing, preservation and site storage procedure
for cryo valve products.
(b) Care should be taken not to damage any paint work,
while lifting and moving valves.
(c) Care should be taken not to damage flange / mating
faces of valves.
(d) Care should be taken to avoid mechanical damage
to cable / junction box of the Position Switch during
installation of valve and throughout its working life, (if
applicable).
(e) Care should be taken to prevent contanmination of
the valve from dirt,dust or any other foreign bodies from
entering the valve internals.
(f) Remove any desiccants that have been placed in bore
of valve prior to installation.
2.2 STORAGE
The valve shall be stored within a sealed polyethylene bag
to prevent any contaminants from entering the valve.
3.0 INSTALLATION
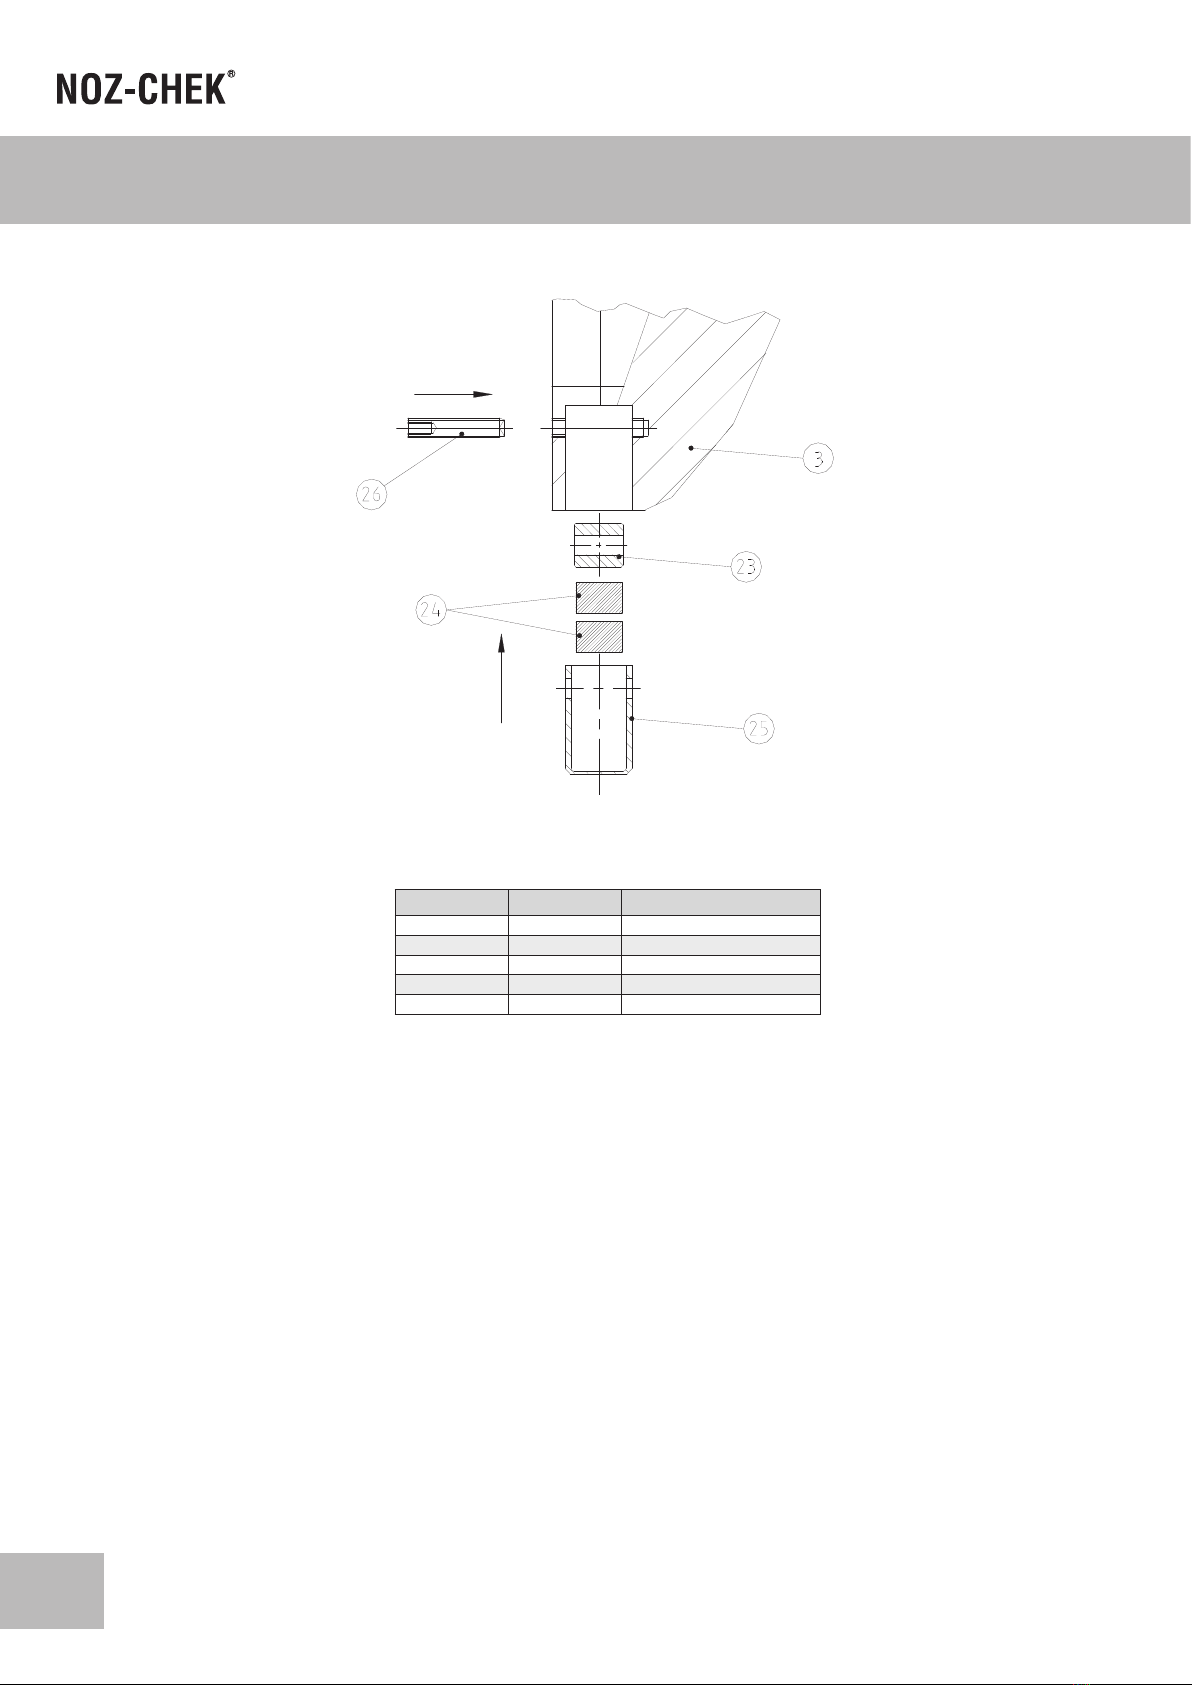
(a) Direction of Flow
The direction of flow should coincide with the flow
direction indicated by the cast‘arrow’ on the body of the
Noz-Chek®.
(b) Operating Orientation
Ensure that the mounting position is in the operating
orientation as advised on the Service specification for
each valve when ordered i.e. horizontal, vertical upwards
or downwards flow.
(c) Line positioning
Ideally the check valve should have 5 diameters of
straight pipe before and 6 diameters after the valve. For
practical reasons this is often not possible. The valve
should have as a minimum, 2 diameters of straight
pipe before and after its location. The valve will under
normal circumstances still function as a non-slam check
valve if fitted closer to other equipment than the stated
guidelines; however this will normally result in increased
pressure loss and wear of components. This phenomenon
is not exclusive to Crane equipment, and should be
applied to any pipe layout as good practice.
The pressure loss of any piece of piping equipment
in a system will be affected by the presence of other
equipment. Pressure loss is an unrecoverable energy loss
and is the measured decrease in pressure. Measuring
the pressure drop immediately before and after piping
equipment will give a higher reading than measuring a
sufficient distance before and after the piping equipment.
This is due to pressure recovery after the equipment as
the flow returns to the full flow area of the pipe. Standard
flow loop testing requires two diameters of straight pipe
before the equipment and six after. Most of the pressure
recovery will occur in the first three diameters after a
nozzle check valve and a significant amount after two
diameters.
Two diameters before the piping equipment will allow
for the pressure recovery of the upstream equipment.
The flow will also lose the increase in turbulence caused
by the disruption of the flow by the equipment. Placing
equipment too close together will amplify any disruption
to the flow and make the overall pressure loss to the
system more than the sum of the individual pressure loss
of the equipment.
Insufficient straight pipe before the piping equipment
can also cause a significant increase in the wear of the
components and reduce the life of the equipment.
Research has shown that typically five diameters are
required to stop the effects of accelerated wear with
the affects increasing in an exponential curve. With the
geometry of the nozzle check valve it has been shown
that two diameters is sufficient to make the affects of the
accelerated wear minimal.
(d) Lifting and Flange Assembly
Always lift the valve by the lifting eyes provided, or
alternatively a well padded sling.
Ensure that no external pipeline stresses are imposed on
the valve prior to tightening bolts and pipework mating
flanges are parallel.
Ensure bolts are tightened correctly. Always tighten in
a diagonally opposing bolt sequence, to ensure that all
bolts apply a uniform load, with the gaskets properly
installed.

www.cranecpe.com
4
NOZ-CHEK®Cryogenic Installation, Operation & Maintenance
(e) Welded End Valves
(Bevelled per ASME B16.25 figure 2 (a) or 3 (a) depending
on wall thickness).
Valves with end connections prepared for welding into a
pipeline should be lowered into position between mating
pipe ends after removal of any debris or foreign matter.
Ensure proper alignment of valve and pipe.
Temperature rise due to heat conduction along inlet end
of valve in proximity of resilient seals should be monitored
during welding process to ensure maximum temperature
of seals are not exceeded. Refer to General Arrangement
drawings for details.
All welding should be performed in accordance with
qualified procedures.
(f) Position Switches
Where a valve is fitted with a position switch, the switch
must be wired in accordance with the switch datasheet.
Ensure that the switch is not exposed to excessive voltage.
Care should be taken not to hit the switch housing as this
may damage the threads and cause leakage.
4.0 OPERATION
4.1 OPENING
Reduced pressure, generated by increased velocity in
the minimal flow area results in additional force to assist
the Disc to open and allows for extra spring loading that
facilitates a faster closing time.
This spring force is balanced in the fully open position of
the disc for a given velocity of flow. This velocity depends
upon the flow imposed by the service conditions and the
Specific Gravity of the fluid.
The Noz-Chek II ® geometry is established by considering
the design velocity required to ensure that the disc is
stabilised open against its stop even if moderate flow
oscillation occurs.
4.2 CLOSING
When the flow through the valve reduces below the
critical velocity (velocity when the valve is just 100%
open) of the valve, the disc reacts immediately, limiting
backflow and valve slamming.
The spring load, disc inertia and short displacement
ensures a rapid self-dampening response.
4.3 POSITION SWITCHES
With reference to valves fitted with a position switch, the
purpose of the switch is to determine if the disc is in the
opened or closed position.
The switch is activated by the presence (close proximity)
of a magnetic field, the magnetic field is emitted from a
magnet located in the sealing disc, and is sensed by the
switch located through the valve wall.

5
www.cranecpe.com
NOZ-CHEK®Cryogenic Installation, Operation & Maintenance NOZ-CHEK®Cryogenic Installation, Operation & Maintenance
5.0 MAINTENANCE
5.1 GENERAL
Depending on the severity of the application (e.g. flow
velocity, cycling, location of valve) maintenance can be
scheduled accordingly. A suggested duration is in the
range of 5-10 years under average conditions.
This product was built and tested to exacting standards.
The following maintenance procedure must be followed
with a great deal of care.
If a detailed inspection is required, we can provide a kit of
spares and special tools:
Standard Design:
Spares: Spring Energized Seal–(10)–(See figure 1)
Alternative Seal Design:
Spares: Metal C-seal
Special Tools: Seat Extractor (See Figure 2)
Disc Extractor (See Figure 2)
Plus tools normally carried by standard maintenance
team.
5.2 POSITION SWITCHES (IF APPLICABLE)
The sensing surfaces of the magnet housing and switch
housing should be checked for deposits that could effect
the operation of the switch and cleaned if necessary.
Also, the magnet housing and switch housing should be
checked to ensure that they have not become loose, and
the cable checked for wear or damage and replaced if
necessary.
The switch (21) may be checked or replaced without
removing the switch housing (20) from the valve (1). This
will eliminate the need for draining the valve prior to
disassembly. Simply unscrew the cable gland (22), whilst
preventing the switch housing (20) from moving. The
switch spacer (27) and switch (21) may then be removed
for inspection. See Figure 3A.
5.3 VALVE DIS-ASSEMBLY (TYPICAL) – SEE FIGURE 1
Ensure that area upstream of seat (2) is clean and free
from scale.
Valve should be resting on downstream side (ensuring no
damage to sealing face)
Valve may need to be secured to avoid rotation when dis-
assembling.
a)Remove seat screw (13) and insert the Seat Extractor
tool into the slots in the seat to unscrew the Seat (2)
counter clockwise (See Figure 2).
b) Remove set screw (12) and screw the Disc Extractor tool
into the tapped hole in the top of the disc (3) to withdraw
it (see Figure 2).
c) Remove compression springs (8). Then using a suitable
hex head socket, remove the guide housing (4) by turning
counter clockwise.
d) Remove retaining rings (6) and extract guide bushes (5)
HEALTH & SAFETY
Caution should be exercised when removing disc as
compression of springs could cause ejection of the disc (a
weight should be placed upon the disc to avoid injury).
Ensure the appropriate Personal Protective Equipment is
used such as safety glasses, gloves and safety shoes.
Ensure surrounding lighting is adequate.
5.4 REPAIRS
Minor repairs can be performed on Seat, Seal and Bushes
– lightly emery to remove any bruising. Remove all
deposits and debris.
Major repairs such as Seal replacement, Seat Machining
etc. would require special equipment. Contact your Crane
Stockham Valve representative for further advice.
Spare discs for metal seated valves should be lapped into
the mating seat in order to achieve low leakage rates.
Disc Seal Replacement – Disc seals employ a specialist
process of applied heat and pressure for bonding rubber
to metal and can only be replaced by Crane Stockham
Valve.
CAUTION
!

www.cranecpe.com
6
NOZ-CHEK®Cryogenic Installation, Operation & Maintenance
5.5 VALVE ASSEMBLY
Assemble all components in reverse order to 5.3.
Lubricate generously with suitable ‘Anti Seize’compound
covering all threaded diameters in both body and seat.
For standard designs: Ensure that the‘Anti Seize’
compound is applied around the O-ring in the seat, and
on the mating body diameter.
For alternative seat designs: Ensure that none of the‘Anti
Seize’ compound is applied around the seal area or on the
seal itself. The sealing compound can affect the sealing
capability at extreme temperatures.
When replacing the guide housing ensure an adequate
amount of Furminite (or other suitable locking
compound/thread seal) is applied to help lock the guide
housing in place.
After assembly of valve, the valve should be
hydrostatically tested by pressurising the valve on the
downstream side and checking for leakage on the
upstream side.
Note:
1. Locktite 222 to be used to secure all screws.
2. Item 11 Back up ring is only required for standard
design valves, PN100 and above. (See figure 1)
5.5.1 PROXIMITY SWITCH ASSEMBLY (WHERE
APPLICABLE)
(g) Switch housing assembly (See Figure 3B)
1. The threads in the body (1) for the switch housing
(20) and the threads on the switch housing (20)
should be cleaned thoroughly with petroleum
solvent, or other suitable detergent.
2. An even coating of“Jet-Lube”(Thick or Thin) thread
paste is applied to the switch housing (20) threads.
3. Screw the switch housing (20) into the body (1) and
wrench tighten. (Care must be taken not to start
screwing the switch housing in on the incorrect
thread as this will damage the threads)
4. The limit switch (21) is inserted fully into the switch
housing, and followed by the switch spacer (27).
5. The cable of the limit switch (21) should be passed
through the cable gland (22) and the cable gland
screwed into the switch housing (20).
(b) Magnet housing assembly (See Figure 4)
1. The 2 magnets (24) are joined together, opposite
pole to opposite pole and inserted into the magnet
housing (25) (the switch’s sensor detects the
presence of a magnetic field, there is no preference
in the polarity of the field, therefore the magnet can
be inserted into the housing either pole first). Ensure
the magnets (24) are positioned in the centre of the
magnet housing (25) and secured in place with an
anti-vibration sealant (or silicone), such as Belzona
2221 Anti-Shock Compound.
2. The magnet spacer (23) is placed in the magnet
housing (25) on top of the magnets (24) so the holes
in the spacer and housing are aligned.
3. Insert the magnet housing assembly into the hole in
the disc (3) so the hole in the magnet housing (25)
and the hole in the disc line up. Secure in place with
an anti-vibration sealant (or silicone).
4. An even coating of“Jet-Lube”(Thick or Thin) thread
paste is applied to the grub screw (26), which is
screwed into the hole in the back of the disc (3) and
tightened to secure the magnet housing (25) into the
disc (3).
A small portion of the magnet housing (25) will
protrude from the hole when fully inserted. This
portion should not impede the axial motion of the
disc (3) by colliding with the switch housing (20).
5.6 PROXIMITY SWITCH DISASSEMBLY
The disassembly of the Proximity Switch can be
accomplished by simply reversing the assembly
instructions in 5.5.1.
ALL THREADS MUST BE CORRECTLY TIGHTENED AND
LOCKED.
DO NOT USE EXCESSIVE FORCE AT ANY POINT DURING
ASSEMBLY.
IF IN DOUBT DIS-ASSEMBLE AND CHECK BEFORE RE-
ASSEMBLY.
REMEMBER: PLEASE USE EYE PROTECTION.
CAUTION
!

7
www.cranecpe.com
NOZ-CHEK®Cryogenic Installation, Operation & Maintenance NOZ-CHEK®Cryogenic Installation, Operation & Maintenance
Item Quantity Description
1 1 BODY
2 1 NOZZLE SEAT
3 1 VALVE DISC
4 1 GUIDE HOUSING
5 2 GUIDE BUSH
6 2 RETAINING RING
7 1 DISC STEM
8 1 SPRING
9 1 SEAL
10 1 SPRING ENERGISED SEAL
11 1 SCREW (DISC)
12 1 SCREW (SEAT)
FIGURE 1
CRANE
®
Engineered Valve Division
Subject
Installation, Operating and Maintenance manual for
Crane Stockham Noz-chek ® valves for use in
Cryogenic Service
Doc No.: ESB 3268
Revision: 0
Checked: P Burns
Revision Date: 25/08/20
Page 11 of 16
Crane Stockham Valve Ltd Registered Number : L549383 Eng.
6 Alexander Road Registered Address : 100 Barbirolli Square
Cregagh Belfast BT6 9HJ Manchester, M2 3AB
Phone: +44 (0)28 90 704222
Fax: +44 (0)28 90 401582
STOCKHAM VALVE Duo-Chek • Noz Chek • Marlin
Flowseal • Center Line
Item Quantity Description
1 1 BODY
21 NOZZLE SEAT
31 VALVE DISC
41 GUIDE HOUSING
5 2 GUIDE BUSH
6 2 RETAINING RING
7 1 DISC STEM
81 SPRING
91 SEAL
10 1 SPRING ENERGISED SEAL
11 1 SCREW (DISC)
12 1 SCREW (SEAT)
FIGURE 1

www.cranecpe.com
8
NOZ-CHEK®Cryogenic Installation, Operation & Maintenance
CRANE
®
Engineered Valve Division
Subject
Installation, Operating and Maintenance manual for
Crane Stockham Noz-chek ® valves for use in
Cryogenic Service
Doc No.: ESB 3268
Revision: 0
Checked: P Burns
Revision Date: 25/08/20
Page 12 of 16
Crane Stockham Valve Ltd Registered Number : L549383 Eng.
6 Alexander Road Registered Address : 100 Barbirolli Square
Cregagh Belfast BT6 9HJ Manchester, M2 3AB
Phone: +44 (0)28 90 704222
Fax: +44 (0)28 90 401582
STOCKHAM VALVE
Duo-Chek • Noz Chek • Marlin
Flowseal • Center Line
FIGURE 2
FIGURE 2

9
www.cranecpe.com
NOZ-CHEK®Cryogenic Installation, Operation & Maintenance NOZ-CHEK®Cryogenic Installation, Operation & Maintenance
CRANE
®
Engineered Valve Division
Subject
Installation, Operating and Maintenance manual for
Crane Stockham Noz-chek ® valves for use in
Cryogenic Service
Doc No.: ESB 3268
Revision: 0
Checked: P Burns
Revision Date: 25/08/20
Page 13 of 16
Crane Stockham Valve Ltd Registered Number : L549383 Eng.
6 Alexander Road Registered Address : 100 Barbirolli Square
Cregagh Belfast BT6 9HJ Manchester, M2 3AB
Phone: +44 (0)28 90 704222
Fax: +44 (0)28 90 401582
STOCKHAM VALVE
Duo-Chek • Noz Chek • Marlin
Flowseal • Center Line
FIGURE 3A
FIGURE 3B
Item Quantity Description
1 1 BODY
20 1 SWITCH HOUSING
21 1 SWITCH
22 1 GLAND
27 1 SWITCH SPACER
FIGURE 3A
FIGURE 3B
Item Quantity Description
1 1 BODY
20 1 SWITCH HOUSING
21 1 SWITCH
22 1 GLAND
27 1 SWITCH SPACER
CRANE
®
Engineered Valve Division
Subject
Installation, Operating and Maintenance manual for
Crane Stockham Noz-chek ® valves for use in
Cryogenic Service
Doc No.: ESB 3268
Revision: 0
Checked: P Burns
Revision Date: 25/08/20
Page 13 of 16
Crane Stockham Valve Ltd Registered Number : L549383 Eng.
6 Alexander Road Registered Address : 100 Barbirolli Square
Cregagh Belfast BT6 9HJ Manchester, M2 3AB
Phone: +44 (0)28 90 704222
Fax: +44 (0)28 90 401582
STOCKHAM VALVE
Duo-Chek • Noz Chek • Marlin
Flowseal • Center Line
FIGURE 3A
FIGURE 3B
Item Quantity Description
1 1 BODY
20 1 SWITCH HOUSING
21 1 SWITCH
22 1 GLAND
27 1 SWITCH SPACER

www.cranecpe.com
10
NOZ-CHEK®Cryogenic Installation, Operation & Maintenance
CRANE
®
Engineered Valve Division
Subject
Installation, Operating and Maintenance manual for
Crane Stockham Noz-chek ® valves for use in
Cryogenic Service
Doc No.: ESB 3268
Revision: 0
Checked: P Burns
Revision Date: 25/08/20
Page 14 of 16
Crane Stockham Valve Ltd Registered Number : L549383 Eng.
6 Alexander Road Registered Address : 100 Barbirolli Square
Cregagh Belfast BT6 9HJ Manchester, M2 3AB
Phone: +44 (0)28 90 704222
Fax: +44 (0)28 90 401582
STOCKHAM VALVE
Duo-Chek • Noz Chek • Marlin
Flowseal • Center Line
Item Quantity Description
3 1 VALVE DISC
23 1 MAGNET SPACER
24 2 MAGNETS
25 1 MAGNET HOUSING
26 1 GRUB SCREW
FIGURE 4
FIGURE 4
Item Quantity Description
3 1 VALVE DISC
23 1 MAGNET SPACER
24 2 MAGNETS
25 1 MAGNET HOUSING
26 1 GRUB SCREW

11
www.cranecpe.com
NOZ-CHEK®Cryogenic Installation, Operation & Maintenance NOZ-CHEK®Cryogenic Installation, Operation & Maintenance
6.0 FAULT FINDING AND CORRECTION
One should keep in mind the purpose of the Noz-Chek®
when operating difficulties are encountered. The valve
is supposed to check reverse flow. When the valve fails
to perform this function, the following points should be
checked:
6.1 The valve fails to check
a) Spring may be broken.
b) Corrosion may have destroyed all or part of the Disc.
This would indicate that the disc material is incorrect
for the media.
c) Debris in the line may prevent the disc from closing.
d) If the valve is fitted with a switch, the grub screw
(26) may have become loose or screwed out and
the magnet housing (25) is impeding the disc’s
(3) movement. To remedy this, clean both threads
thoroughly, apply an even coat of “Jet Lube Thick
or Thin” thread paste to the threads, and screw the
grub screw (26) back into the hole in the disc (3) and
magnet housing (25) and tighten.
6.2 The valve slams violently when flow reverses
a) The spring in the valve is broken and hence does not
perform its function.
b) The spring is too weak. Some flow conditions
require the valve to close quicker than others. Unless
the disc closes before backflow occurs, possible
slamming will result. A stronger spring will help
remedy this problem.
6.3 The valve leaks excessively across seal
a) The seal is defective.
b) Disc is not seating properly.
c) The Spring Energised seal (or Metal C-Seal) may be
damaged.
d) If the valve is fitted with a switch, the grub screw
may have become loose and the magnet housing is
impeding the disc’s movement. To remedy this, clean
both threads thoroughly, apply an even coat of “Jet
Lube Thick or Thin” thread paste to the threads, and
screw the grub screw (26) back into the hole in the disc
(3) and magnet housing (25) and tighten.
6.4 The valve leaks between the flange faces
a) The serrations on either the Noz-Chek II ® flange or
the companion flange are damaged.
b) A new gasket or seal ring is needed.
6.5 There is no flow through the line
a) The valve is installed backwards.
b) The valve is new and the disc has not been broken
loose from the valve seat.
6.6 The switch is not working (if fitted)
a) Ensure switch is connected to relevant system
properly, check the cable for wear or damage and
replace if necessary. Also check that the system has
power.
b) The magnet housing may have become loose and is
impeding the disc’s movement. To remedy this, clean
both threads thoroughly, apply an even coat of “Jet
Lube Thick or Thin” thread paste to the threads, and
screw the grub screw (26) back into the hole in the disc
(3) and magnet housing (25) and tighten.
c) Check for deposits on the sensing surfaces of the
magnet housing and switch housing that could effect
the operation of the switch and clean if necessary.

Crane ChemPharma & Energy
www.cranecpe.com
Crane Co., and its subsidiaries cannot accept responsibility for possible errors in catalogues, brochures, other printed materials, and website
information. Crane Co. reserves the right to alter its products without notice, including products already on order provided that such
alteration can be made without changes being necessary in specifications already agreed. All trademarks in this material are property of the
Crane Co. or its subsidiaries. The Crane and Crane brands logotype, in alphabetical order, (ALOYCO®, CENTER LINE®, COMPAC-NOZ®, CRANE®,
DEPA®, DUO-CHEK®, ELRO®, FLOWSEAL®, JENKINS®, KROMBACH®, NOZ-CHEK®, PACIFIC VALVES®, RESISTOFLEX®, REVO®, SAUNDERS®,
STOCKHAM®, TRIANGLE®, UNI-CHEK®, WTA®, and XOMOX®) are registered trademarks of Crane Co. All rights reserved.
brands you trust.
CPE-NOZ-CHEK-CRYOGENIC-IM-EN-A4-2020_08_26
®
®
Crane Energy Global Headquarters
4526 Research Forest Drive, Suite 400
The Woodlands, Texas 77381 U.S.A.
Tel: +1 936 271 6500
Fax: +1 936 271 6510
Crane Stockham Valve Ltd.
6 Alexander Road
Cregagh, Belfast BT6 9HJ, Northern Ireland
Tel: +44 2 890 704222
Fax: +44 2 890 401582
Xomox Chihuahua, S.A.
Juan Ruiz de Alarcón 313,
Complejo Industrial Chihuahua,
31136 Chihuahua, Mexico
Tel: +52 614 442 9860
Sydney, Australia Operations
146-154 Dunheved Circuit
St. Marys, NSW 2760 Australia
Tel: +61 2 9623 0234
Fax: +61 2 9673 3870
Crane Process Flow Technologies (India) Ltd
E7 / E8 -2 Old MIDC
Satara - 415 004 India
Tel: +91 21 62244417
Fax: +91 21 62245126
Table of contents
Other Crane Control Unit manuals

Crane
Crane D1088 User manual

Crane
Crane KROMBACH 510 Manual

Crane
Crane D923 User manual

Crane
Crane D2003 Assembly instructions

Crane
Crane CRYOFLO T-Globe User manual

Crane
Crane Class 150 User manual

Crane
Crane KROMBACH TUFSEAT Performance Series User manual

Crane
Crane Dominator 80mm Series Manual

Crane
Crane DM921 User instructions

Crane
Crane Dominator PRO Z4000 Series Assembly instructions