CreamWare Pro-12 User manual

Pro-12
Klangbox

Disclaimer
Pro-12 Klangbox is manufactured by CreamWareAudio GmbH, Siegburg, Germany.
(C) CreamWare 1999 - 2006 - all rights reserved.
The following documentation, compiled by CreamWareAudio GmbH (henceforthcalledCreamWare), represents
the current state of the described product. The documentation may be updated on a regular basis. Any changes
which might ensue, including those necessitated by update specifications, are included in the latest version of
this documentation. CreamWare is under no obligation to notify any person, organization, or institution of such
changes or to make these changes public in any other way.
We must caution you that this publication may include technical inaccuracies or typographical errors.
CreamWare offers no warranty, either expressed or implied, for the contents of this documentation. You will find
the warranty regulations for the product at the end of this documentation.
In no event will CreamWare be liable for any loss of data or for errors in data use or processing resulting from the
use of this product or the documentation. In particular, CreamWare will not be responsible for any direct or
indirect damages (including lost profits, lost savings, delays or interruptions in the flow of business activities,
including but not limited to, special, incidental, consequential, or other similar damages) arising out of the use of
orinability to use thisproduct or the associateddocumentation,evenif CreamWareorany authorized CreamWare
representative has been advised of the possibility of such damages.
The use of registered names, trademarks, etc., in this publication does not imply, even in the absence of a
specific statement, that such names are exempt from the relevant protective laws and regulations (patent laws,
trademarklawsetc.) and therefore free for generaluse.In no case does CreamWareguaranteethattheinformation
given in this documentation is free of such third-party rights.
Neither this documentation nor any part thereof may be copied, translated, or reduced to any electronic medium
or machine form without the prior written consent from CreamWareAudio GmbH.
This product (and the associated documentation) is governed by the GTC (General Terms and Conditions) of
CreamWare Audio GmbH.

3
Index
Owner’s Manual
Disclaimer 2
Index 3
Introduction 4
Getting started
Making connections 5
Power adaptor 5
MIDI connection 5
Audio connection 6
Power switch 6
USB connection and drivers 6
Installation of Remote Software 6
Presets 7
Remote Software (Main Page)
OscillatorA & B 9
Filter Section 11
Amplifier 13
LFO / Modulation 15
Glide / Unison 18
Remote Software (Add/Effects Page)
Add page 19
Effects Page 24
Prefs Page 26
MIDI Monitor 28
MIDI Keyboard 29
Preset administration 30
Specifications
MIDI implementation table 32
Specifications 33
Warranty regulations 34
CE certificate 34

4
Introduction
Welcome
Thank you for choosing the PRO-12 Klangbox. We hope you will
haveas much fun with your PRO-12 aswe did whendeveloping this
unique and characterful synthesizer. Please read this manual
thoroughly in order to take full advantage of the many features the
PRO-12 has to offer.
Introduction
The design of the PRO-12 is now regarded as classic synthesizer
style. Two oscillators with multiple waveforms (which may be play-
edindependently orsimultaneously)constitutethe mainsound sour-
ce. The oscillators are mixed with white noise in the mixer section,
then routed through the 24dB lowpass reso¬nating filter and ampli-
fier section.
The filter and amplifier each have their own dedicated envelope
curve with attack, decay, sustain and release controls. The filter
envelope, oscillator B and the LFO (low frequency oscillator) can
also be routed to different modulation destinations. One of the ma-
jor highlights of the PRO-12 is that many interesting combinations
of modulation source and destination can be accessed using the
mod wheel and the 'poly mod' section. We have added some con-
temporary features which the original synth lacked: a full effects
section comprising chorus, flanging and delay, keyboard aftertouch
and MIDI clock synchronisation. In addition, the PRO-12 now has
12 voices - when played in 'unison mode', this produces amazing
results.

5
Getting started
Making Connections
Connecting the power adaptor
To connect your Klangbox to a mains supply, please use the power
adaptor supplied with the unit. First connect the power adaptor to
yourKlangbox.Beforepluggingtheadaptor'splugintoamainssocket,
make sure it is compatible with the mains voltage in your country. If
you lose the power supply, a standard AC or DC 12V / 1.5A power
adaptorcan beused as areplacement.The Klangbox power socket
requiresa hollowplug (5.5 mmx 2.1mmx 11.5mm,centre positive).
MIDI connections
There are two ways to play your Klangbox using MIDI:
1. Connect your Klangbox directly to a master keyboard.
2. Connect your Klangbox to your computer's MIDI port in
order to use it with a sequencer or with the Klangbox
Remote Software.
Connect the MIDI in and out of your Klangbox to the MIDI in and out
ofyourkeyboardorcomputer.TheMIDIinputofyourKlangboxshould
be connected to the MIDI output of your keyboard / computer, and
vice versa.
The Klangbox incoming MIDI signal can also control another
instrument if you connect the Klangbox 'MIDI thru' to the
instrument's MIDI in. If your computer does not have a
MIDIport, youcan useUSB connectionas analternative.
The yellow MIDI LED displays detected MIDI messages
that are coming in at MIDI In with the adjusted MIDI
channel.

6
Audio Connections
In order to hear the Klangbox, connect its stereo
outputs to the left / right inputs of a mixer, a
computer sound card or a HiFi system. You can
alsoprocess externalsignals by plugging an audio
sound source into your Klangbox input.
Power Switch
This is rather obvious, but in order to activate
the Klangbox please turn the power switch on!
The blue LED is the displaying the power
status and the yellow LED is detecting MIDI.
USB Connections and driver installation (Windows XP)
Analternative tousing MIDI toconnect yourKlangbox toa computer
is to use the built-in USB interface. On a PC, this requires Windows
XP with Service Pack 2; the Mac version supports OS10.4. After
connecting the Klangbox to a computer, Windows will automatically
recognizetheKlangbox asan audio
USB instrument. No extra drivers
are required - you can start playing
right away! After starting your
sequencer program (shown here:
Cubase SX), you can use the USB
audio instrument driver as a MIDI
port. Once in a while, under older
versions of Windows XP (before Service Pack 2), the USB port will
not re-appear on screen after disconnecting the Klangbox. In this
case, please reboot Windows XP. After rebooting, your USB port
should appear again.
Installation of the Remote Software
To install the Remote Software supplied with the Klangbox on your
PC, please put the CD-ROM labelled 'Klangbox into the CD-R drive
of your computer find and doubleclick “Pro-12 Klangbox 3.3K.exe”
in the Pro-12 folder.

7
You will then see the message 'Welcome to the Installation' - please
continue by pressing 'Next'.
On the following page you will find the license agreement. Please
read it carefully and if you agree, select "I accept the license terms"
- then continue by pressing the 'Next' button. You can now set the
installation path within the 'Installation path' drop-down menu. If you
don’t set a dedicated path here, the Remote
Software will be installed to e.g.
“C:\Programs\Creamware\Pro-12 3.3K”.
Installation requires 8 MB of empty hard disk
space.
The'ChooseStartMenuFolder'letsyouchoose
your own directory. If you don't make a choice, a directory will be
created.
Presets
The selected preset number of your internal Klangbox preset can
easy changed from an external keyboard or MIDI software via
MIDI Bank select and MIDI Program Change. Bank 0 provides the
first bank which is named “Factory Bank” and Bank 1 is
addressing the second internal bank, which is named “User Bank”.
Once a bank is selected presets can be selected with Programm
Change only. Default is the Factory Bank.

8
General
To control your Klangbox with the Remote Software, you have to
connect the Klangbox to a computer via USB or MIDI.
Panel Layout
The Remote Software has three pages for sound control: the 'Main'
page, the 'Add' page contains additional parameters as aftertouch
and modulation wheel settings. Control settings for the chorus,
flanger and delay effects are found on the 'Effects' page.
An additional 'Prefs' page contains the Remote Software's system
settings and also a facility to update your Klangbox operating sy-
stem when updates become available.
Onthe Remote Software'slowerpanel you willfind the presetadmi-
nistration section, an integrated virtual MIDI keyboard and also a
MIDI monitor which enables you to view incoming MIDI messages.
Remote Software

9
MAIN Page
OscillatorA&B
Apart from a few small differences,
oscillators A & B are largely identical.
Both have sawtooth and pulse wave-
forms, and oscillator B has an additio-
nal triangle wave. Each oscillator wa-
veform has its own dedicated on/off button and all of them can be
active at the same time, which allows a mix of up to five waveforms
in parallel.The pulse wave has a variable width which can be adju-
sted manually or via modulation - full width produces a fat 'square
wave' sound, while more narrow settings create a thinner, more
nasaltone. In addition,oscillator B can operate in a lower frequency
band which allows you to use it as a typical LFO (low frequency
oscillator). If oscillator B is used as a modulation source, you can
disable its keyboard tracking to make it produce a fixed pitch. The
pitch of oscillator A can be synchronized with oscillator B, which
creates some interesting timbres.
Frequency (both oscillators)
Each oscillator has a basic frequency (tuning / pitch) control which
operates in semitone steps over a five-octave range.
Fine (oscillator B)
OscillatorB has itsown fine tuningknob with a rangeof one semito-
ne. Detuning oscillator B slightly and mixing it with oscillatorA pro-
duces a characteristic 'beating' effect - this instantly recognisable
analogue synthesizer sound helps make their sound rich and vi-
brant.
Sawtooth wave button (both oscillators)
Switches the oscillators' sawtooth wave on and off.

10
Coarse
Use this to set the oscillator frequency. The range can be adjusted
over 6 octaves.
Fine
Use this knob to detune the oscillators with respect to one another.
Detuning and then mixing two oscillators produces vibrations that
result in a more lively sound. The range can be adjusted over
approximately one octave.
Octave Up/Down
Unlikethe original model, ourremake is equipped with a switch that
allows you to set each oscillators’frequency in octave steps over a
range of 3 octaves.
Keyboard On/Off
You can use this switch to disconnect Oscillator 1 from the key-
board in order to use it as an LFO. The oscillator is now running at
a much slower rate. Instead of frequencies spanning several octa-
ves in the higher ranges, the “coarse” setting now ranges from just
0.2 Hz to 20 Hz.
Sync On/Off
Thissetting activates the hardsync from Oscillator 2 to Oscillator 1.
Hardsync makes the Oscillator2 waveform re-startwith each cycle
of the Oscillator 1 waveform. This process transfers the pitch from
Oscillator 1 to Oscillator 2. Depending on the “coarse” setting and
Oscillator 2’s frequency modulation, you can create different over-
tone spectra each time you re-start the waveform.
Audio mixer
The audio mixer is used to mix the
oscillators' signal before they are
routed to the filter section. Each
oscillatorhas itsownvolume control.
A third knob controls the amount of
unpitched 'white noise' (useful for
creatingpercussionsoundsandother
effects) in the mix.
11
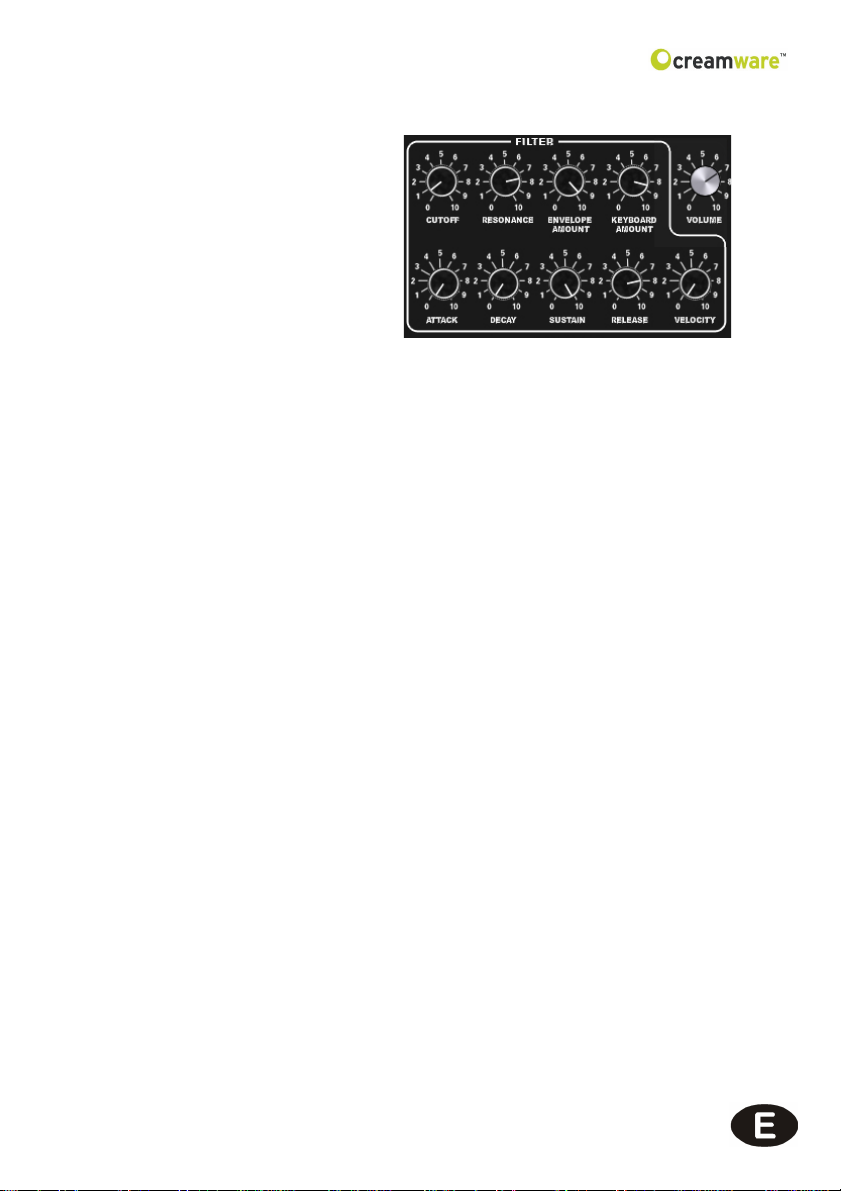
Filter section
Alongwith the envelope cur-
ve and other modulation
sources, the PRO-12 ASB's
filter controls the way the
synthesizer's tone changes
over time. The filter is the
'lowpass' type with a slope
of 24dB per octave; this me-
ans that all frequencies abo-
ve the 'cutoff' frequency are
reducedin volume by 24dBper octave,while frequencies belowthe
cutoff point are left untouched. Filter 'resonance' is created by feed-
back between the filter's input and output, which accentuates fre-
quencies around the region of the cutoff frequency. When the reso-
nance is turned right up, the filter self-oscillates (i.e. produces a
musical pitch).
To modulate the filter cutoff you can use the filter's envelope curve,
keyboard tracking, the LFO and the two sources in the 'Poly Mod'
modulation matrix (see below).
Cutoff
FiIlter 'cutoff frequency' is the frequency above which the PRO-12
ASB's tonal spectrum is filtered and its overtones are reduced in
volume. You can adjust the cutoff frequency manually.
Resonance
This knob determines the amount of resonance in the filter's sound.
Filter resonance is created by feedback between the filter's input
andoutput, which accentuates frequencies around the regionof the
cutoff frequency. When resonance is turned right up the filter self-
oscillates, producing a sine wave at the selected cutoff frequency.
The filter can therefore be regarded as an additional sound source

12
Envelope Amount:
This controls the intensity of the filter's envelope curve. When the
knob is turned up the filter envelope curve acts on the filter cutoff,
causing its frequency to change over time and producing a mobile
timbre. The cutoff frequency returns to normal at the end point of
the envelope curve.
KeyboardAmount:
Thisdetermines the strength of the filter cutoff's 'keyboard tracking'.
When the knob is turned up, the cutoff frequency increases in value
in response to higher notes, producing a brighter and more 'open'
tone in the upper keyboard range.
This determinesthe strength ofthe filtercutoff's 'keyboard tracking'.
When the knob is turned up, the cutoff frequency increases in value
in response to higher notes, producing a brighter and more 'open'
tone in the upper keyboard range.

13
Amplifier
The amplifier's ADSR (attack / decay / sustain / release) envelope
curve determines how the volume of a sound changes over time.
The PRO-12 master volume control is part of the amplifier section.
Attack
Determines the duration of the initial 'attack' phase of the ADSR
envelope curve. In this phase, the volume rises to maximum in the
time set by the attack control.
Decay
This determines the duration of the second phase of the ADSR
envelope curve. During the 'decay' phase the envelope curve falls
to the value set under 'sustain'.
Sustain
'Sustain'sets thevolume at which theenvelope curve comes torest
once the decay phase is over.
Release
The 'release' controls the duration of the dieaway of the sound after
a key is released. (N.B. this dieaway is only introduced when the
'release'switch is turnedon.) During therelease phase oftheADSR
envelope the envelope curve falls back to minimum.
Velocity
Velocity control is a new feature not implemented on the original
1978synthesizer.The PRO-12's volume and tone can now respond
dynamically to subtle variations of keyboard touch - the amplifier
velocity control affects overall volume, while the filter velocity con-
trol affects the instrument's tone colour. Higher velocity settings
produce greater variations of dynamic response.

14
Options for Amp- and Filter Envelope
ADR
Pressingthis button automatically setsthe sustainto
zero.This is a good way to switch rapidly between a
sustainingand apercussive sound without having to
changethe sustainleveleach time. ('ADR'is another
feature not available on the original 1978 synth.)
Release
This button determines whether 'release' is on or off.
When release is switched on, notes die away after
releasing the key at a rate set by the amplifier re-
lease control.
Volume
This controls the master volume of the synthesizer. It also sets the
volume of the signal routed to the effects section, so you can use it
to keep effects at a workable level, avoid distortion when using the
flanger effect with lots of feedback, etc.

15
LFO
The LFO (low frequency oscillator) of your PRO-12 features the
same three waveforms used by oscillator B - sawtooth, triangle and
pulse. Choose a waveform simply by pushing one of the three LED
pushbuttons; you can turnthem on individually, allat the same time
or in any combination you like, which can lead to very interesting
results.Thedestinationsof the LFOmodulation are set in the'wheel
mod' section.
The 'Add page' of the Remote Software provides new LFO features
not found on the original synthesizer. On the 'Add page' you can
sync the LFO to external MIDI clock, and also set the LFO so that it
restarts every time a key is played.
LFO Frequency
This controls the frequency (speed) of the LFO - higher frequencies
produce faster modulation.
LFO Saw wave
Switches the LFO saw wave on and off.
LFO Triangle wave
Switches the LFO triangle wave on and off.
LFO Pulse wave
Switches the LFO pulse wave on and off.

16
Modulation Overview
The PRO-12 has three modulation sources: LFO, filter envelope
andoscillator B.These can be individuallyor simultaneouslyrouted
to five different destinations - oscillator A frequency, oscillator A
pulsewidth,oscillator B frequency, oscillator Bpulse widthand filter
cutoff.
TheLFO has itsown dedicated modulation buss which iscontrolled
bythe mod wheel -the LFO modulation destinationsare selected in
the 'Wheel Mod' section. The 'Poly Mod' section has controls for
routing the filter envelope and oscillator B modulation sources to
any or all of the five destinations - the modulation intensity is adju-
sted manually for each source. When 'Poly Mod' is in use, pushing
up the modulation wheel adds to the overall modulation depth. The
filter envelope and oscillator B are polyphonic modulation sources,
which means that they act upon individual synthesizer voices; the
LFO is a monophonic source which modulates all voices globally.
Wheel Mod
Themodulation wheel controls theintensity of the 'wheelbuss' LFO
modulation. In the origi¬nal synthesizer, this was the only way to
control the wheel buss, but the PRO-12 has more advanced opti-
ons, including additional controls for overall modulation intensity
and modulation offset. (Pitch bend range can also be programmed
now - you will find these controls on the 'Add page' of the Remote
Software.)
LFO / Noise source mix
This control allows you to blend noise in with the LFO modulation -
higher settings introduce more noise!

17
Poly Mod
In this section you can set the depth (intensity) of the modulation
sources (filter envelope and oscillator B) and select single or multi-
ple modulation destinations.
SourceAmount
Filter Env
This knob sets the modulation strength of the filter envelope for all
selected destinations.
Osc B
This knob sets the modulation strength of oscillator B for all selec-
ted destinations.
Destination (Poly Mod / LFO)
FreqA
Selects oscillatorA's frequency (pitch) as a modulation destination.
Freq B
Selects oscillator B's frequency (pitch) as a modulation destination.
PWA
Selects oscillatorA's pulse width as a modulation destination.
PW B
Selects oscillator B's pulse width as a modulation destination.
Filter
Selects the filter cutoff as a modulation destination.

18
Glide
The 'glide' effect creates fluent sliding pitches (glissandi) between
notes at a speed determined by the glide control.
This knob sets the rate of the pitch glides - higher settings produce
slower glides. The glide function doesn‘t have a separate on-off
switch, but is activated simply by turning up this control. If the glide
control is set to zero position, no glides will be heard!
Unison
Pressing this button makes the PRO-12 operate in 'unison mode',
in which a single note triggers multiple voices sounding in unison -
this creates a very big, powerful sound. More unison parameters
can be accessed on the 'Add page' of the Remote Software.

19
ADD Page
Additional Features
Bend Range
This is where you set the maximum detuning via pitch bend in half
tones. The value range covers 0 to 24 semitones.
Modulation Intensity
The maximum intensity of the engageable oscillation and filter mo-
dulations that can be set via the modulation wheel.
Keyboard Mode
Retrig/Normal
Thiscontroltoggles betweenthe two trig-
germodes of theenvelope curve.In 'nor-
mal' mode, the envelope curve is retrig-
gered only when a detached fingering
styleis used:this means thatwhen using
alegato playing technique, onlythe initi-
al note will have an attack. In 'retrigger'
mode the envelope curve restarts on every note regardless of play-
ing style, so sounds keep their attack even when played legato.
This is useful when a consistently percussive attack is required.
Low Note/Last Note
This switch toggles between 'low note' and 'last note' priority. With
'low note priority', lower notes take priority over higher notes, which
means that a high note will not sound if a low note is being held. If
'lastnote priority' is selected,the last note playedalways sounds no
matter what other notes are being sustained.Along with the enve-
lope trigger modes on the 'Add page', this opens up some intere-
stingmusical possibilities! (The difference between the twosettings
is most noticeable in 'single' and 'unison' modes.)
Single
If you select 'single' the instrument uses only one voice. It's advi-
sable to use single mode when playing solo sounds with glide.

20
Aftertouch
The original 1978 synthesizer did not have aftertouch facilities,
sothe PRO-12 aftertouchfunctionhas been modelled on that of the
later Prophet™ T8. However, unlike theT8, the PRO-12 aftertouch
works globally (this is called 'channel aftertouch') rather than poly-
phonically ('key aftertouch'). This means that when aftertouch is
introduced on one note, the resulting modulation will affect all the
other notes currently being played.
Pitch
The degree to which aftertouch affects both oscilllators' pitch can
be adjusted here. This facility allows you to use aftertouch to create
pitch bends.
FreqA
Selects oscillatorA's frequency (pitch) as an aftertouch modulation
destination.
Freq B
Selects oscillator B's frequency (pitch) as an aftertouch modulation
destination.
PW
Controls the amount of aftertouch applied to both oscillators' pulse
width.
PW A
Selects oscillatorA's pulse width as an aftertouch modulation desti-
nation.
PW B
Selects oscillator B's pulse width as an aftertouch modulation desti-
nation.
Table of contents
Languages:
Other CreamWare Synthesizer manuals

CreamWare
CreamWare Noah Vectron Player User manual

CreamWare
CreamWare Noah Minimax User manual

CreamWare
CreamWare MINIMAX ASB User manual

CreamWare
CreamWare Noah Arpeggiator User manual

CreamWare
CreamWare PRO-12 ASB User manual

CreamWare
CreamWare PRO-12 ASB User manual

CreamWare
CreamWare Noah Vocodizer User manual

CreamWare
CreamWare Noah Interpole User manual

CreamWare
CreamWare Noah Step Sequencer User manual

CreamWare
CreamWare Noah Installation instructions


