Creator's Stained Glass Cutter's Mate User manual
Cutter’s Mate
Owner’s Manual
1 van 14
Cuttersmate-europe 2012 Rev. 1
This manual is based on the Original “manual” of Creator’s Stained Glass Inc. and edited by
Cuttersmate Europe. Visit us on www.cuttersmate.com or www.cuttersmate-europe.com
Manufactured by
Creator’s Stained Glass
Ingleside, IL
www.cuttersmate.com
Made in the USA
It’s all you need to cut glass !

Cutter’s Mate
Owner’s Manual
2 van 14
Cuttersmate-europe 2012 Rev. 1
Index 2
Important! 2-3
Warrantee Policy 4
Unpack and Install 5
Unpack the Cutter’s Mate 5
Meet your Cutter’s Mate 5-6
Install your Cutter’s Mate 7
Maintaining the Cutter’s Mate 8
Lubricating the Cutting Wheel 8
Lubricating the Cutters Mate 8
Cleaning the Slide Shaft 8
Adjusting the Cutter’s Mate 9
Grid Adapters 9
End Blocks 10
Adjusting the Cutting Angle 11
Hints 12
Parking & Storing Cutter’s Mate 13
Disassembling and Storing 14
Replacing the Cutting head 14

Cutter’s Mate
Owner’s Manual
3 van 14
Cuttersmate-europe 2012 Rev. 1
IMPORTANT!
These instructions are presented for your safety !.
Warning: Read all the following instructions and save them for future reference.
Cutter’s Mate is a device with moving parts and a cutting wheel. Without proper care
and use, this device can cause personal injury. Please read and adhere to the
following safety precautions.
1. Keep your work area clean and free of unnecessary clutter. Clutter can lead to injury.
2. Keep children away from the device and your work area.
3. Avoid placing fingers or other appendages between moving parts. Care should be taken when
assembling, disassembling, using, parking, and storing device.
4. Always wear safety glasses when using the device. Tiny pieces of glass will be produced when scoring
and fracturing glass.
5. Maintain proper balance and control while using the device.
6. Properly care for and maintain your Cutter’s Mate tool for optimal performance
and safety. Follow instructions for lubrication of all moving parts and cutting wheel. Periodically inspect
the cutting wheel and replace promptly when dull.
7. Any modification to or misuse of the device can be dangerous and may result in ineffective
performance.
PLEASE READ AND SAVE THE PRECEDING INSTRUCTIONS

Cutter’s Mate
Owner’s Manual
4 van 14
Cuttersmate-europe 2012 Rev. 1
Cutter’s Mate Warrantee Policy
Your Cutter’s Mate product is warranted against defective material or workmanship for a period of one
year from the date of purchase. In the event of failure of the product to conform to this written warranty,
please take the following
1. DO NOT return your product to the place of purchase
2. If the product was purchased in the USA, please send it to the USA address below. In all other cases
you send your product to the EU Address
3. Carefully package the product by itself and return it, freight prepaid, along with:
A. copy of your dated proof of purchase (please keep a copy for your records).
B. written statement about the nature of the problem.
C. Your name, address, and phone number to:
Send to:
EU Adress
Cutters Mate-Europe
Holleweg 26
3905 LG . Veenendaal (The Netherlands)
info@cuttersmate-europe.com
USA adress
Creator’s Stained Glass
25091 W. Crabtree Lane Ingleside,
IL 60041 (USA)
info@cuttersmate.com
We recommend that you insure your package against loss and in-transit damage for which we cannot be
responsible.
This warranty applies to the original registered purchaser. DAMAGE TO THE PRODUCT RESULTING FROM
TAMPERING, ACCIDENT, ABUSE, NEGLIGENCE, UNAUTHORIZED REPAIRS OR ALTERATIONS, UNAPPROVED
ATTACHMENTS OR OTHER CAUSE UNRELATED TO PROBLEMS WITH MATERIAL OR WORKMANSHIP ARE
NOT COVERED BY THIS WARRANTY
No employee, agent, dealer, or other person is authorized to give any warranties on behalf of Creator’s
Stained Glass. If inspection by Creator’s Stained Glass shows that the problem was caused by defects in the
material or workmanship within the limitations of the warranty, Creator’s Stained Glass will repair or
replace the product free of charge and return product prepaid. Repairs made necessary by normal wear or
abuse, or repair of product outside the warranty period, if they can be made, will be charged at regular
factory prices

Cutter’s Mate
Owner’s Manual
5 van 14
Cuttersmate-europe 2012 Rev. 1
Unpack and Install
1. Carefully remove the two plastic-wrapped components from the box
2. Cut the sealed plastic bags open and remove the components. Take care if using a sharp knife or scissors
to open the bags.
3. Dispose of the plastic bags properly. These can be dangerous to small children or pets.
NOTE: You can retain the box to transport your Cutter’s Mate.
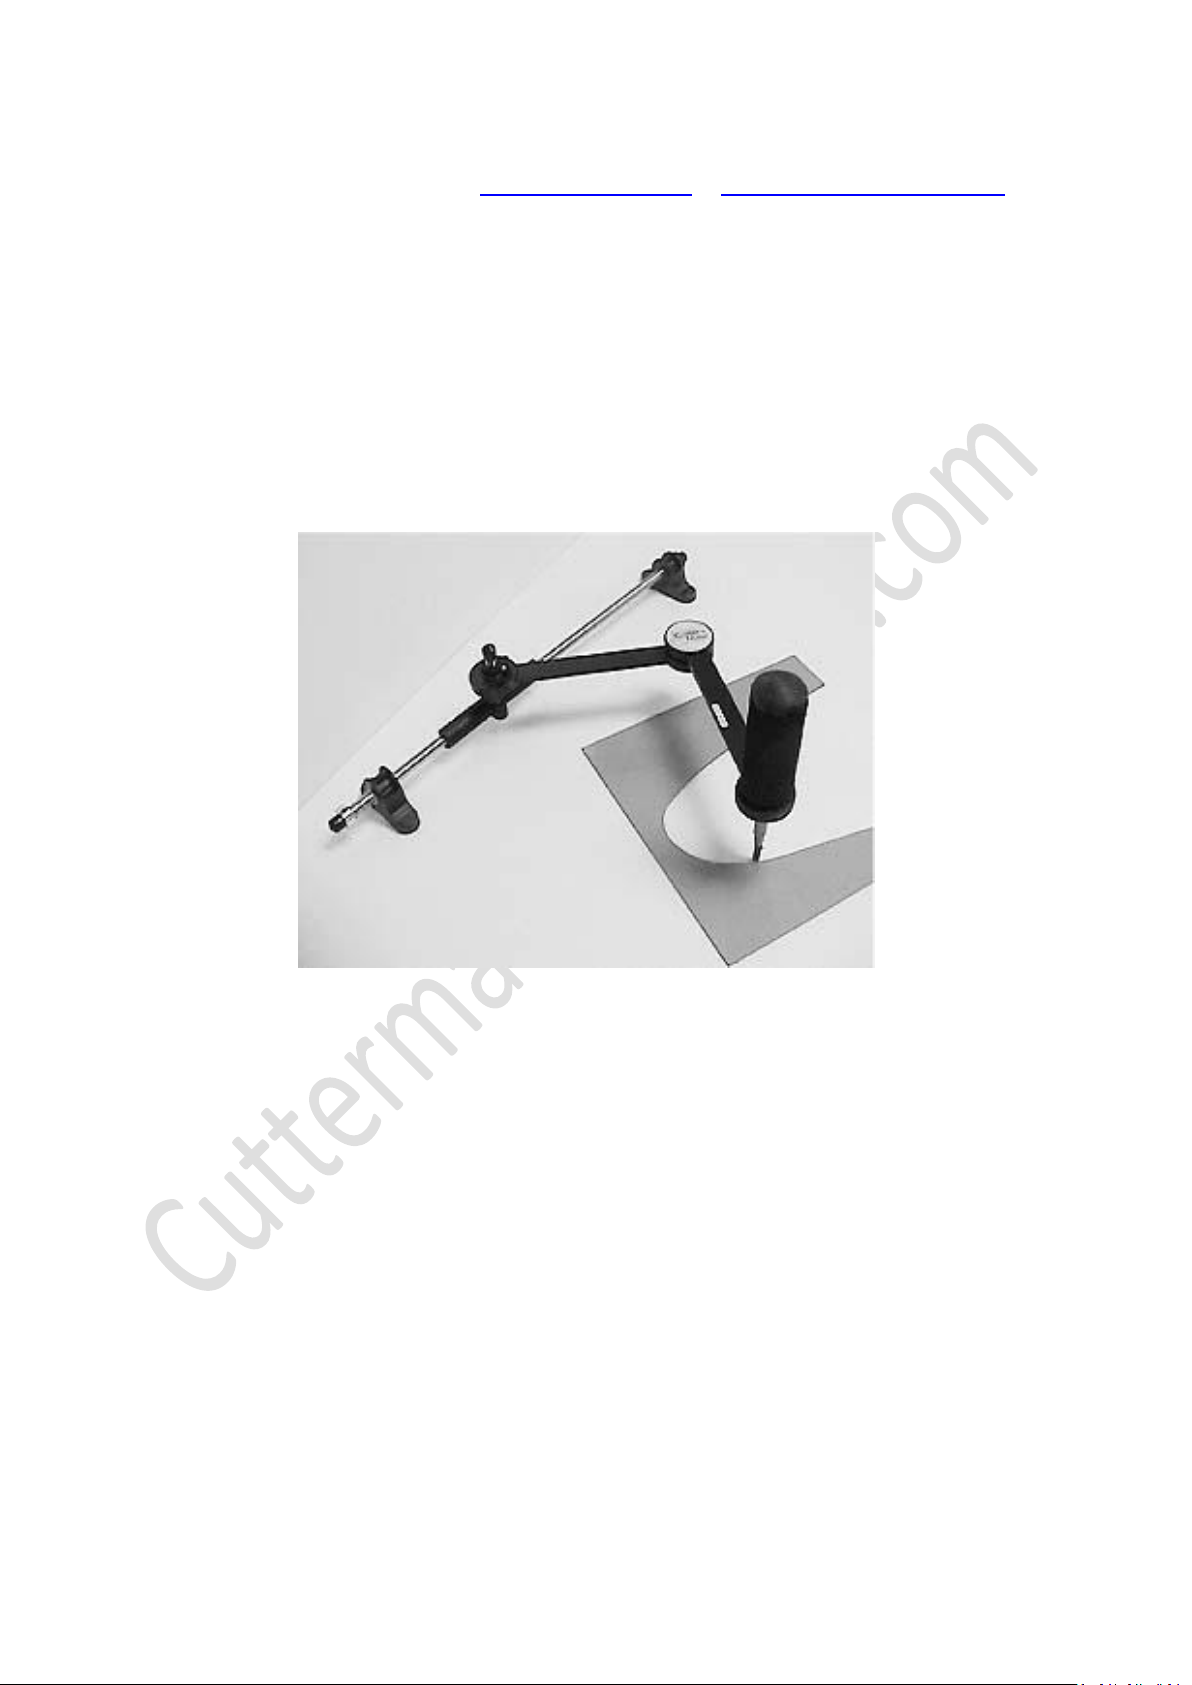
Meet Your Cutter’s Mate
As you examine your Cutter’s Mate for the first time, take a little time to get to know it. The components of
Cutter’s Mate are precision-manufactured for smooth movement in all directions. The handle is large and
cushioned for comfort and control. The arm may seem heavy, but when attached to the base, you will find
it to be perfectly balanced and weighted. You simply have to try your new Cutter’s Mate to believe it.
Part names used throughout these instructions are similar on all three models. The following diagram
illustrates the parts you will need to be aware of while reading this manual. You may need to refer back to
the illustration for clarification.

Cutter’s Mate
Owner’s Manual
6 van 14
Cuttersmate-europe 2012 Rev. 1
IMPORTANT: The manufacturer has preset the arm for use on a table or bench top. If you are planning to
use the Cutter’s Mate with the Beetle Bit Waffle Grid or the Morton Grid, you will need to use the grid
adapters. It is important for the arm to be parallel to the bench top so that the cutting wheel will remain at
a constant 90-degree angle to the glass surface. (See Adjusting Cutter’s Mate, but please note that the grid
adapters automatically compensate for the change between any flat surface and Beetle Bit Waffle Grid or
the Morton Grid.)

Cutter’s Mate
Owner’s Manual
7 van 14
Cuttersmate-europe 2012 Rev. 1
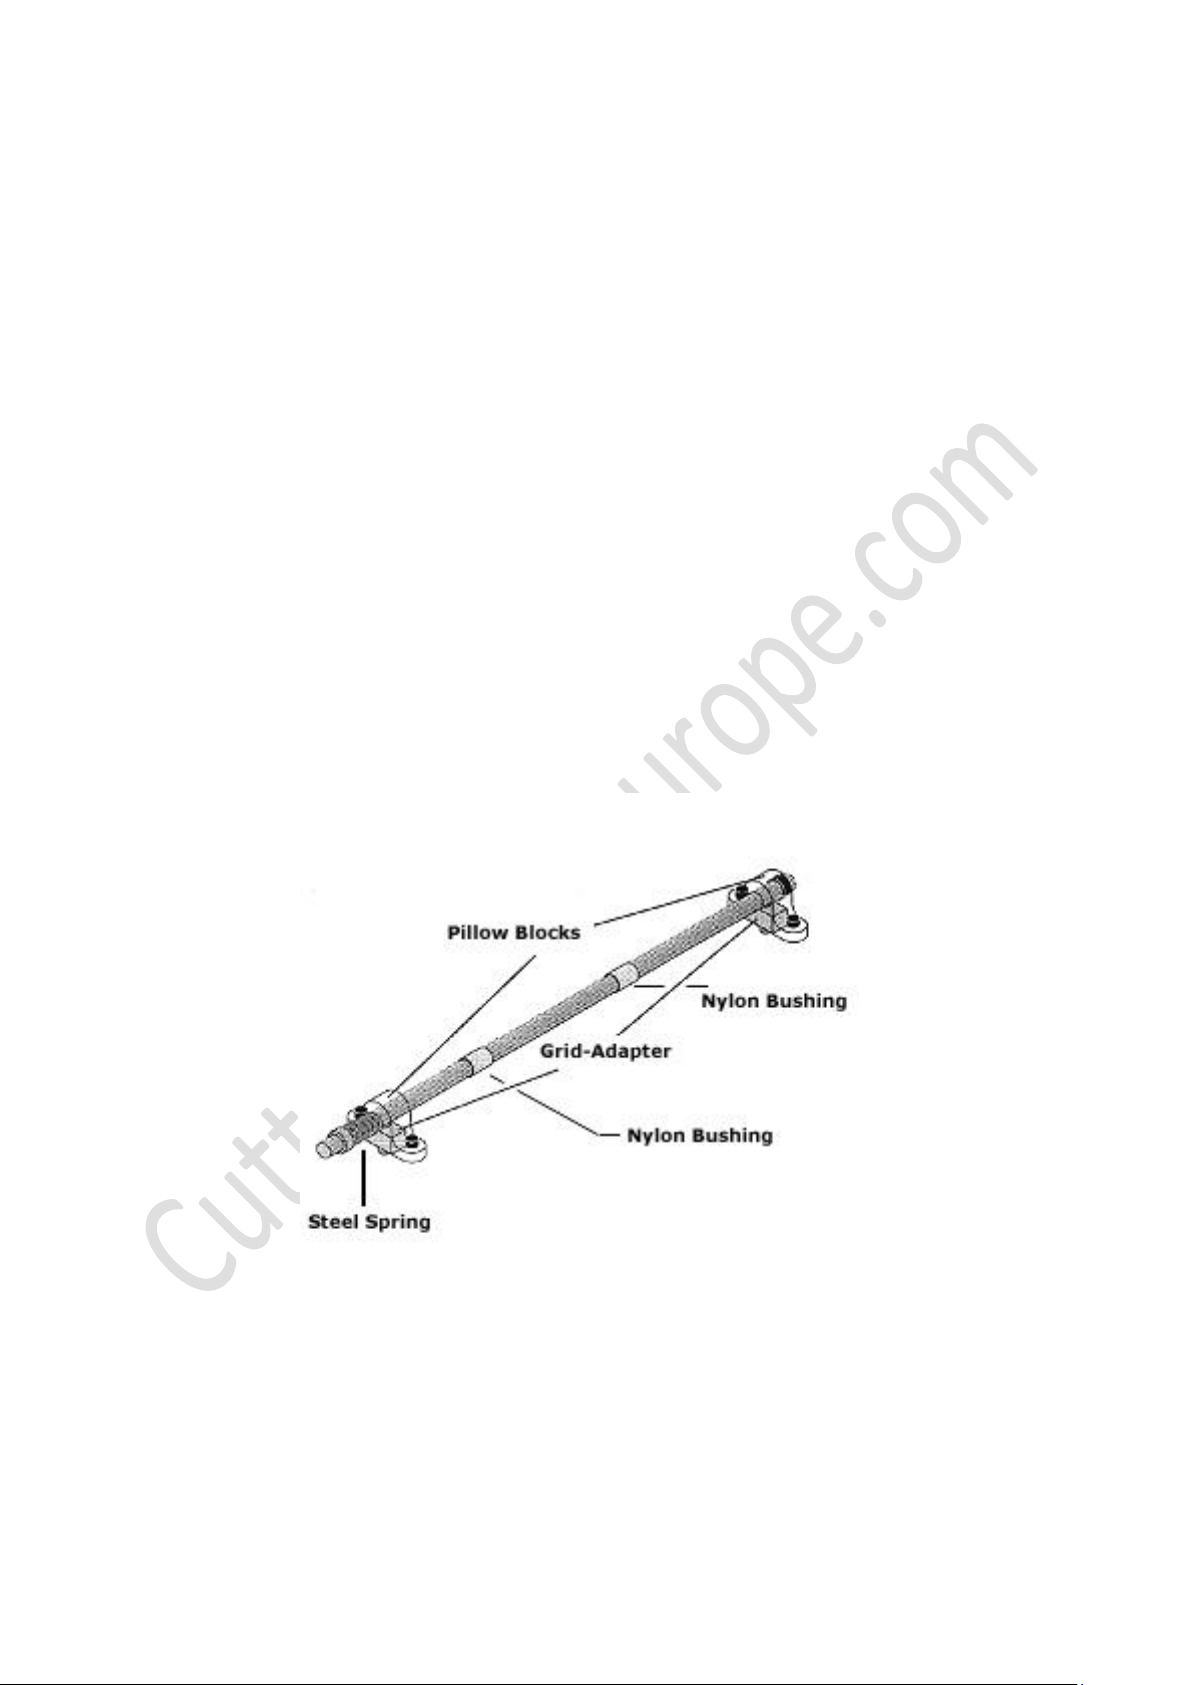
Install your Cutter’s Mate
1. Begin by positioning the base where you find it most comfortable. The figure below shows
the three most common positions.
2. Space the nylon bushings approximately five inches apart.
3. Attach the slide plate to the base one side at a time. Each side of the plate should cover
its nylon bushing.
4. Remove the rubber cap from the cutting wheel (keep the rubber cap to protect the cutting
wheel when not in use.
The following illustrations show recommended positions for left- and right-handed use.
Horizontal positioning is also shown as a possibility. You can place Cutter’s Mate where it is
most comfortable for you
NOTE: Having the spring closer to you allows you to easily set up Cutter’s Mate on a Morton grid. If you
decide to use a Morton grid, you will need to use the grid adapters so that Cutter’s Mate will maintain a
constant 90-degree angle when scoring glass.
Your Cutter’s Mate is almost ready for use. Before scoring glass, you must lubricate the cutting wheel (see
Maintaining Cutter’s Mate, pg. 8)

Cutter’s Mate
Owner’s Manual
8 van 14
Cuttersmate-europe 2012 Rev. 1
Maintaining the Cutter’s Mate
NOTE: Keep your Cutter’s Mate from moisture.
Lubricating the Cutting Wheel.
1. Untwist and remove the oil reservoir cap (the rubber cap does not necessarily need to be
removed before doing this).
2. . Fill the oil reservoir with cutting wheel oil (available at your local stained glass distributor)
3. Replace the oil reservoir cap, and you are ready to cut glass
Lubricating the Cutters Mate
The pivot points may need occasional lubrication. After about 100 hours of use, or approximately every
three months, use a light-weight oil such as sewing machine oil to lubricate the pivot points (refer to
the illustration on page 6). Only a couple of drops at each pivot point is necessary. To apply the oil, you may
find it easier to disconnect the arm from the slide and shaft and lay it on its side
Cleaning the Slide Shaft
If you notice the slide plate is not moving smoothly along the slide shaft, wipe it with a dry, soft cloth.
NOTE: Never use oil on the slide shaft. This will cause the nylon bushings to become sticky.
Cutter’s Mate
Owner’s Manual
9 van 14
Cuttersmate-europe 2012 Rev. 1
Adjusting the Cutter’s Mate
Your Cutter’s Mate is factory-set for use on a flat surface , such as a table or bench top. The arm will be
parallel to the surface when the base is placed on the bench and the cutting wheel is sitting on a piece of
glass for scoring. Since the handle can turn a full 360 degrees, the arm must be parallel to the bench top to
maintain a 90-degree angle to the glass surface when scoring.
Grid Adapters
Grid adapters have been included to make the most common adjustment when moving Cutter’s Mate
between a flat surface and a Beetle Bit Waffle Grid or Morton grid, and back again. When using grid
adapters, no actual adjustment to Cutter’s Mate is necessary.
1. Begin by setting your Cutter’s Mate on the Morton grid approximately where you will be using it.
2. Push the grid adapters into the grid so that they are slightly wider than the end blocks. The spring
should compress slightly.
3. Pick up your Cutter’s Mate, and align the end blocks over the two grid adapters. You should need to
compress the spring slightly

Cutter’s Mate
Owner’s Manual
10 van 14
Cuttersmate-europe 2012 Rev. 1
End Blocks
The arm will glide more smoothly along the slide shaft if the end blocks are placed against the spring and
the silver shaft collar (see page 6).
It may be necessary to move the end blocks closer together on the slide shaft to meet your personal needs
(usually to fit a smaller surface or grid).
Use a hex wrench to loosen the set screw on the black shaft collar. Slide the collar to the desired position
and retighten the set screw.(see picture below)
IMPORTANT: The black shaft collar is made to tighten around the shaft, whereas the silver shaft collar is
held in place by a screw making contact to the shaft. Therefore repositioning the silver shaft collar (do not
do this) will create marks on the shaft which could hinder movement of the nylon bushings.

Cutter’s Mate
Owner’s Manual
11 van 14
Cuttersmate-europe 2012 Rev. 1
Adjusting the Cutting Angle
To maintain a 90-degree angle to the surface of the glass, your Cutter’s Mate may need to be adjusted
slightly. This is accomplished by raising or lowering the threaded shaft collars on the slide cylinder.
Loosen the screws in the threaded shaft collars. Turn the threaded collars to adjust the arm up or down the
desired amount. Re-tighten the screws, being careful not to over tighten.
NOTE: Care should be taken when adjusting the threaded collars. If they are too tight against the arm disk,
movement may be restricted. Leaving them too loose may cause the arm to have too much play.
Cutter’s Mate
Owner’s Manual
12 van 14
Cuttersmate-europe 2012 Rev. 1
Hints
1. When scoring glass, keep the cutting head at least three inches from the slide shaft for better
stability. Wear safety glasses !!!
2. Replace the rubber cap over the cutting wheel when Cutter’s Mate is not in use. This will protect
the wheel from moisture and damage, and will help retain oil on the wheel.
3. The rubber cap can assist in running the score. This is very effective with deep inside cuts and
more delicate work.
A. Make a Score the glass as usual.
B. Turn the glass over so that the score is on the bottom of the glass.
C. Place the yellow, plastic cap over the cutting wheel.
D. Hold the Cutter’s Mate handle as usual and press down with the covered cutting wheel along
the backside of the score. Press firmly until you see the score begin to run. Lift and move the
handle slightly along the score line, and press firmly again. Repeat until the cut is completed.
Remember to lift the handle when the score begins to run. If you continue to press in the same spot, you
may shatter the glass. With practice, you will find this to be a very effective technique.
NOTE: If you find it difficult to see the score line, trace it with a marker on the scored side of the glass.
With some glass, there may be no way to see the scored line. You may want to make a mark on the edge of
the glass and start the run there.
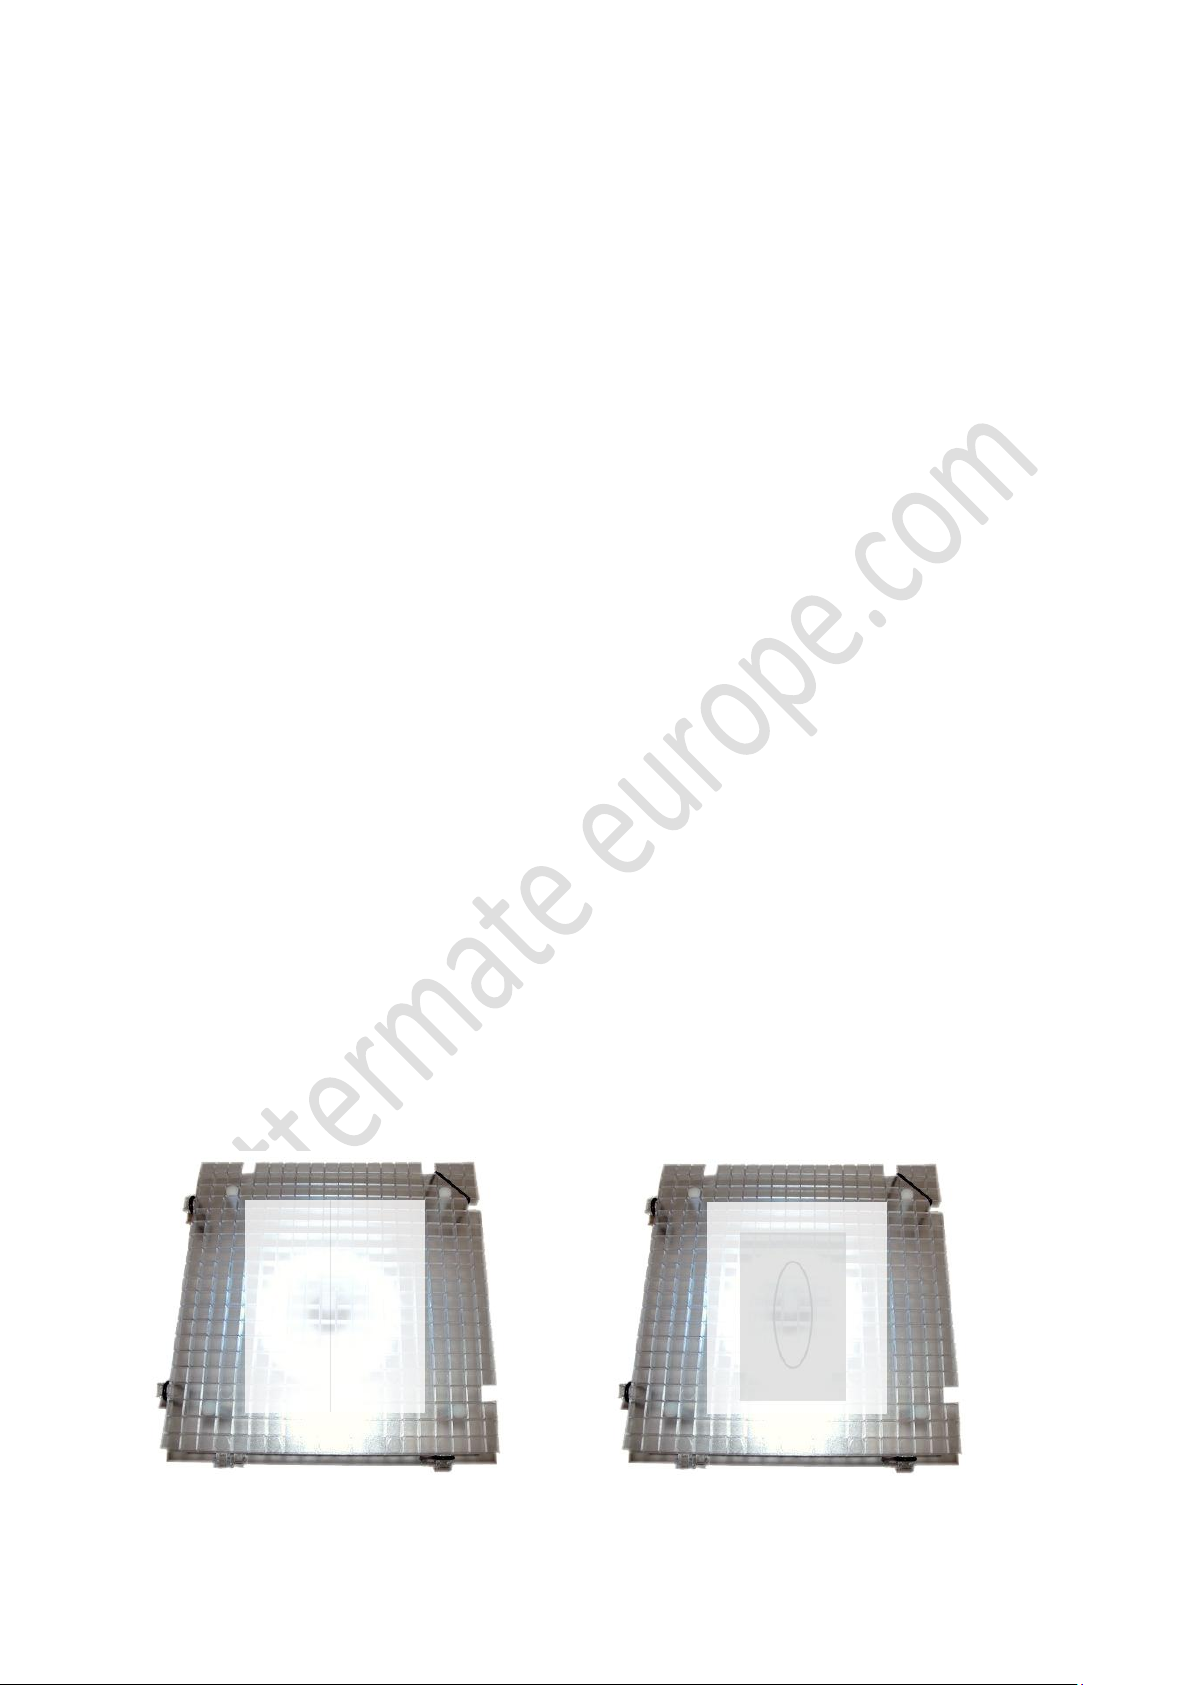
If you work with opal glass and you can hardly see the score line
In this case you might consider using a regular glass cutter with the "Waffelite" to use (see Figure 1 below).
Mark the intersection of the glass with a black marker and put it with the score line to the bottom of the
Waffelite. The intersection is clearly visible. You can also use the Waffelite as follows:
Put a drawing on the Waffelite and then place your glass on the design drawing. Now You can cut your
design (Fig.2).
Fig. 1 Fig. 2

Cutter’s Mate
Owner’s Manual
13 van 14
Cuttersmate-europe 2012 Rev. 1
Parking & Storing Cutter’s Mate
When not in use, Cutter’s Mate can remain on your work area, ready for your next cut. Parking keeps it out
of the way and is also useful for keeping pressure off of the cutting wheel
Het parkeren van de Cutter’s Mate biedt ruimte en voorkomt onnodige druk op het snijwiel van de
glassnijder.
Place the glass cutter against the slide shaft so that the elbow of the arm is resting on your
work surface as illustrated below. The parked position is demonstrated on a Morton grid,
but is effective on the Beetle Bit Waffle Grid or any work surface

Cutter’s Mate
Owner’s Manual
14 van 14
Cuttersmate-europe 2012 Rev. 1
Disassembling and Storing
To disassemble your Cutter’s Mate, hold the base firmly with one hand, and with the other hand, gently
detach the slide plate from the nylon bushings, one side at a time. Your Cutter’s Mate is now ready for
transport or storage. Store your Cutter’s Mate in a clean, dry place.
Replacing the Cutting head
To replace the Toyo TC 10 Cutter rotate Phillips screw, without completely turning it out off the thread.
Remove the cutting head, and beware that the spring in the cutting head is in place, over the pin. If you do
not see the spring, this is still in the cutter. Get in that event out of the cutting head and place it in the new
cutting head (this is supplied without spring!).
Install new cutting head and make sure that when tightening the Phillips screw, the screw falls in the Pin
recess. (See detail white circled black arrow in the picture below)
Table of contents


