Cristofoli SuperGap Evolution 2 User manual

SuperGap Evolution 2
Vacuum Pump
13485
D
E
S
G
A
E
M
S
E
T
T
Ã
S
O
I
S
To develop innovative solutions to protect life and promote health.
Cristófoli Equipamentos de Biossegurança Ltda., established at Rodovia BR-158, nº 127,
Jardim Bandeirantes in Campo Mourão, Paraná, Brazil, manufactures biosafety equipment to
assist the health care, having the following policy: "To develop innovative solutions for health
care by using agile, robust, and objective processes to better serve its customers. To fulfill all the
requirements of the applicable standards, promote the continuous improvement of its quality
and environmental standards, prevent pollution, reduce its environmental impact, and
continuously train its staff, achieving, therefore, a sustainable and profitable maximization of its
value." Rev. 2.
CRISTÓFOLI’S MISSION
CRISTÓFOLI QUALITY AND ENVIRONMENTAL POLICY
Cristófoli, Brazilian importing company and manufacturer of
health products certified by ISO 13485 - Health Products -
Quality Management System - Requirements for Regulatory
Purposes and compliance with RDC 16/2013 - *BPF - Boas
Práticas de Fabricação - ANVISA requirements.

Manual Bomba de Vácuo Supergap 3 Ingl. Rev.2-2018
2
C R I S T Ó F O L I
V A C U U M P U M P S
I N S T R U C T I O N M A N U A L
INDEX
Meaning of Symbols .........................................................................................................
Introduction ......................................................................................................................
Intended Use ....................................................................................................................
Recommendations and Warnings ....................................................................................
Installation Instructions ......................................................................................................
Safety Devices ..................................................................................................................
Component Description ...................................................................................................
How To Use the SuperGap Evolution Vacuum Pump ........................................................
How To Identify Your Autoclave .........................................................................................
Technical Data .................................................................................................................
Preventive Maintenance ...................................................................................................
Troubleshooting ................................................................................................................
Quality Control ..................................................................................................................
How To Proceed When Service Is Needed ........................................................................
Guidance For Final Disposal Of The Equipment ................................................................
Warranty Terms ..................................................................................................................
03
04
04
04
05
09
09
09
10
10
11
12
13
13
14
15

3
MEANING OF SYMBOLS
Maximum Pile
Warning
Manufacturer
Grounding
Protection Terminal
Date of
Manufacture
3
Keep Dry
Recyclable
Keep out of sunlight
This side up
Fragile - handle
with care
LOT
SN
Serial Number
Lot number
ISO 13485
13485
D
E
S
G
A
E
M
S
E
T
T
Ã
S
I
O
S
C R I S T Ó F O L I
V A C U U M P U M P S
I N S T R U C T I O N M A N U A L

Responsible Technician
Eduardo Luiz Soppa
CREA-PR: 109201/D
MANUFACTURER
Cristófoli Equipamentos de Biossegurança Ltda.
Rod. BR 158, nº127 - Campo Mourão - PR - Brasil
CEP 87303-650
CNPJ 01.177.248/0001-95 - Inscr. Est. 90104860-65
Website: www.cristofoli.com - e-mail: [email protected]
4
The complete reading of this manual is indispensable for safe use of the equipment and
preventive maintenance orientation. The owner is responsible to perform the adequacy of the
electrical, hydraulic, suction and drainage systems.
The SuperGap Evolution vacuum pump must be handled by professionals, well aware of
the equipment operation.
Box content:
- 1 Supergap Evolution 2 Vacuum Pump. - 1 noise reducer.
- 1 residue filter. - 4 leveler glides with nuts and washers.
- 2 corrugated hoses (1,5 m). - 3 clamps.
- 2 R/L adapters. - 1 hose for water inlet.
- 1 manual.
INTRODUCTION
This equipment was developed for suction of fluids and residues from odontological
treatments or surgeries.
INTENDED USE
RECOMMENDATIONS AND WARNINGS
Read all instructions of this manual before using your SuperGap Evolution. The incorrect use
may result in malfunction and/or accidents.
For your safety, when performing any kind of maintenance, remember to unplug the power
cord and use PPE (Personal Protective Equipment).
Do not allow patients, especially kids, to get close to the equipment.
Never use your vacuum pump without water.
During the vacuum pump operation, it’s perfectly normal to hear noises, which are part of
the proper functioning of the equipment. Cristófoli is not responsible for accidents that might
occur due to jolts caused by the noises produced by SuperGap Evolution.
Do not use the vacuum pump as a water pump.
Do not place any kind of fabric under the vacuum pump, for it makes difficult the
ventilation, causing overheating and damage to the equipment.
Never move or drag the vacuum pump by the power cord or hoses, keep those parts away
from heat or sharp corners.
C R I S T Ó F O L I
V A C U U M P U M P S
I N S T R U C T I O N M A N U A L

5
INSTALLATION INSTRUCTIONS
Instal vacuum pump on a flat, levelled and firm surface, at the same level or below the
dental unit, never above.
The installation place must be ventilated, dry, clean, free of dust, corrosive gases, and
direct sunlight. Keep SuperGap 2 away from the customer service area and from places
where there’s movement of people. Leave enough room around the equipment (at least 50
cm) for ventilation and preventive maintenance accomplishment.
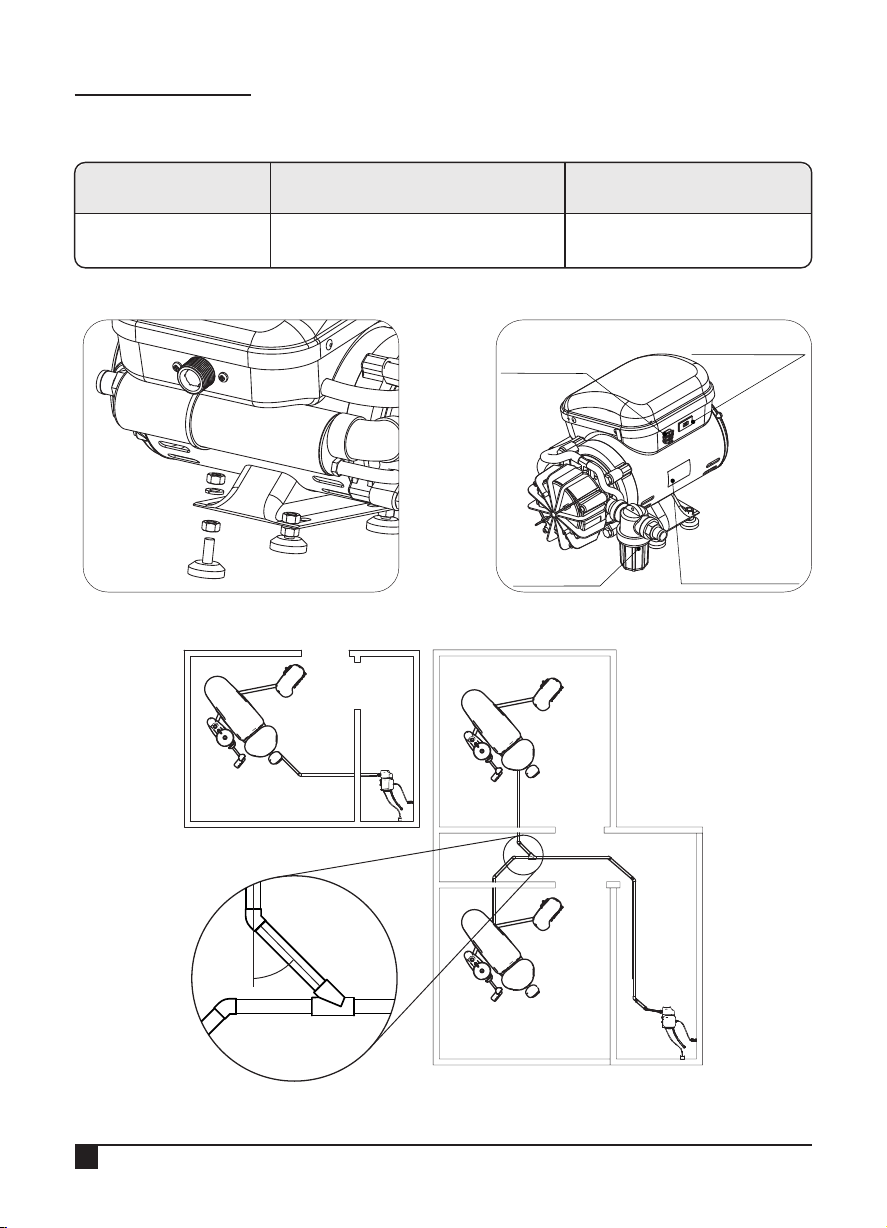
Open the package, remove the equipment and put the leveler glides, for it, use a 5/16" fork
wrench. Put the lock washers and fasten the nuts for all the glides (Fig. 5, page 8).
1
2
3
ELECTRICAL INSTALLATION (Vacuum Pump)
See “How To Proceed When Service Is Needed” (Page 13). If the owner performs the
installation with a non- authorized electrician or technician, Cristófoli will not be responsible
for services done in disagreement with the orientations descibed in this manual.
4
As shown in the identification label, the SuperGap 2 is a dual voltage device, and it
leaves the factory adjusted for 220 V. For 127 V operation, reposition the selector switch,
placed at the back of the equipment (Fig. 9, page 9). See “How To Identify Your
Vacuum Pump” (Fig. 11, page 10).
For installation, use a grounded outlet (2 Pins + Grounding, 20 A), plugging phase/neutral or
phase/phase at the side pins and grounding at the middle pin: Never plug the grounding
on neutral.
Electrical Grounding is very important for the operator’s safety and for your equipment’s
functionality. Therefore, the center pin (grounding) must never be removed or cut. The
failure to observe this procedure may damage your autoclave. Install the equipment
where the power cord can be easily disconnected.
Never use electric extensions, adapters or voltage transformers.
For the proper functioning of the autoclave, the electrical wire must be stable, in other
words, without oscillations. It is mandatory the use of an exclusive circuit breaker for
the outlet where the autoclave will be installed. If after following all the specifications,
the electrical wire still oscillates, contact the local electricity company.
C R I S T Ó F O L I
V A C U U M P U M P S
I N S T R U C T I O N M A N U A L
6
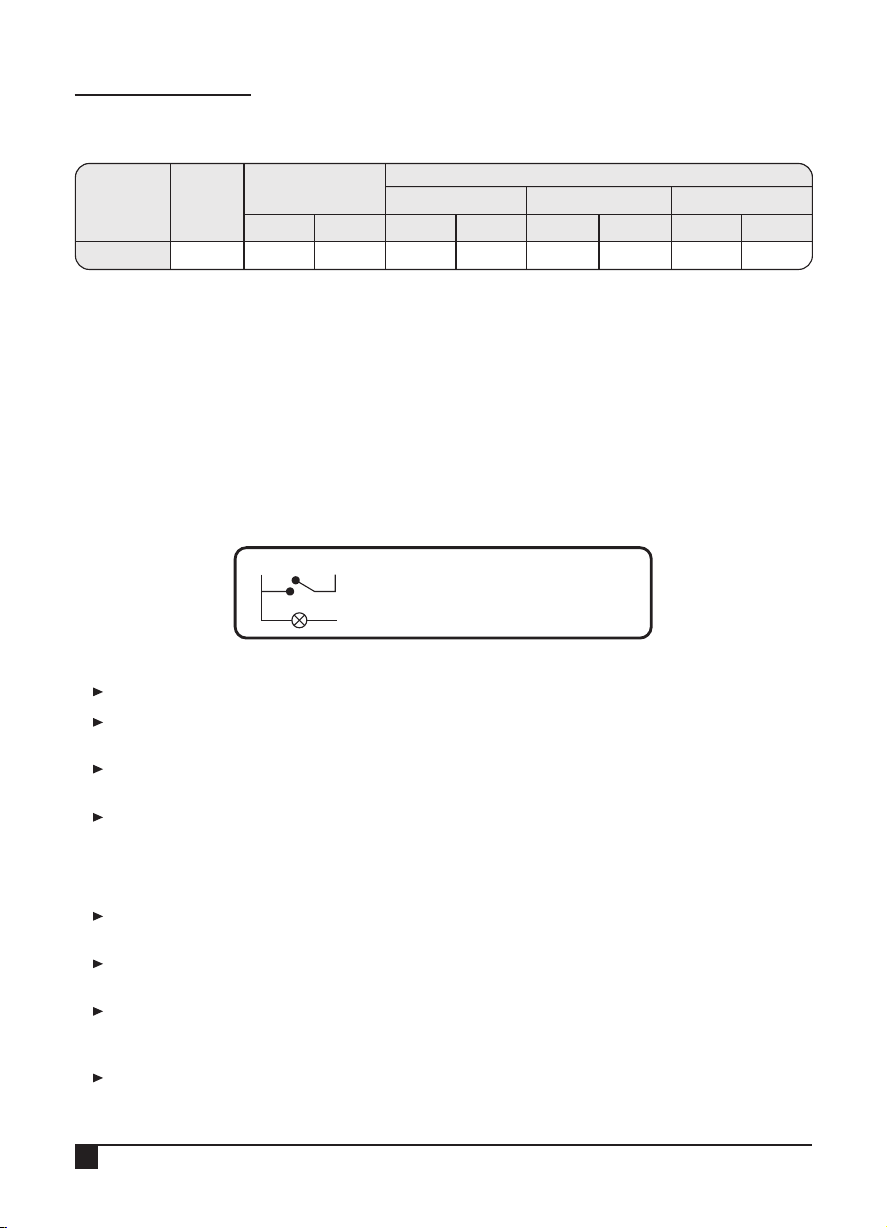
Note: In 127 V regions, use “one-pole” circuit breaker.
In 220 V regions, use “two-pole” for phase-phase and “one pole” for phase-neutral.
Table 1
3/4
SUPERGAP 2
Up to15 m from 15 to 30 m above 30 m
127 V AC 127 V AC 127 V AC 220 V AC220 V AC220 V AC127 V AC 220 V AC
MODEL POWER
(HP)
CIRCUIT BREAKER
(C Curve)
WIRING GAUGE FROM THE CIRCUIT BREAKER UP TO THE VACUUM PUMP (mm²)
15 2,5 2,5 42,5 64
25
ELECTRICAL INSTALLATION (suction instruments activation)
See the dental unit or vacuum pump kit manual to find the activation wiring for the
microswitches and instal it to the strip connector of the vacuum pump (Fig. 9, page 9).
White: Micro switch.
Red: 12 V DC (LED). Note: For dental units or vacuum pump kits which has indicating LED at
the sution instruments.
Black: Ground (GND).
HYDRAULIC INSTALLATION
Provide, close to the vacuum pump, a water supply with a 3/4" external thread water valve.
The water inlet pressure must be around 3 to 40 wcm (water column meters), above 20 wcm,
it could be possible to hear an acute sound from the flow regulator.
Connect the hose with a 90° angle to the water inlet at the front of the vacuum pump (Fig. 8,
page 9) and the other side to the water valve.
The water flow regulation is automatically done by an internal device (Fig. 8, page 9).
SUCTION
The pipe that connects the dental unit to the vacuum pump must have an inclination level
between 0 and 10 %.
It is recommended that right angle connections at the pipes be avoided, prefer 45°
connections and/or soft curves to optimize vacuum (Fig. 7, page 8).
Connect the residue filter to the suction inlet (Fig. 6, page 8), after that, connect the
corrugated hose to the filter. Remember to put the clamp before fitting the hose, fasten it
firmly.
Fasten the R/L adapter at the dental unit suction inlet, after that, fit the other side of the hose
to the R/L adapter (fit the clamp before, as described above).
Fig. 1
Red
Negro
White
White - Red = micro switch
Red - Black = LED
+
-
C R I S T Ó F O L I
V A C U U M P U M P S
I N S T R U C T I O N M A N U A L
7
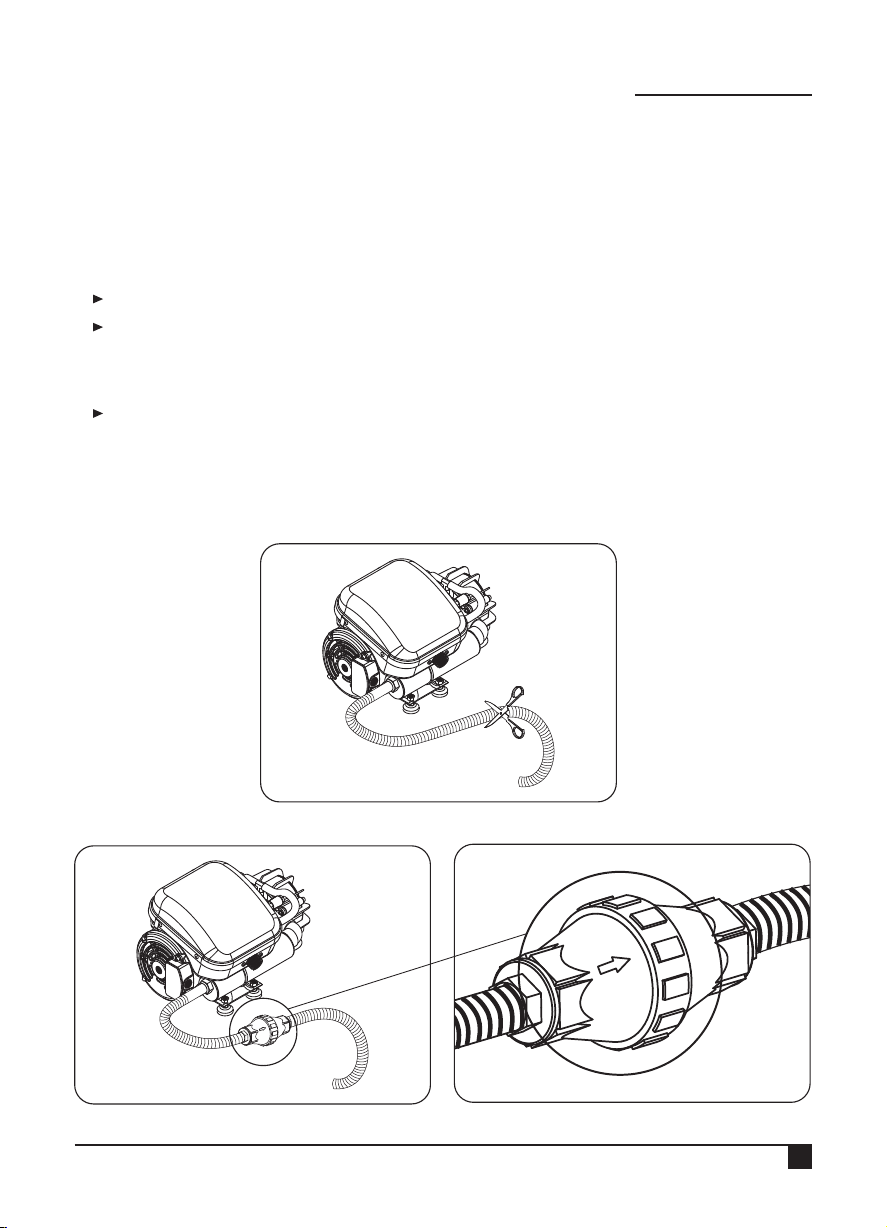
DRAINAGE
The one-way noise reducer minimizes the noise produced by the airflow inside the pipe.
The vacuum pump induces air to the plumbing system, so open drains or siphons near will
release air, noise and probably bad smell, therefore, every drain at the establishment must
have a siphon.
Connect the corrugated hose to the drain exit and fasten it with the clamp (Fig. 2).
Cut the hose at the most convenient place (Fig. 2) and install the noise reducer (Fig. 3)
observing the arrow that indicates flow direction (Figs. 3 and 4). Attention!
The incorrect installation of the noise reducer (backwards) will cause damage to the vacuum
pump.
Connect the R/L adapter to the drain exit of the dental unit, after it, connect the hose to the
adapter and fasten it with the clamp. Note: The vacuum pump and the cuspidor may be
connected to the same drain, since that there’s an exclusive siphon for the cuspidor, to avoid
excessive noise.
3
1
2
Fig. 4
Detailed image of the flow indication arrow
Fig. 2
Fig. 3
C R I S T Ó F O L I
V A C U U M P U M P S
I N S T R U C T I O N M A N U A L
8
Table of dimmensions for pipes from the vacuum pump to the dental unit.
*Consider the most distant from the dental unit vacuum pump.
SuperGap 2 10 m max. 32 mm
Model Pipes length* Pipes diameter
Table 2
Fig. 5 Fig. 6
Strip
Connector
Residue
Filter
Voltage
Selector Switch
Identification
Label
Fig. 7
45 °
C R I S T Ó F O L I
V A C U U M P U M P S
I N S T R U C T I O N M A N U A L
9
Strip connector
Voltage Selector
Switch
Fig. 9
(detail)
Fig. 8
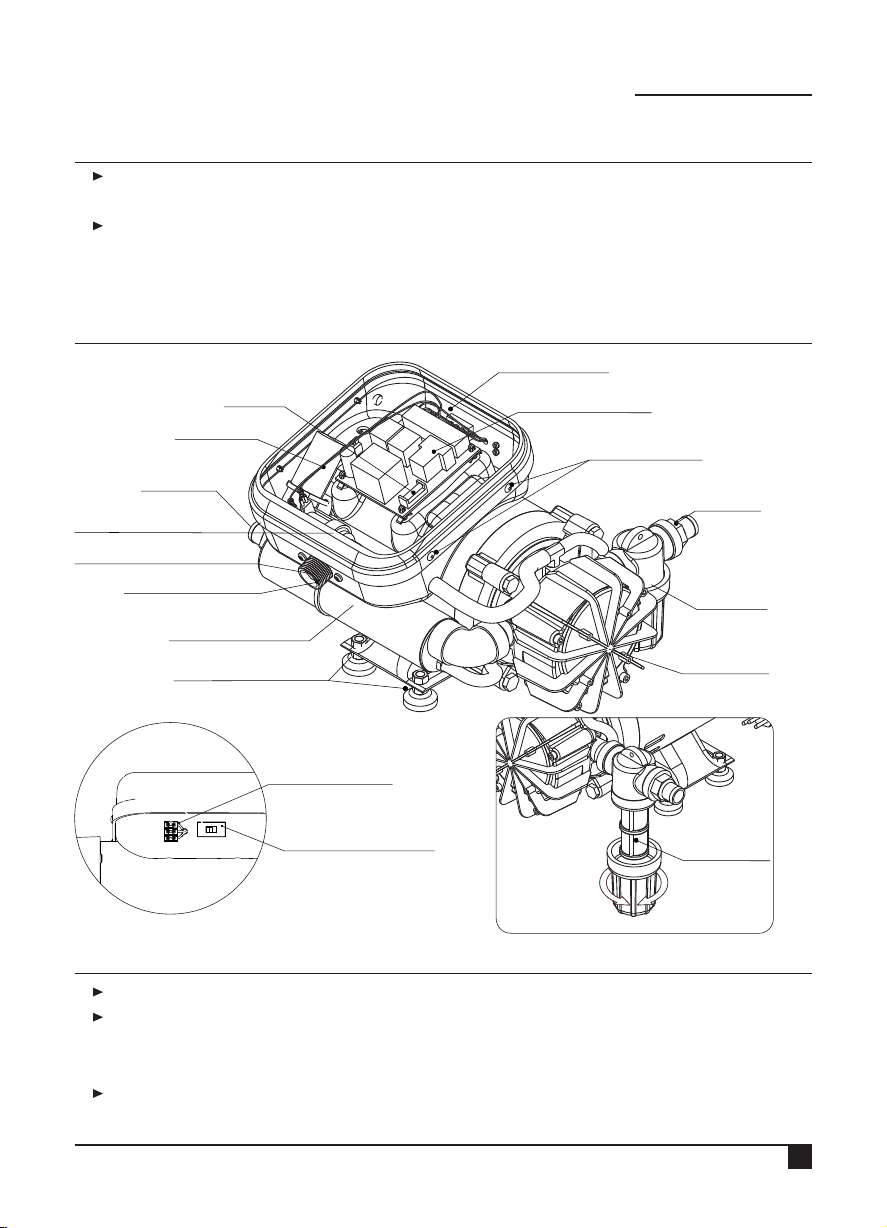
COMPONENT DESCRIPTION
FUSE - Internal device, located at the electronic circuit (glass model - fast acting - 300mA),
that protects the electrical installations and equipment against peaks of energy (Fig. 8).
THERMAL FUSE - Internal device that, in case of overheating, automatically disconnects the
motor. The motor will work again as the temperature gets back to normal levels.
SAFETY DEVICES
1
2
Before turning on the vacuum pump, make sure the water supply valve is open.
At the first use, it is necessary to wait for 2 minutes until the vacuum system is filled with water.
To turn on the vacuum pump, just take the suction instrument out from it’s support, and to
turn it off, get the instrument into the support again, so the vacuum pump will be
automatically deactivated.
At the end of the workday, clean the residue filter (Fig. 10). See “Preventive Maintenance”
(Page 11).
HOW TO USE THE SUPERGAP EVOLUTION VACUUM PUMP
1
2
3
Fig. 10
Filtering
element
Solenoid valve
Electronic circuit
Capacitor
Fuse
Water inlet
Drain exit
Flow limiter
Water feedback
system
Leveler glides
Comand box
Residue
filter
Vacuum
system
Suction
(inlet)
Plastic rivets
OPEN
CLOSE
C R I S T Ó F O L I
V A C U U M P U M P S
I N S T R U C T I O N M A N U A L
10
Fig. 11
The identification label, located at the
back of the equipment, identifies the
technical data of the vacuum pump.
ATTENTION! - The removal of the identification
label or any sticker glued on the equimpent will
cause automatic loss of warranty.
HOW TO IDENTIFY YOUR AUTOCLAVE
TECHNICAL DATA
Table 3
Class ......................................................................
Capacity ................................................................
Gross weight (wrapped) .........................................
Net Weight .............................................................
External dimensions (W x H x D) ..............................
Box dimensions (W x H x D) .....................................
Voltage ..................................................................
Frequency ..............................................................
Water consumption ...............................................
Power .....................................................................
Power Consumption ...............................................
Maximum flow (air) .................................................
RPM ........................................................................
Maximum Vacuum ................................................
Noise level .............................................................
Appropriate relative humidity (operation) ...............
Appropriate relative humidity (transportation and
storing) ...................................................................
Appropriate atmospheric pressure .........................
Room temperature (operation) ..............................
Room temperature (transportation and storing) .....
Certification ........................................................... This equipment is manufactured by
Cristófoli Biossegurança, company
whose the Quality Management System
is certified by and in accordance with ISO
13485:2003.
I
Suitable for up to 4 dental units
14,6 kg
13,5 kg
23,2 cm x 23,5 cm x 35 cm
27 cm x 27 cm x 39 cm
127/220V AC - single-phase
60 Hz
0,16 l/min.
560 W - 3/4 HP
0,56 /hkW
300 liters / min.
3450
620 mm Hg
78 dB
70 %
0 a 75 %
70 - 106 kPa
5 ºC a 40 ºC
-5 ºC a 55 ºC
LOT
S N
PRODUCT: VACUUM PUMP
USE INSTRUCTIONS, PRECAUTIONS, CONSERVATION AND STORING:
SEE THE USER MANUAL.
POWER
MODEL
DIMENSIONS (W x H x D)
MAXIMUM FLOW (AIR)
FREQUENCY
ANVISA RESPONSIBLE TECHNICIAN
VACUUM MAX. PRESSURE
MODEL
C R I S T Ó F O L I
V A C U U M P U M P S
I N S T R U C T I O N M A N U A L
TECHNICAL DATA CHART
CRISTÓFOLI EQUIPAMENTOS DE BIOSSEGURANÇA LTDA
ROD BR 158 Nº 127 - CAMPO MOURÃO - PR - BRASIL
CEP 87309-650 - TEL.: 55 44 3518-3449
CNPJ 01.177.248/0001-95 - INSCR. EST. 90.104.860-65
INDUSTRIA BRASILEÑA

11
PREVENTIVE MAINTENANCE
For better functioning and durability of your vacuum pump, some procedures are needed.
Preventive maintenance correspond to the accomplishment of all procedures below.
PERIODICITY
MAINTENANCE
DAILY
Vacuum pump internal cleaning:
It is recommended that a specific product for this purpose be used, for example, a
detergent which is suitable to disinfect and dissolve residues inside the vacuum
system, for it will reduce the need of cleaning and keep the suction capacity
through duct clearance. To perform this kind of cleaning, proceed according to the
cleaning product manufacturer’s instructions.
Residue filter cleaning:
Open the filter cover by turning it counterclockwise (Fig. 10, page 9), remove-it and
discard the residue in appropriate place. Wash the cover of the residue filter and
filtering element, verify if the gasket inside the cover is properly placed, and
reposition the residue filter. If the gasket is damaged, replace-it. To buy extra filtering
elements, consult your local Cristófoli authorized dealer. ATTENTION! Never forget to
reposition the filtering element of the residue filter. Small fragments are enough
to damage the internal components of the vacuum pump.
MONTHLY
External cleaning:
Unplug the power cord and perform cleaning with a feather duster or a soft cloth,
slightly moistened with water and biodegradable neutral detergent, after it, clean
with a cloth, moistened with 70% alcohol and 1% peracetic acid. Never use
solvents or petroleum derivatives. Verify the openings at the bottom of the motor, if
there’s dirtiness accumulation on it, perform cleaning.
YEARLY
General revision and flow limiter regulation (we recommend that this procedure
be performed by an authorized technical assistance):
Unplug the power cord and close the water supply valve. Remove the hose
connected to the water supply valve. Remove the filtering screen and take the flow
limiter out of the water inlet with a needle nose plier. Rotate the tip of the flow limiter
counterclockwise, taking care not to damage the internal rubber disc. After
removing, wash the parts below running water. When mounting it, take care not to
press the rubber disc. Reposition the set back to the valve. Reconnect the hose to
the water inlet. Turn on the vacuum pump and make the measuring test again.
Measuring test (water consumption): Disconnect the hose from the drain exit of the
vacuum pump. Use a measuring cup with ml (millilitre) scale and a stopwatch.
Activate the vacuum pump, wait for 3 to 5 minutes, until the flow of expelled water
stay constant. Place the measuring cup at the vacuum pump water exit and collect
the expelled water for 1 minute. After this time, observe if the amount of expelled
water is 160 ml. If the result taken is different from the indicated value, perform the
procedure again.
Table 4
C R I S T Ó F O L I
V A C U U M P U M P S
I N S T R U C T I O N M A N U A L

12
TROUBLESHOOTING
ATTENTION! For any replacement of parts, contact yout local dealer. It’s not
recommended the replacement by non-qualified people.
Listed below are the most frequent problems and possible solutions, which could be solved
by the user.
THE VACUUM PUMP DOES NOT SWITCH ON
•Lack of power -------------------------------------------------
•Disarmed circuit breaker ----------------------------------
•The power cord is not plugged in ----------------------
•When taking out the suction instrument out of the
support , the vacuum pump does not activate -------
•Fuse burn ------------------------------------------------------
POSIBLE CAUSES SOLUTION
•Verify if there’s a power failure in your area.
•Rearm the circuit breaker.
•Connect the power cord to the outlet properly.
•Consult “How to proceed when service is needed”
(Page. 13).
•Change the fuse, which is located at the electronic
circuit, inside the command box. To replace the
fuse, unplug the equipment from the outlet, push
the pins of the plastic rivets (Fig. 8, page 9) inside
the command box, with a slim tip, remove de rivets
and the cover, locate the fuse and replace it by a
new one. Take out the the pushed plastic pins,
place the lid again and the plastic rivets. Note: To
place the rivets, insert the plastic pins at the center
of the rivets, about 2 mm, put the rivets inside the
holes and push the pins until they get alined with
the rivets to lock it. See “Safety Devices” (Item 1,
page 9).
If the problem persists after the verification of all items, contact your local dealer.
THE VACUUM PUMP SWITCHES ON BUT PRODUCES INSUFICIENT OR DOES NOT
PRODUCE VACUUM
•Lack of water in the vacuum pump --------------------
•The residue filter is full ----------------------------------------
•The redisue filter cover isn’t properly closed -----------
•Air entrance through the pipes ---------------------------
•Verify if the water valve is closed or if there’s lack of
water ar your area.
•Clean the residue filter. See “Preventive
Maintenance” (Page. 11).
•Remove the residue filter cover, verify the gasket
fitting and mount it again.
•Verify if there’s weak connections or leaks at the
dental unit vacuum pipes.
POSIBLE CAUSES SOLUTION
C R I S T Ó F O L I
V A C U U M P U M P S
I N S T R U C T I O N M A N U A L

13
Cristófoli Vacuum Pumps are individually monitored according to internal test and
manufacturing patterns approved by Cristófoli’s quality control.
QUALITY CONTROL
If there’s any problem with your equipment, at first, see the topic “Troubleshooting” (Page.
12), if the problem persists, contact your local dealer for an evaluation and possible repair of
your equipment. It will be also necessary to have the original invoice from your dealer to
confirm the date of purchase.
Before contact, have in hands the model of your autoclave, voltage, serial number, and
the date of manufacture, found in the identification label located in the back of the
equipment (Fig. 6, page. 8) and a description of the problem.
Always contact your local dealer. If you have problems contacting your dealer, contact
us through our website: www.cristofoli.com.
HOW TO PROCEED WHEN SERVICE IS NEEDED
THE VACUUM PUMP STOPS AND DOES NOT SWITCH ON
•The motor is overheated and the thermal fuse was
activated -------------------------------------------------------- •Wait until the motor gets cold, if it doesn’t get back
to work, see “How To Proceed When Service Is
Needed” (Page 13).
•Verify voltage and electrical wire conditions;
POSIBLE CAUSES SOLUTION
If the problem persists after the verification of all items, contact your local dealer.
C R I S T Ó F O L I
V A C U U M P U M P S
I N S T R U C T I O N M A N U A L

14
GUIDANCE FOR FINAL DISPOSAL OF THE EQUIPMENT
The environment belongs to everyone, therefore, it is up to each one of us to make
decisions that will help in its preservation and reduction of the damages resulting from
human activities.
All products have a useful life span, but it is not possible to determine how long is it, as it
varies according to the intensity and how the equipment is used or handled. Exception
made for the component “lid” which must be replaced every 10 years.
CRISTÓFOLI EQUIPAMENTOS DE BIOSSEGURANÇA LTDA strongly recommends users of
their products to seek the best destination when disposing equipment or components,
taking into account the materials recycling legislation effective in each country.
We advise you to take your equipment to specialized recycling companies that, due to
the continuous and fast paced development of new recycling technologies and materials
reuse, provide the best way of disposing the equipment. Cristófoli contributes this way to
reduce the consumption of non-renewable raw materials.
On behalf of all users, we thank you for your comprehension and cooperation.
C R I S T Ó F O L I
V A C U U M P U M P S
I N S T R U C T I O N M A N U A L

15
WARRANTY TERMS
CRISTÓFOLI EQUIPAMENTOS DE BIOSSEGURANÇA warranties the Cristófoli Vacuum Pumps
for 01 (one) year against any manufacturing defect from the date of the purchase receipt
(provided it contains the serial and lot numbers of the equipment), of which 03 (three) months
refer to the legal warranty (established by section II, art. 26, CDC, Brasil) and nine (09) months to
the contractual warranty (arranged in art. 50, CDC, Brazil). Visit our website www.cristofoli.com
and register your product online.
Traveling costs (based on the distance traveled in km) and the stay of the authorized
technician for installation, repair or maintenance before or after the warranty period will be
responsibility of the buyer/owner as well as the costs related to the autoclave sterilization
monitoring (tests with biological indicators) and freight charges for shipping the equipment to
the authorized technical assistance office for repairs or, if necessary, to the factory itself.
The warranty will be voided in cases of:
• Problems arising from natural causes (such as floods, lightning, etc.);
• Sinister (theft or robbery);
• Damage caused by accidents, such as: dents, drops, short circuits, fire, etc.;
• Problems due to failure of the power supply and/or building wiring;
• Improper use / installation of the equipment and/or plugging it into an incorrect voltage
outlet;
• Removal and/or tampering of the serial number shown in the identification label of the
product;
• Signs of tampering and/or blotted out data on the purchase or service receipt of the
equipment;
• Signs of external violation of the product or broken factory seal;
• Use of non-original or not acquired at the CRISTÓFOLI Authorized Service Network parts;
• Alteration in the equipment performed by the client.
• Repairs performed by technicians who are not part of the CRISTÓFOLI Authorized Service
Network;
• Noncompliance with any measure or caution recommended in the instruction manual of
the product.
Fuse and filtering element are not covered by warranty.
ATTENTION!
In order to validate the contractual warranty of the product it is necessary to send a copy of
the purchase receipt to the following e-mail address: [email protected].
C R I S T Ó F O L I
V A C U U M P U M P S
I N S T R U C T I O N M A N U A L

Table of contents
Other Cristofoli Medical Equipment manuals


Popular Medical Equipment manuals by other brands


PLUSOPTIX
PLUSOPTIX S12R Software update

orfit
orfit HP PRO 25000/33 Instructions for use

Nambison's softroniX
Nambison's softroniX Hi-Power Digi-Scope user manual

SELVAS Healthcare
SELVAS Healthcare Accuniq BC310 user manual

Blatchford
Blatchford ElanIC quick start guide

Humanscale
Humanscale TouchPoint T7 user manual