Crystal Clear 12 GPM Installation and operation manual


Page 2of 15
** THIS UNIT MUST BE INSTALLED AND EARTHED BY A
LICENSED PLUMBER **
WARNING
To prevent risk of electric shock, make sure this system is
properly earthed and protected by a safety switch.
Pull the plug before servicing or replacing lamps.
Keep all connections dry and off the ground.
Do not touch the plug with wet hands.
WARNING
Do not look directly at the UV lamp when it is operating.
The light emitted by the lamp can cause serious damage to eyes
and burn unprotected skin.
WARNING
This unit must be installed by a licensed plumber.
Read manual before installing or servicing the system.
Only experienced technicians who possess a strong understanding
of the system should attempt to replace lamps or service it.
To guard against injury, basic safety precautions should be observed including the following:
1. Read and follow all safety instructions.
2. Ensure the unit is properly earthed before operating.
3. The power supply must be protected by a Residual Current Device (Safety Switch)
4. Since water is employed in the use of this system, special care should be taken to avoid possible electric shocks.
DO NOT attempt to repair the system yourself. Contact an authorized service facility for service.
5. DO NOT operate the system if it has a damaged cord or plug, if it is malfunctioning or if it has been dropped or damaged
in any manner.
6. Before servicing or cleaning, unplug the system. Never pull the cord to disconnect plug from power supply. Grasp the
plug and pull to disconnect.
7. DO NOT use the system for anything other than its intended purpose. The use of attachments or accessories not
recommended or sold by the manufacturer may cause unsafe conditions or reduce performance.
8. Visually inspect the system prior to installation. If the quartz sleeve or lamp is broken, cracked or damaged in anyway,
DO NOT use.
9. DO NOT plug the system into an electrical outlet without properly securing the lamp and quartz sleeve into the chamber.
10. Always shut off water flow and release water pressure before cleaning and maintaining the system.
11. Intended for indoor use only. System MUST NOT be exposed to weather elements.
12. Installation of the system MUST be in accordance with local plumbing and electrical codes as well as any and all
applicable regulations and laws.
13. Warranty will be VOID if the above is not followed.
14. SAVE THIS MANUAL
Page 3of 15
Important Information
The vessel is rated to 700 kpa. The unit must be installed with an Australian Standards
Approved PLV (Pressure Limiting Valve).
A shut off valve must be installed prior to the unit in order to turn the water off and to ensure the
flow is restricted to the unit for servicing.
Ensure adequate clearance at the lamp connection end of the unit in order to safely remove the
lamp from the chamber for servicing and lamp replacement. Space required is at least the
length of the UV chamber.
*NOTE* - UV systems are NOT water filters. They are unable to eliminate bad tastes or smells,
biological material, chemicals, silt, heavy metals and other kinds of impurities and it does not
reduce sediments which effects the efficiency of the UV lamp.
Water Quality Parameters
Water quality is extremely important for the performance of your UV system. The following
levels are recommended for installation.
Hardness < 120 ppm
Turbidity < 1.0 NTU
Iron < 0.3 ppm
Manganese < 0.05 ppm
Tannins < 0.1 ppm
Chloride < 200 ppm
If you water chemistry contains levels in excess of the above, pre-treatment is recommended.
Contact your distributor for advice. Proper pre-treatment is essential for the UV system to
operate as intended.
Pre-treatment must include at least a 1mic sediment filter installed prior to the unit to ensure
that particles capable of shielding pathogens are removed from the water prior to entering the
system.
*IMPORTANT* - DO NOT use water that is murky from Colloidal Clay.
TO TEST –Fill glass and let sit overnight. If murkiness has settled to bottom,
sediment in not clay.
Page 4of 15
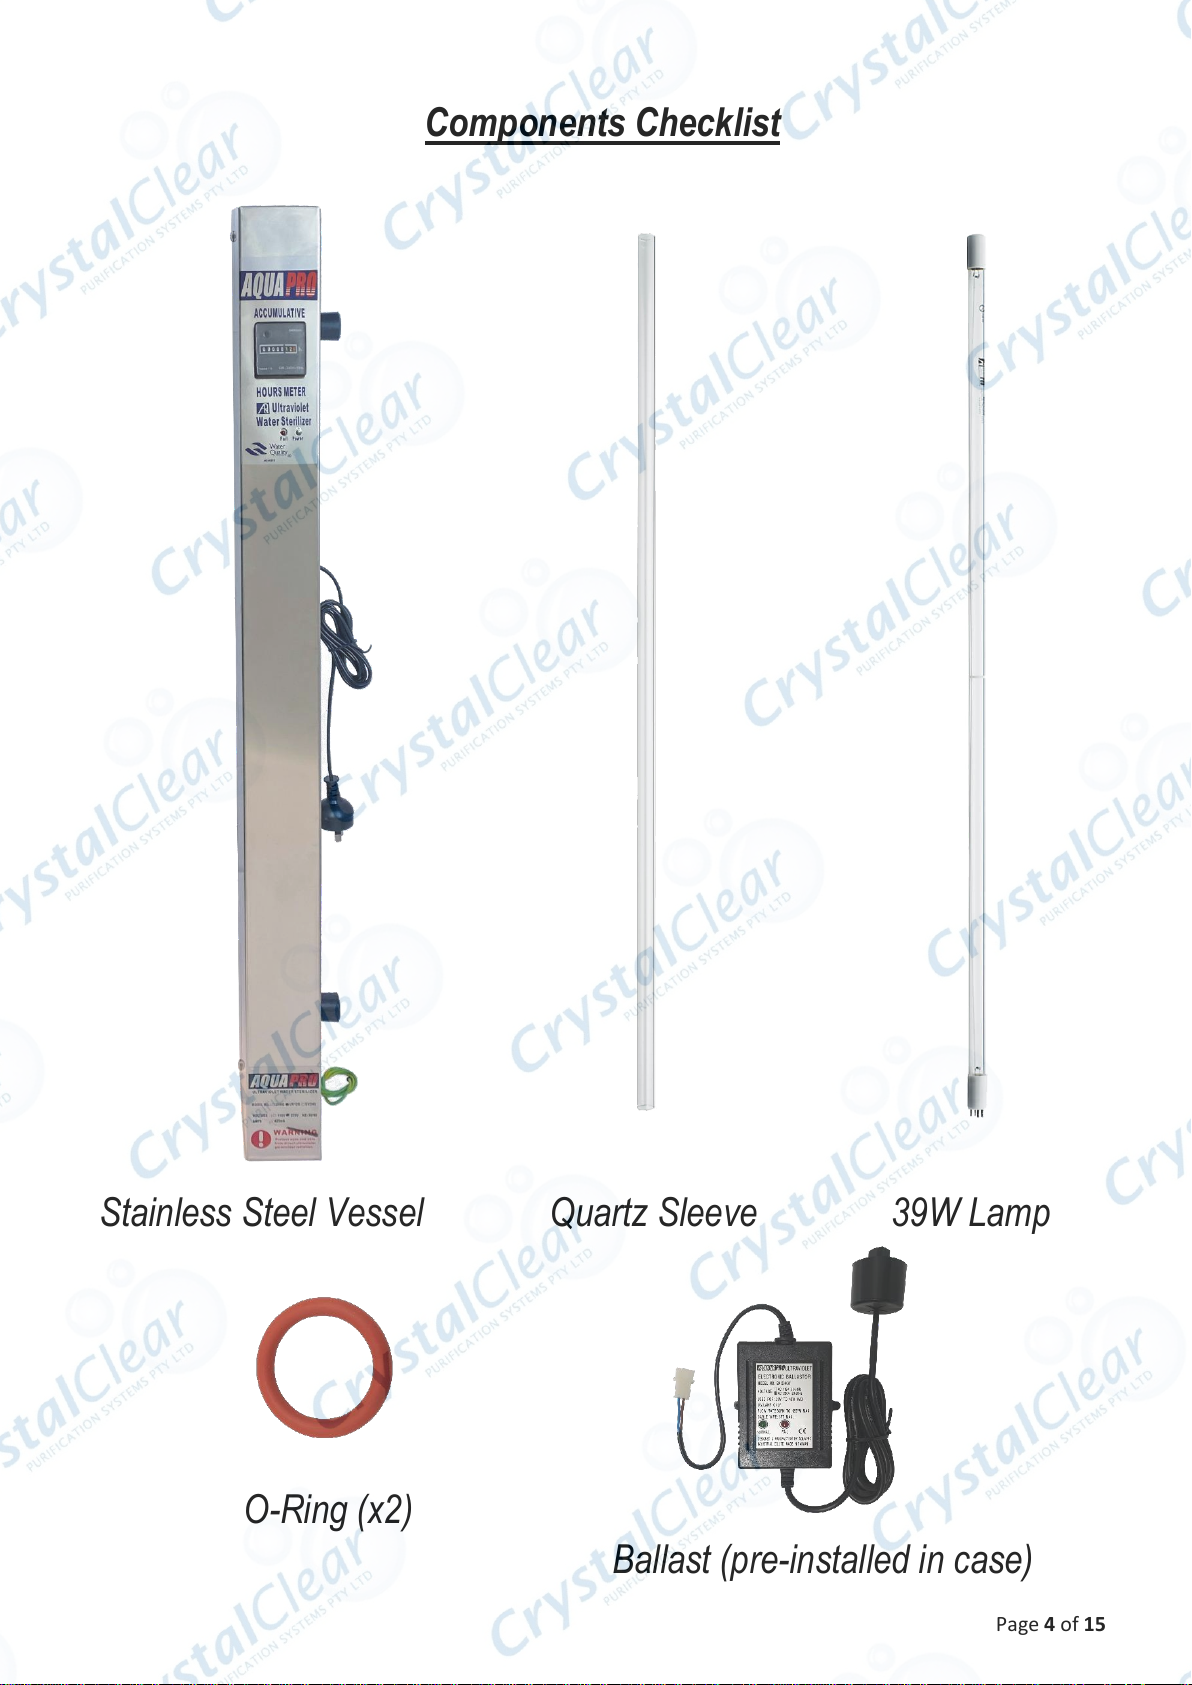
Components Checklist
Stainless Steel Vessel Quartz Sleeve 39W Lamp
O-Ring (x2)
Ballast (pre-installed in case)

Page 5of 15
Before You Begin
Ensure that system and all components are un-damaged and complete. Please contact your
distributor immediately if you are unsure.
The UV system is designed to be mounted either vertically or horizontally at the point of use.
Ideal installation is vertical with the lamp connector on top. This is to prevent water damage
from occurring on the lamp pins and connector.
The ballast should be mounted horizontally either above or beside the chamber to prevent
moisture from running down the cord and causing a potential fire hazard.
Always wear gloves when handling the lamp or quartz sleeve.
NEVER look directly at the UV light. Always wear UV rated eye protection if you must
look at it. Always wear protective clothing.
How a UV System Works
Page 6of 15
System Installation
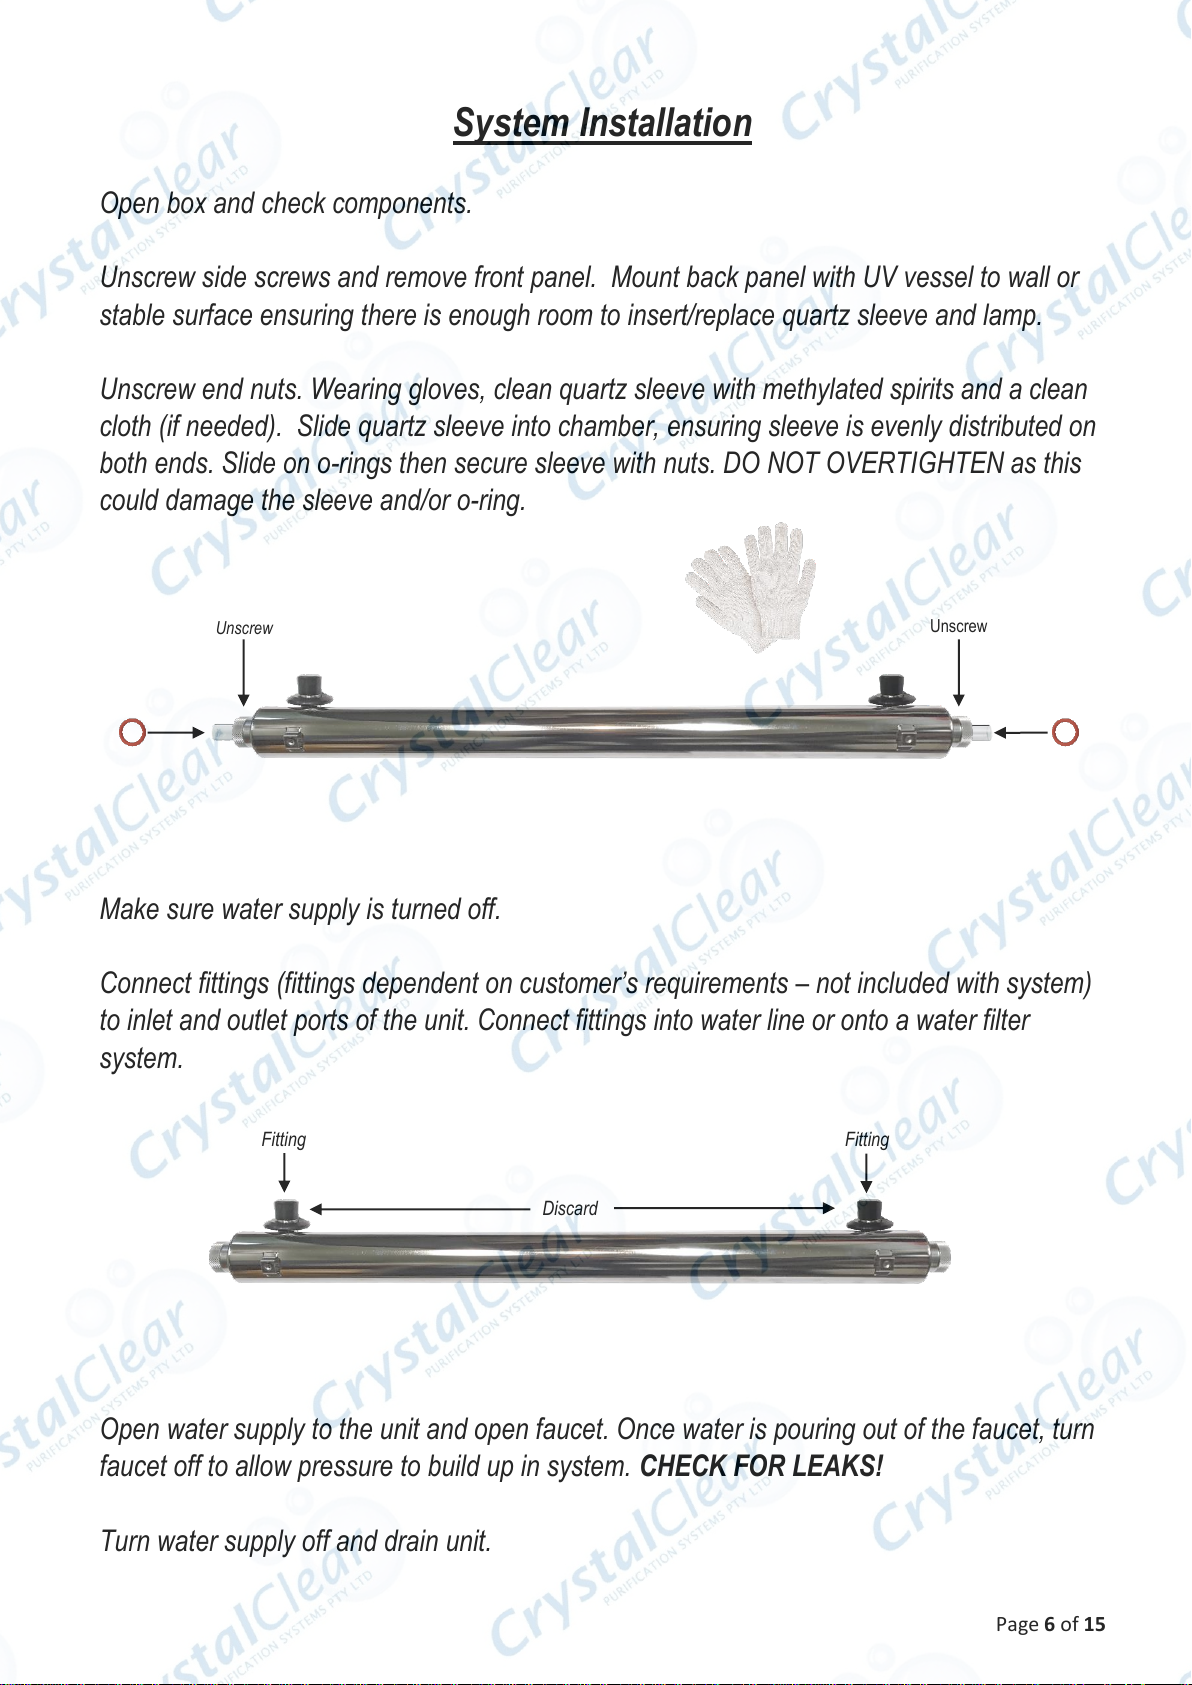
Open box and check components.
Unscrew side screws and remove front panel. Mount back panel with UV vessel to wall or
stable surface ensuring there is enough room to insert/replace quartz sleeve and lamp.
Unscrew end nuts. Wearing gloves, clean quartz sleeve with methylated spirits and a clean
cloth (if needed). Slide quartz sleeve into chamber, ensuring sleeve is evenly distributed on
both ends. Slide on o-rings then secure sleeve with nuts. DO NOT OVERTIGHTEN as this
could damage the sleeve and/or o-ring.
Make sure water supply is turned off.
Connect fittings (fittings dependent on customer’s requirements – not included with system)
to inlet and outlet ports of the unit. Connect fittings into water line or onto a water filter
system.
Open water supply to the unit and open faucet. Once water is pouring out of the faucet, turn
faucet off to allow pressure to build up in system. CHECK FOR LEAKS!
Turn water supply off and drain unit.
Unscrew
Unscrew
Fitting
Discard
Fitting

Page 7of 15
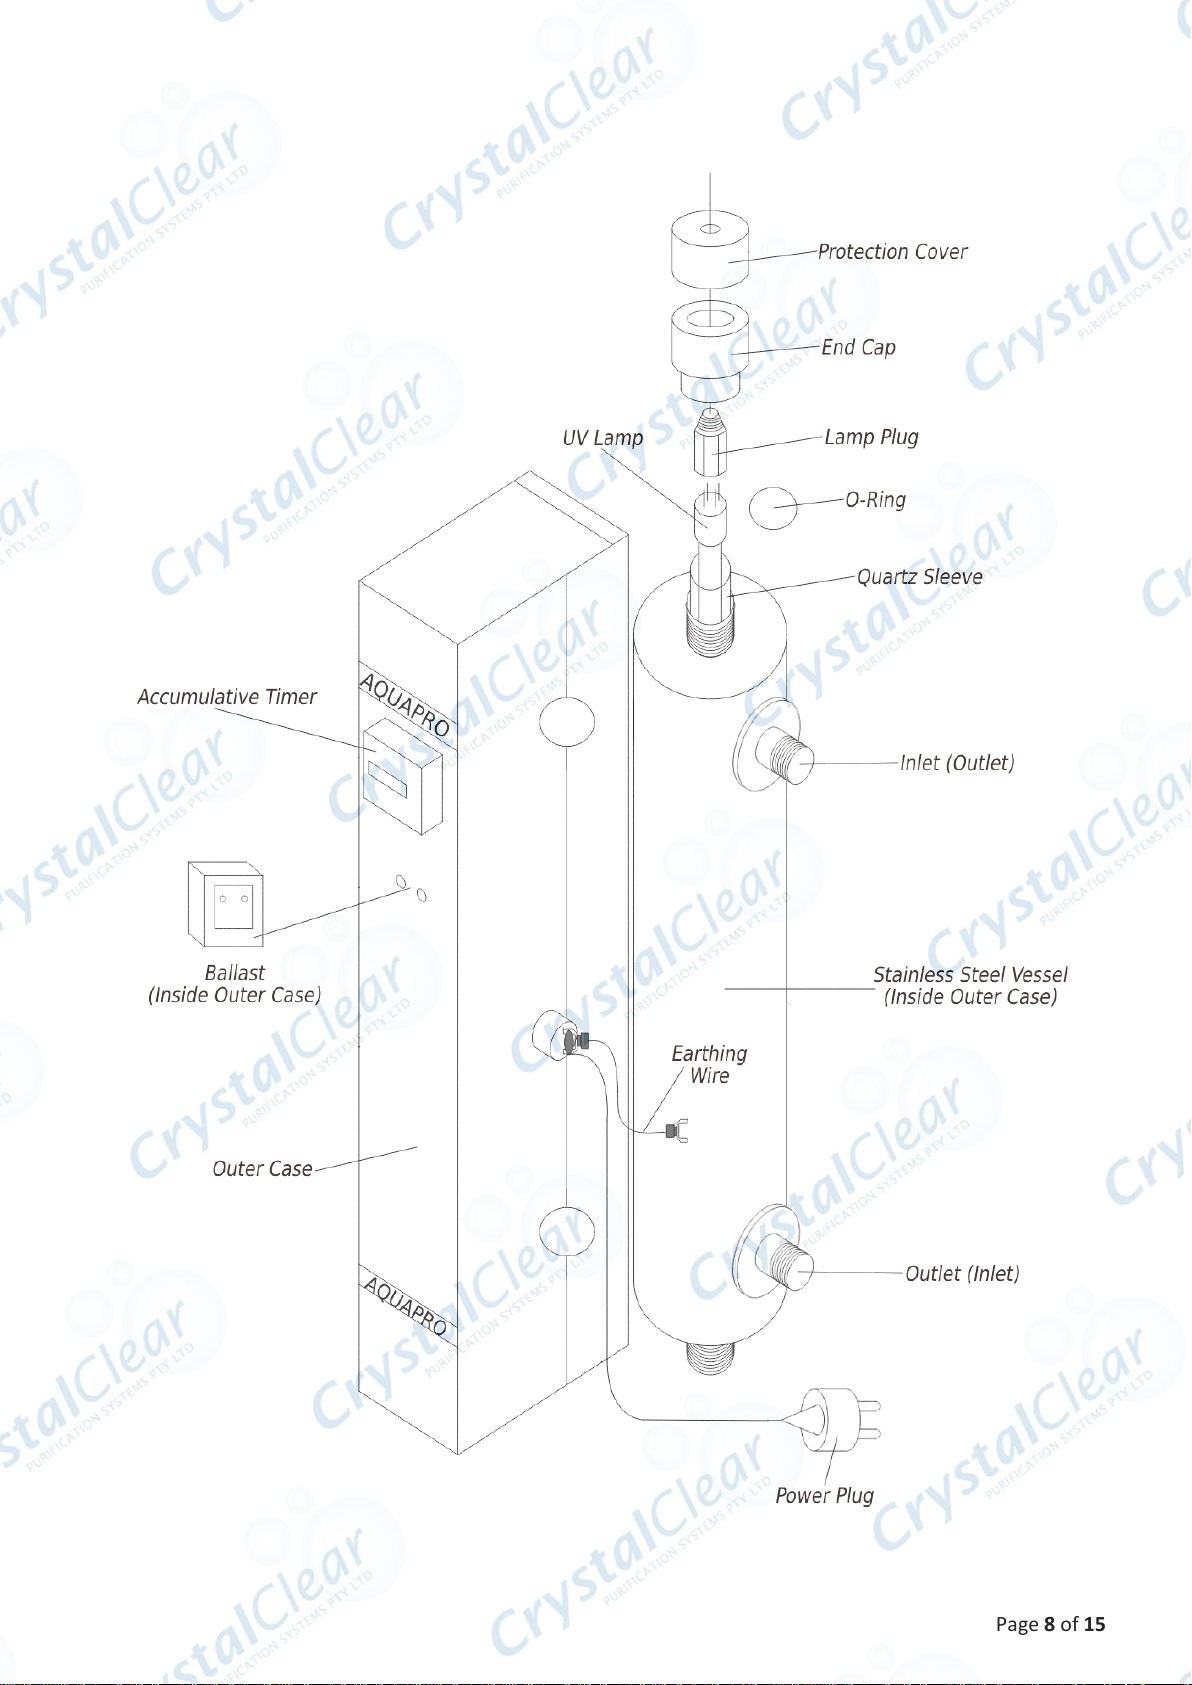
Wearing gloves, clean UV lamp with methylated spirits and a clean cloth (if needed) and
carefully insert into the quartz sleeve leaving the pins exposed.
Connect the female 4-pin plug from the ballast (already installed in front cover) to the pins
on the lamp.
Place the cover over the end of the UV unit.
Connect the unit to a power source, turn water supply on and switch on the power. CHECK
FOR LEAKS!
The light on the ballast should come on and turn green.
(A red light on the ballast indicates a failed lamp and/or ballast. Turn the unit off and
check your lamp connection. If red light remains, replace the lamp and check. If still
not working, replace ballast as well.)
Replace front cover and secure with screws.
Page 8of 15

Page 9of 15
Wiring Diagram
Page 10 of 15
System Maintenance
Minerals in water will build up on the quartz sleeve and vessel. This coating must be
cleaned off periodically as it reduces the amount of UV light reaching the water, therefore
reducing the effectiveness and performance of the system.
Depending on water quality, it is advised to clean the unit and quartz sleeve every time lamp
is replaced.
Make sure to wear gloves whilst handling the unit.
Servicing the Unit
Turn off and disconnect ballast from the power and allow unit to cool down.
Turn off water supply and open faucet to release pressure from unit.
Once system is cool, remove unit from mounting brackets and disconnect inlet and outlet
elbows from chamber. Tip the unit and drain as much water as possible into a bucket.
Remove end cover from chamber, disconnect wire (4 pin plug) from lamp and carefully
remove lamp.
Unscrew both end caps and carefully remove orange o-rings. Check disposition and replace
if necessary.
Carefully remove quartz sleeve.
Chamber can be cleaned with a bottle brush.
NOTE –Hardness can generally be removed with citric acid or commercially available
scale remover (Make sure to follow all directions on cleaning products).
Quartz sleeve can be cleaned with a sponge or cloth. Make sure sleeve is completely clean.
Once chamber and quartz sleeve are clean, wipe them, including inside quartz sleeve, with
methylated spirits or alcohol wipes to remove any smears.
Reassemble and reconnect unit following installation instructions.
Page 11 of 15
Disinfecting the Unit
If unit has been turned off or un-used for an extended period, disinfecting the unit and water
lines is recommended before re-using.
Disconnect power, turn off water supply and drain unit following servicing instructions.
Mix a soapy water solution and use a syringe or funnel to pour solution into vessel.
Reconnect vessel to water supply but do not turn power on.
Open water supply and faucet and allow unit to flush until water no longer suds.
System Limitations
AquaPro UV systems are designed to operate continuously and should not be switched on
and off frequently. Doing this will shorten life of the lamp.
Lamps, quartz sleeves and o-rings should be changed yearly. Lamp may still be working but
light emitted may not kill bacteria as well as it should after a year.
Lamp life 9,000 hours (approx. 1 year)
Lamp Intensity 130 µW/cm² @ 1m
Working pressure 100 psi
Flow rate 12 gpm

Page 12 of 15
Troubleshooting
PRESSURE DROP
Sediment pre-filter clogged
oReplace filter
HIGH BACTERIA COUNT
Check if quartz sleeve stained or dirty
oClean quartz sleeve
Check feed water quality
oTest source water to ensure water quality still within allowable limits
Possible finer sediment in source water than pre-filter capability
oTest source water for turbidity –may need better pre-filtration
HEATED PRODUCT WATER
Infrequent use of water
oRun water until it returns to ambient temperature
CLOUDY WATER
Air in lines
oRun water until air is purged
UNIT LEAKING WATER
Check inlet/outlet fittings correctly installed
Check quartz sleeve o-ring properly fitted.
oReplace if damaged
oClean if dirty
LAMP NOT TURNING ON
Check light on ballast
oRed means lamp and/or ballast has failed. Replace lamp and check. If still
not working, replace ballast as well.
Check lamp connection

Page 13 of 15
Warranty
CRYSTAL CLEAR PURIFICATION SYSTEMS TERMS AND CONDITIONS
TERMS AND CONDITIONS
Any contract of sale, order, or quotation made or accepted by or on behalf of Crystal Clear Purification Systems Pty Ltd (“ Crystal Clear”) is subject to these terms and conditions
of sale.
WARRANTY
Crystal Clear warrants each new product to be free from defects in material and workmanship for a period of 1 year from the date of retail sale established by the date of the
original invoice issued by Crystal Clear.
The Product must be forwarded at the Buyer’s own risk and expense to Crystal Clear, together with proof of purchase. Any damage caused during or as a result of transit will not
be the responsibility of Crystal Clear.
Crystal Clear’s exclusive obligation under this Warranty is, at Crystal Clear’s own option, to either repair or replace the P roduct, once Crystal Clear has deemed that the Product is
defective.
Crystal Clear may, at its own discretion, refund to the Buyer the purchase price paid for the defective goods.
Crystal Clear reserves the right in instalment sales to grant credit for the value of any Product found to be defective under this Warranty.
Crystal Clear will not cover any labour charge incurred by the Buyer for the replacement or repair of any Product.
The Buyer is responsible for freight and local labour charges for Produc ts the subject of this Warranty.
This Warranty applies only to the original retail purchaser of the Product.
This Warranty does not cover any Product that is relocated from the site of its original installation.
All replaced or exchanged parts taken out under this warranty become the property of Crystal Clear.
LIMITED WARRANTY
Crystal Clear’s liability for any breach of this Warranty shall be limited solely to replacement or repair at the sole option of Crystal Clear, of any part or parts found to be defective
during the Warranty Period.
In no event will liability extend beyond the purchase price of the product.
This Warranty is subject to the Product being properly installed and maintained and being used for its intended purpose.
The Warranty will be void if the goods have found to be tampered with.
This Warranty does not cover the normal wear and tear of the Product, or damage caused by misuse, abuse or vandalism.
This Warranty does not extend to a Product that has been modified in any way unless with Crystal Clear’s express consent.
The Warranty does not cover any malfunction or failure resulting from neglect or use of unauthorised parts and accessories, i mproper water pressure etc.
The Warranty does not extend to damage caused by rain, fire, earthquake or other natural causes or acts of nature.
It is expressly agreed that this shall be the sole and exclusive remedy of the buyer stated herein, and under no circumstance s shall Crystal Clear be liable for any costs, loss,
expense, damages, special damages, incidental damages or consequential damages arising directly or indirectly from the design, manufacture, sale, or use or repair of the
product whether based upon warranty, contract, tort or strict liability.
The Warranty limits Crystal Clear’s liability and is in lieu of all other warranties and liabilities expressed or implied.
All implied warranties of merchantability and fitness for a particular purpose are hereby disclaimed by Crystal Clear and exc luded from the Warranty.
WARRANTY PROCEDURE
Goods damaged during transit must be reported within five (5) working days of delivery.
Insured goods damaged during transit must be reported within twenty-four (24) hours of delivery.
A copy of the original invoice must be presented for any Warranty claim as proof of purchase.
The faulty item must be returned to Crystal Clear if such a request is made.
This limited Warranty is void if the Product under Warranty is presented without the said original invoice.
Crystal Clear may request that a Statement accompany the original invoice, signed by the Buyer, setting out the following terms:
1. The name and address of the Buyer.
2. The date and by whom the Product was purchased.
3. The date and by whom the Product was installed.
4. The location where the Product was installed.
5. The date and time the Product first appeared to malfunction.
6. The nature of the problem with the Product.
7. The date and time of any and all loss event/s.
8. The date and time Crystal Clear was first notified of the Product ma lfunction.
A failure by the Buyer to submit the said Statement within 28 days, after such request is made by Crystal Clear, will automat ically void the Warranty.
A failure to answer truthfully or to answer in a way that is misleading, entitles Crystal Clear to void the Warranty and to n otify the police in the event of suspected fraudulent
conduct.
RISK
The risk in the Product will pass to the Buyer immediately upon the Product leaving Crystal Clear’s premises for delivery to the place designated by the Buyer.
RETENTION OF TITLE
Crystal Clear will retain title to (but not risk in) a Product delivered to the Buyer until Crystal Clear has received paymen t in full for the Product and all other sums owing to it by the
Buyer.
Until such payment, the Buyer holds the Product as bailee for Crystal Clear and may not sell or otherwise dispose of the P roduct unless authorised by Crystal Clear. If the
Product is sold, the proceeds of sale will be placed in a separate trust account pending payment to Crystal Clear. The Buyer will store the goods in such a way as to enable them
to be separately identified and will keep them insured at its own expense with Crystal Clear’s in terest noted on any such insurance cover.
If the Buyer fails to make any payment when due or becomes bankrupt or becomes insolvent, or has a judgement entered against it in any Court or enters into any scheme of
arrangement, composition, or assignment or is in receivership or voluntary administration or liquidation, the Buyer grants Crystal Clear licence to enter any of the Buye r’s
premises where the Product is stored, and without notice, to re-take possession of and remove, at the Buyer’s cost and expense, the Product in respect of which title has not
passed to the Buyer.
THIS WARRANTY IS VOID IF
All filter housings are not installed with an Australian Standards approved pressure limiting and check valve.
The system is not turned off when residents are away for over 24 hours
The system is not serviced every 12 months. I.e. Replacement of filters, PLV check & assessment of general condition of syste m.
Product damage results from water hammer, freezing, neglect or is not installed by a licensed plumber in a ccordance with the installation plan.
A system connected to a chiller that does not have an expansion chamber, is not installed with a Pressure Relief Valve.
The water temperature exceeds 40° Celsius
The pressure exceeds 700kpa
SEVERANCE
If any of these terms or conditions or becomes for any reason wholly or partly invalid, that term or condition shall to the extent of the invalidity be severed without prejudice to the to the
continuing force and validity of the remaining terms and conditions
JURISDICTION
Crystal Clear and the buyer agree that this agreement and its provisions shall be construed in accordance with the laws of the State of South Australia and be resolved by a South
Australian Court.

Page 14 of 15
SERVICE NOTES:
SERVICE NOTES:
SERVICE NOTES:
SERVICE NOTES:
SERVICE NOTES:
Service Record
Installation Date: ____/____/____
Next Service Due: ____/____/____
1st Service: ____/____/____
Serviced By: ________________________
Lamp changed: Yes No
Quartz sleeve condition: OK Cleaned Replaced
Filters changed: Yes Replace next service
Next Service Due: ____/____/____
2nd Service: ____/____/____
Serviced By: ________________________
Lamp changed: Yes No
Quartz sleeve condition: OK Cleaned Replaced
Filters changed: Yes Replace next service
Next Service Due: ____/____/____
3rd Service: ____/____/____
Serviced By: ________________________
Lamp changed: Yes No
Quartz sleeve condition: OK Cleaned Replaced
Filters changed: Yes Replace next service
Next Service Due: ____/____/____
4th Service: ____/____/____
Serviced By: ________________________
Lamp changed: Yes No
Quartz sleeve condition: OK Cleaned Replaced
Filters changed: Yes Replace next service
Next Service Due: ____/____/____
5th Service: ____/____/____
Serviced By: ________________________
Lamp changed: Yes No
Quartz sleeve condition: OK Cleaned Replaced
Filters changed: Yes Replace next service
Next Service Due: ____/____/____

Page 15 of 15
Notes
Table of contents
Other Crystal Clear Steriliser manuals


