CS CS1210L User manual


1. WARNING - RISK OF EXPLOSIVE GASES
a. Working in the vicinity of a lead-acid battery can be dangerous. Batteries generate explosive gases
during normal batter operation.
b. For this reason it is of the utmost importance that prior to each use of your charger, you read and
follow the instructions provided exactly.
c. The appliance is not intended for use by young children or infirm persons without supervision.
Young Children should be supervised to ensure that they do not play with the appliance.
2. To reduce risk of a battery explosion, follow these instructions and those marked on the battery.
3. NEVER smoke or allow an open spark or flame in the vicinity of the battery or engine.
4. CAUTION - To reduce the risk of injury use the charger for charging a rechargeable lead-acid battery
only. It is not intended to supply power to a low-voltage electrical system or to charge dry-cell
batteries. May cause them to burst and cause injury and damage to property.
5. Do not expose the charger to moisture, rain or snow. Use in well-ventilated and dry area.
6. Use of an attachment not recommended or sold by the battery charger manufacturer may result in a
risk of fire, electric shock, or injury to persons.
7. To reduce risk of damage to electric plug and cord, pull by plug rather than cord when disconnecting
the charger.
8. Make sure cord is located so that it cannot be stepped on, tripped over, or otherwise subjected to
damage or stress.
9. Study all the battery manufacturers specific precautions such as removing or not removing cell caps
while charging and recommended rates of charge.
10. Do not use the battery charger unless the battery voltage matches the output voltage rating of the
charger.
11. Do not operate the charger in a closed-in area or restrict ventilation in any way.
12. An extension cord should not be used unless absolutely necessary. Use of improper extension cord
could result in risk of fire and electric shock. If extension cord must be used, make sure.
a. pins on the plug of extension cord are the same number, size and shape as plug on charger;
b. That extension cord is properly wired and is in good electrical condition;
13. Do not operate the charger with damaged cord or plug. If the supply cord cannot be replaced and the
cord is damaged, the appliance should be scrapped.
14. Do not operate the charger if it has received a sharp blow, been dropped, or otherwise damaged in
any way. Take it to a qualified repair station or dealer.
15. Do not disassemble the charger. Take it to a qualified repair station or dealer when service or repair
is required. Incorrect reassembly may result in a risk of electric shock or fire.
16. To reduce risk of electric shock, unplug the charger from an outlet before attempting any
maintenance or cleaning.
WARNINGS

PERSONAL PRECAUTIONS
a. Someone should be within close range to come to your aid when you work near lead-acid battery.
b. Have plenty of fresh water and soap nearby in case battery acid contacts skin, clothing or eyes.
c. Wear eye and clothing protection and clothing. Avoid touching eyes while working near a battery.
d. If battery acid contacts skin or clothing, wash immediately with soap and water. If acid enters your eye,
immediately flood eye with running cold water for 10+ minutes and get medical attention at once.
e. NEVER smoke or allow a spark or flame in vicinity of battery or engine.
f. Do not drop metal tools on battery as it might cause a spark or short-circuit damage equipment or Lead
to an explosion.
g. Remove all metal items (jewellery) when working with a lead-acid battery, as they can produce a
short-circuit current strong enough to weld metal, possibly causing a severe burn.
h. It is not intended to supply power to a Low-voltage electrical system or to charge dry-cell batteries.
Charging dry-cell batteries may cause them to burst and cause injury to persons and/or damage to
property.
I. NEVER charge a frozen battery.
PREPARING TO CHARGE
a. If it is necessary to remove the battery from a vehicle for charging, always remove grounded terminals
from battery first. Make sure all accessories in the vehicle are off in order to prevent an arc.
b. Ensure area around battery is ventilated during charging. Explosive gas/micro particles can be blown
away by using a piece of cardboard or non-metallic fans.
c. Clean battery terminals. Be careful to keep corrosion from coming in contact with eyes.
d. If battery is not sealed, add distilled water in each cell until battery acid reaches level specified by
battery manufacturer. This helps purge excessive gas from cells. Do not overfill. For a sealed battery
or a battery without cell caps, carefully follow manufacturers recharging instructions.
e. Study all battery manufacturers' specifications such as removal of cell caps during charging and
recommended rates of charge.
f. Determine voltage of battery by referring to vehicle owner's manual and make sure it matches output
rating of the battery charger.
LOCATE CHARGER
a. Place the charger as far away from battery as the DC cables permit.
b. Never place the charger directly above or below the battery being charged. Gases or fluids from the
battery will corrode and damage the charger.
c. Never allow battery acid to drip on the charger when reading gravity or filling battery.
d. Do not operate charger in a closed-in area with poor ventilation.
e. Do not set a battery on top of charger.
CONNECTION PRECAUTIONS
Connect and disconnect DC output clips only after removing AC cord from the electric outlet. Never allow
clips to touch each other.
1) Follow these steps when battery is installed in vehicle as a spark near battery may cause a battery
explosion.
a. Properly place AC and DC cords to reduce risk of damage by hood, door or any moving engine
parts.
b. Stay clear of fan blades, belts, pulleys, and other parts that can cause injury to persons.
c. Check polarity of battery posts. A positive (+) battery post may have a larger diameter than a
negative (-) post.
d. Determine which battery post is grounded to the chassis. If negative post is grounded to the chassis
(as in most vehicles), see item (e) if positive post is grounded to the chassis, see item (f).
e. For a negative-grounded vehicle, connect the positive (red) clip from the battery charger to the
positive (+) post of battery first. Connect the negative (black) clip from the battery charger to the
vehicle chassis of the engine block remote from the battery and fuel line. Do not connect the clip to
carburetor, fuel lines, or sheet-metal body, instead connect to a heavy gauge metal part of the frame
or engine block.

f. For a positive-grounded vehicle, connect the negative (black) clip from the battery charger to
negative battery post first, then connect the positive (red) clip from the battery charger to the vehicle
chassis or engine block remote from the battery and fuel line.
g. If using permanently mounted eyelet lead SAE connector, simply connect to charger output lead.
h. Connect charger AC supply cord to an electric outlet.
I. When disconnecting the charger, disconnect AC cord, remove clip from vehicle chassis, and then
remove clip from battery terminal.
j. See operating instructions for length of charge information.
2) Follow these steps when battery is outside the vehicle. A spark near the battery may cause an
explosion, reduce risk of a spark near battery.
a. Check polarity of battery posts. A positive (+) battery post may have a larger diameter than a
negative (-) post.
b. Attach at least 1.8m long 1.5mm² insulated battery output cable charger to the negative (-) battery
post.
c. Connect the positive (red) clip from the battery charger to the positive (+) battery post.
d. Position yourself and the free end of cable as far away from battery as possible, then connect
negative (black) clip from the battery charger to free end of cable.
e. Do not face battery when making final connection.
f. Connect charger AC supply cord to an electric outlet.
3) When disconnecting the charger, always do so in reverse sequence of connecting procedure and
break first connection while standing as far away from battery as practical. A marine (boat) battery
must be removed and charged on shore, to charge it on the boat requires equipment specially
designed for marine use.
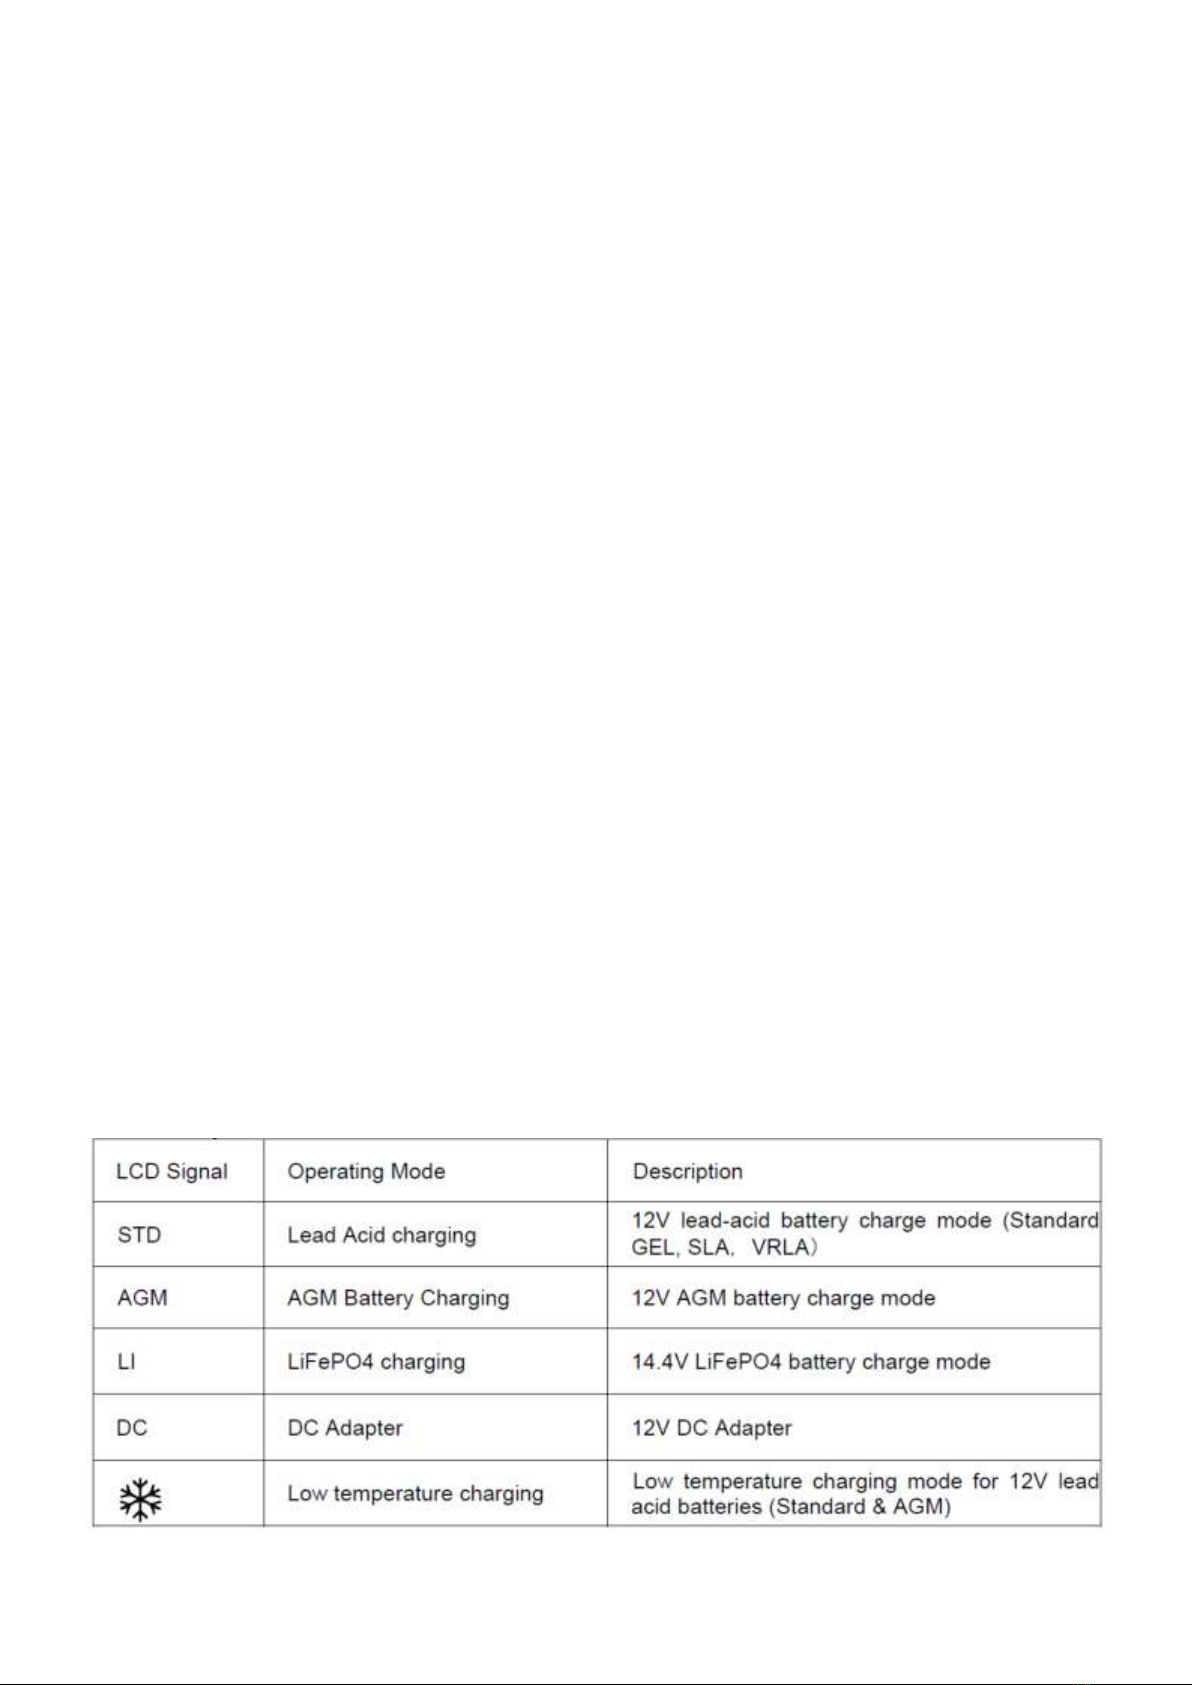
OPERATING INSTRUCTIONS
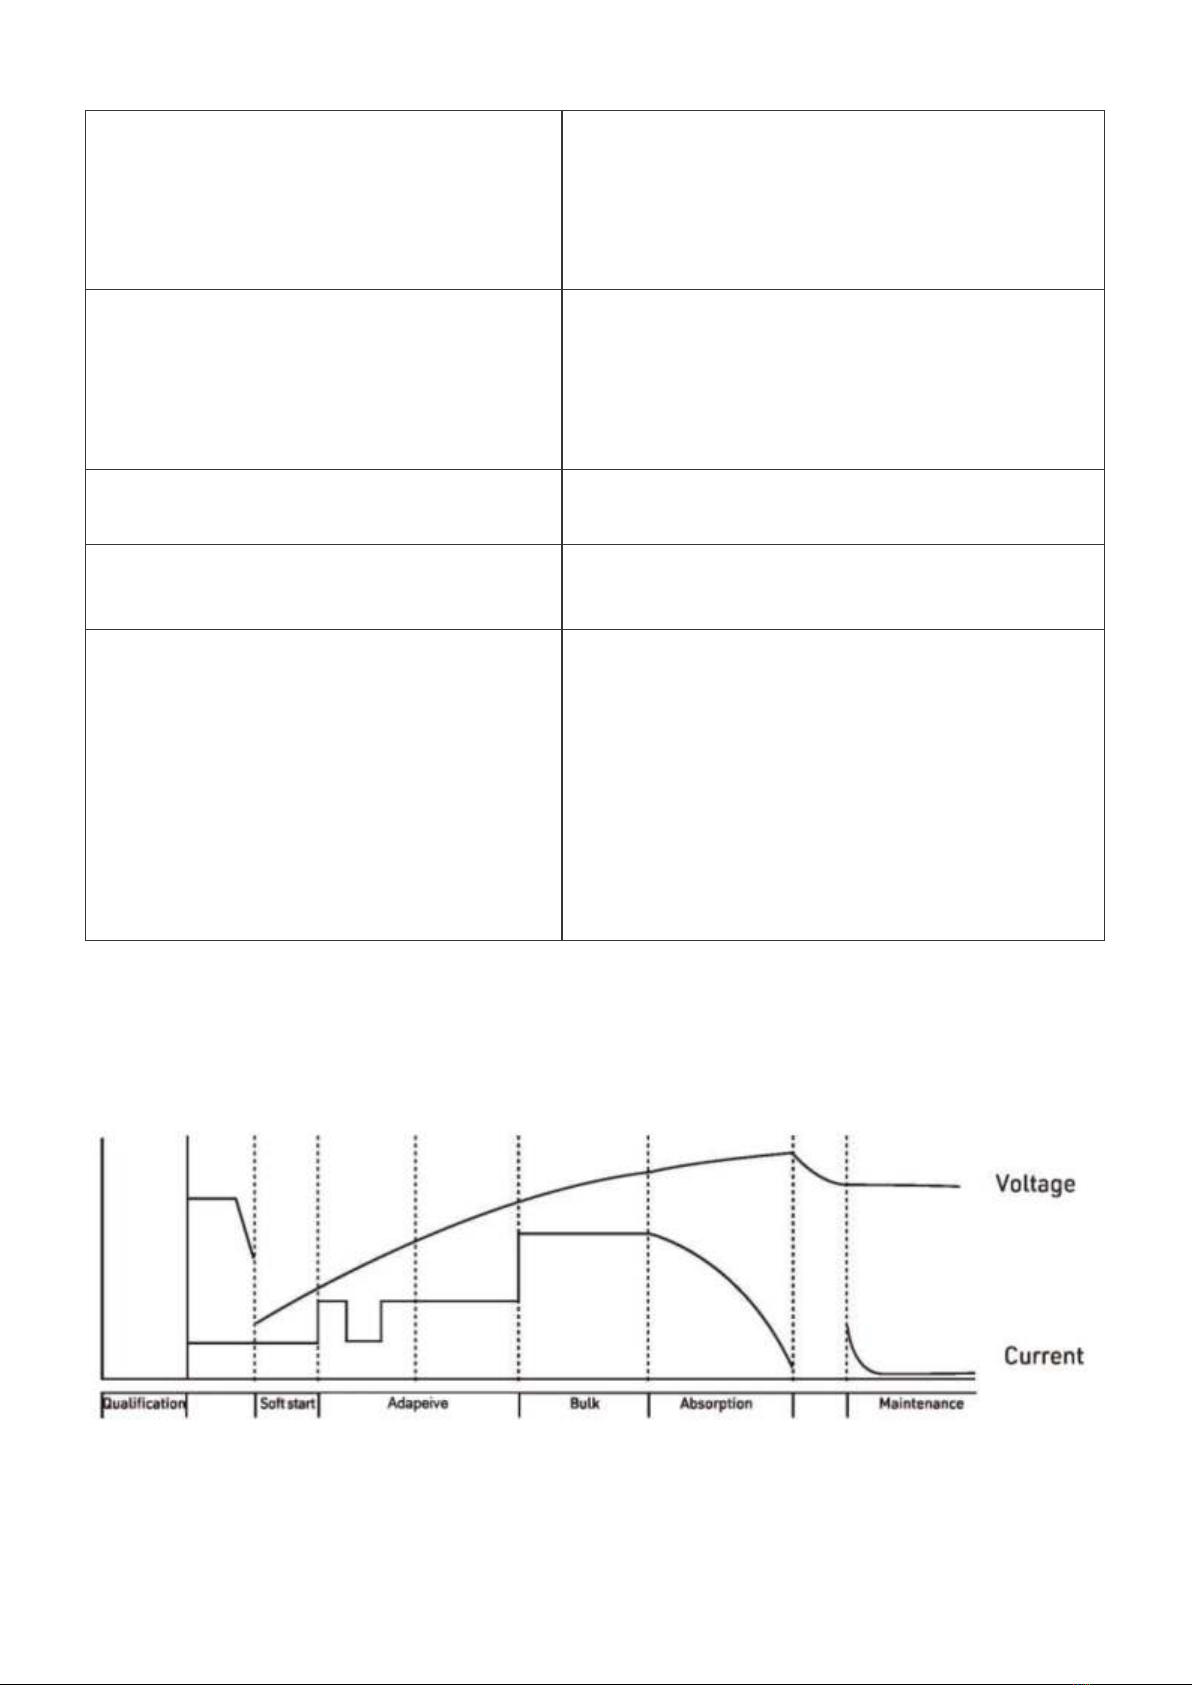
AUTOMATIC MONITORING - Your new battery charger is completely automatic and can be left on
whenever input power is made available to the charger. The charger output depends on the condition of
the battery it is charging. When the battery is fully charged, the "Good" will indicate and battery indicator
will show "100%", then the charger will switch itself to a storage charge mode and will automatically
monitor and maintain the battery at full charge.
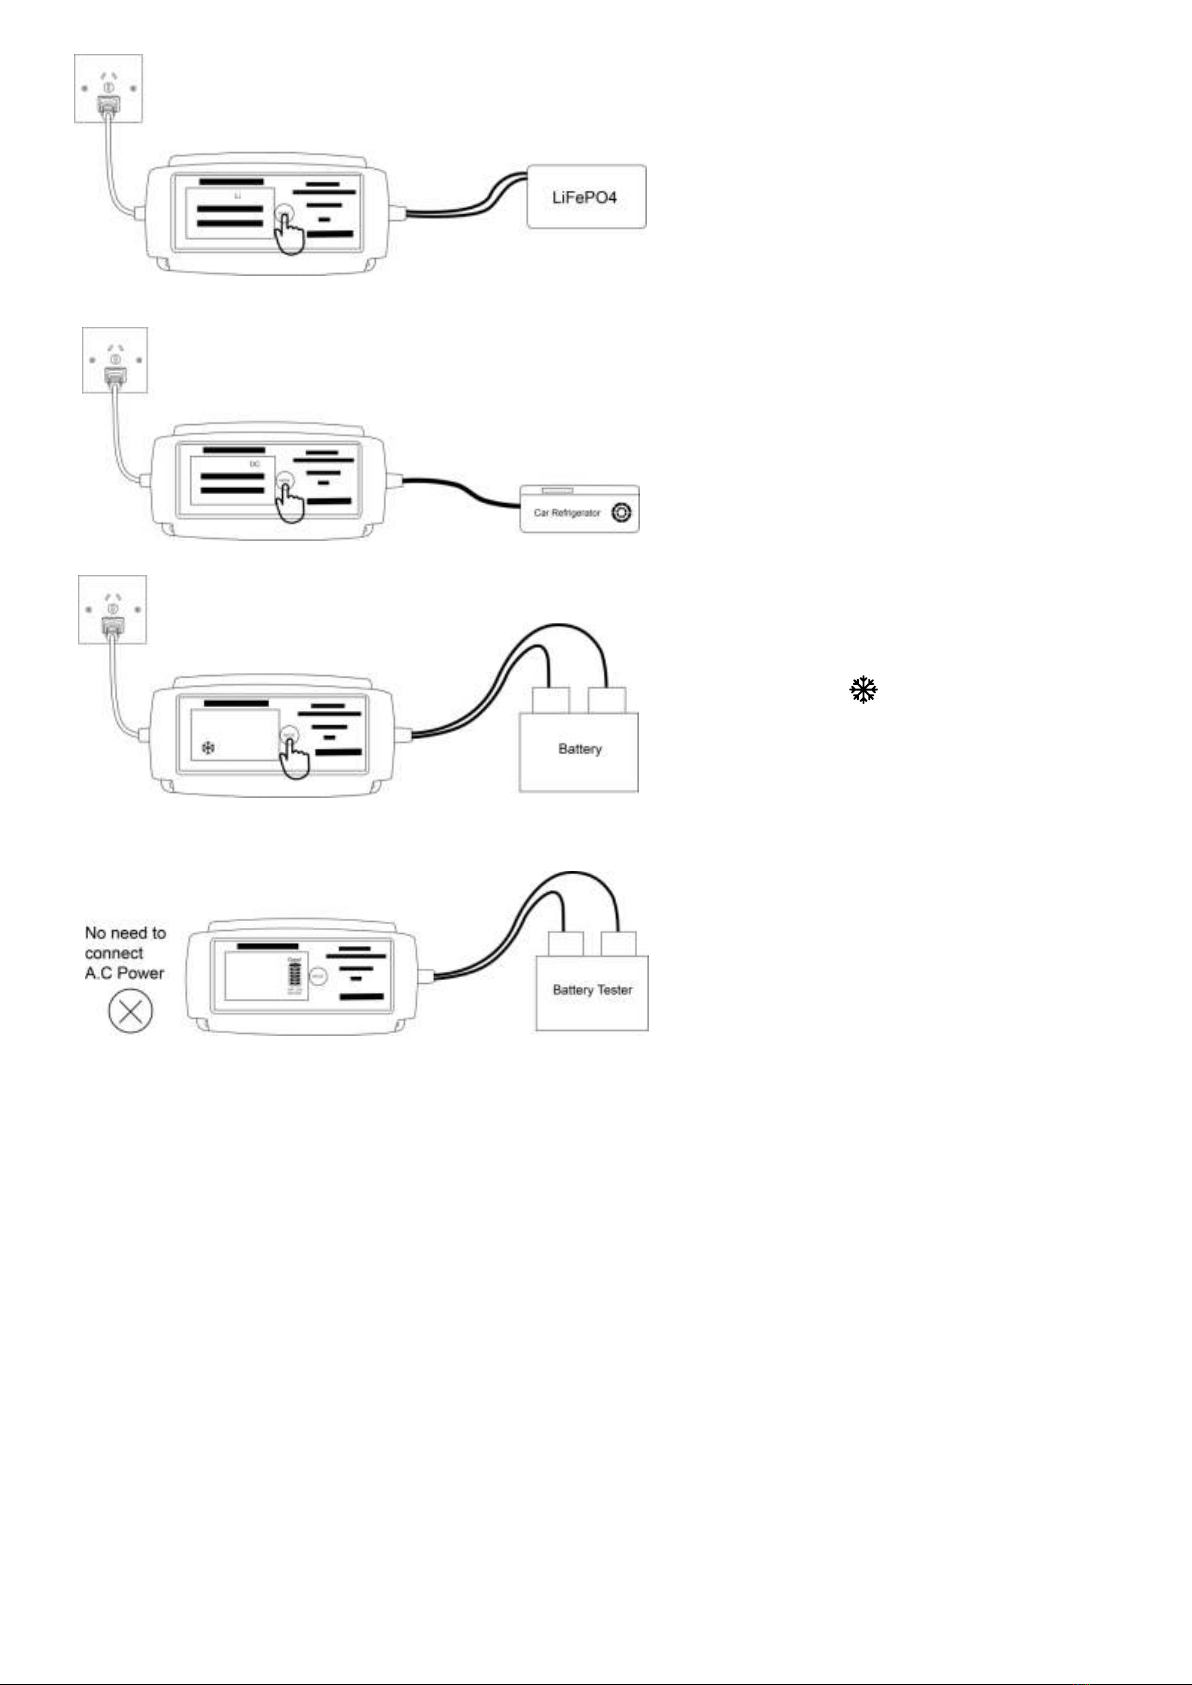
CABLE CONNECTIONS - Your new battery charger is equipped with two output leads, a red positive
lead, and a black negative clip lead and a permanent mount eyelet lead with a 2 pin SAE connector.
Always connect or disconnect the output leads before plugging into AC power.
For all battery types: Connect the red positive (+) lead to the positive terminal of the battery. Connect the
black negative (-) lead to the negative terminal of the battery.
NOTE: If the charger is left connected to a lead acid battery for long periods of time, check water levels
periodically as directed by the battery manufacturer to ensure electrolyte is maintained at proper level
ATTENTION: THE BATTERY CHARGER HAS A SPARK FREE AND REVERSE POLARITY
PROTECTION. AS A GOOD PRACTICE, NEVER ALLOW THE TWO CLIPS TOUCH EACH OTHER
The battery charger will not produce voltage (turn on) until it recognizes at least two volts from the
battery. The battery charger clips must be clipped to a battery in the correct polarity to initiate output
voltage and begin charging when in Lead Acid (Pb) charge mode.
When in Lead Acid (Pb) charge mode if the charger is hooked up in reverse polarity, the red "Reverse
Polarity" light will flash, indicating that the connection has been made in reverse of the polarity of the
battery and a charge has not been initiated. The clips must be re-connected in the proper polarity to start
the charger, Red to positive (+ to +) and Black to Negative (-to-)
NOTE: DO NOT TURN YOUR BATTERY CHARGER ON AND OFF REPEATEDLY (Plug and Unplug)
WITHIN A SHORT PERIOD. IF THIS HAPPENS, UNPLUG BATTERY CHARGER FROM AC POWER,
WAIT FOR ONE MINUTE AND THEN CONNECT THE CHARGER AGAIN TO RESTART CHARGING
CYCLE

ESTIMATED TIME TO CHARGE
(BATTERY CAPACITY) + (CHARGER CURRENT) = HOURS or
(AMP HOURS) + (AMPS) = EST. HOURS TO CHARGE
Suppose you have a 100AH (Amp-Hour) battery. Now Let's say you have a 10 Amps charger that will
deliver 10 Amps for as long as it takes to get the battery voltage up to its recharged level. So how long
will it take to actually charge the battery? You can make a calculated guess by just dividing two numbers.
Example: (100AMP HOURS) DIVIDED BY (10AMPS) = 10 HOURS
Some large capacity batteries may take up to 24 hours or even days to fully charged.
Note: it is recommended that only one battery be charged at a time.
FULLY DISCHARGED BATTERIES - LEAD ACID (Pb) CHARGING MODE: If your battery is totally
discharged (below 2.0 volts) the BATTERY CHARGER circuitry will not start due to its internal safety
circuit. The internal safety circuit of the battery charger must sense more than 2.0 volts in the battery
before it will allow the charging circuit to turn on. Otherwise, the charger is inoperable. In this case, the
bad battery indicator light will flash, which means charging has not been initiated to initiate charge on a
battery that is below 2.0 volts, you must fool the battery charger circuitry by momentarily jumping the
discharged battery to a known charged battery (above 2.0 volts) this will trick the charger into initializing
the charging sequence.
Note: Unless the battery was rapidly discharged (lights left on overnight) most 12 volt lead acid
batteries that are at a state of charge that is less than 9 volts are likely to be worn out or
defective.
HOUR SAFETY FEATURE: A 72 hour Safety Timer will commence anytime the charger is on. This
feature is designed to protect marginal batteries from over charging. If the battery voltage reaches the
proper level within 72 hours, the charger will automatically switch to float mode. If your battery is
marginal or defective, the Battery Charger will stop all the happens, the bad battery indicator will be
indicated. If this is the case, please contact your local battery deal and have the battery tested.
SELECTION FOR OPERATING MODE
AC power is connected with the wall socket properly.
Press MODE key for battery charge mode selection before you connect the charger to the battery
terminals.

LCD SIGNAL INSTRUCTION
HOW TO USE
1. STANDARD MODE:
AC Power is connected with the wall socket
properly, Press "MODE" key, The LCD
signal will show "STD", the charger is
switched to standard battery mode
(GEL,VRLA,SLA), correctly connect the
charger output leads (Red "+" ,Black "-") to
battery positive and negative.
2. AGM MODE:
AC Power is connected with the wall socket
properly, Press "MODE" key, The LCD
signal will show "AGM", the charger is
switched to AGM battery mode (AGM),
correctly connect the charger output leads
(Red "+", Black "-") to battery positive and
negative.

3. LI MODE:
AC Power is connected with the wall
socket properly, Press "MODE" key, The
LCD signal will show "LI", the charger is
switched to LiFePO4 battery mode
(LiFePO4), correctly connect the charger
output leads (Red"+", Black"-") to battery
positive and negative
4. DC ADAPTER MODE:
A.C Power is connected with the wall
socket properly, Press "MODE" key and
hold for 3-5 seconds, The LCD signal will
show "DC", the charger is switched to DC
Adapter with 12V 6Amp (MAX output 72
Watt)
5. LOW TEMPERATURE CHARGING
MODE:
When the ambient temperature is below -
10 degrees, Press "MODE" Key, The LCD
signal will show this mode can be set " "
for battery charging to facilitate the rapid
recovery of the battery capacity.
NOTED: ONLY FOR 12V LEAD ACID
BATTERIES (Standard, AGM)
6. BATTERY TESTER MODE:
The charger can be used for testing your
battery healthy. Correctly connect your
battery positive and negative with the
charger leads, no need to connect AC
power.
The LCD display will indicate battery
indicator 20-100%, "BAT LOW" will be
indicated while the battery voltage is LOW,
easily to know your battery status.

LCD Signal INDICATION
1) (Pd) lead acid battery charging mode

2) Lithium Iron Phosphate (LiFePO4) Battery Charging Mode
1) Note
Please be sure not to touch clips together and make sure to connect the red positive (+) lead to
the positive terminal of the battery and the black negative (-) lead to the negative terminal of the
battery.
2) DC Adapter Mode
AC power is connected with the wall socket properly, Press "MODE" Key for 3-5 seconds. The
device will enter DC adapter mode. The LCD signal will show "DC". It can supply 120-Watt
output (12V-DC & 10-Amp)
3) Battery tester Mode
The charger can be used for testing your battery health. Correctly connect your battery positive
and negative with the charger leads, no need to connect AC power.
The LCD display will indicate battery indicator 20-100%,"BAT LOW" will be indicated while the
battery voltage is LOW. Easy to know your battery status.
!

NO LCD signal A. Disconnect the charger from the AC outlet
Check connections to battery and ensure they
are good
B. Check to ensure that there is power at the
AC outlet by plugging in a table lamp or power meter
LCD Signal is ON, No charging current A. Battery is not connected
B. The battery may be damaged or below 2 volts,
charge process will not begin. In this case the
"Bad Battery" light will be on
BAT LOW signal is ON Battery voltage is under 9V
BAD BAT signal is ON The battery is worn out or is possibly defective
Suggest replacing with a new battery
The charger is charging but the 20-100%
signal does not come on
A. The battery is worn out or is possibly defective
Suggest testing and/or replacing with a new battery
B. The battery may have an excessive current draw
caused by a potential short circuit. Disconnect
battery from charger. Suggest testing and/or
replacing battery
C. The charged battery is larger than the charger
marked capacity (shown in manual) Please
recharge with larger current charger
Pb Charging mode Lead-Acid Battery Charging Model
6 Stage Charge, Conditioning and Maintenance Process Map
TROUBLE MESSAGE LIGHTS CHECKLIST

1. Qualification Phase
Initially ensures the battery is in good condition prior to launch of normal charge processes, as a
safety measure charge processes will not begin if battery is below 2 volts
2. Soft Start Phase
Soft Start is applied when the charger has detected a battery at a very low initial state of charge.
Voltage and current are delivered at a specified rate to help the battery to recover prior to
entering pulse charge mode
3. Bulk Charge Phase
With the battery now having gone through Qualification and Recovery phases as needed the
Bulk Charge phase gives the battery constant current, taking the battery up to 80% of its full
capacity
4. Adaptive Phase
The charger can make a calculated guess for the battery capacity.Automatically adjust the
charging current.to avoid overcharge battery while using this charger for a small capacity battery
5. Absorption Phase
In the Absorption phase the battery is given constant voltage while current is reduced based on
actions taken from ongoing battery monitoring until the battery is 100%o charged
6. Maintenance Phase
The battery can be left safely connected to the charger indefinitely. The charger will constantly
monitor the battery and " turn-on" again as needed to maintain the battery at a full state of
readiness
LiFePO4 Charging Mode( Lithium Battery Charge Mode)
4 Stage Charge, Conditioning Process Map

PCM Activation: Once the charger has been properly connected to the battery it will deliver a
constant pulse frequency to activate the PCM before it enters into the charge program
1. Soft Start Phase
Soft start is applied when the charger has detected a battery at a very low initial state of charge.
Voltage and current are delivered at a specified rate to help the battery to recover prior to bulk
charge
2. Bulk Charge Phase
With the battery now having been activated and gone through the Soft Start phase as needed
the bulk charge phase gives the battery constant current, taking the battery up to 80% of its full
3. Absorption Phase
In the absorption phase the battery is given constant voltage while current is reduced based on
actions taken from ongoing battery monitoring until the battery is 100% charged
4. Full Charge
Charging is complete and the battery can be returned to service or left safely on the charger
indefinitely

Technical Specifications:
Model: CS1210L
Input 230Vac@50Hz
Input Cable 14AWG U.S.SPT-2/ EU-H03W AUST/NZ-H03WV
Output 13.8V 10A for Lead-Acid batteries
14.4V 9A for LiFePO4 batteries
12V 10A for DC adapter
Max Voltage 14. 5V Lead-Acid (Pb) Battery charging
14.9V AGM Battery charging
14.4V LiFePO4 Battery charging
Output Cable #14AWG insulated cable
Min. starting voltage 2.0V (the charger can`t charge battery under 2.0V)
Overcharge Protection Yes
Reverse Polarity Protection Yes
Short Circuit Protection Yes
Spark Proof Yes
Cooling Natural
Operating temperature -10~50 °C
Fuse Protected Cables 10A
Waterproof IP64
Battery Capacity Charging and maintenance all 30-300Ah Lead-Acid
Charging 9-108Ah LiFePO4 batteries
Ring terminal cable length 599 mm
Cigarette cable length 599mm
Dimensions (mm) 205(l) x 99(w) x 57(d)
Charger selection and use
Charge and maintenance capacity ranges are suggested only as a guide for battery charger
selection and application based on varied customer charging and maintenance requirements,
please be sure to follow safety and use information in user guide for correct product application
and use.
Table of contents
Other CS Batteries Charger manuals
Popular Batteries Charger manuals by other brands

Evolution
Evolution R18RCH-Li2 Original instructions

Bauer
Bauer 2105C-B Owner's manual & safety instructions

Chicago Electric
Chicago Electric 95000 Assembly and operation instructions

Zivan
Zivan NG5 Installation and user manual

Matco Tools
Matco Tools MTCCHARGER6 Operating instructions and warnings

Würth
Würth BLG 12/24V-15A Translation of the original operating instructions