Cuisinart TCS-60 Service manual

TCS-60
Turbo Convection Steamer
INSTRUCTION AND
RECIPE BOOKLET
For your safety and continued enjoyment of this product, always read the instruction book carefully before using.
01CU13171 TCS-60 IB 6/30/03 4:55 PM Page 1

Carefully read all instructions before using this appliance.
IMPORTANT SAFEGUARDS
When using an electrical appliance, basic safety precautions should
always be followed, including the following:
1. READ ALL INSTRUCTIONS BEFORE USING.
2. To protect against the risk of electrical shock, do not put base of
steamer in water or other liquid.
3. Close supervision is necessary when any appliance is used by or
near children. Cuisinart does not recommend the use of this
appliance by children.
4. Always unplug from outlet when not in use, before putting on or taking
off parts, and before cleaning or removing contents from steamer.
5. Do not operate any appliance with a damaged cord or plug, or after
the appliance malfunctions, or is dropped or damaged in any manner.
Return appliance to nearest Cuisinart service facility for examination,
repair, and/or mechanical or electrical adjustment.
6. The use of attachments, other than those recommended by Cuisinart,
may cause fire, electrical shock, or risk of injury to persons.
7. Do not use outdoors.
8. Do not let cord hang over edge of counter or table or touch hot
surfaces, which could damage the cord.
9. Regarding your cord set: A longer cord has been provided so that you
will have flexibility in positioning your steamer near an electrical outlet.
Exercise care when using the longer cord to avoid entangling or trip-
ping over the cord. The longer cord should be arranged so that it will
not drape over the counter or tabletop, where it can be pulled on by
children or tripped over.
10. Be certain the steamer cover is securely in place before operating
appliance. Never operate without the cover securely in place.
11. This appliance is intended for household use only.
12. Wash all parts before first use.
13. WARNING: TO REDUCE THE RISK OF ELECTRICAL SHOCK OR
FIRE, DO NOT REMOVE THE BASE PANEL. NO USER SERVICE-
ABLE PARTS ARE INSIDE. REPAIR SHOULD BE DONE ONLY BY
AUTHORIZED PERSONNEL.
14. Do not touch hot surfaces. Use handles or knobs.
15. Extreme caution must be used when moving an appliance
containing hot oil or other hot liquids.
16. To disconnect, turn the control knob to “off”, then remove plug from
wall outlet.
17. Do not use appliance for other than intended use.
SAVE THESE INSTRUCTIONS
FOR HOUSEHOLD USE ONLY
SPECIAL CORDSET INSTRUCTIONS:
Ashort power-supply cord (or detachable power-supply cord) is to be
provided to reduce the risk resulting from becoming entangled in or
tripping over a longer cord. Longer detachable power-supply cords or
extension cords are available and may be used if care is exercised in
their use. If a longer detachable power-supply cord or extension cord
is used:
1. The marked electrical rating of the cord set or extension cord should
be at least as great as the electrical rating of the appliance.
2. The cord should be arranged so that it will not drape over the counter-
top or tabletop where it can be pulled on by children or tripped over
unintentionally.
NOTICE: This appliance has a polarized plug (one prong is wider than
the other).
To reduce the risk of electric shock, this plug will fit into a polarized outlet
only one way. If the plug does not fit fully into the outlet, reverse the plug.
If it still does not fit, contact a qualified electrician. Do not modify the plug
in any way.
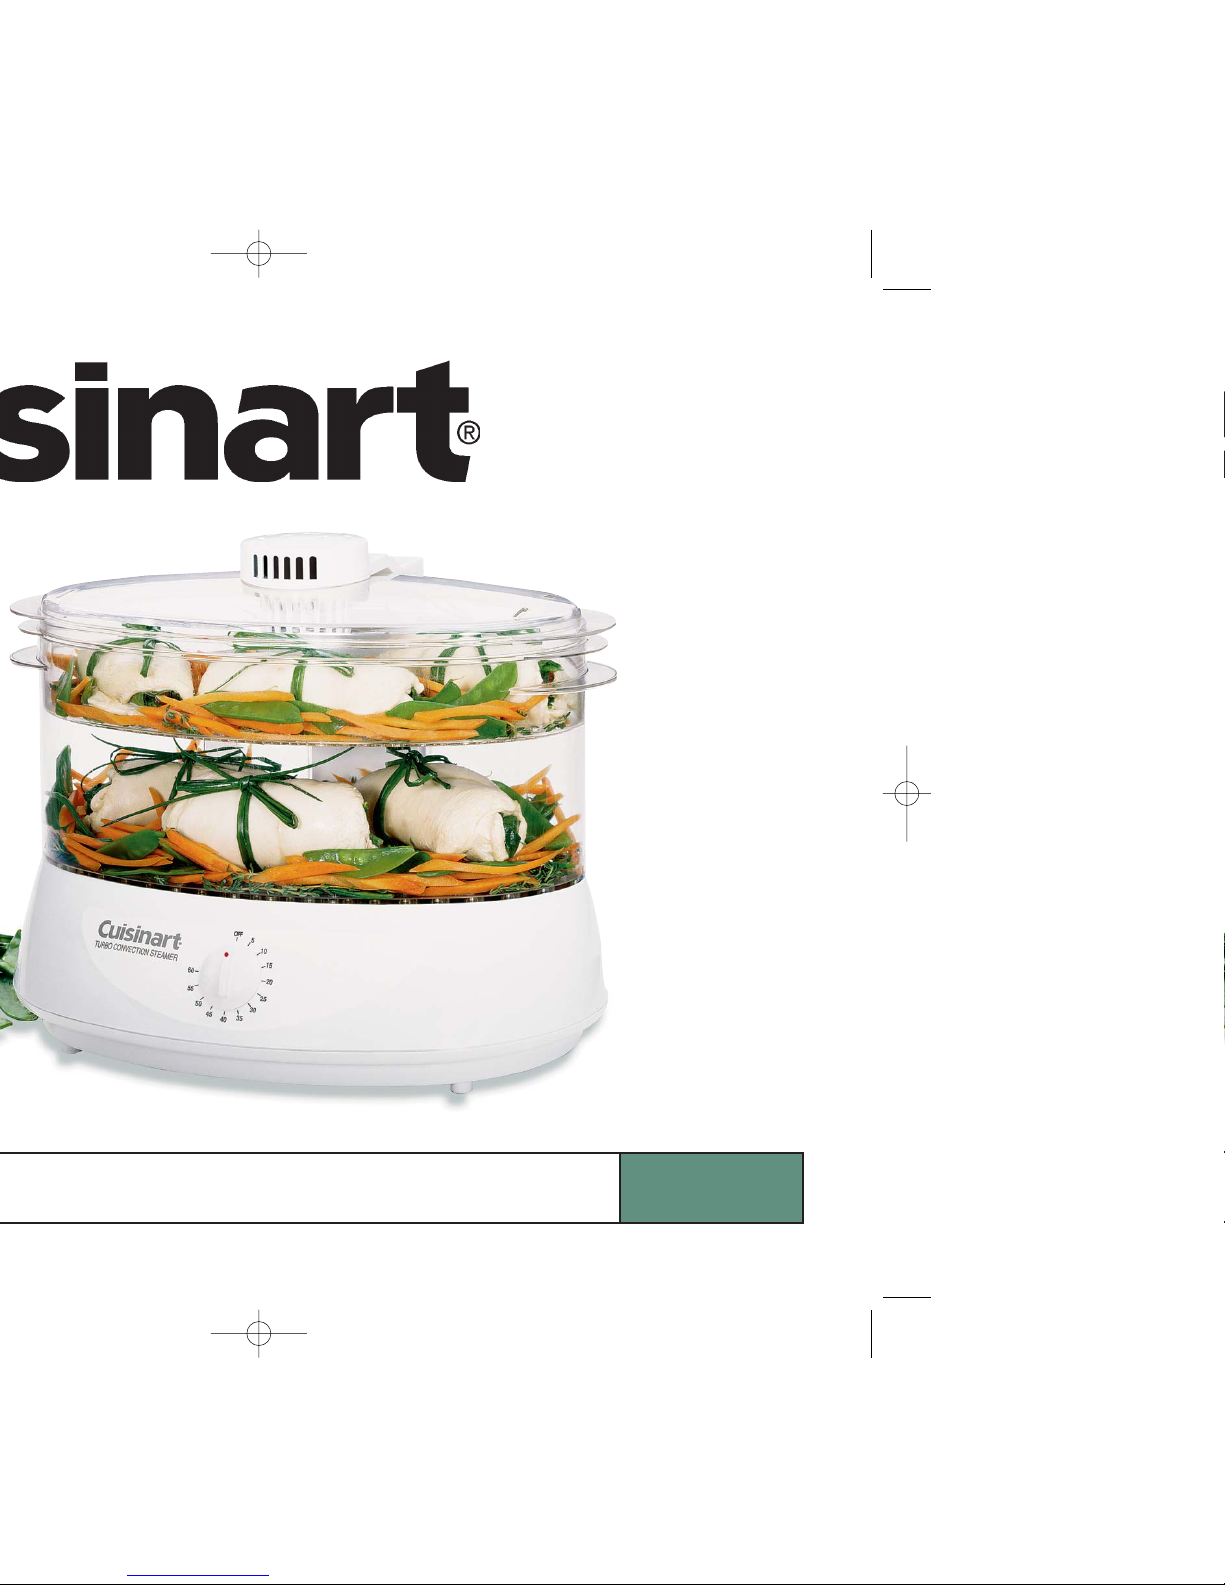
UNPACKING INSTRUCTIONS
1. Place the gift box containing your Cuisinart steamer on a flat, sturdy
surface before unpacking.
2. Remove instruction booklet and other printed materials from top of
polyfoam insert. Next, remove the top polyfoam insert.
3. Carefully lift steamer trays from box and set aside. Then remove
steamer base.
4. Remove the lower polyfoam insert containing the steamer base.
5. Remove any additional literature from the box. Before using for the first
time, wash all parts according to the "Cleaning and Storage" section on
page 5 of this booklet to remove any dust or residue.
2
01CU13171 TCS-60 IB 6/30/03 4:55 PM Page 2

TABLE OF CONTENTS
Important Safeguards . . . . . . . . . . . . . . . . . . . . . . . . . . . . . . . . . .Page 2
Unpacking Instructions . . . . . . . . . . . . . . . . . . . . . . . . . . . . . . . . .Page 2
Features and Benefits . . . . . . . . . . . . . . . . . . . . . . . . . . . . . . . . .Page 3
Introduction . . . . . . . . . . . . . . . . . . . . . . . . . . . . . . . . . . . . . . . . .Page 3
Parts . . . . . . . . . . . . . . . . . . . . . . . . . . . . . . . . . . . . . . . . . . . . . .Page 3
Operating Techniques . . . . . . . . . . . . . . . . . . . . . . . . . . . . . . . . . .Page 4
Useful Hints . . . . . . . . . . . . . . . . . . . . . . . . . . . . . . . . . . . . . . . . .Page 5
Cleaning and Storage . . . . . . . . . . . . . . . . . . . . . . . . . . . . . . . . . .Page 5
Descaling Water Reservoir . . . . . . . . . . . . . . . . . . . . . . . . . . . . . .Page 5
Steaming Guide . . . . . . . . . . . . . . . . . . . . . . . . . . . . . . . . . . . . . .Page 6
Recipes . . . . . . . . . . . . . . . . . . . . . . . . . . . . . . . . . . . . . . . . . . .Page 11
Warranty . . . . . . . . . . . . . . . . . . . . . . . . . . . . . . . . . . . . . . . . . .Page 23
FEATURES AND BENEFITS
1. Convection Fan
Circulates air for even steam distribution. Cooks food faster and seals in
flavors. Patent Pending
2. Large Capacity
Generously sized 6-quart capacity allows you to steam complete meals at
one time.
3. Two Trays
Allow you to separate foods, if desired, while steaming.
4. Rice Bowl
5-cup rice bowl for perfect rice every time.
5. Removable Water Reservoir
Detaches easily to fill at the sink. Patent Pending
6. 60 Minute Timer
Easy-to-set audible tone signals that steaming is complete.
7. Dial Control
Easy to set.
INTRODUCTION
The Cuisinart®Turbo Convection Steamer steams food faster than
conventional steamers. The convection fan circulates air for faster and
more even steam distribution. Foods cook faster, so flavors are sealed in,
which allows the natural flavors to flourish. Steaming food is a healthy way
to prepare your favorite meals. Fats, oils, and butter are not necessary for
steaming, though small amounts of extra virgin olive oil or flavored oils
may be used for added flavor.
PARTS
1. Turbo Convection Fan
2. Lid
3. Second Steaming Tray
4. Rice Bowl
5. Large Steaming Tray
6. Removable Water Reservoir
7. Steamer Base with
Water Reservoir Holder
8. Control Panel
4
6
7
2
3
5
1
8
3
01CU13171 TCS-60 IB 6/30/03 4:55 PM Page 3

4
OPERATING TECHNIQUES
Refer to Steaming Guide or Recipes for recommended
cooking times.
Preparing to Cook:
Position the base unit where you want to do your cooking. Choose a flat,
dry, sturdy surface. Make sure that each individual component fits secure-
ly on top of the part below. Position the large steaming tray on the base
until it fits securely in place. If you are using the second steaming tray,
place the smaller tray inside the larger one. The smaller tray will nest on
top of the larger one, and the handles will be aligned. The steamer should
not be positioned under wall cabinets when operating. Steam may
damage cabinets.
Note: The larger tray must always be put on the base first, and the
smaller tray must always sit inside the larger one. It is not possible to
use the small tray alone. Never attempt to put the small tray directly onto
the base.
Fill water reservoir to desired level with cold tap water. Replace lid. Place
the water reservoir on the reservoir holder in the rear of the steamer unit.
Place lid on top of steaming tray. Insert turbo convection fan onto top of
lid. Make sure the prongs are properly fitted into the slots. Push down
with light pressure to engage. If the prongs are not inserted correctly,
the unit will not operate. Plug the cord into the power outlet.
Using the Rice Bowl:
The large steaming tray must be placed on the base first; then the rice
bowl is placed inside the steamer tray for use. Liquid such as water or
stock is added to rice in the rice bowl. Measure the required quantity of
rice and liquid in the rice bowl according to the Steaming Guide. Cover
with lid. Plug into wall outlet. Do not operate the appliance without the
large steaming tray and lid in place.
WARNING: During use, never touch the base, steamer bowls, or
lid, since they get very hot. When steaming is complete, the timer
will give an audible tone and automatically shut off the steaming
function.
When you have finished steaming, unplug from wall socket and allow
to cool completely. Clean before storing.
Setting the Time:
• Turn the control knob to select the desired steaming time. The steamer
will begin.
Stopping the Steamer:
• The steamer will automatically shut off after the programmed time
has elapsed.
• An audible tone will signal that steaming is complete.
• If you want to stop the steamer before time has elapsed completely,
simply turn the control knob to “off”.
After Cooking:
• Unplug the plug from the power outlet.
• After turning off steamer, wait 1 minute before removing lid to avoid
steam burns.
• When removing the lid or other components from your steamer, make
sure to use oven mitts. First remove the turbo convection fan. Then
remove lid carefully, lifting the side farthest away from you first, to allow
the steam to escape away from you.
• Lift off the top steaming tray first (if you have used both trays).
• Next remove the bottom (larger) steaming tray.
• Set the trays down on a flat, heat and water resistant surface, and
remove contents.
• During the cooking cycle, water from condensation will accumulate in
the steamer base. Allow to cool completely before emptying and
following cleaning instructions on page 5 (remove water reservoir before
emptying steamer base).
01CU13171 TCS-60 IB 6/30/03 4:55 PM Page 4

5
USEFUL HINTS
For high altitude cooking, steaming times may need to be increased.
Steaming times stated in the Steaming Guide and Recipes are only to
be used as a guide. Times may vary depending on the size of pieces,
spacing and placement in the bowl, and personal preference. As you
become more familiar with the steamer, adjust cooking times accordingly.
Asingle layer of food steams faster than several layers. For larger
quantities of food, the cooking time must be increased.
• For best results, foods should be similar in size.
• Meat, poultry and seafood must be thawed completely before steaming.
• Always use cold water in the water reservoir.
• Never add seasonings, broth or herbs to the water reservoir.
• Water only must be used in the water reservoir.
• Meat, poultry and seafood should not be touching the sides of the
steamer trays – air must be able to circulate completely for proper
cooking.
• When using the rice bowl, wipe off the bottom after removing from
steamer to avoid dripping hot accumulated water on counter or floor.
• When using recipes, follow quantities as closely as possible for best
results.
• Some recipes may be modified to include the use of plastic wrap, which
helps seal in herbs and other flavors and makes cleanup even easier.
Cuisinart recommends using Saran™Classic wrap. See the recipe section
for examples.
For optimal results, do not overfill steaming trays with food.
CLEANING AND STORAGE
Always unplug the steamer from electrical outlet and allow to cool
completely before cleaning. Before first use and after each use, clean
each part thoroughly. Wash all parts (except steamer base and turbo
convection fan) in warm soapy water; rinse and dry thoroughly.
Do not use chlorine bleach or abrasive cleaners on any part of the
steamer.
For convenience, the following parts are top rack dishwasher safe:
• Large Steaming Tray
• Second Steaming Tray
• Rice Bowl
• Lid
Never put turbo convection fan or steamer base in dishwasher or immerse
in water. These parts may be wiped with a damp cloth to remove residue.
To clean top of steamer base, sprinkle clean, damp sponge with a tea-
spoon of baking soda, and wipe base. Wipe off with clean, damp sponge.
Store your steamer in a dry place, out of the reach of children.
DESCALING THE STEAMER
After several months of use, chemical deposits may build up on the heating
element of your steamer. This process is normal. You should descale
regularly to maintain maximum steam production and extend the life of
your steamer.
To descale the steamer, fill the water reservoir to the maximum level with
equal parts of water and white vinegar (not cider or wine vinegar). Plug into
a socket. Bowl, lid and water reservoir should be in place. Set timer for
25 minutes and begin steaming.
When the timer sounds, unplug and allow to cool completely before
pouring out vinegar.
Rinse the water reservoir several times with fresh, cold water.
We also recommend using the same method to clean the steamer after
steaming seafood.
01CU13171 TCS-60 IB 6/30/03 4:55 PM Page 5

6
Steaming Guide
Helpful Hints
• Times indicated are based upon use of fresh fruits, meats and seafood (frozen foods not recommended). Steaming times will vary according to size,
temperature and freshness of foods.
• Suggested times are simply a guide. The lowest time will provide a “crisp-tender” vegetable, whereas the highest time will produce a softer texture.
• The turbo-convection feature of the Cuisinart®TCS-60 eliminates the need to stir vegetables halfway through cooking time, which is necessary with
other steamers.
• Use tongs to remove food from the steamer.
• Beans cooked in the Cuisinart steamer cook evenly and do not break up as readily as those cooked on the stovetop.
Food Quantity/Yield Steaming Time Cook’s Notes
Eggs
Soft cooked
eggs
Hard cooked
eggs
Black Beans
Black-eyed
Peas
Chickpeas
(Garbanzo)
Lentils
Great Northern
Beans
Kidney Beans
Up to 12 Grade A large eggs
1 cup of dried beans + 2 to 2 1/2
cups liquid = approximately 3 cups
cooked beans.
• Use second steamer tray.
• Run hard cooked eggs under cold
water to stop cooking. Refrigerate
and cool completely before using.
• Soak dried legumes (except lentils)
overnight, drain, rinse & drain again.
• Spread drained beans evenly in rice
bowl.
• Cover with water or unsalted stock;
add fresh herbs, garlic cloves, onion
or bay leaf.
• Do not add salt until beans are com-
pletely cooked (salt and acids inhibit
the softening of beans).
• After steaming, drain, rinse and drain
again.
Dried Beans and Legumes
6 - 9 minutes
15 minutes
40 - 45 minutes
35 - 40 minutes
60 minutes
35 minutes
45 - 50 minutes
45 - 50 minutes
01CU13171 TCS-60 IB 6/30/03 4:55 PM Page 6

7
Food Quantity/Yield Steaming Time Cook’s Notes
Barley
Brown Rice
White Rice
Quinoa
Wild Rice
Artichokes
(globe)
Asparagus
1 cup (rinse until water runs clear) + 2
cups liquid = 4 cups cooked
1 cup rice + 1 2/3 cups liquid = 3 cups
cooked rice;
1-1/2 cups rice + 2-1/4 cups liquid = 6
cups cooked rice;
2 cups rice + 3-1/4 cups liquid = 8
cups cooked rice
1 cup rice + 1-1/3 cups liquid = 3 cups
cooked rice;
1-1/2 cups rice + 2-1/3 cups liquid = 6
cups cooked rice;
2 cups white rice + 3-1/4 cups liquid =
8 cups cooked rice
1 cup quinoa + 2 cups liquid =
3 cups quinoa
1 cup wild rice + 2 cups liquid =
3 cups cooked rice
(must be drained)
6 medium (6 - 9 oz.)
4 large (10 - 12 oz.)
1 pound, whole spears, 1/2" diameter
2 pounds, whole spears, 1/2" diameter
(use both trays for larger amounts)
35 minutes
45 - 50 minutes +
10 minutes resting time
20 - 25 minutes +
10 minutes resting time
(larger amounts take more time)
30 - 35 minutes
45 - 55 minutes
28 - 35 minutes
35 - 40 minutes
6 - 8 minutes
8 - 10 minutes
• Use rice bowl for rices and grains.
• Liquid can be water or stock accord-
ing to personal preference.
• Cooking times and liquid amounts
may vary with brand and variety
of rice.
• Stir after adding liquid to distribute
evenly in the bowl.
• Use low-sodium/low-fat stocks for
extra flavor.
• Dried or fresh herbs, chopped onion
or garlic may be added.
• Fluff rice with a fork when removing
from rice bowl.
• Trim artichokes.
• Serve cooked artichokes warm or
chilled.
• Choose firm, unrippled stalks with
tight tips; best cooked the day they
are purchased.
• Break off bottoms at the natural
break, then trim closely with a knife.
Vegetables
Rice and Grains
01CU13171 TCS-60 IB 6/30/03 4:55 PM Page 7

8
Food Quantity/Yield Steaming Time Cook’s Notes
Broccoli
Brussels
Sprouts
Carrots
Cauliflower
Corn
on the Cob
Green Beans,
French cut
(string beans/
wax beans)
8 - 10 minutes (crispy)
10 - 16 minutes
10 -15 minutes
16 - 20 minutes
10 - 12 minutes
14 - 16 minutes
7 - 10 minutes
10 - 13 minutes
15 - 18 minutes
18 - 22 minutes
9 - 12 minutes
11 - 15 minutes
10 - 12 minutes
12 - 15 minutes
14 - 16 minutes
• Choose bunches with deep strong
color (emerald green to green with
purple) and tight florets.
• If steaming for salads, steam until
broccoli just turns bright green;
refresh immediately in iced water and
drain before using.
• Smaller sprouts are more tender;
look for small, bright green compact
heads.
• Slice off bottom, peel off outer leaves,
then cut an “x” in the bottom of each
sprout.
• Peel and slice or julienne carrots.
• For ease, use Cuisinart®Food
Processor 4 mm slicing disc or
3 mm julienne disc.
• Choose cauliflower with compact
florets, and no discoloration of florets
or leaves.
• Broccoflower (a hybrid of cauliflower
and broccoli) will require cooking
times similar to cauliflower.
• 4 ears in each steamer tray
• Select crisp, slender bright green
beans.
• Best when steamed until crisp-tender.
• If beans are to be used for a salad,
steam until just bright green, refresh
immediately with iced water, and
drain completely before dressing.
1 to 1-1/2 pounds florets
1 to 1-1/2 pounds spears
(use both trays for larger amounts)
1-1/4 pounds
Whole baby carrots, 1 or 2 pounds
Cut carrots
1 pound sliced
2 pounds sliced
1 pound julienned
(use both trays for larger amounts)
8 ounces, trimmed and cut into florets
1 to 1-1/2 pounds, trimmed,
cut into florets
Whole head, leaves trimmed
(use both trays for larger amounts)
3 - 4 ears fresh corn
6 - 8 ears fresh corn
1 pound
1-1/2 pounds
2 pounds
(use both trays for larger amounts)
Vegetables
01CU13171 TCS-60 IB 6/30/03 4:55 PM Page 8

9
Food Quantity/Yield Steaming Time Cook’s Notes
Green Beans,
Diagonal cut
(string beans/
wax beans)
Potatoes,
Sweet
Potatoes,
White
Snow Peas
Sugar Snap
Peas (Edible
Pod Peas)
Squash,
Summer
(Yellow or
Zucchini)
Squash, Winter
12 - 15 minutes
14 - 16 minutes
14 - 16 minutes
18 - 22 minutes
18 - 22 minutes
20 - 25 minutes
4 - 5 minutes
5 - 7 minutes
5 - 7 minutes
6 - 9 minutes
6 - 8 minutes
7 - 10 minutes
12 - 15 minutes
10 - 12 minutes
• Select crisp, slender, bright green
beans.
• If beans are to be used for a salad,
steam until bright green; refresh
immediately with iced water, then
drain completely before dressing.
• Steamed sweet potatoes are a
delicious alternative to white potatoes
for side dishes or salads – full of
vitamins A & C.
• Peel potatoes and cut in wedges.
• Waxy potatoes such as new red or
white, Yukon gold (or other yellow
potatoes) and purple potatoes are
most suitable for steaming.
• Scrub well, peel if desired, and cut
into wedges for best results.
• Trim tips and tops.
• Choose crisp, bright green pea pods.
• Choose plump, crisp, bright green
pea pods.
• Trim tips, tops and strings if tough.
• Choose firm, narrow, brightly colored
squash.
• Trim root and blossom ends – cut in
half lengthwise, then into 1/2 - 3/4
inch slices.
• Wash and remove tough stem;
remove seeds.
• If steaming halved acorn squash,
place in large steamer tray, cut side
down; increase steaming time to
25 - 30 minutes.
Diagonal cut, 1 to 1-1/2 inches in length
1 pound
1-1/2 pounds
2 pounds
(use both trays for larger amounts)
1 pound, cut in wedges
2 pounds, cut in wedges
(use both trays for larger amounts)
1 pound (use second steamer tray)
2 pounds (use both steamer trays)
1 pound (use second steamer tray)
2 pounds (use both steamer trays)
1 pound
2 pounds
Acorn, cut in wedges, remove seeds
Butternut, peel, seed and cube
Vegetables
01CU13171 TCS-60 IB 6/30/03 4:55 PM Page 9

10
Food Quantity/Yield Steaming Time Cook’s Notes
Boneless,
Skinless
Chicken Breast
Halves or
Thighs
Shrimp,
Sea Scallops
Clams &
Mussels
Fish
Fillets/Steaks
Hot Dogs/
Precooked
Sausages
18 - 22 minutes
5 - 8 minutes
6 - 8 minutes
10 - 15 minutes
per inch of thickness
8 - 10 minutes
• Follow proper safe food handling pro-
cedures for poultry and seafood.
• Always check poultry for proper
doneness – juices should run clear
when tested with a knife, and internal
temperature should read 170° F for
chicken breast meat, and 180° F for
dark meat. The internal temperature
of a fish fillet/steak should read 140°F.
• Do not steam bone-in chicken.
• Clean shrimp; steam in shells for
optimum flavor.
• For most even steaming, chicken and
seafood should not touch sides of
steamer baskets.
•Pierce before steaming.
•If desired, steam drained sauerkraut
in rice bowl as an accompaniment
and increase steaming time by
5-10 minutes.
5 - 6 ounces each, up to 8
(use both steamer trays)
1 pound
(use in second steamer tray)
Steam until shells are just fully opened.
Steam for 10 - 15 minutes per inch of
thickness.
6 to 12
Chicken and Seafood
01CU13171 TCS-60 IB 6/30/03 4:55 PM Page 10

11
RECIPES
ASIAN STEAMED DUMPLINGS
ADim Sum favorite, our Steamed Dumplings make a wonderful appetizer.
Makes about 40
Preparation time: 35 – 40 minutes
(includes freezing time for meat) + 15 minutes steaming time
3 ounces well-trimmed boneless pork chop, cut in
1/2 inch cubes
3 ounces peeled and deveined shrimp
About 6 – 8 large napa cabbage leaves (whole) to line
the steamer
Dipping Sauce for Steamed Dumplings, p.12
5 ounces napa cabbage leaves, cut to fit the Cuisinart®
food processor’s large feed tube
1 clove garlic, peeled
2 slices peeled fresh ginger, each about the size of
a quarter
2 green onions, trimmed and cut into 1-inch pieces
1-1/2 ounces drained water chestnuts
1 tablespoon toasted pine nuts
1/2 jalapeño pepper, stemmed and seeded
1/4 cup fresh cilantro or Italian parsley leaves, loosely
packed
1-1/2 tablespoons soy sauce (low sodium)
1 tablespoon dry sherry
1-1/2 tablespoons cornstarch
1/2 teaspoon freshly ground black pepper
1 package (about 50) wonton wrappers (3-inch square)
Water to seal the dumplings
napa cabbage leaves and fresh cilantro for garnish
Fill the water reservoir of the steamer. Line a baking sheet with
plastic wrap. Lay the pork cubes and shrimp on the lined pan in
a single layer. Freeze for 20 minutes. Line the steamer trays with
the 6 – 8 napa cabbage leaves in a single layer; set aside. Fill
the water reservoir and attach to the steamer. Prepare Dipping
Sauce in Cuisinart®food processor – do not wash work bowl.
Insert the medium (4 mm) slicing disc in food processor.
Arrange the cut cabbage in the large feed tube; use medium
pressure to slice. Remove and reserve. Insert the metal blade.
With the machine running, drop the garlic clove through the
small feed tube. Process 5 seconds to chop. Add the ginger,
green onions, water chestnuts, jalapeño, and cilantro. Pulse to
chop, 5 – 10 times. Add the slightly frozen pork cubes and
shrimp. Pulse to chop, 20 – 30 times. Add the reserved sliced
napa cabbage. Pulse to combine, 10 times. Add the pine nuts,
soy, sherry, cornstarch, and ground pepper; pulse to combine,
10 times. Remove and reserve.
Lay the wonton wrappers on a clean, dry work surface. Work
with about 10 at a time. (If you try to do too many at a time, they
will dry out.) Place a rounded teaspoon of the filling in the center
of each wonton. One at a time, lightly brush the edges of each
wrapper with water. Gather the 4 corners together and pinch to
seal, then pinch the open sides to seal. Repeat until all the filling
has been used. Arrange the sealed dumplings on the leaf-lined
steamer trays, about 20 per level.
Wrap and refrigerate remaining wrappers for another use.
Assemble the steamer and steam the dumplings for 15 minutes.
Turn off steamer and unplug; let sit 1 minute. Carefully lift off the
steamer lid, transfer the dumplings to a platter lined with fresh
napa cabbage leaves, and garnish with a few sprigs of cilantro.
Put the dipping sauce in a small decorative bowl on or next
to the platter.
Nutritional analysis per dumpling
without dipping sauce:
Calories: 31g (15% from fat) • carbo. 5g • prot. 2g. •
sat. fat 0g • chol. 4 mg • sod. 67mg • fiber 0g
01CU13171 TCS-60 IB 6/30/03 4:55 PM Page 11

12
STEAMED SPINACH DUMPLINGS
Our meatless version of this Dim Sum specialty.
Makes about 40
Preparation time: 35 – 40 minutes
(includes weighting time for tofu) + 15 minutes steaming time
8 ounces soft tofu
Dipping Sauce for Dumplings, p.12
Fresh lettuce leaves to line the steamer baskets
1 clove garlic, peeled
2 slices peeled ginger, each about the size of a quarter
1/4 cup Italian parsley leaves,
tightly packed
8 ounces fresh spinach leaves (weigh after removing
stems), washed and dried
3 ounces drained water chestnuts
3 tablespoons toasted pine nuts
1 tablespoon low-sodium soy sauce
1 tablespoon dry sherry
1/2 teaspoon Asian sesame oil
1/4 teaspoon freshly ground
black pepper
1 package (about 50) wonton wrappers (3-inch square)
Water to seal the dumplings
Place tofu between triple thickness of paper towels and set under
a weight for 15 – 20 minutes to remove some of the excess water.
Prepare Dipping Sauce for Dumplings in Cuisinart®food proces-
sor; do not wash work bowl. Line steamer trays with lettuce
leaves. Fill the water reservoir and attach to the steamer.
With the food processor running, drop the garlic through the
small feed tube; process 5 seconds to chop. Add the ginger and
parsley; process 10 seconds to chop. Scrape the work bowl.
Add the tofu; process until smooth, 15 – 20 seconds. Add 2
ounces of the spinach. Pulse to chop, 15 – 20 times; scrape the
work bowl. Repeat, and with the final batch of spinach, add the
water chestnuts, pine nuts, soy sauce, sherry, sesame oil and
black pepper. Pulse to combine well, 20 – 30 times. Remove
and reserve.
Lay the wonton wrappers on a clean, dry work surface. Work with
about 10 at a time. (If you try to do too many at a time, they will
dry out.)
Place a rounded teaspoon of the filling in the center of each
wonton. One at a time, brush the edges of each wrapper with
water. Gather the 4 corners together and pinch to seal, then pinch
the open sides to seal. Repeat until all the filling has been used.
Arrange the sealed dumplings on the leaf-lined steamer trays,
about 20 per level. Wrap and refrigerate remaining wrappers for
another use.
Assemble the steamer and steam the dumplings for 15 minutes.
Turn off steamer and unplug; let sit 1 minute. Carefully lift off the
steamer lid, transfer the dumplings to a platter lined with fresh
napa cabbage leaves, and garnish with a few sprigs of cilantro.
Put the dipping sauce in a small decorative bowl on or next to
the platter.
Nutritional analysis per dumpling
without dipping sauce:
Calories 30 (21% from fat) • carbo. 5g • prot. 1g • fat 1g •
sat. fat 0g • chol. 1mg • sod. 62 mg • fiber 1g
01CU13171 TCS-60 IB 6/30/03 4:55 PM Page 12

13
DIPPING SAUCE FOR DUMPLINGS
Try this Dipping Sauce as a marinade for chicken or salmon.
Makes about 3/4 cup
Preparation: 5 minutes
1 clove garlic, peeled
3 slices peeled fresh ginger, each about the size of
a quarter
2 green onions, trimmed and cut into 1-inch pieces
2 tablespoons fresh cilantro or parsley leaves, loosely
packed
1/3 cup soy or tamari sauce (low sodium)
1/3 cup rice wine vinegar (seasoned if available)
1 tablespoon lime juice (freshly squeezed)
1 teaspoon Asian sesame oil
1/4 teaspoon freshly ground black pepper
Insert the metal blade in the Cuisinart®food processor. With the
machine running, drop the garlic through the small feed tube
and process 5 seconds to chop. Add the ginger, green onions
and cilantro leaves; pulse to chop, 10 – 15 times. Combine the
soy sauce, rice wine vinegar, lime juice, and sesame oil. With the
machine running, add the liquid through the small feed tube in a
steady stream. Add the pepper and process to combine.
Transfer to a jar for storage or to a decorative bowl to serve with
Asian Steamed Dumplings or Steamed Spinach Dumplings.
Nutritional analysis per 1/2 teaspoon:
Calories 2 (34% from fat) • carbo. 0g • prot. 0g • fat 0g •
sat. fat 0g • chol. 0mg • sod. 45mg • fiber 0g
SPINACH SAUCE FOR STEAMED VEGETABLES,
CHICKEN OR SEAFOOD
A light, easy sauce that will enhance your steamed vegetables, our
Spinach Sauce is particularly good with Steamed Artichokes rather
than the traditional drawn butter or a mayonnaise based sauce.
The combination is reminiscent of the popular Spinach Artichoke
Dip, but without the high fat and cholesterol. It also makes a great
sauce to toss with your choice of steamed vegetables and freshly
cooked pasta to make a complete meal.
Makes 1-1/2 cups
Preparation: 10 minutes, + overnight (12 hours) to drain the yogurt
1 cup nonfat plain yogurt (without gelatin)
1 10-ounce package frozen chopped spinach, thawed
1/2 ounce Reggiano Parmesan cheese, cut in 1/2-inch
pieces
1 – 2 cloves garlic, peeled
8 chives, cut into 1-inch lengths
1/2 cup well-packed flat Italian
parsley leaves
1/4 cup extra virgin olive oil
4 – 6 drops Tabasco®or other
hot sauce (to taste)
3 – 4 tablespoons water (as needed)
Use a yogurt strainer or line a strainer with a coffee filter or
cheesecloth to strain the yogurt overnight to remove the whey.
The yogurt will thicken and lose about half its volume. Discard
the whey.
Place the thawed spinach in a clean tea towel (use a dark or old
towel – it will stain); squeeze dry and reserve.
Insert the metal blade in the Cuisinart®food processor. With the
machine running, drop the cheese and garlic through the small
feed tube; process 15 – 20 seconds to chop. Add the chives, pars-
ley, drained yogurt and spinach; process to combine, 45 seconds.
Scrape the work bowl. With the machine running, add the olive oil
through the small feed tube in a steady stream. Scrape the work
bowl. Add the hot sauce, then the water, and process to blend,
about 20 – 30 seconds. The sauce will be thick. If you wish a
thinner sauce, add more water a little at a time to taste.
Use the sauce for steamed vegetables, or with steamed chicken
or seafood.
Nutritional analysis per tablespoon:
Calories 31 (21% from fat) • carbo. 1g • prot. 1g • fat 3g • sat. fat 0g •
chol. 1 mg • sod. 20 mg • fiber 0g
01CU13171 TCS-60 IB 6/30/03 4:55 PM Page 13

14
SWEET POTATOES WITH FENNEL
Sweet potatoes are a good source of vitamins A & C,
and beta carotene.
Makes 6 servings
Preparation: 10 – 15 minutes + 18 minutes steaming time
6 green onions, trimmed and chopped*
12 ounces fresh fennel, trimmed and thickly sliced
(1/2-inch)*, fronds reserved for garnish
1-1/2 pounds sweet potatoes, cut into 3/4-inch wedges
kosher salt and freshly ground pepper to taste
Arrange the wedged sweet potatoes in the large steamer tray.
Steam for 12 – 15 minutes. Turn off and let sit one minute. Add
the fennel to the steamer with the sweet potatoes; steam for an
additional 8 – 10 minutes. Turn off the steamer and let sit one
minute. Transfer the steamed sweet potatoes and fennel to a
bowl. Add the reserved green onions. Season to taste with
kosher salt and freshly ground pepper. Garnish with reserved
fennel fronds to serve.
*May be done in the Cuisinart®food processor. Use metal blade
to chop the green onions, and the thick (6 or 8 mm) slicing disc
to slice the fennel.
Nutritional analysis per serving:
Calories 213 (3% from fat) • carbo. 49g • prot. 4g • fat 1g •
sat.fat 0g • chol. 0 mg • sod. 70g • fiber 6g
WHITE AND SWEET POTATO SALAD WITH DILL DRESSING
White and sweet potatoes combine to make this salad appealing
to the eye and to the palate.
Makes sixteen 1/2-cup servings
Preparation: about 20 minutes + 20 minutes steaming time
1-1/2 pounds new red or white potatoes, peeled if desired,
cut into 1-inch wedges
1-1/2 pounds sweet potatoes, peeled, quartered length-
wise, then cut into 1-inch lengths
3 ribs celery, thinly sliced *
1/2 pound snow peas, trimmed and thinly sliced *
1 shallot (1-1/2 ounces), peeled, cut into 1-inch pieces
1/2 cup fresh dill weed, fairly tightly packed
1-1/2 tablespoons Dijon mustard
1/4 cup white balsamic or white wine vinegar
1/2 teaspoon kosher salt
1/4 teaspoon freshly ground black pepper
1/2 cup extra virgin olive oil
Fresh dill sprigs for garnish
Place the white potatoes in the large steamer tray. Place the
sweet potatoes in the second steamer tray. Fill the water
reservoir and assemble the steamer. Steam the potatoes for
18 – 22 minutes, until tender.
While the potatoes are steaming, prepare the dressing.
In a Cuisinart®blender or food processor fitted with the metal
blade, pulse to chop the shallot finely. Add the dill weed,
mustard, vinegar, kosher salt and pepper. Process to combine;
then with the machine running, add the olive oil in a slow
steady stream. Remove and reserve.
Turn off the steamer and unplug; let sit for 1 minute. Transfer
the potatoes to a large bowl. Toss with half the dressing. If the
salad is to be served warm, add the sliced vegetables and
remaining dressing to taste. If the salad is to be served cold,
cover and refrigerate the potato mixture and sliced vegetables
separately. About 20 – 30 minutes before serving, remove from
the refrigerator, add the sliced vegetables and dressing to
taste, and toss gently to combine. Garnish with sprigs of
fresh dill.
*May use 2 or 3 mm slicing disc of Cuisinart®food processor
for slicing.
Nutritional analysis per 1/2 cup serving:
Calories 159 (42% from fat) • carbo. 21g • prot. 2g • fat 7g •
sat. fat 1g • chol. 0mg • sod. 111mg • fiber 2g
01CU13171 TCS-60 IB 6/30/03 4:55 PM Page 14

15
WHITE BEAN SALAD
Beans cooked in the Cuisinart®steamer cook evenly and do not
break up as readily as those cooked on the stovetop.
Makes 4 cups
Preparation: 12 hours/overnight to soak beans, 50 – 55 minutes
steaming time for beans, 10 minutes to prepare salad
1 cup great northern, navy or white beans
2 sprigs parsley
1 clove garlic, peeled
1 bay leaf
1-3/4 cups water
Juice of 3 lemons
1 red onion (6 ounces), peeled and chopped
5 plum tomatoes, seeded and diced
8 fresh basil leaves, shredded
8 fresh mint leaves, shredded
Kosher salt and freshly ground pepper to taste
Splash of extra virgin olive oil
Pick over beans thoroughly to remove any grit or stones, and rinse.
Place in a medium bowl and cover with 2 inches of cold water.
Allow the beans to soak at least 12 hours or overnight to
rehydrate.
Fill the water reservoir and assemble the steamer. Drain the beans,
rinse, and drain again. Place in the rice basket of the steamer
along with the parsley, garlic, bay leaf, and water. Steam for
50 – 55 minutes. Allow the beans to sit in the hot liquid for 10 min-
utes. Drain, rinse, drain again and transfer to a medium bowl. Toss
with the lemon juice and set aside. Combine the beans with the
chopped onion, plum tomatoes, basil and mint. Season to taste
with kosher salt and pepper. Add a splash of extra virgin olive oil
for flavor if desired.
Toss gently and serve on a bed of fresh greens.
Nutritional analysis per half cup:
Calories 103 (3% from fat) • carbo. 20g • prot. 7g • fat 0g •
sat. fat 1g • chol. 0 mg • sod. 10g • fiber 5g
BROWN RICE, CHICKEN & BROCCOLI SALAD
This salad may be served warm or chilled.
Makes 8 servings
Preparation: 60 - 65 minutes, including steaming time
Salad:
1 cup long grain brown rice
1-1/2 cups chicken broth or stock (nonfat, low salt)
12 ounces boneless, skinless chicken breast halves,
well trimmed
2 cloves garlic, peeled, finely chopped
1/2 teaspoon kosher salt
1/4 teaspoon freshly ground black pepper
1 teaspoon extra virgin olive oil
1 large (about 1-1/2 pounds) bunch of broccoli, florets
cut into 1-inch pieces, stems reserved for another
use (may use broccoli crowns)
2 large celery stalks, thinly sliced *
6 green onions, trimmed and thinly sliced *
1 cup small cherry or grape tomatoes (red or yellow),
washed and dried
Several sprigs of fresh thyme for garnish
Dressing:
1 clove garlic, peeled
Zest of 1/2 lemon, bitter white pith removed
3 teaspoons fresh thyme leaves (1-1/2 teaspoons dried)
1 tablespoon Dijon-style mustard
1/4 cup white balsamic or white wine vinegar
2 tablespoons freshly squeezed lemon juice
1/2 cup extra virgin olive oil
1/4 cup chicken broth or stock (nonfat, low salt)
1/2 teaspoon kosher salt
1/2 teaspoon freshly ground black pepper
Fill the reservoir with water and assemble the steamer. Rinse
the rice under running water until water runs clear; drain well.
Combine the rice and chicken broth in the rice bowl; stir to
combine, and spread the rice into an even layer. Cover and
steam for 35 minutes.
01CU13171 TCS-60 IB 6/30/03 4:55 PM Page 15

16
Combine the boneless chicken breasts with the chopped garlic,
kosher salt, and olive oil. Arrange in the second steamer tray.
When the rice has steamed for 35 minutes, add the chicken
to the steamer. Steam for 18 – 22 minutes, until the juices
run clear when tested with a knife and the internal temperature
measures 170º F when tested with an instant read thermome-
ter. While the rice and chicken steam, prepare the dressing.
In a Cuisinart®blender or Cuisinart®food processor fitted with
the chopping blade, process the garlic and lemon zest to chop
finely. Add the thyme, mustard, vinegar and lemon juice, and
process to combine, about 10 – 15 seconds. Use a spatula to
scrape the blender jar or food processor work bowl. With the
machine running, add the olive oil and chicken stock in a
steady stream. Scrape the jar or work bowl again. Add the salt
and pepper; process to combine. Remove and reserve.
When the chicken is ready, remove from the steamer and
transfer to a plate. Add the broccoli florets to the second
steamer tray. Steam with the rice for another 3 – 5 minutes,
until bright green and crisp-tender. Turn off the steamer.
Remove the broccoli and refresh immediately in iced water,
then drain thoroughly. Allow the rice to remain in the steamer
for an additional 10 minutes to rest.
After 10 minutes, transfer the rice to a large bowl and toss with
half of the prepared dressing. Cut the chicken into bite-sized
pieces. Add the chicken, broccoli, celery, green onions and
tomatoes to the rice. Toss gently to combine. Add more dress-
ing as needed. Garnish with a few sprigs of fresh thyme and
serve. To serve the salad cold, complete as directed, but
reserve the broccoli and add just before serving, to preserve its
bright green color and crisp-tender texture.
*May be done with the slicing disc (2 or 3 mm) of the Cuisinart®
food processor.
Nutritional analysis per serving :
Calories 330 (45% from fat) • carbo. 27g • prot. 19g • fat 17g •
sat. fat 3.g • chol. 33mg • sod. 479mg • fiber 2g
CHICKEN AND ROASTED PEPPER ROULADES
Easy, healthy, but good enough to serve when entertaining.
Makes 6 servings
Preparation: 15 – 20 minutes
6 boneless, skinless chicken breast halves, trimmed,
tenders removed and reserved for another use
(about 4 – 5 ounces each)
1 clove garlic
2 teaspoons dry vermouth or white balsamic vinegar
1 teaspoon extra virgin olive oil
4 – 6 fresh basil leaves, washed and dried
1/4 teaspoon kosher salt
1/4 teaspoon freshly ground black pepper
3 large roasted red peppers (may be from a jar),
drained and halved
36 flat spinach leaves, stems removed, washed well
and dried
12 long flexible chives, tied in pairs at the stem end, using a
square knot
(Tip: have a few extra chives available in case of breakage)
For a whole meal, do only 4 chicken breast halves and add:
8 new potatoes, 3-4 ounces each, quartered lengthwise
8 ounces snow peas, trimmed and strings removed
8 ounces carrots, peeled
Place chicken breast halves between 2 sheets of plastic wrap and
use a flat pounder to pound to an even thickness of about 1/2 inch.
Transfer chicken to a medium bowl. Clean work surface thoroughly
and wash hands with hot water and soap.
In the Cuisinart®Mini-Prep®Processor, chop the garlic about
10 seconds. Add the vermouth, olive oil, basil leaves, salt, and
pepper; process to combine and chop the basil, about 10 – 15
seconds. Add the basil mixture to the chicken and toss to coat
well. Lay the chicken out on a large prep board or flat platter, “skin”
side down. Wash hands with hot water and soap.
Lay 6 spinach leaves out in a line with edges overlapping. Roll a
roasted pepper into a cylinder. Lay the rolled pepper on the
spinach and roll so that the pepper is rolled in the spinach leaves.
01CU13171 TCS-60 IB 6/30/03 4:55 PM Page 16

17
Place on one end of the chicken and roll the chicken jelly roll style,
so that the spinach/roasted pepper roll is rolled up in the chicken.
Place seam side down and repeat. (The chicken may be prepared to
this point up to 8 hours ahead; wrap in plastic wrap and refrigerate.)
Just before steaming, tie a chive around the center of each bundle,
with the knot on the underside.
Spray the bottom of the larger steamer tray with cooking spray or
olive oil.
Arrange the chicken roulades in the large steamer tray. Fill the water
reservoir and steam for 18 - 22 minutes. Turn off the steamer, unplug
and let sit for 1 minute. Remove the fan arm and lid, transfer the
chicken roulades to a serving plate, and serve. May be served hot or
cold.
To make a whole meal:
Spray the bottom of both steamer trays with cooking spray or olive
oil. Arrange the quartered potatoes in a single layer in the large tray.
Arrange four chicken roulades in the second steamer tray (they
should not touch each other or the sides). Steam for 18 minutes.
While the potatoes and chicken steam, trim carrots to fit the large
feed tube of a Cuisinart®food processor horizontally. Insert the
3 mm julienne disc and julienne the carrots. After 18 minutes, turn
off steamer and let sit one minute; remove turbo convection fan and
lid. Chicken should be completely cooked (170º F when tested with
an instant read thermometer), and potatoes nearly done. Remove
chicken to a warm platter and cover loosely with foil. If potatoes are
hard, steam for 3 – 5 minutes longer before continuing. Arrange
carrots and snow peas in second steamer tray. Steam for 3 – 4
minutes for crisp-tender vegetables. Turn off steamer and let sit
1 minute; remove turbo convection fan and lid. Arrange the vegeta-
bles and potatoes on the platter with the chicken and serve.
Nutritional analysis per serving:
Roulades only:
Calories 176 (14% from fat) • carbo. 5g • prot. 31g • fat 3g •
sat. fat 0g • chol. 75 mg • sod. 175mg • fiber 2g
Whole meal:
Calories 314 (9% from fat) • carbo. 36g • prot. 31g • fat 3g •
sat. fat 0g • chol. 75mg • sod. 197mg • fiber 7g
TUSCAN CHICKEN
This whole meal is ready in less than an hour!
Makes 4 servings
Preparation: 15 minutes + 30 – 35 minutes steaming time
6 - 8 sprigs fresh rosemary, about 5 - 6 inches each
1 clove garlic, peeled and chopped
4 teaspoons extra virgin olive oil
1/4 teaspoon kosher salt
1/8 teaspoon freshly ground black pepper
4 boneless, skinless chicken breast halves,
about 4 - 5 ounces each, well trimmed
12 ounces new red or Yukon gold potatoes, 2 - 3 ounces
each – washed, quartered, quarters cut in half
2 plum tomatoes, sliced 1/4 inch thick, stem
ends discarded
2 tablespoons chopped sun-dried tomatoes
10 ounces zucchini squash (slender), halved lengthwise,
cut in 3/4-inch slices
10 ounces yellow squash (slender), halved lengthwise,
cut in 3/4-inch slices
6 ounces mushrooms, rinsed, dried and quartered
Fill the water reservoir and attach to steamer. Line both steamer
trays with 2 or 3 sprigs fresh rosemary; reserve the remaining
rosemary for garnish.
Combine the chopped garlic with the olive oil, kosher salt and
pepper. Rub the chicken with one third of this mixture; set aside.
May be done ahead. If preparing longer than 15 minutes ahead,
wrap and refrigerate until ready to use. Clean work surface
thoroughly; wash hands with hot water and soap.
Toss the potatoes with half the remaining garlic/olive oil mixture,
and arrange over the rosemary sprigs in the large steamer tray.
Arrange the chicken over the rosemary in the second steamer tray
(do not allow the chicken to touch sides of steamer tray). Top the
chicken with the sliced plum tomatoes, then sprinkle with the
chopped sun-dried tomatoes. Steam the potatoes and chicken for
14 minutes.
01CU13171 TCS-60 IB 6/30/03 4:55 PM Page 17

18
Combine the squashes and mushrooms with the remaining
garlic/olive oil mixture; toss to combine. After the potatoes and
chicken have steamed for 14 minutes, turn off the steamer and
let sit for 1 minute. Remove the convection fan, lid and second
steamer tray. Arrange the vegetables on top of the potatoes;
reassemble the steamer and steam for an additional 7 to 8
minutes. Turn off the steamer; let sit for 1 minute. Remove the lid
and check the chicken for doneness (internal temperature should
be 170º F; juices should run clear). Arrange the chicken, potatoes
and vegetables on a warmed serving platter; garnish with the
remaining sprigs of fresh rosemary and serve.
Nutritional analysis per serving:
Calories 498 (25% from fat) • carbo. 59 g • prot. 39g • fat 14g •
sat. fat 4g • chol. 75mg • sod. 270mg • fiber 24g
STEAMED SOLE OR FLOUNDER ROLLS
Aquick, simple way to prepare fish.
Makes 4 servings
Preparation: 5 – 10 minutes + 10 – 15 minutes steaming time
Vegetable oil cooking spray
2 pounds fresh skinless sole or flounder fillets (all about
the same size)
2 green onions, trimmed and chopped*
1-1/2 tablespoons low-sodium soy sauce or tamari
1 tablespoon dry sherry
1/2 teaspoon toasted sesame oil
1/4 teaspoon freshly ground black pepper
Lightly spray the large steaming tray with vegetable oil cooking
spray (spray both baskets if doing a double recipe).
Fill the water reservoir and attach to the steamer.
Rinse and dry the sole. Lay skin side up in a single layer.
Combine the soy sauce, sherry, sesame oil, and black pepper.
Lightly brush each sole fillet with the soy mixture. Sprinkle each
with about a half teaspoon of the chopped green onions. Starting
from the flat end, roll each fillet jelly roll style into a compact log.
Arrange in the prepared steamer tray with the exposed pointed
end on the bottom. Brush again lightly with the soy mixture.
Measure the height of the rolls. Steam the rolls for 10 minutes per
inch of height (i.e., if the rolls are 1-1/2 inches in height, then they
will be steamed for 15 minutes). If desired, you may steam your
vegetable of choice in the second steaming tray. Turn off the
steamer and unplug; let sit 1 minute.
Lift off fan and lid. Transfer to warmed plates to serve.
*May be chopped in a Cuisinart®Mini-Prep or Cuisinart®Food
Processor fitted with the metal blade.
Nutritional analysis per serving:
Calories 163 (14% from fat) • carbo. 1g • prot. 32g • fat 2g •
sat. fat 1g • chol. 82mg • sod. 205mg • fiber 0
01CU13171 TCS-60 IB 6/30/03 4:55 PM Page 18

19
LEMON GINGER FISH FILLETS
The use of plastic wrap makes cleanup easy.
Makes 4 servings
Preparation: 10 minutes, 10 – 15 minutes steaming
1-1/2 pounds fresh fish fillets, such as sea bass, salmon
1small clove garlic, peeled
zest of 1/2 lemon, bitter white pith removed
3 slices fresh ginger, each about the size of a quarter
1/2 teaspoon kosher salt
1/2 teaspoon sugar
1/4 teaspoon freshly ground black pepper
1 teaspoon white balsamic or fruit vinegar
1/2 teaspoon extra virgin olive oil
thin slices of fresh lemon for garnish
Have ready 4 sheets of Saran™Classic Wrap, ten inches in length
each. Remove the skin from the fish if it is not already skinned.
Wash and dry the fish. Cut the fish into 4 equal portions,
6 ounces each.
In the Cuisinart® Mini-Prep or Mini-Prep Plus processor, combine
the garlic, lemon zest, ginger, kosher salt, sugar and black pepper;
process until finely chopped, 15 – 20 seconds. (Alternatively, the
ingredients may be finely chopped by hand, using a sharp knife.)
Add the vinegar and olive oil; process until well combined, 10 – 15
seconds. Divide the mixture evenly and rub all over the 4 portions
of fish. Place each portion of fish in the center of a sheet of Saran™
Classic Wrap. Bring two sides of the wrap together lengthwise
over the center of the fish. Fold the wrap down tightly, then tuck
the two ends under the fish. The fish may be prepared and
wrapped up to 30 minutes before steaming.
Keep refrigerated.
Fill the steamer reservoir with water and assemble the steamer.
Arrange the 4 portions of fish in the large steamer basket. Steam
for 10 – 13 minutes per inch of thickness, depending on desired
doneness. Turn off the steamer. Let sit for 1 minute. Remove the
fan and lid. Use tongs to lift fish portions from the basket. Carefully
unwrap and transfer to warmed plate to serve. Garnish with fresh
lemon slices if desired.
Nutritional analysis per serving:
Calories 176 (25% from fat) • carbo. 2g • prot. 30g • fat 5g •
sat.fat 1g • chol. 85mg • sod. 325mg • fiber 0g
SALMON & ASPARAGUS WRAPS
A nice entrée for entertaining.
Makes 4 servings
Preparation: 20 – 25 minutes + 15 minutes steaming time
1 whole salmon fillet (side) with skin, about 2-1/2 pounds
(there will be about 10 ounces left over)
20 asparagus spears, about 1/4 inch in diameter,
trimmed and peeled
1/4 teaspoon kosher salt
1/8 teaspoon freshly ground black pepper
4 strips of lemon zest (use a citrus stripper),
each about 12 inches long
4 – 5 sprigs fresh dill
Rinse and dry the salmon; remove any loose scales. Using a very
sharp slicing knife, slice salmon on the bias (diagonal cut - as if
you were slicing flank steak or London Broil) into 1/4-inch thick
slices. Using 3 slices per serving, lay them out, overlapping, so
that the brown tissue is hidden (this part of the salmon has a
stronger flavor; if you find it too strong, carefully cut it out), “skin”
side up. Combine the salt and pepper. Lightly season the salmon
with the salt and pepper. Bundle 5 asparagus spears.
Carefully wrap the salmon around the asparagus bundles; place
seam side down. “Tie” the bundle with a strip of lemon zest.
Repeat.
Assemble the steamer. Lay the dill in the bottom of the steamer
tray. Arrange the salmon wraps on top of the dill. Take care not to
allow the salmon to touch the sides of the steamer tray. Steam for
12 minutes. Turn off the steamer and let sit for 3 minutes longer.
Carefully lift out and transfer to warmed plates to serve.
Nutritional analysis per serving:
Calories 330 (51% from fat) • carbo. 4g • prot. 36g • fat 17g •
sat. fat 4g • chol. 100mg • sod. 337 mg • fiber 2g
01CU13171 TCS-60 IB 6/30/03 4:55 PM Page 19

20
OLD BAY®STEAMED SHRIMP DINNER
Add a green salad and crusty bread to complete the meal.
Makes 4 servings
Preparation: 10 minutes + 25 minutes steaming time
3/4 pound new red potatoes, scrubbed, halved
(quartered if large)
3/4 pound new white potatoes, scrubbed, halved
(quartered if large)
2 medium (6 ounce) red or sweet white onions,
peeled (leave root end intact), quartered
3 ears corn, cut into 1-1/2 inch lengths
2 or 3 whole bay leaves
1-1/2 pounds extra large (21-25) shrimp, rinsed
3 lemons
3 tablespoons Old Bay®Seasoning
Fill the water reservoir and attach to the steamer.
Arrange the potatoes and onions in the large steamer tray; tuck in
the bay leaves. Steam for 18 minutes. While the potatoes are
steaming, thinly slice one of the lemons*. Toss the shrimp with 2
tablespoons of the Old Bay® seasoning, then mix in half the lemon
slices. Arrange the shrimp and lemon slices in the small steamer
tray. Shrimp should not touch the sides of the basket. Cut the
remaining lemons in wedges.
Turn off steamer; let sit for 1 minute. Carefully remove the convec-
tion fan and lid. Arrange the corn on top of the partially cooked
potatoes. Insert the small steamer tray and reattach the convection
fan. Steam for 5 – 7 minutes – the shrimp should all have turned
pink. Turn off the steamer and let sit for one minute. Arrange the
potatoes, onions and corn on a large warm platter; sprinkle with
the remaining Old Bay® seasoning. Arrange the shrimp around the
outside of the platter. Garnish with the remaining sliced lemons and
lemon wedges. If desired, serve with drawn butter.
*May be done using the Cuisinart®food processor fitted with the
thin (2 mm) slicing disc.
Nutritional analysis per serving:
Calories 445 (9% from fat) • carbo. 66g • prot. 43g • fat 5g •
sat. fat 1g • chol. 259mg • sod. 777mg • fiber 11g
CHICKEN WITH PESTO AND SHREDDED CARROTS
A quick, easy way to combine meat and vegetables in a single
serving. May be served hot or cool and sliced to serve on
a bed of salad greens for a warm weather meal.
Makes 6 servings
Preparation: 15 minutes + 22 minutes steaming time
6 boneless, skinless chicken breast halves
(about 5 ounces each)
3 – 6 teaspoons pesto (homemade or purchased)
6 ounces carrots, peeled and shredded
(about 1-1/2 cups)
kosher salt, to taste
freshly ground black pepper, to taste
Have ready 6 sheets of Saran™Classic Wrap, each about
12 inches in length.
Trim chicken of all visible fat and gristle. Rinse in cold water and
dry. Cut a sheet of plastic wrap about 20 inches in length. Place a
boneless chicken breast half on one side of the wrap, and fold
the wrap over the chicken. Use a flat mallet or pounder to pound
the chicken to an even thickness of about 1/4 inch. Repeat until
all the chicken has been pounded.
Place the chicken “skin” side down on the work surface. Spread
each chicken breast with 1/2 – 1 teaspoon of pesto, and spread
1/4 cup of shredded carrots evenly over each. Starting from one
of the short ends, roll each piece of chicken jelly roll style.
Sprinkle with salt and pepper to taste. Place a piece of rolled
chicken in the center of one of the sheets of Saran™Classic
Wrap. Bring two sides of the wrap together over the chicken and
fold down tightly; fold in the two open edges and tuck under the
chicken.
Arrange the chicken in the steamer trays, taking care not to push
the rolls against each other or the sides of the steamer trays.
Steam for 22 minutes. Let rest for 1 minute. Use tongs to remove
chicken rolls. Unwrap, slice and serve.
Nutritional Analysis per serving:
Calories 187 (19% from fat) • carbo. 3g • prot. 33g • fat 4g •
sat. fat 1g • chol. 82 mg • sod. 286 mg • fiber 1g
01CU13171 TCS-60 IB 6/30/03 4:55 PM Page 20
This manual suits for next models
1
Table of contents
Other Cuisinart Electric Steamer manuals

Cuisinart
Cuisinart TCS-60C User manual

Cuisinart
Cuisinart CookFresh STM-1000 User manual

Cuisinart
Cuisinart STM1000AR User manual

Cuisinart
Cuisinart Cook & Steam User manual

Cuisinart
Cuisinart COOKFRESH STM1000E User manual

Cuisinart
Cuisinart STM1000U User manual

Cuisinart
Cuisinart TCS-60E User manual

Cuisinart
Cuisinart FP-2207A User manual

Cuisinart
Cuisinart Cook & Steam User manual

Cuisinart
Cuisinart Cook & Steam User manual