Cuisinart COOKFRESH STM1000E User manual

Cuisinart
1
2
65
4
3
Instructions - Hinweise - Instructies - Istruzioni - Instrucciones STM1000E
BABYLISS
99 avenue Aristide Briand
92120 Montrouge
France
www.cuisinart.fr
Instructions - Hinweise - Instructies - Istruzioni - Instrucciones STM1000E
CUISEUR VAPEUR DIGITAL
COOKFRESH TM
DIGITAL STEAM COOKER
6.1 6.2 6.4 6.5
6.3
B IB-16/346A

SOMMAIRE
1. CONSIGNES DE SÉCURITÉ. . . . . . . . . . . . . . . . . . . 1
2. INTRODUCTION . . . . . . . . . . . . . . . . . . . . . . . . . 3
3. CARACTERISTIQUES PRODUIT . . . . . . . . . . . . . . . . 3
4. ASSEMBLAGE ET UTILISATION DU CUIT VAPEUR . . . . 3
a. Assemblage . . . . . . . . . . . . . . . . . . . . . . . . . 3
b. Utilisation en mode «Cuisson préprogrammée». . 4
c. Utilisation en mode «Manuel» . . . . . . . . . . . . . 4
d. Utilisation en mode «Maintien au chaud» . . . . . . 4
e. Utilisation en mode «Réchauage» . . . . . . . . . . 5
f. le signal «Manque d’eau» . . . . . . . . . . . . . . . . 5
5. NETTOYAGE ET ENTRETIEN . . . . . . . . . . . . . . . . . 5
a. Après chaque utilisation . . . . . . . . . . . . . . . . . 5
b. Traitement anticalcaire . . . . . . . . . . . . . . . . . . 5
6. RECETTES. . . . . . . . . . . . . . . . . . . . . . . . . . . . . 6
a. Salade de pommes de terre ratte, let de rouget aux
olives et tomates . . . . . . . . . . . . . . . . . . . . . . 6
b. Spirale de saumon au lard et fenouil à l’anis. . . . . 6
7. GUIDE DE CUISSON . . . . . . . . . . . . . . . . . . . . . . 7
CONTENTS
1. SAFETY INSTRUCTIONS . . . . . . . . . . . . . . . . . . . 9
2. INTRODUCTION . . . . . . . . . . . . . . . . . . . . . . . 11
3.PRODUCT FEATURES . . . . . . . . . . . . . . . . . . . . 11
4.ASSEMBLY AND USE OF THE STEAM COOKER . . . . 11
a. Assembly . . . . . . . . . . . . . . . . . . . . . . . . . . 11
b. Use in“Pre-set cook”mode . . . . . . . . . . . . . . . 12
c. Use in“Manual”mode . . . . . . . . . . . . . . . . . . 12
d. Use in“keep hot” mode . . . . . . . . . . . . . . . . . 12
e. Use in «Reheat» mode . . . . . . . . . . . . . . . . . . 13
f.“Water needed” signal. . . . . . . . . . . . . . . . . . . 13
5.CLEANING AND MAINTENANCE . . . . . . . . . . . . . 13
a.After each use . . . . . . . . . . . . . . . . . . . . . . . 13
b. Descaling . . . . . . . . . . . . . . . . . . . . . . . . . . 13
6.RECIPES . . . . . . . . . . . . . . . . . . . . . . . . . . . . . 13
a.Ratte potato salad, red mullet llet with olives and
tomatoes . . . . . . . . . . . . . . . . . . . . . . . . . . . . 13
b.Salmon spirals in bacon and aniseed fennel . . . . 14
7. COOKING GUIDE . . . . . . . . . . . . . . . . . . . . . . . 14
INHALT
1. SICHERHEITSHINWEISE . . . . . . . . . . . . . . . . . . . 17
2. EINLEITUNG . . . . . . . . . . . . . . . . . . . . . . . . . . 19
3. EIGENSCHAFTEN DES PRODUKTS . . . . . . . . . . . . 19
4. MONTAGE UND VERWENDUNG DES DAMPFGARERS .19
a. Montage.. . . . . . . . . . . . . . . . . . . . . . . . . . 19
b. Verwendung im Modus„Vorprogrammiertes Garen“ . 20
c. Verwendung im Modus „Manuell“ . . . . . . . . . . . 20
d. Nutzung im Modus“Warmhalten” . . . . . . . . . . 20
e. Verwendung im Modus„Aufwärmen“ . . . . . . . . 21
f. Das Signal „Wassermangel“ . . . . . . . . . . . . . . . 21
5. REINIGUNG UND PFLEGE . . . . . . . . . . . . . . . . . 21
a. Nach jeder Verwendung . . . . . . . . . . . . . . . . 21
b. Entkalkung . . . . . . . . . . . . . . . . . . . . . . . . . 21
6. REZEPTE . . . . . . . . . . . . . . . . . . . . . . . . . . . . 22
a. Kartoelsalat mit Kartoeln „La Ratte“, Rotbarbenlet
mit Oliven und Tomaten . . . . . . . . . . . . . . . . . . 22
b. Lachsspiralen mit Speck und Anis-Fenchel . . . . 22
7. GARANLEITUNG . . . . . . . . . . . . . . . . . . . . . . . 23
INHOUD
1. VEILIGHEIDSINSTRUCTIES . . . . . . . . . . . . . . . . . 25
2. INTRODUCTIE . . . . . . . . . . . . . . . . . . . . . . . . . 27
3. PRODUCTSPECIFICATIES . . . . . . . . . . . . . . . . . . 27
4. MONTAGE EN GEBRUIK VAN DE STOOMKOKER. . . . 27
a. Montage. . . . . . . . . . . . . . . . . . . . . . . . . . . 27
b. Gebruik in de stand ‘Voorgeprogrammeerde bereiding’ . . 28
c. Gebruik van de stand‘Handmatig’. . . . . . . . . . . 28
d. Gebruik in het‘warmhoudprogramma’ . . . . . . . 28
e. Gebruik van de stand‘Opwarmen’. . . . . . . . . . . 29
f. Het signaal ‘Watertekort’ . . . . . . . . . . . . . . . . . 29
5. SCHOONMAAK EN ONDERHOUD . . . . . . . . . . . . 29
a. Na ieder gebruik. . . . . . . . . . . . . . . . . . . . . . 29
b. Antikalkbehandeling . . . . . . . . . . . . . . . . . . 29
6. RECEPTEN . . . . . . . . . . . . . . . . . . . . . . . . . . . 30
a. Salade met Ratte-aardappel, let van rode poon met
olijven en tomaten . . . . . . . . . . . . . . . . . . . . 30
b. Zalmrolletjes met spek en anijsvenkel . . . . . . . 30
7. BEREIDINGSTIJDEN . . . . . . . . . . . . . . . . . . . . . 31
SOMMARIO
1. ISTRUZIONI DI SICUREZZA . . . . . . . . . . . . . . . . 33
2. INTRODUZIONE . . . . . . . . . . . . . . . . . . . . . . . 35
3. CARATTERISTICHE DEL PRODOTTO . . . . . . . . . . 35
4. MONTAGGIO E UTILIZZO DEL CUOCITORE A VAPORE . 35
a. Montaggio . . . . . . . . . . . . . . . . . . . . . . . . . 35
b. Utilizzo in modalità «Cottura preprogrammata». . 36
c. Utilizzo in modalità «Manuale» . . . . . . . . . . . . . 36
d. Utilizzo in modalità «Mantenimento al caldo» . . . 36
e. Utilizzo in modalità «Riscaldo» . . . . . . . . . . . . . 37
f. Segnale di «Mancanza d’acqua» . . . . . . . . . . . .37
5. PULIZIA E MANUTENZIONE. . . . . . . . . . . . . . . . 37
a.Dopo ogni utilizzo. . . . . . . . . . . . . . . . . . . . . 37
b.Trattamento anticalcare . . . . . . . . . . . . . . . . . 37
6. RICETTE. . . . . . . . . . . . . . . . . . . . . . . . . . . . . 38
a. Insalata di patate ratte, letto di triglia alle olive e
pomodori . . . . . . . . . . . . . . . . . . . . . . . . . . . 38
b.Spirali di salmone al lardo e nocchio all’anice . . 38
7. GUIDA ALLA COTTURA . . . . . . . . . . . . . . . . . . .39
SUMARIO
1. CONSIGNAS DE SEGURIDAD . . . . . . . . . . . . . . . 41
2. INTRODUCCIÓN. . . . . . . . . . . . . . . . . . . . . . . . 43
3. CARACTERÍSTICAS DEL PRODUCTO . . . . . . . . . . . 43
4. MONTAJE Y USO DE LA COCCIÓN AL VAPOR . . . . . 43
a. Montaje . . . . . . . . . . . . . . . . . . . . . . . . . . . 43
b. Uso en modo «Cocción preprogramada» . . . . . . 44
c. Uso en modo «Manual» . . . . . . . . . . . . . . . . . 44
d. Uso en modo «Mantener caliente» . . . . . . . . . . 44
e. Uso en modo «Recalentamiento» . . . . . . . . . . . 45
f. La señal «Falta de agua». . . . . . . . . . . . . . . . . 45
5. LIMPIEZA Y MANTENIMIENTO. . . . . . . . . . . . . . . 45
a. Tras cada uso . . . . . . . . . . . . . . . . . . . . . . . . 45
b. Tratamiento antical. . . . . . . . . . . . . . . . . . . . 45
6. RECETAS . . . . . . . . . . . . . . . . . . . . . . . . . . . . 46
a. Ensalada de patatas ratte, letes de salmonetes con
aceitunas y tomates . . . . . . . . . . . . . . . . . . . 46
b. Espirales de salmón con tocino e hinojo con anís 46
7. GUÍA DE COCCIÓN . . . . . . . . . . . . . . . . . . . . . .47
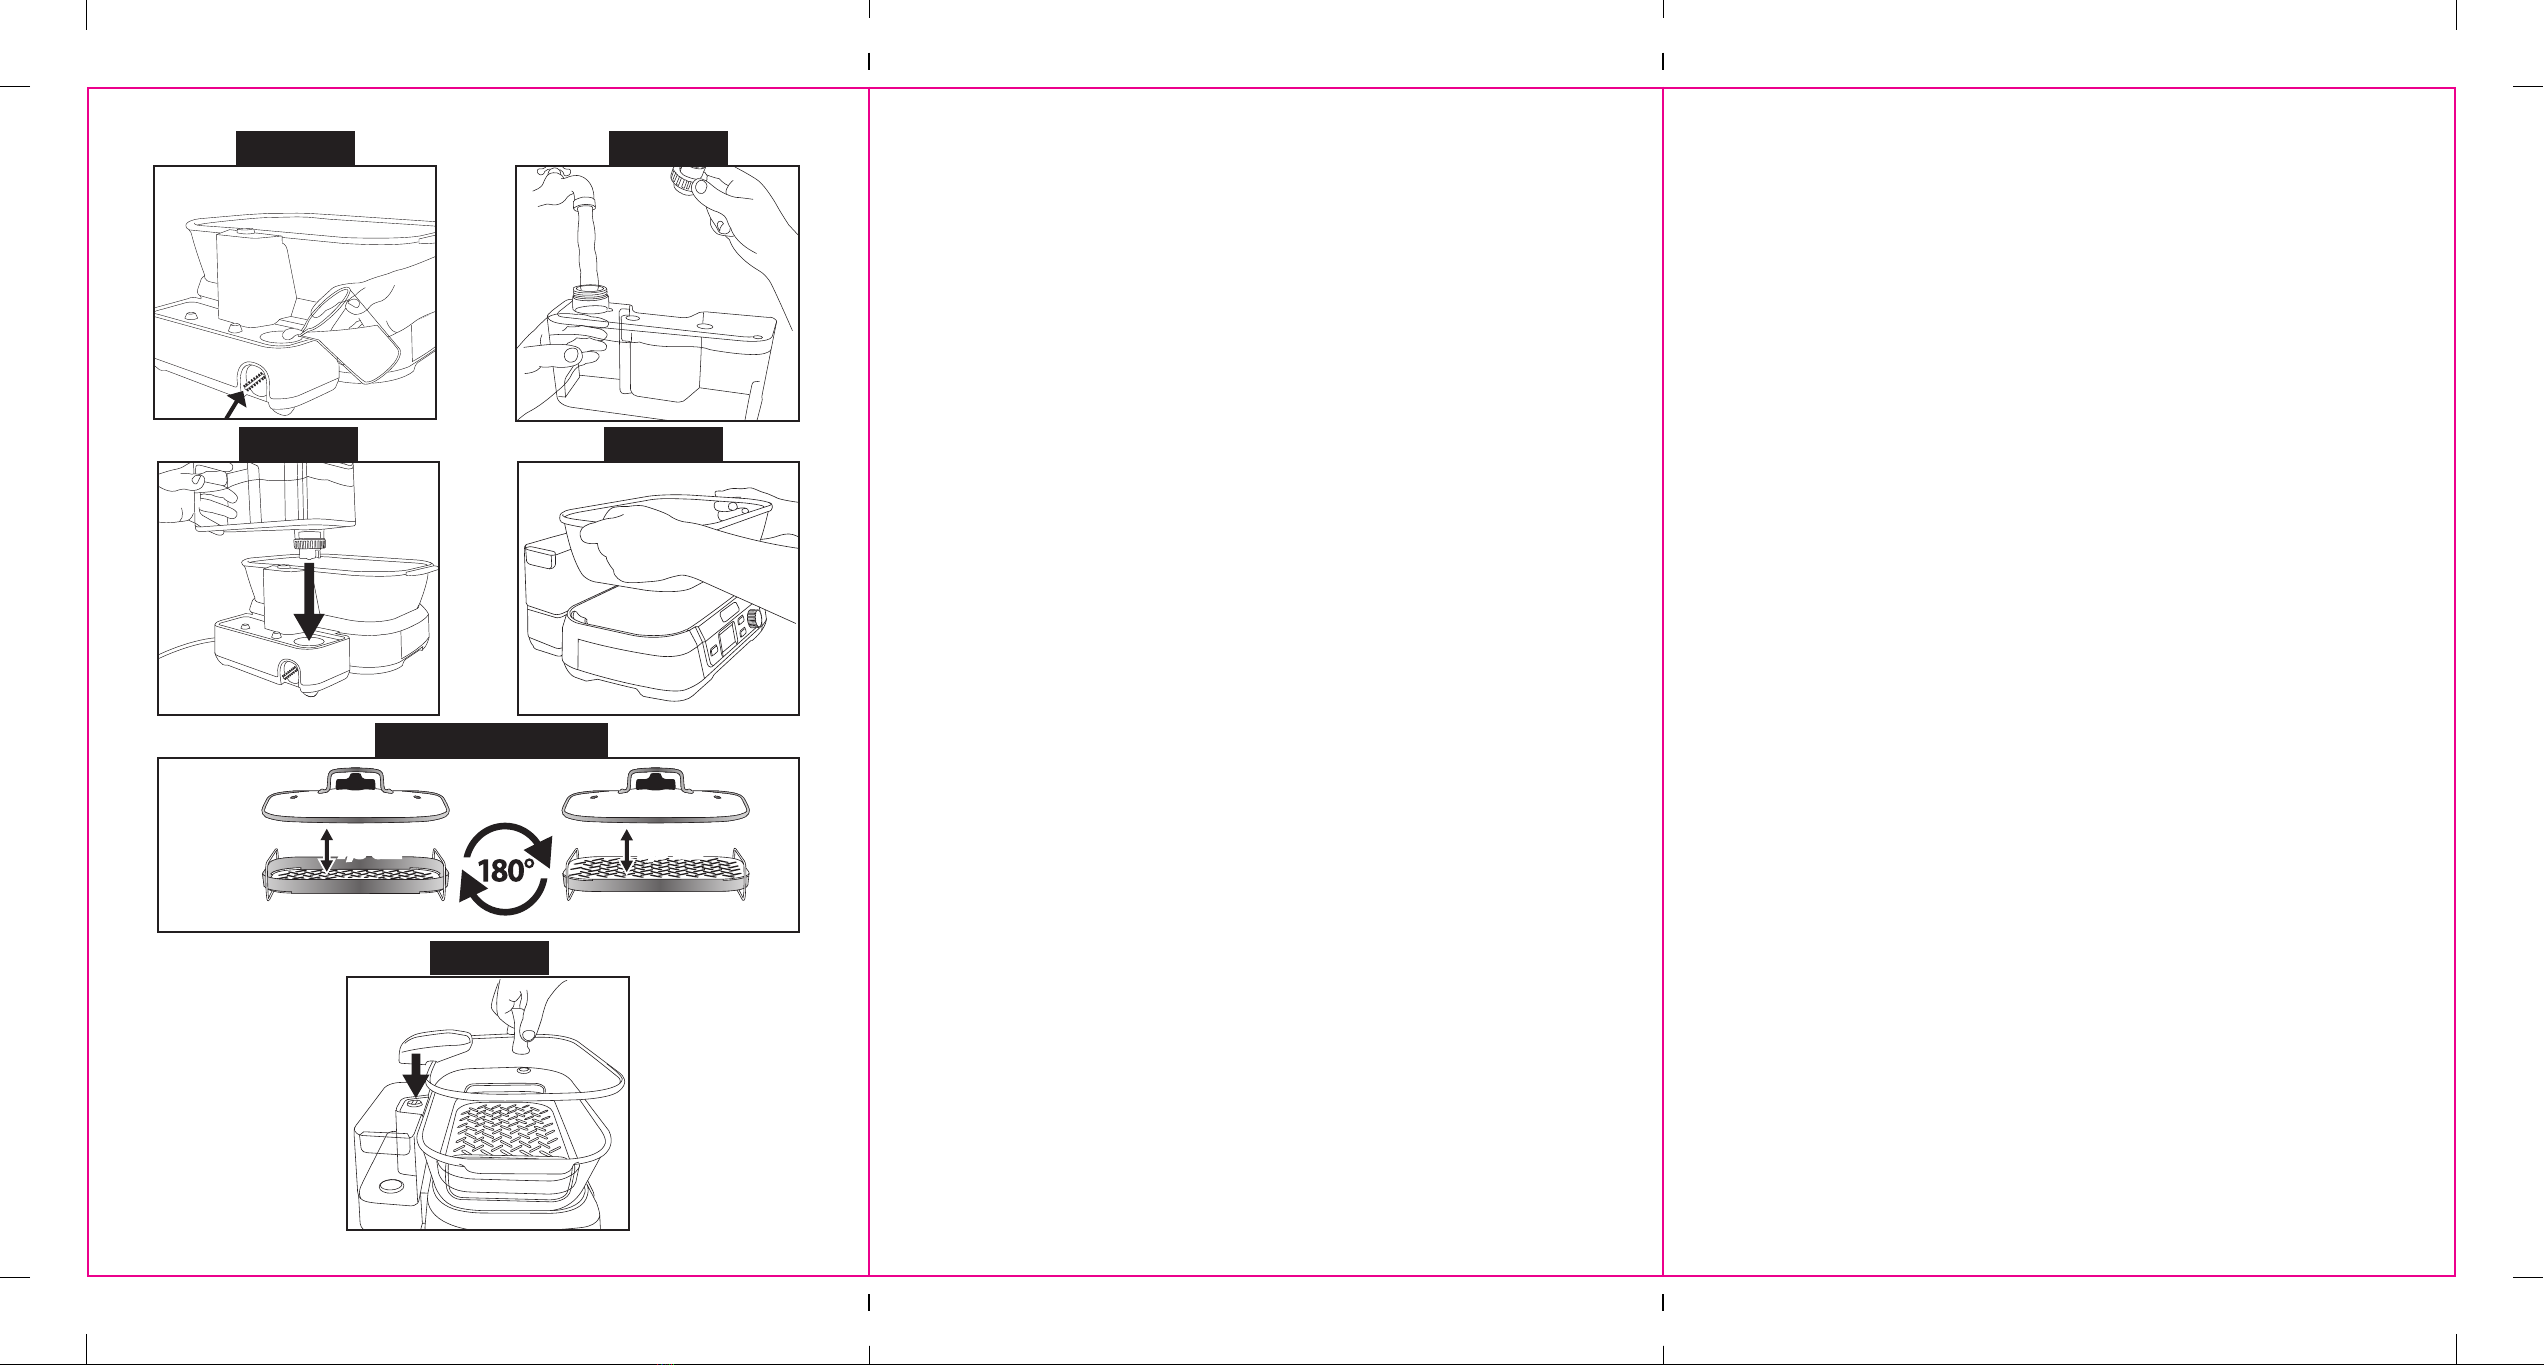
Fig. 4
Fig. 6
7, 3 c m7, 3 c m 6,6 cm6,2 cm
Fig. 5
Fig. 3
Fig. 2
Fig. 1
No more than MAX level
No more than
MAX level

1
1. CONSIGNES DE SÉCURITÉ
LIRE ATTENTIVEMENT CES CONSIGNES DE SECURITE AVANT D’UTILISER
L’APPAREIL !
• ATTENTION : Les sachets en polyéthylène qui entourent
l’appareil ou l’emballage peuvent être dangereux. Pour
éviter tout danger de suocation, conserver ces sachets
hors de la portée de bébés et des enfants. Ces sachets ne
sont pas des jouets.
• ATTENTION : Surface chaude.
• Ne jamais toucher les surfaces chaudes.
• Laisser refroidir l’appareil avant de le ranger.
• La température des surfaces accessibles peut être élevée lorsque
l’appareil est en fonctionnement.
• Ne pas placer l’appareil sur ou à proximité d’un appareil chauant.
Ne pas l’utiliser sur des surfaces sensibles à la chaleur ou a proximité
de matériaux inammables.
• Laisser un espace suffisant entre l’appareil et les murs ou les
éléments de mobilier. Ne pas placer l’appareil sous les éléments
muraux de la cuisine.
• Ne pas laisser le cordon dépasser du bord du plan de travail, et ne
pas le mettre en contact avec des surfaces chaudes.
• Ne pas immerger dans l’eau ou tout autre liquide.
• Toujours débrancher l’appareil après utilisation et avant de le
nettoyer. Ne jamais laisser l’appareil branché sans surveillance.
Pour débrancher, tirer sur la che et jamais sur le cordon.
• Toujours vider le réservoir lorsque l’appareil n’est pas utilisé.
• L’appareil n’est pas destiné à être mis en fonctionnement au moyen
d’une minuterie extérieure ou par un système de commande à
distance séparé.
• Ne pas utiliser l’appareil s’il est tombé ou s’il présente des traces
apparentes de dommage.
• Cesser immédiatement d’utiliser l’appareil si le câble d’alimentation
est endommagé.
• Si le câble d’alimentation est endommagé, il doit être remplacé

2
par le fabricant, son service après-vente ou des personnes de
qualication similaire an d’éviter un danger.
• Aucune réparation ne peut être eectuée par l’utilisateur.
• Toute utilisation d’accessoires non recommandés ou non vendus
par Cuisinart® peut provoquer incendie, électrocution et risque de
blessure.
• Cet appareil peut être utilisé par des enfants à partir de 8 ans et plus
et par des personnes ayant des capacités physiques, sensorielles ou
mentales réduites ou un manque d’expérience et de connaissances
à condition qu’elles aient reçu une supervision ou des instructions
concernant l’utilisation de l’appareil en toute sécurité et qu’elles
comprennent les dangers encourus. Les enfants ne doivent pas
jouer avec l’appareil. Le nettoyage et l’entretien par l’usager ne
doivent pas être eectués par des enfants, sauf s’ils ont plus de 8
ans et qu’ils sont surveillés.
• Maintenir l’appareil et son câble d’alimentation hors de portée des
enfants de moins de 8 ans.
• Utiliser cet appareil exclusivement pour cuisiner, en suivant les
instructions de ce manuel.
• Ne pas utiliser à l’extérieur.
• Cet appareil est destiné à être utilisé pour des applications
domestiques.
Déchets des équipements électriques et électroniques en n
de vie
Dans l’intérêt de tous et pour participer activement à l’eort collectif
de protection de l’environnement :
• Ne pas jeter de produit avec les déchets ménagers.
• Utiliser les systèmes de reprise et de collecte. Certains
matériaux pourront ainsi être recyclés ou valorisés.

3
2. INTRODUCTION
Félicitations pour votre achat!
Depuis plus de 40 ans, Cuisinart® développe une gamme complète d’appareils culinaires qui
permettent aux passionnés de cuisine et aux grands chefs d’exprimer pleinement leur créativité.
Tous les appareils Cuisinart® sont le résultat d’une étroite collaboration entre des ingénieurs et des
grands noms de la Cuisine, tels que Paul Bocuse, ambassadeur charismatique de la marque. Chaque
produit allie robustesse, innovation, performance et ergonomie. Réalisés dans des matériaux
d’origine professionnelle tels que l’acier brossé inoxydable, nos produits s’intègrent facilement
dans chaque cuisine, grâce à un design sobre et élégant.
3. CARACTERISTIQUES PRODUIT
1. Couvercle en verre avec rebord en acier inoxydable
2. Plateau de cuisson réversible en acier inoxydable
3. Plat en verre (capacité : 5 litres)
4. Réservoir amovible transparent (capacité : 1,4 litre)
5. Base de l’appareil
6. Tableau de contrôle
1. Bouton d’allumage/arrêt
2. Ecran Led achant :
- 5 programmes de cuisson : (manuel), (poisson), (volaille), (céréales),
(légumes)
- 1 programme de maintien au chaud
- Temps de cuisson
- Signal de manque d’eau
3. Bouton pour réchauer les aliments
4. Bouton de mise en marche/pause
5. Molette de sélection des modes de cuisson et de réglage des temps de cuisson.
4. ASSEMBLAGE ET UTILISATION DU CUISEUR VAPEUR
Attention : Avant la première utilisation avec aliments, faire fonctionner l’appareil pendant 30
minutes avec de l’eau dans le réservoir, vidanger puis nettoyer soigneusement chaque
partie.
a. Assemblage
• Placer la base de l’appareil sur une surface plane, stable, propre et sèche.
• Remplir d’eau (entre 10 et 20 cl) la base xe du réservoir en vériant au préalable que la vidange
située à l’arrière de l’appareil est bien fermée (Fig.1).
N.B. Ne pas remplir au-delà du niveau maximum indiqué sur l’appareil.
• Dévisser le bouchon de réservoir transparent et le remplir d’eau (Fig.2).
N.B. Ne pas remplir au-delà du niveau indiqué sur le réservoir.
• Revisser le bouchon puis xer le réservoir sur sa base (Fig.3).
• Placer le plat en verre sur la base de l’appareil. (Fig.4).

4
N.B. : S’assurer que le plat est bien centré et bloqué par les quatre cales (situées sur les extrémités
de la base).
• Déposer le plateau métallique réversible dans le sens le plus adapté aux aliments à cuire (Fig.5).
• Déposer les aliments sur le plateau.
• Refermer ensuite le couvercle en emboitant bien le cache sur le conduit vapeur à l’arrière de
l’appareil (Fig.6).
N.B. : s’assurer que le cache du couvercle est bien xé sur le conduit pour éviter toute perte de
vapeur.
b. Utilisation en mode «Cuisson préprogrammée»
• Brancher la che dans la prise.
• Appuyer sur le bouton . L’écran s’illumine.
• Tourner la molette de réglage pour faire déler les catégories d’aliments sur l’écran.
• Lorsque la catégorie souhaitée clignote, appuyer une fois sur la molette pour valider le choix. La
catégorie choisie s’ache seule et l’indicateur de temps clignote.
• Modier éventuellement le temps préprogrammé en tournant la molette puis appuyer sur le
bouton pour lancer la cuisson.
Attention : Durant la cuisson, ne jamais toucher les éléments potentiellement brûlants tels que le
couvercle, le plat ou la base de l’appareil.
N.B.
• Pour éteindre l’appareil avant la n du programme, appuyer sur le bouton .
• Pour changer la durée de cuisson en cours de route, appuyer sur le bouton , utiliser le
bouton de réglage pour modier la durée, puis appuyer à nouveau sur .
c. Utilisation en mode «Manuel»
Le mode manuel permet de régler directement le temps de cuisson ou de lancer la cuisson sans
minuterie.
Pour sélectionner directement le temps de cuisson :
• Sélectionner le mode manuel sur l’écran avec la molette.
• Sélectionner le temps de cuisson souhaité en tournant la molette puis appuyer sur pour
lancer la cuisson.
Pour démarrer la cuisson sans minuterie :
• Sélectionner le mode manuel avec la molette.
• Appuyer sur le bouton pour lancer la cuisson.
N.B. : en mode Manuel, le temps maximum de cuisson est de 59 minutes/59 secondes.
d. Utilisation en mode «Maintien au chaud»
Pour maintenir les aliments au chaud :
• Appuyer sur le bouton . L’écran s’illumine.
• Sélectionner l’icône avec la molette de réglage. Le temps 0:00 apparait.
• Appuyer sur pour lancer le programme sans minuterie ou sélectionner d’abord une durée
avant d’appuyer sur .
N.B. :
- Sans minuterie, le temps maximum de cuisson est de 3h et 59 minutes (temps d’évaporation d’un
réservoir plein).

5
- Avec minuterie, le temps maximum de cuisson est de 59 minutes/59 secondes.
e. Utilisation en mode «Réchauage»
Pour réchauer les aliments :
• Appuyer sur le bouton . L’écran s’illumine.
• Appuyer sur le bouton .
• Appuyer sur pour lancer le programme sans minuterie ou sélectionner d’abord une durée
avant d’appuyer sur .
f. Signal «Manque d’eau»
Lorsque la quantité d’eau du réservoir est faible, l’icône apparait et un signal sonore retentit toutes les
30 secondes. Lorsque le réservoir est vide, l’appareil arrête de fonctionner, l’icône se met à clignoter
et un signal sonore retentit en continu jusqu’à ce que le réservoir soit rempli.
• Remplir le réservoir (comme expliqué plus haut) et appuyer sur pour relancer la cuisson.
5. NETTOYAGE ET ENTRETIEN
a. Après chaque utilisation
• Toujours débrancher et laisser refroidir complétement l’appareil avant de le nettoyer.
• Après chaque utilisation, vider le réservoir d’eau et vidanger puis nettoyer soigneusement chaque
partie de l’appareil.
• Prendre également soin de vider et vidanger la partie arrière de l’appareil : enlever les éléments
amovibles (couvercle, plat en verre, réservoir), dévisser le bouton et vider l’eau en inclinant la base
de l’appareil.
• Pour nettoyer l’intérieur de la base, utiliser une éponge humide avec une cuillère à café de
bicarbonate de soude ; essuyer avec précaution puis rincer à l’eau claire.
• Ne jamais utiliser d’eau de javel pour nettoyer l’appareil.
• Ne jamais mettre la base de l’appareil dans le lave-vaisselle.
• Ranger l’appareil au sec, hors de portée des enfants.
b. Traitement anticalcaire
Après quelques mois d’utilisation, une accumulation de dépôts de calcaire est possible. Il est
conseillé de détartrer l’appareil régulièrement pour garder la production de vapeur optimale et
augmenter la durée de vie.
Pour détartrer : remplir une moitié de réservoir avec de l’eau et l’autre moitié avec du vinaigre.
Mettre en place le plat en verre et le couvercle. Sélectionner 60 minutes d’utilisation en mode
puis appuyer sur le bouton .
Lorsque le signal sonore retentit, débrancher, attendre que l’appareil refroidisse complétement
puis vider le réservoir.
Rincer ensuite le réservoir, le plat et le couvercle plusieurs fois à l’eau claire.
Pour terminer, remplir le réservoir avec de l’eau froide et faire fonctionner le cuiseur vapeur 30
minutes pour supprimer tout résidu éventuel.
Nous recommandons également cette méthode après la cuisson du poisson.

6
6. RECETTES
a. Salade de pommes de terre ratte, let de rouget aux olives et tomates
Pour : 6 personnes
Préparation : 25 minutes
Temps de cuisson : 25 minutes
• 6 lets de rouget d’environ 150g chacun
• 600 g de pommes de terre ratte
• 100 g d’olives noires
• 3 tomates
• 10 cl d’huile d’olive
• 1 échalote épluchée
• 1 cuillère à café de eur de sel
• 1 cuillère à soupe de vinaigre balsamique
• 100 g de salade roquette
• 2 cuillères à soupe de persil haché
• Sel et poivre
• Préparer le cook fresh en suivant les instructions de la notice.
• Cuire les pommes de terre non épluchées durant 20 minutes en position , réserver.
• Préparer la sauce en mélangeant les tomates taillées en dés, l’échalote ciselée, les olives noires et
le persil haché.
• Ajouter l’huile d’olive et la eur de sel.
• Assaisonner et cuire les lets de rouget côté chair durant 5 minutes enposition sur la grille
de cuisson.
• Pendant ce temps, éplucher et tailler les pommes de terre en rondelles et les déposer dans un
saladier.
• Ajouter la roquette, et verser la sauce généreusement.
• Mélanger et dresser dans un plat.
• Déposer les lets de rouget sur le mélange.
b. Spirales de saumon au lard et fenouil à l’anis
Pour : 4 personnes
Préparation : 25 minutes
Temps de cuisson : 30 minutes
• 500 g de saumon dans le cœur
• 4 nes tranches de poitrine fumée
• 2 bulbes de fenouil
• 1 cuillère à café d’anis vert
• 10 g de eur de sel
• Poivre du moulin
• Préparer le cook fresh en suivant les instructions de la notice.
• Laver et couper en quatre les bulbes de fenouil.
• Les déposer sur la grille de cuisson.
• Assaisonner d’anis vert, de eur de sel et de poivre du moulin.
• Précuire le fenouil 20 minutes, en position .
• Pendant ce temps, tailler le saumon en lanières, dans le sens de la longueur.

7
• Rouler les bandes de saumon en spirales et les entourer d’une tranche de lard.
• Déposer les spirales de saumon sur la grille, à côté des morceaux de fenouil.
• Saupoudrer de eur de sel et d’anis vert.
• Cuire 10 minutes, en position .
• Servir l’ensemble dans un plat, arroser d’un let d’huile d’olive.
7. GUIDE DE CUISSON
a. Quelques conseils
Les temps de cuisson mentionnés dans ce guide ne sont qu’une indication. Le temps de cuisson
varie en fonction de la taille et de la quantité d’aliments à cuire, ainsi que des préférences de chacun.
Les temps de cuisson indiqués sont calculés pour des aliments frais.
Pour les légumes, la première indication de temps permet d’obtenir des légumes croquants et la
deuxième des légumes plus cuits. Pour une cuisson plus uniforme, utiliser des aliments de taille à peu
près égale.
La viande, le poulet et les fruits de mer doivent être complètement décongelés avant d’être placés
dans le cuiseur vapeur. Veiller à ce que les aliments ne touchent pas les bords du plateau. Pour obtenir
les meilleurs résultats, la vapeur doit pouvoir circuler librement autour des aliments.
Utiliser toujours de l’eau froide dans le réservoir. Ne pas ajouter d’herbes ou de condiments à l’eau
du réservoir.
PROTÉINES
Aliment Quantité Fonction Temps de cuisson
blanc de poulet 4blancs de poulet, ±
750g Volaille 15 à 20minutes
Palourdes 1kg Poisson 6 à 8minutes
Pattes de crabe fraîches 500g Poisson 8minutes
Pattes de crabe surgelées 500g Poisson 10minutes
Filet de poisson, épais, par ex.:
saumon, cabillaud… 350g Poisson 15minutes
Filet de poisson, n,
par ex.: let de sole,
turbot
250g Poisson 6 à 8minutes
Poisson entier 1kg Poisson 20minutes
Poisson entier 500 à 750g Poisson 15minutes
Queue de homard 4pièces Poisson 10minutes
Moules 1kg Poisson 6 à 8minutes
Crevettes 500g Poisson 6minutes
Crevettes surgelées 500g Poisson 10minutes
LÉGUMES
Aliment Quantité Fonction Temps de cuisson
Artichauts 300 à 350g chacun Légumes 35 à 45minutes
Asperges 500g Légumes 7 à 8minutes
Haricots verts frais 500g Légumes 7 à 8minutes
Haricots verts surgelés 500g Légumes 6minutes

8
Haricots beurre frais 500g Légumes 10 à 12minutes
Betteraves 350 à 400g Légumes 25 à 30minutes
Brocolis Sommité de 2,5 à 5cm 500g Légumes 7minutes
Brocolis surgelés 350g Légumes 6minutes
Choux de Bruxelles 500g Légumes 14minutes
Carottes taillées en tronçons
de 8 cm 500g Légumes 8 à 9minutes
Fanes de carotte 500g Légumes 9 à 10minutes
Chou-eur Sommités 750g Légumes 10minutes
Épis de maïs 4épis Légumes 8minutes
Fenouil Coupé en quartiers 1bulbe moyen, ± 350g Légumes 10minutes
Légumes taillés variés 500g Légumes 7minutes
Panais Tailler en tronçons de 4 à
6 cm de longueur 1botte, ± 500g Légumes 8 à 10minutes
Pommes de terre petite Taillés
en cubes de 2,5 à 5cm 750g Légumes 20minutes
Pommes de terre grosse 1,5kg Légumes 40minutes
Petits pois frais écossé 250g Légumes 5minutes
Épinards 150g Légumes 3 à 4minutes
Épinards surgelés 300g Légumes 14minutes
Potimarron, citrouille taillé en
cube 750g Légumes 15 à 20minutes
Pois mange-tout 350g Légumes 6 à 8minutes
Pois gourmands 350g Légumes 6minutes
Navets ronds taillés en quartiers 450g Légumes 20minutes
Courgette taillée en rondelles 350g Légumes 5minutes
ŒUFS
Aliment Quantité Fonction Temps de cuisson
Œufs mollets ou à la coque 12 maximum Manuelle 8minutes
Œufs durs 12 maximum Manuelle 14minutes

9
1. SAFETY INSTRUCTIONS
READ THESE SAFETY INSTRUCTIONS CAREFULLY BEFORE USING
THE APPLIANCE!
• WARNING: The plastic bags used to cover the unit
or packaging may be dangerous. To avoid the risk of
suocation, keep away from babies and children. These
bags are not toys.
• WARNING: Hot surface.
• Do not touch hot surfaces.
• Allow the appliance to cool before storing.
• The temperature of accessible surfaces may be high when the
appliance is operating.
• Do not place the appliance on or near a hot appliance. Do not
use on heat sensitive surfaces or near inammable materials.
• Leave sucient space between the appliance and walls or
furniture. Do not place the grill below wall-mounted kitchen
elements.
• Do not let cord hang over the edge of the work surface and do
not let it touch hot surfaces.
• Do not immerse it in water or any other liquid.
• Always unplug the appliance after use and before cleaning.
Never leave the appliance unattended when plugged in. Pull on
the plug to unplug, never on the cord.
• Always empty the tank when the appliance is not in use.
• The appliance is not intended to be operated by an external
timer or a remote control system.
• Do not use the appliance if has been dropped or if it shows any
signs of damage.
• Stop using the appliance immediately if the power cable is
damaged.
• If the power cable is damaged, it must be replaced by the
manufacturer, its after sales service or similarly qualied people,
in order to avoid any danger.

10
• Do not try to repair the appliance yourself.
• Any use of accessories which are not recommended or sold by
Cuisinart® may cause a re, electrocution or risk of injury.
• This appliance can be used by children of 8 years old or over and
by persons with reduced physical, sensory or mental capacities,
or by persons lacking in experience or knowledge, if they have
been able to benet from supervision or prior instructions
regarding the safe use of the appliance and if they understand
the risks involved. Children shall not play with the appliance.
Children should not carry out cleaning or maintenance unless
they are aged over 8 years old and are monitored.
• Store the appliance and its power lead out of the reach of
children under 8.
• Use this appliance only for cooking, in accordance with the
instructions in this manual.
• Do not use it outside.
• This appliance is intended for use in the home.
Discarding electrical and electronic equipment at the end of
life
In everybody’s interest and to participate actively in the joint
eort to protect the environment:
• Do not throw products away with household waste.
• Use return and collection systems to recycle or recover
certain materials.

11
2. INTRODUCTION
Congratulations on your purchase!
For over 40 years, Cuisinart® has been developing a full range of kitchen appliances that allow
both passionate amateurs and great chefs to express their creativity to the fullest. All Cuisinart®
appliances result from close collaboration between engineers and great names in Cookery like
Paul Bocuse, the brand’s charismatic ambassador. Every product combines sturdiness, innovation,
performance and ergonomics. Made with professional materials such as brushed stainless steel,
our products will easily t into any kitchen thanks to their simple and elegant design.
3. PRODUCT FEATURES
1. Glass lid with stainless steel rim
2. Reversible stainless steel cooking tray
3. Glass dish (capacity: 5 litres)
4. Removable transparent tank (capacity: 1.4 litres)
5. Appliance base
6. Control panel
1. On/o switch
2. LED display:
- 5 cooking programmes: (manual), (sh), (poultry), (cereals),
(vegetables)
- 1 keep-hot programme
- cooking time
- Water needed signal
3. Food reheat button
4. Start/pause button
5. Dial to select cooking modes and set cooking time.
4. ASSEMBLY AND USE OF THE STEAM COOKER
Warning: Before rst use with food, run the appliance for 30 minutes with water in the tank,
emptying and then cleaning each part thoroughly.
a. Assembly
• Place the appliance base on a clean, at and dry surface.
• Fill the xed base of the tank with water (between 10 and 20 cl), rst checking that the drain
behind the appliance is properly closed (Fig.1).
N.B. : Do not ll beyond the maximum level indicated on the appliance.
• Unscrew the transparent tank cap and ll with water (Fig.2).
N.B. : Do not ll beyond the level indicated on the water tank.
• Screw the cap back in and then x the tank to the base (Fig.3).
• Position the glass dish on the appliance base. (Fig.4).
N.B. : Ensure that the dish is properly centred and locked into position by the four holds (at the
ends of the base).

12
• Position the reversible metal tray in the most appropriate direction according to the food to be
cooked (Fig.5).
• Arrange the food on the tray.
• Now close the lid again, carefully fastening the cover on the steam pipe behind the appliance
(Fig.6).
N.B. : make sure that the lid is securely attached to the duct to prevent loss of steam.
b. Use in“Pre-set cook” mode
• Plug into the socket.
The button lights up. It will switch o automatically after 30 seconds if not used.
• Press the button. The display lights up.
• Turn the dial to run through the food categories on the display.
• When the desired category ashes, press the dial once to conrm the choice. The chosen category
is displayed alone and the time indicator ashes.
• Change the pre-set time if you so wish, by turning the dial, and then press the button to start
cooking.
Warning: Never touch any parts that may be hot during cooking, such as the lid, tray or appliance
base.
N.B.
• To switch the appliance o before the programme ends, press the button.
• To change cooking duration while in progress, press the button, use the settings button to
change the duration and then press once again.
c. Use in “Manual” mode
Manual mode enables cooking time to be adjusted directly or cooking to be started without a
timer.
To select cooking time directly:
• Use the dial to select manual mode on the display.
• Select the desired cooking time by turning the dial, and then press to start cooking.
To start cooking without a timer:
• Use the dial to select manual mode.
• Press the button directly to start cooking.
N.B. : in Manual mode, maximum cooking time is 59 minutes/59 seconds.
d. Use in“keep hot” mode
To keep food hot:
• Press the button. The screen comes on.
• Select the icon with the setting wheel. The time is displayed as 0:00.
• Press to launch the timer-free programme or select a time rst and then press .
N.B. :
- Without a timer, maximum cooking time is 3 hours and 59 minutes (the time it takes for a full tank
to evaporate).
- With the timer, maximum cooking time is 59 minutes/59 seconds.

13
e. Use in «Reheat» mode
To reheat food:
• Press the button. The screen turns on.
• Press the button.
• Press to launch the timer-free programme or select a time rst and then press .
f.“Water needed”signal
When there is not much water in the tank, the icon appears and an audible warning sounds
every 30 seconds. When the tank is empty, the appliance stops operating, the icon starts
ashing and a continuous audible warning sounds until the tank is lled.
• Fill the tank (as explained above) and press to re-start the cooking.
5. CLEANING AND MAINTENANCE
a. After each use
• Always unplug the appliance and leave it to cool completely before cleaning it.
• After each use, empty the water tank and drain; then clean each part of the appliance thoroughly.
• Take care to empty and drain the back of the appliance: remove all removable parts (lid, glass dish,
tank), unscrew the button and empty the water by angling the appliance base.
• To clean the inside of the base, use a damp sponge and a teaspoonful of sodium bicarbonate; wipe
carefully and then rinse in clean water.
• Never use bleach to clean the appliance.
• Never put the appliance base in the dishwasher.
• Store the appliance dry, out of reach of children.
b. Descaling
After a few months of use, scale may build up. It is recommended to descale the appliance regularly
in order to ensure optimal steam production is maintained and increase its useful life.
To descale: ll half the tank with water and the other half with vinegar. Position the glass dish and
lid. Select 60 minutes of use in mode and then press the button.
When the audible warning sounds, unplug and wait for the appliance to cool completely
before emptying the tank.
Then rinse the tank, dish and lid several times in clean water.
Finally, ll the tank with cold water and run the steam cooker for 30 minutes to eliminate any
residues.
We also recommend this method after cooking sh.
6. RECIPES
a. Ratte potato salad, red mullet llet with olives and tomatoes
Serves: 6 people Preparation time: 25 minutes Cooking time: 25 minutes
• 3 red mullet llets, each weighing approximately 150g
• 600 g ratte potatoes

14
• 100 g black olives
• 3 tomatoes
• 10 cl olive oil
• 1 peeled shallot
• 1 tsp eur-de-sel sea salt
• 1 tbs balsamic vinegar
• 100 g rocket lettuce
• 2 tbs diced parsley
• Salt and pepper
• Prepare the cook fresh by following the instructions given.
• Cook the unpeeled potatoes for 20 minutes in position ; set aside.
• Prepare the sauce by mixing the diced tomatoes with the chopped shallot, black olives and diced
parsley.
• Add the olive oil and eur-de-sel sea salt.
• Season and cook the red mullet llets for 5 minutes in position on the cooking grill.
• In the meantime, peel and slice the potatoes into disc shapes, laying them out in a salad bowl.
• Add the rocket and pour over plenty of sauce.
• Mix and dress on a plate.
• Arrange the red mullet llets on top of the mixture.
b. Salmon spirals in bacon and aniseed fennel
Serves: 4 people Preparation time: 25 minutes Cooking time: 30 minutes
• 500 g heart of salmon
• 4 thin slices of smoked belly of pork
• 2 fennel bulbs
• 1 tsp green aniseed
• 10 g eur-de-sel sea salt
• Ground pepper
• Prepare the cook fresh by following the instructions given.
• Wash and cut the fennel bulbs into four pieces each.
• Arrange them on the cooking grill.
• Season with green aniseed, eur-de-sel sea salt and ground pepper.
• Pre-cook the fennel for 20 minutes in position .
• In the meantime, cut the salmon into strips longways.
• Roll the strips of salmon into spirals and wrap them in a slice of bacon.
• Arrange the salmon spirals on the grill, alongside the pieces of fennel.
• Dust with eur-de-sel sea salt and green aniseed.
• Cook for 10 minutes in position .
• Serve on a plate, drizzled in olive oil.
7. COOKING GUIDE
a. Useful advice
The cooking times given in this guide are for information only. Cooking time varies according to the
size and quantity of food to be cooked, as well as personal preference. The cooking times stated are
calculated for fresh food.
For vegetables, the rst indication of time leaves vegetables crispy; the second cooks them more.

15
For more even cooking, use food that has been cut to more or less the same size.
Meat, poultry and seafood should be completely defrosted before being put into the steam cooker.
Make sure these foods do not touch the edges of the tray. For best results, the steam must be able
to circulate freely around the food.
Always use cold water in the tank. Do not add any herbs or seasoning to the water in the tank.
PROTEINS
Food Amount Feature Cooking time
chicken breast
4 chicken breasts, ±
750g Poultry 15 to 20 minutes
Clams 1kg Fish 6 to 8 minutes
Fresh crab legs 500 g Fish 8 minutes
Frozen crab legs 500 g Fish 10 minutes
Fish llet, thick, e.g.
salmon, cod, etc. 350 g Fish 15 minutes
Fish llet,
thin, e.g. sole,
turbot
250 g Fish 6 to 8 minutes
Whole sh 1 kg Fish 20 minutes
Whole sh 500 to 750 g Fish 15 minutes
Lobster tail 4 pieces Fish 10 minutes
Mussels 1 kg Fish 6 to 8 minutes
Shrimps 500 g Fish 6 minutes
Frozen shrimps 500 g Fish 10 minutes
VEGETABLES
Food Amount Feature Cooking time
Artichokes 300 to 350 g each Vegetables 35 to 45 minutes
Asparagus 500 g Vegetables 7 to 8 minutes
Fresh green beans 500 g Vegetables 7 to 8 minutes
Frozen green beans 500 g Vegetables 6 minutes
Fresh butter beans 500 g Vegetables 10 to 12 minutes
Beet 350 to 400 g Vegetables 25 to 30 minutes
Broccoli tips from
2.5 to
500 g Vegetables 7 minutes
Frozen broccoli 350 g Vegetables 6 minutes
Brussels sprouts 500 g Vegetables 14 minutes
Carrots cut into 8 cm
discs 500 g Vegetables 8 to 9 minutes
New carrots 500 g Vegetables 9 to 10 minutes
Cauliower tips 750 g Vegetables 10 minutes
Corn on the cob 4 ears Vegetables 8 minutes

16
Fennel cut into
quarters
1 average bulb, ±
350 g
Vegetables 10 minutes
Mixed cut vegetables 500 g Vegetables 7 minutes
Parsnip cut into pieces
of
1 bunch, ± 500 g Vegetables 8 to 10 minutes
Sliced small potatoes 750 g Vegetables 20 minutes
Large potatoes 1.5 kg Vegetables 40 minutes
Shelled fresh peas 250 g Vegetables 5 minutes
Spinach 150 g Vegetables 3 to 4 minutes
Frozen spinach 300 g Vegetables 14 minutes
Squash, carved
pumpkin
750 g Vegetables 15 to 20 minutes
Mange-tout peas 350 g Vegetables 6 to 8 minutes
Snow peas 350 g Vegetables 6 minutes
Round turnips
cut into quarters 450 g Vegetables 20 minutes
Courgette sliced into
discs
350 g Vegetables 5 minutes
EGGS
Food Amount Feature Cooking time
soft-boiled eggs maximum 12 Manual 8 minutes
hard-boiled eggs maximum 12 Manual 14 minutes

17
1. SICHERHEITSHINWEISE
LESEN SIE DIE SICHERHEITSHINWEISE VOR DEM GEBRAUCH DES
GERÄTS BITTE SORGFÄLTIG DURCH!
• ACHTUNG: Die Polyethylenbeutel, die das Produkt oder
seine Verpackung enthalten, können eine Gefährdung
für Kinder darstellen. Um jede Erstickungsgefahr zu
vermeiden, sollten diese Beutel außerhalb der Reichweite
von Babys oder Kleinkindern aufbewahrt werden. Diese
Beutel sind kein Spielzeug.
• ACHTUNG: Heiße Oberächen.
• Die heißen Oberächen nie berühren.
• Das Gerät vor dem Verstauen abkühlen lassen.
• Die zugänglichen Oberächen des Geräts können während des
Betriebs sehr heiß werden.
• Das Gerät nicht auf ein Heizgerät oder in dessen Nähe stellen.
Nicht auf hitzeempndlichen Oberächen oder in der Nähe von
entzündlichem Material verwenden.
• LassenSieausreichendAbstandzwischendemGerätundWänden
oder Möbelelementen. Das Gerät nicht unter Hängeschränke in
der Küche stellen.
• Lassen Sie das Netzkabel nicht über den Rand der Arbeitsplatte
hängen und bringen Sie es nie in Berührung mit heißen
Oberächen.
• Den Sockel des Geräts nicht in Wasser oder andere Flüssigkeiten
tauchen.
• Nach dem Gebrauch und vor dem Reinigen stets den Netzstecker
des Geräts ziehen. Das Gerät nie unbeaufsichtigt lassen, wenn
es an den Netzstrom angeschlossen ist. Zum Entfernen des
Netzsteckers immer am Stecker und nicht am Kabel ziehen.
• Den Wasserbehälter immer leeren, wenn das Gerät nicht benutzt
wird.
• Das Gerät ist nicht für das automatische Einschalten über eine
externeZeitschaltuhrodereingetrenntesFernbedienungssystem
geeignet.
• DasGerätnichtbenutzen,wennesgefallenistoderoensichtliche

18
Spuren einer Beschädigung aufweist.
• Den Betrieb des Geräts unverzüglich einstellen, wenn das Kabel
beschädigt ist.
• Wenn das Kabel beschädigt ist, muss es durch den Hersteller,
seinen Kundendienst oder eine ähnlich qualizierte Person
ersetzt werden, um jede Gefahr zu vermeiden.
• Der Benutzer darf keinerlei Reparaturen selbst durchführen.
• Jeder Gebrauch von Zubehör, das nicht durch Cuisinart®
empfohlen oder vertrieben wird, kann zu Feuer, Stromschlag
und Verletzungsgefahr führen.
• Dieses Gerät kann von Kindern ab 8 Jahren sowie von Personen
mit eingeschränkten körperlichen, sensorischen oder geistigen
Fähigkeiten bzw. eingeschränkter Wahrnehmung oder ohne
Erfahrung und Kenntnisse verwendet werden. Bedingung ist
hierbei ihre Beaufsichtigung und Anleitung hinsichtlich der
sicheren Handhabung des Geräts und das Bewusstsein der
damit verbundenen Risiken. Kinder dürfen nicht mit dem Gerät
spielen. Die Reinigung und Wartung durch den Benutzer darf
nicht von Kindern ausgeführt werden, es sei denn diese sind
mindestens 8 Jahre alt und werden beaufsichtigt.
• Gerätund Anschlusskabel außerhalb der Reichweite von Kindern
unter 8 Jahren halten.
• Benutzen Sie dieses Gerät ausschließlich zum Garen und
befolgen Sie die Hinweise in dieser Anleitung.
• Nicht im Freien verwenden.
• Dieses Gerät ist für die Verwendung im Haushalt bestimmt.
Entsorgung von elektrischen und elektronischen Altgeräten
Im Interesse der Allgemeinheit und als aktiver Beitrag zum
kollektiven Einsatz für den Umweltschutz:
• Geräte nicht über den Hausmüll entsorgen.
• Rücknahme- und Verwertungssysteme verwenden.
Bestimmte Materialien können so wiederverwertet oder
aufbereitet werden.
This manual suits for next models
1
Table of contents
Languages:
Other Cuisinart Electric Steamer manuals

Cuisinart
Cuisinart STM1000U User manual

Cuisinart
Cuisinart CookFresh STM-1000 User manual

Cuisinart
Cuisinart STM-1000A Series Service manual

Cuisinart
Cuisinart FP-2207A User manual

Cuisinart
Cuisinart Cook & Steam User manual

Cuisinart
Cuisinart TCS-60C User manual

Cuisinart
Cuisinart TCS-60E User manual

Cuisinart
Cuisinart Cook & Steam User manual

Cuisinart
Cuisinart CookFresh STM-1000 Quick guide

Cuisinart
Cuisinart STM1000AR User manual