Curtis G4 Series User manual

G4 Digital Iced Tea Brewing System
USER GUIDE
READ AND SAVE THESE INSTRUCTIONS
NOTICE TO INSTALLER: Please leave this booklet with the machine.
ø $
'$(5#'30/5$07&3 'SFW#

CONTENTS CL5
.H\)HDWXUHV6SHFLÀFDWLRQV6\VWHP5HTXLUHPHQWV................................................................................................FS5
,PSRUWDQW6DIHJXDUGV............................................................................................................................................... IS2
,QVWDOODWLRQ,QVWUXFWLRQV*HQHUDO.............................................................................................................................. II2
,QVWDOODWLRQ,QVWUXFWLRQV/HYHOLQJ:DWHU6XSSO\(OHFWULFDO..................................................................................... II8
2SHUDWLQJ,QVWUXFWLRQV ..............................................................................................................................................OI4
&OHDQLQJ,QVWUXFWLRQV%UHZHU .................................................................................................................................CI1
&OHDQLQJ,QVWUXFWLRQV7HD'LVSHQVHU .....................................................................................................................CI6
3URJUDPPLQJ*XLGH ............................................................................................................................................. 3*
5RXJK,Q'UDZLQJ................................................................................................................................................... 5'
,OOXVWUDWHG3DUWV5HFRPPHQGHG3DUWV0DLQ&KDVVLV............................................................................................. IP5
,OOXVWUDWHG3DUWV5HFRPPHQGHG3DUWV7DQN$VVHPEO\........................................................................................ IP21
(OHFWULFDO6FKHPDWLF ..............................................................................................................................................ES11
7URXEOHVKRRWLQJ*XLGH ............................................................................................................................................7*
7URXEOHVKRRWLQJ*XLGH ..........................................................................................................................................7*
(UURU&RGHV .............................................................................................................................................................EC1
3URGXFW:DUUDQW\....................................................................................................................................................3:
(5#$0/5&/54-*45ø "
Contact Information
Wilbur Curtis Co., Inc.
"DDP4USFFU].POUFCFMMP$"64
1IPOF]5PMM'SFF
&NBJMDTSBTTJTUBODF!XJMCVSDVSUJTDPN]8FCXXXXJMCVSDVSUJTDPN
'PSUIFMBUFTUTQFDJmDBUJPOTBOEJOGPSNBUJPOHPUPXXXXJMCVSDVSUJTDPN
5PMM'SFF].POEBZ'SJEBZA.M.P.M.PT
&NBJMUFDITVQQPSU!XJMCVSDVSUJTDPN
%VFUPDPOUJOVFEQSPEVDUJNQSPWFNFOUUIFQSPEVDUTJMMVTUSBUFEQIPUPHSBQIFEJOUIJTHVJEFNBZWBSZTMJHIUMZGSPNUIFBDUVBMQSPEVDU

KEY FEATURES/SPECIFICATIONS/SYSTEM REQUIREMENTS FS5
Key Features
• Generation Four (G4) Digital Control Module – Large, 4.3” touchscreen. Icon-driven interface streamlines
operation. Provides precise control of all critical brewing functions.
• G4 Enhanced Tea Flavor and Clarity – With digital accuracy, two separate precision valves provide
unsurpassed control over brewing and dilution cycle.
• On-Screen Instructions – Provides fast, intuitive training; reduces service calls.
• Built-in Self Diagnostic System – Includes real-time feedback of the brewing process and energy saving mode.
• Industry’s most effective mineral tolerant design.
• Encapsulated control boards – Protect against steam, water and impact.
6SHFLÀFDWLRQV
(OHFWULFDO6XSSO\5HTXLUHPHQWV
MODEL # DESCRIPTION PHASE VOLTS AMPS HEATING CONFIG WIRE WATTS HERTZ CAPACITY
G4TB Single, Iced Tea Brewing System 1 PH 120 V 13.8 A 1 X 1600 W 2W + G 1650 W 50/60 Hz 12.0 gal/hr
[45.4 l/hr]
G4TBP Single, Iced Tea Brewing System.
Polaris Style 1 PH 120 V 13.8 A 1 X 1600 W 2W + G 1650 W 50/60 Hz 12.0 gal/hr
[45.4 l/hr]
'LPHQVLRQV :DWHU6XSSO\5HTXLUHPHQWV
MODEL # HEIGHT WIDTH DEPTH SHIP WEIGHT SHIP CUBE WATER CONNECTOR WATER PRESSURE MIN. FLOW RATE
G4TB 34.29”
[87.1 cm]
10.11”
[25.7 cm]
22.82”
[58.0 cm]
41.0 lbs
[18.6 kg]
9.14 cu. ft.
[0.26 m3]µÁDUH
20 - 90 psi
[138 - 620 kPa]
1.0 gpm
[3.8 lpm]
G4TBP 29.38”
[74.6 cm]
10.97”
[27.9 cm]
25.70”
[65.3 cm]
46.0 lbs
[20.9 kg]
7.50 cu. ft.
[0.21 m3]µÁDUH
20 - 90 psi
[138 - 620 kPa]
1.0 gpm
[3.8 lpm]
(5#,&:'&"563&441&$44:45&.3&26*3&.&/54ø $
• #SFXUFNQFSBUVSF¡'¡$
• .JOJNVNCSFXUFNQFSBUVSF¡'¡$
• Brew volume = Large-Small
• Energy save mode = Off
Following are the factory default settings for the brewer:

IMPORTANT SAFEGUARDS IS2
Symbols
This is the safety alert symbol. It is used to alert you to potential physical injury hazards. Obey all safety
messages that follow this symbol to avoid possible injury or death.
DANGER - Indicates a hazardous situation which, if not avoided, will result in death or serious injury.
WARNING - Indicates a hazardous situation which, if not avoided, could result in death or serious injury.
CAUTION - Indicates a hazardous situation which, if not avoided, could result in minor or moderate injury.
NOTICE - Indicates a situation which, if not avoided, could result in property damage.
IMPORTANT - Provides information and tips for proper operation.
SANITATION REQUIREMENTS
Important Safeguards/Conventions
WARNING:
• Make sure that this appliance is installed and grounded according to the INSTALLATION
*/4536$5*0/4CZRVBMJmFEQFSTPOOFMCFGPSFBUUFNQUJOHUPVTFJU'BJMVSFUPGPMMPXUIF*/45"--"5*0/
INSTRUCTIONS could result in personal injury or void the warranty.
• This appliance is designed for commercial use. Any service other than cleaning and preventive
maintenance should be performed by an authorized Wilbur Curtis service technician.
• 5PSFEVDFUIFSJTLPGmSFPSFMFDUSJDTIPDL%0/05PQFOUIFTFSWJDFQBOFMT5IFSFBSFOPVTFS
serviceable parts inside.
• Keep hands, arms and other items away from hot surfaces of the unit during operation.
• Clean the appliance and any dispensers completelyCFGPSFVTJOHUIFNGPSUIFmSTUUJNFBDDPSEJOHUP
the CLEANING INSTRUCTIONS. Clean them regularly as instructed in the CLEANING INSTRUCTIONS.
• Use this appliance only for its intended use, brewing/dispensing hot and/or cold beverages/water.
• This appliance is not intended for use by persons (including children) with reduced physical, sensory
or mental capabilities or lack of experience and knowledge, unless they have been given supervision
or instruction concerning use of the appliance by a person responsible for their safety. Children should
be supervised to ensure that they do not play with the appliance.
• Avoid spillage onto the power (mains) connector.
$0''&&5&"#3&8&34*.1035"/54"'&(6"3%44:.#0-4 )
WARNING - 5IJTQSPEVDUDBOFYQPTFZPVUPDIFNJDBMTJODMVEJOH"DSZMBNJEFBOE#JTQIFOPM"#1"
which are known to the State of California to cause cancer and birth defects or other reproductive harm.
'PSNPSFJOGPSNBUJPOWJTJUXXX18BSOJOHTDBHPW

IMPORTANT SAFEGUARDS IS2
$0''&&5&"#3&8&34*.1035"/54"'&(6"3%44:.#0-4 )
CE Requirements
• This appliance must be installed in locations where it can be overseen by trained personnel.
• 'PSQSPQFSPQFSBUJPOUIJTBQQMJBODFNVTUCFJOTUBMMFEXIFSFUIFUFNQFSBUVSFJTCFUXFFO¡$UP¡$
• This appliance is not suitable for outdoor use.
• 5IJTBQQMJBODFTIBMMOPUCFUJMUFENPSFUIBO¡GPSTBGFPQFSBUJPO
• "OFMFDUSJDJBONVTUQSPWJEFFMFDUSJDBMTFSWJDFBTTQFDJmFEJODPOGPSNBODFXJUIBMMMPDBMBOEOBUJPOBMDPEFT
'PSTBGFVTFBOBMMQPMFEJTDPOOFDUJPONVTUCFJODPSQPSBUFEJOUPUIFmYFEXJSJOHJOBDDPSEBODFXJUIUIF
XJSJOHSVMFTPVUMJOFEJODMBVTFPG*&$GPSNFFUJOHUIFNJOJNVNFMFDUSJDBMTBGFUZPGUIJTTUBOEBSE
• This appliance must not be cleaned by water jet.
• 5IJTBQQMJBODFDBOCFVTFECZQFSTPOTBHFEGSPNZFBSTBOEBCPWFJGUIFZIBWFCFFOHJWFOTVQFSWJTJPOPS
instruction concerning use of the appliance in a safe way and if they understand the hazards involved.
• ,FFQUIFBQQMJBODFBOEJUTDPSEPVUPGSFBDIPGDIJMESFOBHFEMFTTUIBOZFBST
• "QQMJBODFTDBOCFVTFECZQFSTPOTZFBSTBOEBCPWFXJUISFEVDFEQIZTJDBMTFOTPSZPSNFOUBMDBQBCJMJUJFT
or lack of experience and knowledge if they have been given supervision or instruction concerning use of the
appliance in a safe way and understand the hazards involved.
• $IJMESFOVOEFSUIFBHFPGZFBSTTIPVMECFTVQFSWJTFEUPFOTVSFUIFZEPOPUQMBZXJUIUIFBQQMJBODF
• If the power cord is ever damaged, it must be replaced by the manufacturer or authorized service personnel
with a special cord available from the manufacturer or its authorized service personnel in order to avoid a
hazard.
• Machine must not be immersed for cleaning.
• $MFBOJOHBOEVTFSNBJOUFOBODFTIBMMOPUCFNBEFCZDIJMESFOVOMFTTUIFZBSFPMEFSUIBOZFBSTBOE
supervised.
• This appliance is intended to be used in household and similar applications such as:
oTUBGGLJUDIFOBSFBTJOTIPQTPGmDFTBOEPUIFSXPSLJOHFOWJSPONFOUT
oCZDMJFOUTJOIPUFMTNPUFMTBOEPUIFSSFTJEFOUJBMUZQFFOWJSPONFOUT
– bed and breakfast type environments.
• This appliance not intended to be used in applications such as:
– farm houses
• Access to the service areas permitted by Authorized Service personnel only.
• 5IF"8FJHIUFETPVOEQSFTTVSFMFWFMJTCFMPXE#"

INSTALLATION INSTRUCTIONS II2
Installation Instructions
Installation Requirements
• A secure surface capable of supporting the weight of the appliance.
• For units without an attached cord set attached or dual voltage units set up for use with 220 - 240 Volts:
"QQSPQSJBUFMZTJ[FE6-MJTUFEHSPVOEJOHUZQFQPXFSDBCMFUPNFFUUIFFMFDUSJDBMTQFDJmDBUJPOTGPSUIF
BQQMJBODF*GZPVIBWFRVFTUJPOTBCPVUUIFDPSSFDUDBCMFTJ[FBOEMFOHUIDPOTVMUBRVBMJmFEJOTUBMMFS*GUIF
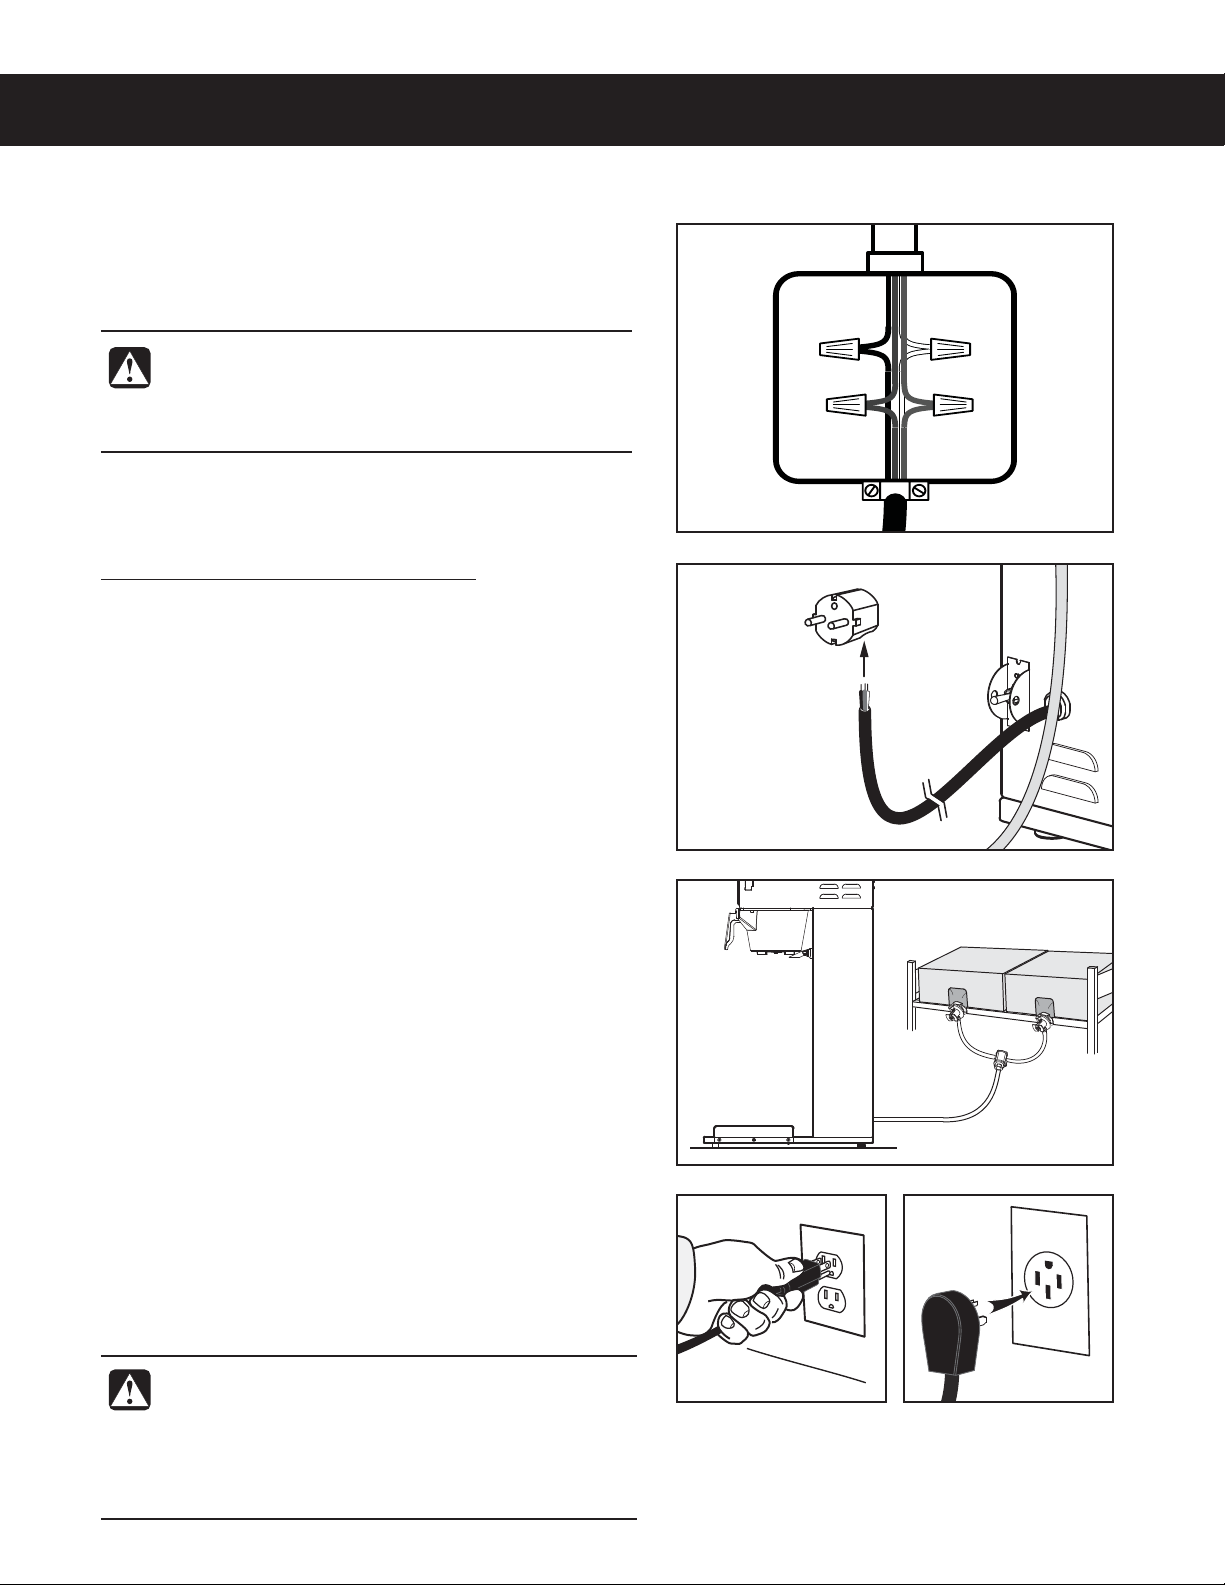
appliance will be hard wired to a junction box, the power cable must be long enough so that the unit can be
moved for cleaning underneath.
• "HSPVOEFEFMFDUSJDBMDPOOFDUJPOUPBOFMFDUSJDBMDJSDVJUUIBUNFFUTUIFFMFDUSJDBMTQFDJmDBUJPOTPGUIF
appliance (see SPECIFICATIONS). The circuit must be protected by the appropriate sized circuit breaker. If
you are not certain that the existing circuit meets the requirements for your unit, consult a licensed electrician.
• "XBUFSmMUSBUJPOTZTUFNJTSFRVJSFEUPNBJOUBJOUSPVCMFGSFFPQFSBUJPO8JMCVS$VSUJT$P*ODSFDPNNFOETB
8JMCVS$VSUJTBQQSPWFEXBUFSmMUFS4FFUIF$VSUJT&RVJQNFOU$BUBMPHGPSBGVMMMJOFPG8JMCVS$VSUJTBQQSPWFE
XBUFSmMUFST
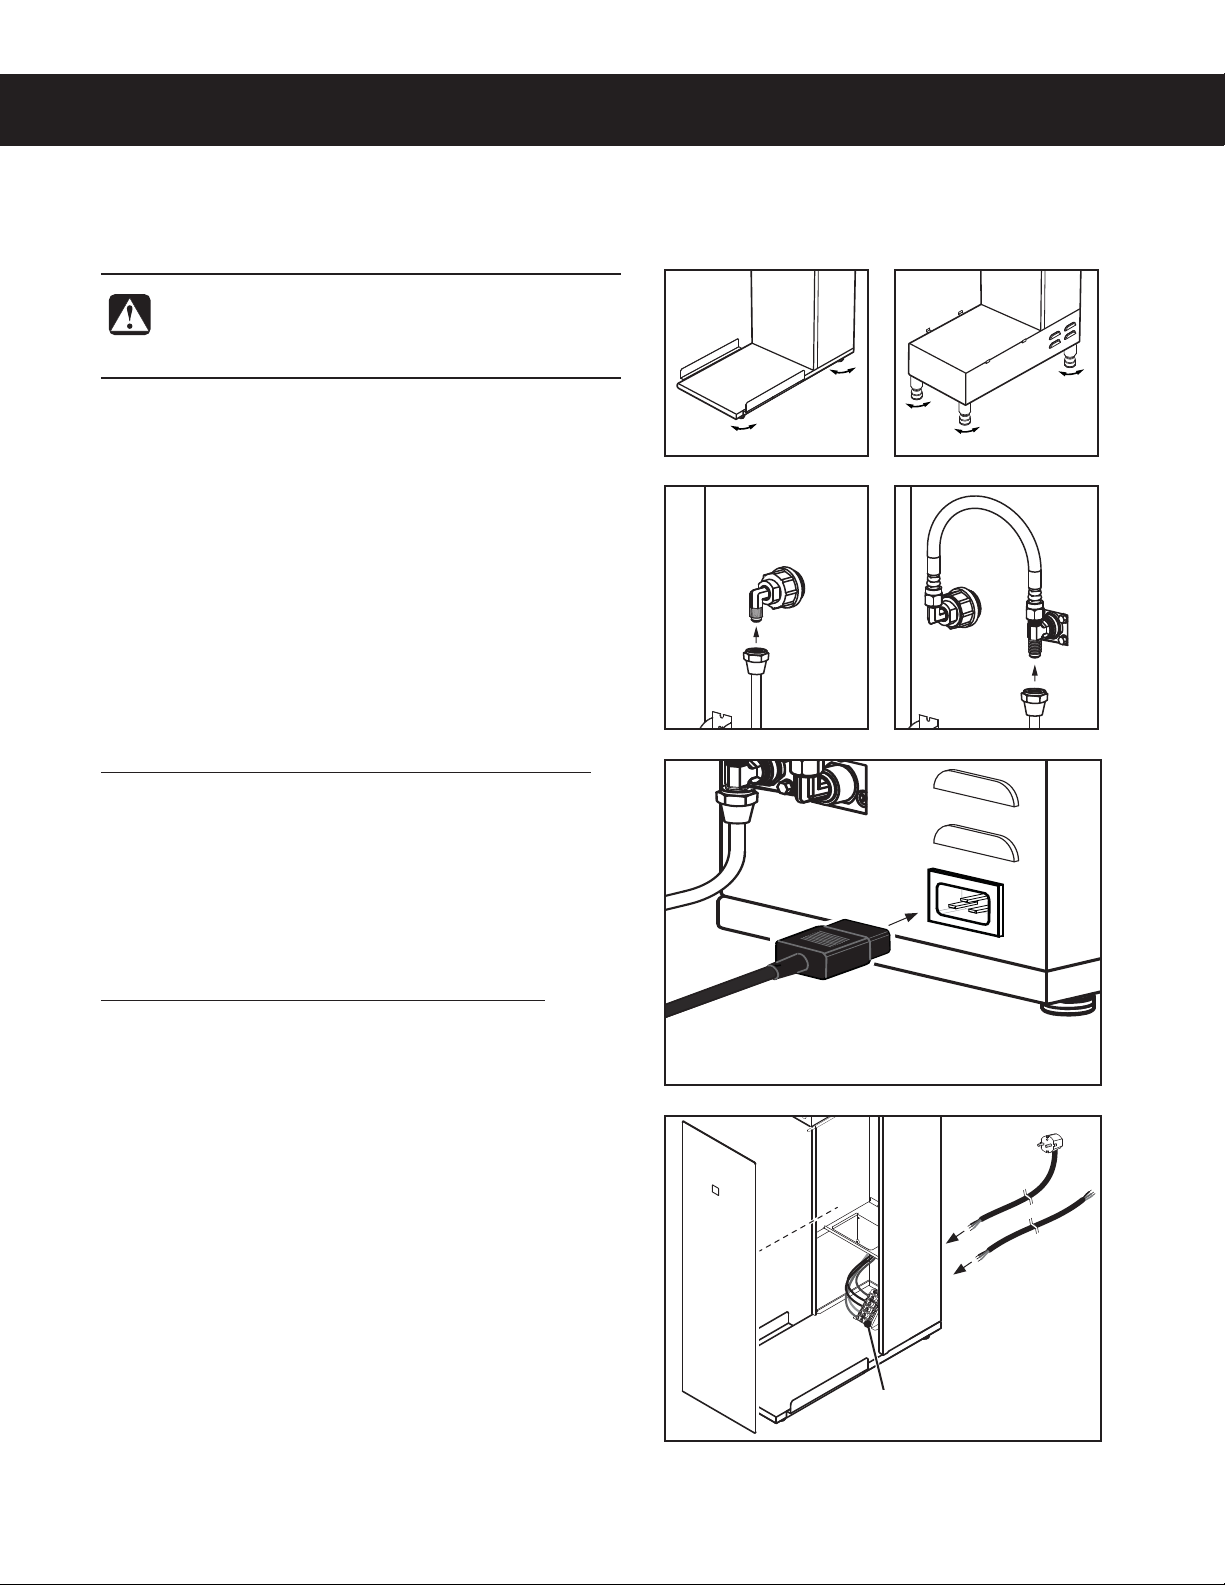
• 1PUBCMFXBUFSTVQQMZMJOFDPOOFDUJPOGSPNUIFXBUFSmMUFSDBQBCMFPGTVQQMZJOHUIFNJOJNVNnPXSBUFSFRVJSFE
CZUIFTQFDJmDBUJPOT5IFXBUFSTVQQMZMJOFNVTUCFBCMFUPDPOOFDUUPUIFnBSFmUUJOHPOUIFCBDLPGUIF
VOJU4FFUIFSPECIFICATIONS section for the correct size. The water line should also be capable of being
controlled by a shut off valve. Do not connect the water line to a saddle valve or needle valve.
*&$SFRVJSFTUIFGPMMPXJOHXBUFSDPOOFDUJPO
1A quick disconnect or additional coiled tubing (at least two times the depth of the appliance) is required
so that it can be moved for cleaning underneath.
2 5IJTFRVJQNFOUJTUPCFJOTUBMMFEXJUIBEFRVBUFCBDLnPXQSPUFDUJPOUPDPNQMZXJUIBQQMJDBCMF
federal, state and local codes.
8BUFSQJQFDPOOFDUJPOTBOEmYUVSFTEJSFDUMZDPOOFDUFEUPBQPUBCMFXBUFSTVQQMZTIBMMCFTJ[FE
installed and maintained in accordance with federal, state and local codes.
WARNING:*OTUBMMBUJPOJTUPCFQFSGPSNFEPOMZCZBRVBMJmFEJOTUBMMFS
WARNING: Improper electrical connection may result in an electric shock hazard or damage the unit. This
appliance must be properly grounded.
NOTICE: DO NOT connect this appliance to a hot water supply. The water inlet valve is not rated for hot
water. Do not exceed the maximum water pressure stated in the SPECIFICATIONS section.
IMPORTANT: Observe all governing codes and ordinances.
#3&8&34=41&$*"-5:%*41&/4&34(&/&3*$*/45"--"5*0/*/4536$5*0/4 F
5IF*OUFSOBUJPOBM1MVNCJOH$PEFPGUIF*OUFSOBUJPOBM$PEF$PVODJMBOEUIF'PPEBOE%SVH"ENJOJTUSBUJPO
'%"'PPE$PEFNBOVBMEJSFDUUIBUUIJTFRVJQNFOUNVTUCFJOTUBMMFEXJUIBEFRVBUFCBDLnPX
QSFWFOUJPOJODPNQMJBODFXJUIGFEFSBMTUBUFBOEMPDBMDPEFT'PSVOJUTJOTUBMMFEPVUTJEFPGUIF64"
make sure that the installation is in compliance with the applicable plumbing/sanitation code for your area.

Installation
Leveling
1 Position the brewer on the countertop. Level it left to
right and front to back by turning the bottom of the
legs.
Connect the Water Supply
2 Flush the water supply line prior to installation to
QVSHFBJSBOEEFCSJTGSPNUIFXBUFSmMUFSBOEUVCJOH
3 $POOFDUUIFXBUFSTVQQMZMJOFUPUIFnBSFmUUJOHPO
the back of the brewer. Leave the water supply valve
closed until the power is connected.
Connect the Brewer Wiring
Brewers With a Power Connector Mounted on the Back
4 Connect a C20 IEC power cord (not supplied)
compatible with the electrical outlet installed in the
GBDJMJUZBOEUIBUNFFUTTQFDJmDBUJPOT
INSTALLATION INSTRUCTIONS II8
DECANTER/DISPENSER BREWERS, INSTALLATION INSTRUCTIONS 081519C
WARNING: Use the leveling legs to level the
brewer only. Do not use them to adjust brewer
height. Do not extend them higher than necessary.
Front
panel
or
Style
varies
Brewers With a Strain Relief Mounted on the Back
5 Remove the front panel.
6 Loosen the strain relief on the back of the brewer.
7 On dual voltage units being operated at 220-240 Volts
(nominal) disconnect the existing power cable from
the terminal block and remove. Disconnect and cap
the jumper wire between the “C” and “N” terminals on
the terminal block.
8 Feed the 220-240 Volt power cable into the brewer.
The brewer may be wired for connection directly to
a junction box or (if local ordinances permit) for use
with a power plug that connects to an electrical outlet
meeting the brewer SPECIFICATIONS.
9 Connect the wires on the power cable to the terminal
block inside the brewer.
10 Tighten the strain relief and replace the front panel.
Terminal
block

Power Up the Brewer
14 Turn on the water supply valve.
15 On units with a power plug, connect it to the appropriate
electrical outlet.
11 If the power cord will be connected directly to the
junction box, connect the power cable wires to the
terminals in the junction box. See the ELECTRICAL
SCHEMATIC for the power supply requirements.
INSTALLATION INSTRUCTIONS II8
DECANTER/DISPENSER BREWERS, INSTALLATION INSTRUCTIONS 081519C
Connect the Brewer Wiring (cont.)
Brewers That Come With A Cord Attached
12 If not already installed, install the appropriate type of
power plug for your locality. Consult local electrical
codes to determine the approved type of power plug
for your region.
WARNING: Connect the power cord only to the
appropriate type and size electrical outlet. If it is not
compatible, either have the cord replaced or have
the electrical outlet upgraded by a licensed
electrician. Do not use an extension cord. Do not
use a power cord/plug that is damaged.
WARNING: Turn off power to the junction box at
the circuit breaker panel before connecting the
power cable to the brewer. Lock out and tag the
circuit breaker.
Power cable from brewer
Connect the Bag-in-Box (BIB) Sweetener -
Units Equipped for Brewing Sweet Tea Only
13 Connect two bag-in-box (BIB) sweeteners to the
brewer sweetener supply hoses as instructed in the
OPERATING INSTRUCTIONS section. Connecting two
bags allows the brewer to continue operating if one
bag runs out. The length of the tubing from the transfer
valve to each bag-in-box connector is should be 1 ft.
(30.5 cm) to 3 ft. (91.4 cm). The total length of tubing
from each bag-in-box connector to the brewer can be
up to 6 ft. (183 cm) under optimal conditions.

Power Up the Brewer (cont.)
16 Make sure that the circuit breaker supplying power to
the unit is on.
17 Turn the toggle switch on the back of the brewer to the
0/QPTJUJPO5IFXBUFSUBOLXJMMTUBSUUPmMM8IJMFUIF
UBOLJTmMMJOHJOTQFDUUIFXBUFSTVQQMZMJOFGPSMFBLT
18 When the water in the tank rises to the correct level, the
heating elements will turn on automatically. Depending
on the incoming water temperature and the electrical
TQFDJmDBUJPOTUIFXBUFSUBOLUZQJDBMMZSFRVJSFTUP
minutes to reach the factory set operating temperature.
When the water has heated, Ready to brew will be
displayed on the LCD screen.
19 Perform a brew cycle of a least 12 oz. (350 ml) to purge
any remaining air from the system. See OPERATING
INSTRUCTIONS. During the initial brew cycle and
XIFOFWFSUIFmMUFSJTSFQMBDFEZPVNBZIFBSUIF
TPVOETPGBJSCFJOHQVSHFEGSPNUIFmMUFSUVCJOHBOE
water tank.
20 *GUIFVOJUJTFRVJQQFEXJUIBIPUXBUFSGBVDFUmMMB
coffee cup with hot water to purge air from the hot water
line.
INSTALLATION INSTRUCTIONS II8
DECANTER/DISPENSER BREWERS, INSTALLATION INSTRUCTIONS 081519C
IMPORTANT: When operating the brewer at
higher elevations, reduce the factory set operating
temperature (204°F/96°C) by 2°F/1°C for each
1000 ft. (300 m) of elevation above 2000 ft.
(600 m). See PROGRAMMING GUIDE.

OPERATING INSTRUCTIONS OI4
Brewing Instructions
G4TB/G4STB, OPERATING INSTRUCTIONS 080416NC
2 Remove/open the lid from
an empty tea dispenser and
position it on the brew deck.
Center it under the brew
basket.
TEA
DISPENSER
3 *OTFSUBDMFBOQBQFSmMUFSJOUP
the brew basket. Fill with the
proper amount of leaf tea.
-FWFMUIFUFBJOUIFmMUFS
4 4MJEFUIFmMMFECSFXCBTLFU
into the brew rails under the
control panel. Slide it all the
way back until it stops.
5 )PMEZPVSmOHFSPOUIF
appropriate brew icon. As
soon as you hear the click
of the brew valve, lift your
mOHFS#SFXJOHXJMMCFHJO
5IFCSFXFSXJMMCSFXDPGGFFPSUFBCBTFEPOUIFTFUUJOHTQSPHSBNNFEJOUPUIFVOJWFSTBMDPOUSPMNPEVMF6$.5P
DIBOHFUIFTFUUJOHTTFFUIFPROGRAMMING GUIDE.
1 The brewer should be ON.
$POmSNUIJTBUUIFSFBSUPHHMF
switch. “Ready to brew”
should be on the display.
6 If a keypad appears on
the display, the brew code
GFBUVSFJTFOBCMFEEFGBVMU
JTPGGBrewing will start
immediately after you enter
the brew code. See the
PROGRAMMING GUIDE to set
up/disable the brew code.
WARNING - TO AVOID SCALDING, AVOID SPLASHING. ,FFQ CPEZ QBSUT DMFBS PG UIF CSFXFS EVSJOH
CSFXJOH%POPUSFNPWFUIFCSFXCBTLFUXIJMFi#SFXJOHwBQQFBSTPOUIFEJTQMBZ
WARNING - %0/05SFGSJHFSBUFVOVTFEUFBPWFSOJHIUGPSMBUFSDPOTVNQUJPO
The G4 Tea Brewer is factory preset for optimal performance.

NOTICE - Do not use cleaning liquids, compounds or powders containing chlorine (bleach) or corrosives.
5IFTFQSPEVDUTQSPNPUFDPSSPTJPOBOEXJMMEBNBHFUIFmOJTIFT USE OF THESE PRODUCTS WILL VOID
THE WARRANTY.
CLEANING INSTRUCTIONS CI1
Cleaning The Brewer - Daily
BREWERS - GENERIC, CLEANING INSTRUCTIONS 080416B
WARNING: HOT SURFACES - To avoid injury, allow the brewer and dispenser(s) to cool before cleaning.
The brewer should be OFF.5VSOUIFCSFXFSPGGCZnJQQJOHUIFSFBSUPHHMFTXJUDIUPUIF0''QPTJUJPO
1 Remove the dispenser(s). Wipe exterior brewer surfaces with a damp cloth to remove spills and debris.
2 Remove the brew basket(s) and clean them in a mild detergent solution. Use a soft bristled brush for hard to
clean areas. Rinse with clean water, then dry.
3 Wipe the spray head area with a cloth soaked in a mild detergent solution. Rinse with a cloth soaked with
clean water removing any residual detergent. Use a clean, soft cloth to dry.
4 Dump out the drip tray(s) (if applicable). Rinse with clean water, then dry with a soft, clean cloth.
Cleaning The Brewer - Weekly
The brewer should be OFF.5VSOUIFCSFXFSPGGCZnJQQJOHUIFSFBSUPHHMFTXJUDIUPUIF0''QPTJUJPO
1 Remove the spray head(s), unscrewing counterclockwise from the dome plate.
2 Thoroughly clean and rinse the dome plate area.
3 Clean the brew basket rails with a brush soaked with a mild detergent solution. Rinse the area with a cloth
soaked with clean water, removing any residual detergent.
4 Dry the area with a soft, clean cloth.
5 Reattach the spray head(s).
WARNING: DO NOT immerse the brewer in water or any other liquid.

CLEANING INSTRUCTIONS CI6
TEA DISPENSER, CLEANING INSTRUCTIONSø B
Cleaning the Tea Dispenser (Daily)
The following cleaning process requires a mild solution
of dish-washing detergent and warm water, and One-Pro
#FWFSBHF&RVJQNFOU$MFBOFS$VSUJT1/8$.JYUIF
0OF1SPDMFBOFSBUBSBUJPPGP[HQFSHBM-PG
IPUXBUFS¡'¡$NJO
Container
1SFQBSFBNJMETPMVUJPOPGEFUFSHFOUBOEXBSNXBUFS
Remove the dispenser from the brewer and remove the
MJE3JOTF
Wash8JQFUIFFYUFSJPSTVSGBDFTXJUIBTQPOHFBOE
UIFEFUFSHFOUTPMVUJPOUPSFNPWFTQJMMTBOEEFCSJT6TF
the detergent solution and a soft bristled brush to wash
UIFJOTJEFPGUIFDPOUBJOFS
3 Rinse3JOTFXJUIDMFBOXBSNXBUFS
4 Sanitize'JMMUIFDPOUBJOFSUPUIFUPQXJUI0OF1SP
DMFBOJOHTPMVUJPONJYFEBTTQFDJmFEBCPWF"MMPX
UIFNJYUVSFUPTPBLGPSNJOVUFTUIFOESBJO'JMMUIF
DPOUBJOFSUPUIFUPQXJUIXBSNDMFBOXBUFSUIFOESBJO'JMM
XJUIXBUFSBOEESBJOBTFDPOEUJNF
Disassemble the faucet - Unscrew the faucet assembly
GSPNUIFEJTQFOTFS5IFOVOTDSFXUIFIBOEMFCPOOFU
BTTFNCMZGSPNUIFUPQPGUIFGBVDFUBOESFNPWF*OTQFDU
UIFTFBUDVQGPSXFBS3FQMBDFUIFTFBUDVQJGJUJT
EBNBHFE
6 Air Dry - Turn the container upside down and allow to
BJSESZ
Faucet, Lid and Drip Tray
Wash - Wash the lid, drip tray and faucet parts with the
EFUFSHFOUTPMVUJPO
Rinse - Thoroughly rinse all parts with clean, warm
XBUFS
Sanitize - After rinsing, place the faucet parts in One-
1SPTPMVUJPONJYFEBTTQFDJmFEBCPWFBOEBMMPXUIFN
UPTPBLGPSNJOVUFT
Air Dry3FNPWFUIFQBSUTGSPNUIFTBOJUJ[FSSJOTF
UIFNPGGUIPSPVHIMZBOEBMMPXUIFNUPBJSESZ
3FBTTFNCMF8IFOESZSFBTTFNCMFUIFIBOEMFCPOOFU
)BOEUJHIUFOUIFIBOEMFCPOOFUPOUPUIFUPQPGUIFGBVDFU
BTTFNCMZ)BOEUJHIUFOUIFGBVDFUBTTFNCMZPOUPUIF
EJTQFOTFSPVUMFU
Seat cup
Faucet
Handle
Bonnet
WASH
RINSE
SANITIZE

PROGRAMMING GUIDE PG36
2 The ACCESS CODE screen will appear. The
default pass code is 1 2 3 4. Once the code is
entered, press OK. The MAIN MENU screen will
appear. The access code can be reset in the
Control Settings sub-menu, under Passwords.
Manual Programming Mode
1 5BQUIFXIJUF$VSUJTMPHPPOUIFUPVDITDSFFOmWFUJNFTUPFOUFSQSPHSBNNJOHNPEF
3 The MAIN MENU screen contains a series of sub-
NFOVJDPOT5IFJDPOTWBSZCBTFEPOUIFNPEFM
selected under the Model Select sub-menu. For
UIFCSFXFSUPPQFSBUFQSPQFSMZUIFNPEFMTFMFDUFE
must match the model series on the brewer model
OVNCFSMBCFMBGmYFEUPUIFPVUTJEFPGUIFNBDIJOF
(5&"130(3"..*/((6*%&ø NC
Status lights
Brew Button
Curtis logoHome Undo Scroll
left/right
Return to
previous
Control symbols - all
symbols may not be
present at the same
time
Display view varies
with model
Touchscreen Control Module Overview
5IFUPVDITDSFFOUVSOTPOXIFOFWFSUIFSFBSUPHHMFTXJUDIJTPO5IFTZNCPMCVUUPOTPOUIFTDSFFODPOUSPM
PQFSBUJPOBOEQSPHSBNNJOH1SFTTJOHUIFPOTDSFFOTZNCPMTBOECVUUPOTXJUIZPVSmOHFSUJQBDUJWBUFTUIFWBSJPVT
functions. The default screen, as well as additional control buttons are shown below.
There are two methods for changing the default settings on G4 brewers. The settings can be programmed
NBOVBMMZVTJOHUIFCSFXFSUPVDITDSFFOTFFCFMPXPSBVUPNBUJDBMMZVTJOHUIF64#6OJWFSTBM4FSJBM#VTEBUB
port on the side of the brewer (see Automatic Programming - USB).

PROGRAMMING GUIDE PG36
Manual Programming Mode (cont.)
4IPXOCFMPXBOEPOUIFGPMMPXJOHQBHFTBSFUIFTVCNFOVTBWBJMBCMFGPSUIFQSPHSBNNJOH."*/.&/65IF
JDPOTBOEQSPHSBNNJOHPQUJPOTUIBUBQQFBSWBSZCBTFEPOUIFCSFXFSNPEFMTFMFDUFEVOEFS.PEFM4FMFDU
Recipes Menu
4FMFDUGSPNUIFGPMMPXJOHUFBUZQFT4UBOEBSE1VSQMF4UBOEBSE(SBZ4UBOEBSE"NCFS5SPQJDBM1VSQMF5SPQJDBM
(SBZ1VSQMFPS(SBZ5IFGBDUPSZEFGBVMUTFUUJOHJT4UBOEBSE1VSQMF4FMFDUJOHUIFUFBUZQFTFUT
UIFUFNQFSBUVSFBOEWBSJPVTCSFXTFUUJOHTGPSUIFCSFXFSTIPXOJOUIFBrew SettingsTFDUJPOUPUIFGBDUPSZ
SFDPNNFOEFETFUUJOHTGPSUIFUZQFPGUFBCFJOHCSFXFE*GEFTJSFEUIFJOEJWJEVBMCSFXTFUUJOHTNBZCF
DIBOHFEPODFUIFUFBUZQFJTTFMFDUFEUPNFFUZPVSCSFXJOHOFFET
IMPORTANT:*GZPVDIBOHFBOZPGUIFCSFXFSTFUUJOHTPOUIFGPMMPXJOHQBHFTTPNFPSBMMPGUIFNNBZCF
NPEJmFEJGZPVDIBOHFUIFUFBUZQFBGUFSXBSEVTJOHUIF3FDJQFTNFOV
continued...
(5&"130(3"..*/((6*%&ø NC
Tea
Model Select
Control Settings Brew Settings
Tea Recipes
ComboCoffee
Settings Summary Exit
**
**Only models covered by this user guide are shown.*Sweet tea models only.
Tea/IC-1Batch
Tea/IC-2Batch
Tea/IC-3Batch
Tea/IC-4Batch
Tea-Sweet
Dual-Dilution
Dual-Sweet
Standard-Purple
Standard-Gray
Standard-Amber
Tropical-Purple
Tropical-Gray
76/308-Purple
76/308-Gray
Full Only
Full & Half
By Volume
By Time
Dilution by Volume
Dilution by Time
Dilution Delay
Dilution Stir
Fast-Brew
Pulses
Drip-Out
Sweetener*
Temperature Settings
Quality Timer
Energy Savings
Sounds
Diagnostics
Display Settings
Preventative Maintenance
Brew Counter
Passwords
Master Reset
Regional Settings
Recipe Default Brew Settings
All Full Batch, except Tea-Sweet and Dual-Sweet
Temperature Tea by Volume Tea by Time Tea Dilution Volume Tea Dilution Time Tea Dilution Delay Tea Dilution Stir
Standard Purple 204°F/96°C 128 oz./3.8 L 5 min. 10 sec. 256 oz./7.6 L 3 min. 59 sec. 30 sec. ON
Standard Gray 204°F/96°C 128 oz./3.8 L 4 min. 27 sec. 256 oz./7.6 L 3 min. 59 sec. 30 sec. ON
Standard Amber 204°F/96°C 128 oz./3.8 L 4 min. 45 sec. 256 oz./7.6 L 3 min. 59 sec. 30 sec. ON
Tropical Purple 204°F/96°C 96 oz./2.8 L 3 min. 52 sec. 276 oz./8.2 L 4 min. 18 sec. 9 min. OFF
Tropical Gray 204°F/96°C 96 oz./2.8 L 3 min. 20 sec. 276 oz./8.2 L 4 min. 18 sec. 9 min. OFF
76/308 Purple 196°F/91°C 76 oz./2.2 L 3 min. 04 sec. 308 oz./9.1 L 4 min. 48 sec. 4 min. OFF
76/308Gray 196°F/91°C 76 oz./2.2 L 2 min. 39 sec. 308 oz./9.1 L 4 min. 48 sec. 4 min. OFF
Recipe Default Brew Settings
All Half Batch, except Tea-Sweet and Dual-Sweet
Temperature Tea by Volume Tea by Time Tea Dilution Volume Tea Dilution Time Tea Dilution Delay Tea Dilution Stir
Standard Purple 204°F/96°C 64 oz./1.9 L 2 min. 35 sec. 128 oz./3.8 L 1 min. 59 sec. 30 sec. ON
Standard Gray 204°F/96°C 64 oz./1.9 L 2 min. 13 sec. 128 oz./3.8 L 1 min. 59 sec. 30 sec. ON
Standard Amber 204°F/96°C 64 oz./1.9 L 2 min. 22 sec. 128 oz./3.8 L 1 min. 59 sec. 30 sec. ON
Tropical Purple 204°F/96°C 48 oz./1.4 L 1 min. 56 sec. 138 oz./4.1 L 2 min. 09 sec. 4 min. OFF
Tropical Gray 204°F/96°C 48 oz./1.4 L 1 min. 40 sec. 138 oz./4.1 L 2 min. 09 sec. 4 min. OFF
76/308 Purple 196°F/91°C 38 oz./1.1 L 1 min. 32 sec. 154 oz./4.6 L 2 min. 24 sec. 2 min. OFF
76/308Gray 196°F/91°C 38 oz./1.1 L 1 min. 19 sec. 154 oz./4.6 L 2 min. 24 sec. 2 min. OFF

PROGRAMMING GUIDE PG36
(5&"130(3"..*/((6*%&ø NC
Recipes Menu (cont.)
Control Settings Menu
Temperature - TFUTUIFCSFXJOHUFNQFSBUVSFPGUIFXBUFSIFMEJOUIFXBUFSUBOL5IFGBDUPSZEFGBVMUTFUUJOHJT
'¡$5IFTFUUJOHSBOHFJT'UP'¡$UP¡$
Quality Timer - BOBVEJPBOEWJTVBMBMBSNUIBUOPUJmFTUIFVTFSUIBUUIFUFBJTOPMPOHFSGSFTI5IFGBDUPSZ
EFGBVMUTFUUJOHJT%JTBCMFE8IFO&OBCMFEBOBMBSNTPVOETBOEi#3&8'3&4)5&"wBQQFBSTPOUIFEJTQMBZ
XIFOUIFUJNFSIBTFYQJSFE5IFTFUUJOHSBOHFJTNJOVUFTUPIPVST
Energy Save Mode - TBWFTFOFSHZEVSJOHQFSJPETPGOPOVTF5IFGBDUPSZEFGBVMUTFUUJOHJT/P$IBOHF
FOFSHZTBWFSPGG5IFTFUUJOHPQUJPOTBSF/P$IBOHFUVSOPGGUIFIFBUJOHFMFNFOUBGUFSGPVSIPVSTPGOPOVTF
PSSFEVDFUIFIFBUJOHFMFNFOUUFNQFSBUVSFUP¡'¡$BGUFSGPVSIPVSTPGOPOVTF
Sounds - UVSOTUIFCFFQFSIFBSEFBDIUJNFBCVUUPOJTQSFTTFEPOPSPGG5IFGBDUPSZEFGBVMUTFUUJOHJT0O
Diagnostics - SVOTUIFTZTUFNBVUPUFTU4FFUIFTroubleshooting Guide for more details.
Display Settings
• Brew Timer - UVSOTUIFCSFXUJNFSPOUIFEJTQMBZPOBOEPGG5IFGBDUPSZEFGBVMUTFUUJOHJT4IPX
• Quality Timer - UVSOTUIFRVBMJUZUJNFSEJTQMBZPOBOEPGG5IFGBDUPSZEFGBVMUTFUUJOHJT)JEF
• Rinse Server Message - UVSOTUIFi3JOTF4FSWFSCFGPSF#SFXJOHwNFTTBHFEJTQMBZPOBOEPGG5IF
GBDUPSZEFGBVMUTFUUJOHJT4IPX
• Iced Coffee Icon (units equipped for iced coffee) - replaces the iced tea icon in the lower right
DPSOFSPGUIFEJTQMBZXJUIUIFJDFEDPGGFFJDPO5IFGBDUPSZEFGBVMUTFUUJOHJTJDFEUFB
• Display Name - DIBOHFTUIFDPNQBOZOBNFUIBUBQQFBSTPOUIFEJTQMBZ5IFGBDUPSZEFGBVMUTFUUJOH
is blank.
• Screen saver - UVSOTUIFEJTQMBZTDSFFOTBWFSPOBOEPGG5IFGBDUPSZEFGBVMUTFUUJOHJT0GG
continued...
Recipe Default Brew Settings
Tea-Sweet and Dual-Sweet, Half Batch
Temperature Tea by Volume Tea by Time Tea Dilution Volume Tea Dilution Time Tea Dilution Delay Tea Dilution Stir
Standard Purple 204°F/96°C 64 oz./1.9 L 2 min. 35 sec. 128 oz./3.8 L 1 min. 36 sec. 30 sec. ON
Standard Gray 204°F/96°C 64 oz./1.9 L 2 min. 13 sec. 128 oz./3.8 L 1 min. 36 sec. 30 sec. ON
Standard Amber 204°F/96°C 64 oz./1.9 L 2 min. 22 sec. 128 oz./3.8 L 1 min. 36 sec. 30 sec. ON
Tropical Purple 204°F/96°C 48 oz./1.4 L 1 min. 56 sec. 138 oz./4.1 L 1 min. 46 sec. 4 min. OFF
Tropical Gray 204°F/96°C 48 oz./1.4 L 1 min. 40 sec. 138 oz./4.1 L 1 min. 46 sec. 4 min. OFF
76/308 Purple 196°F/91°C 38 oz./1.1 L 1 min. 32 sec. 154 oz./4.6 L 2 min. 01 sec. 2 min. OFF
76/308Gray 196°F/91°C 38 oz./1.1 L 1 min. 19 sec. 154 oz./4.6 L 2 min. 01 sec. 2 min. OFF
Recipe Default Brew Settings
Tea-Sweet and Dual-Sweet, Full Batch
Temperature Tea by Volume Tea by Time Tea Dilution Volume Tea Dilution Time Tea Dilution Delay Tea Dilution Stir
Standard Purple 204°F/96°C 128 oz./3.8 L 5 min. 10 sec. 256 oz./7.6 L 3 min. 14 sec. 30 sec. ON
Standard Gray 204°F/96°C 128 oz./3.8 L 4 min. 27 sec. 256 oz./7.6 L 3 min. 14 sec. 30 sec. ON
Standard Amber 204°F/96°C 128 oz./3.8 L 4 min. 45 sec. 256 oz./7.6 L 3 min. 14 sec. 30 sec. ON
Tropical Purple 204°F/96°C 96 oz./2.8 L 3 min. 52 sec. 276 oz./8.2 L 3 min. 33 sec. 9 min. OFF
Tropical Gray 204°F/96°C 96 oz./2.8 L 3 min. 20 sec. 276 oz./8.2 L 3 min. 33 sec. 9 min. OFF
76/308 Purple 196°F/91°C 76 oz./2.2 L 3 min. 04 sec. 308 oz./9.1 L 4 min. 03 sec. 4 min. OFF
76/308Gray 196°F/91°C 76 oz./2.2 L 2 min. 39 sec. 308 oz./9.1 L 4 min. 03 sec. 4 min. OFF

PROGRAMMING GUIDE PG36
(5&"130(3"..*/((6*%&ø NC
Control Settings Menu (cont.)
Preventive Maintenance
• Maintenance Interval - UVSOTPOPGGBOEBEKVTUTUIFQSFWFOUJWFNBJOUFOBODFCSFXNPOJUPS5IF
GBDUPSZEFGBVMUTFUUJOHJT%JTBCMFE8IFO&OBCMFEUIF6$.NFBTVSFTUIFOVNCFSPGHBMMPOTCSFXFE
CFGPSFUIFNBJOUFOBODFSFNJOEFSBQQFBSTPOUIFEJTQMBZ5IFTFUUJOHSBOHFJTUPHBMMPOT
MJUFST
• Service Telephone Number - TFUTUIFTFSWJDFQIPOFOVNCFSUIBUBQQFBSTPOUIFEJTQMBZXIFOUIF
6$.EFUFDUTBOFSSPSDPOEJUJPO5IFGBDUPSZEFGBVMUJT
Brew Counter - 8IFOBDDFTTFEUIJTGFBUVSFEJTQMBZTUIFUPUBMOVNCFSPGCSFXDZDMFTBOEUIFSFTFUUBCMF
CSFXDZDMFDPVOUFSOVNCFSPGCSFXDZDMFTTJODFMBTUSFTFU
Passwords
• Programming Password - DIBOHFTUIFQSPHSBNNJOHNFOVQBTTXPSE"MXBZTBDUJWF5IFGBDUPSZ
default is 1234.
• Brew Password - turns the brew access password feature on and off and is used to create the brew
QBTTXPSE5IFGBDUPSZEFGBVMUTFUUJOHJT%JTBCMFE5IJTGFBUVSFQSFWFOUTCSFXJOHCZVOBVUIPSJ[FE
QFSTPOT8IFO&OBCMFEBOBDDFTTDPEFLFZQBEBQQFBSTPOUIFTDSFFOXIFOUIFCSFXCVUUPOJT
pressed. The correct access code must be entered before brewing will proceed.
• USB Password - UVSOTUIF64#TDSFFOBDDFTTQBTTXPSEPOBOEPGGBOEJTVTFEUPDSFBUFUIF
64#BDDFTTQBTTXPSE5IFGBDUPSZEFGBVMUTFUUJOHJT%JTBCMFE5IJTGFBUVSFQSFWFOUTBDDFTTCZ
VOBVUIPSJ[FEQFSTPOTUPUIF64#QSPHSBNNJOHTDSFFOT8IFO&OBCMFEBOBDDFTTDPEFLFZQBE
BQQFBSTPOUIFTDSFFOXIFOUIFVTFSBUUFNQUTUPBDDFTTUIF64#NFOVT
Master Reset - SFTFUTUIFCSFXFSVOJWFSTBMDPOUSPMNPEVMF6$.UPUIFGBDUPSZEFGBVMUTFUUJOHT
Regional Settings
• SI/US - TXJUDIFTUIFCSFXFSVOJUTFUUJOHTCFUXFFO64BOENFUSJD5IFGBDUPSZEFGBVMUTFUUJOHJT64
• Language - DIBOHFTUIFMBOHVBHFUIBUBQQFBSTPOUIFEJTQMBZ5IFGBDUPSZEFGBVMUTFUUJOHJT&OHMJTI
Brew Settings Menu
8IFOZPVmSTUFOUFSUIF#SFX4FUUJOHTQSPHSBNNJOHNFOVZPVXJMMCFBTLFEUPTFMFDUQSFTTB#3&8CVUUPOUP
DIBOHFUIFTFUUJOHTGPS5PQSPHSBNNPSFUIBOPOF#3&8CVUUPOmOJTIQSPHSBNNJOHUIFmSTUUIFOreenter the
Brew Settings menu to program the second.
Tea by Volume - BEKVTUTUIFWPMVNFCSFXFE4FFUIFRecipesTFDUJPOGPSUIFGBDUPSZEFGBVMUWBMVFT8JUI
BEJTQFOTFSJOQMBDFQSFTT45"35UPCFHJO8IFOUIFEFTJSFEWPMVNFJTSFBDIFEQSFTT45015IFCSFX
WPMVNFJTOPXTFU
Tea by Time - BEKVTUTUIFBNPVOUPGDPGGFFCSFXFECZUJNFSBUIFSUIBOCZWPMVNF4FFUIFRecipes section
GPSUIFGBDUPSZEFGBVMUWBMVFT5IFTFUUJOHSBOHFJTTFDPOETUPNJOVUFT
Tea Dilution Volume - TFUTUIFUFBEJMVUJPOWPMVNF4FFUIFRecipesTFDUJPOGPSUIFGBDUPSZEFGBVMUWBMVFT
Tea Dilution Time - sets the amount of tea dilution according to time. See the RecipesTFDUJPOGPSUIFGBDUPSZ
EFGBVMUWBMVFT5IFTFUUJOHSBOHFJTTFDPOETUPNJOVUFT
Tea Dilution Delay - TFUTUIFEFMBZVOUJMUFBEJMVUJPOCFHJOT4FFUIFRecipesTFDUJPOGPSUIFGBDUPSZEFGBVMU
WBMVFT5IFTFUUJOHSBOHFJTTFDPOETUPNJOVUFT
continued...

PROGRAMMING GUIDE PG36
(5&"130(3"..*/((6*%&ø NC
Brew Settings Menu (cont.)
Tea Dilution Stir - turns the dilution stir feature On and Off. See the RecipesTFDUJPOGPSUIFGBDUPSZEFGBVMU
settings.
Tea Fast Brew - UVSOTGBTUCSFX0OBOE0GGBOEBEKVTUTUIF%FMBZ5JNFXIFOTFUUP0O*G0OJTTFMFDUFEUIF
%FMBZ5JNFTDSFFOXJMMBQQFBS
Tea Pulse Brew - UVSOTQVMTFCSFX0OBOE0GGBOEBEKVTUTUIFQVMTFCSFXTFUUJOHTXIFOTFUUP0O*G0O
JTTFMFDUFETVCTFRVFOUTDSFFOTXJMMBQQFBSUPBEKVTUUIF1VMTF$PVOU0O5JNFBOE0GG5JNF4UBSUTBUUIF
CFHJOOJOHPGUIFCSFXDZDMF/VNCFSPGQVMTFTJTBEKVTUBCMFGSPNUP1VMTF0O5JNFJTBEKVTUBCMFGSPN
UPTFDPOET1VMTF0GG5JNFJTBEKVTUBCMFGSPNUPTFDPOET#VUUPOTDBOIBWFJOEFQFOEFOUQVMTF
routines.
Tea Drip-Out - sets the Tea Drip-Out time. Drip-out allows additional time for tea to drain from the brew
CBTLFUCFGPSFi#SFXJOHwEJTBQQFBSTGSPNUIFEJTQMBZ5IFTFUUJOHSBOHFJTTFDPOETUPNJOVUFT5IF
GBDUPSZEFGBVMUTFUUJOHJTTFDPOET
Sweetener Time (units equipped for brewing sweet tea only) - BEKVTUTUIFBNPVOUPGUJNFTXFFUFOFSJT
EJTQFOTFEXIFOCSFXJOHTXFFUUFB5IFTFUUJOHSBOHFJTTFDPOETUPNJOVUFT5IFGBDUPSZEFGBVMUTFUUJOHT
are 2 minutes for full batch and 1 minute for half batch.
Sweetener Delay (units equipped for brewing sweet tea only) - TFUTUIFEFMBZVOUJMTXFFUFOFSCFHJOTUP
QPVS5IFTFUUJOHSBOHFJTTFDPOETUPNJOVUFT5IFGBDUPSZEFGBVMUTFUUJOHJTTFDPOET
Model Select Menu
Batch Size - 5IFNPEFMOVNCFSJTTFUBUUIFGBDUPSZBOETIPVMESFNBJOTFUUPNBUDIUIFNPEFMOVNCFSMBCFM
BGmYFEUPUIFVOJU)PXFWFSUIJTNFOVDBOCFVTFECZUIFFOEVTFSUPTFMFDUXIFUIFSUIFIBMGCBUDICVUUPO
BQQFBSTPOUIFEJTQMBZ6QPOFOUFSJOHUIF.PEFM4FMFDUTVCNFOVTFMFDUUIFDPSSFDUNPEFMOVNCFSBOE'VMM
#BUDIPS'VMMBOE)BMG#BUDI

PROGRAMMING GUIDE PG36
(5&"130(3"..*/((6*%&ø NC
Automatic Programming - USB
6TJOHUIF64#DPOOFDUJPOBOEBnBTIESJWFFBTJMZSFQSPHSBNTUIFTFUUJOHTCZTJNQMZ
DPQZJOHEBUB
"nBTIESJWFDBODPQZBMMPGUIFTFUUJOHTGSPNPOFJEFOUJDBM(CSFXFSUPBOPUIFS%PJOH
TPFMJNJOBUFTUIFOFFEUPQSPHSBNFBDITUFQJOEJWJEVBMMZVTJOHUIFUPVDITDSFFO5IJT
QSPDFTTBMTPNBLFTJUFBTZUPRVJDLMZTUBOEBSEJ[FUIFQSPHSBNTFUUJOHTPONVMUJQMF(CSFXFST
6TFBnBTIESJWFUIBUTVQQPSUT64#PSBCPWFBOEIBTBUZQF"64#DPOOFDUJPO5IFTUPSBHFDBQBDJUZNVTU
CF(#NJOJNVN
IMPORTANT:5IFnBTIESJWFNVTUCFDPNQMFUFMZCMBOL&SBTFBOZFYJTUJOHmMFTPOUIFESJWFCFGPSF
starting the following process.
Uploading the Software to the Flash Drive
1 .BLFTVSFUIFCSFXFSJTPO$IFDLUPNBLFTVSFUIBUUIFCSFXFSZPVBSFDPQZJOHTFUUJOHTGSPNJTQSPHSBNNFE
as desired.
2 0QFOUIFDPWFSPOUIF64#QPSUBOEJOTFSUUIFDPOOFDUPSPOUIFFNQUZnBTIESJWF5IFQPSUJTMPDBUFEPOUIF
SJHIUTJEFQBOFMPGUIFCSFXFSOFBSUIFUPQ5IFVOJWFSTBMDPOUSPMNPEVMF6$.XJMMVQMPBEBMMPGUIFTFUVQ
EBUBPOUPUIFnBTIESJWF5IFZFMMPX-&%JDPOPOUIFUPQMFGUPGUIFUPVDITDSFFOXJMMMJHIUJOEJDBUJOHUIBUEBUBJT
USBOTGFSSJOH5IJTQSPDFTTXJMMPOMZUBLFBTFDPOEUPDPNQMFUF
Downloading the Software to the Brewer from the Flash Drive
1 4FMFDUUIFJEFOUJDBMCSFXFSZPVXJTIUPNBLFQSPHSBNDIBOHFTUP5IFCSFXFSNVTUCFPO
2 1MVHUIFMPBEFEnBTIESJWFJOUPUIF64#QPSUPOUIFCSFXFS5IFEBUBDPQJFEGSPNUIFmSTUCSFXFSXJMM
BVUPNBUJDBMMZEPXOMPBEPWFSXSJUJOHBMMUIFTFUUJOHTUIBUXFSFPOUIFTFDPOECSFXFS
3 5IFSFE-&%POUIFUPQMFGUPGUIFUPVDITDSFFOXJMMJOEJDBUFUIBUUIFEPXOMPBEJTJOQSPDFTT5IJTXJMMPOMZUBLF
a second.
4 Once the download is complete, the UCM will reboot so that the changes take effect.
3FNPWFUIFnBTIESJWF5IFEPXOMPBEJTDPNQMFUF5IFEBUBPOUIFnBTIESJWFDBODPOUJOVFUPCFEPXOMPBEFE
JOUPBTNBOZJEFOUJDBMCSFXFSTBTOFFEFE
USB File Transfer
5IJTTDSFFOXJMMCFQSFTFOUXIFOFWFSUIF64#nBTIESJWFJTJOTFSUFEQSPWJEFEUIFCSFXFSJTOPUDVSSFOUMZCSFXJOH
5IFEFGBVMUBDUJPOJTi/P"DUJPOw5IF6$.XJMMBMXBZTDSFBUFBCBDLVQ
POUIFnBTIESJWFCFGPSFEPXOMPBEJOHTFUUJOHTSFDJQFTPSBTDSFFOTBWFS
*GBmSNXBSFVQEBUFJTQSFTFOUPOUIFnBTIESJWFUIFmSNXBSFVQEBUF
procedure will be started before the screen is shown.
FILE TRANSFER
Settings/recipes
Present on USB
Screensaver
Not present on USB
Start
Upload
to USB
Download
from USB No Action

ROUGH-IN DRAWINGS RD6
G4TB - Tea Brewer
G4TB, ROUGH-IN DRAWING 051717B
11.80 in
[30.0 cm]
22.29 in
[56.6 cm]
22.67 in
[57.6 cm]
23.96 in
[60.9 cm]
34.29 in
[87.1 cm]
20.84 in
[52.9 cm]
10.04 in
[25.5 cm]
9.11 in
[23.1 cm]
13.41 in
[34.1 cm]
18.39 in
[46.7 cm]
16.61 in
[42.2 cm]
0.49 in
[1.2 cm]
1.29 in
[3.3 cm]
22.82 in
[58.0 cm ]
10.11 in
[25.7 cm]

ROUGH-IN DRAWINGS RD6
G4TB, ROUGH-IN DRAWING 051717B
G4TBP - Tea Brewer
6.27 in
[15.9 cm]
9.94 in
[25.3 cm]
9.59 in
[24.3 cm]
9.04 in
[23.0 cm]
9.14 in
[23.2 cm]
18.98 in
[48.2 cm]
29.38 in
[74.6 cm]
4.00 in
[10.2 cm]
9.11 in
[23.1 cm]
10.97 in
[27.9 cm]
10.21 in
[25.9 cm]
16.61 in
[42.2 cm]
18.39in
[46.7 cm]
22.91 in
[58.2 cm]
25.70 in
[65.3 cm]
13.46 in
[34.2 cm ]
Other manuals for G4 Series
1
This manual suits for next models
2
Table of contents
Other Curtis Kitchen Appliance manuals

Curtis
Curtis ThermoPro G4 User manual

Curtis
Curtis TCT-35 User manual

Curtis
Curtis MILANO G3 User manual

Curtis
Curtis RTB User manual

Curtis
Curtis Thermopro TLXA22 User manual

Curtis
Curtis TB User manual

Curtis
Curtis TCTS/T User manual

Curtis
Curtis TLXA30 User manual

Curtis
Curtis TCT User manual

Curtis
Curtis FRW080 Operation manual