CYP CPLUS-V2PE User manual

CPLUS-V2PE
1 by 2 UHD Scaler with Audio De-Embedded
Operation Manual
Operation Manual
+

DISCLAIMERS
The information in this manual has been carefully checked and
is believed to be accurate. Cypress Technology assumes no
responsibility for any infringements of patents or other rights of third
parties which may result from its use.
Cypress Technology assumes no responsibility for any inaccuracies
that may be contained in this document. Cypress also makes no
commitment to update or to keep current the information contained
in this document.
Cypress Technology reserves the right to make improvements to this
document and/or product at any time and without notice.
COPYRIGHT NOTICE
No part of this document may be reproduced, transmitted,
transcribed, stored in a retrieval system, or any of its part translated
into any language or computer le, in any form or by any means—
electronic, mechanical, magnetic, optical, chemical, manual, or
otherwise—without express written permission and consent from
Cypress Technology.
© Copyright 2016 by Cypress Technology.
All Rights Reserved.
TRADEMARK ACKNOWLEDGMENTS
All products or service names mentioned in this document may be
trademarks of the companies with which they are associated.

SAFETY PRECAUTIONS
Please read all instructions before attempting to unpack, install or
operate this equipment and before connecting the power supply.
Please keep the following in mind as you unpack and install this
equipment:
• Always follow basic safety precautions to reduce the risk of re,
electrical shock and injury to persons.
• To prevent re or shock hazard, do not expose the unit to rain,
moisture or install this product near water.
• Never spill liquid of any kind on or into this product.
• Never push an object of any kind into this product through any
openings or empty slots in the unit, as you may damage parts
inside the unit.
• Do not attach the power supply cabling to building surfaces.
• Use only the supplied power supply unit (PSU). Do not use the PSU
if it is damaged.
• Do not allow anything to rest on the power cabling or allow any
weight to be placed upon it or any person walk on it.
• To protect the unit from overheating, do not block any vents or
openings in the unit housing that provide ventilation and allow for
sufcient space for air to circulate around the unit.
REVISION HISTORY
VERSION NO. DATE DD/MM/YY SUMMARY OF CHANGE
VR0 07/04/16 Preliminary Release

CONTENTS
1. Introduction............................................ 1
2. Applications........................................... 1
3. Package Contents ................................ 1
4. System Requirements............................ 1
5. Features.................................................. 2
6. Operation Controls and Functions....... 3
6.1 Front Panel ........................................3
6.2 Rear Panel.........................................4
6.3 OSD Menu.........................................5
7. Connection Diagram .......................... 13
8. Specications ...................................... 14
8.1 Technical Specications ...............14
8.2 Video Supports Specication .......15
8.3 Audio Specications......................16
9. Acronyms ............................................. 16

1
1. INTRODUCTION
The 1 by 2 UHD Scaler with Audio De-Embedded is designed to
upscale 1080p signal into 4K2K 6G or downscale 4K2K 6G signal into
1080p with synchronized digital and analog audio output. Friendly
and simple design that allow user with direct viewing on input HDMI
content and OSD that ease user with output settings/selection. Scaling
signal up to 2 simultaneous HDMI output with two different resolutions
or generate patterns to output display with assigned resolution
allowing on-site display testing. This UHD Scaler is the best dene tool
between your HD and UHD signal.
2. APPLICATIONS
• On-site equipment testing
• HDMI signal splitting
• Production testing
• R&D design and testing
3. PACKAGE CONTENTS
• 1 x 1 by 2 UHD Scaler with Audio De-Embedded
• 1 x 5V DC Power adaptor
• Operational Manual
4. SYSTEM REQUIREMENTS
Input source equipment such as PS3 or Blu-ray player and output
display or TV with equivalent HDMI cables.

2
5. FEATURES
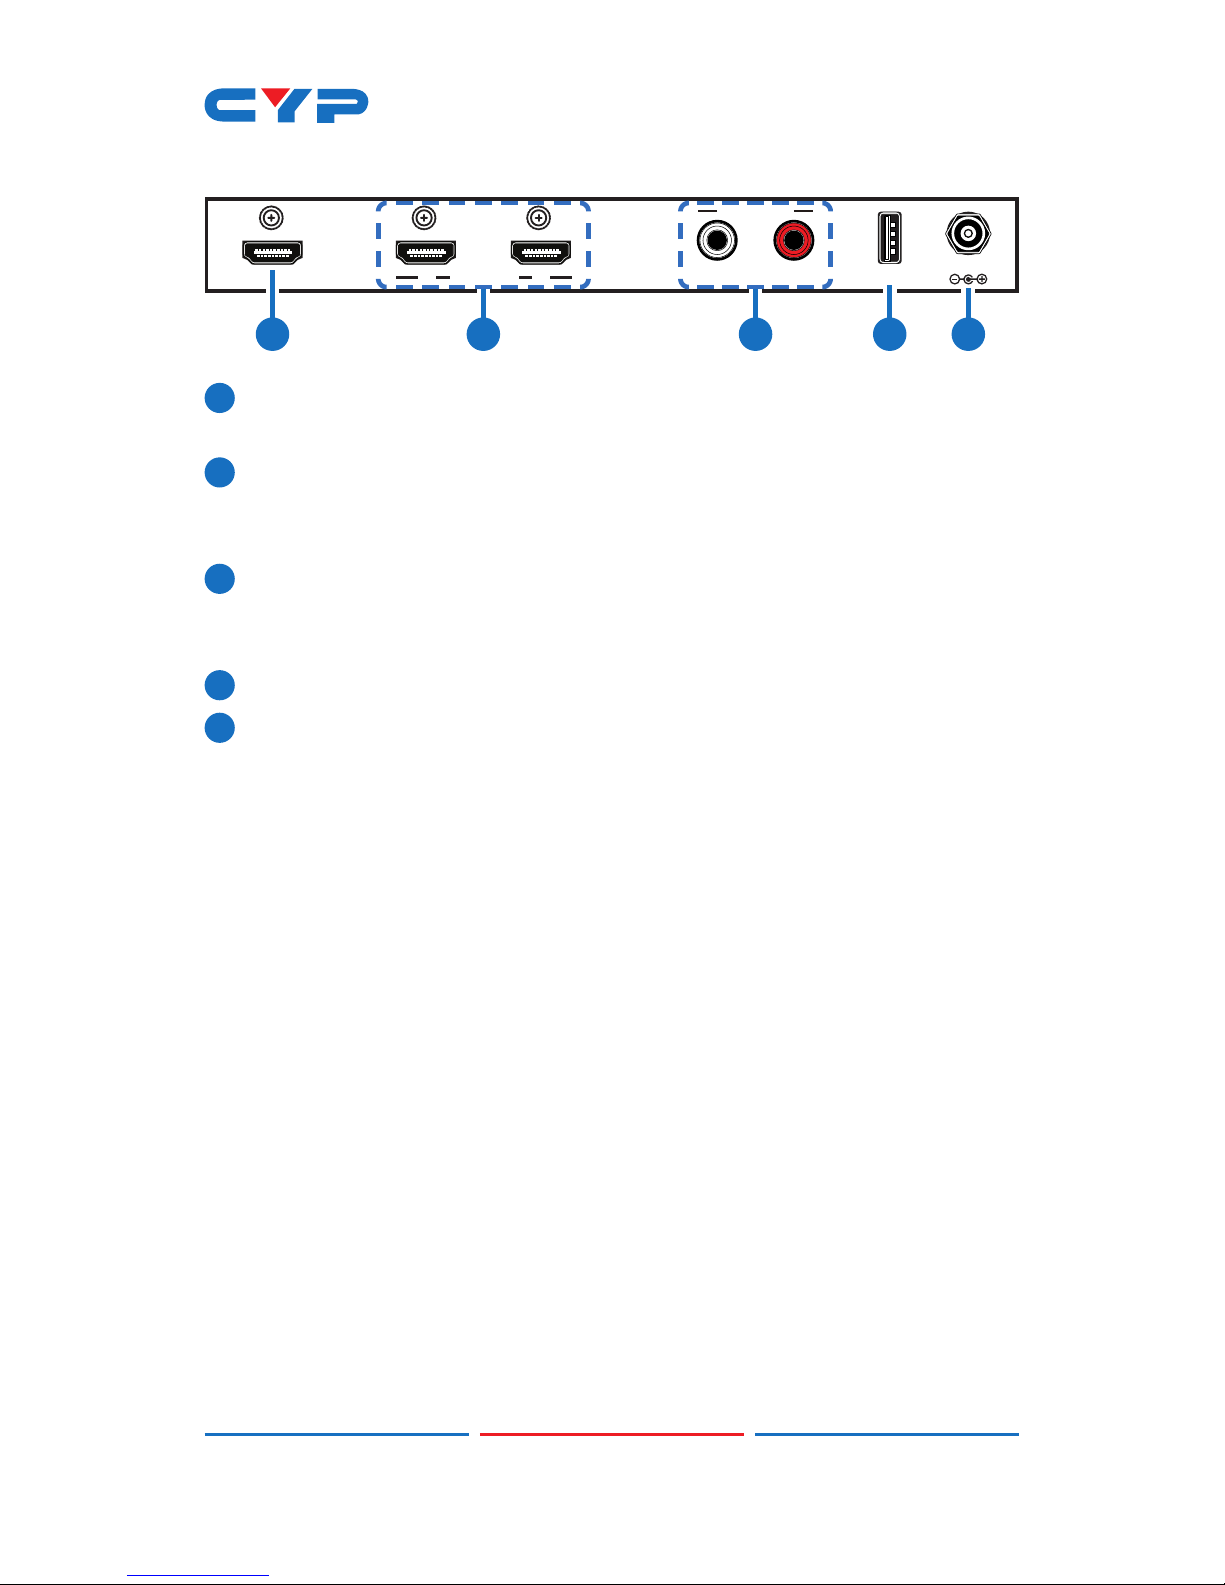
• HDMI with 6G 4Kx2K supported and HDCP 2.2 compliant
• Supports HDMI signal bypass on both outputs or upscale 1080p
signal into 4K2K on output B and downscale 4K2K signal into 1080p
on output A
• Supports 4K2K@50/60 (4:4:4) to 4K2K@50/60(4:2:0) conversion
• Supports auto pattern generation with assigned resolution for on-site
display testing
• Supports HDMI input of one 6G and HDMI outputs of two 6G
• Supports HDMI signal bypass, upscale and downscale
• Supports EDID selections
• Supports High-Dynamic-Range (HDR) image
• Supports HDR conversion from 4Kx2K@24/25/30(444/422)10 or 12bit
to 4096x2160@24/25/30Hz 8bit x
• Supports UHD resolutions up to 4Kx2K: 3840x2160@24/25/30Hz
3840x2160@50/60 Hz (4:4:4) & 4096x2160 @24/25/30 Hz,
4096x2160@50/60Hz (4:4:4)
• Supports data rate up to 6Gbps (600MHz) and Deep Color up to
1080p 48-bit
• Supports pass-through of HD audio formats of LPCM 2/5.1/7.1CH,
Dolby Digital 2~5.1CH, DTS 2~5.1CH, Dolby Digital Plus, Dolby TrueHD,
Dolby Atmos and DTS-HD Master Audio
• HDMI compatible with DVI
• Supports OSD with instant I/O resolution display
• Supports Digital to Analog (DAC) audio conversion
• Supports Apple mode signal display
• Supports HDCP 2.2 to HDCP1.4 conversion
Note: When displaying HDMI 4Kx2K/HDR signal, equivalent source
signal, output display and HDMI cables are required in order to
secure the best image display. It is suggested to use Premium High
Speed HDMI cable for 6G HDMI signal.

3
6. OPERATION CONTROLS AND FUNCTIONS
6.1 Front Panel
POWER4K2K SYNC MENU
–+
ENTER
+
TEST
PATTERN
21 3 4 5 6
1POWER LED: This LED will illuminate when the device is connected
with power supply.
24K2K LED: This LED will illuminate when the input source contains
4K2K signal.
3SYNC LED: This LED will illuminate when the input source is sending
signal.
4MENU: Press this button to enter into OSD menu and when under
OSD selection press this button to exit. Press and hold this button
together with TEST PATTERN “-“ button for 3 seconds to set the
device back to factory default.
5TEST PATTERN -/+: Press these buttons to select patterns to display
on outputs instantly. Press these buttons together to switch output
timing to 1280x720@60 instantly. When under OSD selection, press
these buttons to roll the scroll.
6ENTER: Press this button to enter and conrm OSD selection.
Press and hold this button together with the MENU button for
3 seconds to enter into rmware update mode. The LEDs will
illuminate in circle from left to right. Plug in the USB thumb drive
with updated rmware inside and the LEDs will stop illuminating.
Once the update procedure completed or successfully, all LEDs
will illuminate together but if update failed no LED will illuminate.
The device will automatically reboot after 10 seconds or user may
re-power on the device manually.

4
6.2 Rear Panel
LRSERVICE
DC 5V
HDMI IN
AUDIO OUT
AB
HDMI OUT
21 3 4 5
1HDMI IN: This slot is to connect with source equipment such as PS3
or Blu-ray player.
2HDMI OUT: These slots are to connect with UHD display/TV for
images display. Each output can be displaying with different
timing and pattern and image.
3AUDIO OUT L/R: These slots are to connect with audio equipment
such as amplier or speakers for audio signal output PCM 2CH that
is synchronized with HDMI input audio signal.
4SERVICE: This slot is reserved for factory rmware update only.
5DC 5V: Plug the 5V DC power supply into the unit and connect the
adaptor to an AC outlet.

5
6.3 OSD Menu
1ST LEVEL 2ND LEVEL 3RD LEVEL 4TH LEVEL
OUTPUT
OUTPUT A INPUT 4K2K
PASS THROUGH
DOWN 1080P*1
FIX 4K2K(420)*2
INPUT HDR PASS THROUGH
FIX 8 BITS*5
OUTPUT B
INPUT 1080P
PASS THROUGH
UP 4K2K*3
INPUT 4K2K
UP 4K2K(420)*4
PASS THROUGH
FIX 4K2K(420)
INPUT HDR
PASS THROUGH
FIX 8 BITS*5
INT
4K(6G-2CH) YES/NO
INT
4K(3G-2CH) YES/NO
INT
4K(420-2CH) YES/NO
INT
1080P(2CH) YES/NO
EDID EXT
OUT A YES/NO
EXT
OUT B YES/NO
EXT
OUT A (2CH) YES/NO

6
1ST LEVEL 2ND LEVEL 3RD LEVEL 4TH LEVEL
EXT
OUT B (2CH) YES/NO
HDCP
HDCP SUPPORT
OFF
REFER TO
SOURCE
REFER TO DISPLAY
DISPLAY INFO.
ON
OFF
5 SEC.
10 SEC.
OSD 15 SEC.
OSD TIME OUT 20 SEC.
25 SEC.
30 SEC.
35 SEC.
40 SEC.
OFF
MODE ON
AUTO PATTERN
AUTO TIMING
WHITE COLOR
RED COLOR
GREEN COLOR
TEST PATTERN A BLUE COLOR
PATTERN MEGENTA
COLOR

7
1ST LEVEL 2ND LEVEL 3RD LEVEL 4TH LEVEL
YELLOW COLOR
CYAN COLOR
COLOR BAR
RAMP
TOGGLE
720X480P@60
720X576P@50
1280X720P@50
1280X720P@60
1920X1080P@50
RESOLUTION 1920X1080P@60
3840X2160P@24
3840X2160P@25
3840X2160P@30
4096X2160P@24
4096X2160P@25
4096X2160P@30
HDCP
OUTPUT A DISABLE/ENABLE
OUTPUT B DISABLE/ENABLE
10 SEC.
20 SEC.
30 SEC.
40 SEC.
SWITCH TIME 50 SEC.
1 MIN.

8
1ST LEVEL 2ND LEVEL 3RD LEVEL 4TH LEVEL
2 MIN.
TEST PATTERN A 3 MIN.
5 MIN.
720X480P@60 YES/NO
720X576P@50 YES/NO
1280X720P@50 YES/NO
1280X720P@60 YES/NO
1920X1080P@50 YES/NO
1920X1080P@60 YES/NO
AUTO TIMING
SELECT NEXT PAGE
3840X2160P@24 YES/NO
3840X2160P@25 YES/NO
3840X2160P@30 YES/NO
4096X2160P@24 YES/NO
4096X2160P@25 YES/NO
4096X2160P@30 YES/NO
PREVIOUS PAGE
OFF
MODE ON
AUTO PATTERN
AUTO TIMING
WHITE COLOR
RED COLOR
GREEN COLOR
BLUE COLOR

9
1ST LEVEL 2ND LEVEL 3RD LEVEL 4TH LEVEL
PATTERN MEGENTA
COLOR
YELLOW COLOR
CYAN COLOR
TEST PATTERN B COLOR BAR
RAMP
TOGGLE
720X480P@60
720X576P@50
1280X720P@50
1280X720P@60
1920X1080P@50
1920X1080P@60
3840X2160P@24
3840X2160P@25
RESOLUTION 3840X2160P@30
4096X2160P@24
4096X2160P@25
4096X2160P@30
3840X2160P@50
3840X2160P@60
4096X2160P@50
4096X2160P@60
10 SEC.
20 SEC.
30 SEC.

10
1ST LEVEL 2ND LEVEL 3RD LEVEL 4TH LEVEL
40 SEC.
SWITCH TIME 50 SEC.
1 MIN.
2 MIN.
TEST PATTERN B 3 MIN.
5 MIN.
HDCP
OUTPUT A DISABLE/ENABLE
OUTPUT B DISABLE/ENABLE
720X480P@60 YES/NO
720X576P@50 YES/NO
1280X720P@50 YES/NO
1280X720P@60 YES/NO
1920X1080P@50 YES/NO
1920X1080P@60 YES/NO
NEXT PAGE
3840X2160P@24 YES/NO
AUTO TIMING
SELECT 3840X2160P@25 YES/NO
3840X2160P@30 YES/NO
4096X2160P@24 YES/NO
4096X2160P@25 YES/NO
4096X2160P@30 YES/NO
3840X2160P@50 YES/NO
3840X2160P@60 YES/NO
4096X2160P@50 YES/NO
4096X2160P@60 YES/NO

11
1ST LEVEL 2ND LEVEL 3RD LEVEL 4TH LEVEL
PREVIOUS PAGE
INPUT XXX
INFORMATION RESOLUTION OUTPUT A XXX
OUTPUT B XXX
HDCP
OUTPUT A DISABLE/ENABLE
OUTPUT B DISABLE/ENABLE
FIRMWARE VERSION VX.XX
FIRMWAR
UPDATE
NO
YES
FACTORY
SETTING
NO
YES
Default settings are in Italian bold font
Note: When input timing is non-VESA standard, OSD may be disable.
To enter into OSD selection, press hot keys to enter into test
pattern mode and do the OSD selection.

12
* 1 Input → Output
3840x2160@24 → 1920x1080p@24
3840x2160@25 → 1920x1080p@25
3840x2160@30 → 1920x1080p@30
3840x2160@50 → 1920x1080p@50
3840x2160@60 → 1920x1080p@60
4096x2160@24 → 1920x1080p@24
4096x2160@25 → 1920x1080p@25
4096x2160@30 → 1920x1080p@30
4096x2160@50 → 1920x1080p@50
4096x2160@60 → 1920x1080p@60
* 2 Input → Output
3840x2160@50(RGB,YCbCr444,Ycbcr422) → 3840x2160@50(YCbCr420)
3840x2160@60(RGB,YCbCr444,Ycbcr422) → 3840x2160@60(YCbCr420)
4096x2160@50(RGB,YCbCr444,Ycbcr422) → 4096x2160@50(YCbCr420)
4096x2160@60(RGB,YCbCr444,Ycbcr422) → 4096x2160@60(YCbCr420)
* 3 Input → Output
1920x1080p@24 → 3840x2160@24
1920x1080p@25 → 3840x2160@25
1920x1080p@30 → 3840x2160@30
1920x1080p@50 → 3840x2160@50
1920x1080p@60 → 3840x2160@60
* 4 Input → Output
1920x1080p@50(RGB,YCbCr444,Ycbcr422) →
3840x2160@50(YCbCr420)
1920x1080p@60(RGB,YCbCr444,Ycbcr422) →
3840x2160@60(YCbCr420)
* 5 Input → Output
HDR 4K2K@24/25/30(444/422) 10/12bit → 4K2K@24/25/30(444/422) 8bit

13
7. CONNECTION DIAGRAM
AB LRSERVICE
DC 5V
HDMI IN HDMI OUT AUDIO OUT
DVD or Blu-ray Player
Active
Speakers
USB Flash Disk
TV or Monitor

14
8. SPECIFICATIONS
8.1 Technical Specications
VideoBandwidth 600MHz/18G
1 x USB (Service only)
Output ports 2 x HDMI
1 x R/L
HDMI Cable Length 15 m@1080p/8-bit, 10 m@1080p/12-bit,
5 m@4K
Power Supply 5V DC/2.6A (US/EU standards, CE/FCC/UL
certied)
ESD Protection Human body model:
±8kV (air-gap discharge)
±4kV (contact discharge)
Dimensions 231.5mm (W) x 108mm (D) x 25mm (H)/
Jack Excluded
231.5mm (W) x 117mm (D) x 25mm (H)/
Jack Included
Weight 616g
Chassis Material Metal
Silkscreen Color Black
Operating Temperature 0˚C~40˚C / 32˚F ~ 104˚F
Storage Temperature -20˚C~60˚C / -4˚F ~ 140˚F
Relative Humidity 20~90% RH (no condensation)
Power Consumption 5.8W
Note: HDMI cable distance might affected by material or design of
cable. It is suggested to use Premium High Speed HDMI cable
for 6G HDMI signal.

15
8.2 Video Supports Specication
DVI and HDMI Supported Input Output
640x480i@60
640x480p@60
720x480p@60
720x576i@50
720x576p@50
800x600@56/60/72/75/85
1024x768@60/70/75/85
1280x720p@50/60
1280x768@60/75
1280x800@60/75
1280x1024@60/75
1366x768@60
1400x1050@60/75
1440x900@60/75
1600x900@60
1600x1200@60
1680x1050@60
1920x1080i@50/60
1920x1080p@24/25/30/50/60
1920x1200@60
3840x2160@24/25/30/50/60
4096x2160@24/25/30/50/60

16
8.3 Audio Specications
Input
Level/Freq
Output
Terminal
Output
Level THD+N Frequence
Response SNR Crosstalk
HDMI
0dBFS 20、
1K、20KHz
HDMI 0dB~-1dB <0.01% ±1dB >80dB <-80dB
L/R Vrms±10% <0.1% ±3dB >70dB <-60dB
9. ACRONYMS
ACRONYM COMPLETE TERM
Other manuals for CPLUS-V2PE
1
Table of contents
Other CYP Media Converter manuals
Popular Media Converter manuals by other brands

Cadenceberge
Cadenceberge CAD-HV-HE04 product manual

arcutronix
arcutronix EDX100 user guide

Etatron America
Etatron America WATER METER SIGNAL SPLITTER Operating instructions and maintenance

Dagan
Dagan HDSP04V15 user manual

MicroE Systems
MicroE Systems Mercury 1000 Installation manual and reference guide

Arcam
Arcam airDAC Connections and quickstart guide