manuals.online logo
Brands
  1. Home
  2. •
  3. Brands
  4. •
  5. D-Link
  6. •
  7. Wireless Access Point
  8. •
  9. D-Link DAP-1350 Manual

D-Link DAP-1350 Manual

Other manuals for DAP-1350

3

Other D-Link Wireless Access Point manuals

D-Link AirPremier N DAP-2690 User manual

D-Link

D-Link AirPremier N DAP-2690 User manual

D-Link DWL-3610AP User manual

D-Link

D-Link DWL-3610AP User manual

D-Link DAP-2553 - Wireless N Dual Band Gigabit Access... User manual

D-Link

D-Link DAP-2553 - Wireless N Dual Band Gigabit Access... User manual

D-Link D DWL-8200AP DWL-8200AP User manual

D-Link

D-Link D DWL-8200AP DWL-8200AP User manual

D-Link DWL-8620AP User manual

D-Link

D-Link DWL-8620AP User manual

D-Link NUCLIAS CONNECT User manual

D-Link

D-Link NUCLIAS CONNECT User manual

D-Link AirPro DWL-6000AP User manual

D-Link

D-Link AirPro DWL-6000AP User manual

D-Link D DWL-G700AP DWL-G700AP User manual

D-Link

D-Link D DWL-G700AP DWL-G700AP User manual

D-Link AirPlus Xtreme G DWL-2000AP User manual

D-Link

D-Link AirPlus Xtreme G DWL-2000AP User manual

D-Link DWL-3500AP User manual

D-Link

D-Link DWL-3500AP User manual

D-Link DWL-8620APE User manual

D-Link

D-Link DWL-8620APE User manual

D-Link DAP-3310 User manual

D-Link

D-Link DAP-3310 User manual

D-Link nuclias connect DAP-2662 User manual

D-Link

D-Link nuclias connect DAP-2662 User manual

D-Link DAP-1513 User manual

D-Link

D-Link DAP-1513 User manual

D-Link DWL-700AP - Air - Wireless Bridge User manual

D-Link

D-Link DWL-700AP - Air - Wireless Bridge User manual

D-Link AirPlus Xtreme G DWL-2000AP User manual

D-Link

D-Link AirPlus Xtreme G DWL-2000AP User manual

D-Link DWL-1000AP User manual

D-Link

D-Link DWL-1000AP User manual

D-Link AirPremier DWL-1700AP User manual

D-Link

D-Link AirPremier DWL-1700AP User manual

D-Link UNIFIED WIRED & WIRELESS ACCESS SYSTEM... User manual

D-Link

D-Link UNIFIED WIRED & WIRELESS ACCESS SYSTEM... User manual

D-Link DWL-8220AP - AirPremier Wireless Switch Dualband Access... User manual

D-Link

D-Link DWL-8220AP - AirPremier Wireless Switch Dualband Access... User manual

D-Link DI-713 User manual

D-Link

D-Link DI-713 User manual

D-Link AirPremier DWL-7700AP User manual

D-Link

D-Link AirPremier DWL-7700AP User manual

D-Link DWL-6610AP User manual

D-Link

D-Link DWL-6610AP User manual

D-Link DWL-6700AP User manual

D-Link

D-Link DWL-6700AP User manual

Popular Wireless Access Point manuals by other brands

TRENDnet TPL-410AP user guide

TRENDnet

TRENDnet TPL-410AP user guide

EnGenius EWS377-FIT quick start guide

EnGenius

EnGenius EWS377-FIT quick start guide

Aerohive Networks Aerohive AP121 Hardware reference guide

Aerohive Networks

Aerohive Networks Aerohive AP121 Hardware reference guide

Vonets VAP11G Step-by-step guide

Vonets

Vonets VAP11G Step-by-step guide

Ubiquiti UniFi AP AC Outdoor quick start guide

Ubiquiti

Ubiquiti UniFi AP AC Outdoor quick start guide

Monoprice MW301A user guide

Monoprice

Monoprice MW301A user guide

TP-Link Auranet EAP225 Quick installation guide

TP-Link

TP-Link Auranet EAP225 Quick installation guide

Ubiquiti NanoStation NSM2 quick start guide

Ubiquiti

Ubiquiti NanoStation NSM2 quick start guide

Aruba IAP-335 user guide

Aruba

Aruba IAP-335 user guide

Advantek Networks AWN-AP-54MR user manual

Advantek Networks

Advantek Networks AWN-AP-54MR user manual

IP-COM AP355 user guide

IP-COM

IP-COM AP355 user guide

Buffalo AirStation WLA-L11G user manual

Buffalo

Buffalo AirStation WLA-L11G user manual

EnGenius EnStationACv2 user manual

EnGenius

EnGenius EnStationACv2 user manual

Edimax CAP1200 user manual

Edimax

Edimax CAP1200 user manual

xG Technology xMax CN1300 installation guide

xG Technology

xG Technology xMax CN1300 installation guide

Ubiquiti LBE-5AC-Gen2 quick start guide

Ubiquiti

Ubiquiti LBE-5AC-Gen2 quick start guide

Aruba AP-203R installation guide

Aruba

Aruba AP-203R installation guide

LuXout Shades LUXSHADE MOTION manual

LuXout Shades

LuXout Shades LUXSHADE MOTION manual

manuals.online logo
manuals.online logoBrands
  • About & Mission
  • Contact us
  • Privacy Policy
  • Terms and Conditions

Copyright 2025 Manuals.Online. All Rights Reserved.

©2009 D-Link Corporation/D-Link Systems, Inc. All rights reserved. D-Link and MediaBridge are trademarks or registered trademarks of D-Link Corporation or its subsidiaries in the United States and/or other countries. Windows Vista is either a registered trademark or trademark of Microsoft Corporation in the United States and/or other countries. Other trademarks or registered
trademarks are the property of their respective owners. QIG Version 1.1 (November 3, 2009)
2
START hERE:
ThERE ARE ThREE opERATing SySTEmS liSTEd bElow To Show inTRucTionS
on how To configuRE youR compuTER And bEgin ThE SETup pRocESS.
OPTION 1: WINDOWS®XP
OPTION 2: WINDOWS VISTA®
OPTION 3: WINDOWS 7
OPTION 1 - XP
OPTION 2 - Vista
OPTION 3 - Windows 7
Begin by connecting the power cable to the DAP-1350. Then, connect your ethernet
cable to the device’s Ethernet (LAN/WAN) port on the back.
Once your PC is connected to the device, go to the computer’s taskbar and click
on START, then select Control Panel.
In Control Panel, double-click “Network Connections”.
When you have opened the “Network Connections” window, right-click (or double
click) the “Local Area Connection” icon and select Properties. After the window has
been opened, click “Internet Protocol” (TCP/IP) and click Properties.
Once you have opened the properties window, select the “Use the following IP
address” option. The text boxes below will allow you to type the manual IP address.
In the “IP address” text box, type “192.168.0.51”. Click the “Subnet Mask:” text box
and the address “255.255.255.0” will appear. You may leave the “Default Gateway,”
“Preferred DNS Server” and “Alternate DNS Server” blank. Then click “OK”.
You have successfully configured your computer to access the device’s web-based
configuration. Please proceed to the DAP-1350 guide on the reverse side of this
guide.
Connect the power cable to the router. Then connect your ethernet cable to the
DAP-1350’s Ethernet (LAN/WAN) port on the back.
Once connected, go to the computer’s taskbar and click START. Open Control Panel
and then click on Network and Sharing Center.
In the “Network Connections” window, right-click (or double-click) the “Local Area
Connection” icon and click Properties. When the window opens, select “Internet
Protocol Version 4 (TCP/IPv4)” and click Properties.
23
456
23
46
Connect the power cable to the router. Then connect your ethernet cable to the
DAP-1350’s Ethernet (LAN/WAN) port on the back.
In the “ Local Area Connection “ window, click Properties. When the window opens,
select “ Internet Protocol Version 4 (TCP/IPv4)” and click Properties.
You have successfully configured your computer to access the device’s web-based
configuration. Please proceed to the DAP-1350 guide on the reverse side of this
guide.
23
56
4
Once you have opened the properties window, select the “Use the following IP
address” option. The text boxes below will allow you to type the manual IP address.
In the “IP address” text box, type “192.168.0.51”. Click the “Subnet Mask:” text box
and the address “255.255.255.0” will appear. You may leave the “Default Gateway,”
“Preferred DNS Server” and “Alternate DNS Server” blank. Then click “OK”.
You have successfully configured your computer to access the device’s web-based
configuration. Please proceed to the DAP-1350 guide on the reverse side of this
guide.
Once connected, go to the computer’s taskbar and select Start -> Control Panel
-> Network and Internet, then click View network status and task.
In “Network and Sharing Center,” click on “Manage Network Connections” on the
left side.
In “ View your basic network information and set up connections,” click on “ Local
Area Connection “ on the right side
Once you have opened the properties window, select the “Use the following
IP address” option. The text boxes below will allow you to type the manual IP
address. In the “IP address” text box, type “192.168.0.51”. Click the “Subnet
Mask:” text box and the address “255.255.255.0” will appear. You may leave the
“Default Gateway,” “Preferred DNS Server” and “Alternate DNS Server” blank.
Then click “OK”.
INITIAL SETUP GUIDE
noTE:
Before you begin, make sure you have administrative
permission to modify the computer’s network settings.
When using Router mode, you must configure the pocket
router using your wireless adapter. The Ethernet port will not
allow you to connect to the web-based configuration utility.
5
1
1
1
2
WIRELESS N POCKET ROUTER/ACCESS POINT SETUP GUIDE
ThERE ARE ThREE opTionS To chooSE fRom whEn SETTing up youR
nEw dAp-1350 wiRElESS n pockET RouTER/AccESS poinT.
OPTION 1: ROUTER MODE
In Router mode, the DAP-1350 will connect to a broadband modem and act as a router for wireless clients on your network. The
DAP-1350 will provide NAT (Network Address Translation) and a DHCP server to generate IP addresses. NAT and the DHCP server
allow many wireless computers to share the same Internet connection.
OPTION 2: AP MODE
Your device will operate as your router’s access point. It is required that you disable the wireless network on your router before
configuring the device. See your router’s manual for further information.
OPTION 3: WIRELESS CLIENT MODE
In this mode, your device will function as a wireless adapter to your computer or any other machine that you wish to connect to
your network.
OPTION 1 - Router Mode
OPTION 2 - AP Mode
OPTION 3 - Wireless Client Mode
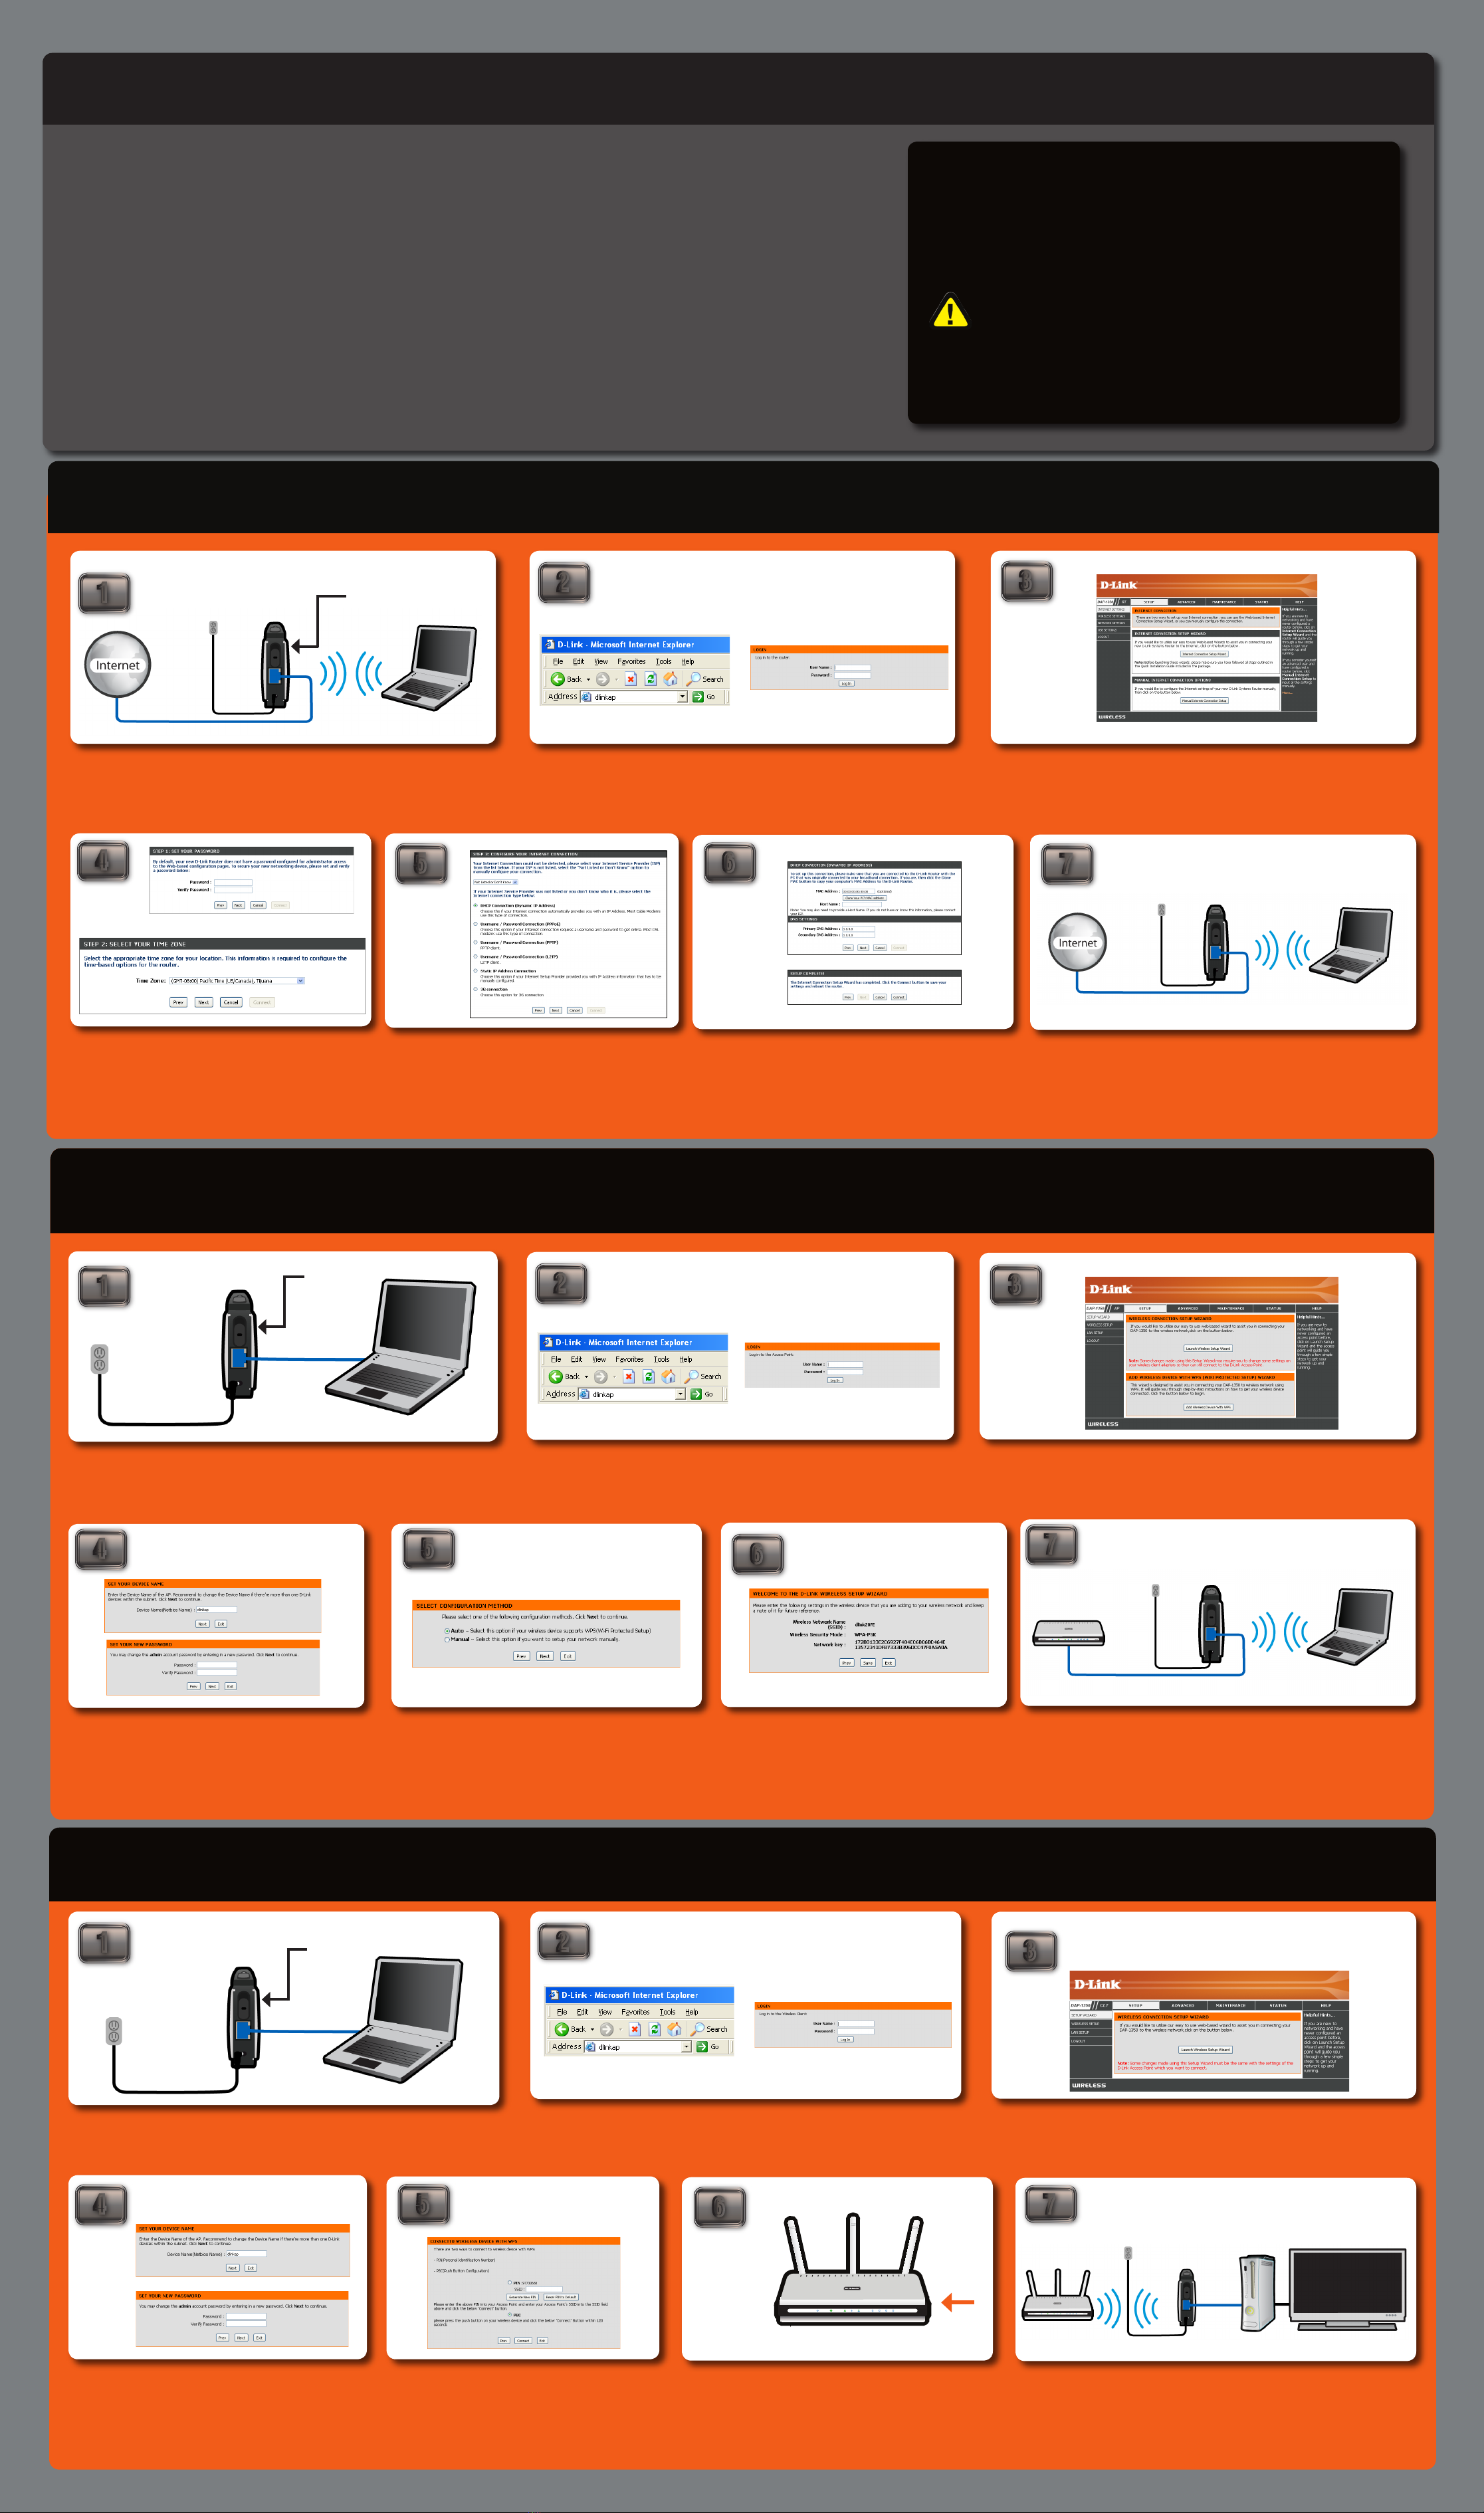
Move the selection switch to RT on the back of the DAP-1350. Connect the
DAP-1350 to your broadband modem or Internet connection. You must connect
wirelessly to configure the pocket router. The default SSID is dlink.
Once connected to the device, open your web browser and type in the address bar
“http://192.168.0.50” or “dlinkap” and then press ENTER.
Type “admin” and then enter your password. Leave the password blank by default..
Click Log In to continue.
You will then be directed to the device’s setup page with two options. Click the
“Launch Wireless Setup Wizard” to begin the setup.
You will be asked to create a password each time you log
in to the GUI. Click Next to continue. Next, select your
Time Zone from the drop-down menu and click Next to
continue.
Once the device has been configured, you may place it in the location you
desire. You may connect multiple wireless clients to the pocket router to
access the Internet.
23
457
23
45
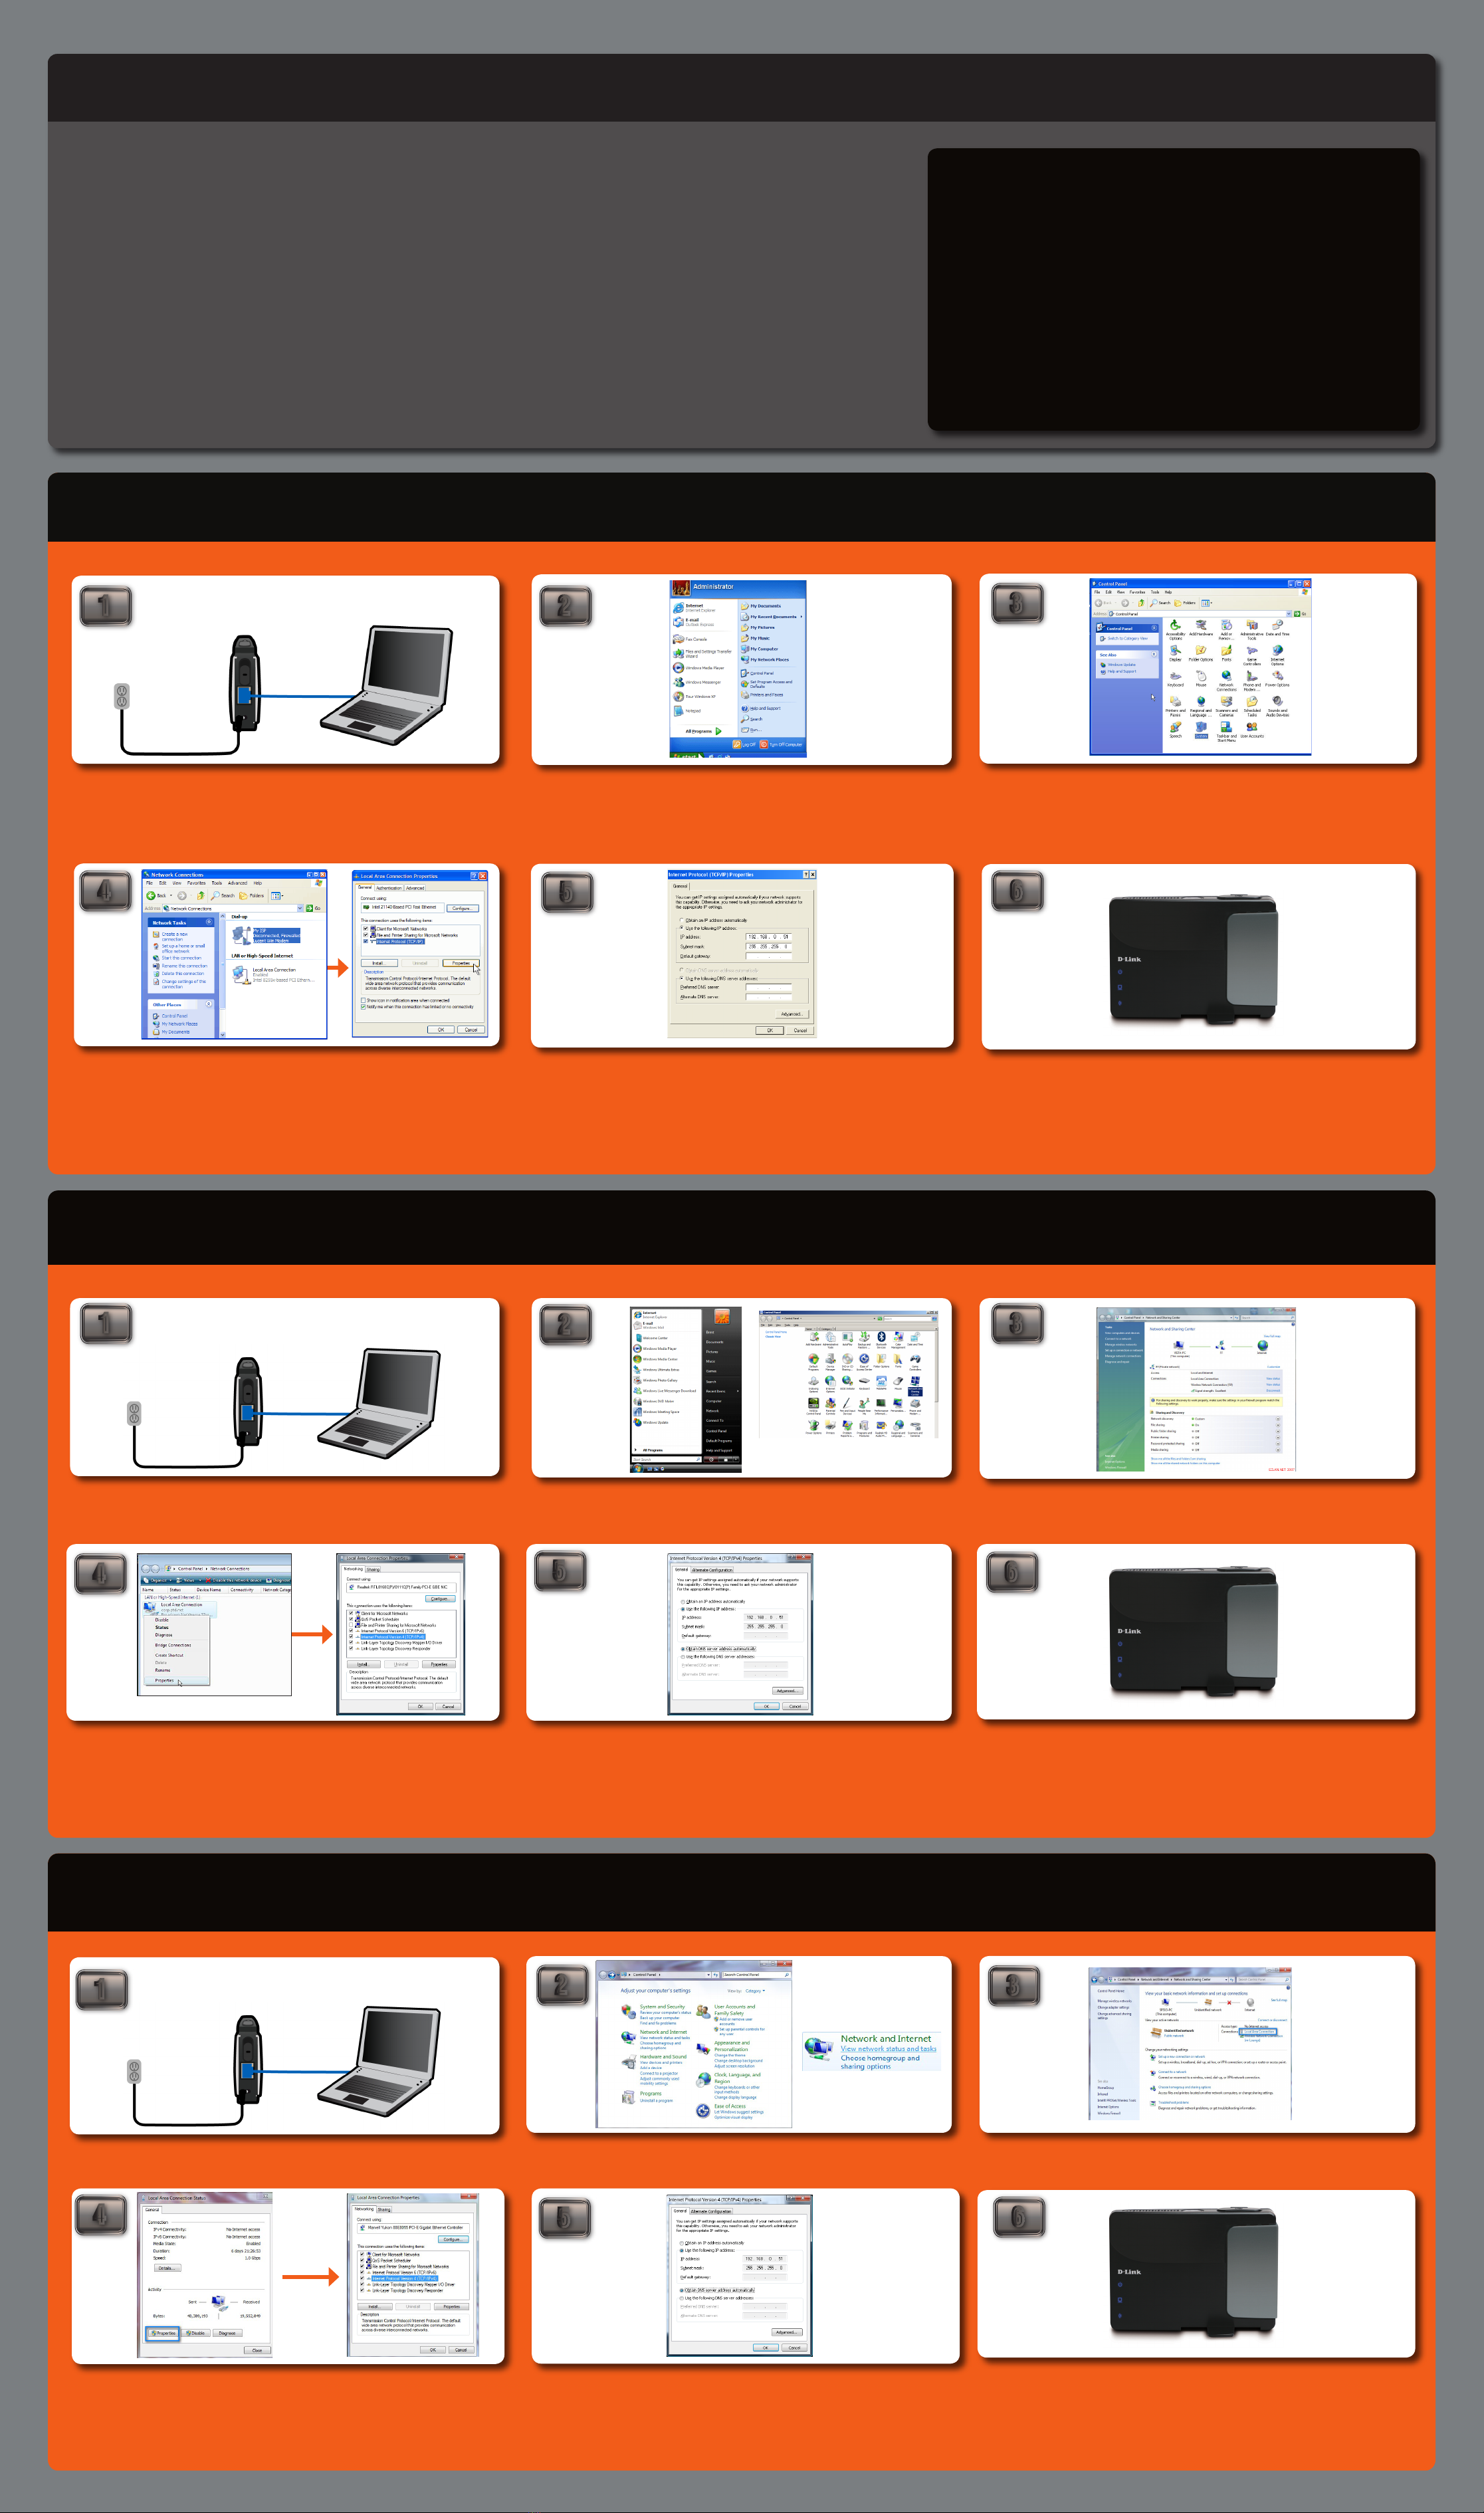
Move the selection switch to CL on the back of the DAP-1350. For setup purposes,
connect the DAP-1350 to your PC. Follow the steps on the other side of this poster
to assign your computer a static IP address.
You will be asked to give your device a name. Once you
have created a name for the device, you will be asked to
create a password for each time you log in to the GUI. If
you choose not to have a password, you must check the
box shown below.
If you are going to connect this to another device like a game console, then
disconnect the Ethernet cable from your computer and then connect to
the device. Make sure the IP settings on your device are within the same
network.
23
7
4
noTE:
For Router mode, you must connect using your wireless
adapter. The Ethernet port will not allow access to the web
based configuration utility.
STop
Follow through the Initial Setup Guide before doing the
DAP-1350 Setup Guide.
67
6
6
5
You will be directed to a configuration page where you will
select the type of Internet connection you have. Select the
type and click Next to continue. Depending on the ISP type,
enter the requested information supplied by your ISP.
A common setup is Dynamic as shown above. Dynamic is
used by most Cable and hotel connections. Click Next to
continue.
The Setup Complete screen will appear. Click Connect. It may
take 1-2 minutes to connect.
This page will display the Wireless Network Name,
Wireless Security Mode and the Network Key. Please
write down and store the information for future
reference.
Once connected to the device, open your web browser and type in the address bar
“http://192.168.0.50” or “dlinkap” and then press ENTER.
Type “admin” and then enter your password. Leave the password blank by default..
Click Log In to continue.
Move the selection switch to AP on the back of the DAP-1350. For setup purposes,
connect the DAP-1350 to your PC. Follow the steps on the other side of this poster
to assign your computer a static IP address.
You will then be directed to the device’s setup page with two options. Click the “Launch
Wireless Setup Wizard” to begin the setup.
When you select Next, you will be directed to this screen.
Select “Auto” and click NEXT.
You will be asked to give your device a name. Once you
have created a name for the device, you will be asked to
create a password for each time you log in to the GUI. If
you choose not to have a password, you must check the
box shown below.
Once the device has been disconnected and your computer’s IP address has
been restored back to the previous settings, connect the Ethernet cable from
the DAP-1350’s Ethernet port to your switch or router. Now you are able to
connect your laptop wirelessly to the device.
Press the PBC button on your router within 120 seconds.
Wait until the WPS LED on the DAP-1350 stops blinking.
Refer to your router’s manual for more information.
Once connected to the device, open your web browser and type in the address bar
“http://192.168.0.50” or “dlinkap” and then press ENTER.
Type “admin” and then enter your password. Leave the password blank by default..
Click Log In to continue.
Set up the network and security settings to match
your current wireless network settings. Choose the
PBC method and click Connect. Refer to the manual
on the included CD for detailed information on this
setup.
You will then be directed to the device’s setup page with two options, Click the
“Launch Wireless Setup Wizard” to begin the setup.
wireless router DIR-655
1 2 3 4
1
1
1
Move to RT
Move to AP
Move to CL
©2009 D-Link Corporation/D-Link Systems, Inc. All rights reserved. D-Link and MediaBridge are trademarks or registered trademarks of D-Link Corporation or its subsidiaries in the United States and/or other countries. Windows Vista is either a registered trademark or trademark of Microsoft Corporation in the United States and/or other countries. Other trademarks or registered
trademarks are the property of their respective owners. QIG Version 1.1 (November 3, 2009)