Dacor EF24LWCZ2SS User manual

Use and Care Manual
WineSteward™2-Zone Wine Cooler
Part No. 100962 Rev. E 7081 623-00
Table of Contents
Important Safety Instructions ............................................. 1-2
Getting To Know Your Wine Cooler...................................... 3
Operating Your Wine Cooler............................................ 4-6
Care and Cleaning ......................................................... 7-8
Before You Call for Service.................................................. 9
Warranty and Service ...................................................... 10
Notes ........................................................................ 11-12
Warranty Card ....................................................Back Cover
Models: EF24LWCZ2SS, EF24RWCZ2SS

© 2009 Dacor, all rights reserved

1
Important Safety Instructions
INSTALLER: Leave these instructions with the appliance.
CUSTOMER: Read this use and care manual completely before
using your appliance. Save it for future reference. It contains
important use and care information. Retain your sales receipt or
canceled check. Proof of original purchase date is required for
warranty service.
For warranty and service information, see page 10.
If you have any questions (other than warranty questions), call:
Dacor Customer Service
(800) 793-0093 (U.S.A. and Canada)
Monday — Friday 6:00 a.m.to 5:00 p.m.Pacific Time
Web site: www.Dacor.com
Have the complete model and serial number identification of
your wine cooler ready. These numbers are found on the product
data label located inside the door on the left side. Record these
numbers below for easy access.
Model number ________________________________________
Serial number ________________________________________
Date of purchase ______________________________________
Since we continually improve the quality and performance of
our products, we may make changes to the appliance without
updating this manual. Visit www.Dacor.com to download the latest
version of this manual.
What You Need to Know About
Safety Instructions
The Important Safety Instructions and warnings in this manual
are not meant to cover all possible problems and situations that
can occur. Use common sense and caution when installing,
maintaining or operating this or any other appliance.
Always contact the Dacor Customer Service Team about problems
or situations that you do not understand.
Safety Symbols and Labels
DANGER
DANGER – Immediate hazards that WILL result in severe
personal injury or death.
WARNING
WARNING – Hazards or unsafe practices which COULD result
in severe personal injury or death.
CAUTION
CAUTION – Hazards or unsafe practices which COULD result
in minor personal injury or property damage.
DANGER
IMPORTANT: To prevent child entrapment and suffocation when
discarding an old appliance:
Take off the door(s).•
Leave the racks in place so children cannot easily climb•
inside.
Cut the prongs off the power plug and discard them.•
Cut the power cable off and discard it separately from the•
old appliance.
IMPORTANT: To avoid the possibility of explosion or fire, do not
store or use combustible, flammable or explosive vapors and
liquids (such as gasoline) inside or in the vicinity of this or any
other appliance.
IMPORTANT: The interior light emits class 1M laser radiation.
To avoid severe eye injury or electric shock, do not remove the
light cover or attempt to change the light bulb. Only a qualified
service technician should replace the light.
WARNING
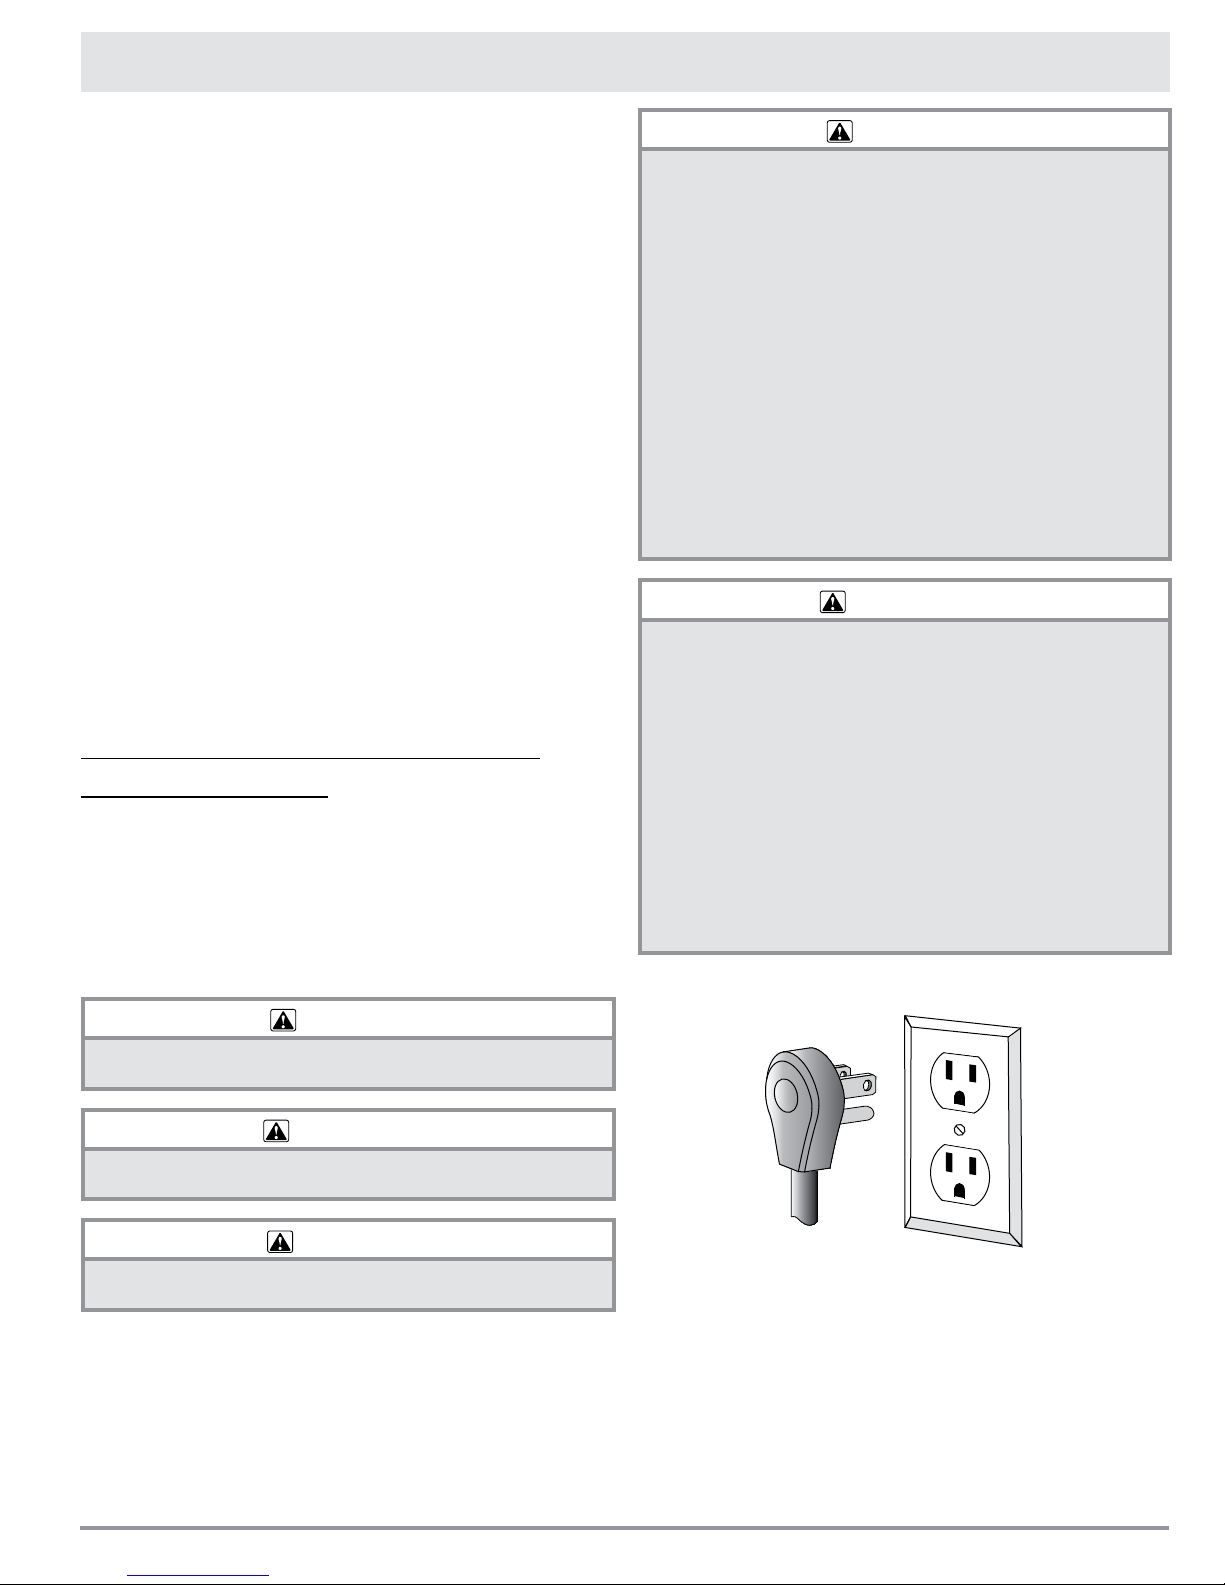
IMPORTANT: This appliance is equipped with a three prong
grounding electric plug for protection against possible electric
shock hazards. It must be plugged into a dedicated, grounded,
electrical outlet. If only a two prong electrical outlet is available,
it is the responsibility of the customer to have it replaced with a
dedicated, properly grounded three prong electrical outlet. Do
not under any circumstances:
Cut or remove the third (ground) prong from the power cord.•
Use an adapter plug.•
Use a power cord that is frayed or damaged.•
Connect the appliance to an extension cord.•
NOTE: Use of an electrical outlet with a ground fault interrupter
(GFI) is not recommended.
READ AND SAVE THESE INSTRUCTIONS
Power cord with three
prong grounding plug
Grounded type
electrical outlet

2
Important Safety Instructions
General Safety Precautions
To reduce the risk of fire, electric shock, serious injury or death when installing and using your wine cooler, follow basic safety
precautions, including the following:
WARNING
If you receive a damaged product, immediately contact your dealer or builder. Do not install or use a damaged appliance.•
Make sure that this appliance has been properly installed by a qualified installer according to the accompanying installation•
instructions. Have the installer show you the location of the electrical outlet so that you know where and how to disconnect power.
To prevent personal injury, property damage or damage to the unit, this appliance should only be unpacked and set up by two•
people according to the accompanying installation instructions.
Keep packaging materials away from children. Plastic sheets and bags can cause suffocation.•
Connect this appliance to a 115 Vac, 15 Amp. circuit that is controlled by a circuit breaker or fuse. This appliance should have its•
own separate grounded circuit.
Do not install, repair or replace any part of the appliance unless specifically recommended in the literature accompanying it. A•
qualified service technician should perform all other service.
Before performing any type of service, disconnect the unit from electric power.•
Use this appliance only for its intended purpose, the storage of wine and beverage products. It is not intended for commercial•
use.
Never allow anyone, including children to sit, stand or climb on any part of the appliance, including the door. Doing so may cause•
damage, serious injury or death.
Do not tamper with the controls.•
If “• F0” or “F1” appears on the display, a fault has occurred. Unplug the appliance and contact Dacor customer service.
CAUTION
To protect the wine cooler from possible damage, allow it to stand in place 1/2 to 1 hour after moving before turning the electricity•
on. Doing so allows the refrigerant and system lubrication to reach equilibrium.
In the event of a power outage, minimize opening the door.•
Do not allow the ventilation grill below the door to become obstructed. Make sure there is always good ventilation in front of the•
appliance.
When disconnecting the power cord, do not pull on the cable. Instead, grasp the plug and pull it out of the electrical outlet.•

3
Additional Features:
User-friendly electronic controls•
Electronic display•
Adjustable lighting•
Door open alarm•
Child-resistant lock on the control panel•
Easy to clean•
Low energy consumption (2.5 Amp. @ 115 Vac, 60 Hz.)•
CFC-free•
Safety Features
The refrigerant system on this appliance has been tested for•
leaks.
This appliance also complies with current safety regulations and•
EC directives 73/23/EEC and 89/336/EEC.
In addition, this appliance complies with UL250 and is designed•
to cool and store wine and beverages.
Your wine cooler can operate within the room temperature limits•
listed below. These temperature limits should not be exceeded.
ROOM TEMPERATURE REQUIREMENTS
FOR PROPER OPERATION
61°F to 90°F (16°C to 32°C)
Model Identification
EF24LWCZ2SS
(handle on right)
Features
The right environment for your wines...
A vine is an extremely sensitive plant. Grape quality is dependent
on three factors: light, air humidity and ambient temperature. This
sensitivity continues even after the wine is bottled. To allow a
wine’s flavor to fully develop and to preserve the excellent aroma,
it has to be properly stored. Your wine cooler offers the best
storage environment:
2 Temperature Zones:Your wine cooler has two compart-
ments (or zones). The upper and lower compartments can
be set to different temperatures. Doing so allows you to keep
different wines at different storage and/or serving tempera-
tures. Each compartment can be set between 41 to 64°F (5 to
18°C).
Wine Cellar Simulation:The fan on your wine cooler allows
you to simulate the humid conditions inside a wine cellar. High
humidity prevents bottle corks from drying out.
High Storage Capacity:Your wine cooler can store up to 44
750 mL bottles of wine. It allows you to preserve the flavor of
your favorite wines and keep them ready to serve.
Getting to Know Your Wine Cooler
EF24RWCZ2SS
(handle on left)
Handle
All specifications subject to change without notice.

4
Getting to Know the Control Panel
1. ON/OFF button
2. FAN button
Interior3. LIGHT on/off button
4. ALARM on/off button
Child-resistant lock indicator5.
Fan indicator6.
Upper compartment temperature display7.
8. Lower compartment temperature display
9. LOWER compartment temperature selection button
Temperature setting buttons10.
11. UPPER compartment temperature selection button
Turning Your Wine Cooler ON and OFF
Clean your wine cooler before turning it on•
for the first time. See the Care and Cleaning
section.
Connect the power cord to the electrical outlet.•
The wine cooler will come on.
The alarm will sound and the temperature•
display will flash because the wine cooler is warm when you
first turn it on (see the Alarm section for details). Push the
ALARM button to turn the alarm off while your wine cooler is
cooling down to operating temperature. The temperature display
will continue to flash until the interior has cooled.
To turn the wine cooler off, push and hold the• ON/OFF button
for about three seconds. The display will turn off to indicate that
the wine cooler is off.
To turn it on, push the• ON/OFF button until the display lights up.
Operating Your Wine Cooler
Setting the Temperature
Push the• LOWER or UPPER button to select the upper or lower
compartment. The temperature setting will flash on the display.
Push the• UP or DOWN button repeatedly to raise or lower the
temperature. You can change the settings in increments of 1°F
(or 1°C). While you are setting the temperature, the display will
flash. After five seconds the display will stop flashing and the
actual temperature of the compartment will be displayed.
NOTE: Depending on the amount of temperature change, it
may take a few minutes to a few hours for the compartment
temperature to reach the newly adjusted temperature level.

5
Operating Your Wine Cooler
Setting Up the Display (Set-up Mode)
In set-up mode you can turn the child resistant lock on and off
(see page 6 for details), set the temperature scale to Fahrenheit
or Celsius, and adjust the brightness of the display.
Changing the Temperature Scale (ºF or ºC)
You can select the temperature scale that the wine cooler uses to
display the temperature settings:
P• ush and hold the FAN button for about five seconds to enter
set-up mode. The display will begin to flash.
Push the• UP or DOWN button repeatedly until the degree
symbol “ º ” flashes on the display.
Push the• FAN button. “ ºF ” or “ ºC ” will flash on the display.
Push the• UP or DOWN button until the desired temperature
scale flashes on the display. Push the FAN button to select the
desired temperature scale.
Push the• ON/OFF button to exit set-up mode.
Within about two minutes, the wine cooler will change the
temperature scale on the display.
Changing the Display Brightness
Push and hold the• FAN button for about five seconds to enter
set-up mode. The display will begin to flash.
Push the• UP or DOWN button repeatedly until an “h” flashes on
the display. Push the FAN button. The current display
brightness level, from 1 to 5, will flash on the display. h1 is the
lowest level. h5 is the highest level.
Push the• UP or DOWN button repeatedly until the desired
brightness level flashes on the display. Push the FAN button to
select the desired brightness level.
Push the• ON/OFF button to exit set-up mode.
Loading Your Wine Cooler
Your wine cooler is equipped with slide out racks. All of the racks
slide out, except for the bottom shelf of each compartment.
Each rack holds up to• seven 750 mL Bordeaux bottles, except
for the bottom shelf of each compartment. The bottom shelf of
the upper compartment can hold five bottles. The bottom shelf
of the lower compartment can hold 11 bottles.
For maximum capacity• on the slide out racks and the bottom
shelf of the lower compartment, reverse the position of every
other bottle as shown below.
Labeling Your Wines
The front of each slide out rack• has a slot for attaching wine
labels. Labeling the front of the rack allows you to find the bottle
of wine you are looking for without having to pull the racks out
and look at the bottle labels.
You can obtain additional labels from your Dacor dealer or• parts
distributor.
Slot for Labels

6
Operating Your Wine Cooler
Push the• FAN button. “c0” or “c1” will flash on the display.
c0- means that the lock is off.
c1- means that the lock is on.
Push the• UP or DOWN button to select the desired mode. Push
the FAN button to select that mode.
Push the• ON/OFF button to exit set-up mode.
Door Lock (some models)
Some units come equipped with a door lock to prevent
unauthorized access.
The door is unlocked when the key is in the vertical position and
locked when in the horizontal position.
CAUTION
During locking or unlocking of the door, hold on to the key at all
times. The lock cylinder is spring loaded and will eject the key if
you release your grip.
To lock the door:
With the door closed, insert1.
the key into the lock as
shown.
Turn the key 90°2.
counterclockwise.
Remove the key.3.
To unlock the door:
Insert the key into the lock.1.
Turn the key 90° clockwise (to the vertical position).2.
Turning on the Fan
When storing wine for long periods of time, turn
on the fan. The fan will increase the humidity level
which prevents bottle corks from drying out. The
fan runs continuously until it is turned off.
To turn on the fan, push the• FAN button. The fan
indicator will appear on the display.
When the fan is on, pushing the• FAN button turns it off.
Alarm
The alarm helps to protect your wines against
excessive temperature fluctuations. The alarm
sounds when the door is open for longer than
about 60 seconds. It also sounds when the interior
gets too warm or too cold. The temperature
display will also flash. It will continue to flash until
the temperature problem has been fixed, even if
the alarm has been muted.
To• mute the alarm, push the ALARM button.
Interior Lighting
You can adjust the interior lighting on your wine cooler so that it is
on all the time, or so that it comes on only when the door is open.
You can also adjust the brightness level.
To make the light stay on (or turn off) when the door is
closed:
P• ush the light button.
To adjust the brightness level:
Push and hold the light button.•
While holding the light button down, push the• UP or DOWN
button to change the brightness.
When done adjusting the level, release the light button.•
Child-Resistant Lock
Your wine cooler has a child resistant lock feature
that makes it more difficult for a child to tamper
with the controls. The child resistant lock indicator
appears on the display when the lock is on.
To lock (or unlock) the control panel:
Push and hold the• FAN button for about five seconds to enter
set-up mode. The display will begin to flash.
Push the• UP or DOWN button repeatedly until “c” flashes on
the display.
Unlocked Locked

7
Replacing the Filters
Air quality is an important part of preserving and maturing
good wine. To maintain good air quality, your Dacor wine
cooler is equipped with an activated charcoal filter inside each
compartment. They are located on the rear wall.
Dacor recommends that you replace both filters at least once a
year. Filters (Dacor PN 101844) can be obtained from your Dacor
dealer, parts distributor or at www.everythingdacor.com.
To remove the old filters:
Disconnect the power cord from the electrical outlet or turn off1.
power at the circuit breaker or fuse box.
Hold the top filter by the handle in the center.2.
Turn it 90° to the left or right. Pull it out.3.
Remove the bottom filter the same way.4.
To install the new filters:
Insert the top filter with the handle in the vertical position.1.
Turn it 90° to the left or right until it clicks into place.2.
Replace the bottom filter the same way.3.
Reconnect the power.4.
Care and Cleaning
WARNING
To avoid possible injury due to electric shock, disconnect the•
power cord or turn off power at the circuit breaker or fuse
box before cleaning the appliance.
Clean only the parts of the wine cooler listed in this manual.•
Clean them only in the manner specified.
Do not use a steam cleaner to clean the wine cooler. Steam•
could penetrate the electrical components and cause a short
circuit.
Do not allow water or cleaning fluids to penetrate into the•
electrical components or ventilation grill.
CAUTION
To avoid damage to your wine cooler’s surfaces and
accessories during cleaning:
Use• only the types of cleaning solutions specified in this
manual.
Do not use abrasives such as steel wool, scouring pads,•
rough sponges or scrub brushes.
Defrosting
Both compartments of your wine cooler defrost automatically.
Water may form on the rear wall as part of the defrost process. It
drains into a reservoir at the back of the appliance and is heated
so that it evaporates.
Cleaning the Surfaces
Stainless Steel Surfaces
CAUTION
Always wipe stainless steel (silver colored) surfaces with the
grain.
Clean stainless steel surfaces with a mild solution of detergent•
and warm water. Rinse and dry with a soft, lint-free cloth.
You may also use Dacor Stainless Steel Cleaner•
(Dacor PN A302) on the stainless steel surfaces. Use it
according to the directions on the package.
Stainless steel that is exposed to chlorine gas and moisture•
may have some discoloration. This discoloration is normal. If
your unit is used in this type of environment, clean and polish
your stainless steel more often.
If the surface discolors or rust appears, clean it quickly with a•
non-abrasive cloth and protect it.
Glass Surfaces
To remove finger prints on glass surfaces, use a mild glass•
cleaner with a soft damp rag.
Other Surfaces
Clean• all other surfaces with a soft damp rag. You may soak the
rag with a mild detergent solution.
1) Turn handle 90° 2) Pull out

8
The Lights
DANGER
IMPORTANT: The interior lights emit class 1M laser radiation.
To avoid severe eye injury or electric shock, do not remove
the light covers or attempt to change the light bulbs. Only
a qualified service technician should replace the lights. The
location of the lights is shown below only so that the customer
can determine if they are working.
If one of the lights is not working, call your dealer or Dacor
Customer Service to have it replaced.
Light Fixture Locations:
Upper Compartment: Mounted in the ceiling toward the front.
Lower Compartment: Mounted underneath the control panel
toward the front.
Lights
Care and Cleaning

9
Before You Call for Service
Problem Solution Guide
PROBLEM MAY BE CAUSED BY WHAT TO DO
Nothing works. Wine cooler does
not cool, control panel display is
off and lights do not work.
Wine cooler not connected to
electrical power.
Make sure the wine cooler is plugged in.
Electricity to power outlet is off. Turn power on at circuit breaker panel or fuse box. Check
for tripped circuit breaker or blown fuse.
Wine cooler is turned off. See Turning Your Wine Cooler On and Off on page 4.
Power outage. Contact power company.
Light does not come on. No power. See “Nothing works”, above.
Lights are turned off. See Interior Lighting on page 6.
Light bulb burned out. Call for service to have it replaced. See Getting Help on
page 10 for details.
Loud running noise. Bottles vibrating. Adjust bottles and racks to minimize vibration.
Appliance not standing firmly on
floor.
Make sure that wine cooler is level according to installation
instructions. If the problem persists, contact installer. Have
installer level appliance or modify installation.
Wine cooler runs constantly. Room temperature too hot. Make sure room temperature is between limits on room
temperature chart on page 3. Adjust ventilation system if
necessary.
Door has been left ajar. Make sure door is firmly shut.
Wine cooler mounted too close to
heat source.
Have a technician or installer modify the appliance
installation or the heat source.
A lot of bottles added to cooler. The wine cooler will run until it has had a chance to cool all
the bottles.
Temperature not cold enough. Temperature not set properly. See Setting the Temperature on page 4.
See Wine cooler runs
constantly, above.
“F0” or “F1” appears on the
display.
Wine cooler has a fault. Disconnect the power cord. Call for service. See Getting
Help on page 10 for details.

10
LIMITED 6TH THROUGH 12TH YEAR WARRANTY
From the 6th through 12th year from the date of original purchase,
your DACOR warranty covers all parts that prove to be defective
in materials or workmanship in the sealed system (parts only).
OUTSIDE THE FIFTY STATES OF THE U.S.A., THE DISTRICT
OF COLUMBIA, AND CANADA:
LIMITED TWO YEAR WARRANTY
If your DACOR product fails to function within two years of
the original date of purchase, due to a defect in material or
workmanship, DACOR will furnish a new part, F.O.B. factory,
to replace the defective part. All delivery, installation, and labor
costs are the responsibility of the purchaser. The owner must
provide proof of purchase, upon request, and have the appliance
accessible for service.
LIMITED TWELVE YEAR WARRANTY
If your DACOR product fails to function within twelve years of
the original date of purchase, due to a defect in material or
workmanship of any components in the sealed system, DACOR
will furnish a new part, F.O.B. factory, to replace the defective
part. All delivery, installation, and labor costs are the responsibility
of the purchaser. The owner must provide proof of purchase,
upon request, and have the appliance accessible for service.
The “sealed system” means only the compressor, condenser,
evaporator, drier, and all connecting tubing.
What Is Not Covered
Service calls to educate the customer in the proper use and•
care of the product.
Failure of the product when used for commercial, business,•
rental, or any application other than for residential consumer
use.
Replacement of house fuses or fuse boxes or resetting of circuit•
breakers.
Damage to the product caused by accident, fire, flood or other•
acts of God.
Breakage, discoloration or damage to glass, metal surfaces,•
plastic components, trim, paint, or other cosmetic finish, caused
by improper usage or care, abuse or neglect.
THE REMEDIES PROVIDED FOR IN THE ABOVE EXPRESS
WARRANTIES ARE THE SOLE AND EXCLUSIVE REMEDIES.
THEREFORE, NO OTHER EXPRESS WARRANTIES ARE
MADE, AND OUTSIDE THE FIFTY STATES OF THE UNITED
STATES, THE DISTRICT OF COLUMBIA, AND CANADA, ALL
IMPLIED WARRANTIES, INCLUDING BUT NOT LIMITED
TO, ANY IMPLIED WARRANTY OF MERCHANTABILITY OR
FITNESS FOR A PARTICULAR USE OR PURPOSE, ARE
LIMITED IN DURATION TO ONE YEAR FROM THE DATE OF
ORIGINAL PURCHASE. IN NO EVENT SHALL DACOR BE
LIABLE FOR INCIDENTAL EXPENSE OR CONSEQUENTIAL
DAMAGES. NO WARRANTIES, EXPRESS OR IMPLIED, ARE
MADE TO ANY BUYER FOR RESALE.
Some states do not allow limitations on how long an implied
warranty lasts, or do not allow the exclusion or limitation of
inconsequential damages, so the above limitations or exclusions
may not apply to you. This warranty gives you specific legal rights,
and you may also have other rights that vary from state to state.
Warranty and Service
Getting Help
Before you request service, please review the Before You Call
for Service section on page 9. If you have performed the checks
in the Problem Solution Guide and the problem has not been
remedied, please contact us at one of the numbers below. Prior
to requesting service, it is helpful to be familiar with the warranty
terms and conditions listed in the Warranty section on this page.
For warranty repairs, call:
Dacor Distinctive Service
Phone: (877) 337-3226 (U.S.A. and Canada)
Business Hours: 6:00 a.m.- 4:00 p.m.Pacific Time
For a list of Dacor service agents for non-warranty
repairs:
Dacor Customer Service
Phone: (800) 793-0093 (U.S.A. and Canada)
Business Hours: 6:00 a.m.- 5:00 p.m.Pacific Time
Contact us through our web site at:
www.Dacor.com
At Dacor, we believe that our quality of service equals that of
our product. Should your experience with our service network
or product be different, please contact our Customer Service
Team and share your encounter with us. We will do our utmost to
resolve the situation for you and deliver on our Dacor promise.
If you need anything clarified, just let us know.
Warranty
What Is Covered
CERTIFICATE OF WARRANTIES
DACOR WINE COOLERS
WITHIN THE FIFTY STATES OF THE U.S.A., THE DISTRICT OF
COLUMBIA, AND CANADA*:
FULL TWO-YEAR WARRANTY
If your DACOR product fails to function within two years of
the original date of purchase, due to a defect in material or
workmanship, DACOR will remedy the defect without charge
to you or subsequent users. The owner must provide proof of
purchase upon request, and have the appliance accessible for
service.
* Warranty is null and void if non-CSA approved product is
transported from the U.S.
FULL FIVE-YEAR WARRANTY
For five years from the date of original purchase, your DACOR
warranty covers all parts and labor to repair or replace
any components that prove to be defective in materials or
workmanship in the sealed system. The “sealed system” means
only the compressor, condenser, evaporator, drier, and all
connecting tubing.

11
Notes

12
fold here
DACOR
ATTN WARRANTY PROCESSING DEPT
PO BOX 90070
CITY OF INDUSTRY CA 91715-9907
NO POSTAGE
NECESSARY
IF MAILED
IN THE
UNITED STATES
BUSINESS REPLY MAIL
FIRST-CLASS MAIL CITY OF INDUSTRY CAPERMIT NO 1600
POSTAGE WILL BE PAID BY ADDRESSEE
Notes

fold here
DACOR
ATTN WARRANTY PROCESSING DEPT
PO BOX 90070
CITY OF INDUSTRY CA 91715-9907
NO POSTAGE
NECESSARY
IF MAILED
IN THE
UNITED STATES
BUSINESS REPLY MAIL
FIRST-CLASS MAIL CITY OF INDUSTRY CAPERMIT NO 1600
POSTAGE WILL BE PAID BY ADDRESSEE

Web site: www.Dacor.com
Corporate phone: (800) 793-0093
WARRANTY INFORMATION
IMPORTANT:
Your warranty will not be activated until you activate it online or return this form to Dacor. If you have purchased more
than one Dacor product, please return all forms in one envelope or activate the warranty for each product online.
Please rest assured that under no conditions will Dacor sell your name or any of the information on this form for mailing list purposes. We
are very grateful that you have chosen Dacor products for your home and do not consider the sale of such information to be a proper way
of expressing our gratitude!
Your willingness to take a few seconds to fill in the section below will be sincerely appreciated. Thank you.
1. How were you first exposed to Dacor products? (Please check one only.)
A. T.V. Cooking Show F Builder
B. Magazine G. Architect/Designer
C. Appliance Dealer Showroom H. Another Dacor Owner
D. Kitchen Dealer Showroom I. Model Home
E. Home Show J. Other
2. Where did you buy your Dacor appliances?
A. Appliance Dealer D. Builder
B. Kitchen Dealer E. Other
C. Builder Supplier
3. For what purpose was the product purchased?
A. Replacement only C. New Home
B. Part of a Remodel D. Other
4. What is your household income?
A. Under $75,000 D. $150,000 – $200,000
B. $75,000 – $100,000 E. $200,000 – $250,000
C. $100,000 – $150,000 F. Over $250,000
5. What other brands of appliances do you have in your kitchen?
A. Cooktop C. Dishwasher
B. Oven D. Refrigerator
6. Would you buy or recommend another Dacor product?
Yes No
Comments:
Owner’s Name:
Street:
City: State: Zip:
Purchase Date: Email: Telephone:
Dealer:
City: State: Zip:
(Please Print or Type)
Last First Middle
cut herecut here
Please visit www.Dacor.com to activate your warranty online.
Thank you very much for your assistance. The information you have
provided will be extremely valuable in helping us plan for the future
and giving you the support you deserve.
Other manuals for EF24LWCZ2SS
1
This manual suits for next models
1
Table of contents
Other Dacor Wine Cooler manuals

Dacor
Dacor HWC241 Series User manual

Dacor
Dacor Wine Steward/Beverage Cooler User manual

Dacor
Dacor HWC242L User manual

Dacor
Dacor RNF242WCL Installation guide

Dacor
Dacor EF24RBCSS Owner's manual

Dacor
Dacor EWC240 Installation guide

Dacor
Dacor DRW24980RAP User manual

Dacor
Dacor EF24LWCZ1SS User manual

Dacor
Dacor Wine Steward/Beverage Cooler User manual

Dacor
Dacor DRW24980RAP/LAP User manual