Dacor EF24LWCZ2SS User manual

InstallatIon InstructIons
BuIlt-InWIne coolers & Beverage centers
For use with models:
EF24LWCZ2SS, EF24RWCZ2SS
EF24LWCZ1SS, EF24RWCZ1SS
EF24LBCSS, EF24RBCSS
Part No. 100961 Rev. B

1
Important Safety Instructions .....................................................1
Customer Service Information....................................................2
Planning the Installation...........................................................2-3
Electrical Requirements..............................................................2
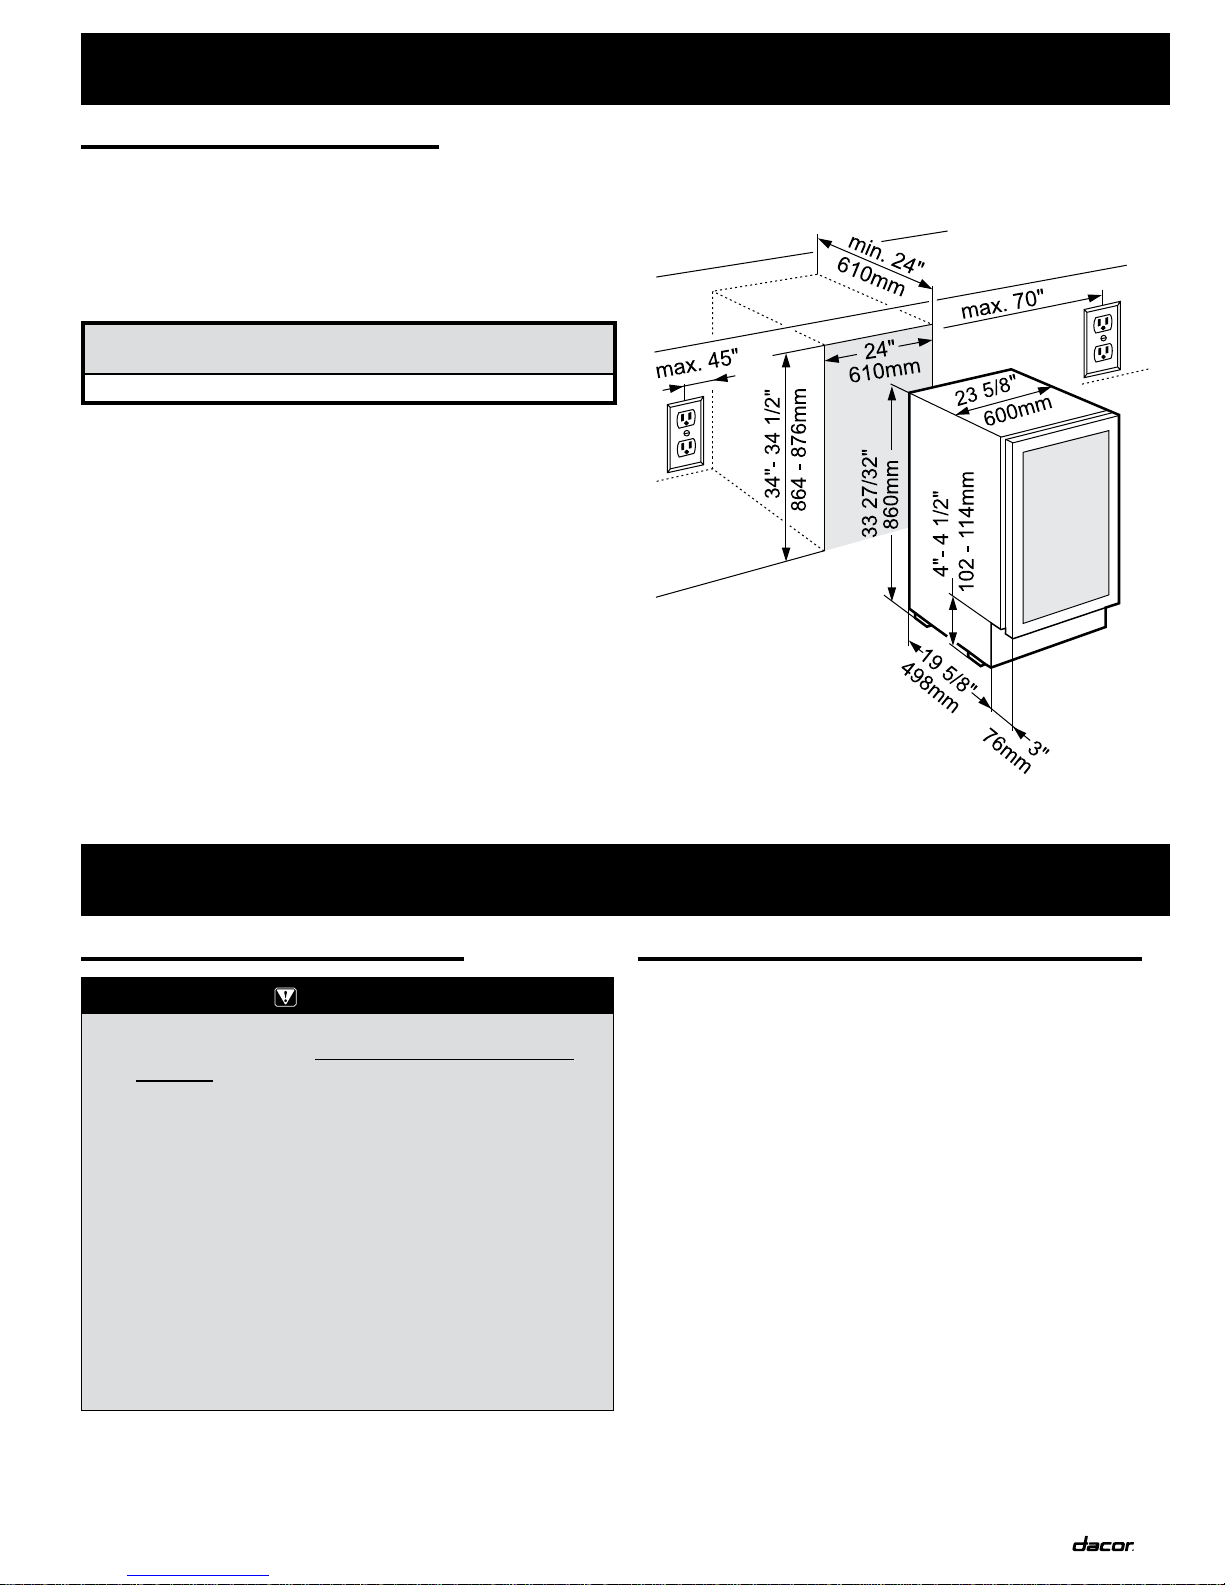
Location Requirements...............................................................3
Dimensions.................................................................................3
Installation Instructions............................................................3-4
Unpacking the Appliance............................................................3
Tools Required for Installation....................................................3
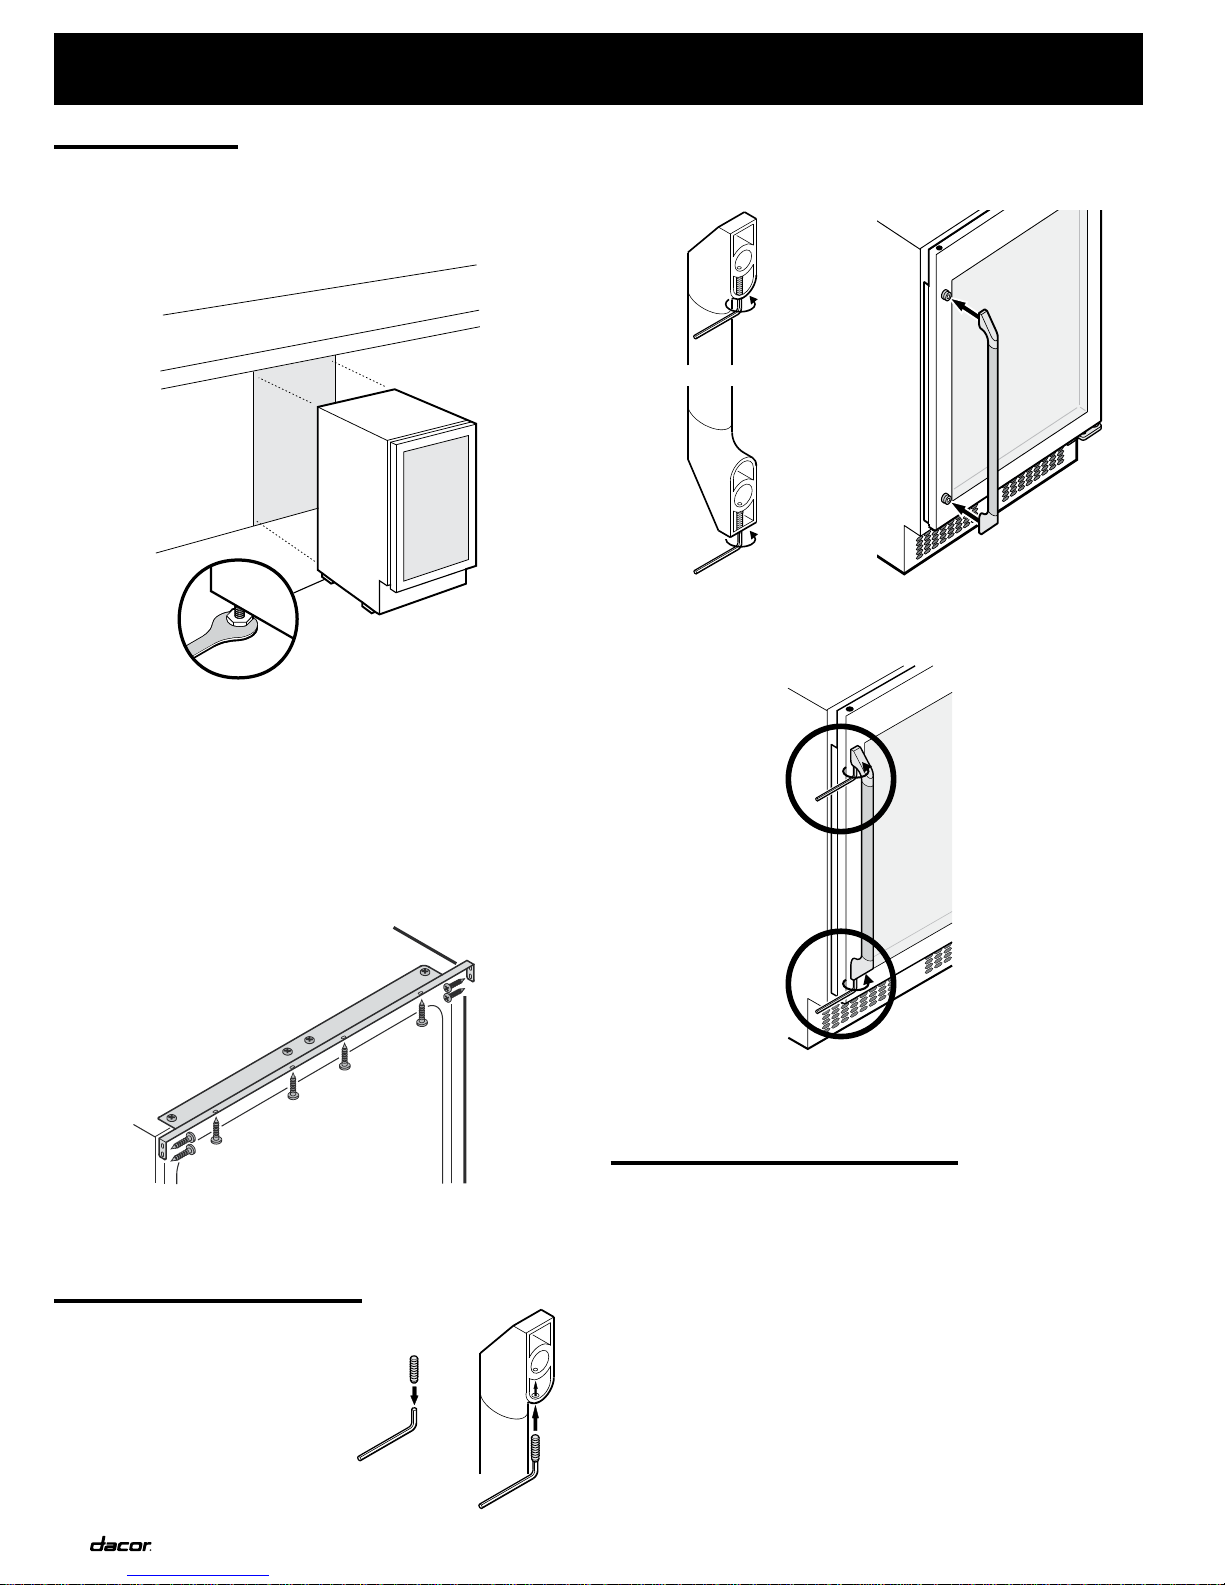
Installation...................................................................................4
Handle Installation......................................................................4
Installation Checklist...................................................................4
Table of ConTenTs
What You Need to Know About Safety
Instructions
Warnings and Important Safety Instructions appearing in this
guide are not meant to cover all possible conditions and situations
that may occur. Common sense, caution and care must be
exercised when installing, maintaining or operating an appliance.
Always contact Dacor®about problems or conditions you do not
understand.
Safety Symbols, Words, and Labels
DANGER
DANGER – Immediate hazards which WILL result in severe
personal injury or death.
WARNING
WARNING – Hazards or unsafe practices which COULD result
in severe personal injury or death.
CAUTION
CAUTION – Hazards or unsafe practices which COULD result
in minor personal injury or property damage.
IMPORTANT:
INSTALLER: In the interest of safety, read this installation instruction manual completely, before you begin the installation process.
Leave these installation instructions with the homeowner.
HOMEOWNER: Keep these installation instructions for future reference. Save these installation instructions for the local electrical
inspector’s use.
◊
◊
ImporTanT safeTy InsTruCTIons
DANGER
IMPORTANT: Child entrapment and suffocation are not
problems of the past. Junked or abandoned appliances are
still dangerous, even if they sit out for “just a few days.”
When taking an appliance out of service, please follow the
instructions below to help prevent accidents:
Take off the door.
Leave the racks in place so children cannot easily climb
inside.
Cut the prongs off the power cable plug and discard
them.
Cut the power cable off and discard it separately from
the old appliance.
IMPORTANT: The interior lights on this appliance emit class
1M laser radiation.
Only a qualified service technician should replace the
light bulbs or remove the light covers.
Service technicians: To avoid severe eye injury or
electric shock, disconnect power to the appliance before
removing the light covers or changing the light bulbs.
•
•
•
•
•
•
To reduce the risk of fire, electric shock, serious injury, or death when installing or using this appliance, follow basic
safety precautions, including the following:
WARNING
This appliance is to be installed only by a qualified in-
staller according to these installation instructions.
This appliance must be installed in a cabinet or counter
before it is used.
1.
2.
WARNING
Only a qualified service technician should service this
appliance, unless the service procedure is specifically
recommended in the literature accompanying it. Before
performing any type of service, disconnect the unit from
electric power.
To avoid fire or explosion, do not operate the appliance
in the presence of explosive materials or fumes, such as
gasoline.
To protect the appliance from possible damage, allow it
to stand in place 1/2 to 1 hour after delivery before turn-
ing the electricity on. Doing so allows the refrigerant and
system lubrication to reach equilibrium.
Never allow anyone, including children to sit, stand, or
climb on any part of the appliance, including the door. Do-
ing so may cause, damage, serious injury, or death.
Do not tamper with the controls.
Do not allow the ventilation grill below the door to become
obstructed. Make sure there is always good ventilation in
front of the appliance.
If “F0” or “F1” appears on the display, a fault has oc-
curred. Unplug the appliance and contact Dacor cus-
tomer service.
3.
4.
5.
6.
7.
8.
9.

2
plannIng The InsTallaTIon
eleCTrICal requIremenTs
This appliance should have its own separate, 110-120 VAC,
10 amp grounded circuit controlled by a circuit breaker or fuse.
Use a 15 Amp circuit for side-by-side installations. Follow the
National Electrical Code and local codes and ordinances when
installing the electrical outlet.
The electrical outlet must accept a grounded 3-prong power cord.
A ground fault circuit interrupter (GFCI) type is not recommended
because it may cause interruption of operation. See “Location and
Cabinet Layout Requirements” for guidelines regarding location of
the electrical outlet.
This appliance complies with current safety regulations and EC
directives 73/23/EEC and 89/336/EEC.
In addition, this appliance complies with UL250 and is designed to
cool and store wine and beverages.
The refrigerant system on this appliance has been tested for
leaks.
DANGER
ELECTRICAL SHOCK HAZARD – Plug this unit only into a
grounded 3-prong electrical outlet.
Do not remove the ground prong.
Do not use a 2-prong adapter.
Do not use an extension cord.
Do not use a power cord that is frayed or damaged.
Failure to comply with the above can result in fire, electric
shock, or death.
•
•
•
•
IMPORTANT: Observe all governing codes and ordinances during
planning and installation.
CusTomer servICe InformaTIon
Any questions or problems not related to installation should be
directed to your Dacor dealer or the Dacor Customer Service
Department.
Dacor Customer Service
1-800-793-0093 (U.S.A. and Canada)
Monday — Friday 6:00 am to 5:00 pm Pacific Time
website: www.dacor.com
If the unit requires service, be sure to have the model and serial number available
when you call. You’ll find these numbers on the serial number plate located inside
the door on the lower left side wall.
All Dacor appliances are subject to continuous improvement. The manufacturer
reserves the right to make modifications in the shape, equipment, and technology.

3
NOTE: The overall height of the appliance can be increased by
1 ⅛” (28.6 mm) by adjusting the feet. The cut-out dimensions
allow for additional clearance for sliding the appliance into its
recess based on how you chose the final installation to look.
Cabinet Cut-Out and Product Dimensions
loCaTIon requIremenTs
Operating Environment
Do not install this appliance where it is hit by direct sunlight or
near a stove, range top, radiator, or similar heat source.
The appliance is set to operate within the room temperature
limits listed below. These temperature limits should not be
exceeded.
ROOM TEMPERATURE REQUIREMENTS
FOR PROPER OPERATION
61°F to 90°F (16°C to 32°C)
Location and Cabinet Layout Requirements
The Dacor wine cooler or beverage center can be recessed in an
opening between cabinets or installed at the end of a cabinet run
using a side panel to enclose it
IMPORTANT:
The installation location should permit the door to open a
minimum of 90°. The maximum angle the door can open is
105°.
The appliance must be located so that the grill on the bottom
is not obstructed.
The electrical outlet must be accessible after installation so
that the user can unplug the appliance.
The floor under the appliance must be flat and level with the
surrounding floor.
◊
◊
◊
◊
◊
◊
plannIng The InsTallaTIon
InsTallaTIon InsTruCTIons
unpaCkIng The applIanCe
Protect the floor surface before you un-crate the unit. Put the
unit on cardboard, plywood, or preferably a carpet remnant
(backing up) placed on the floor.
Keep the floor protected when moving the appliance.
◊
◊
If you receive a damaged product, immediately contact
your dealer or builder. Do not install or use a damaged
appliance.
To prevent personal injury, property damage, or damage
to the unit, this appliance should only be unpacked and
set up by two people.
Keep packaging materials away from children. Plastic
sheets and bags can cause suffocation.
Keep the appliance out of the weather. Avoid placing the
appliance in direct sunlight or near a stove, range top,
radiator, or similar heat source.
To protect the unit from possible damage, allow it to stand
in place 1/2 to 1 hour after delivery before turning the
electricity on. Doing so allows the refrigerant and system
lubrication to reach equilibrium.
1.
2.
3.
4.
5.
WARNING
Tools requIred for InsTallaTIon
Make sure that you have the necessary tools and materials
available for a proper installation.
Phillips screwdriver set
Level
Crescent wrenches
3 mounting screws (included)
Allen wrench (included)
2 Set screws (included)
Handle (included)
◊
◊
◊
◊
◊
◊
◊

4
InsTallaTIon InsTruCTIons
InsTallaTIon
Adjust the appliance height to fit the cut-out using the four
adjustable feet on the underside of the appliance.
Make sure all four feet hit the floor and that the appliance
does not rock.
Place the level on one of the racks inside the appliance.
Check to make sure the appliance is level front to back and
side to side. Re-adjust the feet if necessary.
Slide the appliance into the cut-out.
Attach the appliance to the front of the cut-out as shown
using the four mounting screws included with the unit. The
screws can be installed into the bottom of the counter and/or
into the cabinet in any combination. All four screws must be
used.
Connect the power cord to the electrical outlet. Turn the
appliance on several hours before loading it.
handle InsTallaTIon
Put one of the included set
screws on the end of the
included allen wrench.
Insert the set screw into one
end of the handle.
1.
2.
3.
4.
5.
6.
1.
2.
Thread the set screw two turns into the handle.
Repeat steps 1 to 3 for the other end of the handle.
Put both ends of the handle over the handle mounting pins.
Tighten both set screws into place. Do not overtighten.
3.
4.
5.
6.
InsTallaTIon CheCklIsT
IMPORTANT: The importance of the proper installation of your
Dacor Built-In appliance cannot be overemphasized. To ensure
a safe and proper installation, the following checklist should be
completed by the installer to ensure that no part of the installation
has been overlooked.
Has the appliance been secured in place?
Are all leveling legs extended down to make contact with the
floor? Is the unit level?
Is the power cord plugged into a properly grounded dedicated
3-prong outlet, which has been installed in accordance with
all applicable electrical codes?
Have any installation/service problems been noted on the
product registration card? Has the registration card been
mailed?
□
□
□
□
NOTE: Dacor recommends cleaning the appliance according to
the cleaning instructions in use and care manual before use.

The information and images in this book are the copyright
property of Distinctive Appliances, Inc. Neither this book nor any
information or images contained herein may be copied or used
in whole or in part without the express written permission of
Distinctive Appliances, Inc.
©2006 Distinctive Appliances, Inc. all rights reserved.
Specifications contained within are subject to change without notice.
No liability is assumed by DACOR for changes in specifications.
Web Site: www.dacor.com
Phone: (800) 793-0093
Other manuals for EF24LWCZ2SS
1
This manual suits for next models
5
Table of contents
Other Dacor Wine Cooler manuals

Dacor
Dacor EWC240 Installation guide

Dacor
Dacor HWC241 Series User manual

Dacor
Dacor Discovery DYWS4 User manual

Dacor
Dacor EF24LWCZ2SS User manual

Dacor
Dacor DRW24980RAP User manual

Dacor
Dacor HWC241L User manual

Dacor
Dacor RNF241WCL Installation guide

Dacor
Dacor RNF242WCL Installation guide

Dacor
Dacor HWC242L User manual

Dacor
Dacor DRW24980RAP/LAP User manual