DAW Industries 4P10 KD User manual

Sitting Position
DAW
© Copyright 2021, DAW Industries, San Diego, CA - All Rights Reserved 01272021
®
DAW
Industries
DAW
© Copyright 2021, DAW Industries, San Diego, CA - All Rights Reserved 01272021
®
DAW
Industries
DAW
IMPORTANT:
Adjusting alignment beyond
recommended limits described within will
adversely affect patient’s gait, and could
cause premature wear.
PRACTITIONER’S
MANUAL
DAW Industries
CENTRAL/EASTERN
DISTRIBUTION CENTER:
5579-B Chamblee Dunwoody Road
Suite 227
Atlanta, GA 30338-4154
Orders: (800) 824-7192
Fax: (800) 865-8563
HEADQUARTERS:
6610 Nancy Ridge Road
San Diego, CA 92121-2252
Orders: (800) 252-2828 • (858) 622-4962
Fax: (800) 856-8563
www.daw-usa.com
Technical Support
(800) 242-8669
Stock#: TGK-4P10
4P10™KD
Engineered with True-KD™Biomechanics
Benefits:
✔Engineered specifically to serve the needs of KD Amputees
✔Ultra-Lite, high strength carbon fiber construction
✔Decades of proven reliability
✔Safe, natural toe-clearance in swing for added efficiency
✔Separate extension / flexion pneumatic adjustments
✔ Completely maintenance free
True-KD™ Biomechanics:
not only serves your KD Amputee’s unique cosmetic needs, True-KD
Knees are also engineered to maximize stability & efficiency by
exploiting your Patient’s distinct biomechanical advantages!
Learn more @ daw-usa.com/true-kd-biomechanics
IMPORTANT:
Read technical information
thoroughly before using knee.
DAW
© Copyright 2021, DAW Industries, San Diego, CA - All Rights Reserved 01272021
®
DAW
Industries
DAW
© Copyright 2021, DAW Industries, San Diego, CA - All Rights Reserved 01272021
®
DAW
Industries
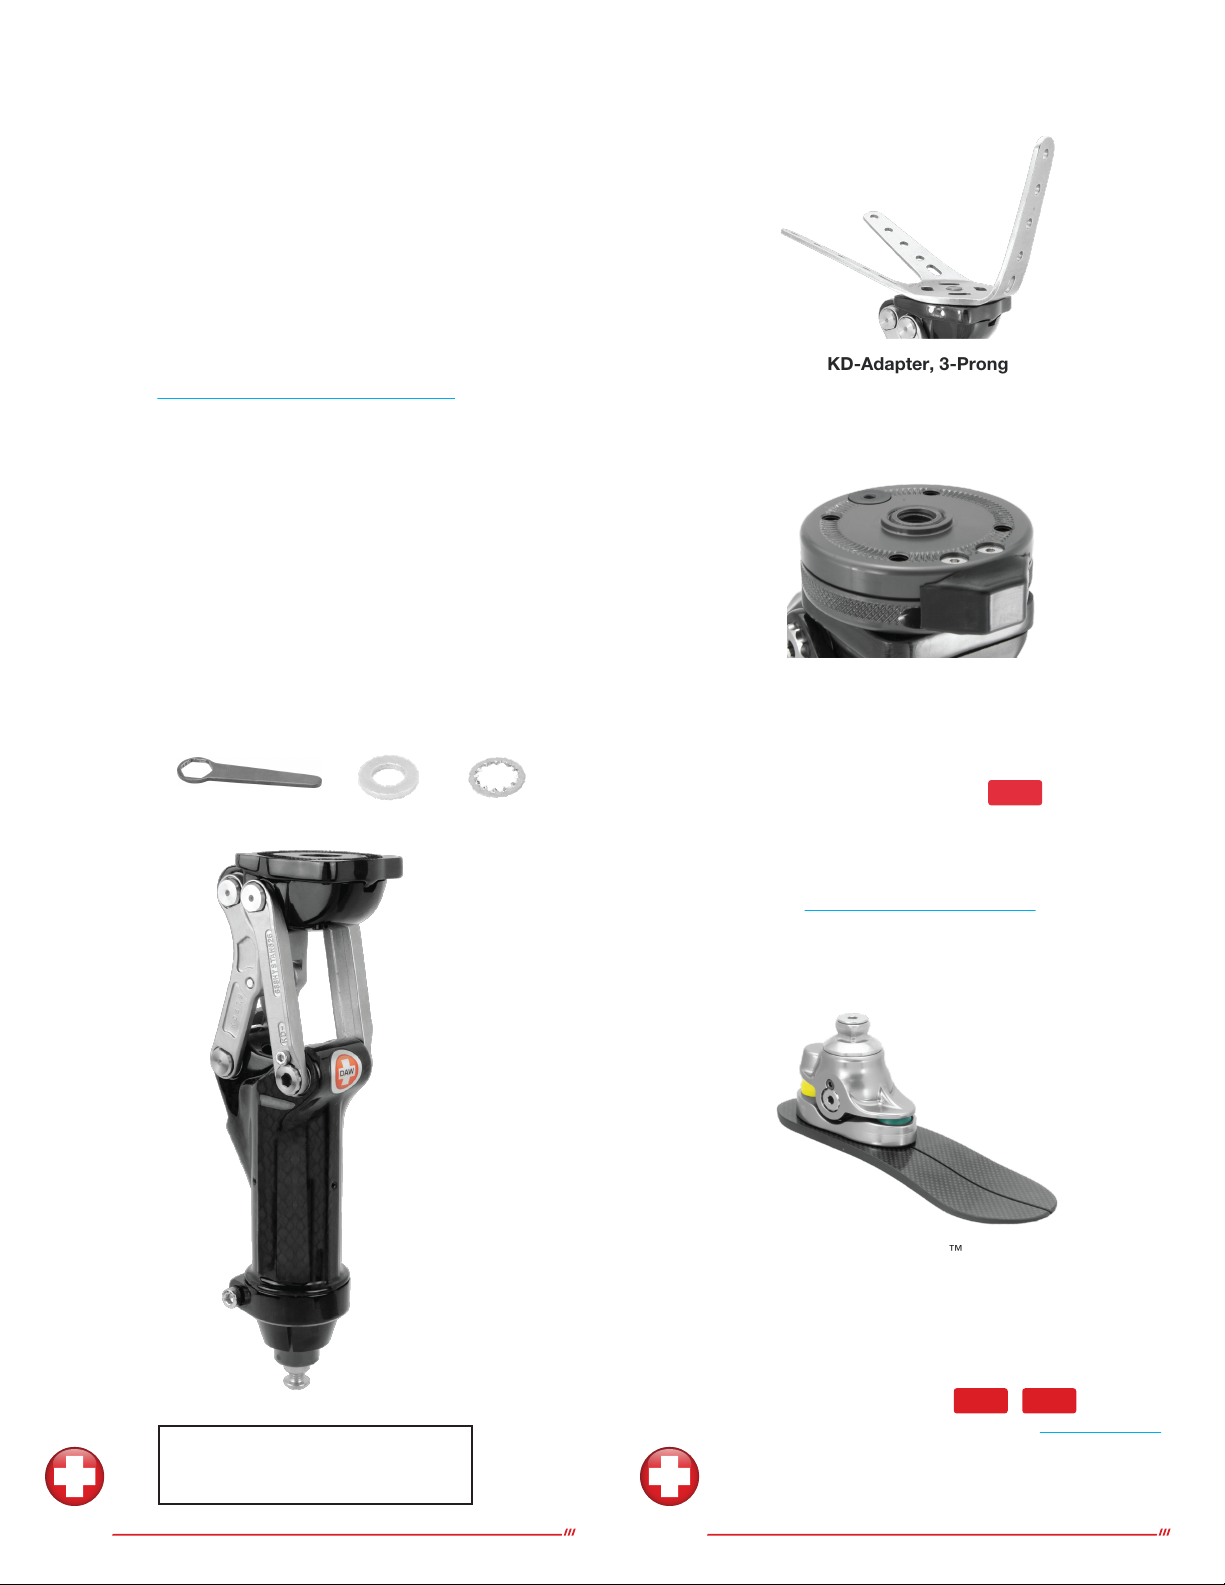
Includes: Adjustment Wrench, Washer & Lock Washer
Browse our complete selection of Unique Components at
daw-usa.com/all-connectors
Popular Proximal Options
Lo-Pro Rotator™
(#: TKR-01)
Provides Rotational Adjustment
Attach any 4-Hole connector
Suggested L-Codes*: L5984
K3 Pro-Action™Foot
Engineered for the low to moderately active K3 Individual
Provides 3 Dynamic Energy Returning Carbon Keel Options
& Multi-Axial Ankle Motion with Rotation.
Suggested L-Codes*: L5981 L5986
*Please refer to the complete reimbursement disclaimer at www.daw-usa.com
Recommended K3 Foot
KD-Adapter, 3-Prong
Stainless Steel (#: TSC-KDL)
Provides Rotational Adjustment
Stock#: TGK-4P10
4P10™KD
Engineered with True-KD™Biomechanics

DAW
© Copyright 2021, DAW Industries, San Diego, CA - All Rights Reserved 01082021
®
DAW
Industries
For Technical Support call (800)242-8669
DAW
© Copyright 2021, DAW Industries, San Diego, CA - All Rights Reserved 01082021
®
DAW
Industries
For Technical Support call (800)242-8669
Patient Notes Contents
16 1
Page #
Recommended Order of Adjustments ................1 (Below)
KD Adapter Lamination / Connection Procedure ............2-3
Build Height .......................................... 4
Torque Settings ....................................... 4
Alignment ............................................ 5
Extension Stop (Stability & Swing Phase Trigger Point) . . . . . . . 6
Swing Phase Adjustments (Flexion & Extension Dampening) 7
Returning Flexion & Extension to Factory Setting ............. 8
Extension Assist Adjustment ........................... 9
Replacing or Trimming the Extension Assist Spring . . . . . . . . . . 10
Cleaning Pneumatic Components ........................ 11
DAW Prosthetic Knee Limited Warranty ................... 12
Specifications........................................ 13
Patient Notes ......................................14-16
Popular Proximal Options ................. (inside back cover)
1. Extension Stop
2. Flexion Dampening
3. Extension Dampening
4. Extension Assist
Recommended Order of Adjustments
adjustable functions
DAW
© Copyright 2021, DAW Industries, San Diego, CA - All Rights Reserved 01082021
®
DAW
Industries
For Technical Support call (800)242-8669
DAW
© Copyright 2021, DAW Industries, San Diego, CA - All Rights Reserved 01082021
®
DAW
Industries
For Technical Support call (800)242-8669
2 15
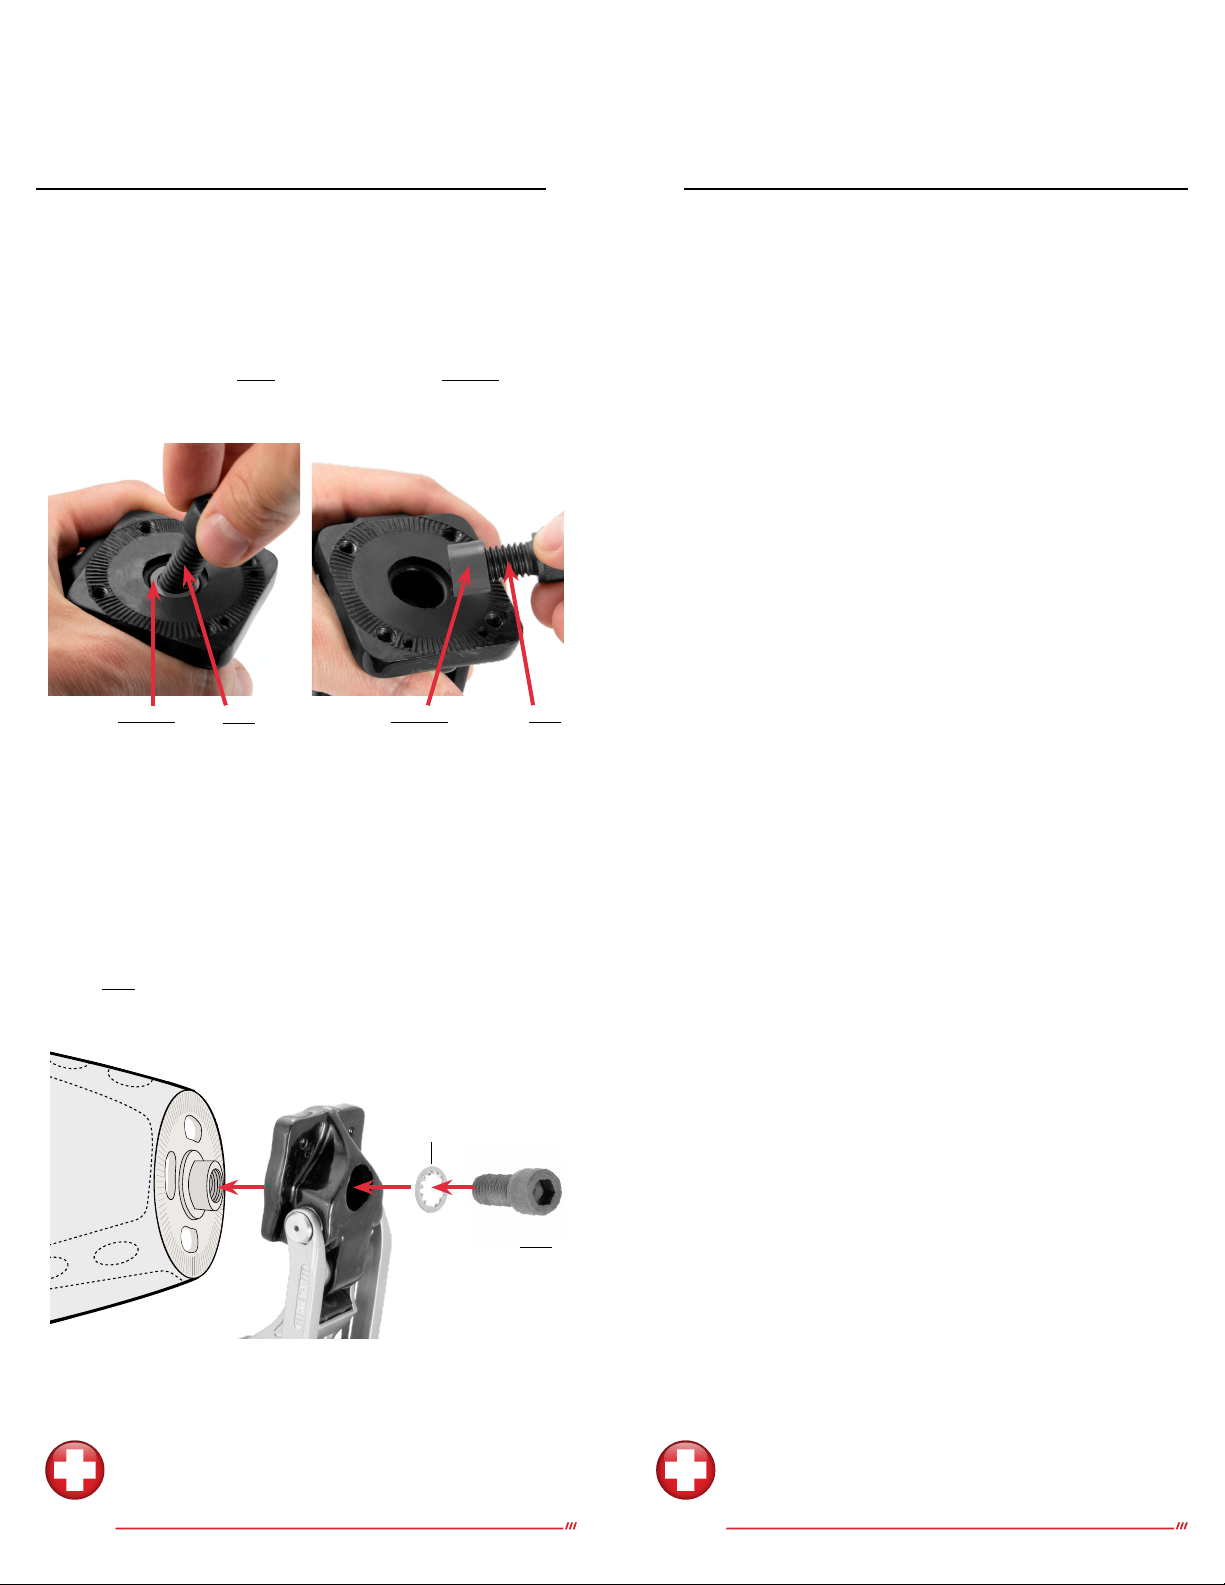
True-KD™Series
Knee Connection to KD Adapter (TSC-KDL)
7
/16 Bolt
(8mm hex)
Lock Washer
7
/16 Bolt
Spacer Spacer 7
/16 Bolt
The instructions below apply to True-KD™Series Knees, when
using the KD Adapter (TSC-KDL):
After lamination of the KD Adapter (TSC-KDL) is complete,
A. Use the included 7
/16 Bolt to remove the black Spacer from the
center of the top of the knee.
B. Remove the Kneecap.
C. Flex the 4P10 KD™True-KD Knee approx. 90-degrees.
D. Select your desired degree of external knee rotation.
Each notch of the KD Adapter and knee top is an adjustment
of 2 degrees.
E. Secure the knee to the KD Adapter using the included
7
/16 Bolt (8mm hex). Torque the bolt to 9ft-lb (12.2Nm).
Patient Notes

DAW
© Copyright 2021, DAW Industries, San Diego, CA - All Rights Reserved 01082021
®
DAW
Industries
For Technical Support call (800)242-8669
DAW
© Copyright 2021, DAW Industries, San Diego, CA - All Rights Reserved 01082021
®
DAW
Industries
For Technical Support call (800)242-8669
14 3
True-KD™Series Knee Connection to
Wire Basket Adapter (TSC-BX)
with Lo-Pro Rotator™
Threaded Side Unthreaded Side
Rubber Plug
7
/16 Bolt
(8mm hex)
M6 Buttonhead
Screw (4mm hex)
M4
Screw Rubber
Plug
Button
Lock Washer
The Lo-Pro Rotator attaches directly to the top of any DAW
True-KD™Series knee. It’s low build height allows KD Amputees
the convenience of knee rotation while still maintaining cosmetic
appearance in the sitting position.
The Lo-Pro Rotator features an
Unthreaded Side (with an unthreaded 4-Hole pattern) and a
Threaded Side (with a threaded 4-Hole pattern*Rubber Plug).
A. First, screw in the included M4 Screw
(by hand) partially into the Rubber Plug
and pull up to remove it.
B. Push and hold down the Button and rotate
until the Plug’s Hole lines up with one of
the unthreaded holes on the rotator’s other
side. If it is difficult to rotate, screw in 2
M6 Button Head Screws partially into the
Threaded Side to use as leverage.
C. With the Unthreaded Side against the
adapter, insert one of the included
M6 Button Head Screws (4mm hex)
through the 2 holes into a threaded hole
of the Wire Basket. Screw in, but do not
tighten. It’s recommended the button be
positioned facing forward.
D. Repeat steps B. & C. until all 4 M6 Button
Head Screws are screwed in. Torque each
screw to 7.4ft-lb (9.9Nm).
E. Return the Rubber Plug to its hole.
F. Now you may secure the knee to the bottom of the Lo-Pro
Rotator using the included 7
/16 Bolt (8mm hex). Torque the
bolt to 9ft-lb (12.2Nm).
Connection of the Lo-Pro Rotator to the 4P10 KD™:
After lamination of the Wire Basket Adapter (TSC-BX) is complete,
Patient Notes
DAW
© Copyright 2021, DAW Industries, San Diego, CA - All Rights Reserved 01082021
®
DAW
Industries
For Technical Support call (800)242-8669
DAW
© Copyright 2021, DAW Industries, San Diego, CA - All Rights Reserved 01082021
®
DAW
Industries
For Technical Support call (800)242-8669
4 13
TORQUE SETTINGS
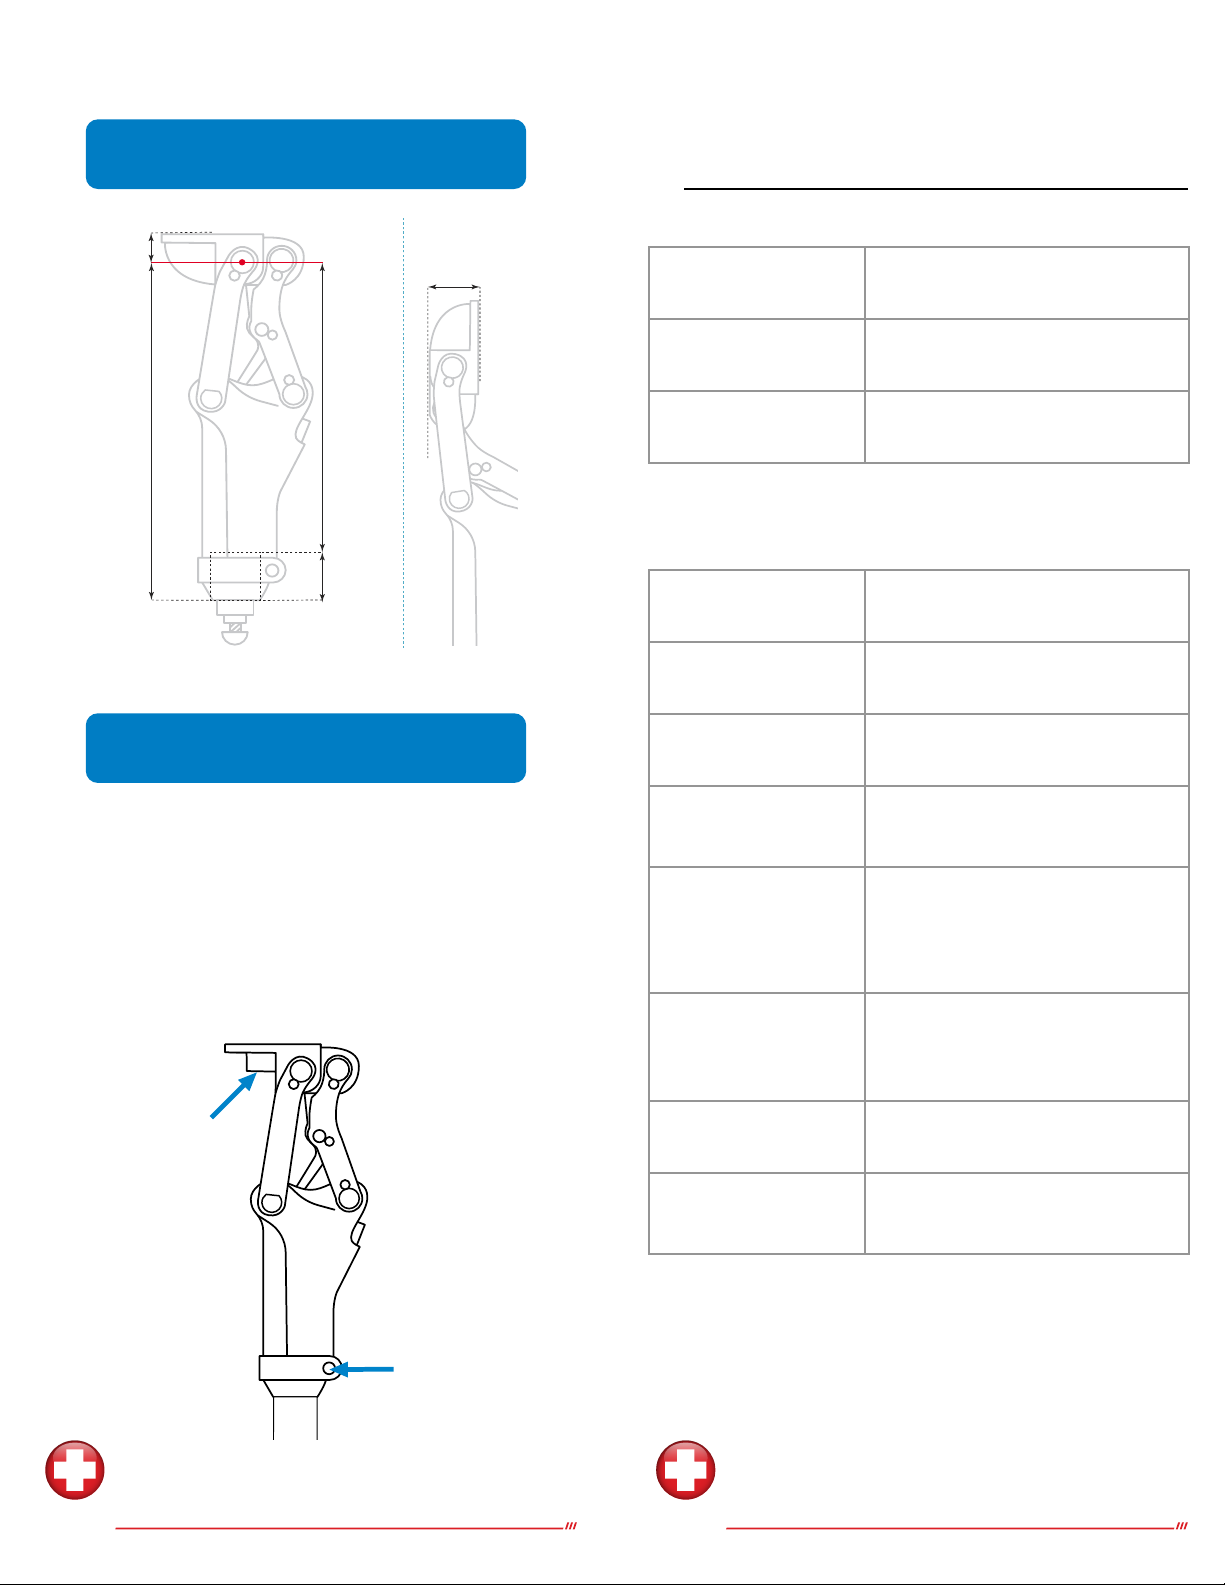
BUILD HEIGHT
Single 7/16 SAE Bolt
(8mm hex)
9ft-lb (12.2Nm)
Pylon Clamp Screw
(5mm hex)
11ft-lb (15Nm)
Important:
Use blue Loctite™242 on all screws referenced here.
It is not recommended to use Ottobock Titanium Pylon.
Do not use a spacer for height adjustment.
Ensure pylon is cut straight.
It is recommended these torques be checked within 30 days
and then 6 months after your delivery of this prothesis.
7
7
/
16 in
(189
mm
)
1
3
/
8in
(35
mm
)
8
13
/
16 in
(224
mm
)
3
/
4in
(18
mm
)
Knee Center
4P10 KD
TM
Sitting Position
1
3
/
16 in
(30
mm
)
Specifications
Patient profile:
Body weight Under 275lb (125kg)
Functional level K3 / K4
Amputation level Knee Disarticulation
Knee Specifications:
Stock number TGK-4P10
Max weight limit 275lb (125kg)
Knee weight 2.4 lb (1084g)
Proximal connection M6 threaded 4-hole or,
Unthreaded single hole
Swing Controls
Separate DAW Pneumatics™
Extension/Flexion Adjustments,
Extension Assist Adjustment &
Adjustable Swing Phase Trigger
Stability Controls True-KD™Biomechanics Stability,
Adjustable Extension Stop
Distal connection 30mm tube clamp
Warranty 2 years, upgrade
for additional 3 years
Knee Shown
w/ KneeCap
Removed

DAW
© Copyright 2021, DAW Industries, San Diego, CA - All Rights Reserved 01082021
®
DAW
Industries
For Technical Support call (800)242-8669
DAW
© Copyright 2021, DAW Industries, San Diego, CA - All Rights Reserved 01082021
®
DAW
Industries
For Technical Support call (800)242-8669
12 5
ALIGNMENT
RECOMMENDED
BENCH & STATIC
Standard alignment procedure must be observed to obtain the
maximum benefits offered by this knee. All alignment
references should be taken from the center of the anterior
superior knee axis (commonly referred to as the Knee Center).
Knee Center is
recommended 5-10mm
posterior to TKA
(15mm Maximum,
as illustrated here)
A socket flexion
angle of 5°
recommended
+10mm Heel
TKA
DAW Prosthetic Knee Limited Warranty
The knee comes with a Limited Warranty for 2-years. It covers
manufacturer defects (excluding wear & tear). An additional 3
years of warranty coverage can be purchased for +15% of the
original cost of the knee. See full warranty statement at:
www.daw-usa.com/practitioner-resources/
Weight limit of this knee is 275lb (125kg)
Bumpers are not under warranty.
Tight screws and a straight cut of the tubing are a must. Not
following recommended use of components, including weight
limit and alignment, will void the warranty. Make sure to read
all instructions enclosed with the knee unit.
All repairs on the knee module must be done by a factory-
trained DAW technician. Any disassembly done on the knee
during the warranty period(s) will void the warranty (excluding
dissasembly of the extension spring housing).
Service Under Warranty
For all component repairs call DAW Industries right away. We
will ship a replacement knee the same day, which will become
your patient’s new knee. The replacement component is under
warranty for the time remaining on the original component.
The overnight shipping charge will be credited upon receipt of
the failed knee component.
Service Outside of Warranty
Knees not under warranty may be repaired by DAW. While any
unwarranted knee is being serviced, DAW will provide a rental
knee subject to availability. The DAW rental fee is listed in the
price list under each knee. The rental fee covers the period
DAW takes to complete the repair with ten (10) days allowed
for shipping in both directions. The same rental fee will be
charged every 30 days passed the initial rental fee period.
For any repair you must first contact our Technical Services
at 1(800)242-8669. This will allow DAW to best understand
the issue. Our Technical Support will immediately asses if the
repair qualifies as a “minor” or “substantial” repair. A “minor”
repair will be completed, as a courtesy, free of charge (you
will just pay for return shipping). A “substantial” repair will be
billed at a flat rate according to knee model. Upon return of
your repaired knee, you will be invoiced for the repair charge, if
any. When DAW receives the rental knee, your account will be
credited for the value of the returned knee
(Gold Preferred+ = FREE rental; Preferred = 33% off).
In the event your knee is unrepairable, you will be
notified immediately. The rental must then be returned to
DAW, 2nd day, within five (5) working days. The rental fee may
be applied toward the purchase of a new DAW knee.
DAW
© Copyright 2021, DAW Industries, San Diego, CA - All Rights Reserved 01082021
®
DAW
Industries
For Technical Support call (800)242-8669
DAW
© Copyright 2021, DAW Industries, San Diego, CA - All Rights Reserved 01082021
®
DAW
Industries
For Technical Support call (800)242-8669
6 11
Adjusting the Extension Stop Bumper
(Stability & Swing Phase Trigger Point)
Extension Stop Screw
(2.5mm hex)
To customize the “trigger point” of swing-phase, adjust the
Extension Stop Screw. Max adjustment is 2°.
Note: This adjustment will affect socket flexion slightly.
Turn the Extension Stop Screw (2.5mm hex):
Clockwise for earlier swing-phase initiation
(& less stance phase stability)
Counter-clockwise for later swing-phase initiation
(& more stance phase stability)
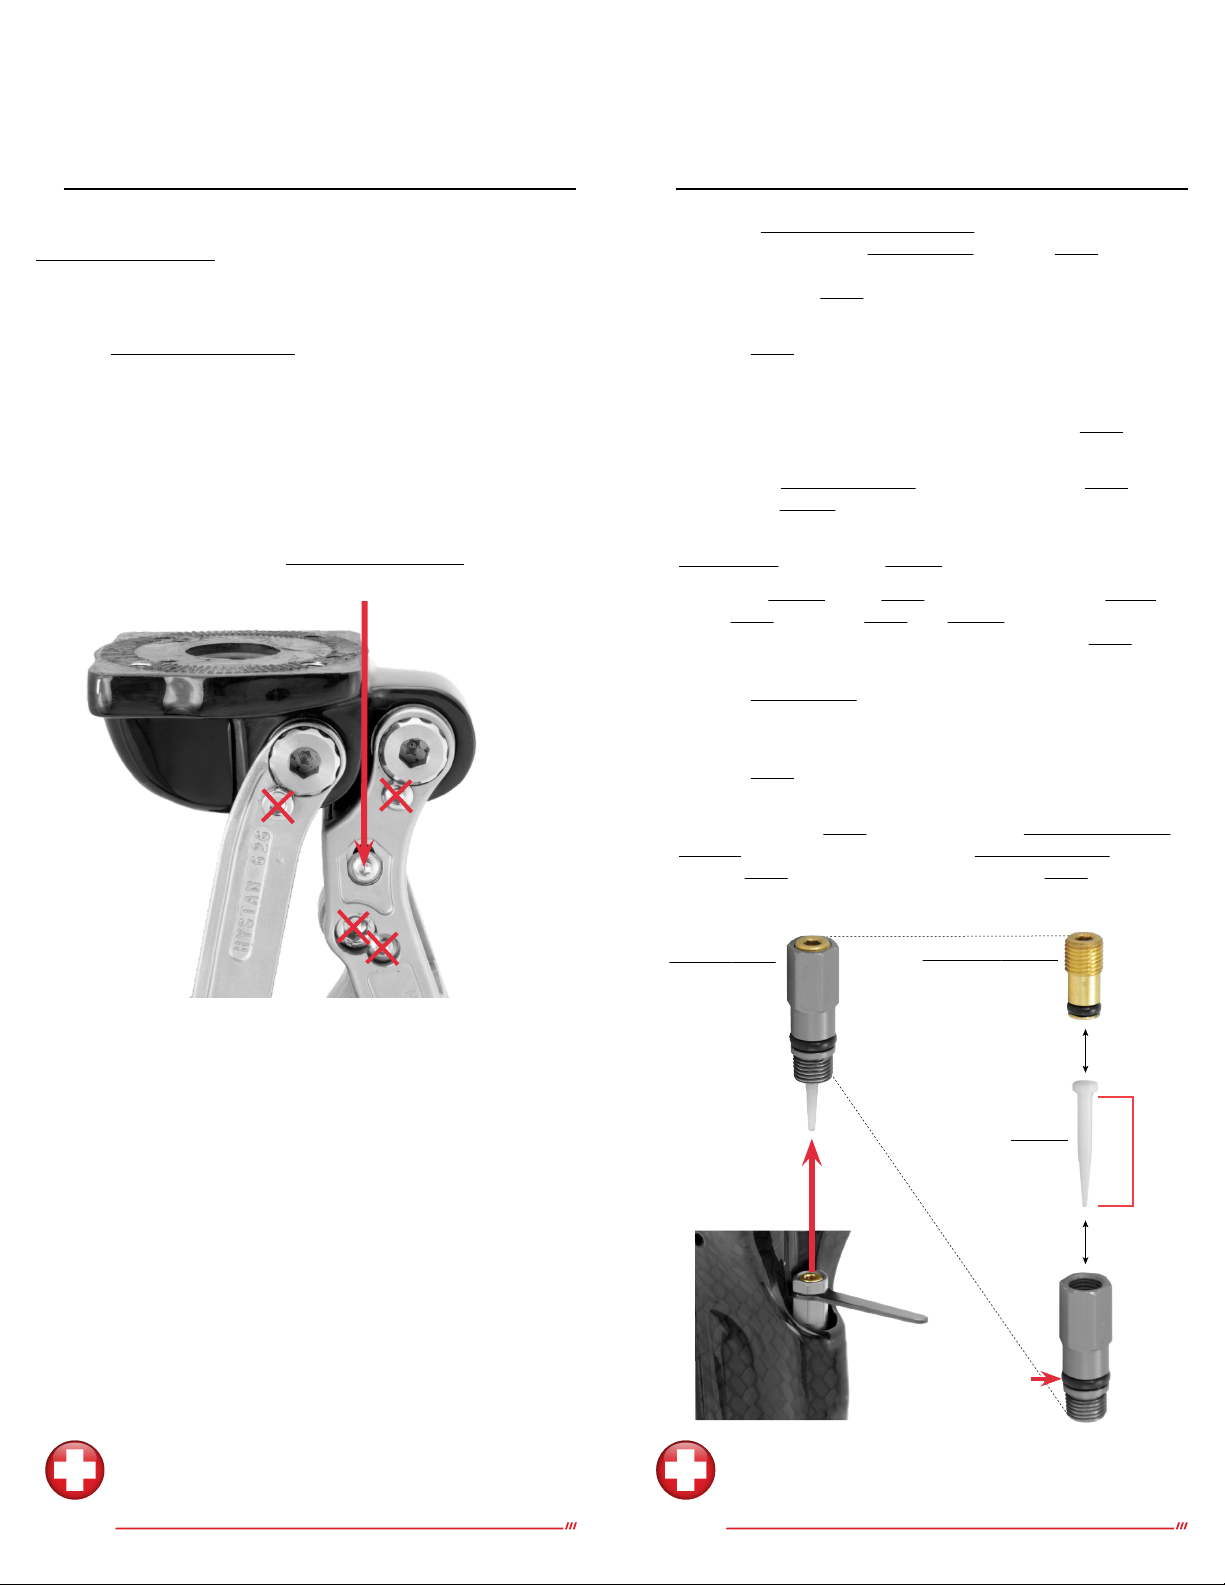
Cleaning Pneumatic Components
Using the Swing Adjustment Wrench (or 9mm wrench),
completely remove the Flexion Knob. Turn the Knob
counter-clockwise until it no longer appears to be
unthreading. The Knob pulls out of its chamber with a small
amount of force.
With the Knob removed, flex the Knee quickly & repeatedly
to clear out any debris from the air passage. Air should flow
smoothly with no restriction.
Using a Q-Tip, clean the chamber from which the Knob was
removed. The entire chamber should be dry.
Remove the Extension Screw (3mm Hex) from the Knob.
Remove the Needle and clean it of any debris or lubricant.
Apply a very light coat of wheel-bearing grease to the
Knob O-ring. Be sure the Needle remains dry.
Return the Needle to the Knob. Do not yet return the Screw
to the Knob. Press the Knob and Needle back into the
chamber of the knee. You will hear a “click” as the Knob
seats back into the chamber.
Turn the Flexion Knob clockwise. Initially, apply a small
amount of downward force while you turn to ensure the
threads catch. Gently screw it in until it stops. Do not tighten.
Turn the Knob counter-clockwise 2 rotations
(the factory setting for Extension).
While holding the Knob stationary with the Swing Adjustment
Wrench (or 9mm wrench), screw the Extension Screw back
into the Knob until 1 thread shows above the Knob
(the factory setting for Flexion).
A.
B.
C.
D.
E.
F.
G.
H.
I.
Needle
Clean
Flexion Knob
(9mm)
Extension Screw
(3mm)
Knob O-ring
Apply wheel
bearing grease

DAW
© Copyright 2021, DAW Industries, San Diego, CA - All Rights Reserved 01082021
®
DAW
Industries
For Technical Support call (800)242-8669
DAW
© Copyright 2021, DAW Industries, San Diego, CA - All Rights Reserved 01082021
®
DAW
Industries
For Technical Support call (800)242-8669
10 7
Replacing or Trimming
the Extension Assist Spring
To replace the current Extension Assist Spring with the
Stronger spring included with your knee:
Completely remove the Pylon Clamp Screw (5mm hex).
Remove the pylon.
Flex the knee to full flexion.
Using a 12mm wrench, or crescent wrench, twist the
Lock Nut clockwise, the Spring Housing will extend
out of the knee as you twist the Lock Nut.
You can now pull the Spring out of the Housing .
Insert your new Spring into the Housing .
Unflex the knee to full extension and return the housing
to the knee making sure the groove for the
Pylon Clamp Screw lines up properly.
After returning the Pylon. Retighten Pylon Clamp Screw
(5mm hex) to 11ft-lb (15Nm)
Too much Extension Assist even with the lighter spring?
Complete steps A. through E. above
Using a grinding wheel, trim one or two coils (maximum) off one
end of the Spring. Smooth the trimmed end. Return the Spring to
the housing, trimmed end down. Continue with step G. above.
A.
B.
C.
D.
E.
F.
G.
1
1
2
2
2
2
3
3
3
Groove for
Pylon Clamp Screw
Adjusting Swing Phase Controls
(Flexion & Extension Dampening)
It is recommended your Patient take their first steps slowly!
This knee is engineered to conserve your Patient’s energy &
strength throughout the day. Very little energy is required to
initiate gate.
The DAW Pneumatics™Knob-and-Screw-Adjustment
provides exceptionally precise control of heel rise and
extension dampening. Perform these adjustments in
1/8-turn increments.
Needed for This Adjustment:
✔3mm hex key
✔Swing Adjustment Wrench (included) or a 9mm wrench
It is recommended to make your Extension Adjustment first,
then your Flexion Adjustment. Repeat adjusting Extension
then Flexion as needed.
Adjusting Extension Dampening:
In 1
/8-turn increments, turn the brass Extension Screw:
Clockwise to increase resistance
Counter-Clockwise to decrease resistance
Adjusting Flexion Dampening:
While holding the Extension Screw stationary (3mm hex key),
in 1
/8-turn increments turn the Flexion Knob:
Clockwise to increase resistance
Counter-Clockwise to decrease resistance
NOTE: Excessive adjustment of Extension Screw can jam
needle pin, eliminating full range-of-motion resistance control.
Flexion Knob
(9mm)
(Posterior View)
Extension Screw
(3mm hex key)
Swing Adjustment
Wrench
DAW
© Copyright 2021, DAW Industries, San Diego, CA - All Rights Reserved 01082021
®
DAW
Industries
For Technical Support call (800)242-8669
DAW
© Copyright 2021, DAW Industries, San Diego, CA - All Rights Reserved 01082021
®
DAW
Industries
For Technical Support call (800)242-8669
8 9
Pylon Clamp Screw
(5mm hex)
11ft-lb(15nm)
Lock Nut
(12mm wrench)
Hand Tighten
Extension Assist Control Screw
(5mm hex)
To Adjust Extension Assist:
Loosen the Pylon Clamp Screw (5mm hex)
and remove the Pylon
Loosen the Lock Nut (12mm wrench)
Turn the Extension Assist Control Screw (5mm hex):
Clockwise to increase extension assist
Counter-clockwise to decrease extension assist
Re-tighten the Lock Nut, Hand Tighten (12mm wrench)
After returning the pylon, re-tighten Pylon Clamp Screw to
11ft-lb (15Nm).
A.
B.
C.
D.
Adjusting Extension Assist
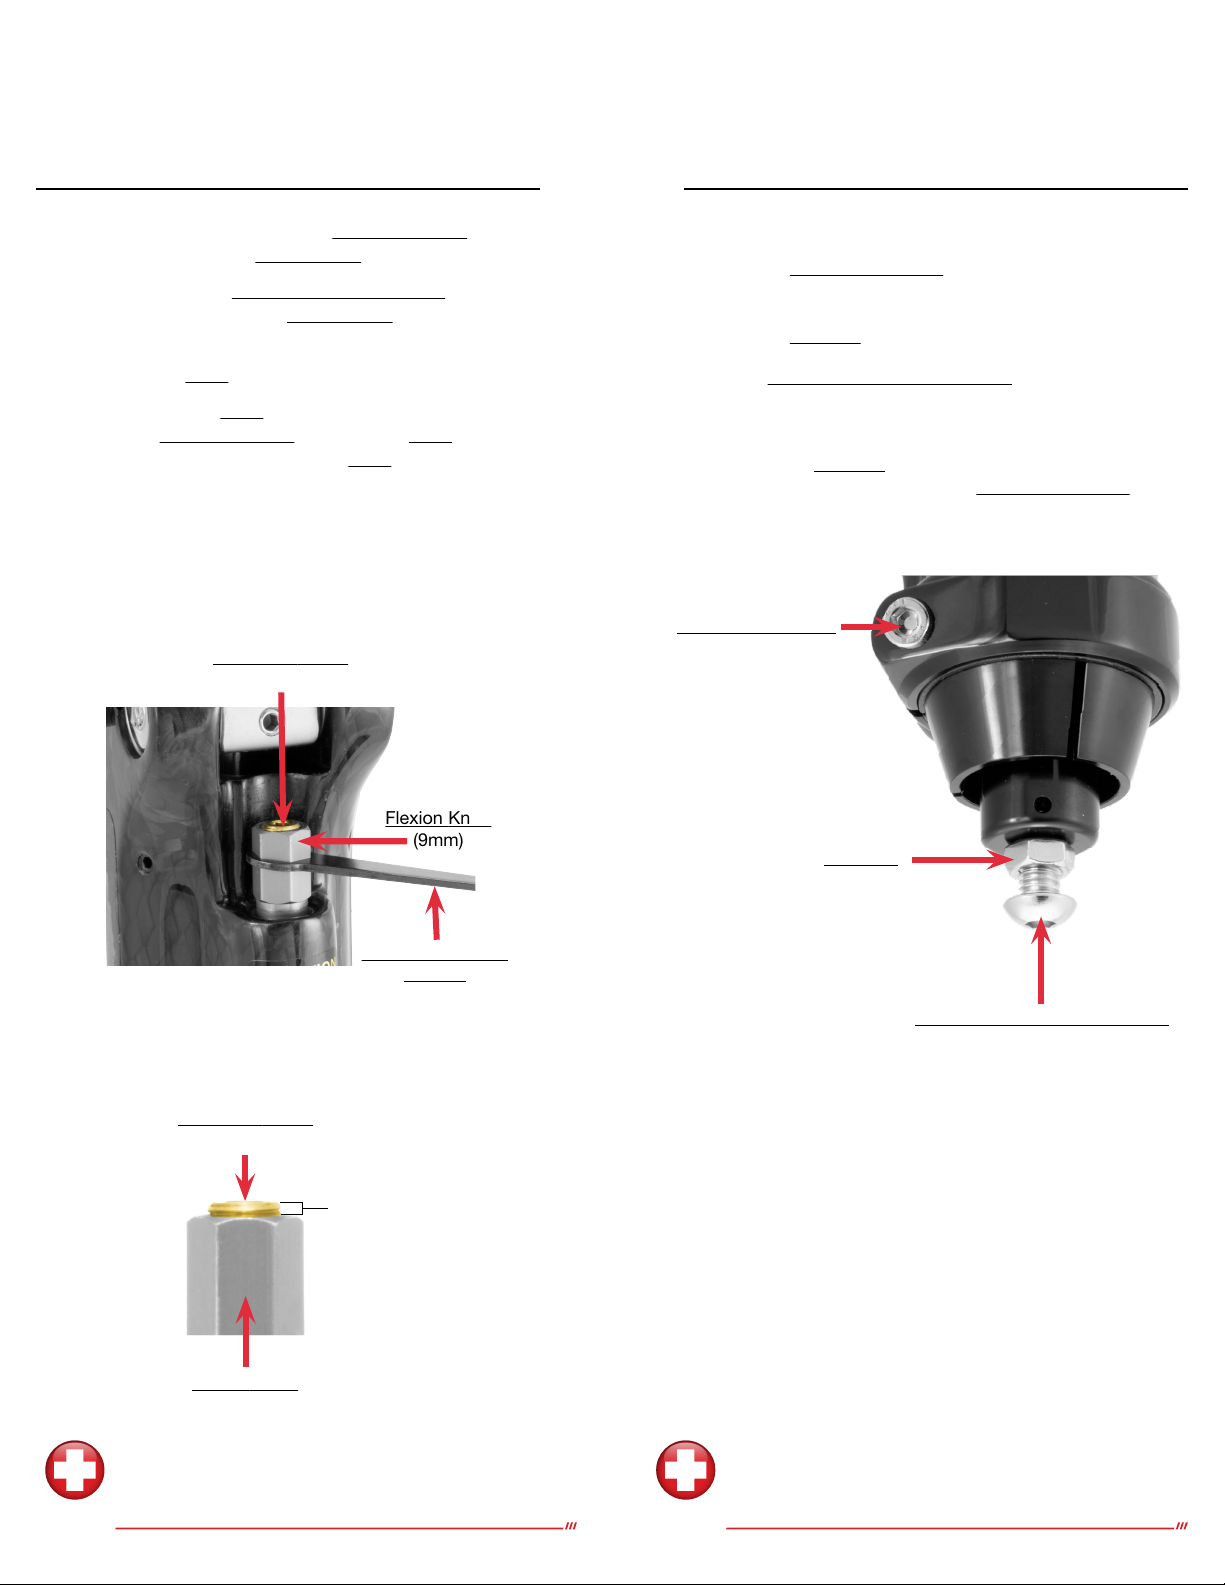
Returning Flexion & Extension
Adjustments to Factory Settings
A.
B.
C.
D.
The knee’s Flexion & Extension Controls
are now at their factory settings.
Fig. 1
Fig. 2
Flexion Knob
(9mm)
(Posterior View)
Extension Screw
(3mm hex key)
Swing Adjustment
Wrench
1 Thread showing
above Knob
Flexion Knob
(9mm)
Extension Screw
(3mm hex)
Unscrew and remove the brass Extension Screw (3mm Hex)
from the center of the Flexion Knob.
Using the included Swing Adjustment Wrench (or a 9mm
wrench), gently screw the Flexion Knob clockwise until
it stops. Do not tighten.
Now turn the Knob counter-clockwise 2 full rotations.
While holding the Knob stationary,
screw the Extension Screw back into the Knob (fig. 1)
until one thread shows above the Knob (fig. 2).
This manual suits for next models
1
Other DAW Industries Medical Equipment manuals

Popular Medical Equipment manuals by other brands


Mac Medical
Mac Medical SS32 instruction manual

BRASSELER USA
BRASSELER USA EndoPro 270 Operation, maintenance & instruction manual

Zeiss
Zeiss OPMI Lumera T Instructions for use

Handicare
Handicare SystemRoMedic Carina350EE user manual

Bistos
Bistos BT-350 Operator's manual

AmpliVox
AmpliVox Otosure operating manual


