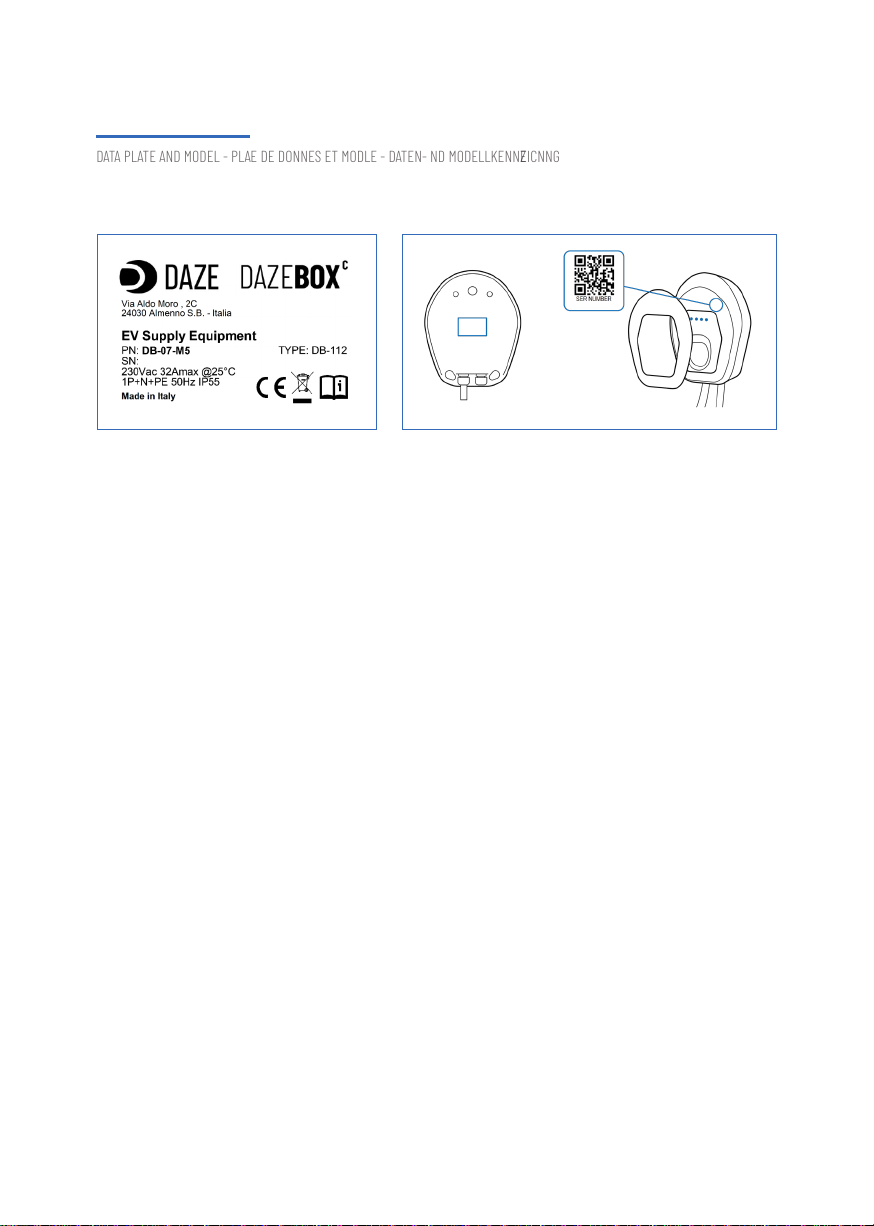
DAZE DazeBox C User manual

DazeBox
Manuale di installazione
Installation manual
Manuel d'installation
Installationsanleitung
V.1 27/10/2023
IT EN FR DE
C

DOCUMENTI UTILI
IT EN FR DE
USEFUL DOCUMENTS - DOCUMENTS UTILES - NÜTZLICHE DOKUMENTE
IT Leggere accuratamente la presente documentazione, prima di installare il dispositi-
vo di ricarica.
EN Please read this documentation carefully before installing the charging device.
FR Lisez attentivement la présente documentation avant d'installer le dispositif de
recharge.
DE Bitte lesen Sie diese Dokumentation sorgfältig durch, bevor Sie das Ladegerät in-
stallieren.

01
02
03
04
05
07
06
08
10
09
11
SCHEDA TECNICA
TARGA DATI E MODELLO
INFORMAZIONI DI SICUREZZA
PREPARAZIONE ALL'INSTALLAZIONE
PREDISPOSIZIONE DELL'IMPIANTO
COLLEGAMENTO ELETTRICO
MONTAGGIO DELLA DAZEBOX
CONFIGURAZIONE
INDICATORI DI STATO
RISOLUZIONE PROBLEMI
04.1 CONTENUTO DELLA CONFEZIONE
08.1 CONFIGURAZIONE TRAMITE APP
04.2 ATTREZZATURA NECESSARIA
08.2 CONFIGURAZIONE TRAMITE INTERRUTTORI
AUTENTICAZIONE TRAMITE RFID
4
12
7
13
8
15
10
16
22
21
23
INDICE
DATA SHEET - F ICHE TECHNIQUE - TECHNISCHE SPEZIFIKATIONEN"
PREPARATION OF THE INSTALLATION - PREPARACIÓN DE LA INSTALACIÓN - PREPARAÇÃO DA INSTALAÇÃO
MOUNTING THE DAZEBOX - MONTAGE DE LA DAZEBOX - MONTAGE DER DAZEBOX
ELECTRICAL CONNECTION - CONNEXION ÉLECTRIQUE - ELEKTRISCHE VERBINDUNG
CONFIGURATION - CONFIGURATION - KONFIGURATION
DATA PLATE AND MODEL - PLAQUE DE DONNÉES ET MODÈLE - DATEN- UND MODELLKENNZEICHNUNG
SAFETY INFORMATION - INFORMATIONS DE SÉCURITÉ - SICHERHEITSINFORMATIONEN
PREPARING TO INSTALL - PRÉPARATION À L'INSTALLATION - VORBEREITUNG ZUR INSTALLATION
STATUS INDICATORS - INDICATEURS D'ÉTAT - STATUSANZEIGEN
TROUBLESHOOTING - RÉSOLUTION DES PROBLÈMES - PROBLEMSTELLUNG UND LÖSUNGEN
CONTENTS OF THE PACK - CONTENU DE L'EMBALLAGE - INHALT DER VERPACKUNG
CONFIGURATION BY THE APP - CONFIGURATION VIA L'APPLICATION - KONFIGURATION ÜBER DIE APP
NECESSARY EQUIPMENT - MATÉRIEL NÉCESSAIRE - BENÖTIGTES WERKZEUG
CONFIGURATION BY SWITCH - CONFIGURATION VIA LES INTERRUPTEURS - KONFIGURATION ÜBER SCHALTER
AUTHENTICATION BY RFID - AUTHENTIFICATION PAR RFID - AUTHENTIFIZIERUNG PER RFID
SUMMARY - SOMMAIRE - INHALTSVERZEICHNIS

DAZEBOX
4.
C
IT
1. Copertura estetica rimovibile
2. LED di stato
3. Portaconnettore
4. Impianto elettrico (non incluso)
FR
1. Couvercle esthétique
amovible
2. LED d'état
3. Port de connexion
4. Installation électrique
(non incluse)
EN
1. Removable cover
2. Status LED
3. Connector holder
4. Electrical system
(not included)
DE
1. Abnehmbare ästhetische
Abdeckung
2. Status-LED
3. Anschlussport
4. Elektrische Anlage
(nicht enthalten)
DazeBox C 1PSPEC. GENERALI
IT DazeBox C 3P
Codice Modello (PN)1
2
3
4
5
7
8
6
Lunghezza cavo ricarica [m]
Peso [kg]
Consumo in stand-by [W]
Dimensioni (con cavo) [mm]
Connessione
Modo di ricarica
Dimensioni (senza cavo) [mm]
DB-07-M
3, 4, 5, 7
~ 4
< 2
Type 2
3
335 x 277 x 102
335 x 277 x 285
DB-07-T
5, 7
~ 5
01. SCHEDA TECNICA
9
10
11
12
13
14
DazeBox C 1PSPEC. ELETTRICHE DazeBox C 3P
Connessione
Tensione
Corrente massima [A]
Potenza massima [kW]
Frequenza [Hz]
Congurazione rete
N+L+T
20 / 32
230 ±10%
4,6 / 7,4 22,2
50-60
TT / TN
N+L1+L2+L3+T
32
400 ±10%
DATASHEET - FICHE TECHNIQUE - TECHNISCHES DATENBLATT

5.
DAZEBOXC
15
20
29
35
16
21
30
36
17
23
22
24
31
37
18
25
32
27
28
19
26
33
34
Solo su codici ***-RF
DazeBox C 1P
DazeBox C 1P
DazeBox C 1P
DazeBox C 1P
CONNETTIVITÀ
FUNZIONALITÀ
SICUREZZA
INSTALLAZIONE
DazeBox C 3P
DazeBox C 3P
DazeBox C 3P
DazeBox C 3P
Connettività Bluetooth
Indicazione di stato e messaggi
Rilevamento correnti in continua (RCM)
Congurazione iniziale
Protocollo internet interoperabilità
Reportistica consumi sessioni di ricarica
Sicurezza antincendio
Dynamic Power Management
Power Sharing
Categoria di sovratensione
compatibile con Solar Boost
Connettività Wi-Fi
Interfaccia utente
Monitoraggio temperatura
Ancoraggio
Aggiornamento software
Programmazione blocco/sblocco
Gestione utenti e amministratori
Lettore RFID per sblocco ricarica
Gestione bobina di sgancio
Passaggio cavi
Interfaccia con sistemi di gestione
Dynamic Power Management
Classe di isolamento
BLE 4.2
4 LED multicolore indipendenti
Integrato, 6 mA CC (Permette utilizzo RCD tipo A)
APP o Dip Switch su scheda
802.11 b/g/n
App Daze, Android o iOS
Integrato con protezione surriscaldamento
A muro o su supporti SD01
Bluetooth o Wi-Fi
Tramite App
Tramite App
A giorno o Sottotraccia
Modbus TCP
Opzionale, necessita PM02*
Sì, tramite assistenza Daze
I
OVC III
OCPP 1.6 Json
Misura corrente integrata e report tramite App
UL94 V-0
40
44
41
38
42
39
43
IK08
IP55
Da -25 a +55
Da -30 a +60
Policarbonato ad alta resistenza
2000 m a.s.l.
PD2
DazeBox C 1PRESIST. AMBIENTALE DazeBox C 3P
Grado di protezione IPGrado di protezione IP
Massima altitudine installazione
Grado di protezione IK
Materiale involucro
Temperatura di funzionamento [ºC]
Grado di inquinamento ammesso
Temperatura di stoccaggio [ºC]
47
48
45
46
DazeBox C 1PCERTIFICAZIONI DazeBox C 3P
Certicazione
Norma di riferimento internazionale
Ente terzo certicatore
Norma di riferimento nazionale
IMQ
IEC 61851-1, IEC 61851-21, IEC 62196-2
CE
CEI EN 61851-1, CEI EN 61851-21-2, CEI EN 62196-2

DAZEBOX
6.
C
ALLGEMEINE SPEZIFIKATIONEN
SPÉCIFICATIONS GÉNÉRALES
GENERAL SPECIFICATIONS
KONNEKTIVITÄT
CONNECTIVITÉ
CONNECTIVITY
INSTALLATION
INSTALLATION
INSTALLATION
ZERTIFIZIERUNGEN
CERTIFICATIONS
CERTIFICATION
FUNKTIONALITÄT
FONCTIONNALITÉS
FUNCTIONALITY
SICHERHEIT
SÉCURITÉ
SAFETY
UMWELTBESTÄNDIGKEIT
RÉSISTANCE ENVIRONNEMENTALE
ENVIRONMENTAL RESISTANCE
ELEKTRISCHE SPEZIFIKATIONEN
SPÉCIFICATIONS ÉLECTRIQUES
ELECTIC SPECIFICATIONS
Modellcode (PN)
Code modèle (PN)
Model Code (PN)
1
1
1
9
9
9
2
2
2
10
10
10
3
3
3
11
11
11
4
4
4
12
12
12
13
13
13
14
14
14
5
5
5
6
6
6
15
15
15
35
35
35
45
45
45
20
20
20
29
29
29
38
38
38
7
7
7
8
8
8
16
16
16
36
36
36
46
46
46
21
21
21
30
30
30
39
39
39
17
17
17
37
37
37
47
47
47
48
48
48
22
23
22
23
22
23
31
31
31
40
40
40
18
18
18
24
24
24
32
32
32
41
41
41
19
19
19
25
25
25
33
33
33
42
42
42
34
34
34
43
43
43
44
44
44
27
27
27
28
28
28
26
26
26
Länge des Typ-2-Steckerka-
bels [m]
Longueur du câble du
connecteur Type 2 [m]
Charging cable length [m]
Gewicht [kg]
Poids [kg]
Weight [kg]
Standby-Stromverbrauch [W]
Consommation en veille [W]
Stand-by consumption [W]
Verbindung
Connexion
Connection
Lademodus
Mode de charge
Charging mode
Abmessungen (ohne Kabel) [mm]
Dimensions (sans câble) [mm]
Dimensions (without cable) [mm]
Abmessungen (mit Kabel) [mm]
Dimensions (avec câble) [mm]
Dime
Verbindung
Connexion
Connection
Spannung
Tension
Voltage
Frequenz [Hz]
Fréquence [Hz]
Frequency [Hz]
Netzwerkkonguration
Conguration réseau
Network Setup
Maximaler Strom [A]
Courant maximal [A]
Maximum current [A]
Maximaler Strom [A]
Puissance maximale [kW]
Maximum power [kW]
Bluetooth-Konnektivität
Connectivité Bluetooth
Bluetooth connectivity
Erstkonguration: Über die App oder
Dip-Schalter im Schaltschrank
Conguration initiale Application ou inter-
rupteur DIP sur le tableau électronique
Initial conguration: App or DipSwitch
on electronic board
Zertizierung
Certication
Certication
Statusanzeige und Nachrichten: 4
unabhängige, mehrfarbige LEDs
Indication de l'état et des messages:
4 LED multicolores indépendantes
Status and message indication: 4
independent multi-colored LEDs
Erkennung von Gleichstrom (RCD): Integriert,
6 mA DC (ermöglicht die Verwendung von
RCD Typ A)
Détection du courant continu (RCD):
Intégrée, 6 mA CC (Permet l'utilisation d'un
dispositif de protection RCD de type A)
Continuous current detection (RCM):
Integrated, 6 mA DC (Allows use
RCD type A)
Schutzart IP
ndice de protection IP
Degree of protection IP
Internetinteroperabilitätsprotokoll
Protocole d'interopérabilité Internet
Internet protocol interoperability
Verbrauchsbericht der Ladesitzungen:
Integrierte Strommessung und Berichte
über die App
Rapport de consommation des sessions
de recharge: Mesure du courant intégrée
et rapports via l'application
Charging Session Consumption Reporting:
Integrated current measurement and
reports via App
Brandschutz
Sécurité incendie
Fire safety
Lagertemperatur [°C]
Température de stockage [°C]
Storage temperature [°C]
Wi-Fi-Konnektivität
Connectivité Wi-Fi
Wi-Fi connectivity
Befestigung: An der Wand oder mit
SD01-Haltern
Fixation: Sur le mur ou sur les
supports SD01
Anchor: On the wall or on supports
SD01
Internationale Referenznorm
Norme de référence internationale
International reference standard
Benutzeroberäche
Interface utilisateur
User interface
Temperaturüberwachung: Integriert mit
Überhitzungsschutz
Surveillance de la température: Intégrée
avec protection contre la surchauffe
Temperature Monitoring: Integrated
with Overheating Protection
Schutzart IK
ndice de protection IK
Degree of protection IK
Softwareaktualisierung
Mise à jour logicielle
Software update
Kabeldurchführung: Über Tage oder
durch den Boden
Passage des câbles: Par le jour ou par
la piste
Cable routing: By day or under track
Zertizierungsstelle Dritter
Organisme de certication tiers
Third-party certication authority
Nationale Referenznorm
Norme de référence nationale
National reference standard
Sperren, Entsperren und zeitgesteuer-
te Sperrung: über die App
Benutzerverwaltung und Administrato-
renverwaltung: über die App
RFID-Lesegerät zur Freigabe des
Ladevorgangs: Nur bei **-RF-Codes
Verrouillage, déverrouillage et program-
mation horaire du verrouillage: via App
Gestion des utilisateurs et des admini-
strateurs: via l'application
Lecteur RFID pour le déverrouillage de la
charge: Uniquement sur les codes **-RF
Lock/unlock programming: via App
User and Administrator Management:
via App
RFID reader to unlock charging: Only on
codes ***-RF
Verwaltung der Freigabespule
Gestion de la bobine de libération
Release Coil Management
Betriebstemperatur [°C]
Température de fonctionnement [°C]
Operating temperature [°C]
Schnittstelle zu Verwaltungssystemen
Interface avec les systèmes
de gestion
Interface with management systems
Dynamisches Leistungsmanagement:
Optional, erfordert PM02*
Dynamic Power Management: En
option, nécessite PM02*
Dynamic Power Management: optio-
nal, requires PM02*
Isolationsklasse
Classe d'isolation
Insulation class
Maximale Installationshöhe
Altitude maximale d'installation
Maximum installation altitude
Überspannungskategorie
Catégorie de surtension
Overvoltage category
Gehäusematerial: Hochfestes
Polycarbonat
Matériau du boîtier: Polycarbonate
haute résistance
Casing material: Polycarbonate with
high resistance
Zulässiger Verschmutzungsgrad
Niveau de pollution autorisé
Permissible level of pollution
Power Sharing: Yes, through Daze support
Power Sharing: Oui, via le support Daze
Leistungsverteilung: Ja, über die
Daze-Halterung
Dynamisches Leistungsmanagement
kompatibel mit Solar Boost
Dynamic Power Management
compatible avec Solar Boost
Dynamic Power Management
compatible with Solar Boost
DE
FR
EN

7.
DAZEBOXC
IT
Il modello di DazeBox C è vericabile leggendo la
targa dati del prodotto (esempio in alto), che si tro-
va sul lato posteriore del prodotto (E, nell’immagine
riportata sopra).
In caso di richiesta di assistenza sul prodotto è
necessario conoscere il numero seriale (SN) del
caricatore. Questo numero è identicabile, oltre che
sulla targa dati, anche sotto il coperchio removibi-
le frontale (sotto il QR code) oppure sulla tessera
all’interno della confezione.
FR
Le modèle de DazeBox C peut être vérié en lisant
la plaque de données du produit (comme illustré
ci-dessus), située à l'arrière du produit (E, sur l'ima-
ge ci-dessus).
En cas de demande d'assistance sur le produit, il
est nécessaire de connaître le numéro de série (SN)
du chargeur. Ce numéro est également identiable,
en plus de la plaque de données, sous le couvercle
amovible avant (sous le QR code) ou sur la carte à
l'intérieur de l'emballage.
EN
The model of the DazeBox C can be veried by re-
ading the product nameplate (example above), whi-
ch can be found on the back side of the product (E,
in the image above).
In case of a request for assistance on the product,
it is necessary to know the serial number (SN) of
the charger. The serial number can be identied
not only on the nameplate, but also under the remo-
vable front cover (under the QR code) or on the card
inside the packaging.
DE
Das Modell des DazeBox C kann über das Datene-
tikett des Produkts (wie oben gezeigt) überprüft
werden, das sich auf der Rückseite des Produkts
bendet (E, auf dem oben gezeigten Bild).
Im Falle einer Anfrage für Unterstützung bei dem
Produkt ist es erforderlich, die Seriennummer (SN)
des Ladegeräts zu kennen. Diese Nummer ist, zu-
sätzlich zum Datenetikett, auch unter der abnehm-
baren Vorderabdeckung (unter dem QR-Code) oder
auf der Karte im Inneren der Verpackung identi-
zierbar.
02. TARGA DATI E MODELLO
DATA PLATE AND MODEL - PLAQUE DE DONNÉES ET MODÈLE - DATEN- UND MODELLKENNZEICHNUNG
XXXXXXXXXXX
XXXXXXXXXXX
E

DAZEBOX
8.
C
IT Disattivare l’alimentazione elettrica agendo sull’interruttore del quadro a monte
prima di intervenire su DazeBox C per operazioni di pulizia.
EN Switch off the power supply by actuating the switch on the upstream panel
before working on the DazeBox C for cleaning purposes.
FR Désactivez l'alimentation électrique en actionnant l'interrupteur en amont du table-
au avant d'intervenir sur le DazeBox C pour des opérations de nettoyage.
DE Schalten Sie die Stromversorgung durch Betätigen des Schalters am Verteiler vor
dem Eingreifen in den DazeBox C für Reinigungsarbeiten aus.
ITLeggere attentamente queste istruzioni prima di utilizzare DazeBox C.
EN Read these instructions carefully before using DazeBox C.
FRLisez attentivement ces instructions avant d'utiliser DazeBox C.
DELesen Sie diese Anweisungen sorgfältig durch, bevor Sie DazeBox C verwenden.
IT Tutte le operazioni di installazione, manutenzione e messa fuori servizio di DazeBox
C devono essere effettuate esclusivamente da personale qualicato.
ENAll installation, maintenance and decommissioning of the DazeBox C
must only be carried out by qualied personnel.
FR Toutes les opérations d'installation, d'entretien et de mise hors service de DazeBox
C doivent être effectuées exclusivement par du personnel qualié.
DE Alle Installationen, Wartungs- und Außerbetriebnahmearbeiten an DazeBox C dürf-
en ausschließlich von qualiziertem Personal durchgeführt werden.
IT Non tentare di toccare i contatti del connettore di ricarica, non introdurre alcun
oggetto in esso.
EN Do not attempt to touch the contacts of the charging connector, do not insert any
object into it.
FR Ne tentez pas de toucher les contacts du connecteur de charge, n'y introduisez
aucun objet.
DE Versuchen Sie nicht, die Kontakte des Ladeanschlusses zu berühren, führen Sie
keine Gegenstände ein.
03. INFORMAZIONI DI SICUREZZA
SAFETY INFORMATION - INFORMATIONS DE SÉCURITÉ - SICHERHEITSINFORMATIONEN

9.
DAZEBOXC
ITUna non corretta installazione o riparazione può causare rischi per l’utente. Se Daze-
Box C è danneggiata, deve essere immediatamente sostituita da personale qualicato.
EN Incorrect installation or repair may cause hazards for the user. If the DazeBox C is
damaged, it must be replaced immediately by qualied personnel.
FR Une installation ou réparation incorrecte peut présenter des risques pour l'utilisa-
teur. Si DazeBox C est endommagée, elle doit être immédiatement remplacée par du
personnel qualié.
DEEine unsachgemäße Installation oder Reparatur kann Gefahren für den Benutzer ve-
rursachen. Wenn DazeBox C beschädigt ist, muss sie sofort von qualiziertem Personal
ausgetauscht werden.
IT Non è consentita la modica di parti dei componenti di DazeBox C. Non rimuovere
eventuali etichette, codici o targhette.
ENParts of the DazeBox C components may not be modied. Do not removeany labels,
codes or nameplates.
FR La modication de pièces des composants de DazeBox C n'est pas autorisée. Ne
retirez pas les étiquettes, les codes ou les plaques le cas échéant.
DE Die Modikation von Teilen der Komponenten von DazeBox C ist nicht gestattet.
Entfernen Sie keine Etiketten, Codes oder Schilder.
IT I bambini o le persone che potrebbero non essere in grado di valutare i rischi relativi
all’uso di DazeBox C non devono utilizzare il dispositivo poiché possono incorrere in
lesioni gravi.
EN Children or people who may not be able to assess the risks related to the use of
DazeBox C must not use the device as they may incur serious injury.
FR Les enfants ou les personnes qui pourraient ne pas être en mesure d'évaluer les
risques liés à l'utilisation de DazeBox C ne doivent pas utiliser l'appareil, car ils pourraient
subir de graves blessures.
DEKinder oder Personen, die möglicherweise nicht in der Lage sind, die mit der Verwen-
dung von DazeBox C verbundenen Risiken einzuschätzen, sollten das Gerät nicht
verwenden, da sie schwer verletzt werden könnten.
IT DazeBox C durante il funzionamento non può essere esposta a radiazioni dirette
come i raggi solari, poiché surriscaldamenti possono danneggiare i componenti interni.
EN During operation, the DazeBox C may not be exposed to direct radiation such as
sunlight, as overheating can damage internal components.
FRPendant son fonctionnement, DazeBox C ne doit pas être exposé aux radiations di-
rectes telles que les rayons du soleil, car cela pourrait endommager les composants
internes en provoquant une surchauffe.
DE Während des Betriebs darf DazeBox C nicht direkter Strahlung wie Sonnenlicht au-
sgesetzt werden, da dies zu Überhitzung und Schäden an den internen Komponenten
führen kann.

DAZEBOX
10.
C
IT L’installazione deve essere effettuata dopo aver disattivato l'alimentazione elettrica
agendo sull'interruttore del quadro a monte.
EN The installation must be carried out after switching off the power supply by acting
on the switch of the switchboard upstream.
FR L'installation doit être effectuée après avoir désactivé l'alimentation électrique en
agissant sur l'interrupteur en amont du tableau.
DE Die Installation muss nach Abschalten der Stromversorgung durch Betätigen des
Schalters am Verteiler erfolgen.
04.1 CONTENUTO DELLA CONFEZIONE
4.
3.
2.1.
5. 6. 7.
IT
All’interno della confezione viene fornito:
1. DazeBox C;
2. Portacavo (opzionale);
3. Guida rapida;
4. Viti Ø5 x 60 mm e tasselli Ø8 x 40 mm;
5. Tessera seriale e PUK;
6. Terminali a boccola;
7. Tessere RFID (opzionale).
FR
À l'intérieur de l'emballage, vous trouverez :
1. DazeBox C;
2. Porte-câble (optionnel);
3. Guide rapide;
4. Vis Ø5 x 60 mm et chevilles Ø8 x 40 mm;
5. Carte série et PUK;
6. Bornes à douille;
7. Cartes RFID (optionnelles).
EN
The following is supplied in the package:
1. DazeBox C;
2. Cable holder (optional);
3. Quik start guide;
4. Screws Ø5 x 60 mm and dowels Ø8 x 40 mm;
5. Serial card and PUK;
6. Bushing terminals;
7. RFID cards (optional).
DE
In der Verpackung nden Sie:
1. DazeBox C;
2. Kabelträger (optional);
3. Schnellstartanleitung;
4. Schrauben Ø5 x 60 mm und Dübel Ø8 x 40 mm;
5. Serienkarte und PUK;
6. Hülsenklemmen;
7. RFID-Karten (optional).
04. PREPARAZIONE ALL'INSTALLAZIONE
PREPARING TO INSTALL - PRÉPARATION À L'INSTALLATION - VORBEREITUNG ZUR INSTALLATION
CONTENTS OF THE PACK - CONTENU DU PACKAGE - INHALT DER VERPACKUNG

11.
DAZEBOXC
04.2 ATTREZZATURA NECESSARIA
IT
Per installare DazeBox C, è necessaria la seguente
attrezzatura non fornita:
1. Trapano con punta da muro Ø8 mm;
2. Matita, martello, livella a bolla d’aria, metro;
3. Cacciavite a croce;
4. Pinze crimpatrici per terminali a boccola e RJ45.
FR
Pour installer DazeBox C, vous aurez besoin de l'éq-
uipement suivant, non fourni:
1. Perceuse avec mèche de mur Ø8 mm;
2. Crayon, marteau, niveau à bulle, mètre;
3. Tournevis cruciforme;
4. Pince à sertir pour bornes à douille et RJ45.
EN
To install DazeBox C, you need the following equip-
ment that is not provided:
1. Drill with Ø8 mm wall bit;
2. Pencil, hammer, bubble level, meter;
3. Phillips screwdriver;
4. Crimping pliers for bushing terminals and RJ45.
DE
Für die Installation von DazeBox C benötigen Sie
die folgende, nicht mitgelieferte Ausrüstung:
1. Bohrer mit Ø8 mm Mauerbohrer;
2. Bleistift, Hammer, Wasserwaage, Metermaß;
3. Kreuzschlitzschraubendreher;
4. Crimpzange für Hülsenklemmen und RJ45-
Stecker.
NECESSARY EQUIPMENT - ÉQUIPEMENT NÉCESSAIRE - ERFORDERLICHE AUSRÜSTUNG

DAZEBOX
12.
C
IT DazeBox C può essere installata in impianti con
i seguenti sistemi di messa a terra: TT, TN.
Per il corretto funzionamento del caricatore con
tutti i veicoli è necessario vericare che la resisten-
za di terra dell'impianto sia minore di 100 Ω.
La linea di alimentazione di DazeBox C deve esse-
rededicata e protetta da:
1. interruttore differenziale di tipo A 40A, cor-
rente di intervento di 30 mA
2. interruttore magnetotermico 40 A, curva C
3. Sganciatore di minima tensione 230V (solo
per Italia)
Per un corretto funzionamento installare le versioni di Dazebox C
monofase su impanti monofase e le versioni di Dazebox C trifase su
impianti trifase.
IT L'impianto elettrico deve essere conforme alle
norme di installazione locali.
FR L'installation électrique doit être conforme aux
normes d'installation locales.
EN The electrical installation must comply with
local installation standards.
DE Die elektrische Anlage muss den örtlichen
Installationsnormen entsprechen.
Requisiti di impianto
FR DazeBox C peut être installé dans des installa-
tions avec les systèmes de mise à la terre suivants:
TT, TN.
Pour assurer le bon fonctionnement du chargeur
avec tous les véhicules, il est nécessaire de vérier
que la résistance de terre de l'installation soit in-
férieure à 100 Ω. La ligne d'alimentation de DazeBox
C doit être dédiée et protégée par :
1. un disjoncteur différentiel de type A 40A,
courant de déclenchement de 30 mA
2. un disjoncteur magnétothermique de 40 A,
courbe C
3. un déclencheur de basse tension 230V (uni-
quement pour l'Italie)
Pour un fonctionnement correct, installez les versions monophasées
de Dazebox C sur des systèmes monophasés et les versions tri-
phasées de Dazebox C sur des systèmes triphasés.
EN DazeBox C can be installed in systems with the
following earthing systems: TT, TN.
For the correct operation of the charger with all
vehicles it is necessary to verify that the track
resistance of the system is less than 100 Ω.
The DazeBox C power line must bededicated and
protected by:
1. Type A 40A differential switch, 30 mA swi-
tching current
2. 40 A circuit breaker, curve C
3. Low-voltage circuit breaker 230V (Italy only)
For correct operation, install single-phase Dazebox C versions on
single-phase systems and three-phase Dazebox C versions on
three-phase systems.
DE DazeBox C kann in Anlagen mit den folgenden
Erdungssystemen installiert werden: TT, TN.
Um den ordnungsgemäßen Betrieb des Ladegeräts
mit allen Fahrzeugen zu gewährleisten, muss der
Erdungswiderstand der Anlage unter 100 Ω liegen.
Die Stromversorgungsleitung von DazeBox C muss
dediziert sein und durch folgende Schutzvor-
richtungen abgesichert sein:
1. einen Fehlerstromschutzschalter (RCD) Typ
A 40A, Auslösestrom 30 mA
2. einen Leistungsschutzschalter (Leitungs-
schutzschalter) 40 A, Charakteristik C
3. einen Unterspannungsauslöser 230V (nur
für Italien)
Für einen ordnungsgemäßen Betrieb installieren Sie die einphasigen
Versionen von Dazebox C in einphasigen Systemen und die dreipha-
sigen Versionen von Dazebox C in dreiphasigen Systemen.
05. PREDISPOSIZIONE DELL'IMPIANTO
PREPARATION OF THE INSTALLATION - PRÉPARATION DU SYSTÈME - ANLAGENVORBEREITUNG
Planting requirements - Exigences d'installation - Anforderungen an die Installation

13.
DAZEBOXC
Schemi di cablaggio
Wiring diagrams - Schémas de câblage - Verdrahtungspläne
IT Di seguito vengono riportati gli schemi di
cablaggio per DazeBox C monofase (1F) e Daze-
Box C trifase (3F).
• RCBO: interruttore magnetotermico-diffe-
renziale
• SPD: Protezione contro sovratensioni transi-
torie (Surge Protection Device)
• POP: Protezione contro sovratensioni
permanenti
• U<: sganciatore di minima tensione
FR Voici les schémas de câblage pour DazeBox C
monophasée (1F) et DazeBox C triphasée (3F).
• RCBO: Disjoncteur magnétothermique-diff-
érentiel
• SPD: Dispositif de protection contre les
surtensions transitoires (Surge Protection
Device)
• POP: Protection contre les surtensions
permanentes
• U<: Décrocheur de tension minimale
EN Below are the wiring diagrams for DazeBox C
single-phase (1F) and DazeBox C three-phase (3F).
• RCBO: Residual Current Circuit Breaker with
Overcurrent Protection
• SPD: Surge Protection Device
• POP: Permanent Overvoltage Protection
• U<: Under-voltage Release
DE Hier sind die Verdrahtungspläne für DazeBox C
einphasig (1F) und DazeBox C dreiphasig (3F).
• RCBO: Fehlerstromschutzschalter (Residual
Current Circuit Breaker with Overcurrent
Protection)
• SPD: Schutzvorrichtung gegen transiente
Überspannungen (Surge Protection Device)
• POP: Schutzvorrichtung gegen dauerhafte
Überspannungen
• U<: Unterspannungsauslöser
IT - DazeBox C monofase e trifase con RCBO + Sganciatore di minima tensione (installazione obbligatoria per il mercato italiano).
EN - DazeBox C single-phase and three-phase with RCBO + Under-voltage Release (mandatory installation for the Italian market).
FR - DazeBox C monophasée et triphasée avec RCBO + Décrocheur de tension minimale (installation obligatoire pour le marché italien).
DE - DazeBox C einphasig und dreiphasig mit RCBO + Unterspannungsauslöser (obligatorische Installation für den italienischen Markt).

DAZEBOX
14.
C
IT - DazeBox C monofase e trifase con RCBO+SPD+POP (installazione per il mercato spagnolo).
EN - DazeBox C single-phase and three-phase with RCBO+SPD+POP (installation for the Spanish market).
FR - DazeBox C monophasée et triphasée avec RCBO + SPD + POP (installation pour le marché espagnol).
DE - DazeBox C einphasig und dreiphasig mit RCBO + SPD + POP (Installation für den spanischen Markt).
IT - DazeBox C monofase e trifase con RCBO (installazione per nazioni che non richiedono dispositivi di sicurezza aggiuntivi).
EN - DazeBox C single-phase and three-phase with RCBO (installation for countries that do not require additional safety devices).
FR - DazeBox C monophasée et triphasée avec RCBO (installation pour les pays ne nécessitant pas de dispositifs de sécurité supplémentaires).
DE - DazeBox C einphasig und dreiphasig mit RCBO (Installation für Länder, die keine zusätzlichen Sicherheitsvorrichtungen erfordern).

15.
DAZEBOXC
1.
4.
2.
5.
3.
7A.6A.
8B.7B.6B.
06. MONTAGGIO DELLA DAZEBOX
MOUNTING THE DAZEBOX - MONTAGE DE LA DAZEBOX - MONTAGE DER DAZEBOX
A. installazione con passaggio dei cavi a giorno
A. installation with open cables passage - A. installation avec passage des câbles en saillie - A. installation mit sichtbar verlegten
Kabeln abertos
B. installation with under track cables - B. installation avec passage des câbles encastrés - B. installation mit unterputzverlegten
Kabeln
B. installazioni con passaggio dei cavi sottotraccia

DAZEBOX
16.
C
IT
1. Segnare i tre punti dove si andrà a forare
con una matita mediante la dima di foratura.
(foglio staccabile al centro del manuale).
2. Realizzare i fori sulla parete utilizzando un
trapano.
3. Inserire i 3 tasselli in dotazione nei fori.
4. Rimuovere la copertura estetica frontale di
DazeBox C.
5. Aprire DazeBox C svitando le 4 viti indicate in
gura con un cacciavite.
6. Inserire il cavo di alimentazione attraverso il
passacavo nella parte inferiore di DazeBox C.
7. Fissare DazeBox C al muro sfruttando i 3 fori
passanti della scocca.
8. Aprire il foro predisposto sul retro di DazeBox
C, delle dimensioni desiderate con una fresa
conica a gradino.
9. Inserire i cavi di alimentazione attraverso un
passacavo nel foro appena creato.
10. Fissare DazeBox C al muro sfruttando i 3 fori
passanti della scocca con le viti in dotazioni.
EN
1. Mark the three points where you will drill with
a pencil using the drilling template. (deta-
chable sheet in the center of the manual).
2. Make the holes on the wall using a drill.
3. Insert the 3 dowels supplied in the holes.
4. Remove the DazeBox C front cover.
5. Open DazeBox C by unscrewing the 4 screws
indicated in the gure with a screwdriver.
6. Insert the power cord through the grommet
at the bottom of the DazeBox C.
7. Fix DazeBox C to the wall using the 3 throu-
gh holes of the body.
8. Open the hole on the back of the DazeBox
C, the desired size, with a tapered step cutter.
9. Insert the power cables through a grommet
into the newly created hole.
10. Fix DazeBox C to the wall using the 3
through holes of the body with screws in
equipment.
DE
1. Markieren Sie die drei Punkte, an denen Sie
mit einem Bleistift gemäß der Bohrschablo-
ne bohren werden. (heraustrennbares Blatt in
der Mitte des Handbuchs).
2. Bohren Sie die Löcher in die Wand mit einem
Bohrer.
3. Setzen Sie die 3 mitgelieferten Dübel in die
Löcher ein.
4. Entfernen Sie die vordere Abdeckung von
DazeBox C.
5. Öffnen Sie DazeBox C, indem Sie die 4
Schrauben lösen, die in der Abbildung mit
einem Schraubendreher markiert sind.
6. Führen Sie das Netzkabel durch die Kabel-
durchführung unten an DazeBox C ein.
7. Befestigen Sie DazeBox C an der Wand,
indem Sie die 3 Durchgangslöcher des
Gehäuses verwenden.
8. Öffnen Sie das Loch auf der Rückseite von
DazeBox C mit einem konischen Stufen-
bohrer in der gewünschten Größe.
9. Führen Sie die Netzkabel durch eine Kabel-
durchführung in das neu erstellte Loch ein.
10. Befestigen Sie DazeBox C an der Wand,
indem Sie die 3 Durchgangslöcher im
Gehäuse mit den mitgelieferten Schrauben
verwenden.
FR
1. Marquez les trois points où vous percerez
avec un crayon à l'aide du gabarit de perçage.
(feuille détachable au centre du manuel).
2. Percez les trous dans le mur à l'aide d'une
perceuse.
3. Insérez les 3 chevilles fournies dans les trous.
4. Retirez le cache esthétique avant de DazeBox
C.
5. Ouvrez DazeBox C en dévissant les 4 vis
indiquées dans la gure à l'aide d'un tournevis.
6. Passez le câble d'alimentation à travers le
passe-câble situé dans la partie inférieure de
DazeBox C.
7. Fixez DazeBox C au mur en utilisant les 3
trous traversants de la coque.
8. Ouvrez le trou prévu à l'arrière de DazeBox C
de la taille souhaitée avec un foret conique à
étages.
9. Passez les câbles d'alimentation à travers un
passe-câble dans le trou fraîchement créé.
10. Fixez DazeBox C au mur en utilisant les 3
trous traversants de la coque avec les vis
fournies.
6A.
6A.
6A.
6A.
7A.
7A.
7A.
7A.
6B.
6B.
6B.
6B.
7B.
7B.
7B.
7B.
8B.
8B.
8B.
8B.

17.
DAZEBOXC
IT
1. Predisporre tutti i cavi con i terminali a boc-
cola prima dei collegamenti. Per DazeBox C
trifase collegare linea 1 (L1), linea 2 (L2), linea
3 (L3), neutro (N) e terra (PE), come indicato
sulla scheda, ai morsetti “push-lock” senza
l’utilizzo di attrezzi. Per DazeBox C monofase
collegare linea (L1) e neutro (N), senza inver-
tirli; collegare la terra (PE).
2. Il pressacavo (PG) posto nel lato inferiore
della DazeBox ha due fori ciechi Ø5 mm
per il collegamento di accessori (bobina di
sgancio, obbligatoria in Italia, Power Mana-
gement). Per inserire il cavo rompere il fondo
cieco del foro servendosi di un cacciavite.
FR
1. Préparez tous les câbles avec les terminaux
à douille avant les connexions. Pour DazeBox
C triphasé, connectez la ligne 1 (L1), la ligne
2 (L2), la ligne 3 (L3), le neutre (N) et la terre
(PE) comme indiqué sur la che, aux bornes
"push-lock" sans utiliser d'outils. Pour Daze-
Box C monophasé, connectez la ligne (L1) et
le neutre (N) sans les inverser, et connectez
la terre (PE).
2. Le presse-étoupe (PG) situé sur le côté
inférieur de la DazeBox comporte deux trous
borgnes Ø5 mm pour la connexion d'acces-
soires (bobine de déclenchement, obligatoire
en Italie, Power Management). Pour insérer
le câble, percez le fond borgne du trou à
l'aide d'un tournevis.
3.
DE
1. Bereiten Sie alle Kabel mit den Kabelschuhen
vor dem Anschließen vor. Für DazeBox C-Drei-
phasen verbinden Sie die Phase 1 (L1), die
Phase 2 (L2), die Phase 3 (L3), den Neutrallei-
ter (N) und die Erde (PE) gemäß den Angaben
auf dem Datenblatt mit den "Push-Lock"-K-
lemmen, ohne Werkzeuge zu verwenden. Für
DazeBox C-Einzelphasen verbinden Sie die
Phase (L1) und den Neutralleiter (N) ohne
Vertauschung und verbinden Sie die Erde
(PE).
2. Der Kabelverschraubung (PG) auf der Unter-
seite der DazeBox hat zwei blinde Löcher Ø5
mm für die Verbindung von Zubehör (Auslös-
errolle, in Italien obligatorisch, Power Mana-
gement). Um das Kabel einzuführen, brechen
Sie den blinden Boden des Lochs mit einem
Schraubendreher auf.
3.
EN
1. Arrange all cables with bushing terminals be-
fore connections. For DazeBox three-phase
connect line 1 (L1), line 2 (L2), line 3 (L3), neu-
tral (N) and ground (PE), as indicated on the
board, to the "push-lock" terminals without
the use of tools. For DazeBox C single-phase
connect line (L1) and neutral (N), without in-
verting them; connect the ground (PE).
2. The cable gland (PG) located on the under-
side of the DazeBox has two blind holes Ơ5
mm for connecting accessories (release
coil, mandatory in Italy, Power Manage-
ment). To insert the cable break the blind
bottom of the hole using a screwdriver.
07. COLLEGAMENTO ELETTRICO
ELECTRICAL CONNECTION - CONNEXION ÉLECTRIQUE - ELEKTRISCHE VERBINDUNG

DAZEBOX
18.
C
08. CONFIGURAZIONE
CONFIGURATION - CONFIGURATION - KONFIGURATION
CONFIGURATION BY THE APP - CONFIGURATION VIA L'APPLICATION - KONFIGURATION ÜBER DIE APP
08.1 CONFIGURAZIONE TRAMITE APP
1. Scaricare l'App
IT
Scaricare l’App dagli store Google Play o App Store.
IT
Nonostante sia possibile congurare DazeBox C
senza l'utilizzo dell'app, si consiglia vivamente di
utilizzarla per garantire che il prodotto sia sempre
aggiornato.
FR
Téléchargez l'application depuis les boutiques
Google Play ou App Store.
FR
Même s'il est possible de congurer DazeBox C
sans utiliser l'application, il est fortement recom-
mandé de l'utiliser pour garantir que le produit soit
toujours à jour.
EN
Download the App from the Google Play or App
Store stores.
EN
Although it's possible to congure DazeBox C
without using the app, it is strongly recommen-
ded to use it to ensure that the product is always
up-to-date.
DE
Laden Sie die App aus dem Google Play Store oder
dem App Store herunter.
DE
Obwohl es möglich ist, DazeBox C ohne die
Verwendung der App zu kongurieren, wird drin-
gend empfohlen, sie zu verwenden, um sicherzu-
stellen, dass das Produkt immer auf dem neuesten
Stand ist.
2. Abbinare DazeBox C all'App
Download App - Téléchargez l'application - Laden Sie die App herunter
Pair DazeBox C with the App - Associez DazeBox C à l'application - Verknüpfen Sie DazeBox C mit der App

19.
DAZEBOXC
IT
Una volta scaricata la app e creato un account,
avviare lo wizzard per abbinare DazeBox C al
proprio utente. Verranno richiesti Numero Seriale
e PUK. Questi dati si trovano sulla tessera fornita
all'interno della confezione. Conservare con cura
questa tessera.
FR
Une fois l'application téléchargée et un compte
créé, lancez l'assistant pour associer DazeBox C
à votre utilisateur. Vous devrez fournir le numéro
de série et le PUK. Ces données se trouvent sur la
carte fournie dans l'emballage. Conservez soigneu-
sement cette carte.
EN
Once you have downloaded the app and created
an account, start wizzard to match DazeBox C to
your user. Serial Number and PUK will be required.
This information can be found on the card provi-
ded inside the box. Keep this card carefully.
DE
Sobald die App heruntergeladen und ein Konto
erstellt wurde, starten Sie den Assistenten, um
DazeBox C mit Ihrem Benutzer zu verknüpfen.
Sie werden nach der Seriennummer und der PUK
gefragt. Diese Daten nden Sie auf der Karte, die in
der Verpackung enthalten ist. Bewahren Sie diese
Karte sorgfältig auf.
SN
XXXXXXXXXXX
PUK
XXXXXXXXXX
CONFIGURATION BY SWITCH - CONFIGURATION VIA DES INTERRUPTEURS - KONFIGURATION ÜBER SCHALTER
08.2 CONFIGURAZIONE TRAMITE INTERRUTTORI

DAZEBOX
20.
C
IT
Qualora non fosse possibile congurare DazeBox C
tramite App, è possibile effettuare la congurazione
iniziale anche tramite interruttori su scheda. Questa
congurazione è da effettuare quando DazeBox C
non è alimentata.
1. Servirsi dello schema a lato individuando lo
scenario di utilizzo di DazeBox C da parte
dell’utente e le caratteristiche dell’impianto
elettrico (monofase o trifase).
2. Individuare la tabella corretta tra quelle se-
guenti (scelta tramite lo schema).
3. Agire sui 10 interruttori del selettore situato
in alto a sinistra della scheda elettronica (si
veda gura in alto) seguendo le combinazioni
della tabella. Le tabelle riportano due pos-
sibili valori associati a ciascun interruttore:
0: levetta in basso / 1: levetta in alto.
Nota: una volta che i parametri vengono modicati tramite app
DazeBox C non considera più eventuali modiche delle congurazioni
degli interruttori ma fa solo riferimento a quanto congurato via app.
FR
Si la conguration de DazeBox C via l'application
n'est pas possible, il est également possible d'ef-
fectuer la conguration initiale via les interrupteurs
sur la carte. Cette conguration doit être effectuée
lorsque DazeBox C n'est pas alimentée.
1. Utilisez le schéma à côté pour déterminer le
scénario d'utilisation de DazeBox C par l'utili-
sateur et les caractéristiques de l'installation
électrique (monophasée ou triphasée).
2. Identiez la table correcte parmi celles qui
suivent (choisie à l'aide du schéma).
3. Agissez sur les 10 interrupteurs du sélecteur
situé en haut à gauche de la carte électroniq-
ue (voir la gure en haut) en suivant les com-
binaisons de la table. Les tables indiquent
deux valeurs possibles associées à chaque
interrupteur: 0: levier en bas / 1: levier en haut.
Note: Une fois que les paramètres ont été modiés via l'application,
DazeBox C n'acceptera plus de modications des congurations des
interrupteurs, mais se référera uniquement à ce qui a été conguré
via l'application.
EN
If it is not possible to congure DazeBox C via the
App, the initial conguration can also be made
via tab switches. This conguration is performed
when DazeBox C is not powered.
1. Use the diagram to the side identifying the
scenario of use of DazeBox C by the user and
the characteristics of the electrical system
(single-phase or three-phase).
2. Find the correct table among the following
(chosen through the scheme).
3. Act on the 10 switches of the switch loca-
ted at the top left of the electronic board
(see gure above) following the combina-
tions of the table. The tables show two pos-
sible values associated with each switch:
0: bottom lever / 1: Top lever.
Note: Once the parameters are changed via the DazeBox C app, it no
longer considers changes to the switch congurations, but only refers
to what is congured via the app.
DE
Falls die Konguration von DazeBox C über die
App nicht möglich ist, kann die Erstkonguration
auch über die Schalter auf der Platine durchgeführt
werden. Diese Konguration sollte erfolgen, wenn
DazeBox C nicht mit Strom versorgt wird.
1. Verwenden Sie das nebenstehende Schema,
um das Szenario für die Verwendung von
DazeBox C durch den Benutzer und die Eigen-
schaften der elektrischen Installation (einpha-
sig oder dreiphasig) zu bestimmen.
2. Identizieren Sie die richtige Tabelle aus den
folgenden (ausgewählt anhand des Sche-
mas).
3. Steuern Sie die 10 Schalter des Schalters
oben links auf der Leiterplatte (siehe Abbil-
dung oben) entsprechend den Kombinatio-
nen aus der Tabelle. Die Tabellen geben zwei
mögliche Werte für jeden Schalter an: 0: He-
bel unten / 1: Hebel oben.
Hinweis: Nachdem die Parameter über die App geändert wurden,
berücksichtigt DazeBox C keine weiteren Änderungen an den Schal-
terkongurationen, sondern bezieht sich ausschließlich auf die über
die App vorgenommene Konguration.
This manual suits for next models
2
Table of contents
Other DAZE Batteries Charger manuals