DeFelsko PosiTector IRT User manual

Infrared Thermometer
Instruction Manual

1
Introduction
Introduction
The osiTector Infrared Thermometer (IRT) is a hand-held
electronic instrument that measures surface temperature quickly
and accurately. t consists of a body (Standard or Advanced) and
probe (pg. 3).
Basic Operation
Basic Operation
1. Remove the protective rubber cap from the probe.
2. Power-up Gage by pressing the center navigation button.
3. Verify emissivity setting and adjust if necessary (pg. 4).
Typical Display
The infrared temperature sensor immediately begins measuring.
Press the button to pause the measurement. Press again to
resume.
SmartTrend Indicator -
Appears when surface
temperature is rising or
falling. Does not appear
when measurement is
stable.
Emissivity (pg. 4)
Battery Indicator
Surface
Temperature
Temperature Unit
Press the button to power up the Gage. To conserve battery
life, the gage will automatically go to sleep after 5 minutes of
inactivity. While in Sleep Mode, the gage powers up significantly
faster— convenient when moving between parts or locations. The
gage will completely power off after 4 hours of inactivity.
Alternatively, select ower Off from the main menu. All settings
are retained.

2
Button Functions — Normal Operation
Laser ointer
Press the button to toggle the laser pointer on/off. The laser
helps aim the infrared temperature sensor. The symbol is dis-
played on the screen when the laser is active.
Laser Active
Laser Radiation. Do not stare into beam. Class 2 laser product.
Laser Parameters:
Wavelength: 652 nm
Laser power for classification: <1.0 mW
Beam diameter: <2 mm at aperture
Divergence: 1 mRad
Mode of operation: CW
EN/ EC 60825-1:2014 (2007 USA)
Pause / Resume
View Trend Chart
(Advanced only)
Access the Menu Activate Laser Pointer
(Down Button)
3
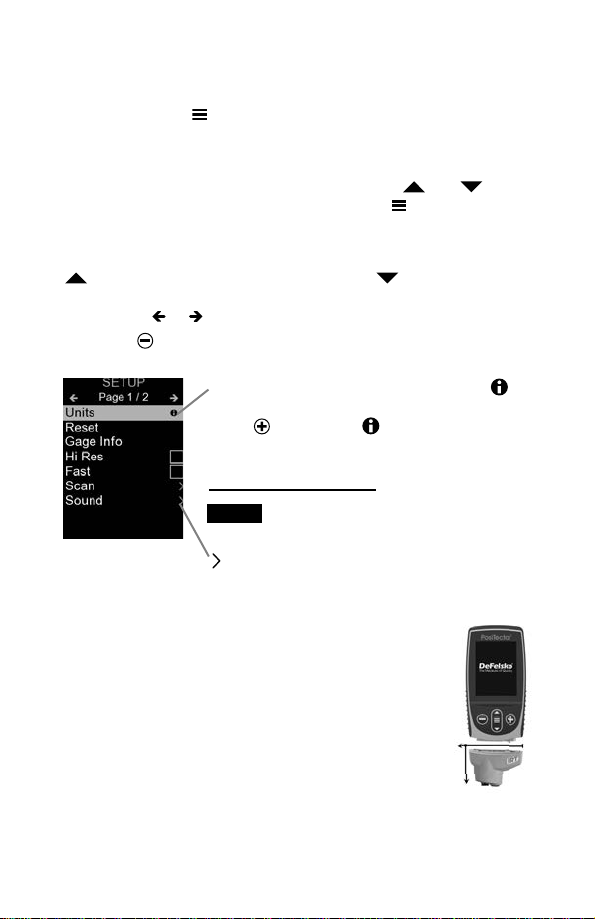
Menu Operation
To access the Menu, power-up the gage, then press the center
navigation button . Either the keypad or touch screen can be
used to navigate the menu. f desired, touch screen functionality
can be disabled within the Setup menu (See Touch, pg. 7).
Select a menu option by touching it, or use the and but-
tons to highlight the desired option and press to select it.
On menus longer than one page, the current page number is
displayed below the menu name. Navigate between pages using
when the first menu item is selected, or when the last
menu item is selected. f using touch, navigate between pages
by touching or , or by swiping up or down.
When powered-up, the osiTector automatically
determines which probe is attached and does a self-
check.
To disconnect a probe from a body, slide the plastic
probe connector horizontally (in the direction of the
arrow) away from the body. Reverse these steps to
attach a different probe. t is not necessary to power-
down the Gage when switching probes.
The osiTector gage body accepts a wide variety of probe types
When a Menu option is highlighted, the
icon indicates on-gage help is available.
Press or touch the icon to display the
help. A formatted PDF containing all on-
gage help items is available at
www.defelsko.com/help
indicates that a sub-menu exists for the
Menu option. Select the option to display its
sub menu.
Update your gage to ensure that you
have the latest on-gage help information.
NOTE:
robes
robes
Press the button or swipe right to return to a previous screen.
Select Exit to close the Menu.

including magnetic, eddy current and ultrasonic coating thickness,
environmental, surface profile, shore hardness durometer, salt
contamination, and ultrasonic wall thickness probes. See
www.defelsko.com/probes
Emissivity refers to a material’s ability to emit infrared energy,
compared to an ideal black surface at the same temperature. The
ratio varies from 0 to 1, and each material has a specific emissivity
associated with it. The osiTector IRT has built in emissivity
settings for certain materials as well as a user-adjustable
emissivity option (pg. 6).
Most organic and painted surfaces have an emissivity of around
0.95, and are ideal surfaces for accurate infrared temperature
readings. Shiny or reflective surfaces can be difficult to measure
with an infrared thermometer, as they tend to reflect ambient
infrared energy instead of their own. To compensate for this, cover
such surfaces with flat paint or a piece of electrical tape. Allow the
paint or tape to acclimate to the surface’s temperature, and take a
measurement over the paint or tape.
Emissivity
Emissivity
Distance to Spot Ratio (D:S)
Distance to Spot Ratio (D:S)
The distance to spot ratio refers
to the relationship between the
diameter of the area being
measured compared to the
instrument’s distance from the
area. As the distance (D) from
the target increases, the spot
size (S) of the area being
measured by the unit becomes
larger. The D:S ratio of the
osiTector IRT is 5.7:1. For
example, when the instrument is
100 cm (40 inches) from the
target, the spot size will be about
18 cm (7 inches) in diameter.
Distance
Spot Size
4

5
Setup Menu
Setup Menu
Reset
Reset (menu reset) restores factory settings and returns the Gage
to a known condition. The following occurs:
- All batches and stored readings, batch names and screen
captures are erased.
- Menu settings are returned to the following:
Memory = OFF
Statistics = OFF
HiLo Alarm = OFF
Trend Chart = None
Display = None
Bluetooth & Stream = OFF
WiFi & Access oint = OFF
USB Keyboard & Stream = OFF
BLE Keyboard = OFF
Units
Converts the display from Celsius (°C) to Fahrenheit (°F) and vice
versa.
Perform a more thorough Hard Reset as follows:
1. Power down the Gage and wait 5 seconds.
2. Simultaneously press and hold the and buttons
until the Reset symbol appears.
This returns the Gage to a known, “out-of-the-box” condition. t
performs the same function as a menu Reset with the addition of:
NOTE:
Units = Celsius
Touch = ON
Flip Lock = OFF
Auto Sync .net = ON
Sound = Medium
Language = English
Emissivity = 0.95
Battery Type = Alkaline
Backlight = Normal
Bluetooth Smart = OFF
USB Drive= ON
Date, Time and WiFi settings are not affected by either Reset.
- Bluetooth pairing info is cleared.
- Menu settings are returned to the following:
6
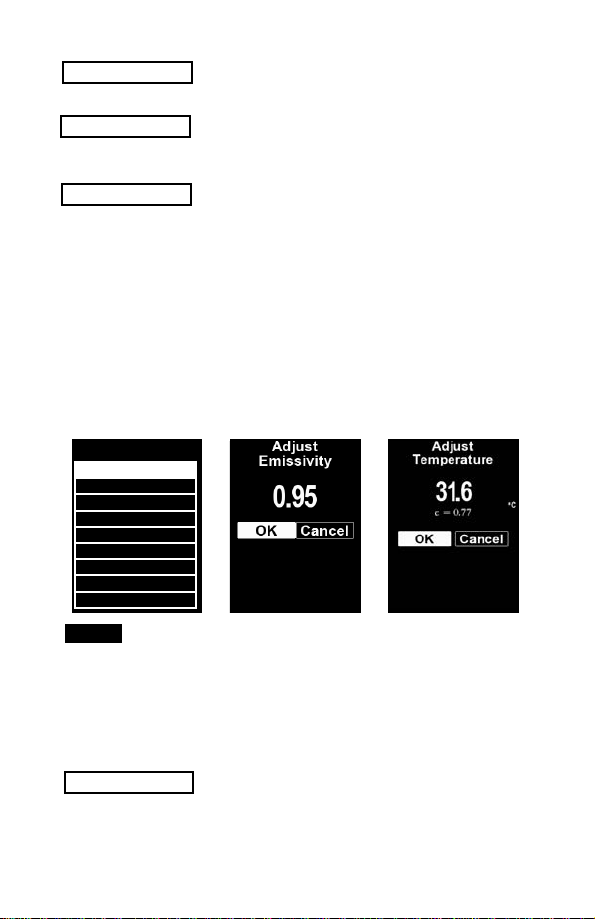
Emissivity
Turns the trend chart on. The trend chart can also be turned on by
pressing the Up navigation button from the main screen.
Trend Chart
Displays information on the gage body and attached probe.
Gage Info
Sets the emissivity ratio for the osiTector IRT infrared
temperature sensor.
Select Custom to manually adjust the emissivity value or to adjust
to a known temperature. Emissivity is automatically calculated
when adjusting to a temperature. See NOTE below.
Alternatively, use one of the following preset options:
Aluminum (rough) = 0.07 lastics = 0.94
Zinc (Galvanized) = 0.25 Steel (Oxidized) = 0.95
Concrete = 0.54 Wood = 0.95
aint = 0.96
NOTE:
Depending on surface treatment, metals such as blasted steel can
have a broad range of emissivity values. Adjusting to a known
temperature (measured by a direct contact surface temperature
probe) on a representative sample will assist in obtaining an
accurate emissivity value.
Zinc Galv. 0.25
Steel Ox. 0.95
Al Rough 0.07
Concrete 0.54
Wood 0.95
aint 0.96
lastics 0.94
Custom
Exit
Emissivity
Adjusts the volume of built-in speaker (Off, Low, Medium, High).
Sound

Disables the Auto Rotate feature by locking the display in its
current orientation.
Flip Lock
Allows the touch screen functionality to be disabled. All gage
functions can also be controlled using the navigation buttons.
Touch
All measurements are date and time stamped (24-hour format)
when stored into memory. t is therefore important to set the
correct date and time. Use the and buttons to select a
value, and the and buttons to adjust it. The current date
and time setting can also be viewed at the top of the main menu.
Set Clock
Selects the type of batteries used in the Gage from a choice of
“Alkaline”, “Lithium” or “NiMH” (nickel-metal hydride rechargeable).
The battery state indicator symbol is calibrated for the selected
battery type. No damage will occur if the battery type used in the
Gage does not match the selected battery type.
Battery Type
A statistical summary will appear on the
display. Reset Statistics by pressing the
button. Press to pause statistics.
Statistics
HiLo Alarm
Allows Gage to visibly and audibly alert the
user when readings exceed user-specified
limits.
–Average
–Maximum Value
–Standard Deviation
–Minimum Value
X
X
Statistics Mode
Statistics Mode
7

8
Memory Management
Memory Management
The osiTector IRT has internal memory storage for recording
measurement data. Stored readings can be reviewed on-screen or
accessed via computers, tablets and smart phones. Each reading
is date and time-stamped. Press the button to store a
measurement.
The symbol appears when the Gage is set to store readings.
Standard models store up to 1,000 readings in one batch.
Advanced models store 250,000 readings in up to 1,000 batches.
“New Batch” closes any open batch and creates a new batch name
using the lowest available number. New batch names are date
stamped when they are created.
Create a new batch
(Advanced only)
Scroll through display
modes (Advanced only)
Delete last reading
Activate Laser
Pointer (pg. 2)
Access the Menu
Screen Capture
Press both and buttons simultaneously to save an image of
the current display. The last 100 screen captures are stored in
memory and can be accessed when connected to a computer
(see osiSoft USB Drive below).
Accessing Stored Measurement Data
Accessing Stored Measurement Data
DeFelsko offers the following free solutions for viewing, analyzing
and reporting data:
osiSoft USB Drive - Connect the Gage to a PC/Mac using the
supplied USB-C cable. View and print readings and graphs using
universal PC/Mac web browsers or file explorers. No software or
internet connection required.
osiSoft Desktop - Powerful desktop software (PC/Mac) for
downloading, viewing, printing and storing measurement data.
ncludes a customizable, templated PDF Report Generator. No
internet connection required.

9
osiSoft.net - Web-based application offering secure, centralized
storage of measurement data. Access your data from any web
connected device.
osiTector App - (Advanced models only) App for compatible iOS
and Android smart devices. Permits users to create, save and share
professional PDF reports. Add images and notes using the smart
device’s camera and keyboard.
Connect Menu
Connect Menu
Allows connection to your local wireless network or mobile hot
spot. deal for using your network’s internet connection for
synchronizing stored measurements with PosiSoft.net (above).
See www.defelsko.com/wifi
WiFi (Advanced models only)
When USB Drive is enabled , the osiTector gage uses a
USB mass storage device class which provides users with a
simple interface to retrieve stored data in a manner similar to
USB flash drives and digital cameras. USB Drive is also required
to import stored measurements into osiSoft Desktop software
(pg. 9).
USB
While connected, power is supplied through the included
USB-C cable. The batteries are not used and the body will not
automatically power down.
NOTE:
When enabled and connected to a computer, the PosiTector will be
recognized as a Keyboard. Readings are sent to the computer as
they are taken, emulating keystrokes, followed by a carriage return.
Keyboard
Stream
NOTE:
Stream individual readings to a USB connected computer via a
serial protocol. deal for use with serial compatible SPC data
collection software.
For more information on USB Keyboard and Streaming
visit: www.defelsko.com/usb/stream
(Advanced models only)
(Advanced models only)

10
The above WiFi, USB and Bluetooth menus contain a Sync .net
Now option. When selected, the Gage immediately synchronizes
stored measurement data via its respective communication
method (internet connection required). Alternatively, select Auto
Sync .net from within the USB connect menu to automatically
synchroniz e upon connection to a PC. Additional measurements
added to memory while connected are synchronized only when the
USB cable is disconnected and reconnected, or when the Sync
.net Now option is selected. WiFi connected gages automatically
attempt synchronization upon power-up.
Sync .net Now
Allows individual readings to be sent to a computer, printer or
compatible device as they are taken using Bluetooth wireless
technology. See www.defelsko.com/bluetooth
Bluetooth (Advanced models only)
osiSoft Desktop is required when using a USB
connection to synchronize measurements with PosiSoft.net.
NOTE:
Allows communication with a smart device running the
PosiTector App (pg. 9) via auto-pairing Bluetooth Smart (BLE)
wireless technology.
Bluetooth Smart (Advanced models only)
Sync Batches
Select batches to flag them for synchronization to the PosiTector
App. Sync Batches is useful when connecting a new device to a
gage with pre-existing batches, since only batches created while
Bluetooth Smart is enabled are automatically selected.
Selected batches are synchronized when the next reading is
taken in a batch flagged for synchronization, or when the Sync
Batches option is selected at the bottom of the list of selected
batches.
f Bluetooth Smart is disabled or disconnected, data
from batches selected in the Sync Batches menu are held in a
queue until communication with the PosiTector App is re-
established.
NOTE:
11
The Gage will perform a Hard Reset (pg. 5) after an
update. All stored measurements will be erased from memory.
Updates
Determine if a software update is available for your Gage.
See www.defelsko.com/update
WARN NG:
BLE Keyboard
When enabled and connected to a computer, the PosiTector will
be recognized as a wireless Keyboard. Readings are sent to the
computer as they are taken, emulating keystrokes, followed by a
carriage return.
(Advanced models only)
Send Batches
Transfers selected batches to the PosiTector App. Send Batches
is useful when switching between devices, as only readings and
batches that have yet to be synchronized with any smart device
are synchronized automatically.
The Send Batches option is visible in the menu when the Gage
is connected to a smart device running the PosiTector App.

12
Technical Data
Technical Data
Conforms to: SO 8502-4, BS7079-B and ASTM D3276
Returning for Service
Returning for Service
Before returning the instrument for service…
1. nstall new batteries in the proper alignment as shown within
battery compartment.
2. Examine the surface temperature sensor for dirt or damage.
3. Perform a Hard Reset (pg. 5).
4. f issue is not resolved, Update (pg. 11) your osiTector
gage body and re-attempt measurements.
IM ORTANT:
f these steps do not resolve the issue and the Gage must be
returned for service, please follow the instructions provided at
www.defelsko.com/service.
Laser Pointer Class 2 < 1mW
Distance to Spot Ratio (D:S) 5.7:1
Emissivity Adjustable
Response Time <500 µs (95% respo se)
Spectral Response 2 - 14 µm
Specifications Range Acc racy Resol tion
Temperat re
Range
–70˚ to 380˚ C ±1˚C + 1%
@ 23˚ C ambie t
0.1˚ C
–94˚ to 716˚ F 0.1˚ F
13
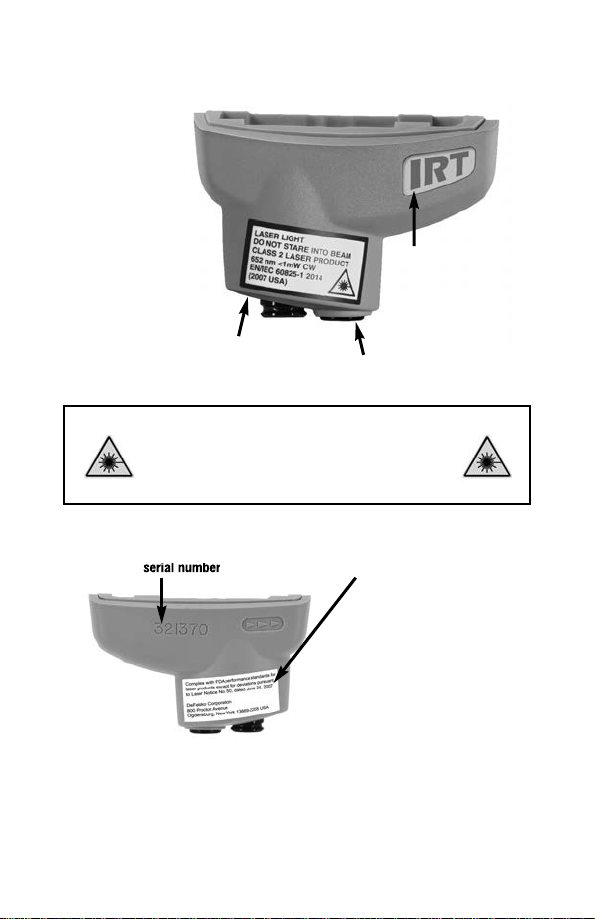
LASER L GHT DO NOT STARE NTO BEAM
Class 2 laser product
652 nm < 1mW CW
EN/ EC 60825-1-2014 (2007 USA)
serial number
Manufacturer’s Identification
and certification label
Complies with FDA
performance standards for
laser products except for
deviations pursuant
to Laser Notice No. 50,
dated June 24, 2007
DeFelsko Corporation
800 Proctor Avenue
Ogdensburg, New York
13669-2205 USA
Hazard Warning and
Explanatory Label Aperture
Product Model
roduct Labeling
roduct Labeling

Laser recautions:
Use of controls or adjustments or performance of
procedures other than those specified herein may result in
hazardous radiation exposure.
Do not open or modify the product. There are no user serviceable
components within the product; any service or repair is to be
performed only by DeFelsko Corporation personnel. No scheduled
maintenance is necessary to maintain product in compliance with
laser safety standards.
To prevent eye damage and personal injury:
nRead all safety information before you use the product.
nDo not use the product if it operates incorrectly.
nDo not use the product if the housing appears cracked
or otherwise damaged.
nUse the product only as specified.
nDo not look into the laser. Do not point the laser directly
or indirectly (off reflective surfaces) at persons.
CAUT ON:
DeFelsko Corporation
800 Proctor Avenue
Ogdensburg, New York 13669-2205 USA
+1-315-393-4450
Limited Warranty, Sole Remedy
Limited Warranty, Sole Remedy
and Limited Liability
and Limited Liability
DeFelsko's sole warranty, remedy, and liability are the express
limited warranty, remedy, and limited liability that are set forth on
its website: www.defelsko.com/terms
www.defelsko.com
© DeFelsko Corporation USA 2020
All Rights Reserved
This manual is copyrighted with all rights reserved and may not be reproduced or transmitted, in whole
or part, by any means, without written permission from DeFelsko Corporation.
DeFelsko, PosiTector, and PosiSoft are trademarks of DeFelsko Corporation registered in the U.S. and
in other countries. Other brand or product names are trademarks or registered trademarks of their
respective holders.
Every effort has been made to ensure that the information in this manual is accurate. DeFelsko is not
responsible for printing or clerical errors.

Termómetro Infrarrojo
Manual de Instrucciones

1
Introducción
Introducción
El termómetro infrarrojo PosiTector Infrared Thermometer (IRT)
es un instrumento electrónico portátil que mide la temperatura
superficial con precisión y rapidez. Consiste de un cuerpo
(Standard o Advanced) y una sonda (pg. 4).
1. Retire la goma de la tapa protectora roja de la sonda si la lleva.
2. Encienda el Medidor pulsando el botón central .
3. Verifique la configuración de emisividad y ajústela si es
necesario (pág. 4).
Pantalla típica
El sensor de temperatura infrarrojo mide de manera continua
inmediatamente. Presione la tecla para interrumpir la medición
a tiempo real. Presione la tecla nuevamente para continuar
midiendo.
Indicador inteligente
de Tendencia –
Aparece cuando la tem-
peratura superficial esta
incrementando o decre-
mentando. No aparece
cuando la temperatura
es estable.
Emisividad (pg.4)
Indicador de
batería
Temperatura
Superficial
Unidad de Temperatura
Presione el boton para encender el instrumento. Para conser-
var la vida de la bateria, el instrumento entrará en reposo
automáticamente tras 5 minutos de inactividad. Cuando se
encuentra dentro del modo de reposo, el instrumento se reactiva
significativamente más rápido. El instrumento se apagará comple-
tamente después de 4 horas de inactividad. Alternativamente,
seleccione la opcion “Apagar” en el menu principal. Todas las
configuraciones se mantienen.
Inicio rápido

2
Funciones de los botones - Funcionamiento normal
Laser Activo
Radiación láser. NO MIRE DIRECTAMENTE. Producto laser Clase 2
Parámetros láser:
Longitud de onda: 652 nm
Potencia láser para clasificación: <1.0 mW
Diámetro del haz: <2 mm at aperture
Divergencia : 1 mRad
Modo de operación: CW
EN/IEC 60825-1:2014 (2007 USA)
Pausa / Reinicio
Ver gráfico de tenden-
cias (solo Advanced)
Acceso al menú Activar Laser
(Abajo)
Apuntador Laser
Pulse el botón de desplazamiento hacia abajo para para
alternar el apuntador laser encendido/apagado. El laser permite
orientar el sensor de temperatura infrarrojo a una ubicación
determinada. El indicador de (advertencia) laser aparece en
la pantalla todo el tiempo que el laser está activo.

Para ingresar al menu principal, encienda el medidor, después
presione el botón de navegación . Puede utilizar tanto el
teclado del tablero como la pantalla tactil para navegar en el
menú. Si lo desea, la funcionalidad de la pantalla táctil puede
ser deshabilitada desde el menu “Configurar” (vea Touch, pág.
7).
Seleccione la opcion del menú tocando el título o utilice las
teclas y para señalar la opción del menu de su elección
finalmente presione el para validar la selección.
Cuando el contenido del menú necesite desplegarse en más de
una pantalla, se mostrará debajo del título del menú el número
depágina. Podrá navegar entre las páginas del menú usando las
teclas y . Cuando llegue al inicio o final de unalista
presione la tecla respectiva para avanzar o retroceder entre
páginas. Si utiliza la pantalla táctil, simplemente presione or
, o deslice el dedo por la pantalla hacia abajo o arriba.
Presione el botón o deslice el dedo hacia su derecha para
regresar a la pantalla anterior. Selecciones Salir para cerrar el
menú.
3
Menú Operación
Cuando se resalta una opción del menú,
aparece el ícono informando que hay
información de ayuda disponible para ese
elemento del menú. Presione la tecla o
el ícono para desplegar la informacion de
ayuda. Puede descargar un archivo en for-
mato PDF con todos los items de ayuda del
menú en www.defelsko.com/help
indica la existencia de un sub-menú para
esa opción del menú. Seleccione la opción
para desplegar los elementos del sub-menú.
Actualice periodicamente el medidor
para asegurar que el medidor cuenta con la
información de ayuda del menú más
reciente.
NOTA:

Una vez encendido, el PosiTector determinará
automáticamente el tipo de sonda conectado y
realizará una comprobación automática.
Para desconectar una sonda de la base del
PosiTector deslíce el conector de la sonda de
plástico horizontalmente (en la dirección de la
flecha) separándola de la base PosiTector.
Invierta los pasos para conectar una sonda
diferente. No es necesario apagar el medidor
cuando se cambia la sonda.
Adicionalmente, el cuerpo del PosiTector es compatible con una
amplia variedad de sondas de tipo magnético, eddy current,
ultrasónica para espesor de película de recubrimiento, perfil de
superficie, condiciones ambientales, dureza, contaminación por
cloruros y ultrasónicas para espesor de pared. Ver
www.defelsko.com/probes
4
Sondas
Emisividad
Emisividad
Emisividad es un término que se refiere a la estabilidad de un
material para emitir energía infrarroja comparando dicha emisión
contra la energía emitida por una superficie negra ideal a la misma
temperatura. La proporción varia desde 0 hasta 1, cada material
tiene una emisividad específica asociada a si mismo. El
PosiTector IRT tiene pre-configurados algunos ajustes de
emisividad para ciertos materiales y además cuenta con la opción
de ajuste por el usuario (pag. 6).
La mayoría de las superficies con recubrimientos orgánicos tienen
una emisividad cercana a 0.95 y son superficies ideales para
obtener mediciones precisas. Las superficies reflejantes o muy
brillantes pueden ser difíciles de medir porque tienden a reflejar la
energía infrarroja del ambiente mas que la suya propia. Para
compensar esta interferencia, cubra estas superficies con pintura
mate o con cinta de electricista para aislar. Permita que la
temperatura en la pintura o la cinta se atempere con la
temperatura de la superficie. Tome una lectura sobre la pintura o
la cinta.
Other manuals for PosiTector IRT
4
Table of contents
Languages:
Other DeFelsko Thermometer manuals


