Del ozone Total Eclipse Series User manual

4-0026 Rev.F
ECT-2 and ECT-4
Installation & Operations Manual
Total Eclipse

2
IMPORTANT SAFETY INSTRUCTIONS
READ AND FOLLOW ALL INSTRUCTIONS.
• Read this manual completely before attempting installation.
• All permanent electrical connections should be made by a qualified
electrician.
• For cord and plug-connected units, connect to a grounded, grounding
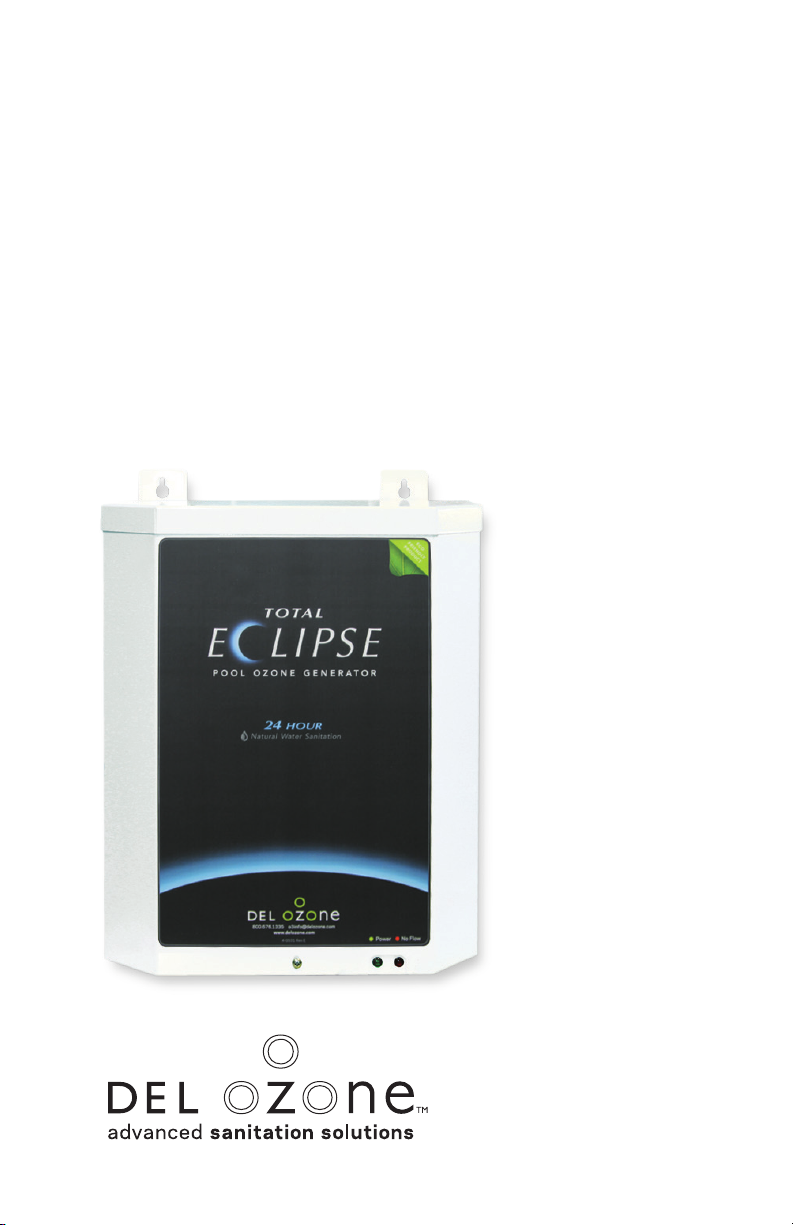
type receptacle only. If the Total Eclipse™ electrical connection is to be
attached to the pool controls, be sure the pool controls are protected
by a Ground Fault Circuit Interrupter (G.F.C.I.). If the Total Eclipse™ is
connected to an independent electrical supply, then a G.F.C.I. must be
installed between the Total Eclipse™ and the electrical supply.
• Do not bury cord.
• Warning - To reduce the risk of electrical shock, replace damaged cord
immediately.
• A pressure wire connector is provided on the outside of the unit to permit
connection to a minimum No. 8 AWG (8.4 mm2) solid bonding conductor
between this point and any grounded metal equipment, grounded
metal enclosures of electrical equipment, metal water pipes, or conduit
within five (5) feet (1.5m) of the unit as needed to comply with local
requirements.
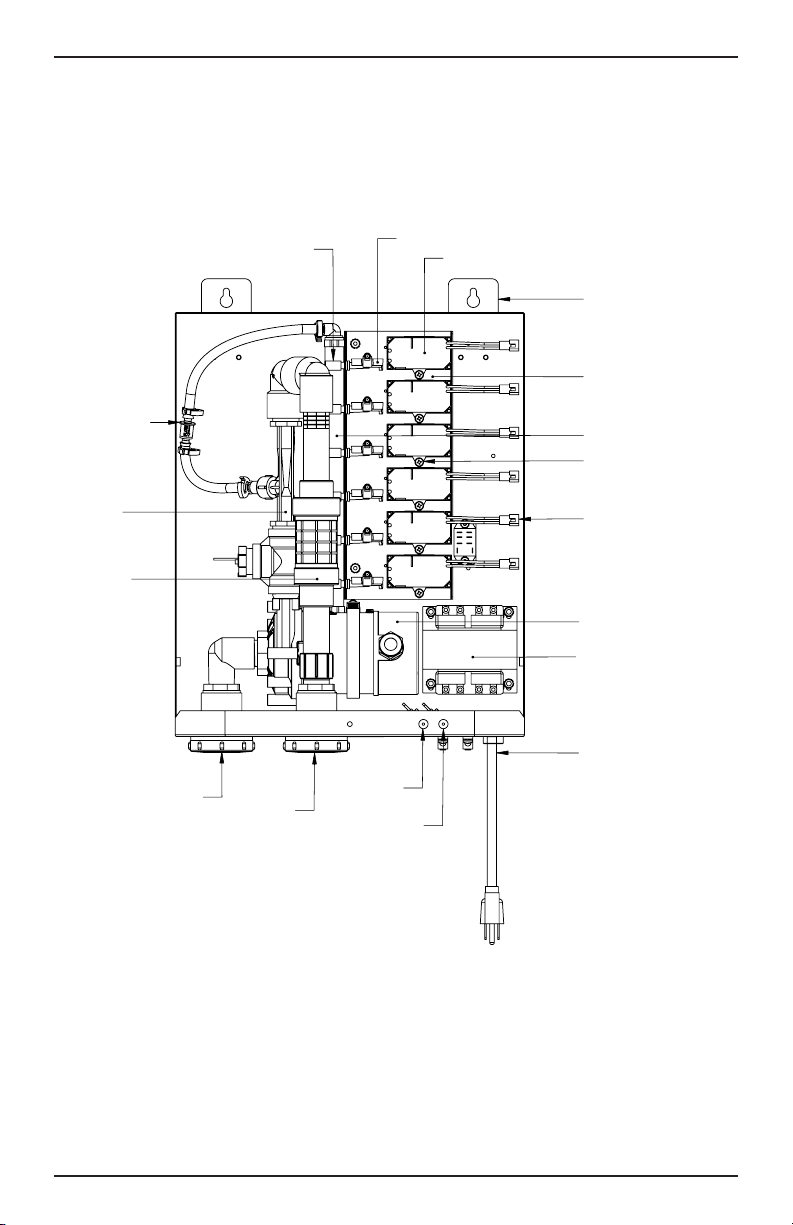
• Install at least 5 feet (1.5 meters) from wall of pool water using
nonmetallic tubing. It is highly recommended that the ozone generator
be installed at least one (1) foot above the water level to prevent water
from contacting electrical equipment. Install in accordance with the
installation instructions.
• Follow all applicable electrical codes.
• Electric shock hazard. Be sure to turn power OFF and disconnect from
power source before any service work is performed. Failure to do so
could result in serious injury or death.
• The Total Eclipse™ must be installed in an outdoor location, or indoors
in a forced air ventilated room, and installed so that the orientation
is exactly as shown in Figure 1. Install to provide water drainage of
generator to protect electrical components.
• Mount the Total Eclipse™ so that it is inaccessible to anyone in the pool.
Never attempt any servicing if the unit is wet.
• Plastic ozone supply tubing is inside the Total Eclipse™. Never replace
this tubing with metal tubing.
• Warning - Short-term inhalation of high concentrations of ozone and
long term inhalation of low concentrations of ozone can cause serious
harmful physiological effects. DO NOT inhale ozone gas produced by
this device.
• For your safety, do not store or use gasoline, chemicals or other
flammable liquids or vapors near this or any other appliance.
SAVE THESE INSTRUCTIONS!

2 3
TABLE OF CONTENTS
SECTION 1 General Information
1A. Description ........................................................................................ 1
1B. Specifications.................................................................................... 1
SECTION 2 Installation & Operation
2A. Installation......................................................................................... 1
2B. Operation .......................................................................................... 3
2C. Maintenance ..................................................................................... 4
SECTION 3 Trouble Shooting .............................................. 8
SECTION 4 Replacement Parts & Ordering Information
4A. Ordering Information .........................................................................9
4B. Standard Replacement Parts List .....................................................9
APPENDIX A Warranty
Warranty .................................................................................................10

1
Total Eclipse Installation & Operations Manual
SECTION 1 General Information
1A. Description
The Total Eclipse is designed to recirculate pool water while
injecting ozone 24 hours a day. With the Total Eclipse you will
maximize your ozone effectiveness while minimizing your operating
costs. The Total Eclipse provides efficient, cost effective, continuous
ozone production.
1B. Specifications
• Wall Mount - 17” H x 14” W x 7” D
• Advanced Plasma Gap (Ozone) Technology
• 0.5 gr/hr (ECT-2)/ 1.0 gr/hr (ECT-4) ozone output applied to 5 gpm
nominal
• 24 hour operation independent of pool equipment
• 120V · 50/60Hz · 192W
• 240V · 50/60Hz · 192W
• Built-in 1/20 hp recirculation pump, 5 gpm, 20 psi max
• Complete with internal injector
• Inline flow switch and check valve for protection of pump and ozone
modules
SECTION 2 Installation & Operation
2A. Installation
The most common pool and pool/spa configurations are
discussed in this manual. For additional installation options
or questions on your specific installation, please contact DEL
Ozone at 805-541-1601, extension 249.
1. The Total Eclipse wbe connected to a G.F.C.I. protected
120V/240V outlet providing continuous power.
2. Mount the Total Eclipse in a clean, protected area.
a. Install the Total Eclipse at least one (1) foot above water level,
and no higher than eight feet above the pool’s main pump.
b. In some installations, the top of the Total Eclipse cabinet can
be mounted up to 36 inches below the surface of the water.
If installed below the surface of the water, isolation valves
must be provided as a safeguard in case of prolonged loss
of power where water seepage past check valves can occur.

Total Eclipse Installation & Operations Manual
2
NOTE: Exceeding the recommended elevations may affect the
water circulation rate (i.e. Total GPM/ozone delivery).
c. Even though the Total Eclipse is designed for outdoor use,
care should be taken when choosing a mounting location. To
protect your investment, mount the Total Eclipse where it is
protected from the elements (direct sun, rain, dirt), completely
sheltered if possible while providing adequate ventilation.
3. Install 3/4” PVC piping for circulation of pool water, as shown in
Figure 1.
a. Smaller diameter pipe will increase dynamic pressure loss,
possibly causing inefficient or faulty operation of the unit.
b. Pipe larger than 3/4” may be used if necessary. However, in
a larger diameter pipe larger air bubbles will collect, causing
gurgling at the pool. Avoid long pipe runs. Elbows, tees, and
sharp bends in the piping should be avoided when possible.
c. Plumbing an independent return line from the Total Eclipse
is highly recommended. Bubble formation and gurgling may
occur otherwise.
NOTE: Air bubbles in the system can be removed by installing
a DEL MDV-20. Contact your local dealer or visit DEL’s website
at www.delozone.com for details.
4. For optimum ozone distribution, the ozonated water should be
returned back to the pool through a dedicated pipe in the bottom
of the pool. If it is not possible to install with the dedicated return
to the bottom of the pool, then install the Total Eclipse as shown
in Figures 2, 3, or 4 based on the specific configuration of your
system. These installation figures cover the following installation
types: Figure 2–existing pools with in-floor cleaning system
(ICS); Figure 3–existing pool/spa combination without in-floor
cleaning system; Figure 4–existing pool/spa combination with
in-floor cleaning system.
In case you are building a new pool with an ICS or a new pool/spa
combination with or without an ICS follow these general guidelines:
a. Plumb the Water Inlet to the Total Eclipse as shown in
Figures 2, 3, and 4,
b. Plumb the Water Return out of the Total Eclipse as a
dedicated line to the bottom of the pool as shown in Figure 1.

3
Total Eclipse Installation & Operations Manual
c. The recommended location to plumb the Total Eclipse inlet
“T” is after the filter and before the heater.
NOTE: If returned directly to the skimmer, the ozonated water
will be drawn back into the filtration system and will not mix
with the pool water as effectively. If returned to the main return
line, the line pressure (back-pressure) could cause a loss
of suction and stop ozone from being mixed with the water,
causing large bubbles to be trapped and released into the pool
5. Ensure that the provided 5lb. check valve is installed at the
location and in the direction shown in the relevant figure.
NOTE: An installed check valve will not affect the Total Eclipse
if the check valve’s opening pressure is 1lb. or less.
6. In all cases the return should be in the pool bottom or as low as
possible on the pool wall.
7. When winterizing takes place, installation of the unions as
shown in Figures 1-4 is necessary. If no winterizing will take
place, unions are still included to facilitate unit removal if
necessary.
2B. Operation
Once the Total Eclipse has been properly installed, simply plug
the unit into a 120V / 240V G.F.C.I. protected outlet. Turn the main
pump on to its normal timed cycle. The Total Eclipse will detect flow
from the main pump and start automatically. The Total Eclipse will
continue running when the main pump cycles off. If water flow is
lost to the unit for any reason, the unit will shut down to protect the
internal pump. If power is lost, the unit will shut down until power
is restored to the main pump and the Total Eclipse. Once the main
pump cycles on, flow will be restored to the Total Eclipse and it will
begin running.
Indicator Lights: There are two lights, green and red, on the front
of the unit. The green light indicates when there is power to the unit
(when the unit’s power cord is plugged in to an electrical outlet). The
red light indicates when there is no water or ozone flow within the unit.
NOTE: When you initially plug in the Total Eclipse the red light
will be on. As soon as flow is initiated through the unit, via the

Total Eclipse Installation & Operations Manual
4
main circulation pump, the red light will go out, indicating that
the unit is operating properly.
2C. Maintenance - Refer to Figure 5
2C‐1. Ozone Module Replacement
The Ozone Module consists of a power supply and ozone cell.
The Ozone modules have a life expectancy of 15,000 hours
(approximately two years for continuous use and five years for
seasonal use).
1. Turn off electrical power and unplug Total Eclipse.
2. Remove the ozone generator from its support if access is
limited.
3. Remove Total Eclipse cover by removing the (3) Phillips head
screws that attach cover to generator base.
4. Remove (1) Phillips head screw that holds Ozone Power Supply
to the Module Mounting plate.
5. Remove Air Filter by pulling filter away from Ozone Cell then
pull ozone cell out of oz module manifold.
6. Disconnect the Ozone Power Supply by pulling the Wire
Connector apart from the wire harness.
7. Reverse process to install new Ozone Module.
2C‐2. Check Valve Replacement
The ozone check valve should be replaced annually to avoid back
flooding issues.
1. To replace Ozone Check Valve remove the two black hose
clamps and pull the tubing away from the check valve.
2. Reverse the process to install new check valve being careful
to note flow direction of Check Valve (arrow points toward the
injector).
2C‐3. Air Filter Replacement
The air filter should be replaced when replacing the ozone modules
or sooner if necessary in dusty environments.
1. To replace air filter pull filter away from ozone cell.
2. Reverse process to install new filter.
2C 4. Winterizing the Total Eclipse
To winterize the Total Eclipse, unscrew the unions connecting it to
the inlet and outlet plumbing. The water will drain out of the Total
Eclipse and make it ready for winter. Once the water has drained,
tighten the unions. When restarting your pool and/or spa equipment,
the Total Eclipse will restart itself once water starts flowing through it.

Figure 1: New Pool
Note:
1. To help break up the bubbles at floor
entry, we suggest using a “Salt & Pepper”
style fitting (not included).
Figure 2: Existing Pool with Infloor Cleaning System
Note:
1. “ICS” stands for Infloor Cleaning System.
2. Even when the ICS is not operating, bubbles
from the ozone generator will escape through
the ICS head.
5
Total Eclipse Installation & Operations Manual
Common Installation Diagrams
NOTE: The following two-dimensional diagrams are for illustration
purposes only, indicating the required key components. Plumbing
orientation (i.e. depth below ground) may vary from pool to pool.

Figure 3: Existing Pool/
Spa Combination without Infloor Cleaning System
Figure 4: Existing Pool/
Spa Combination with Infloor Cleaning System
Note:
1. “V” stands for multiport, diverter valve.
2. The Total Eclipse will shut down when in Spa
Mode and will restart when returned to Pool Mode.
3. We suggest using an eyeball fitting or reducer
nozzle at the point of entry (ie: the wall). This
will help to break up the bubbles and push them
further out, preventing any possible
discoloration to the pool wall.
Note:
1. “ICS” stands for Infloor Cleaning System.
2. The Total Eclipse will shut down when in Spa
Mode and will restart when returned to Pool Mode.
3. Even when the ICS is not operating, bubbles
from the ozone generator will escape through
the ICS head.
Total Eclipse Installation & Operations Manual
6

Figure 5: Total Eclipse Component Locations
Mounting
Bracket
Ozone Module Sub-Assembly.
ECT-2 (4 module option)
ECT-4 (6 module option)
Circulation
Pump
Optional Stepdown
Transformer For 240V Units
Ozone Check Valve
Ozone Injector
Expansion Fitting
Water In
Water Out
Power
Indicator Light
No Flow
Indicator Light
Air Filter ( cap and cotton filter)
(one per ozone module)
Ozone Module Manifold (black)
Ozone Power Supply
Ozone Cell
Power Supply Mounting Screw
Wire Connector
Power Cord
120V, 60Hz
(90° 1/2" Conduit Elbow
For 240V, 50/60Hz Units)
7
Total Eclipse Installation & Operations Manual

Total Eclipse Installation & Operations Manual
8
SECTION 3 Trouble Shooting
1. The green light is on, indicating power to the unit; but the
red light is also on, and the Total Eclipse won’t run.
a. Ensure that the 5lb. check valve is plumbed in the main
plumbing line after the tee to the water inlet of the Total
Eclipse. This creates the pressure in the plumbing to divert
the water into the Total Eclipse and prime the pump.
b. There could be an air lock trapped in the Total Eclipse. With
the pool’s main circulation pump running, carefully open the
union in the water out line from the Total Eclipse. As water
starts to flow out of the union, quickly re-connect it. This will
drain the air lock.
2. The Total Eclipse runs with the main circulation pump, but
when the main circulation pump is turned off, the Total
Eclipse shuts down immediately or shortly after.
a. Ensure that you still have power to the Total Eclipse (green
light is on).
b. Ensure that your filtration equipment is working properly.
The addition of a new sanitation device, like the Total
Eclipse, will destroy a great deal of contaminants in the
water and leave them to be filtered out. Therefore, you many
find it necessary to clean your filter to un-restrict flow to your
Total Eclipse.
c. Air is seeping into the Total Eclipse, prime is lost at the flow
switch, thus shutting down the system.
i. Inspect the pool’s plumbing for signs of leaks. Water
seeping out of a fitting, when the pump is running,
means air can seap in when the pump is not running.
ii. Inspect the design of the plumbing for traps where air
pockets can collect. If an air pocket makes its way to the
Total Eclipse, it will disengage the system’s flow switch,
shutting down the unit.
d. Ensure that the Total Eclipse is plumbed as described, using
a 5lb. check valve at the juncture where the plumbing tees
into the Total Eclipse, and returns from the Total Eclipse
back into the main plumbing to the pool.
3. The Total Eclipse has become clogged.
When installed as recommended, the Total Eclipse draws in
filtered water free of debris. If it does however get clogged,
unscrew the base of the expansion fitting and carefully remove
the injector. It can be cleaned with vinegar or a mild acid solution.

9
9
Total Eclipse Installation & Operations Manual
4. The Total Eclipse lost power during a power outage.
Once power returns to the main pool pump and the Total
Eclipse, it will restart and continue running as soon as flow is
detected from the main pool pump.
5. The Total Eclipse continues to run when the main filtration
system is turned off.
The Total Eclipse is designed to run independent of the main
filtration system. When the main pump to the filter system
shuts down, the Total Eclipse will continue to run, continuously
ozonating the pool water.
6. Bubbles appear in the pool when the unit is running.
Some fine bubbles into the pool are normal. To avoid any
large bubbles being trapped and released, plumb with a single
3/4” line independently returned to the bottom of the pool. In
addition, keep all pipe runs to the pool straight and level using a
minimum number of elbows and fittings.
NOTE: The collection of air bubbles in the system can be
minimized by installing a DEL MDV-20.
SECTION 4
4A. Ordering Information
To locate a dealer nearest you visit www.delozone.com or call DEL
at 1-805-541-1601 ext 249.
Be prepared with the following information:
• Name • Address
• DEL Model # • Date Purchased
4B. Standard Replacement Parts List
1. Ozone Module Sub‐Assemblies: *
a. ECT-2 Models...........................9-1094-01
b. ECT-4 Models...........................9-1094-02
2. Ozone Module ...............................9-1056-01
3. Ozone Check Valve .......................7-1140-01
4. Air Filter .........................................9-0858-01
5. Tubing,Green,PVC ........................7-0594
*Pre‐assembled Includes: Ozone Modules, Mounting Plate,
Manifold with fittings, Air Filters and Relay.*

9 10
APPENDIX A: Warranty

DEL OZONE
COMMERCIAL PRODUCT
LIMITED ONE YEAR WARRANTY
The limited warranty set forth below applies to products manufactured by DEL OZONE – 3580 Sueldo Street, San Luis
Obispo, California 93401, and sold by DEL OZONE or its authorized dealers. This limited warranty is given only to the first
retail purchaser of such products and is not transferable to any subsequent owners or purchasers of such products.
Systems sized 65 grams or greater require factory commissioning and startup to maintain warranty as set forth below.
DEL OZONE warrants that DEL or DEL authorized dealers will repair or replace, at DEL’s option, any part of such
products proven to be defective in materials or workmanship within one (1) year of the date of receipt. Parts are covered
under the one (1) year warranty when and only when the stated maintenance requirements are met. See owner’s manual
for complete maintenance details. This Warranty specifically excludes any components not manufactured by DEL OZONE
that are external to the products covered, such as pumps, air compressors, monitors, tanks, or related components. DEL
OZONE will assist with warranty claims for such components purchased through DEL OZONE; limited to the extent of the
manufacturer’s standard warranty. ANY REPAIR OR REPLACEMENT WILL BE WARRANTED ONLY FOR THE
BALANCE OF THE ORIGINAL ONE (1) YEAR WARRANTY PERIOD
.
NOTE: USE ONLY DEL AUTHORIZED DEL REPLACEMENT PARTS. USE OF ANY OTHER PART(S) WILL VOID
THIS WARRANTY.
Any replaced parts must be returned to DEL OZONE for warranty evaluation.
THIS LIMITED WARRANTY DOES NOT INCLUDE ANY OF THE FOLLOWING:
(a) Any labor charges for troubleshooting, removal, or installation of such parts.
(b) Any repair or replacement of such parts necessitated by faulty installation, improper maintenance, improper
operation, misuse, abuse, negligence, accident, fire, flood, repair materials, and/or unauthorized accessories.
(c) Any such products installed without regard to required local codes and accepted trade practices.
(d) Damage to unit caused by water backflow;
(e) Any implied warranty of merchantability or implied warranty of fitness for particular purpose, and such
warranties are hereby disclaimed.
(f) DEL Ozone shall not be liable under any circumstances for loss of use of such product, loss of profits, direct
damages, indirect damages, consequential damages, and / or incidental damages.
This warranty gives you specific legal rights. You may have other rights which vary from state to state.
Extended Warranties and Service Agreements are available. Contact DEL for additional details.
TO OBTAIN WARRANTY SERVICE:
DEL OZONE
3580 Sueldo, San Luis Obispo, CA 93401
Customer Service Number: (800) 676-1335
Fax Number: (805) 541-8459
PROVIDE:
1. Project, contact name, mailing address and telephone.
2. Installer/Mechanical Contractor.
3. Unit Part Number, Serial Number, and date of purchase.
4. The date of failure.
5. A description of the failure.
After this information is provided, DEL Ozone may release a RETURN GOODS AUTHORIZATION (RGA) NUMBER. After receiving the RGA number
the part in question must be returned to DEL Ozone, freight prepaid, with the RGA number clearly marked on the outside of the package. All
preauthorized defective parts must be returned to DEL Ozone within thirty (30) days. Under no circumstances may any product be returned to DEL
Ozone without prior authorization. Returns without the assigned RGA number on the outside of the package will be refused and shipped back to the
sender at their expense. Upon receipt of preauthorized returned goods, DEL Ozone will repair or replace, at DEL Ozone’s option, the defective product(s)
and return them (freight prepaid for products under warranty). Buyer’s acceptance of the product and use thereof constitutes acceptance of these terms.
4-1399-01_Rev.D
11
APPENDIX A: Warranty

11

3580 Sueldo Street, San Luis Obispo, CA 93401
(800) 676-1335
o3inf[email protected]
www.delozone.com
EPA Estab. No. 071472-CA-001
Table of contents
Other Del ozone Lighting Equipment manuals