manuals.online logo
Brands
  1. Home
  2. •
  3. Brands
  4. •
  5. Delta
  6. •
  7. Network Hardware
  8. •
  9. Delta DVP series User manual

Delta DVP series User manual

http://www.delta.com .tw/industrialautomation/
5011651101-D2E1
2007-01-15
Analog Output Module
Instruction Sheet
Warning
9Please read this instruction carefully before use.
9Switch off the power before wiring.
9DVP04DA-H2 is an OPEN-TYPE device and therefore should be installed in an enclosure free of
airborne dust, humidity, electric shock and vibration. The enclosure should prevent non-maintenance
staff from operating the device (e.g. key or specific tools are required to open the enclosure) in case
danger and damage on the device may occur.
9DO NOT connect input AC power supply to any of the I/O terminals; otherwise serious damage may
occur. Check all the wiring again before switching on the power.
9DO NOT tough any terminal when the power is switched on. DO NOT touch any internal circuit in 1
minute after the power is switched off.
9Make sure the groud terminal is correctly grounded in order to prevent electromagnetic
interference.
Introduction
1.1 Model Explanation & Peripherals
Thank you for choosing Delta DVP series. DVP04DA-H2 is able to read and write data of DVP04DA-H2 analog
signal output modules through FROM/TO instructions given by the program of DVP-EH2 series MPU. The
analog signal output module receives 4 groups of 12-bit digital data from PLC MPU and converts the data into 4
points of analog signals for output in either voltage or current.
The user can select voltage or current output by wiring. Range of voltage output: 0V ~ +10VDC (resolution:
2.5mV). Range of current output: 0mA ~ 20mA (resolution: 5μA).
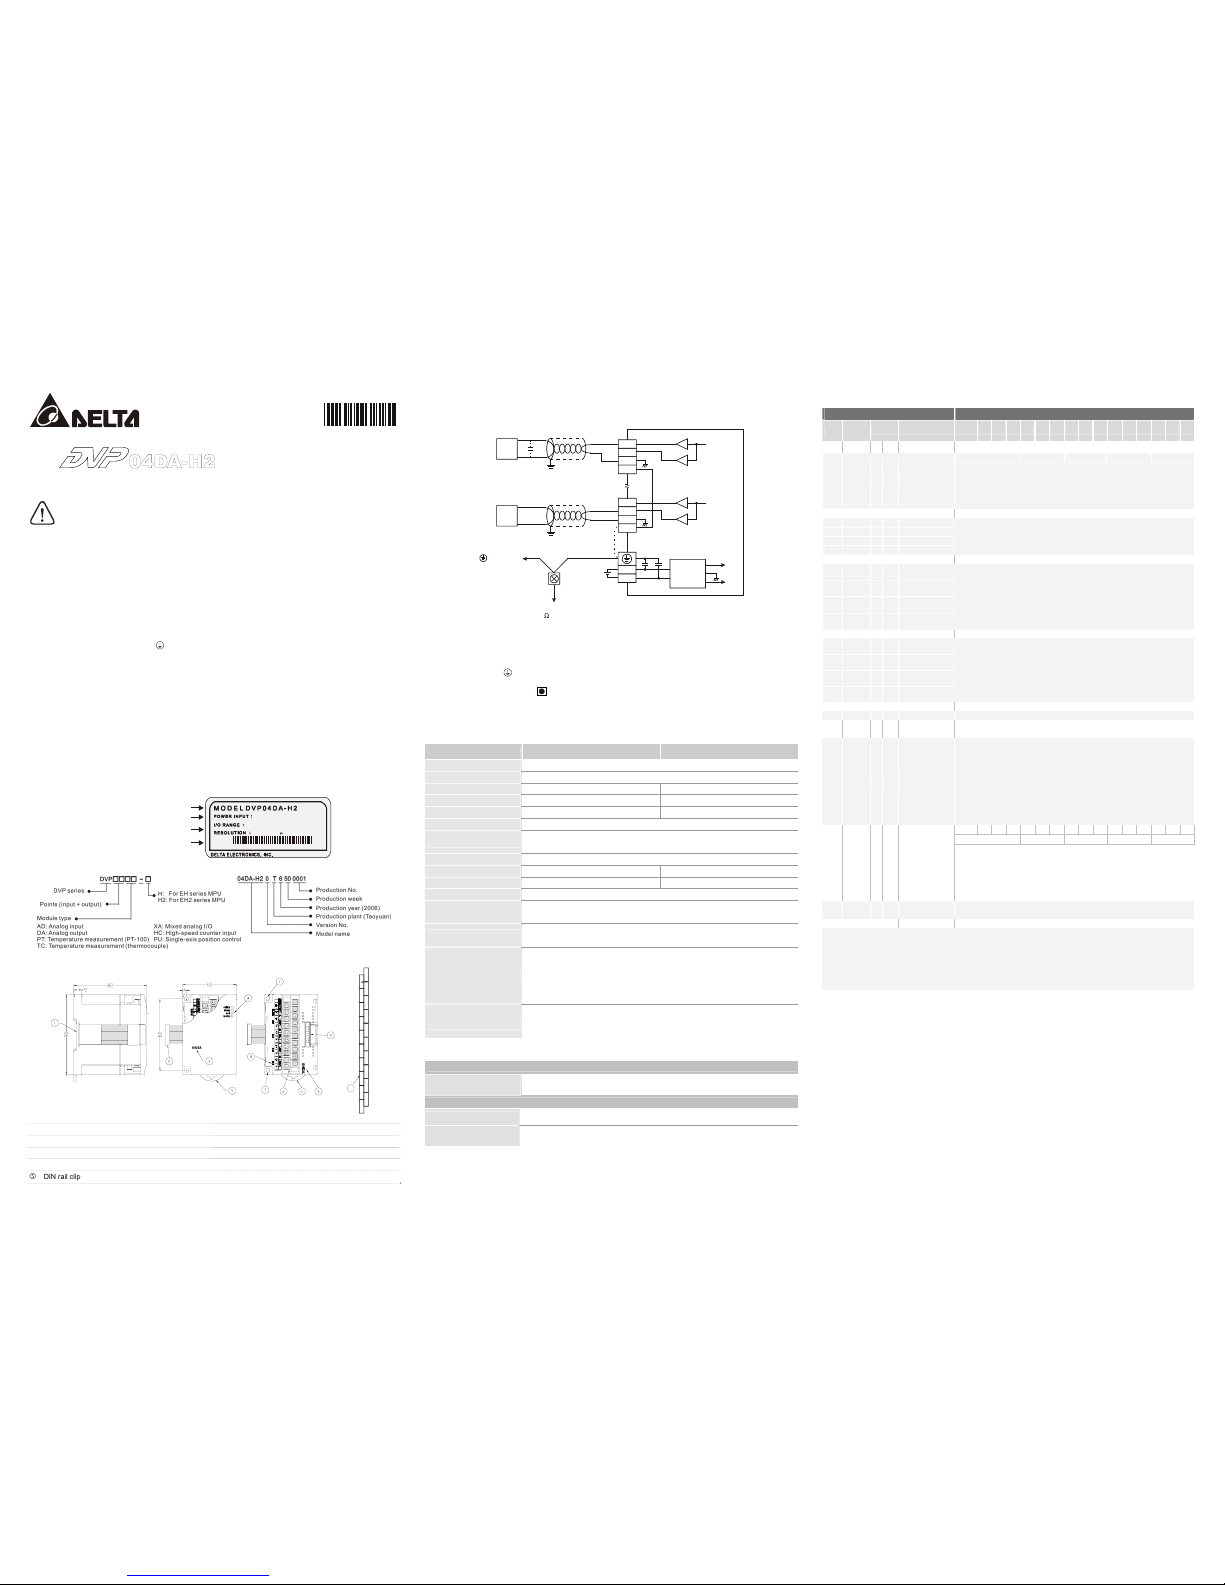
Nameplate Explanation
04DA-H2 0T6500 001
VX.XXXX
24Vdc 4.5W
MADE IN XXXXXX
2.5 mV or 5 A
0V ~ + 10V or 0mA ~ +20m A
Power input specification
Delta PLC model name
Barcode, Serial No., Version
Analog I/O module specification
Model/Serial No. Explanation
1.2 Product Profile (Indicators, Terminal Block, I/O Terminals)
Unit: mm
D - V + I + V +
24V 0V
I + V + I + V + I +
D + COM
8
CH1 CH2 CH3 CH4RS-485
FG FG FGCOM CO M CO M
1 DIN rail (35mm) 6 Terminals
2 Connection port for extension modules 7 Mounting hole
3 Model name 8 I/O terminals
4 POWER, ERROR, D/A indicator 9 Mounting port for extension modules
5 DIN rail clip
1.3 External Wiring
V+
I+
COM
V+
I+
COM
24+
24-
DC/DC
+15V
-15V
AG
FG
FG
CH1
CH1
0V~+10V
*2
*3
0mA~20mA
DC24V
CH4 CH4
AC drive, recorder,
scale valve...
AC drive, recorder,
scale valve...
voltage output
shielding cable *1
shielding cable *1
current output
converter
terminal of
power module
system grounding
class 3 grounding
(100
or less)
Note:
1. When performing analog output, please isolate other power wirings.
2. If the ripples at the loaded input terminal are too significant that causes noise interference on the wiring, connect the
wiring to 0.1 ~ 0.47μF 25V capacitor.
3. Please connect the terminal on both the power modules and DVP04DA-H2 to the system earth point and ground the
system contact or connect it to the cover of power distribution cabinet.
4. DO NOT wire empty terminals
Specifications
2.1. Functions
Digital/Analog (4D/A) Module
Voltage Output Current Output
Power supply voltage 24 VDC (20.4VDC ~ 28.8VDC) (-15% ~ +20%)
Analog output channel 4 channels/module
Range of analog output 0 ~ 10V 0 ~ 20mA
Range of digital data 0 ~ 4,000 0 ~ 4,000
Resolution 12 bits (1LSB = 2.5mV) 12 bits (1LSB = 5 μA)
Output impedance 0.5Ωor lower
Overall accuracy
±0.5% when in full scale (25°C, 77°F)
±1% when in full scale within the range of 0 ~ 55°C, 32 ~ 131°F
Responding time 3ms × the number of channels
Max. output current 10mA (1KΩ~ 2MΩ) -
Tolerable load impedance - 0 ~ 500Ω
Digital data format 11 significant bits out of 16 bits are available; in 2’s complement
Isolation Internal circuit and analog output terminals are isolated by optical coupler.
No isolation among analog channels.
Protection Voltage output is protected by short circuit. Short circuit lasting for too long may
cause damage on internal circuits. Current output can be open circuit.
Communication mode
(RS-485)
ASCII/RTU mode.
Communication speed: 4,800/9,600/19,200/38,400/57,600/115,200 bps
ASCII data format: 7-bit, Even bit, 1 stop bit (7, E, 1)
RTU data format: 8-bit, Even bit, 1 stop bit (8, E, 1)
RS-485 cannot be used when connected to PLC MPU.
When connected to
DVP-PLC MPU in series
The modules are numbered from 0 to 7 automatically by their distance from MPU.
No.0 is the closest to MPU and No.7 is the furthest. Maximum 8 modules are allowed
to connect to MPU and will not occupy any digital I/O points.
2.2. Others
Power Supply
Max. rated power
consumption 24VDC (20.4VDC ~ 28.8VDC) (-15% ~ +20%)., 4.5W supplied by external power
Environment
Operation/storage Operation: 0°C ~ 55°C (temperature); 50 ~ 95% (humidity); pollution degree 2
Storage: -40°C ~ 70°C (temperature); 5 ~ 95% (humidity)
Vibration/shock
immunity
International standards: IEC1131-2, IEC 68-2-6 (TEST Fc)/IEC1131-2 & IEC
68-2-27 (TEST Ea)
Control Registers
DVP04DA-H2 analog output module
Description
CR#
RS-485
p
arameter
address
Latched
Register content
b15
b14
b13
b12
b11
b10
b9
b8
b7
b6
b5
b4
b3
b2
b1
b0
#0
H’4032
○
R
Model name Set up by the system. DVP04DA-H2 model code = H’6401
reserved CH4 CH3 CH2 CH1
#1
H’4033
○
R/W
Output mode
setting
Output mode: Default = H’0000
Mode 0: Voltage output (0V ~ 10V)
Mode 1: Voltage output (2V ~ 10V)
Mode 2: Current output (4mA ~ 20mA)
Mode 3: Current output (0mA ~ 20mA)
#2 ~ #5 Reserved
#6
H’4038
╳
R/W
CH1 output value
#7
H’4039
╳
R/W
CH2 output value
#8
H’403A
╳
R/W
CH3 output value
#9
H’403B
╳
R/W
CH4 output value
Range of output value at CH1 ~ CH4: K0 ~ K4,000
Default = K0 (unit: LSB)
#10 ~ #17 Reserved
#18
H’4044
○
R/W
Adjusted OFFSET
value of CH1
#19
H’4045
○
R/W
Adjusted OFFSET
value of CH2
#20
H’4046
○
R/W
Adjusted OFFSET
value of CH3
#21
H’4047
○
R/W
Adjusted OFFSET
value of CH4
Range of OFFSET at CH1 ~ CH4: K-2,000 ~ K2,000
Default = K0 (unit: LSB)
#22 ~ #23 Reserved
#24
H’404A
○
R/W
Adjusted GAIN
value of CH1
#25
H’404B
○
R/W
Adjusted GAIN
value of CH2
#26
H’404C
○
R/W
Adjusted GAIN
value of CH3
#27
H’404D
○
R/W
Adjusted GAIN
value of CH4
Range of GAIN at CH1 ~ CH4: K-1,600 ~ K8,000
Default = K2,000 (unit: LSB)
#28 ~ #29 Reserved
#30
H’4050
╳
R
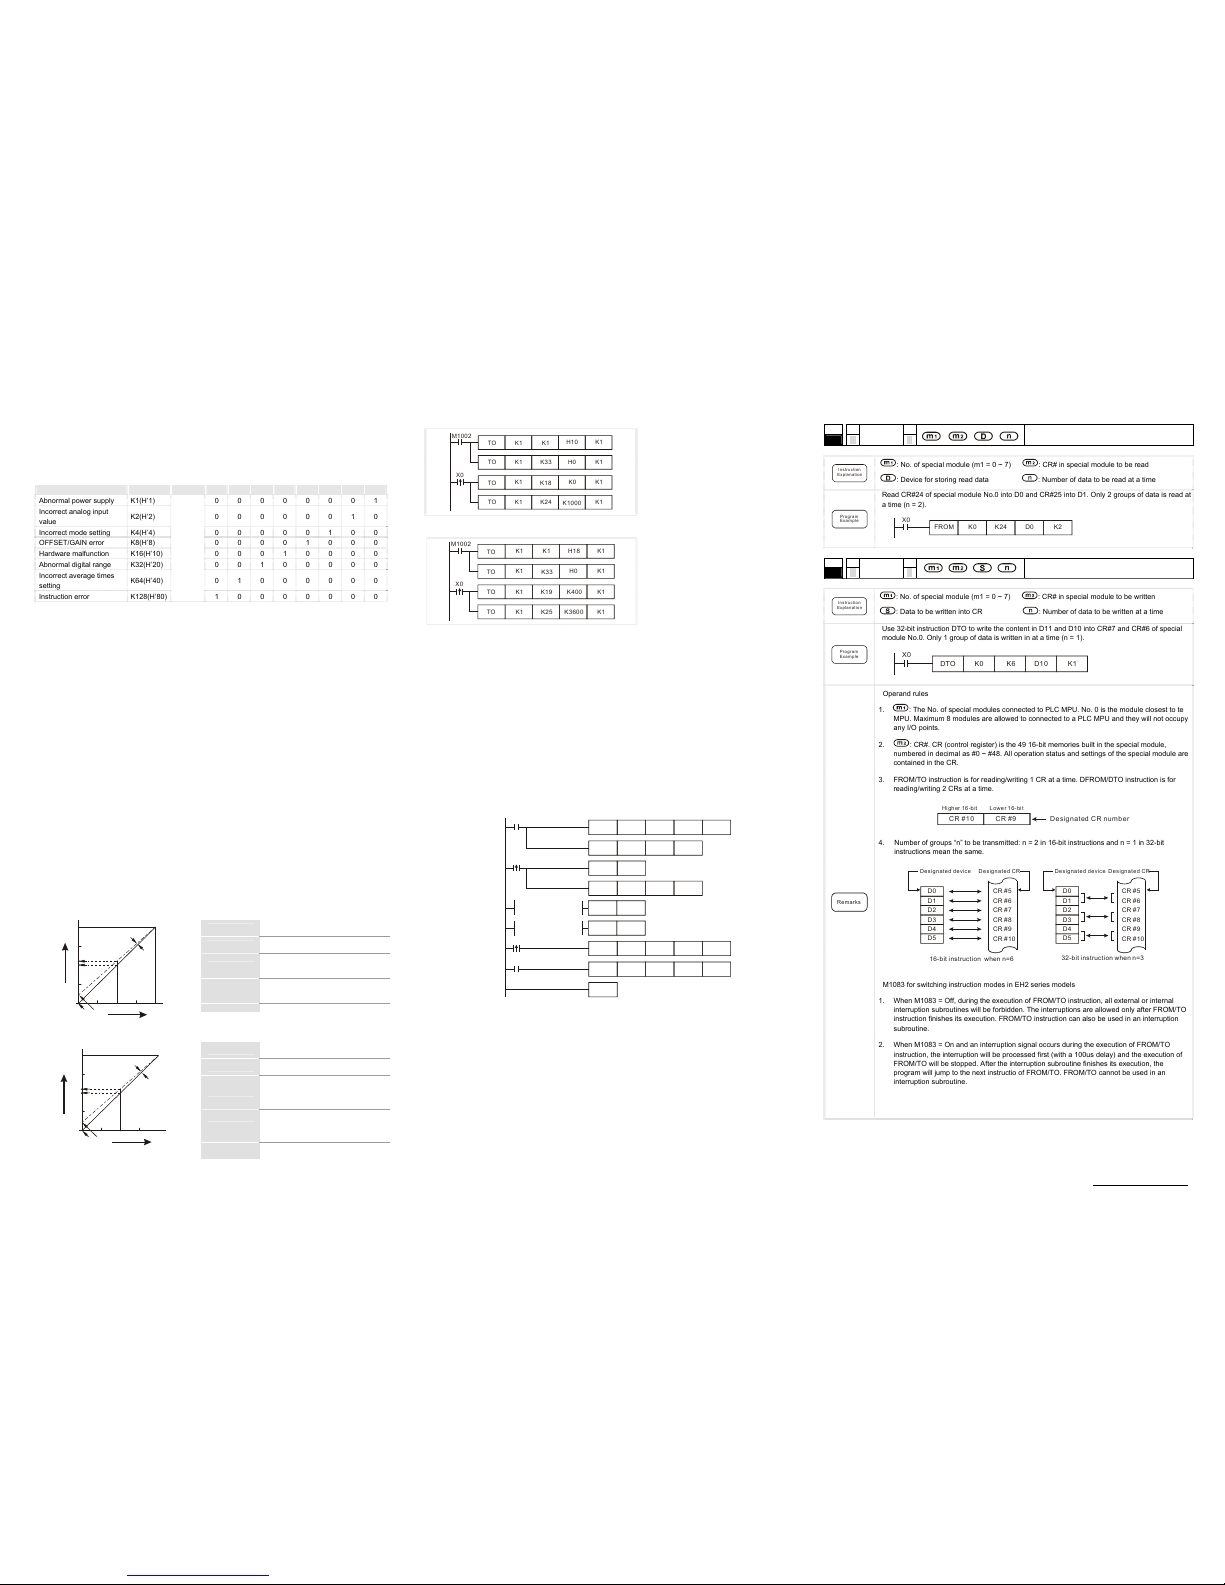
Error status Register for storing all error status. See the table of error status for more information.
#31
H’4051
○
R/W
Communication
address setting
For setting up RS-485 communication address. Range: 01 ~ 255
Default = K1
#32
H’4052
○
R/W
Communication
speed (baud rate)
setting
Default = H’0002. For setting up communication speed: 4,800 / 9,600 / 19,200 /
38,400 / 57,600 / 115,200bps
ASCII data format: 7-bit, Even bit, 1 stop bit (7, E, 1)
RTU data format: 8-bit, Even bit, 1 stop bit (8, E, 1)
b0: 4,800bps b1: 9,600bps (default)
b2: 19,200bps b3: 38,400bps
b4: 57,600bps b5: 115,200bps
b6 ~ b13: reserved
b14: High/low bit exchange of CRC checksum (only valid in RTU mode)
b15: Switch between ASCII/RTU mode. 0 = ASCII mode (default)
b15
b14
b13
b12
b11
b10
b9
b8
b7
b6
b5
b4
b3
b2
b1
b0
reserved CH4 CH3 CH2 CH1
#33
H’4053
○
R/W
Return to default
setting;
OFFSET/GAIN
tuning
authorization
Default = H’0000. Take the setting of CH1 for example:
1. When b0 = 0, the user is allowed to tune CR#18 (OFFSET) and CR#24 (GAIN)
of CH1. When b0 = 1, the user is not allowed to tune CR#18 (OFFSET) and
CR#24 (GAIN) of CH1.
2. b1 represents whether the OFFSET/GAIN tuning registers are latched. b1 = 0
(default, latched); b1 = 1 (non-latched)
3. When b2 = 1, all settings will return to default values. (except CR#31, CR#32)
#34
H’4054
○
R
Firmware version
Displaying the current firmware version In hex; e.g. version 1.0A is indicated as
H’010A.
#35 ~ #48 For system use.
Symbols
○: latched (when written in through RS-485 communication)
╳: non-latched
R: Able to read data by FROM instruction or RS-485 communication
W: Able to write data by TO instruction or RS-485 communication
LSB (Least Significant Bit): For voltage output 1LSB = 10V/4,000 = 2.5mV。
For current output 1LSB = 20mA/4,000 = 5μA。
Explanations:
1. CR#0: Model name. The user can read the model name from the program and see if the extension module
exists.
2. CR#1: The working mode of the four channels in the analog input module. There are 4 modes for each channel
which can be set up separately. For example, if the user needs to set up CH1: mode 0 (b2 ~ b0 = 000); CH2:
mode 1 (b5 ~ b3 = 001), CH3: mode 2 (b8 ~ b6 = 010) and CH4: mode 3 (b11 ~ b9 = 011), CR#1 has to be set
as H’000A and the higher bits (b12 ~ b15) have to be reserved. Default value = H’0000.
3. CR#2 ~ CR#5, CR#10 ~ CR#17, CR#22, CR#23, CR#28 and CR#29 are reserved.
4. CR#6 ~ CR#9: The output values of CH1 ~ CH4 (range: K0 ~ K4,000; default = K0; unit: LSB)
5. CR#18 ~ CR#21: The adjusted OFFSET value of CH1 ~ CH4 (default = K0, unit = LSB), representing the analog
output voltage or current when the output digital value = 0 after calculation. The adjustable range: -2,000 ~
+2,000.
The adjustable range of voltage: -5V ~ +5V (-2,000LSB ~ +2,000LSB)
The adjustable range of current: -10mA ~ +10mA (-2,000LSB ~ +2,000LSB)
6. CR#24 ~ CR#2: The adjusted GAIN value of CH1 ~ CH4 (default = K2,000, unit = LSB), representing the analog
output voltage or current when the output digital value = 2,000 after calculation.
The adjustable range of voltage: -4V ~ +20V (-1,600LSB ~ +8,000LSB)
The adjustable range of current: -8 mA ~ +40 mA (-1,600LSB ~ +8,000LSB)
Please note that: GAIN value – OFFSET value = +400LSB ~ +6,000LSB (voltage or current). When GAIN –
OFFSET is small (steep oblique), the resolution of output signal will be finer and variation on the digital value will
be greater. When GAIN – OFFSET is big (gradual oblique), the resolution of output signal will be rougher and
variation on the digital value will be smaller.
7. CR #30: Error status value (See the table below)
Error status Content b15 ~ b8
b7
b6
b5
b4
b3
b2
b1
b0
Abnormal power supply K1(H’1) 0 0 0 0 0 0 0 1
Incorrect analog input
value K2(H’2) 0 0 0 0 0 0 1 0
Incorrect mode setting K4(H’4) 0 0 0 0 0 1 0 0
OFFSET/GAIN error K8(H’8) 0 0 0 0 1 0 0 0
Hardware malfunction K16(H’10)
0 0 0 1 0 0 0 0
Abnormal digital range K32(H’20)
0 0 1 0 0 0 0 0
Incorrect average times
setting K64(H’40)
0 1 0 0 0 0 0 0
Instruction error K128(H’80)
reserved
1 0 0 0 0 0 0 0
Note: Each error status is determined by the corresponding bit (b0 ~ b7) and there may be more than 2 errors occurring at the same time.
0 = normal; 1 = error
8. CR#31: The setting of RS-485 communication address (Range: 01 ~ 255, default = K1).
9. CR#32: The setting of RS-485 communication speed. b0: 4,800bps; b1: 9,600bps (default); b2: 19,200bps; b3:
38,400bps; b4: 57,600bps; b5: 115,200bps; b6 ~ b13: reserved; b14: high/low bit exchange of CRC checksum
(only valid in RTU mode); b15 = 0: ASCII mode; b15 = 1: RTU mode. ASCII data format: 7-bit, Even bit, 1 stop
bit (7, E, 1); RTU data format: 8-bit, Even bit, 1 stop bit (8, E, 1).
10. CR#33: For authorizations on some internal functions, e.g. OFFSET/GAIN tuning. The latched function will
store the output setting in the internal memory before the power is cut off.
11. CR#34: Firmware version of the model.
12. CR#35 ~ CR#48: Parameters for system use.
13. CR#0 ~ CR#34: The corresponding parameter addresses H’4032 ~ H’4054 are for users to read/write data by
RS-485 communication. When using RS-485, the user has to separate the module with MPU first.
a. Communication baud rate: 4,800/9,600/19,200/38,400/57,600/115,200bps
b. Modbus ASCII/RTU communication protocols: ASCII data format (7-bit, Even bit, 1 stop bit (7, E, 1)); RTU
data format (8-bit, Even bit, 1 stop bit (8, E, 1)).
c. Function: H’03 (read register data); H’06 (write 1 word datum to register); H’10 (write many word data to
register)
d. Latched CR should be written by RS-485 communication to stay latched. CR will not be latched if written by
MPU through TO/DTO instruction.
Adjusting D/A Conversion Curve
4.1 Explanation
Voltage Output Mode
+2,000
+4,000
2V
5V
6V
10V
OFFSET
GAIN
V
o
l
t
a
g
e
o
u
t
p
u
t
Digital input
Mode 1
Mode 0
CR#1 mode 0 GAIN = 5V (2,000LSB)
OFFSET = 0V (0LSB)
CR#1 mode 1 GAIN = 6V (2,400LSB)
OFFSET = 2V (800LSB)
GAIN
The voltage output value when the digital
input value = K2,000
Range: -4V ~ +20V (-1,600LSB ~ +8,000LSB)
OFFSET
The voltage output value when the digital
input value = K0
Range: -5V ~ +5V (-2,000LSB ~ +2,000LSB)
GAIN - OFFSET Range: +1V ~ +15V (+400 LSB ~ +6,000 LSB)
Current Output Mode
0+2,000
+4,000
20mA
OFFSET
GAIN
12mA
10mA
4mA
C
u
r
r
e
n
t
o
u
t
p
u
t
Digital input
Mode 2
Mode 3
CR#1 mode 2 GAIN = 12mA (2,400LSB)
OFFSET = 4mA (800LSB)
CR#1 mode 3 GAIN = 10mA (2,000LSB)
OFFSET = 0mA (0LSB)
GAIN
The current output value when the digital
input value = K2,000
Range: -8mA ~ +40mA (-1,600LSB ~
+8,000LSB)
OFFSET
The current output value when the digital
input value = K0
Range: -10mA ~ +10mA (-2,000LSB ~
+2,000LSB)
GAIN - OFFSET Range: +2mA ~ +30mA (+400 LSB ~ +6,000
LSB)
4.2 Program Example
Example 1: Set the OFFSET value of CH1as 0V (= K0LSB) and GAIN value as 2.5V (= K1,000LSB).
X0
K1000
K24
H10 K1
K1
H0
K1
M1002
K33
K1
K1
K18 K0
TO
TO
TO
TO
K1
K1
K1
K1
Write H’10 into CR#1 of analog output module
No.1 and set CH1 in mode 0 (voltage output 0V
~ +10V) and CH2 in mode 2 (current output
4mA ~ +20mA).
Write H’0 into CR#33 and allow OFFSET/GAIN
tuning in CH1 ~ CH4
When X0 goes from Off to On, write the
OFFSET value K0LSB into CR#18 and the GAIN
value K1,000LSB into CR#24.
Example 2: Set the OFFSET value of CH2 as 2mA (= K400 LSB) and GAIN value as18mA (= K3,600LSB).
X0
K1
K1
H0
K1
M1002
K33
K1
K1
H18
K19
K25
K400
K3600
TO
TO
TO
TO
K1
K1
K1
K1
Write H’18 into CR#1 of analog output module
No.1 and set CH1 in mode 0 (voltage output 0V
~ +10V) and CH2 in mode 3 (current output
0mA ~ +20mA).
Write H’0 into CR#33 and allow OFFSET/GAIN
tuning in CH1 ~ CH4
When X0 goes from Off to On, write the
OFFSET value K400LSB into CR#19 and the
GAIN value K3,600LSB into CR#25.
Trial Operation & Troubleshooting
LED Display
1. When the module is powered for the first time, POWER LED will be on. After ERROR LED being on for 0.5
second, D/A LED will start to flash.
2. When the power supply is normal, POWER LED will be on and ERROR LED should be off. When the
power supply is less than 19.5V, ERROR LED will keep being on until the power supply is higher than
19.5V.
3. When controlled by RS-485, the RS-485 LED will flash after receiving RS-485 instruction.
4. When the input or output value exceeds the upper bound or falls below the lower bound after conversion,
ERROR LED will flash.
Program Example
M0
K1
M1000
FROM
END
D0
TO
K0K1
D0CMP H6401
INC D100
ADD D101 K5
= K4000 RST
H10
K2K6
M1
M1013
D101
D100
D100
= K4000 RST
D101
D101
K1
K1
K1
TO
M1
K1
D100
Read the model name from K1 and see if it is DVP04DA-H2: H’6401.
D100 increases K1 and D101 increases K5 every second.
When D100 and D101 reach K4,000, they will be cleared as 0.
See if the model is DVP04DA-H2 when M1 = On. If so, set up output mode: CH1 in mode 0; CH2 in mode 2.
Write the output settings of D100 and D101 into CR#6 and CR#7. The analog output will change with the
changes in D100 and D101.
Relevant Instructions
API
78
D
FROM
P
Read CR data in special modules
Instruction
Explanation
: No. of special module (m1 = 0 ~ 7) : CR# in special module to be read
: Device for storing read data : Number of data to be read at a time
Program
Example
Read CR#24 of special module No.0 into D0 and
CR#25 into D1. Only 2 groups of data is read at
a time (n = 2).
X0
FROM K0 K24 D0 K2
API
79
D
TO P
Write CR data into special modules
Instruction
Explanation
: No. of special module (m1 = 0 ~ 7) : CR# in special module to be written
: Data to be written into CR : Number of data to be written at a time
Program
Example
Use 32-bit instruction DTO to write the content in D11 and D10 into CR#7 and CR#6 of special
module No.0. Only 1 group of data is written in at a time (n = 1).
X0
DTO
K0 K6
D10
K1
Remarks
Operand rules
1. : The No. of special modules connected to PLC MPU. No. 0 is the module closest to te
MPU. Maximum 8 modules are allowed to connected to a PLC MPU and they will not occupy
any I/O points.
2. : CR#. CR (control register) is the 49 16-bit memories built in the special module,
numbered in decimal as #0 ~ #48. All operation status and settings of the special module are
contained in the CR.
3. FROM/TO instruction is for reading/writing 1 CR at a time. DFROM/DTO instruction is for
reading/writing 2 CRs at a time.
CR #10 CR #9
Lower16-bit
Designated CR number
Hi gh er 16-b it
4. Number of groups “n” to be transmitted: n = 2 in 16-bit instructions and n = 1 in 32-bit
instructions mean the same.
D0
D1
D2
D3
D4
D5
CR #5
CR #6
CR #7
CR #8
CR #9
CR #10
D0
D1
D2
D3
D4
D5
CR #5
CR #6
CR #7
CR #8
CR #9
CR #10
Designated device
Designated CR
Designated device
Designated CR
16-bit instruction when n=6
32-bit instruction when n=3
M1083 for switching instruction modes in EH2 series models
1. When M1083 = Off, during the execution of FROM/TO instruction, all external or internal
interruption subroutines will be forbidden. The interruptions are allowed only after FROM/TO
instruction finishes its execution. FROM/TO instruction can also be used in an interruption
subroutine.
2. When M1083 = On and an interruption signal occurs during the execution of FROM/TO
instruction, the interruption will be processed first (with a 100us delay) and the execution of
FROM/TO will be stopped. After the interruption subroutine finishes its execution, the
program will jump to the next instructio of FROM/TO. FROM/TO cannot be used in an
interruption subroutine.
The content of this instruction sheet may be revised without prior notice. Please consult our distributors or
download the most updated version at http://www.delta.com.tw/industrialautomation

Other manuals for DVP series

2

This manual suits for next models

1

Other Delta Network Hardware manuals

Delta CMC-EC01 User manual

Delta

Delta CMC-EC01 User manual

Delta DVPEN01-SL User manual

Delta

Delta DVPEN01-SL User manual

Delta R2-EC 004 Series User manual

Delta

Delta R2-EC 004 Series User manual

Delta MNVR1104-GCW User manual

Delta

Delta MNVR1104-GCW User manual

Delta AS Series Owner's manual

Delta

Delta AS Series Owner's manual

Delta Vivotek ND9213P User manual

Delta

Delta Vivotek ND9213P User manual

Delta DX-2100 Series User manual

Delta

Delta DX-2100 Series User manual

Delta VIVOTEK ND9442P User manual

Delta

Delta VIVOTEK ND9442P User manual

Delta AHCPU560-EN2 Series User manual

Delta

Delta AHCPU560-EN2 Series User manual

Delta PD-01 User manual

Delta

Delta PD-01 User manual

Popular Network Hardware manuals by other brands

Black Box MT330A Specifications

Black Box

Black Box MT330A Specifications

HIK VISION DS-7108NI user manual

HIK VISION

HIK VISION DS-7108NI user manual

Black Box JPM440A Installation

Black Box

Black Box JPM440A Installation

Avtech 67xb-a quick start

Avtech

Avtech 67xb-a quick start

X-Vision X2RN user guide

X-Vision

X-Vision X2RN user guide

Planet NVR-810 user manual

Planet

Planet NVR-810 user manual

Black Box SW1009A manual

Black Box

Black Box SW1009A manual

Watchguard Firebox T20 Hardware guide

Watchguard

Watchguard Firebox T20 Hardware guide

red lion DAS00PN1EE200000 installation guide

red lion

red lion DAS00PN1EE200000 installation guide

M-TI AP5822 user manual

M-TI

M-TI AP5822 user manual

AVPro Edge AC-MXNET-CBOX Quick connect guide

AVPro Edge

AVPro Edge AC-MXNET-CBOX Quick connect guide

Sentryus HD-NVR Series user manual

Sentryus

Sentryus HD-NVR Series user manual

Multitech MultiConnect MTC-LNA4 user guide

Multitech

Multitech MultiConnect MTC-LNA4 user guide

Black Box SW591C manual

Black Box

Black Box SW591C manual

HIK VISION DS-9608NI-I8 user manual

HIK VISION

HIK VISION DS-9608NI-I8 user manual

Promise Vess A3340 product manual

Promise

Promise Vess A3340 product manual

InWin IW-RJ424-04 user manual

InWin

InWin IW-RJ424-04 user manual

AirLive AirMax5X II Quick installation guide

AirLive

AirLive AirMax5X II Quick installation guide

manuals.online logo
manuals.online logoBrands
  • About & Mission
  • Contact us
  • Privacy Policy
  • Terms and Conditions

Copyright 2025 Manuals.Online. All Rights Reserved.