Denon HOME SOUND BAR 550 User manual

What you can do with this unit 5
Accessories 10
Before using the remote control unit 11
Operating range of the remote control unit 12
Part names and functions 13
Sound bar 13
Remote control unit 17
Positioning 19
Positioning the sound bar 19
Connections
Connecting a TV 21
Connection 1: TV equipped with an HDMI connector and
compatible with the eARC (Enhanced Audio Return Channel) or
ARC (Audio Return Channel) 22
Connection 2: TV equipped with an HDMI connector and
incompatible with the eARC or ARC / TV equipped with an optical
digital connector 23
Connection 3: TV equipped with an HDMI connector and
incompatible with the eARC or ARC / TV equipped with an analog
connector 24
Connecting a playback device 25
Connecting an HDMI device 25
Connecting the power cords 26
Playback
Enjoying TV, movies and music 27
Adjusting the volume 28
Adjusting the bass volume 28
Turning off the sound temporarily (Muting) 28
Listening to music on a Bluetooth device 29
Pairing a Bluetooth device for the first time 29
Pairing with other Bluetooth devices 30
Listening to music with a paired Bluetooth device 30
Getting the HEOS App 31
Setting up first HEOS built-in device 32
Adding more HEOS built-in devices 33
HEOS Account 34
Playing from streaming music services 35
Listening to the same music in multiple rooms 38
Contents Connections Playback Settings Tips Appendix
2

Listening to Internet Radio 42
Playing music stored on your mobile 43
Playing back files stored on a PC or NAS 44
Playing music from a USB flash drive 45
AirPlay function 46
Playing songs from your iPhone, iPod touch or iPad 47
Playing iTunes music with this unit 47
Play a song from your iPhone, iPod touch or iPad on multiple
synced devices (AirPlay 2) 48
Spotify Connect function 49
Settings
Settings 50
Adjusting the audibility of dialog and vocals (Dialog enhancer) 50
Setting the night mode 50
Setting the sound mode 51
Quick select function 56
Operating this unit using the remote control of a TV 57
Wirelessly connecting the HEOS built-in speakers as surround
speakers 58
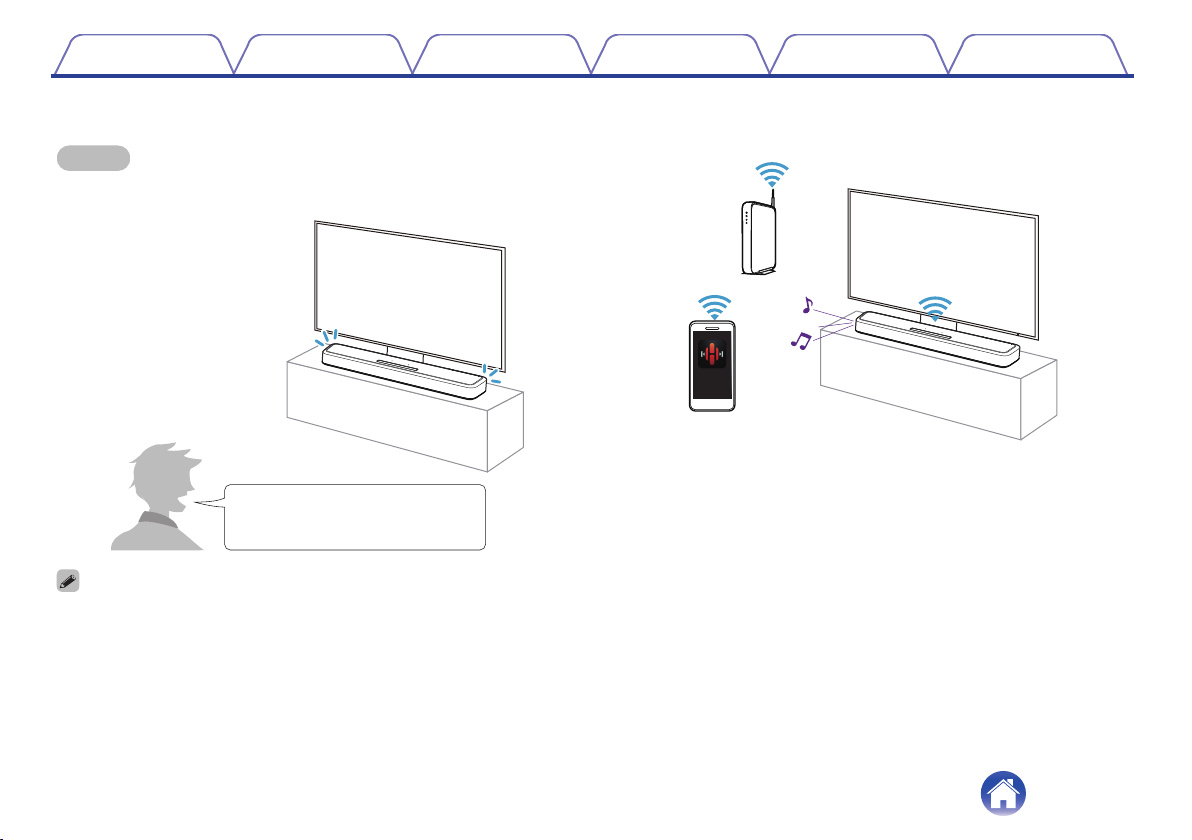
Operating this unit by voice with the Amazon Alexa function 59
Setting the input source to switch with the TV button on the
remote control unit 60
Tips
Troubleshooting 61
Power does not turn on / Power is turned off 62
Operations cannot be performed through the remote control unit 62
Trouble teaching this unit remote control commands 63
No sound comes out 63
Music cuts out or delays sometimes 64
The HDMI Control function does not work 64
Audio can be heard coming from the TV’s speakers 64
I hear a delay when using the external input with my TV 65
Bluetooth playback does not work 65
Cannot connect the sound bar to the network 66
Connecting to a network using an iOS device 66
Connecting to a WPS network 67
This unit takes long time to turn on 67
Cannot operate the unit with Alexa 68
Alexa does not respond even if called 68
Resetting factory settings 69
Resetting the firmware to the default state 70
Contents Connections Playback Settings Tips Appendix
3

Thank you for purchasing this Denon product.
To ensure proper operation, please read this owner’s manual carefully before using the product.
After reading this manual, be sure to keep it for future reference.
What you can do with this unit
This sound bar supports immersive surround sound and enables you to connect this unit to your TV to enjoy high-quality sound.
In addition to Dolby Atmos and DTS:X playback, traditional audio signals can also be enjoyed in virtual 3D audio.
This unit is equipped with an HDMI input/output connector that supports 4K and enables passthrough of 4K video signals to your TV, such as signals for
Blu-ray disc players and video game consoles.
Contents Connections Playback Settings Tips Appendix
5

oPlaying TV audio
.
[Related information]
0“Connecting a TV” (v p. 21)
0“Enjoying TV, movies and music” (v p. 27)
oConnecting to a playback device such as a
Blu-ray disc player to perform playback
.
[Related information]
0“Connecting a TV” (v p. 21)
0“Connecting an HDMI device” (v p. 25)
0“Enjoying TV, movies and music” (v p. 27)
Contents Connections Playback Settings Tips Appendix
6

oOperating by talking to Alexa
NOTE
0Optional Alexa Built-in functionality will become available via a future firmware
update.
.
・Alexa, turn up the volume
・Alexa, what’s the weather today?
0Alexa isn’t available in certain languages and countries.
[Related information]
0“Operating this unit by voice with the Amazon Alexa
function” (v p. 59)
oUsing the app for smartphones/tablets (HEOS
App) for easy operation
.
HEOS
[Related information]
0“Getting the HEOS App” (v p. 31)
Contents Connections Playback Settings Tips Appendix
7

oPlaying streaming audio with Wi-Fi
.
PC
Streaming music service /
Internet radio
Internet
NAS
[Related information]
0“Playing from streaming music services” (v p. 35)
0“Listening to Internet Radio” (v p. 42)
0“Playing music stored on your mobile” (v p. 43)
0“Playing back files stored on a PC or NAS” (v p. 44)
0“AirPlay function” (v p. 46)
0“Spotify Connect function” (v p. 49)
Contents Connections Playback Settings Tips Appendix
8

Accessories
Check that the following parts are supplied with the product.
.
Quick Start Guide Safety Instructions Warranty
(North America model only)
Wall mount templateOptical digital cableHDMI cable (4K) Remote control unit
(RC-1241 / Built-in battery)
Power cord
(for North America model)
Wall mount spacers
Power cord
(for Europe model)
or
Contents Connections Playback Settings Tips Appendix
10

Before using the remote control unit
The remote control unit has a built-in lithium battery.
Pull out the insulation sheet before use.
.
oReplacing the battery
1. Lightly slide the catch of the battery case on the back of the remote
control in the rightward direction.
.
2. While pushing the catch lightly to the right, pull out the battery case.
.
3. Remove the old battery, then insert a new coin-shaped lithium
battery (CR2025) into the battery compartment so that the + symbol
engraved on the battery faces upwards.
4. Replace the battery case in the original position.
.
CR2025
NOTE
0If the battery should have a leakage, immediately replace and dispose of the
battery. In this case, there is a risk of burn when the liquid comes in contact with
skins or clothes, so a great care should be taken. If the liquid accidentally comes in
contact, wash with tap water and consult a doctor.
0Remove the battery from the remote control unit if it will not be in use for long
periods.
Contents Connections Playback Settings Tips Appendix
11

Part names and functions
Sound bar
oTop panel
Hold your hand over the top of the sound bar to show the operation panel keys. Touch these keys to perform operations. Moving your hand away from
the area hides the keys.
.
e
q
r
w
t
For details, see the next page.
Contents Connections Playback Settings Tips Appendix
13

.
et
q
r
w
AMicrophone off key ( )
This disables the microphone function. In the state with the microphone
function disabled, Alexa does not respond even if called. Use this in
cases such as when you want to protect your privacy. (v p. 59)
BPlay/Pause key (1/3)
0Press this key to pause during playback. If pressed while paused or
stopped, resumes playback from the last track played.
0Press the key twice to play the next track.
0Press the key three times to restart the current track or play the
previous track.
0Press and hold the key for 5 seconds to enter deep standby mode.
(v p. 73)
CVolume keys (+, –)
These adjusts the volume level. (v p. 28)
DAction key ( )
This calls Alexa. You can use voice control without saying “Alexa”.
(v p. 59)
EMicrophone
This is the microphone to talk to Alexa. (v p. 59)
0Do not put anything on top of the sound bar. Doing so may lead accidental
operations.
0The light of the operation panel keys is activated using a small amount of static
electricity from the human body. Due to the nature of this mechanism, the keys
may light up or blink due to noise from the surrounding environment or connection
cables, but it is not malfunctioning.
Contents Connections Playback Settings Tips Appendix
14

oFront panel
.
qw e
ARemote control sensor
This receives signals from the remote control unit. (v p. 12)
BStatus LED
Please refer to the “Status LED table” (v p. 74) for LED color and
state meaning.
CLight bar
While Alexa responds, the LED lights up. (v p. 59)
Contents Connections Playback Settings Tips Appendix
15

oRear panel
.
yiouQ
0
Q
1
qqtrew
AWall hook hole
Used to mount the sound bar on a wall. (v p. 20)
BOptical digital input connector (OPTICAL IN)
Use the included optical cable to connect a TV with an optical digital
terminal. (v p. 23)
CAnalog audio input connector (AUX IN)
Use a commercially available 3.5 mm stereo audio cable to connect a
TV with an AUX audio output connector. (v p. 24)
DHDMI IN connector
Used to connect to the HDMI equipment with an HDMI cable.
(v p. 25)
ENETWORK connector
Used to connect this unit to a wired Ethernet network. (v p. 33)
FPower inlet
Used to connect the power cord. (v p. 26)
GBluetooth button (g)
0Switches the input source to “Bluetooth”. (v p. 29)
0Used to pair with Bluetooth devices. (v p. 29)
HHDMI OUT connector (eARC/ARC)
Use the included HDMI cable to connect an eARC or ARC function-
compatible TV. (v p. 21)
IUSB port
This is used to connect USB storages (such as USB flash drives).
(v p. 45)
JCONNECT button
Used for Wi-Fi setup.
KCONNECT LED
Indicates the status of this unit. (v p. 74)
Contents Connections Playback Settings Tips Appendix
16

Remote control unit
q
w
r
y
e
t
u
APower operation button (c)
0Press the button to turn the sound bar power on/off (quick start
mode). (v p. 27)
0Press and hold the button for 5 seconds to enter deep standby
mode. (v p. 73)
BInput source buttons (TV, HDMI, OPT, AUX, g)
This selects the input source. (v p. 27)
CNight mode button (NIGHT)
Compresses the dynamic range (difference between loud and soft
sounds) to make audio easier to hear at low volumes. (v p. 50)
DBass volume control buttons (BASS +, –)
This setting adjusts the volume level for the bass. (v p. 28)
EDialog enhancer button (DIALOG ENHANCER)
Adjust the volume of dialog in movies, vocals in music, etc. so these
can be heard more easily. (v p. 50)
FMovie mode button (MOVIE)
Switches to the sound mode suitable for enjoying movies and TV
programs. (v p. 51)
GQuick select buttons (QUICK SELECT 1 - 3)
Register input source, volume level and sound mode, night mode and
dialog enhancer settings to these buttons or recall those settings.
(v p. 56)
Contents Connections Playback Settings Tips Appendix
17

Q2
Q1
i
Q0
o
HRemote control signal transmitter
This transmits signals from the remote control unit. (v p. 12)
IMute button (h)
This mutes the output audio. Press again to unmute. (v p. 28)
JVolume buttons (VOL +, –)
These adjusts the volume level. (v p. 28)
KMusic mode button (MUSIC)
Switches to the sound mode suitable for enjoying music. (v p. 51)
LPure mode button (PURE)
Enjoy high quality sound that is faithful to the original source.
(v p. 51)
Contents Connections Playback Settings Tips Appendix
18

oWhen hanging the sound bar on a wall
The sound bar has a wall hook hole to hang it on a wall. When hanging
it on a wall, position it in a flat, vertical position.
To ensure safety, request a contractor perform the mounting work
when mounting onto a wall.
NOTE
0In order to use the unit safely, do not place items on or hang items from the
unit.
0Be sure to fix connection cables to the wall to ensure that cannot be pulled or
tripped over causing this unit to fall. Check that the unit is mounted safely after
the mounting work is complete.
0Also, periodically check the safety of this unit and whether there is a possibility
that the unit may fall.
0Denon cannot accept any responsibility for damage, injury or accidents
caused by problems with the mounting location or mounting method.
.
0When hanging it on a wall, use the included wall mount template.
[How to use the wall mount template]
AAffix the template to the location you would like to mount the sound bar.
BScrew in the wall mount screws by following the template.
Consult a construction professional about the proper wall mount screws for the material and strength of your wall.
CRemove the template from the wall.
DMount the included wall mount spacer on the spine of the sound bar.
Mounting the wall mount spacer creates a space for cords to pass through between the sound bar and the wall.
EMount the sound bar on the wall.
Contents Connections Playback Settings Tips Appendix
20
Table of contents
Other Denon Speakers System manuals

Denon
Denon DHT-S217 User manual

Denon
Denon Speaker SC-CX101 User manual

Denon
Denon SYS-391HT User manual

Denon
Denon HEOS LINK User manual

Denon
Denon DHT-S716H User manual

Denon
Denon SC-M53 User manual

Denon
Denon DHT-S218 User manual

Denon
Denon DHT-S514 User manual

Denon
Denon DHT-S716H User manual

Denon
Denon DHT-S516 User manual

Denon
Denon Envaya Mini DSB-100 User manual

Denon
Denon SYS-65HT User manual

Denon
Denon DHT-S517 User manual

Denon
Denon DSB-150 User manual

Denon
Denon SYS-5.1 User manual

Denon
Denon DHT-S217 User manual

Denon
Denon DHT-S517 User manual

Denon
Denon SYS-C3L User manual

Denon
Denon DHT-S216 User manual

Denon
Denon DHT-S516H User manual