DENTSPLY Cavitron SPS Manual

ENGLISH • 1
ENGLISH
Cavitron®SPS™Ultrasonic Scaler
with Steri-Mate® Handpiece
Introduction
Directions For Use
Please read carefully and completely before operating unit.
DENTSPLY®Professional is an ISO9001 and EN46000 certified
company. The Cavitron®SPS™Scaler System is classified by
Underwriters Laboratories Inc. with respect to electric shock,
fire, mechanical hazards only in accordance with UL 2601-1 1
and Can/CSA C22.2 NO. 601.1, assigned control # 13VA.
The System operates by converting ordinary AC house current
into high frequency current. The ultrasonic system consists of
two parts: an insert, and the SPS™electronic system. The SPS™
system incorporates two closed loops. One loop provides
automatic tuning (operating frequency is adjusted to be at
resonance for each insert), the second loop automatically controls
the tip stroke over different working conditions. The Cavitron®
SPS™scaler produces 30,000 microscopically small strokes per
second at the insert’s working tip. This combined with acoustic
effects of the coolant water, produces a synergistic action that
literally “powers away” the heaviest calculus deposits while
providing exceptional operator and patient comfort.
Technical Support
For technical support and repair assistance in the U.S., call
1-800-989-8826 Monday through Friday, 8:00 AM to 5:00 PM
(Eastern Time). For other areas, contact your local DENTSPLY®
representative.
Supplies & Replacement Parts
To order supplies or replacement parts in the U.S., contact your
local Dentsply®Distributor or call 1-800-989-8826 or 717-767-8502
Monday through Friday, 8:00 AM to 5:00 PM (Eastern Time). For
other areas, contact your local DENTSPLY®representative.
Caution: U.S. Federal Law restricts this device to sale by or on
the order of a Dentist.
Cavitron®SPS™
Ultrasonic Scaler with
Steri-Mate® Handpiece

ENGLISH • 2
Table of Contents
Section Section Title Page
Number Description of Contents Number
1 Indications ................................................................................................................................................................................. 3
2 Contraindications and Warnings/Adverse Reactions ........................................................................................................ 3
2.1 Contraindications
2.2 Warnings
3 Precautions ................................................................................................................................................................................. 3
3.1 Precautions for All Systems
3.2 Precautions for Ultrasonic Prophylaxis Procedures
4 Infection Control ...................................................................................................................................................................... 4
4.1 Infection Control Information Reference Card
4.2 General Infection Control Recommendations
4.3 Water Supply Recommendations
5 Installation Instructions ...................................................................................................................................................... 4-5
5.1 General Information
5.2 Water Line Requirements
5.3 Electrical Requirements
5.4 Unpacking the System
5.5 Power Cord/Power Connection
5.6 Foot Control Cable Assembly Connection
5.7 Water Supply Line Connection
6 SPS™Ultrasonic Scaler Description .................................................................................................................................... 6-7
6.1 System Controls
6.2 Handpiece
6.3 Cavitron®30K™Ultrasonic Inserts
6.4 Foot Control Information & Operation
7 Accessories .................................................................................................................................................................................. 7
8 Techniques for Use ................................................................................................................................................................... 8
8.1 Patient Positioning
8.2 Performing Ultrasonic Scaling Procedures
8.3 Patient Comfort Considerations
9 System Care ........................................................................................................................................................................... 8–9
9.1 Daily Maintenance — Start-Up Procedures, Between Patients, Shut-Down Procedures
9.2 Weekly Maintenance
9.3 Water Filter Maintenance
10 Troubleshooting ....................................................................................................................................................................... 9
10.1 Troubleshooting Guide
10.2 Technical Support and Repairs
11 Specifications ............................................................................................................................................................................ 10
12 Classification ............................................................................................................................................................................ 10

ENGLISH • 3
Section1:Indications
Section 2: Contraindications andWarnings
Section 3: Precautions
3.1 Precautions for All Systems
• Do not place the System on or next to a radiator or
other heat source. Excessive heat may damage the
System’s electronics. Place the System where air is
free to circulate on all sides and beneath it.
• The System is portable, but must be handled
with care when moving.
• Equipment flushing and dental water supply system
maintenance are strongly recommended. See Water
Supply under Section 9: System Care
• Close the coolant water shut-off valve to the System
every night before leaving the office. The use of an
in-line water filter is recommended.
2.1 Contraindications
• Ultrasonic Systems should not be used for restorative
dental procedures involving the condensation of
amalgam.
• For optimum performance use only inserts
manufactured by DENTSPLY®Professional.
Ultrasonic procedures:
• All general supra and subgingival scaling applications.
• Periodontal debridement for all types of periodontal diseases.
• For patients with a history of sensitivity to ultrasonics.
• Endodontic procedures.
2.2 Warnings
• Persons fitted with cardiac pacemakers have been
cautioned that some types of electronic equipment
might interfere with the operation of a pacemaker.
Although no instance of pacemaker interference has
ever been reported to DENTSPLY®, we recommend
that the handpiece and cables be kept at least 6 to 9
inches (15 to 23 cm) away from any pacemaker and
pacemaker leads during use.
• There are a variety of pacemakers on the market.
Clinicians should contact the pacemaker manufacturer
or the patient's physician for detailed information about
the pacemaker.
3.2 Precautions for Ultrasonic
Prophylaxis Procedures
• Like a toothbrush, ultrasonic inserts “wear out” with
use. Inserts with just 2 mm of wear lose about 50% of
their scaling efficiency. In general, it is recommended that
ultrasonic inserts be discarded and replaced after 2 mm
of wear to maintain optimal efficiency and avoid
breakage.
• If excessive wear is noted, or the insert has been bent,
reshaped or otherwise damaged, discard the insert
immediately.
• Ultrasonic insert tips that have been bent, damaged, or
reshaped are susceptible to in-use breakage and should
be discarded and replaced immediately.
• Retract the lips, cheeks and tongue to prevent contact
with the insert tip whenever it is placed in the patient’s
mouth.

ENGLISH • 4
Section5: Installation Instructions
5.1 General Information
If the installation of your Cavitron®SPS™System is performed
by someone other than trained DENTSPLY®Distributor
personnel, care should be taken to observe the following
requirements and recommendations.
5.2 Water Line Requirements
• The System’s water supply line is factory installed. Do
not disconnect from the System.
• Incoming water supply line pressure to the System must
be 25 psi (172 kPa minimum) to 60 psi (414 kPa
maximum). If your dental water system’s supply line
pressure is above 60 psi, install a water pressure
regulator on the water supply line to your Cavitron®
SPS™System.
• A manual shut-off valve on the dental water system
supply line should be used so that the water can be
completely shut-off when the office is unoccupied.
• A filter in the dental water system supply line is
recommended so that any particles in the water supply
will be trapped before reaching the System.
• After the above installations are completed on the dental
water supply system, the dental office water line should
be thoroughly flushed prior to connection to the
System.
Section 4: Infection Control
4.1 Infection Control Information
Reference Card
For your convenience, an Infection Control Information
reference card has been included with your Cavitron®SPS™
System. Additional cards can be obtained by calling Customer
Service at 1-800-989-8826 Monday through Friday, 8:00 AM
to 5:00 PM (Eastern Time). For other areas, contact your local
DENTSPLY®representative.
4.2 General Infection Control
Recommendations
• As with all dental procedures, use standard personal
protection equipment (i.e., wear face mask, eyewear,
or face shield, gloves and protective gown).
• For maximal operator and patient safety, carefully follow
the Infection Control Information procedures detailed
on the reference card accompanying your System.
• As with high speed handpieces, and other dental
devices, the combination of water and ultrasonic
vibration from your Cavitron®SPS™System will create
aerosols. With proper technique, much of the Cavitron®
SPS™System’s aerosol dispersion can be effectively
controlled and minimized. Please carefully follow the
procedural guide lines in this manual regarding the use
of your System.
4.3 Water SupplyRecommendations
It is highly recommended that all dental water supply systems
conform to applicable CDC (Centers for Disease Control and
Prevention) and ADA (American Dental Association) standards,
and that all recommendations be followed in terms of flushing,
chemical flushing, and general infection control procedures. See
sections 4.2 and 9.
5.3 ElectricalRequirements
Refer to Section 11: Specifications.
5.4 Unpacking the System
Carefully unpack your Cavitron®SPS™System and verify that all
components and accessories are included:
1. Cavitron®SPS™System with water supply line and
handpiece cable connector assembly factory installed.
2. Detachable AC Power Cord set.
3. Steri-Mate™Detachable Sterilizable Handpiece.
4. Dual position Foot Control Assembly.
5. Cavitron®Ultrasonic Inserts (quantity optional).
6. Efficiency Indicator for Cavitron Inserts.
7. Literature Packet.

ENGLISH • 5
5.5 Power Cord/Power Connection
• Verify the Power Control ON/OFF switch located
at the left front underside of the System is set to the
OFF position before proceeding.
• Plug the detachable AC cord into the back of the System.
• Plug the 3 prong grounded plug into an approved
outlet.
Section 5: Installation Instructions cont'd
5.6 Foot Control Cable Assembly
Connection
Align the Foot Control plug with the receptacle on the back of
the System and push it in until firmly seated.
5.7 Water Supply Line Connection
• Connect the free end of the system’s water supply line
to the office water supply line or a Cavitron®DualSelect™
Dispensing System.
• Inspect all connections to make certain there are no leaks.
Left underside of System.

ENGLISH • 6
Section 6: SPS Ultrasonic Scaler Description
6.1 System Controls
Top Grooves
Provide a convenient, temporary
palcement for the handpiece during
treatment procedures. Always place
handpiece in holder when not being used.
Handpiece Holder
Securely holds the System's Handpiece
when system is not being used.
Power Adjustment
Turn knob to select ultrasonic
power level for operation:
clockwise increases system
power, counter clockwise
decreases system power.
AC Power Indicator Light
Lighted when System is
switched ON.
Power Control
ON/OFF switch located at the
left front underside of the
Sytem.
Handpiece
Operates all Cavitron®30K™
Ultrasonic inserts and trans-
mits power and lavage from
the System to the insert.
Boost Indicator Light
The two-position Foot Control
provides the capability to
increase the front panel Power
dial setting.
When lighted,
indicates Foot Control is fully
depressed, and System is
functioning in"Boost" mode.
Lavage Flow Adjustment
Turn knob to select Lavage Flow level during System operation.
Clockwise increases flow at insert tip, counter clockwise decreases
flow.
The rate of flow through the Handpiece determines the temperature
of the lavage. Low flow rates produce warmer temperatures, higher
flow rates produce cooler temperatures.
6.2 Handpiece
The handpiece accepts all Cavitron®30K™Ultrasonic Inserts.
The open end of the handpiece accepts all Cavitron®30K inserts.
Insert Port
Steri-Mate™
Handpiece
Handpiece Connector-
(Handpiece & Mating
Assembly are Keyed)
Cable Assembly
Date Codes (MMY)
Prior to connecting, align Handpiece and
Cable Assembly electrical connections. If
Cable Assembly does not seat into Handpiece,
gently rotate handpiece until contacts align.

ENGLISH • 7
9608 30K FSI-SLI-10S-##
CAVITRON
R
Section 6: SPS Ultrasonic Scaler Description cont'd
6.4 Foot Control Information & Operation
The Foot Control is a two-position momentary switch, which activates both ultrasonic energy and Lavage Flow at the insert tip.
O-Ring
Provides seal for handpiece
coolant.
Insert Tip
Shape and size of tip
determines access and
adaptation. Preheated
Lavage directed to tip.
FingerGrip
Connecting Body
Transfers and amplifies mechanical
motion of stack to insert tip.
Hold the handpiece in an upright position. Activate the Foot Control to bleed any air bubbles that might be trapped inside the hand-
piece. Lubricate the rubber O-ring on the insert with water before placing it into the handpiece. Fully seat insert with a gentle push-twist
motion. DO NOT FORCE.
6.3 Cavitron® 30K™Ultrasonic Inserts
The many styles of Cavitron®30K™Ultrasonic Inserts are easily interchangeable
for various procedures and applications. See enclosed booklet for specific information.
Magnetostrictive Stack
Converts energy provided by the
handpiece into mechanical oscillations
used to activate the insert tip.
Insert Marking
Manufacturer, Date (YYMM),
Frequency, Type, Tip Lot.
Foot Control
released...
Both ultrasonic activation and
irrigating flow stop.
Foot Control
depressed half
way...
The ultrasonic insert tip is activated
and irrigating water flows.
Foot Control fully
depressed...
This activates the "Boost" mode.
(1st position)
(2nd position)
Section 7: Accessories
1. Steri-Mate®Detachable Sterilizable Handpiece
2. AC Power Cord Set
3. Cavitron®Ultrasonic Inserts
4. Dual position Foot Control Assembly
5. DualSelect™ Dispensing System
*For detailed information, contact your local DENTSPLY®
Representative or authorized DENTSPLY®Distributor.

ENGLISH • 8
Section 8:Techniques for Use
8.1 PatientPositioning
• For optimal access to both the upper and lower arches,
the backrest of the chair should be adjusted as for other
dental procedures. This assures patient comfort and
clinician visibility.
• Have the patient turn their head to the right or left.
Also position their chin up or down depending upon
the quadrant and surface being treated. Evacuate irrigant
using either a saliva ejector or High Volume Evacuator
(HVE).
8.2 Performing Ultrasonic Scaling
Procedures
• NOTE: Refer to the Infection Control Information card
supplied with your System for general procedures to be
followed at the beginning of each day and between
patients.
• The edges of Cavitron®Ultrasonic Inserts are intention-
ally rounded so there is little danger of tissue laceration
with proper ultrasonic scaling technique. Whenever the
insert tip is placed in the patient’s mouth, the lips, cheek
and tongue should be retracted to prevent accidental
prolonged contact with the activated tip.
• Hold the empty Handpiece in an upright position.
Activate the Foot Control until fluid exits.
• Lubricate the rubber O-ring on the insert with water
before placing it into the handpiece. Fully seat insert
with a gentle push-twist motion. DO NOT FORCE.
• Activate the System. Hold the handpiece over a sink or
drain. Check spray temperature to verify fluid is reaching
the working end of the insert tip. Adjust the Lavage
Control knob to ensure adequate flow for the selected
Power setting. Greater flow settings provide
cooler irrigant.
• It may be necessary to adjust lavage with the System in
“Boost” mode (Foot Control fully depressed) so
adequate fluid will be available to cool tip tooth interface.
• In general, it is suggested that a “feather-light-touch” be
used both supra- and subgingivally. The motion of the
activated tip and acoustic effects of the irrigating fluid, in
most cases, is adequate to remove even the most
tenacious calculus.
• Periodically check the Cavitron®ultrasonic insert for wear
with the DENTSPLY®Insert Efficiency Indicator.
• The use of a saliva ejector or High Volume Evacuator
(HVE) is recommended during all procedures.
• Set the System’s Power Adjustment knob to the lowest
power setting for the application and the selected insert.
8.3 Patient Comfort Consideration
Reasons for sensitivity
• Incorrect tip placement. Point should be directed away
from root surfaces.
• Not keeping tip in motion on tooth. Do not allow the
insert to remain in a static position on any one area of
the tooth. Change the insert’s path of motion.
• Applying pressure. Use extremely light grasp and
pressure, especially on exposed cementum.
• If sensitivity persists, decrease power setting and/or
move from the sensitive tooth to another and then
return.
Section 9: System Care
It is recommended that you perform the following maintenance
procedures to help minimize bio-film formation in the lavage
path of your Cavitron®SPS™ultrasonic scaler which could affect
the lavage flow to the ultrasonic insert tip and scaling performance.
9.1 DailyMaintenance
Start-Up Procedures at the beginning of the day:
1. Open the manual shut-off valve on the dental office water
supply system.
2. Turn the System ON using the Power ON/OFF switch. (see
illustration on page 5) Verify the Power Indicator Light is
lighted.
3. Set the Power Adjustment knob at the top of the blue scale.
4. Set the Lavage Control knob to maximum.
5. Hold the Handpiece (without an insert installed) upright over

ENGLISH • 9
Section 10: Troubleshooting
Although service and repair of the Cavitron®SPS™Ultrasonic Scaler
should be performed by DENTSPLY®personnel, the following
are some basic trouble shooting procedures that will help avoid
unnecessary service calls. Generally, check all lines and connections to
and from the System, a loose plug or connection will often create
problems. Check the settings on the System’s knobs.
10.1 TroubleshootingGuide
System will not operate:
(Power Indicator Light is not lighted.)
1. Check that the Power switch is in the ON position,
and that the detachable Power Cord is fully seated in
the receptacle on back of System.
2. Check that the System’s three-prong plug is fully
seated in an appropriate AC receptacle, and that AC
current is present.
Power Indicator Light is lighted.)
Section 9: System Care cont'd
a sink or drain. Activate the Foot Control and flush the water
line for at least 2 minutes.
6. Place a sterilized insert into the Handpiece and set the Lavage
Control knob to your preferred operating position.
Between Patients
1. Remove all ultrasonic inserts and handpiece used, clean and
sterilize.
2. Clean and disinfect the surfaces of the cabinet, Power Cord,
Handpiece Connector and cable assembly, Foot Control and
cable assembly by applying an approved non-immersion type
disinfectant solution* carefully following the instructions
provided by the disinfectant solution manufacturer. To clean
system, generously spray disinfectant solution on a clean towel
and wipe all surfaces. Discard used towel. To disinfect system,
generously spray disinfectant on a clean towel and wipe all
surfaces. Allow disinfectant solution to air dry.
3. Connect a freshly sterilized handpiece to its matching cable
connector. Hold the handpiece over a sink or drain and flush
the water line of the unit as above at maximum water flow
for 30 seconds.
4. Place a freshly sterilized insert into the handpiece.
Shut-Down Procedures at the end of the day:
1. Remove all ultrasonic inserts and handpiece used, clean and
sterilize.
2. Turn the System OFF.
3. Clean and disinfect the surfaces of the cabinet, Power Cord,
Handpiece Connector and cable assembly, Foot Control and
cable assembly by applying an approved non-immersion type
disinfectant solution* carefully following the instructions
provided by the disinfectant solution manufacturer. To clean
system, generously spray disinfectant solution on a clean towel
and wipe all surfaces. Discard used towel. To disinfect system,
generously spray disinfectant on a clean towel and wipe all
surfaces. Allow disinfectant solution to air dry.
4. Close the manual shut-off valve on the dental water supply
system.
*NOTE: Water-based disinfection solutions are preferred. Some
alcohol-based disinfectant solutions may be harmful and may
discolor plastic materials.
9.2 WeeklyMaintenance
End of Week Procedures (when connected to a DualSelect™
Dispensing System)
Follow the end of week procedures listed in the DualSelect™
manual.
9.3 Water Filter Maintenance
When the water filter becomes discolored, the filter should be
replaced to prevent reduced water flow to the Cavitron®SPS™
Ultrasonic Scaler. A 10-pack of replacement filters is available by
ordering Part Number 90158 from your local DENTSPLY®
distributor.
1. Disconnect the water supply hose from the water source. If a
quick-disconnect connector is attached to the end of the hose,
relieve the water pressure by pressing the tip of the connector
in an appropriate container and drain the water.
2. Grasp the fittings on either side of the filter disk and twist
counterclockwise. Remove the filter section from either side
of the water hose.
3. Install the replacement filter onto the water hose fittings. The
filter should be positioned to match up with the correct hose
fitting.
4. Hand tighten the two hose fittings in a clockwise direction.
Reconnect the water supply hose, operate the unit to bleed
the air and test for leaks.
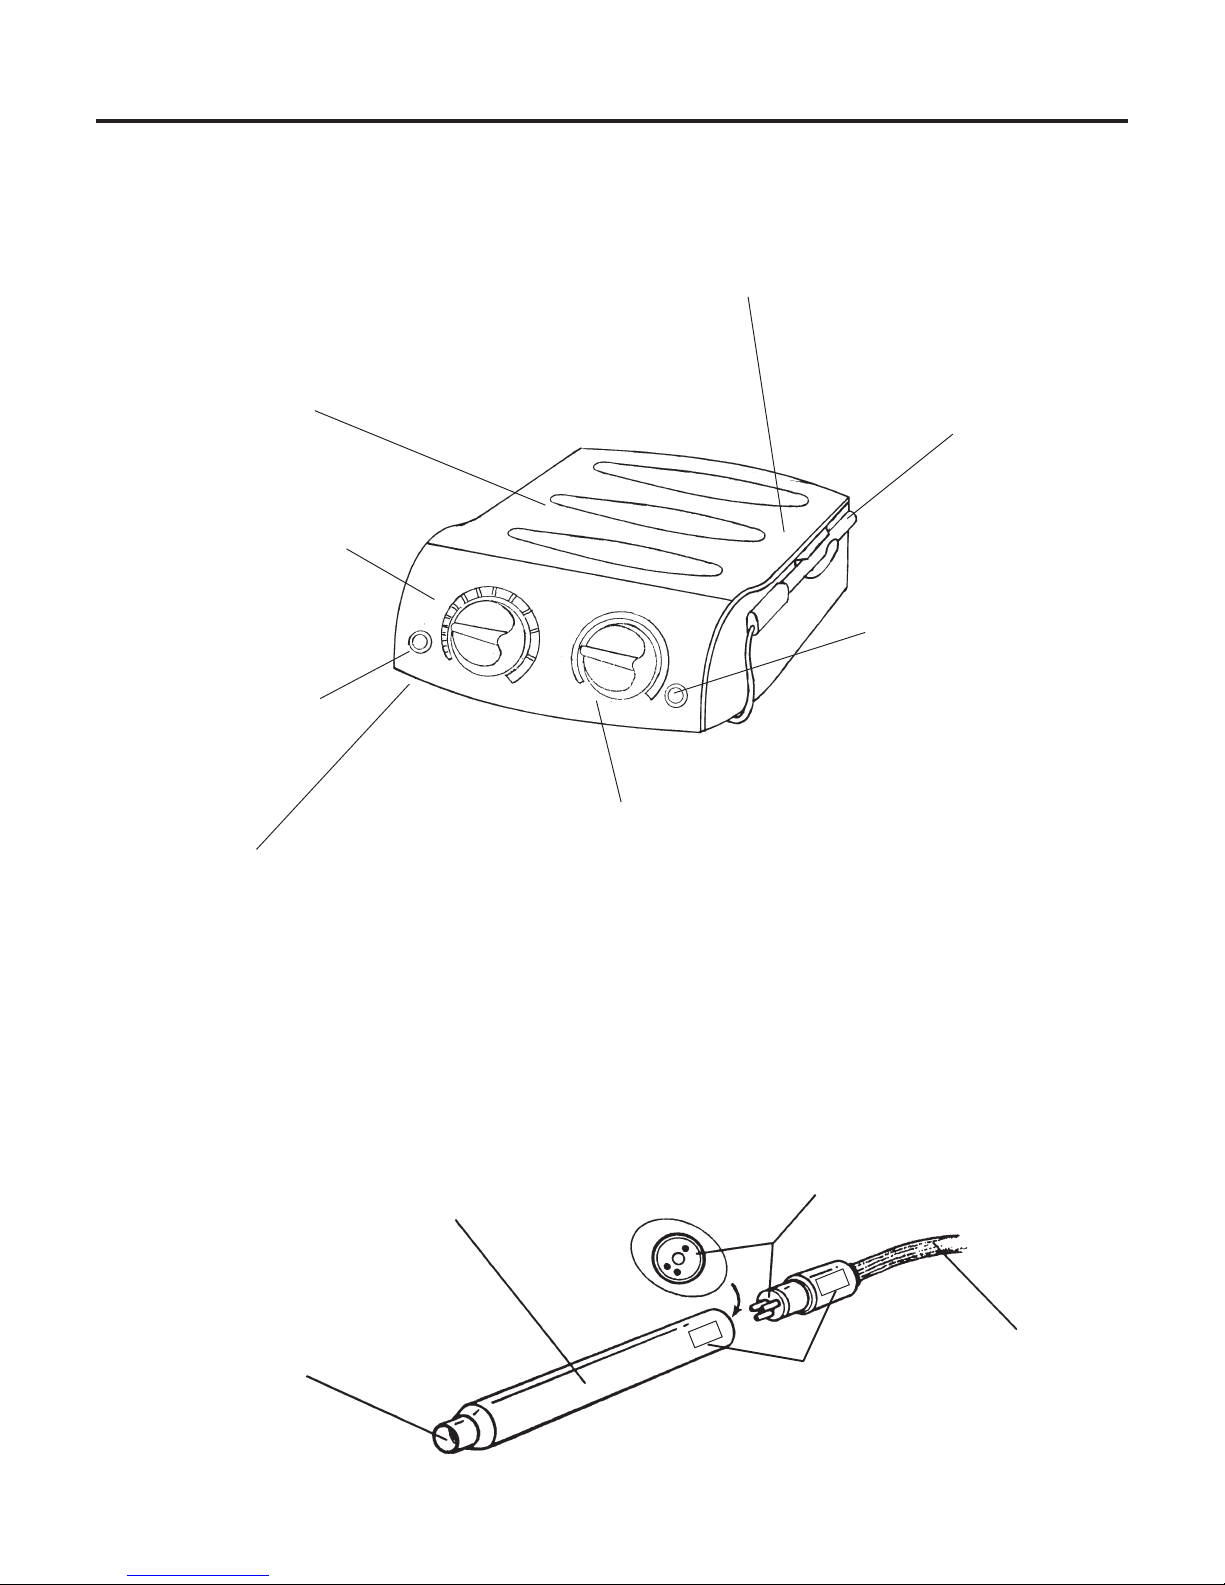
1. Check that the Foot Control Connector is fully seated
in the Foot Control Receptacle on the back of the
System.
System operates:
(No lavage flow at insert tip.)
1. Assure that Lavage control is properly adjusted.
2. Check that irrigant supply control valve/s (dental
office water supply) are open.
3. If connected to DualSelect™Dispensing System, check
that fluid level in thse selected bottle is sufficient. Make
sure valves are open when using external water source.
10.2 Technical Support and Repairs
For technical support and assistance call 1-800-989-8826 Monday
through Friday, 8:00 AM to 5:00 PM (Eastern Time). For other
areas, contact your local DENTSPLY®representative.

ENGLISH • 10
Section11: Specifications
Cavitron®SPS: 100/115 VAC Systems
Electrical Voltage 100V Gen 119J
115V Gen 119
Current .9/.8 amps @ 100v/115v
Frequency 50/60 Hertz
Water Pressure 25–60 psig
Flow Rate Minimum setting (CCW) < 15 ml/min
Maximum setting (CW) > 55 ml/min
Weight 12 lb.
Dimensions Height: 4 in.
Width: 7 3/8 in.
Depth: 9 ½ in.
Handpiece Cable: 81 in.
Foot Control Cable: 96 in.
Power Cord: 84 in.
Water Supply Line: 96 in.
Air Supply Line: 98 in.
Cavitron® SPS: 230 VAC Systems
Electrical Voltage 230V Gen 119U
Current .5/.4 amps @ 200v/230v
Frequency 50/60 Hertz
Water Pressure 172 - 414 kPa
Flow Rate Minimum setting (CCW) < 15 cc/min
Maximum setting (CW) > 55 cc/min
Weight 5,4 kg
Dimensions Height: 10,2 cm
Width: 18,7 cm
Depth: 24,1 cm
Handpiece Cable: 2,0 m
Foot Control Cable: 2,4 m
Power Cord: 2,1 m
Water Supply Line: 2,4 m
Air Supply Line: 2,5 m
Footswitch Not for operating theatres
Protection Class 1PXO
Operating Environment
Temperature: 15 to 40 Deg. Celsius
Relative Humidity: 30% to 75% (non-condensing)
Transport and Storage Conditions
Temperature: 0 to 70 Deg. Celsius
Relative Humidity: 10% to 95% (non-condensing)
Atmospheric Pressure: 500 to 1060 hPa
Section 12: Classification
• Type of protection against electric shock: Class 1
• Degree of protection against electric shock: Type B
• Degree of protection against the harmful ingress of
water: Ordinary
• Mode of operation: Continuous
• Degree of safety of application in the presence
of a flammable anaesthetic mixture with air or with
oxygen or nitrous oxide: Equipment not suitable for
use in the presence of flammable anesthetics or
oxygen.
TYPE B EQUIPMENT
FOOTSWITCH
SYSTEMON/OFF
Table of contents
Other DENTSPLY Media Converter manuals